基于OpenCV与Keras的停车场车位自动识别系统
本项目旨在利用计算机视觉技术和深度学习算法,实现对停车场车位状态的实时自动识别。通过摄像头监控停车场内部,系统能够高效准确地辨认车位是否被占用,为车主提供实时的空闲车位信息,同时为停车场管理者提供智能化的车位管理工具。该系统结合了OpenCV的强大图像处理能力与Keras的易用性,便于快速构建和部署。
技术栈:
- OpenCV:用于图像的预处理,包括视频捕获、图像处理(如灰度转换、滤波、边缘检测等)以及ROI(感兴趣区域)的选取,为深度学习模型提供高质量的输入。
- Keras:基于TensorFlow的高级API,用于搭建和训练深度学习模型。项目中,可能采用预训练模型(如VGGNet、ResNet等)进行迁移学习,通过微调模型来适应车位识别任务,或者从零开始构建卷积神经网络(CNN)模型进行车位状态分类。
项目流程:
-
数据收集与预处理:首先,通过摄像头录制停车场视频,从中截取包含车位的画面,人工标注车位状态(如空闲或占用)。接着,对图像进行归一化、增强等预处理,创建训练和验证数据集。
-
模型训练:使用Keras构建深度学习模型,加载预处理后的数据集进行训练。训练过程中,可能涉及调整超参数、优化器选择、损失函数配置等,以达到理想的分类性能。
-
模型验证与优化:在验证集上评估模型性能,根据准确率、召回率等指标调整模型结构或参数,进行模型优化。
-
实时检测与应用:将训练好的模型集成到OpenCV中,实现实时视频流处理。系统不断捕获停车场的视频帧,进行图像处理后,通过模型预测车位状态。识别结果以可视化方式展示,如在视频流中标记车位为空闲或占用,并可进一步集成到停车场管理系统,实现车位引导、计费等功能。
特色与优势:
- 实时性:系统能够实时监控车位状态,及时更新信息,提高停车场的运营效率。
- 准确性:深度学习模型具有强大的特征学习能力,即使在复杂光照、遮挡等条件下也能保持较高识别准确率。
- 易部署与扩展:基于OpenCV和Keras的方案易于开发和调试,且模型可根据新数据持续优化,便于后续维护和功能升级。
- 智能化管理:为停车场管理者提供精准的车位占用情况,有助于优化停车资源分配,提升用户体验。
总结: 此项目通过融合OpenCV的图像处理能力和Keras构建的深度学习模型,实现了对停车场车位状态的自动识别,是智能交通系统和智慧城市应用中的一个重要组成部分,具有广泛的应用前景和社会价值。
from __future__ import division # 改变 Python 2 中除法操作符 / 的默认行为,使其表现得像 Python 3 中的除法操作符,结果会保留小数部分
import  matplotlib.pyplot as plt # 用于创建图表和可视化数据的 Python 库
import cv2
import os, glob # glob文件名匹配的模块
import numpy as np
from PIL import Image
from keras.applications.imagenet_utils import preprocess_input
from keras.models import load_model
from keras.preprocessing import image
from Parking import Parking
import pickle   # 序列化和反序列化对象的标准模块cwd = os.getcwd() # 获取当前工作目录def img_process(test_images, park):# 过滤背景,低于lower_red和高于upper_red的部分分别编程0,lower_red~upper_red之间的值编程255# map 函数用于将一个函数应用到可迭代对象的每个元素,并返回结果# 通过 list 函数将其转换为列表white_yellow_images = list(map(park.select_rgb_white_yellow,test_images))park.show_images(white_yellow_images)# 转灰度图gray_images = list(map(park.convert_gray_scale, white_yellow_images))park.show_images(gray_images)# 进行边缘检测edge_images = list(map(lambda image: park.detect_edges(image),gray_images))park.show_images(edge_images)# 根据需要设定屏蔽区域roi_images = list(map(park.select_region, edge_images))park.show_images(roi_images)# 霍夫变换,得出直线list_of_lines= list(map(park.hough_line, roi_images))# zip 函数来同时迭代 test_images 和 list_of_lines 中的元素line_images = []for image,lines in zip(test_images,list_of_lines):line_images.append(park.draw_lines(image,lines))park.show_images(line_images)rect_images = []rect_coords = [] # 列矩形for image,lines in zip(test_images, list_of_lines):# 过滤部分直线,对直线进行排序,得出每一列的起始点和终止点,并将列矩形画出来new_image,rects = park.identify_blocks(image,lines)rect_images.append(new_image)rect_coords.append(rects)park.show_images(rect_images)delineated = []spot_pos = []for image,rects in zip(test_images, rect_coords):# 在图上将停车位画出来,并返回字典{坐标:车位序号}new_image,spot_dict = park.draw_parking(image,rects)delineated.append(new_image)spot_pos.append(spot_dict)park.show_images(delineated)final_spot_dict = spot_pos[1]print(len(final_spot_dict))with open('spot_dict.pickle','wb') as handle:pickle.dump(final_spot_dict,handle,property==pickle.HIGHEST_PROTOCOL)park.save_images_for_cnn(test_images[0],final_spot_dict)return final_spot_dictdef keras_model(weights_path):model = load_model(weights_path)return modeldef img_test(test_image,final_spot_dict,model,class_dictionary):for i in range (len(test_images)):predicted_images = park.predict_on_image(test_images[i],final_spot_dict,model,class_dictionary)def video_test(video_name,final_spot_dict,model,class_dictionary):name = video_namecap = cv2.VideoCapture(name)park.predict_on_video(name,final_spot_dict,model,class_dictionary,ret=True)if __name__ == '__main__':test_images = [plt.imread(path) for path in glob.glob('test_images/*.jpg')]weights_path = 'car1.h5'video_name = 'parking_video.mp4'class_dictionary = {}class_dictionary[0] = 'empty'class_dictionary[1] = 'occupied'park = Parking()park.show_image(test_images)final_spot_dict = img_process(test_images, park)model = keras_model(weights_path)img_test(test_images,final_spot_dict,model,class_dictionary)video_test(video_name,final_spot_dict,model,class_dictionary)
parking py
import matplotlib.pyplot as plt
import cv2
import os,glob
import numpy as npclass Parking:def show_images(self, images, cmap=None):cols = 2rows = (len(images) + 1)//cols # //为整除运算符plt.figure(figsize=(15,12)) # 创建一个图形窗口,并指定其大小为 15x12 英寸for i,image in enumerate(images):plt.subplot(rows, cols, i+1) # 在当前图形窗口中创建一个子图,i+1 是因为子图的编号是从 1 开始的# 检查图像的维度,如果图像是二维的(灰度图像),则将颜色映射设置为灰度,否则保持传入的 cmap 参数不变cmap = 'gray' if len(image.shape)==2 else cmapplt.imshow(image, cmap=cmap)plt.xticks([]) # 去除 x 轴和 y 轴的刻度标签plt.yticks([])plt.tight_layout(pad=0,h_pad=0,w_pad=0) # 调整子图之间的间距plt.show()def cv_show(self, name, img):cv2.imshow(name, img)cv2.waitKey(0)cv2.destroyAllWindows()def select_rgb_white_yellow(self,image):# 过滤掉背景lower = np.uint8([120,120,120])upper = np.uint8([255,255,255])# 低于lower_red和高于upper_red的部分分别编程0,lower_red~upper_red之间的值编程255,相当于过滤背景white_mask = cv2.inRange(image,lower,upper)self.cv_show('white_mask',white_mask)# 与操作masked = cv2.bitwise_and(image, image, mask=white_mask)self.cv_show('masked',masked)return maskeddef convert_gray_scale(selfself,image):return cv2.cvtColor(image, cv2.COLOR_BGR2GRAY)# 提取图像中的边缘信息# 返回的是一个二值图像,其中边缘点被标记为白色(255),而非边缘点被标记为黑色(0)def detect_edges(self, image, low_threshole=50, high_threshold=200):return cv2.Canny(image, low_threshole, high_threshold)def filter_region(self, image, vertices):# 剔除掉不需要的地方mask = np.zeros_like(image) # 创建和原图一样大的图,置零if len(mask.shape)==2: # 是否为一张灰度图cv2.fillPoly(mask, vertices, 255) # 使用顶点vertices在mask上填充多边形,并置为255白色self.cv_show('mask',mask)return  cv2.bitwise_and(image,mask)def select_region(self, image):# 手动选择区域# 首先,通过顶点定义多边形。rows, cols = image.shape[:2] # h和wpt_1 = [cols*0.05, rows*0.09]pt_2 = [cols*0.05, rows*0.70]pt_3 = [cols*0.30, rows*0.55]pt_4 = [cols*0.6,  rows*0.15]pt_5 = [cols*0.90, rows*0.15]pt_6 = [cols*0.90, rows*0.90]vertices = np.array([[pt_1, pt_2, pt_3, pt_4, pt_5, pt_6]],dtype=np.int32)point_img = image.copy()point_img = cv2.cvtColor(point_img, cv2.COLOR_BGR2GRAY)for point in vertices[0]:cv2.circle(point_img,(point[0], point[1]), 10, (0,0,255), 4)self.cv_show('point_img',point_img)return self.filter_region(image, vertices)# 霍夫变换,得出直线def hough_line(self,image):# 检测输入图像中的直线,并返回检测到的直线的端点坐标# 输入的图像需要是边缘检测后的结果# minLineLength(线的最短长度,比这个短的都被忽略)和MaxLineCap(两条直线之间的最大间隔,小于辞职,认为是一条直线)# rho以像素为单位的距离分辨率,通常设置为 1 像素# thrta角度精度# threshod直线交点数量阈值。只有累加器中某个点的投票数高于此阈值,才被认为是一条直线。return cv2.HoughLinesP(image, rho=0.1, thrta=np.pi/10, threshold=15,minLineLength=9,maxLineGap=4)# 过滤霍夫变换检测到的直线def draw_lines(self, image, lines, color=[255,0,0], thickness=2, make_copy=True):if make_copy:image = np.copy(image)cleaned = []for line in lines:for x1,y1,x2,y2 in line:if abs(y2-y1) <= 1 and abs(x2-x1) >= 25 and abs(x2-x1) <= 55:cleaned.append((x1,y1,x2,y2))cv2.line(image, (x1,y1), (x2,y2), color, thickness)print(" No lines detected: ", len(cleaned))return image# 过滤部分直线,对直线进行排序,得出每一列的起始点和终止点,并将列矩形画出来def identify_blocks(self, image, lines, make_copy=True):if make_copy:new_image = np.copy(image)# step1: 过滤部分直线cleaned = []for line in lines:for x1,y1,x2,y2 in line:if abs(y2-y1) <= 1 and abs(x2-x1) >= 25 and abs(x2-x1)<= 55:cleaned.append((x1,y1,x2,y2))# step2: 对直线按照 起始点的x和y坐标 进行排序import operator # 可以使用其中的各种函数来进行操作,例如比较、算术list1 = sorted(cleaned, key=operator.itemgetter(0,1)) # 从列表的每个元素中获取索引为0和1的值,然后将这些值用作排序的依据# step3: 找到多个列,相当于每列是一排车clusters = {} # 列数:对应该列有哪些车位线dIndex = 0clus_dist = 10for i in range(len(list1) - 1):distance = abs(list1[i+1][0] - list1[i][0]) # 根据前后两组车位线的x1距离if distance <= clus_dist:if not dIndex in clusters.keys(): clusters[dIndex] = []clusters[dIndex].append(list1[i])clusters[dIndex].append(list1[i + 1])else:dIndex += 1# step4: 得到每一列的四个坐标rects = {} # 每一列的四个角的坐标i = 0for key in clusters:all_list = clusters[key]# 将列表 all_list 转换为一个集合set,去重# {(10, 20, 30, 40), (20, 30, 40, 50)} 转为 [(10, 20, 30, 40), (20, 30, 40, 50)]cleaned = list(set(all_list))if len(cleaned) > 5:cleaned = sorted(cleaned, key=lambda tup: tup[1]) # 按y1进行排序avg_y1 = cleaned[0][1]  # 第一条线段的起始点 y 坐标avg_y2 = cleaned[-1][1] # 最后一条线段的起始点 y 坐标,即整个区域的上下边界avg_x1 = 0avg_x2 = 0for tup in cleaned: # 累加起始点和结束点的 x 坐标avg_x1 += tup[0]avg_x2 += tup[2]avg_x1 = avg_x1/len(cleaned) # 取平均起始点和结束点x坐标值avg_x2 = avg_x2/len(cleaned)rects[i] = (avg_x1, avg_y1,avg_x2,avg_y2)i += 1print("Num Parking Lanes:", len(rects))# step5: 把列矩形画出来buff = 7for key in rects:tup_topLeft = (int(rects[key][0] - buff), int(rects[key][1])) # x1-buff, y1tup_botRight = (int(rects[key][2] + buff), int(rects[key][3])) # x2+buff, y2cv2.rectangle(new_image, tup_topLeft, tup_botRight,(0,255,0),3)return new_image,rects# 在图上将停车位画出来,并返回字典{坐标:车位序号}def draw_parking(self, image, rects, make_copy=True, color=[255,0,0], thickness=2, save=True):if make_copy:new_image = np.copy(image)gap = 15.5 # 一个车位大致高度spot_dict = {} # 字典:一个车位对应一个位置tot_spots = 0 # 总车位# 微调adj_y1 = {0: 20, 1: -10, 2: 0, 3: -11, 4: 28, 5: 5, 6: -15, 7: -15, 8: -10, 9: -30, 10: 9, 11: -32}adj_y2 = {0: 30, 1: 50, 2: 15, 3: 10, 4: -15, 5: 15, 6: 15, 7: -20, 8: 15, 9: 15, 10: 0, 11: 30}adj_x1 = {0: -8, 1: -15, 2: -15, 3: -15, 4: -15, 5: -15, 6: -15, 7: -15, 8: -10, 9: -10, 10: -10, 11: 0}adj_x2 = {0: 0, 1: 15, 2: 15, 3: 15, 4: 15, 5: 15, 6: 15, 7: 15, 8: 10, 9: 10, 10: 10, 11: 0}for key in rects:tup = rects[key]x1 = int(tup[0] + adj_x1[key])x2 = int(tup[2] + adj_x2[key])y1 = int(tup[1] + adj_y1[key])y2 = int(tup[3] + adj_y2[key])cv2.rectangle(new_image,(x1,y1), (x2,y2), (0,255,0), 2)num_splits = int(abs(y2-y1)//gap) # 一列总共有多少个车位for i in range (0,num_splits+1):   # 画车位框y = int(y1 + i*gap)cv2.rectangle(new_image, (x1,y), (x2,y2), (0,255,0), 2)if key > 0 and key < len(rects)-1:# 竖直线x = int((x1+x2)/2)cv2.line(new_image,(x,y1),(x,y2),color,thickness)# 计算数量if key == 0 or key == (len(rects) - 1): # 对于第一列和最后一列(只有一排车位)tot_spots += num_splits + 1else:tot_spots += 2*(num_splits + 1)     # 一列有两排车位# 字典对应好if key == 0 or key == (len(rects) - 1): # 对于第一列和最后一列(只有一排车位)for i in range(0, num_splits+1):cur_len = len(spot_dict)y = int(y1 + i*gap)spot_dict[(x1,y,x2,y+gap)] = cur_len + 1else:for i in range(0, num_splits+1):cur_len = len(spot_dict)y = int(y1 + i*gap)x = int((x1+x2)/2)spot_dict[(x1,y,x,y+gap)] = cur_len + 1spot_dict[(x,y,x2,y+gap)] = cur_len + 2print("total parking spaces: ", tot_spots, cur_len)if save:filename = 'with_parking.jpg'cv2.imwrite(filename, new_image)return new_image, spot_dict# 根据传入的起始点和终止点坐标列表画框def assign_spots_map(self, image, spot_dict, make_copy= True, color=[255,0,0], thickness=2):if make_copy:new_image = np.copy(image)for spot in spot_dict.keys():(x1,y1,x2,y2) = spotcv2.rectangle(new_image,(int(x1),int(y1)), (int(x2),int(y2)), color, thickness)return new_image# 遍历字典{坐标,车位号}在图片中截取对应坐标的图像,按车位号保存下来def save_images_for_cnn(self, image, spot_dict, folder_name= 'cnn_data'):for spot in spot_dict.keys():(x1,y1,x2,y2) = spot(x1,y1,x2,y2) = (int(x1),int(y1),int(x2),int(y2))# 裁剪spot_img= image[y1:y2, x1:x2]spot_img = cv2.resize(spot_img, (0,0), fx=2.0, fy=2.0)spot_id = spot_dict[spot]filename = 'spot' + str(spot_id) + '.jpg'print(spot_img.shape, filename, (x1,x2,y1,y2))cv2.imwrite(os.path.join(folder_name, filename), spot_img)# 将图像进行归一化,并将其转换成一个符合深度学习模型输入要求的四维张量,进行训练def make_prediction(self, image, model, class_dictionary):# 预处理img = image/255. # 将图像的像素值归一化到 [0, 1] 的范围内# 将图像转换成一个四维张量image = np.expend_dims(img, axis = 0)# 将图片调用keras算法进行预测class_predicted = model.predict(image) # 得出预测结果inID = np.argmax(class_predicted[0]) # 找到数组中最大值所在的索引label = class_dictionary[inID]return labeldef predict_on_image(self, image, spot_dict, model, class_dictionary,make_copy=True, color=[0,255,0], alpha=0.5):if make_copy:new_image = np.copy(image)overlay = np.copy(image)self.cv_show('new_image',new_image)cnt_empty = 0all_spots = 0for spot in spot_dict.keys():all_spots += 1(x1, y1, x2, y2) = spot(x1, y1, x2, y2) = (int(x1), int(y1), int(x2), int(y2))spot_img = image[y1:y2, x1:x2]spot_img = cv2.resize(spot_img, (48,48))label = self.make_prediction(spot_img, model, class_dictionary)if label== 'empty':cv2.rectangle(overlay, (int(x1), int(y1)), (int(x2), int(y2)), color, -1)cnt_empty += 1cv2.addWeighted(overlay, alpha, new_image, 1-alpha, 0, new_image)cv2.putText(new_image, "Available: %d spots" %cnt_empty, (30,95),cv2.FONT_HERSHEY_SIMPLEX,0.7,(255,255,255),2)cv2.putText(new_image, "Total: %d spots" %all_spots, (30,125),cv2.FONT_HERSHEY_SIMPLEX, 0.7,(255,255,255),2)save = Falseif save:filename = 'with_parking.jpg'cv2.imwrite(filename, new_image)self.cv_show('new_image',new_image)return new_imagedef predict_on_video(self, video_name, final_spot_dict, model, class_dictionary, ret=True):cap= cv2.VideoCapture(video_name)count = 0while ret:ret, image = cap.read()count += 1if count == 5:count == 0new_image = np.copy(image)overlay = np.copy(image)cnt_empty = 0all_spots = 0color = [0,255,0]alpha = 0.5for spot in final_spot_dict.keys():all_spots += 1(x1,y1,x2,y2) = spot(x1,y1,x2,y2) = (int(x1), int(y1), int(x2), int(y2))spot_img = image[y1:y2, x1:x2]spot_img = cv2.resize(spot_img, (48,48))label = self.make_prediction(spot_img, model, class_dictionary)if label == 'empty':cv2.rectangle(overlay, (int(x1),int(y1)), (int(x2),int(y2)), color, -1)cnt_empty += 1cv2.addWeighted(overlay, alpha, new_image, 1-alpha, 0, new_image)cv2.putText(new_image,"Available: %d spots" % cnt_empty,(30,95),cv2.FONT_HERSHEY_SIMPLEX, 0.7, (255,255,255),2)cv2.putText(new_image, "Total: %d spots" %all_spots, (30,125),cv2.FONT_HERSHEY_SIMPLEX, 0.7, (255,255,255), 2)cv2.imshow('frame',new_image)# 检测用户是否按下了 'q' 键if cv2.waitKey(10) & 0xFF == ord('q'): # 通过 & 0xFF 操作,可以确保只获取ASCII码的最后一个字节breakcv2.destroyWindow()cap.release()
相关文章:
基于OpenCV与Keras的停车场车位自动识别系统
本项目旨在利用计算机视觉技术和深度学习算法,实现对停车场车位状态的实时自动识别。通过摄像头监控停车场内部,系统能够高效准确地辨认车位是否被占用,为车主提供实时的空闲车位信息,同时为停车场管理者提供智能化的车位管理工具…...

YOLOv10改进教程|C2f-CIB加入注意力机制
一、 导读 论文链接:https://arxiv.org/abs/2311.11587 代码链接:GitHub - CV-ZhangXin/AKConv YOLOv10训练、验证及推理教程 二、 C2f-CIB加入注意力机制 2.1 复制代码 打开ultralytics->nn->modules->block.py文件,复制SE注意力机…...
)
算法训练营day06 哈希表(统计数,去重,降低时间复杂度)
💡 解题思路 📝 确定输入与输出🔍 分析复杂度🔨 复杂题目拆分 :严谨且完整 地拆分为更小的子问题(哈希表的使用场景)–(多总结)💭 选择处理逻辑:…...

影帝郭晋安关联保健品企业,草姬集团无研发费用销售成本不低
《港湾商业观察》黄懿 5月30日,草姬集团控股有限公司(下称“草姬集团”)递表港交所主板,农银国际为其独家保荐人。 草姬集团成立于1999年,是中国香港多元化保健品、美容与护肤品供应商,由TVB港星郭晋安及…...
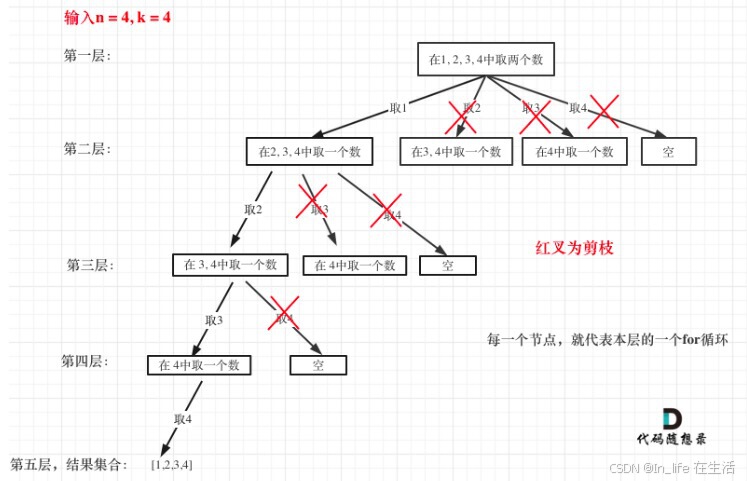
leetcode-19-回溯-组合问题(剪枝、去重)
引自代码随想录 一、[77]组合 给定两个整数 n 和 k,返回 1 ... n 中所有可能的 k 个数的组合。 示例: 输入: n 4, k 2 输出: [ [2,4], [3,4], [2,3], [1,2], [1,3], [1,4]] 1、大致逻辑 k为树的深度,到叶子节点的路径即为一个结果 开始索引保证不…...
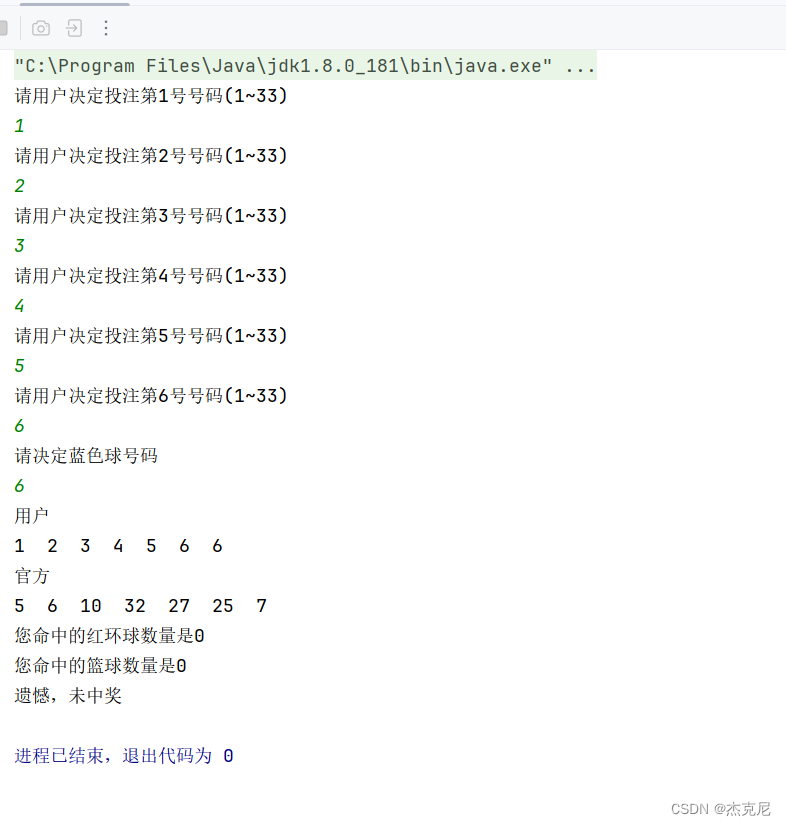
Java案例实现双色球
一问题: 二具体代码: package 重修;import java.util.Random; import java.util.Scanner;public class first {public static void main(String[] args) {int []usersnumbersusernumslect();System.out.println("用户");for (int i 0; i <…...
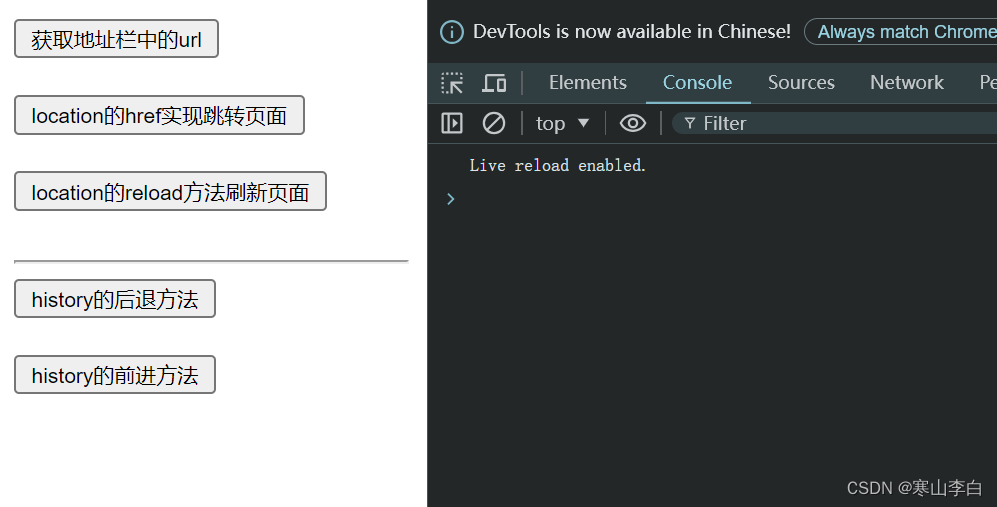
JS(JavaScript)的BOM操作
天行健,君子以自强不息;地势坤,君子以厚德载物。 每个人都有惰性,但不断学习是好好生活的根本,共勉! 文章均为学习整理笔记,分享记录为主,如有错误请指正,共同学习进步。…...
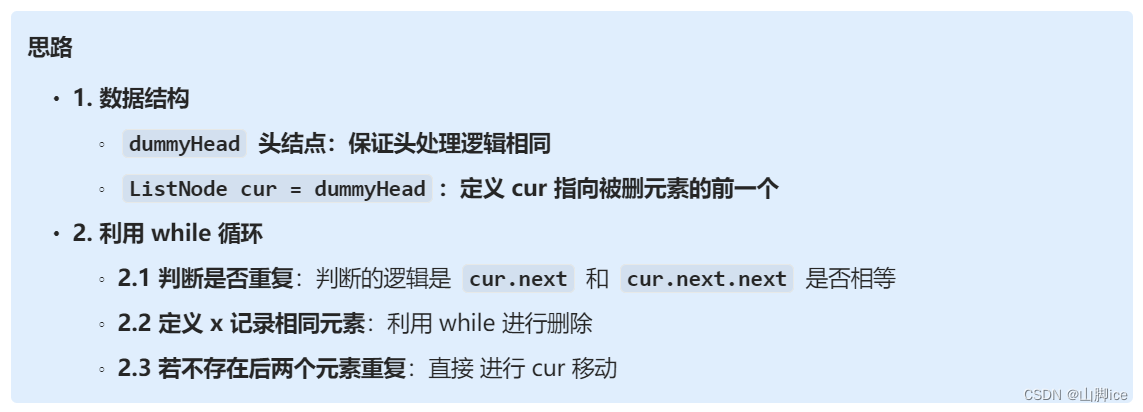
【CT】LeetCode手撕—82. 删除排序链表中的重复元素 II
题目 原题连接:82. 删除排序链表中的重复元素 II 1- 思路 模式识别1:已排序链表 ——> 判重逻辑 ,涉及到 while 2- 实现 ⭐82. 删除排序链表中的重复元素 II——题解思路 class Solution {public ListNode deleteDuplicates(ListNode h…...

C++ STL unique_ptr智能指针源码剖析
由于上一篇博客将shared_ptr,weak_ptr,enable_shared_form_this的源码实现整理了一遍,想着cpp智能指针还差个unique_ptr故写下此篇博客,以供学习 源码剖析 一,模板参数 首先,我们先看unique_ptr的模板参数,第一个参数_TP自是不用说表示对象类型,第二个模板参数定义了unique_p…...
)
Unity中的的文件夹(特殊文件夹)
Unity中的的文件夹(特殊文件夹) Unity工程中的关键文件夹和路径知识点, 以下是对Unity工程中几个关键文件夹和路径的总结: 1. 工程路径获取 print(Application.dataPath) 用途:通常只在编辑模式下使用。注意事项:游戏发布后࿰…...

Go语言定时器Timer和Ticker到底怎么用
原文链接,可获取更多Go语言学习资料 概述 在日常开发中,我们不可避免的需要使用到定时任务用来处理业务逻辑。在Go语言中内置的有两个定时器,Timer和Ticker,合理的使用这两个定时器可以很好的解决定时任务的需求,同时…...

41、web基础和http协议
web基础与http协议 一、web web:就是我们所说得页面,打开网页展示得页面。(全球广域网,万维网) world wide webwww 分布式图形信息系统 http:超文本传输协议 https:加密的超文本传输协议…...

6-173 二分查找的关键字比较次数
6-173 二分查找的关键字比较次数 - (32)专科段数据结构专项练习(2024版) (pintia.cn) int CountSearchTimes(int a[], int low, int high, int x) {int time0;while(low < high){int mid(lowhigh)/2;time;if(a[mid]x)return t…...

【基础篇】第5章 Elasticsearch 数据聚合与分析
在Elasticsearch的庞大功能体系中,数据聚合与分析扮演着至关重要的角色,它使我们能够从海量数据中提炼出有价值的信息,为决策提供依据。本章将深入探讨Elasticsearch的聚合功能,从基本概念到常见类型的实践,让你掌握如…...
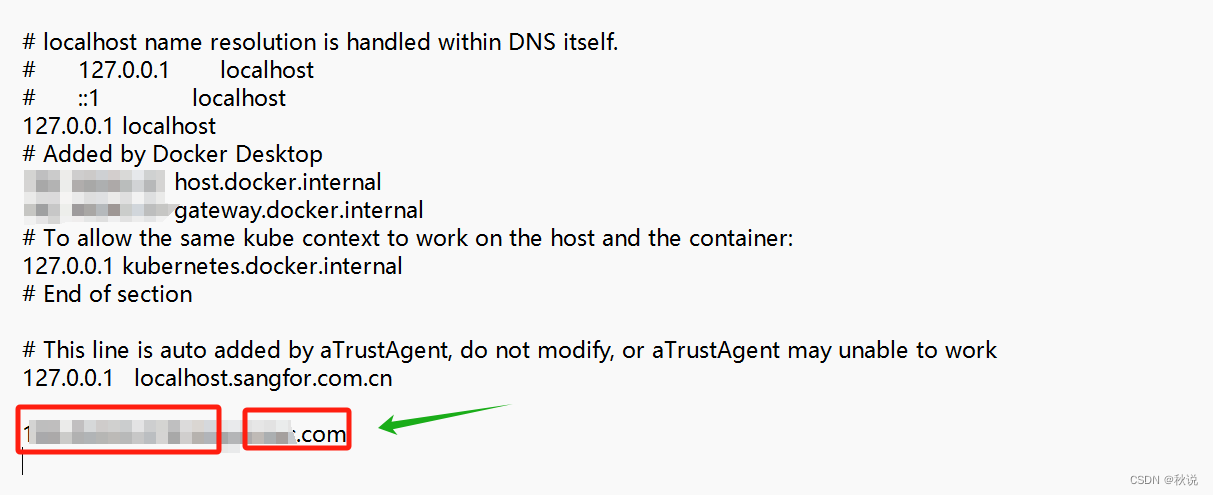
【网络安全】修改Host文件实现域名解析
场景 开发一个网站或者服务,需要在本地测试时,可以将线上的域名指向本地开发环境的IP地址。从而模拟真实环境中的域名访问,方便调试和开发。 步骤 1、以管理员身份打开命令提示符 2、编辑hosts文件: 输入以下命令打开hosts文…...

Spring Boot 全面解析:从入门到实践案例
引言: Spring Boot 是由 Pivotal 团队提供的全新框架,旨在简化 Spring 应用的初始搭建以及开发过程。它基于 Spring 平台,通过“约定优于配置”的原则,尽可能自动化配置,减少XML配置,使得开发者能够快速启…...

222222222
2222222...

Boost 智能指针
scoped_ptr 不能被复制或赋值给其他 scoped_ptr 对象,不能与其他指针比较 (除了 nullptr) scoped_ptr 用例 template <typename T> class scoped_ptr { public:// 构造函数:初始化 scoped_ptr 并接管指针的所有权explicit scoped_ptr(T* ptr n…...
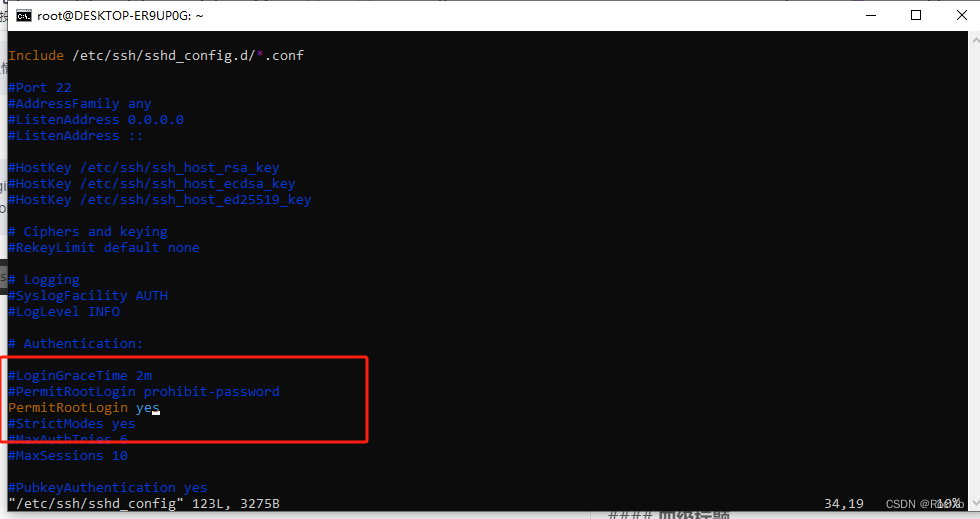
在WSL Ubuntu中启用root用户的SSH服务
在 Ubuntu 中,默认情况下 root 用户是禁用 SSH 登录的,这是为了增加系统安全性。 一、修改配置 找到 PermitRootLogin 行:在文件中找到 PermitRootLogin 配置项。默认情况下,它通常被设置为 PermitRootLogin prohibit-password 或…...
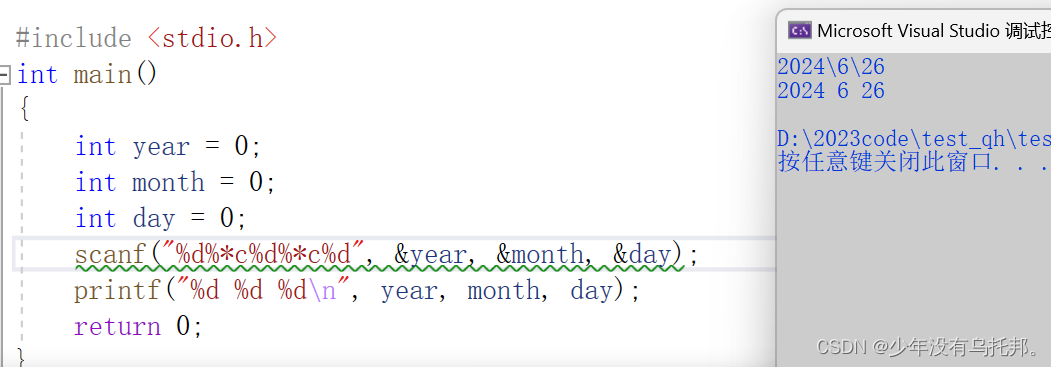
C语⾔数据类型和变量
C语⾔数据类型和变量 1.数据类型介绍1.1 字符型1.2 整型1.3 浮点型1.4 布尔类型1.5 各种数据类型的长度1.5.1 sizeof操作符1.5.2 数据类型长度1.5.3 sizeof中表达式不计算 2. signed 和 unsigned3. 数据类型的取值范围4. 变量4.1 变量的创建4.2 变量的分类 5. 算术操作符&#…...

JAVA:类和对象完全解析
一、编程世界的乐高积木在面向对象编程(OOP)的宇宙中,类(Class)和对象(Object)如同乐高积木的基础模块。如果把程序看作一个虚拟城市,类就是建筑设计图,而对象则是根据图…...

开源协作平台Octopal:整合Git、文档与任务的项目管理利器
1. 项目概述:一个为开发者量身定制的开源协作平台如果你是一名开发者,或者是一个小型技术团队的负责人,那么你一定对这样的场景不陌生:手头有几个并行的项目,团队成员分散,沟通主要靠即时通讯工具ÿ…...

为AI编码助手打造专业技能库:DSkills项目实战指南
1. 项目概述:为AI编码助手打造的专业技能库如果你和我一样,日常重度依赖Claude Code、Codex或者Gemini CLI这类AI编码助手来提升开发效率,那你肯定遇到过这样的场景:想让AI帮你搜索最新的技术文档,它却只能给出过时的信…...

5个关键技巧:掌握AutoJs6界面布局设计的最佳实践
5个关键技巧:掌握AutoJs6界面布局设计的最佳实践 【免费下载链接】AutoJs6 安卓平台 JavaScript 自动化工具 (Auto.js 二次开发项目) 项目地址: https://gitcode.com/gh_mirrors/au/AutoJs6 AutoJs6作为安卓平台领先的JavaScript自动化工具,其界面…...

解决ClaudeCode频繁封号与Token不足问题转向稳定聚合平台
🚀 告别海外账号与网络限制!稳定直连全球优质大模型,限时半价接入中。 👉 点击领取海量免费额度 解决ClaudeCode频繁封号与Token不足问题转向稳定聚合平台 对于依赖Claude Code进行编程辅助的开发者而言,服务中断和资…...

AI编码助手配置框架:六层缰绳架构实现团队规范与上下文持久化
1. 项目概述:为什么你的AI编码助手总像个“健忘的实习生”? 如果你和我一样,已经深度使用Claude Code、Cursor这类AI编码助手超过半年,那你一定经历过这种“血压升高”的时刻:明明昨天刚跟它详细解释过项目的架构规范…...
)
Cheat Engine 简单使用教程(新手版)
很多人第一次打开 Cheat Engine,都会被界面吓到。 其实真没那么复杂。 如果你只是想修改一下单机游戏里的金币、血量或者资源,掌握下面这几个步骤基本就够用了。 一、先打开游戏,再启动 Cheat Engine 这一点很多新人容易搞反。 正确顺序是…...

静态前端项目实战:从营销页到现代化门户的架构与实现
1. 项目概述:一个纯粹的静态前端项目最近在GitHub上看到了一个名为“Vibe Code”的项目,它的README写得非常漂亮,充满了各种炫酷的特性介绍,比如支持Claude Code、OpenAI Codex等AI编程助手,还有深色/亮色主题切换、多…...

CCM实战调校:从原理到精准色彩还原
1. 色彩校正矩阵(CCM)的核心原理 色彩校正矩阵(CCM)是图像处理流水线中一个关键的数学工具,它的主要作用是修正相机传感器捕获的颜色与实际场景颜色之间的偏差。想象一下,你用手机拍了一张草莓的照片&…...

17 LCD1602模块——显示屏
一、51单片机模块二、LCD1602模块三、模块间的连接单片机P2端口:P2_5~P2_7单片机P0端口:P0_0~P0_7四、LCD1602芯片1、参数和引脚这里只需要了解单片机的引脚功能,也可以大致看一眼,后面在编码显示功能的时候,也会做详细…...