【机器学习】机器学习与图像识别的融合应用与性能优化新探索


文章目录
- 引言
- 第一章:机器学习在图像识别中的应用
- 1.1 数据预处理
- 1.1.1 数据清洗
- 1.1.2 数据归一化
- 1.1.3 数据增强
- 1.2 模型选择
- 1.2.1 卷积神经网络
- 1.2.2 迁移学习
- 1.2.3 混合模型
- 1.3 模型训练
- 1.3.1 梯度下降
- 1.3.2 随机梯度下降
- 1.3.3 Adam优化器
- 1.4 模型评估与性能优化
- 1.4.1 模型评估指标
- 1.4.2 超参数调优
- 1.4.3 增加数据量
- 1.4.4 模型集成
- 第二章:图像识别的具体案例分析
- 2.1 手写数字识别
- 2.1.1 数据预处理
- 2.1.2 模型选择与训练
- 2.1.3 模型评估与优化
- 2.2 图像分类
- 2.2.1 数据预处理
- 2.2.2 模型选择与训练
- 2.2.3 模型评估与优化
- 第三章:性能优化与前沿研究
- 3.1 性能优化
- 3.1.1 特征工程
- 3.
- 3.1.3 模型集成
- 3.2 前沿研究
- 3.2.1 深度学习在图像识别中的应用
- 3.2.2 强化学习在图像识别中的应用
- 3.2.3 联邦学习与隐私保护
- 结语
引言
图像识别是计算机视觉领域的一项重要任务,通过分析和理解图像中的内容,使计算机能够自动识别和分类物体、场景和行为。随着深度学习技术的发展,机器学习在图像识别中的应用越来越广泛,推动了自动驾驶、医疗诊断、智能监控等领域的发展。本文将详细介绍机器学习在图像识别中的应用,包括数据预处理、模型选择、模型训练和性能优化。通过具体的案例分析,展示机器学习技术在图像识别中的实际应用,并提供相应的代码示例。

第一章:机器学习在图像识别中的应用
1.1 数据预处理
在图像识别应用中,数据预处理是机器学习模型成功的关键步骤。图像数据通常具有高维度和复杂性,需要进行清洗、归一化和数据增强等处理。
1.1.1 数据清洗
数据清洗包括去除噪声、裁剪图像和调整图像大小等操作。
import cv2
import numpy as np# 加载图像
image = cv2.imread('image.jpg')# 转换为灰度图像
gray_image = cv2.cvtColor(image, cv2.COLOR_BGR2GRAY)# 去除噪声
denoised_image = cv2.GaussianBlur(gray_image, (5, 5), 0)# 裁剪图像
cropped_image = denoised_image[50:200, 50:200]# 调整图像大小
resized_image = cv2.resize(cropped_image, (128, 128))
1.1.2 数据归一化
数据归一化可以消除不同图像之间的亮度和对比度差异,使模型更容易学习。
# 归一化图像
normalized_image = resized_image / 255.0
1.1.3 数据增强
数据增强通过对训练图像进行随机变换,如旋转、平移、翻转等,增加数据的多样性,提高模型的泛化能力。
from keras.preprocessing.image import ImageDataGenerator# 创建数据增强生成器
datagen = ImageDataGenerator(rotation_range=20,width_shift_range=0.2,height_shift_range=0.2,horizontal_flip=True
)# 生成增强图像
augmented_images = datagen.flow(np.expand_dims(normalized_image, axis=0), batch_size=1)
1.2 模型选择
在图像识别中,常用的机器学习模型包括卷积神经网络(CNN)、迁移学习模型和混合模型等。不同模型适用于不同的任务和数据特征,需要根据具体应用场景进行选择。
1.2.1 卷积神经网络
卷积神经网络(CNN)是图像识别领域的基础模型,通过卷积层、池化层和全连接层的组合,提取图像的特征,实现图像分类和识别。
from keras.models import Sequential
from keras.layers import Conv2D, MaxPooling2D, Flatten, Dense# 构建卷积神经网络模型
model = Sequential()
model.add(Conv2D(32, (3, 3), activation='relu', input_shape=(128, 128, 1)))
model.add(MaxPooling2D((2, 2)))
model.add(Conv2D(64, (3, 3), activation='relu'))
model.add(MaxPooling2D((2, 2)))
model.add(Flatten())
model.add(Dense(128, activation='relu'))
model.add(Dense(10, activation='softmax'))# 编译模型
model.compile(optimizer='adam', loss='categorical_crossentropy', metrics=['accuracy'])
1.2.2 迁移学习
迁移学习通过使用预训练模型,如VGG、ResNet等,在已有的模型基础上进行微调,适用于数据量较小或训练时间有限的场景。
from keras.applications import VGG16
from keras.models import Model
from keras.layers import GlobalAveragePooling2D# 加载预训练模型
base_model = VGG16(weights='imagenet', include_top=False, input_shape=(128, 128, 3))# 冻结预训练模型的层
for layer in base_model.layers:layer.trainable = False# 添加自定义分类层
x = base_model.output
x = GlobalAveragePooling2D()(x)
x = Dense(128, activation='relu')(x)
predictions = Dense(10, activation='softmax')(x)# 构建迁移学习模型
model = Model(inputs=base_model.input, outputs=predictions)# 编译模型
model.compile(optimizer='adam', loss='categorical_crossentropy', metrics=['accuracy'])
1.2.3 混合模型
混合模型结合多个模型的优点,通过集成学习的方法提高模型的稳定性和预测精度。
from keras.models import Model
from keras.layers import concatenate# 构建两个子模型
model1 = Sequential()
model1.add(Conv2D(32, (3, 3), activation='relu', input_shape=(128, 128, 1)))
model1.add(MaxPooling2D((2, 2)))
model1.add(Flatten())model2 = Sequential()
model2.add(Conv2D(64, (3, 3), activation='relu', input_shape=(128, 128, 1)))
model2.add(MaxPooling2D((2, 2)))
model2.add(Flatten())# 合并子模型
combined = concatenate([model1.output, model2.output])
x = Dense(128, activation='relu')(combined)
output = Dense(10, activation='softmax')(x)# 构建混合模型
model = Model(inputs=[model1.input, model2.input], outputs=output)# 编译模型
model.compile(optimizer='adam', loss='categorical_crossentropy', metrics=['accuracy'])
1.3 模型训练
模型训练是机器学习的核心步骤,通过优化算法最小化损失函数,调整模型参数,使模型在训练数据上表现良好。常见的优化算法包括梯度下降、随机梯度下降和Adam优化器等。
1.3.1 梯度下降
梯度下降通过计算损失函数对模型参数的导数,逐步调整参数,使损失函数最小化。
import numpy as np# 定义损失函数
def loss_function(y_true, y_pred):return np.mean((y_true - y_pred) ** 2)# 梯度下降优化
def gradient_descent(X, y, learning_rate=0.01, epochs=1000):m, n = X.shapetheta = np.zeros(n)for epoch in range(epochs):gradient = (1/m) * X.T.dot(X.dot(theta) - y)theta -= learning_rate * gradientreturn theta# 训练模型
theta = gradient_descent(X_train, y_train)
1.3.2 随机梯度下降
随机梯度下降在每次迭代中使用一个样本进行参数更新,具有较快的收敛速度和更好的泛化能力。
def stochastic_gradient_descent(X, y, learning_rate=0.01, epochs=1000):m, n = X.shapetheta = np.zeros(n)for epoch in range(epochs):for i in range(m):gradient = X[i].dot(theta) - y[i]theta -= learning_rate * gradient * X[i]return theta# 训练模型
theta = stochastic_gradient_descent(X_train, y_train)
1.3.3 Adam优化器
Adam优化器结合了动量和自适应学习率的优点,能够快速有效地优化模型参数。
from keras.optimizers import Adam# 编译模型
model.compile(optimizer=Adam(learning_rate=0.001), loss='categorical_crossentropy', metrics=['accuracy'])# 训练模型
model.fit(X_train, y_train, epochs=10, batch_size=32, validation_split=0.2)
1.4 模型评估与性能优化
模型评估是衡量模型在测试数据上的表现,通过计算模型的准确率、召回率、F1-score等指标,评估模型的性能。性能优化包括调整超参数、增加数据量和模型集成等方法。
1.4.1 模型评估指标
常见的模型评估指标包括准确率(Accuracy)、精确率(Precision)、召回率(Recall)和F1-score等。
from sklearn.metrics import accuracy_score, precision_score, recall_score, f1_score# 计算评估指标
accuracy = accuracy_score(y_test, y_pred)
precision = precision_score(y_test, y_pred, average='weighted')
recall = recall_score(y_test, y_pred, average='weighted')
f1 = f1_score(y_test, y_pred, average='weighted')print(f'Accuracy: {accuracy}')
print(f'Precision: {precision}')
print(f'Recall: {recall}')
print(f'F1-score: {f1}')
1.4.2 超参数调优
通过网格搜索(Grid Search)和随机搜索(Random Search)等方法,对模型的超参数进行调优,找到最优的参数组合。
from sklearn.model_selection import GridSearchCV# 定义超参数网格
param_grid = {'batch_size': [16, 32, 64],'epochs': [10, 20, 30]
}# 网格搜索
grid_search = GridSearchCV(estimator=model, param_grid=param_grid, cv=5, scoring='accuracy')
grid_search.fit(X_train, y_train)# 输出最优参数
best_params = grid_search.best_params_
print(f'Best parameters: {best_params}')# 使用最优参数训练模型
model = model.set_params(**best_params)
model.fit(X_train, y_train)
1.4.3 增加数据量
通过数据增强和采样技术,增加训练数据量,提高模型的泛化能力和预测性能。
from imblearn.over_sampling import SMOTE# 数据增强
smote = SMOTE(random_state=42)
X_resampled, y_resampled = smote.fit_resample(X_train, y_train)# 训练模型
model.fit(X_resampled, y_resampled)# 预测与评估
y_pred = model.predict(X_test)
1.4.4 模型集成
通过模型集成的方法,将多个模型的预测结果进行组合,提高模型的稳定性和预测精度。常见的模型集成方法包括Bagging、Boosting和Stacking等。
from sklearn.ensemble import VotingClassifier# 构建模型集成
ensemble_model = VotingClassifier(estimators=[('cnn', model1),('vgg', model2)
], voting='soft')# 训练集成模型
ensemble_model.fit(X_train, y_train)# 预测与评估
y_pred = ensemble_model.predict(X_test)
第二章:图像识别的具体案例分析
2.1 手写数字识别
手写数字识别是图像识别中的经典问题,通过分析手写数字图像,识别每个数字的类别。以下是手写数字识别的具体案例分析。
2.1.1 数据预处理
首先,对手写数字数据集进行预处理,包括数据清洗、归一化和数据增强。
from keras.datasets import mnist
from keras.utils import to_categorical# 加载手写数字数据集
(X_train, y_train), (X_test, y_test) = mnist.load_data()# 数据清洗
X_train = X_train / 255.0
X_test = X_test / 255.0# 扩展维度
X_train = np.expand_dims(X_train, axis=-1)
X_test = np.expand_dims(X_test, axis=-1)# 标签编码
y_train = to_categorical(y_train, num_classes=10)
y_test = to_categorical(y_test, num_classes=10)# 数据增强
datagen = ImageDataGenerator(rotation_range=10,width_shift_range=0.1,height_shift_range=0.1,horizontal_flip=False
)
datagen.fit(X_train)
2.1.2 模型选择与训练
选择合适的模型进行训练,这里以卷积神经网络为例。
# 构建卷积神经网络模型
model = Sequential()
model.add(Conv2D(32, (3, 3), activation='relu', input_shape=(28, 28, 1)))
model.add(MaxPooling2D((2, 2)))
model.add(Conv2D(64, (3, 3), activation='relu'))
model.add(MaxPooling2D((2, 2)))
model.add(Flatten())
model.add(Dense(128, activation='relu'))
model.add(Dense(10, activation='softmax'))# 编译模型
model.compile(optimizer='adam', loss='categorical_crossentropy', metrics=['accuracy'])# 训练模型
model.fit(datagen.flow(X_train, y_train, batch_size=32), epochs=10, validation_data=(X_test, y_test))
2.1.3 模型评估与优化
评估模型的性能,并进行超参数调优和数据增强。
# 评估模型
loss, accuracy = model.evaluate(X_test, y_test)
print(f'Accuracy: {accuracy}')# 超参数调优
param_grid = {'batch_size': [16, 32, 64],'epochs': [10, 20, 30]
}
grid_search = GridSearchCV(estimator=model, param_grid=param_grid, cv=5, scoring='accuracy')
grid_search.fit(X_train, y_train)
best_params = grid_search.best_params_
print(f'Best parameters: {best_params}')# 使用最优参数训练模型
model = model.set_params(**best_params)
model.fit(datagen.flow(X_train, y_train, batch_size=32), epochs=10, validation_data=(X_test, y_test))# 数据增强
smote = SMOTE(random_state=42)
X_resampled, y_resampled = smote.fit_resample(X_train.reshape(X_train.shape[0], -1), y_train)
model.fit(X_resampled.reshape(-1, 28, 28, 1), y_resampled)# 预测与评估
y_pred = model.predict(X_test)
2.2 图像分类
图像分类是通过分析图像的内容,将图像分配到预定义的类别中。以下是图像分类的具体案例分析。
2.2.1 数据预处理
from keras.datasets import cifar10
from keras.utils import to_categorical# 加载图像分类数据集
(X_train, y_train), (X_test, y_test) = cifar10.load_data()# 数据清洗
X_train = X_train / 255.0
X_test = X_test / 255.0# 标签编码
y_train = to_categorical(y_train, num_classes=10)
y_test = to_categorical(y_test, num_classes=10)# 数据增强
datagen = ImageDataGenerator(rotation_range=20,width_shift_range=0.2,height_shift_range=0.2,horizontal_flip=True
)
datagen.fit(X_train)
2.2.2 模型选择与训练
选择合适的模型进行训练,这里以迁移学习为例。
# 加载预训练模型
base_model = VGG16(weights='imagenet', include_top=False, input_shape=(32, 32, 3))# 冻结预训练模型的层
for layer in base_model.layers:layer.trainable = False# 添加自定义分类层
x = base_model.output
x = GlobalAveragePooling2D()(x)
x = Dense(128, activation='relu')(x)
predictions = Dense(10, activation='softmax')(x)# 构建迁移学习模型
model = Model(inputs=base_model.input, outputs=predictions)# 编译模型
model.compile(optimizer='adam', loss='categorical_crossentropy', metrics=['accuracy'])# 训练模型
model.fit(datagen.flow(X_train, y_train, batch_size=32), epochs=10, validation_data=(X_test, y_test))
2.2.3 模型评估与优化
评估模型的性能,并进行超参数调优和数据增强。
# 评估模型
loss, accuracy = model.evaluate(X_test, y_test)
print(f'Accuracy: {accuracy}')# 超参数调优
param_grid = {'batch_size': [16, 32, 64],'epochs': [10, 20, 30]
}
grid_search = GridSearchCV(estimator=model, param_grid=param_grid, cv=5, scoring='accuracy')
grid_search.fit(X_train, y_train)
best_params = grid_search.best_params_
print(f'Best parameters: {best_params}')# 使用最优参数训练模型
model = model.set_params(**best_params)
model.fit(datagen.flow(X_train, y_train, batch_size=32), epochs=10, validation_data=(X_test, y_test))# 数据增强
smote = SMOTE(random_state=42)
X_resampled, y_resampled = smote.fit_resample(X_train.reshape(X_train.shape[0], -1), y_train)
model.fit(X_resampled.reshape(-1, 32, 32, 3), y_resampled)# 预测与评估
y_pred = model.predict(X_test)
第三章:性能优化与前沿研究
3.1 性能优化
3.1.1 特征工程
通过特征选择、特征提取和特征构造,优化模型的输入,提高模型的性能。
from sklearn.feature_selection import SelectKBest, f_classif# 特征选择
selector = SelectKBest(score_func=f_classif, k=10)
X_selected = selector.fit_transform(X, y)
3.
1.2 超参数调优
通过网格搜索和随机搜索,找到模型的最优超参数组合。
from sklearn.model_selection import RandomizedSearchCV# 随机搜索
param_dist = {'n_estimators': [50, 100, 150],'max_depth': [3, 5, 7, 10],'min_samples_split': [2, 5, 10]
}
random_search = RandomizedSearchCV(estimator=RandomForestClassifier(), param_distributions=param_dist, n_iter=10, cv=5, scoring='accuracy')
random_search.fit(X_train, y_train)
best_params = random_search.best_params_
print(f'Best parameters: {best_params}')# 使用最优参数训练模型
model = RandomForestClassifier(**best_params)
model.fit(X_train, y_train)# 预测与评估
y_pred = model.predict(X_test)
3.1.3 模型集成
通过模型集成,提高模型的稳定性和预测精度。
from sklearn.ensemble import StackingClassifier# 构建模型集成
stacking_model = StackingClassifier(estimators=[('cnn', model1),('vgg', model2)
], final_estimator=LogisticRegression())# 训练集成模型
stacking_model.fit(X_train, y_train)# 预测与评估
y_pred = stacking_model.predict(X_test)
3.2 前沿研究
3.2.1 深度学习在图像识别中的应用
深度学习在图像识别中的应用包括卷积神经网络、生成对抗网络和自监督学习等。
3.2.2 强化学习在图像识别中的应用
强化学习通过与环境的交互,不断优化识别策略,在动态目标检测和自动驾驶中具有广泛的应用前景。
3.2.3 联邦学习与隐私保护
联邦学习通过在不交换数据的情况下进行联合建模,保护用户数据隐私,提高图像识别系统的安全性和公平性。
结语
机器学习作为图像识别领域的重要技术,已经在多个应用场景中取得了显著的成果。通过对数据的深入挖掘和模型的不断优化,机器学习技术将在图像识别中发挥更大的作用,推动计算机视觉和人工智能的发展。

相关文章:
【机器学习】机器学习与图像识别的融合应用与性能优化新探索
文章目录 引言第一章:机器学习在图像识别中的应用1.1 数据预处理1.1.1 数据清洗1.1.2 数据归一化1.1.3 数据增强 1.2 模型选择1.2.1 卷积神经网络1.2.2 迁移学习1.2.3 混合模型 1.3 模型训练1.3.1 梯度下降1.3.2 随机梯度下降1.3.3 Adam优化器 1.4 模型评估与性能优…...

Unity射击游戏开发教程:(29)躲避敌人的子弹射击
在这篇文章中,我将介绍如何创建一个可以使玩家火力无效的敌人。创建的行为如下...... 当玩家向敌人开火时,敌人会向左或向右移动。向左或向右的移动是随机选择的,并在一段时间后停止敌人的移动。如果敌人移出屏幕,它就会绕到另一边。将一个精灵拖到画布上,将其缩小以匹配游…...

SpringCloud Gateway 网关获取或修改接口响应数据
文章目录 前言一、获取响应数据并打印 前言 我们的网关在之前只记录了接口请求日志,响应日志是没有做记录的,在后续别人对接我们开放平台时出现了一些问题没法确认当时的一个数值状态,照成了很多不必要的麻烦,后来决定在网关添加上…...
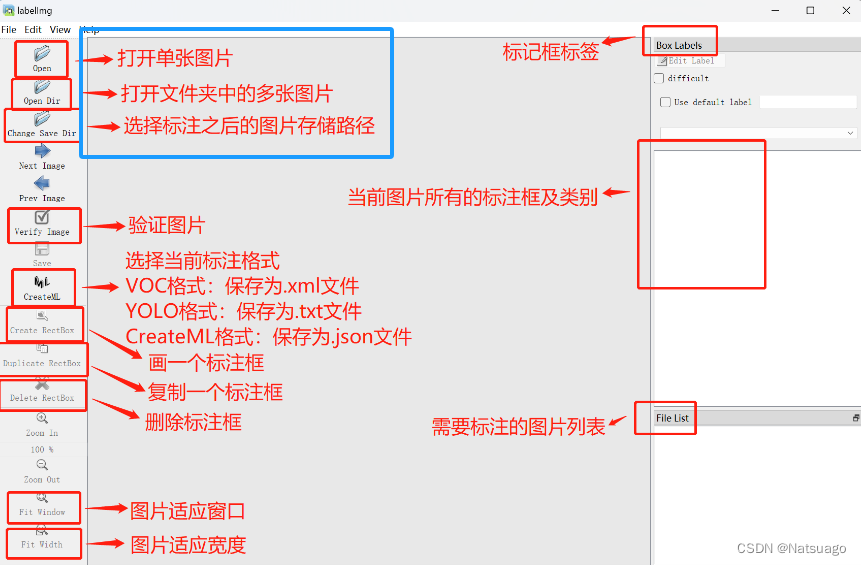
【课程总结】Day13(上):使用YOLO进行目标检测
前言 在上一章《【课程总结】Day11(下):YOLO的入门使用》的学习中,我们通过YOLO实现了对图片的分类任务。本章的学习内容,将以目标检测为切入口,了解目标检测流程,包括:数据标准、模…...

老年生活照护实训室:探索现代养老服务的奥秘
在老龄化社会加速发展的今天,如何为老年人提供优质、贴心的生活照护服务,成为了社会关注的焦点。老年生活照护实训室作为培养专业养老服务人才的重要场所,正逐渐揭开现代养老服务的神秘面纱,为我们展现出一幅充满关爱与智慧的画卷…...
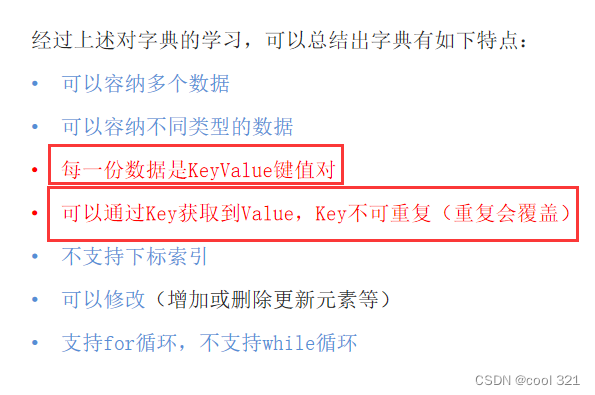
python-字典
为什么需要字典 字典的定义 字典数据的获取 字典的嵌套 嵌套字典的内容获取 字典的注意事项: 字典的常用操作 新增元素 更新元素 删除元素 清空字典 汇总 字典的特点...
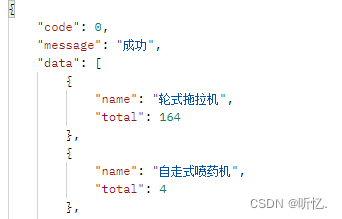
使用java stream对集合中的对象按指定字段进行分组并统计
一、概述 有这样一个需求,在一个list集合中的对象有相同的name,我需要把相同name的对象进行汇总计算。使用java stream来实现这个需求,这里做一个记录,希望对有需求的同学提供帮助 一、根据指定字段进行分组 一、先准备好给前端要…...

03.C1W2.Sentiment Analysis with Naïve Bayes
目录 Probability and Bayes’ RuleIntroductionProbabilitiesProbability of the intersection Bayes’ RuleConditional ProbabilitiesBayes’ RuleQuiz: Bayes’ Rule Applied Nave Bayes IntroductionNave Bayes for Sentiment Analysis P ( w i ∣ c l a s s ) P(w_i|clas…...

一个强大的分布式锁框架——Lock4j
一、简介 Lock4j是一个分布式锁组件,它提供了多种不同的支持以满足不同性能和环境的需求,基于Spring AOP的声明式和编程式分布式锁,支持RedisTemplate、Redisson、Zookeeper。 二、特性 • 简单易用,功能强大,扩展性…...
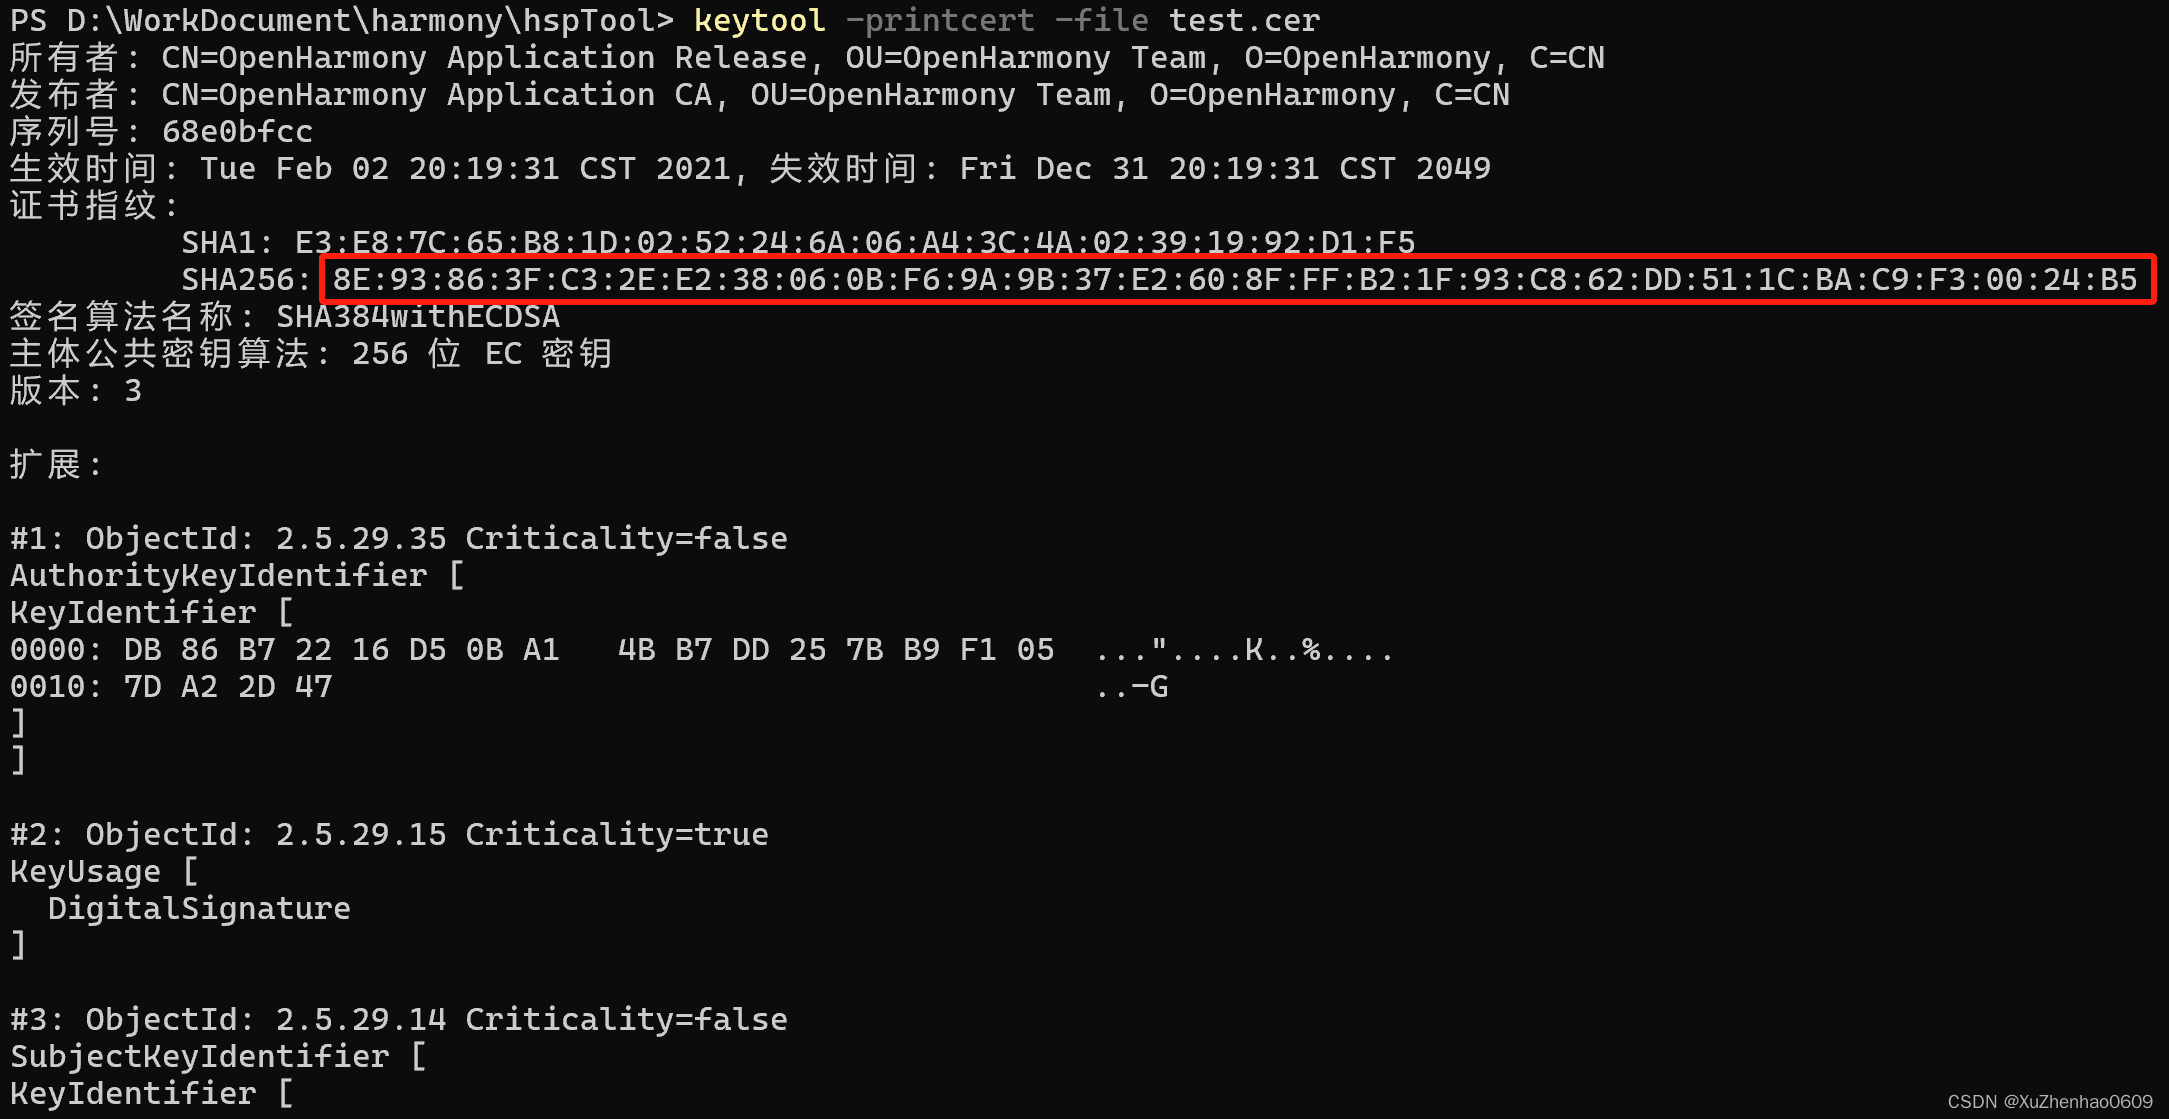
HarmonyOS - 通过.p7b文件获取fingerprint
1、查询工程所对应的 .p7b 文件 通常新工程运行按照需要通过 DevEco Studio 的 Project Structure 勾选 Automatically generate signature 自动生成签名文件,自动生成的 .p7b 文件通常默认在系统用户目录下. 如:C:/Users/zhangsan/.ohos/config/default…...
vue3实现echarts——小demo
版本: 效果: 代码: <template><div class"middle-box"><div class"box-title">检验排名TOP10</div><div class"box-echart" id"chart1" :loading"loading1"&…...
Python 项目依赖离线管理 pip + requirements.txt
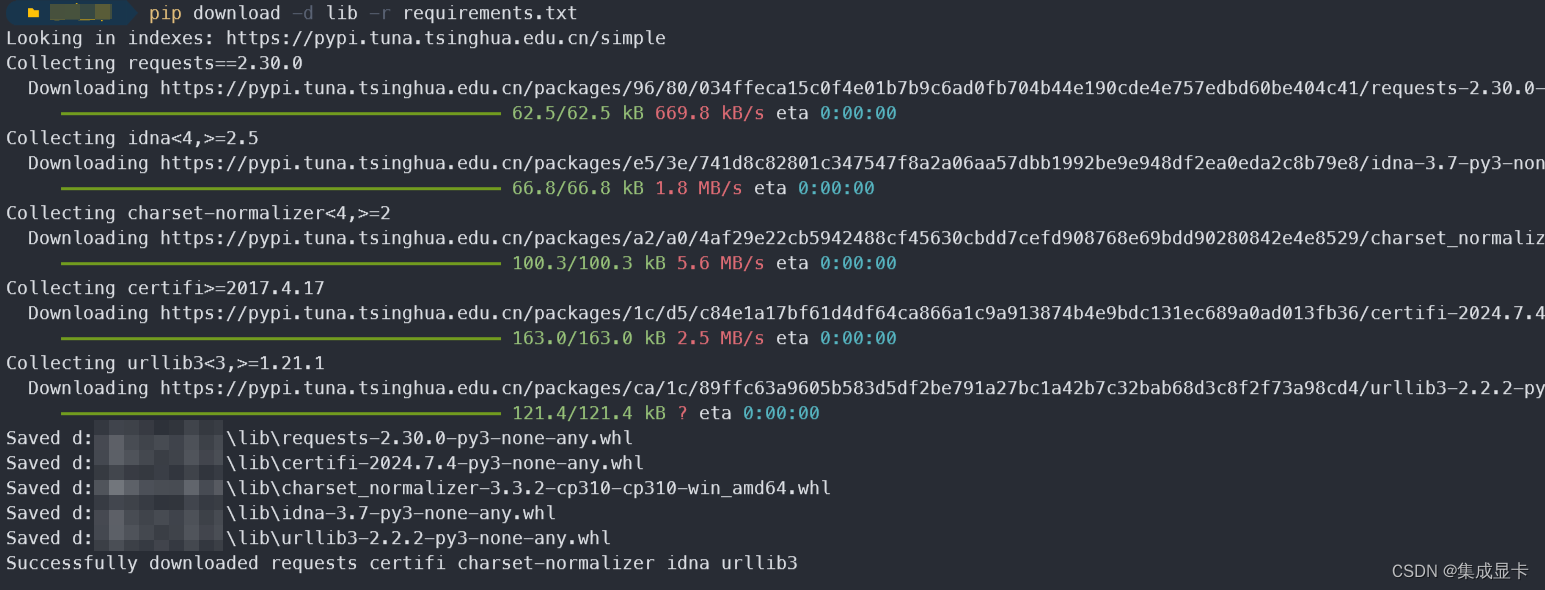
背景 项目研发环境不支持联网,无法通过常规 pip install 来安装依赖,此时需要在联网设备下载依赖,然后拷贝到离线设备进行本地安装。 两台设备的操作系统、Python 版本尽可能一致。 离线安装依赖 # 在联网设备上安装项目所需的依赖 # -d …...
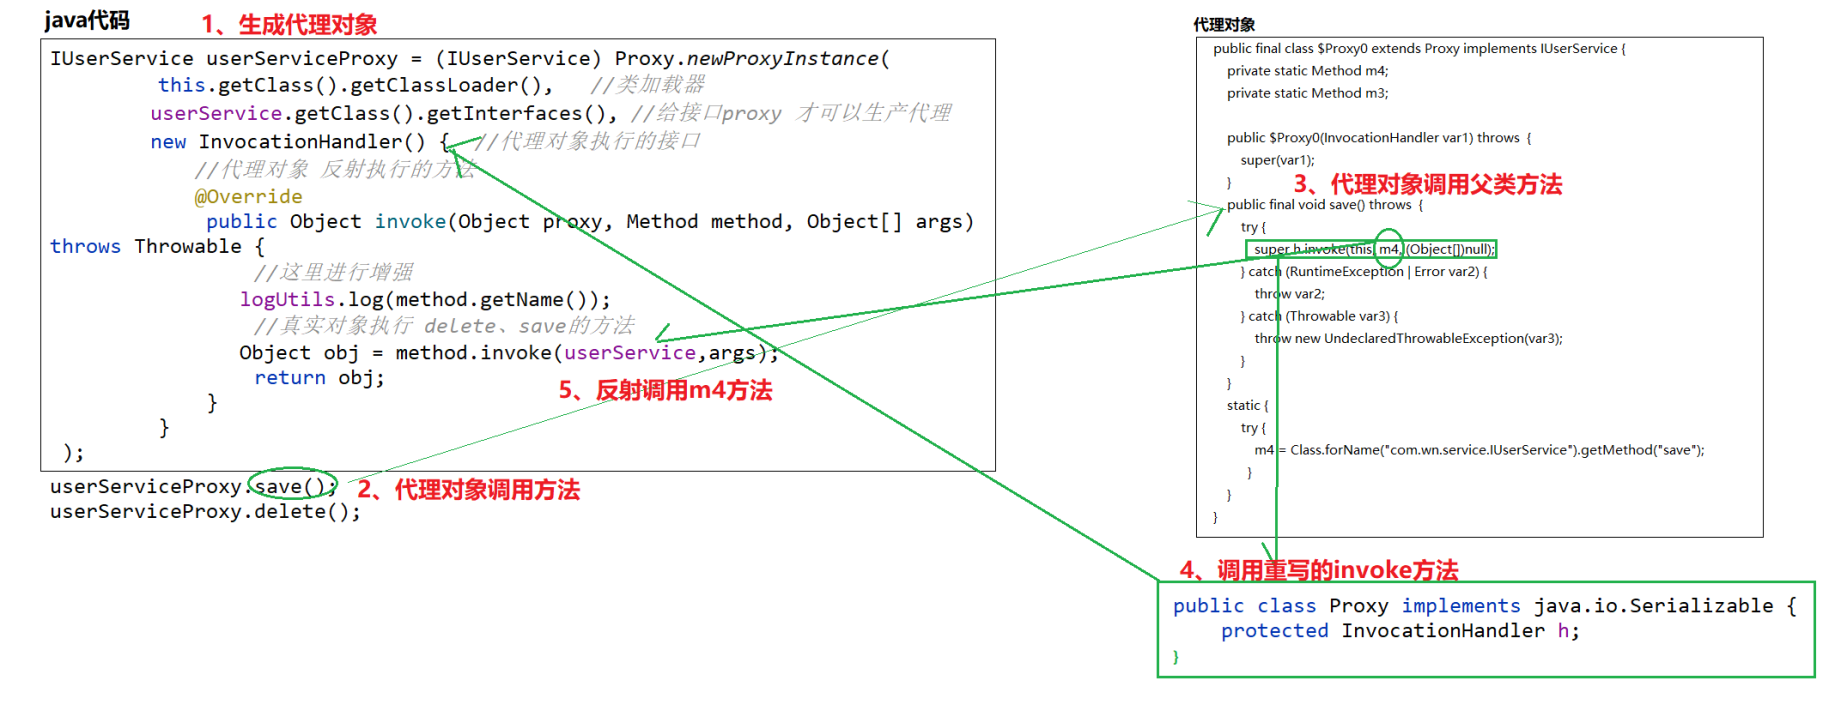
jdk动态代理代码实现
1、jdk动态代理代码实现 1、接口 public interface IUserService {void save();void delete();}2、接口实现 Service public class UserServiceImpl implements IUserService {Overridepublic void save() {System.out.println("UserServiceImpl.save");}Override…...

mybatis的xml如何使用java枚举
mybatis的xml如何使用java枚举 使用方式 ${com.haier.baseManage.enums.LoganUploadTaskTypeEnumLOG_TYPE.type} 例子 <?xml version"1.0" encoding"UTF-8"?> <!DOCTYPE mapper PUBLIC "-//mybatis.org//DTD Mapper 3.0//EN" &quo…...

SQL Server中设置端口号
在SQL Server中设置端口号可以通过SQL Server配置管理器进行。以下是具体步骤: 使用SQL Server 配置管理器设置端口 打开SQL Server配置管理器: 在Windows开始菜单中搜索“SQL Server 配置管理器”,然后打开它。 配置SQL Server网络配置&…...
)
CSS Border(边框)
CSS Border(边框) 引言 在网页设计中,边框是增强元素视觉效果和页面布局的重要工具。CSS 提供了丰富的边框样式属性,允许开发者自定义边框的宽度、颜色、样式等。本文将详细介绍 CSS 边框的相关属性,包括基本用法和高级技巧,帮助…...
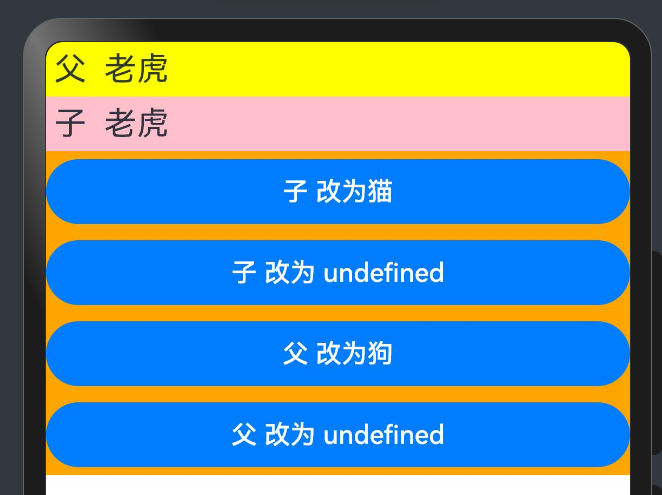
【鸿蒙学习笔记】@Prop装饰器:父子单向同步
官方文档:Prop装饰器:父子单向同步 [Q&A] Prop装饰器作用 Prop装饰的变量可以和父组件建立单向的同步关系。Prop装饰的变量是可变的,但是变化不会同步回其父组件。 [Q&A] Prop装饰器特点 1・Prop装饰器不能在Entry装饰的…...
-状态模式)
设计模式(实战项目)-状态模式
需求背景:存在状态流转的预约单 一.数据库设计 CREATE TABLE appointment (id bigint(20) unsigned NOT NULL AUTO_INCREMENT COMMENT 主键id,appoint_type int(11) NOT NULL COMMENT 预约类型(0:线下查房...),appoint_user_id bigint(20) NOT NULL COMMENT 预约人…...

【python】OpenCV—Color Map
文章目录 cv2.applyColorMapcv2.putText小试牛刀自定义颜色 参考学习来自 OpenCV基础(21)使用 OpenCV 中的applyColorMap实现伪着色 cv2.applyColorMap cv2.applyColorMap() 是 OpenCV 中的一个函数,用于将灰度图像或单通道图像应用一个颜色…...

MySQL:表的内连接和外连接、索引
文章目录 1.内连接2.外连接2.1 左外连接2.2 右外连接 3.综合练习4.索引4.1见一见索引4.2 硬件理解4.3 MySQL 与磁盘交互基本单位(软件理解)4.4 (MySQL选择的数据结构)索引的理解4.5 聚簇索引 VS 非聚簇索引 5.索引操作5.1 创建索引5.2 查询索引5.3 删除索引 1.内连接 内连接实…...

Topit:macOS窗口置顶神器,让多任务处理效率翻倍
Topit:macOS窗口置顶神器,让多任务处理效率翻倍 【免费下载链接】Topit Pin any window to the top of your screen / 在Mac上将你的任何窗口强制置顶 项目地址: https://gitcode.com/gh_mirrors/to/Topit 你是否经常在macOS上同时处理多个任务时…...

深圳实体门店有必要做GEO AI代运营吗
深圳实体门店有必要做GEO AI代运营吗一、开篇引言2026年深圳本地实体商业竞争进入白热化阶段,全城数百万家线下实体门店涵盖本地生活、家装工装、汽车服务、餐饮娱乐、教育培训等全品类,传统线下地推、门店自然客流、传统团购平台引流效果持续下滑&#…...

Yokogawa AAI835-H50/K4A00模拟输入/输出模块
Yokogawa AAI835-H50/K4A00 模拟输入/输出模块产品特点:通道配置:共8个通道,含4路模拟输入和4路模拟输出。信号类型:所有通道均支持4-20mA标准电流信号。HART通信:支持HART协议,可与智能现场设备双向数字通…...

Veo 2胶片质感生成器失效?——深度解析Color Science v2.3内核中被屏蔽的Cinematic Grain Injection层
更多请点击: https://kaifayun.com 第一章:Veo 2胶片质感生成器失效现象全景透视 近期大量用户反馈,Veo 2 胶片质感生成器在调用 generate_film_effect() 接口后返回空纹理、纯灰帧或 HTTP 503 Service Unavailable 错误,且该问题…...

rk35xx 通过recovery升级问题
Firefly 的 recovery 库是一个核心组件,它构建了一个独立的微型 Linux 系统,专门用于在设备主系统之外执行高可靠性的固件升级。简单来说,它的工作流程是:主系统通过命令触发,将升级指令写入特定分区并重启;…...

1901-2022年中国气温变化分析实战:用这份1km栅格数据我们能发现什么?
1901-2022年中国气温变化分析实战:如何从1km栅格数据中挖掘气候演变规律当一份覆盖122年、分辨率精确到1公里的气温栅格数据摆在面前时,我们看到的不仅是数字矩阵,更是一部写在经纬度坐标里的气候变迁史诗。这份由逐月数据聚合生成的逐年气温…...

RevSSH反向SSH隧道:无公网IP设备的安全远程运维方案
1. 这不是又一个SSH封装工具——RevSSH解决的是“根本性连接悖论”你有没有遇到过这样的场景:一台部署在客户内网的嵌入式设备,没有公网IP,NAT穿透失败,防火墙策略死死锁住所有入向端口,连ICMP都被禁了;或者…...

3个实用场景教你轻松解锁网易云音乐NCM加密文件:ncmdumpGUI完整指南
3个实用场景教你轻松解锁网易云音乐NCM加密文件:ncmdumpGUI完整指南 【免费下载链接】ncmdumpGUI C#版本网易云音乐ncm文件格式转换,Windows图形界面版本 项目地址: https://gitcode.com/gh_mirrors/nc/ncmdumpGUI 你是否曾经下载了网易云音乐的…...
)
保姆级教程:手把手教你搞定ESXi 6.7安装前的BIOS设置(VT-x/VT-d/AES全开)
从零开始:ESXi 6.7安装前的BIOS设置终极指南当你第一次接触企业级虚拟化平台时,那种既兴奋又忐忑的心情我完全理解。作为过来人,我记得自己第一次在Dell PowerEdge服务器上安装ESXi时,光是搞清楚BIOS里那些晦涩的选项就花了整整一…...

XXPermissions:Android权限管理框架的架构设计与最佳实践
XXPermissions:Android权限管理框架的架构设计与最佳实践 【免费下载链接】XXPermissions Android Permissions Framework, Adapt to Android 16 项目地址: https://gitcode.com/GitHub_Trending/xx/XXPermissions 在Android应用开发中,权限管理一…...