Vue+Element Plus后台管理主界面搭建实现
续接Django REST Framework,使用Vite构建Vue3的前端项目
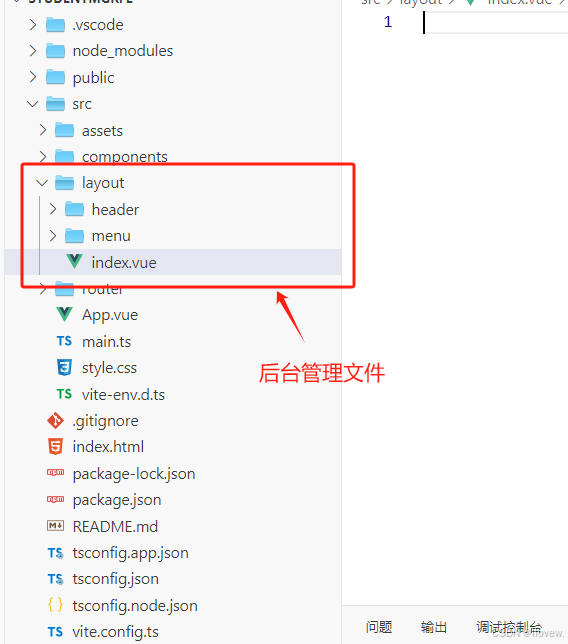
1. 后台管理系统主界面框架搭建
- 后台系统主界面搭建
新建后台管理文件目录
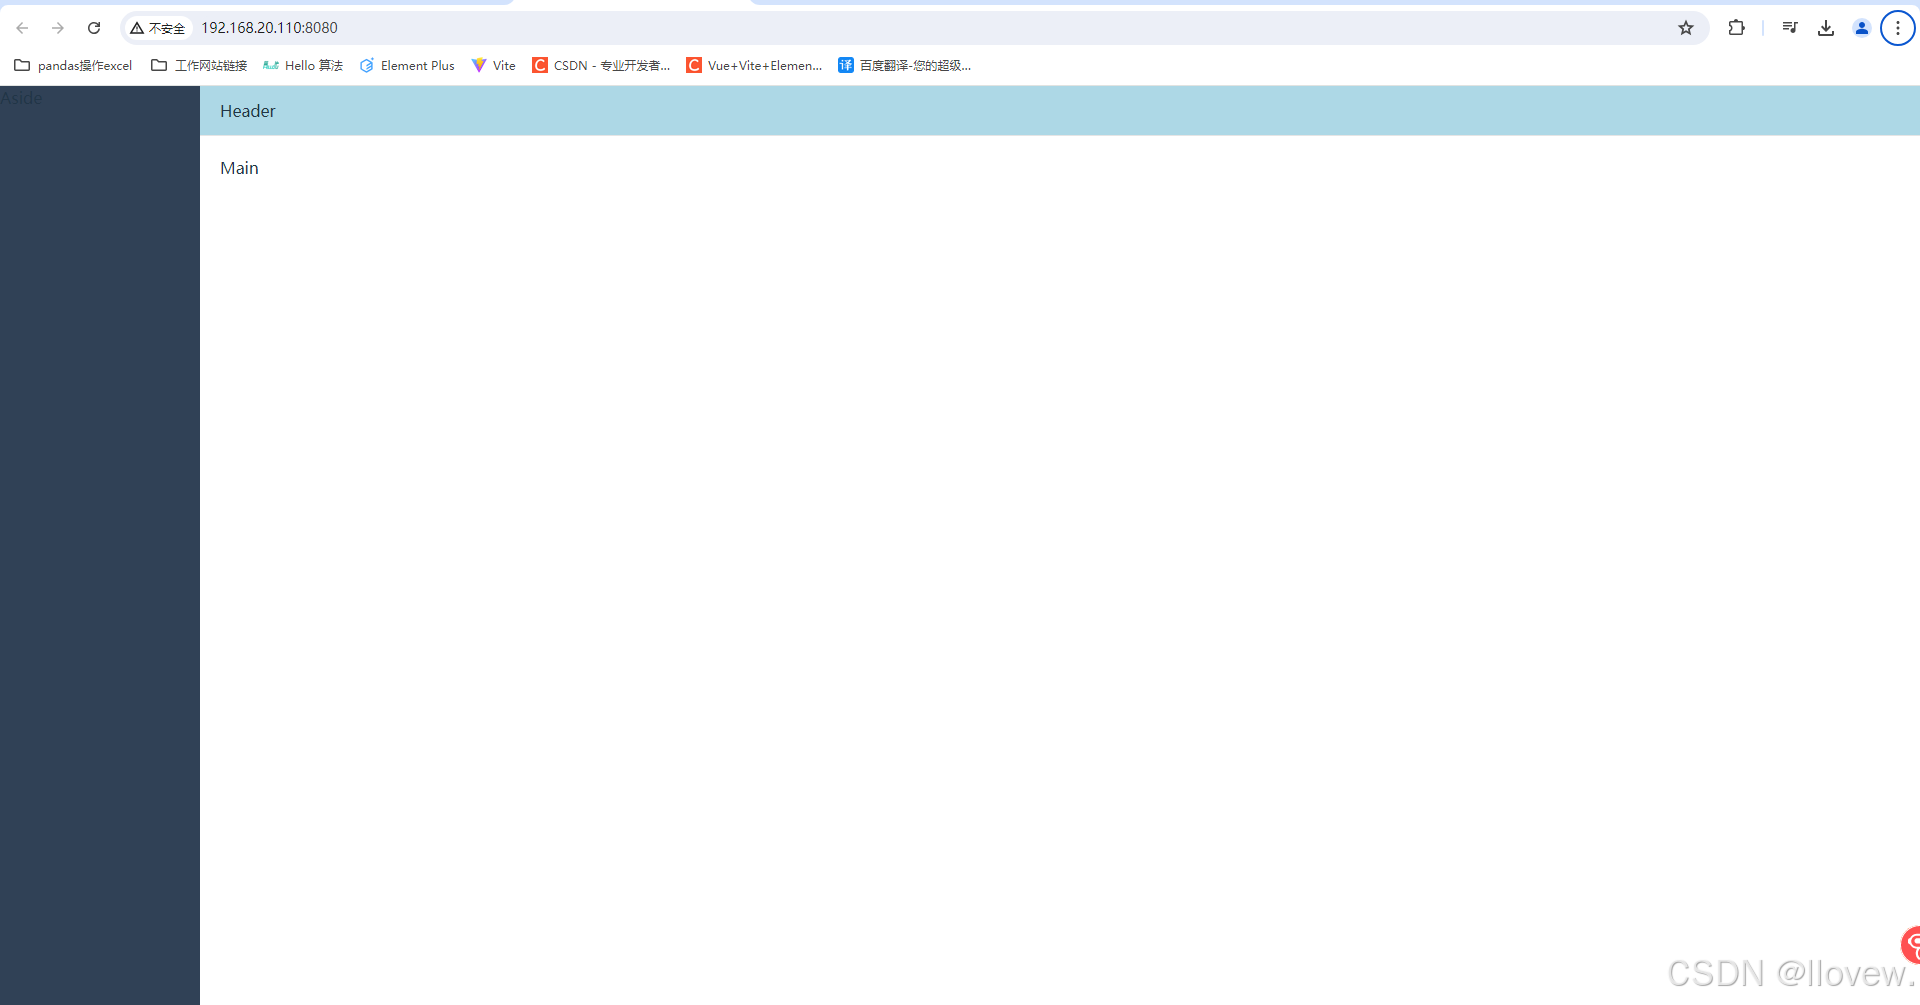
- 完成后台整体布局
// 1.主界面 index.vue<script setup lang="ts"></script><template><el-container  class="layout"><el-aside width="200px" class="aside">Aside</el-aside><el-container><el-header class="header">Header</el-header><el-main class="main">Main</el-main></el-container></el-container></template><style scoped>
.layout {height: 100%;
}.aside {background-color: #304156;
}
.header {background-color: lightblue;height: 50px;border-bottom: 1px solid #e5e5e5;display: flex;align-items: center;justify-content: space-between;
}
</style>// 2.配置路由
import { createRouter, createWebHistory, RouteRecordRaw } from "vue-router";
import Index from '../layout/index.vue'
const routes: Array<RouteRecordRaw>= [{path: "/",// name: 'Home',component: Index,    },]// 创建一个 vue-router对象
const router = createRouter({history: createWebHistory(),
})// 暴露接口
export default router3.app.vue引入路由
<script setup lang="ts"></script>
<template><router-view></router-view>
</template><style scoped>
#app {font-family: Avenir, Helvetica, Arial, sans-serif;-webkit-font-smoothing: antialiased;-moz-osx-font-smoothing: grayscale;text-align: center;color: #2c3e50;
}</style>
- 后台页面满屏显示
1.style.css 注销 #app{}
2.index.html添加样式
<!doctype html>
<html lang="en"><head><meta charset="UTF-8" /><link rel="icon" type="image/svg+xml" href="/vite.svg" /><meta name="viewport" content="width=device-width, initial-scale=1.0" /><title>后台管理</title></head>
<!--添加样式--><style>html, body,#app{padding: 0px;margin: 0px;height: 100%;width: 100%;}</style><body><div id="app"></div><script type="module" src="/src/main.ts"></script></body>
</html>
- 侧边栏布局实现
// Menu.vue<script setup lang="ts"></script><template><el-menu active-text-color="#ffd04b" background-color="#545c64" class="el-menu-vertical-demo" default-active="2"text-color="#fff"><el-sub-menu index="1"><template #title><el-icon><location /></el-icon><span>基础数据</span></template><el-menu-item index="1-1">院系管理</el-menu-item><el-menu-item index="1-2">专业管理</el-menu-item><el-menu-item index="1-3">学生管理</el-menu-item></el-sub-menu><el-sub-menu index="2"><template #title><el-icon><location /></el-icon><span>学生管理</span></template><el-menu-item index="2-1">学生信息</el-menu-item><el-menu-item index="2-2">学生成绩</el-menu-item><el-menu-item index="2-3">学生照片</el-menu-item></el-sub-menu><el-sub-menu index="3"><template #title><el-icon><location /></el-icon><span>用户角色</span></template><el-menu-item index="3-1">登录账号</el-menu-item><el-menu-item index="3-2">用户角色</el-menu-item><el-menu-item index="3-3">菜单管理</el-menu-item><el-menu-item index="3-4">权限信息</el-menu-item></el-sub-menu><!-- <el-menu-item index="2"><el-icon><icon-menu /></el-icon><span>Navigator Two</span></el-menu-item><el-menu-item index="3" disabled><el-icon><document /></el-icon><span>Navigator Three</span></el-menu-item><el-menu-item index="4"><el-icon><setting /></el-icon><span>Navigator Four</span></el-menu-item> --></el-menu>
</template><style scoped>
.el-menu-item {display: block;text-align: center;
}
</style>
// index.vue 注册
<script setup lang="ts">
// 引入组件
import MenuVue from './menu/Menu.vue';
import HeaderVue from './header/Header.vue';</script><template><el-container class="layout"><el-aside width="200px" class="aside"><!-- 调用组件 --><MenuVue></MenuVue></el-aside><el-container><el-header class="header"><!-- 调用组件 --><HeaderVue></HeaderVue></el-header><el-main class="main">Main</el-main></el-container></el-container></template><style scoped>
.layout {height: 100%;
}.aside {background-color: #304156;
}
.header {background-color: lightblue;height: 50px;border-bottom: 1px solid #e5e5e5;display: flex;align-items: center;justify-content: space-between;
}
</style>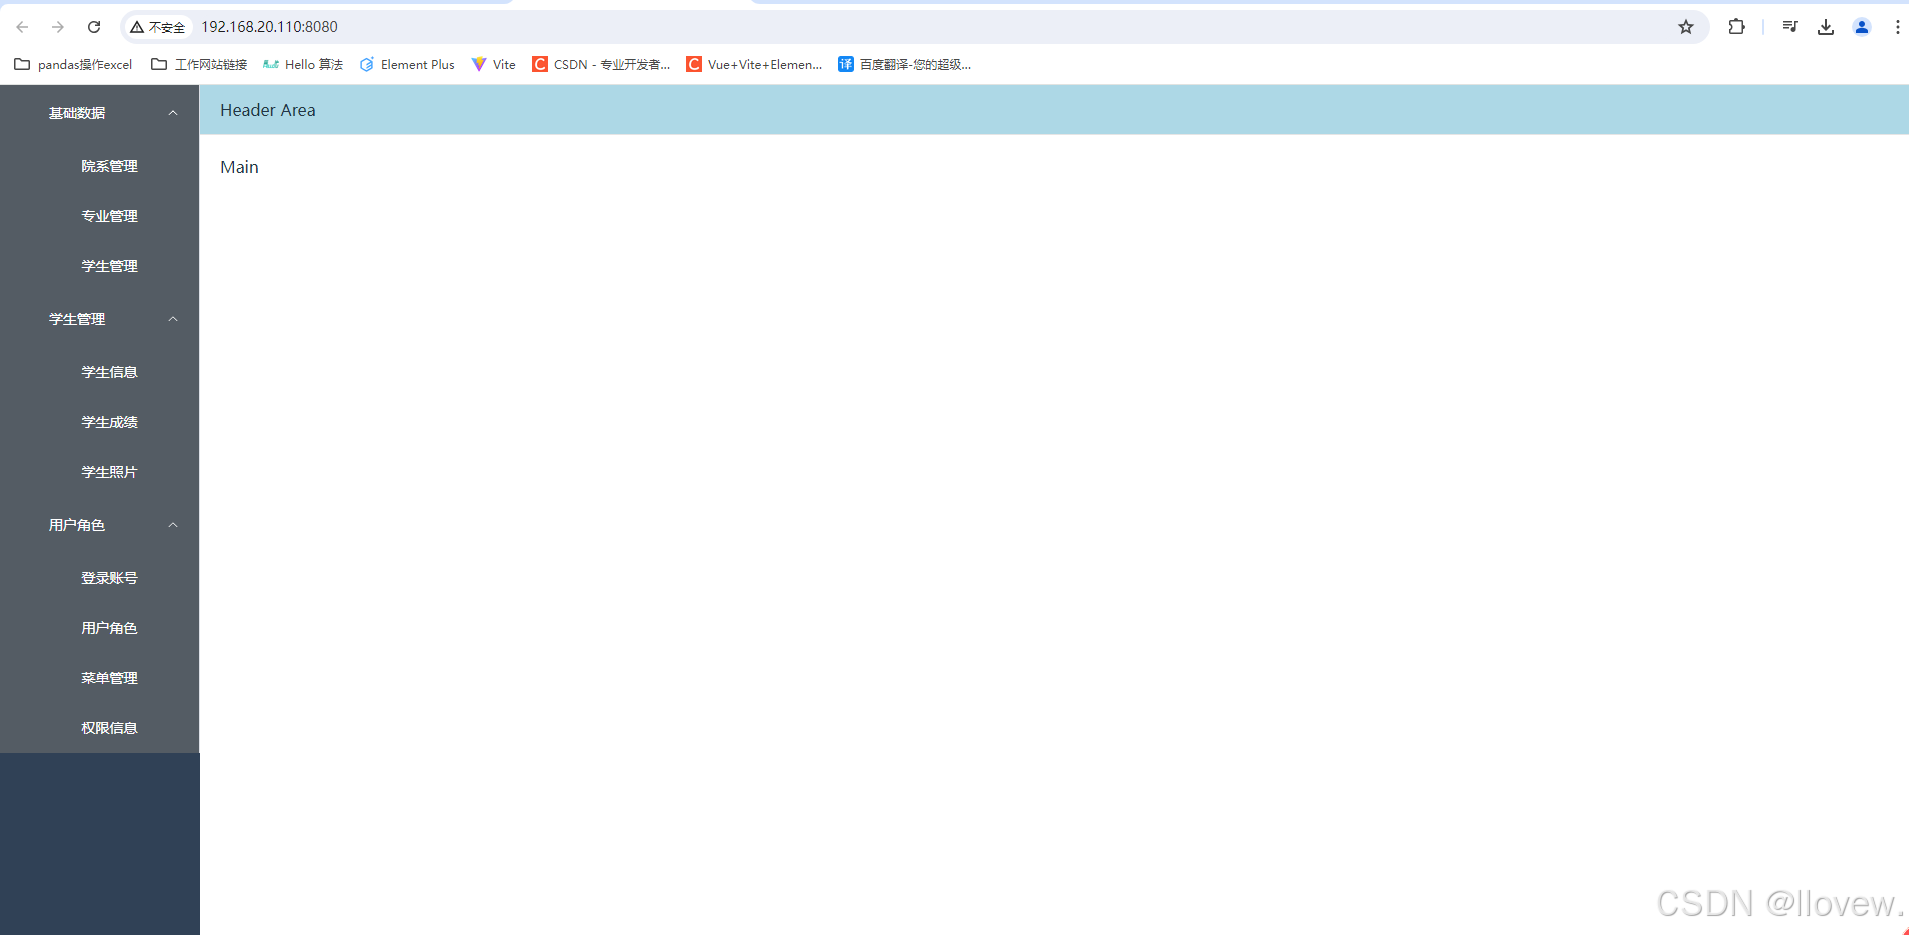
- 添加侧边栏Logo
// 新建MenuLogo.vue<script setup lang="ts"></script><template><div class="logo"><!-- 图片 --><img src="../../assets/logo_main.png" alt="Logo"><span class="title">信息管理系统</span></div>
</template><style scoped>
.logo {background-color: #2b2f3a;height: 50px;border: none;line-height: 50px;display: flex;align-items: center;padding-left: 15px;color: #fff;
}
.logo img {width: 32px;height: 32px;margin-right: 12px;
}
.logo span {font-weight: 600;line-height: 50px;font-size: 16px;font-family: Avenir, Helvetica Neue, Arial, Helvetica, sans-serif;vertical-align: middle;
}
</style>
// Menu.vue 绑定并注册 MenuLogo
<script setup lang="ts">
import MenuLogo from './MenuLogo.vue';</script><template><!-- 导入Logo组件 --><MenuLogo class="layout-logo"></MenuLogo><el-menu active-text-color="#ffd04b" background-color="#545c64" class="el-menu-vertical-demo" default-active="2"text-color="#fff"><el-sub-menu index="1"><template #title><el-icon><location /></el-icon><span>基础数据</span></template><el-menu-item index="1-1">院系管理</el-menu-item><el-menu-item index="1-2">专业管理</el-menu-item><el-menu-item index="1-3">学生管理</el-menu-item></el-sub-menu><el-sub-menu index="2"><template #title><el-icon><location /></el-icon><span>学生管理</span></template><el-menu-item index="2-1">学生信息</el-menu-item><el-menu-item index="2-2">学生成绩</el-menu-item><el-menu-item index="2-3">学生照片</el-menu-item></el-sub-menu><el-sub-menu index="3"><template #title><el-icon><location /></el-icon><span>用户角色</span></template><el-menu-item index="3-1">登录账号</el-menu-item><el-menu-item index="3-2">用户角色</el-menu-item><el-menu-item index="3-3">菜单管理</el-menu-item><el-menu-item index="3-4">权限信息</el-menu-item></el-sub-menu><!-- <el-menu-item index="2"><el-icon><icon-menu /></el-icon><span>Navigator Two</span></el-menu-item><el-menu-item index="3" disabled><el-icon><document /></el-icon><span>Navigator Three</span></el-menu-item><el-menu-item index="4"><el-icon><setting /></el-icon><span>Navigator Four</span></el-menu-item> --></el-menu>
</template><style scoped>
.el-menu-item {display: block;text-align: center;
}
.el-menu-vertical-demo:not(.el-menu--collapse) {width: 230px;min-height: 400px;
}.el-menu {border-right: none;
}.el-menu-item {color: #f4f4f5 !important;
}:deep(.el-sub-menu .el-sub-menu__title) {color: #f4f4f5 !important;
}
/* .el-submenu .is-active .el-submenu__title {border-bottom-color: #1890ff;
} */
:deep(.el-menu .el-menu-item) {color: #bfcbd9;
}/* 菜单点中文字的颜色 */
:deep(.el-menu-item.is-active) {color: #409eff !important;
}
/* 当前打开菜单的所有子菜单颜色 */
:deep(.is-opened .el-menu-item) {background-color: #1f2d3d !important;
}
/* 鼠标移动菜单的颜色 */
:deep(.el-menu-item:hover) {background-color: #001528 !important;
}/* Logo CSS部分的动画 */
@keyframes logoAnimation {0% {transform: scale(0);}50% {transform: scale(1);}100% {transform: scale(1);}
}.layout-logo {animation: logoAnimation 1s ease-out;
}
</style>- 动态生成侧边栏菜单
// 新建MenuItem.vue
<script setup lang="ts">
// 导入基本模块
import { reactive } from 'vue'; // 初始化构造数据
let menuList = reactive([{path: "/",meta: {title: "首页",icon: "HomeFilled",},},{path: "/baisc",meta: {title: "基础数据",icon: "Setting",},children: [{path: "/basic/faculty",meta: {title: "院系信息",icon: "Ship",},},{path: "/basic/major",meta: {title: "专业信息",icon: "ShoppingBag",},},{path: "/basic/teacher",meta: {title: "教师信息",icon: "ShoppingCartFull",},},],},{path: "/student",meta: {title: "学生管理",icon: "UserFilled",},children: [{path: "/student/info",meta: {title: "学生信息",icon: "VideoCameraFilled",},},{path: "/student/exam",meta: {title: "考试信息",icon: "OfficeBuilding",},},{path: "/student/image",meta: {title: "学生照片",icon: "TakeawayBox",},},],},{path: "/user",meta: {title: "用户角色",icon: "Ticket",},children: [{path: "/user/account",meta: {title: "登录账号",icon: "Coordinate",},},{path: "/user/roles",meta: {title: "角色信息",icon: "CreditCard",},},{path: "/user/menu",meta: {title: "菜单管理",icon: "DeleteLocation",},},{path: "/user/permission",meta: {title: "权限管理",icon: "Goods",},},],},
]);</script><template><template v-for="menu in menuList"><!-- 1.循环遍历menuList2.如果children存在并且不为空及长度大于0,则创建一级菜单,反之则创建多级3. 点击菜单,跳转到对应路径--><el-sub-menu v-if="menu.children && menu.children.length>0" :index="menu.path"><!-- 展示二级菜单第一层 --><template #title><span>{{ menu.meta.title }}</span></template><!-- 展示二级菜单第二层 --><!-- <template v-for="child in menu.children"><el-menu-item :index="child.path"><span>{{ child.meta.title }}</span></el-menu-item></template> --><template #default><el-menu-item v-for="child in menu.children" :key="child.path" :index="child.path"><span>{{ child.meta.title }}</span></el-menu-item></template></el-sub-menu><el-menu-item v-else :index="menu.path" style="text-align: left;"><span>{{ menu.meta.title }}</span></el-menu-item></template></template><style scoped>
.el-menu-item {display: block;text-align: center;padding-right: 80px;
}</style>
// Menu.vue 注册
<script setup lang="ts">
import MenuLogo from './MenuLogo.vue';
import MenuItem from './MenuItem.vue';</script><template><!-- 导入Logo组件 --><MenuLogo class="layout-logo"></MenuLogo><el-menu active-text-color="#ffd04b" background-color="#545c64" class="el-menu-vertical-demo" default-active="2"text-color="#fff"><MenuItem></MenuItem></el-menu>
</template><style scoped>
.el-menu-item {display: block;text-align: center;
}
.el-menu-vertical-demo:not(.el-menu--collapse) {width: 230px;min-height: 400px;
}.el-menu {border-right: none;
}.el-menu-item {color: #f4f4f5 !important;
}:deep(.el-sub-menu .el-sub-menu__title) {color: #f4f4f5 !important;
}
/* .el-submenu .is-active .el-submenu__title {border-bottom-color: #1890ff;
} */
:deep(.el-menu .el-menu-item) {color: #bfcbd9;
}/* 菜单点中文字的颜色 */
:deep(.el-menu-item.is-active) {color: #409eff !important;
}
/* 当前打开菜单的所有子菜单颜色 */
:deep(.is-opened .el-menu-item) {background-color: #1f2d3d !important;
}
/* 鼠标移动菜单的颜色 */
:deep(.el-menu-item:hover) {background-color: #001528 !important;
}/* Logo CSS部分的动画 */
@keyframes logoAnimation {0% {transform: scale(0);}50% {transform: scale(1);}100% {transform: scale(1);}
}.layout-logo {animation: logoAnimation 1s ease-out;
}
</style>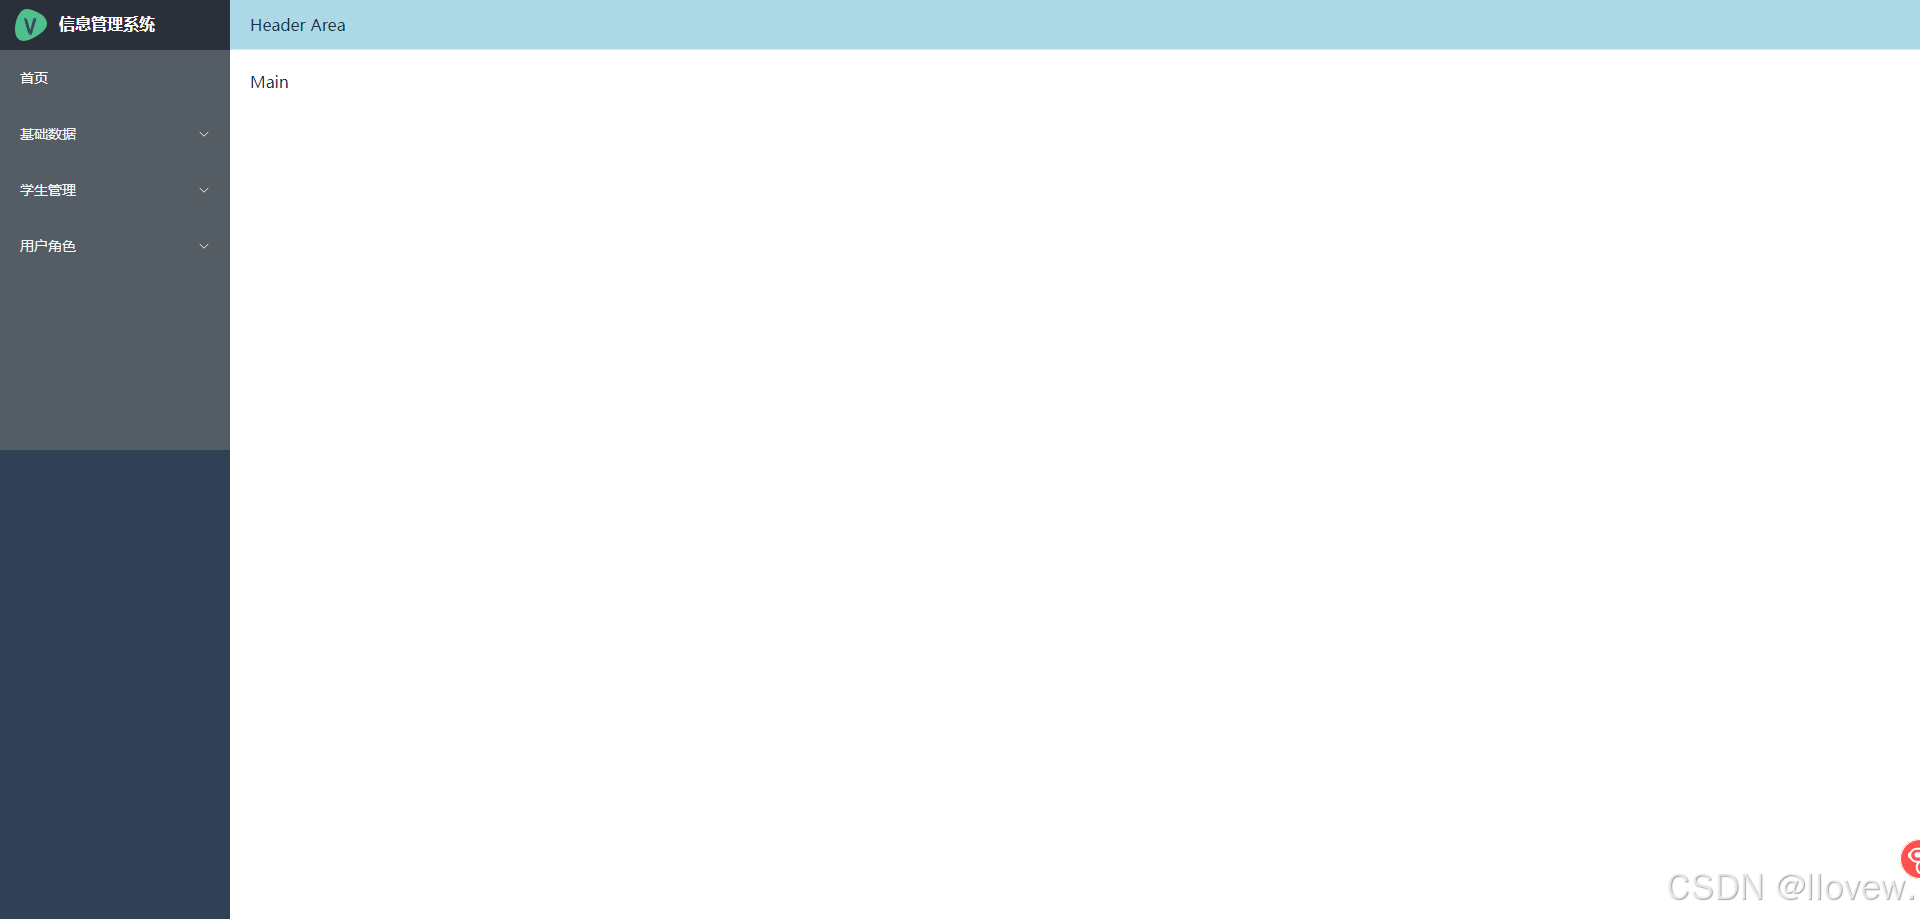
- 侧边栏菜单添加图标
安装
npm install @element-plus/icons-vue全局注册
// main.tsimport { createApp } from 'vue'
import './style.css'
import App from './App.vue'
import router from './router' // 导入路由文件
import * as ElementPlusIconsVue from '@element-plus/icons-vue' // 导入所以 icon图标import ElementPlus from 'element-plus'
import 'element-plus/dist/index.css' // 创建app
const app= createApp(App)app.use(router).use(ElementPlus).mount('#app')// 遍历所有 icon将每个图标以组件方式加载到app中
Object.keys(ElementPlusIconsVue).forEach((key) => {app.component(key, ElementPlusIconsVue[key as keyof typeof ElementPlusIconsVue]); // 注册成全局组件
})
使用
// MenuItem.vue
<script setup lang="ts">
// 导入基本模块
import { reactive } from 'vue'; // 初始化数据
let menuList = reactive([{path: "/",meta: {title: "首页",icon: "HomeFilled",},},{path: "/baisc",meta: {title: "基础数据",icon: "Setting",},children: [{path: "/basic/faculty",meta: {title: "院系信息",icon: "Ship",},},{path: "/basic/major",meta: {title: "专业信息",icon: "ShoppingBag",},},{path: "/basic/teacher",meta: {title: "教师信息",icon: "ShoppingCartFull",},},],},{path: "/student",meta: {title: "学生管理",icon: "UserFilled",},children: [{path: "/student/info",meta: {title: "学生信息",icon: "VideoCameraFilled",},},{path: "/student/exam",meta: {title: "考试信息",icon: "OfficeBuilding",},},{path: "/student/image",meta: {title: "学生照片",icon: "TakeawayBox",},},],},{path: "/user",meta: {title: "用户角色",icon: "Ticket",},children: [{path: "/user/account",meta: {title: "登录账号",icon: "Coordinate",},},{path: "/user/roles",meta: {title: "角色信息",icon: "CreditCard",},},{path: "/user/menu",meta: {title: "菜单管理",icon: "DeleteLocation",},},{path: "/user/permission",meta: {title: "权限管理",icon: "Goods",},},],},
]);</script><template><template v-for="menu in menuList"><!-- 1.循环遍历menuList2.如果children存在并且不为空及长度大于0,则创建一级菜单,反之则创建多级3. 点击菜单,跳转到对应路径--><el-sub-menu v-if="menu.children && menu.children.length>0" :index="menu.path"><!-- 展示二级菜单第一层 --><template #title><el-icon><component class="icons" :is="menu.meta.icon"></component></el-icon><span>{{ menu.meta.title }}</span></template><!-- 展示二级菜单第二层 --><!-- <template v-for="child in menu.children"><el-menu-item :index="child.path"><span>{{ child.meta.title }}</span></el-menu-item></template> --><template #default><el-menu-item v-for="child in menu.children" :key="child.path" :index="child.path"><el-icon><component class="icons" :is="child.meta.icon"></component></el-icon><span style="color: aliceblue;">{{ child.meta.title }}</span></el-menu-item></template></el-sub-menu><el-menu-item v-else :index="menu.path" style="text-align: left;"><el-icon><component class="icons" :is="menu.meta.icon"></component></el-icon><span>{{ menu.meta.title }}</span></el-menu-item></template>
</template><style scoped>
.el-menu-item {display: block;text-align: center;padding-right: 80px;
}</style>- Header区域基本布局
// 图标组件定义 Collaspe.vue<script setup lang="ts"></script><template><!-- 使用全局定义的折叠图标 --><el-icon><component class="icons" is="Fold"></component></el-icon>
</template><style scoped>
.el-icon{font-style: 22px;margin-right: 10px;
}
</style>// 面包屑导航定义 Bredcum.vue
<script setup lang="ts"></script><template><el-breadcrumb separator="/"><el-breadcrumb-item>首页</el-breadcrumb-item><el-breadcrumb-item>基础数据</el-breadcrumb-item><el-breadcrumb-item>院系管理</el-breadcrumb-item></el-breadcrumb></template><style scoped></style>// 用户下拉框定义 UserInfo.vue
<script setup lang="ts"></script><template><el-dropdown><span class="el-dropdown-link"><el-icon style="margin-right: 5px;"><user-filled /></el-icon>   <span>admin</span><el-icon class="el-icon--right" style="margin-left: 5px;"><arrow-down /></el-icon></span><template #dropdown><el-dropdown-menu><el-dropdown-item>用户信息</el-dropdown-item><el-dropdown-item>修改密码</el-dropdown-item><el-dropdown-item>安全退出</el-dropdown-item><!-- <el-dropdown-item disabled>Action 4</el-dropdown-item><el-dropdown-item divided>Action 5</el-dropdown-item> --></el-dropdown-menu></template></el-dropdown>
</template><style scoped></style>
// 父组件 Header.vue引入
<script setup lang="ts">
// 导入组件
import UserInfo from './UserInfo.vue';
import Collaspe from './Collaspe.vue';
import Bredcum from './Bredcum.vue';
</script><template><!-- 靠着横排显示将两组件放在同一个div中 --><div style="display: flex; align-items: center;"><Collaspe></Collaspe><Bredcum></Bredcum></div><UserInfo></UserInfo>
</template><style scoped></style>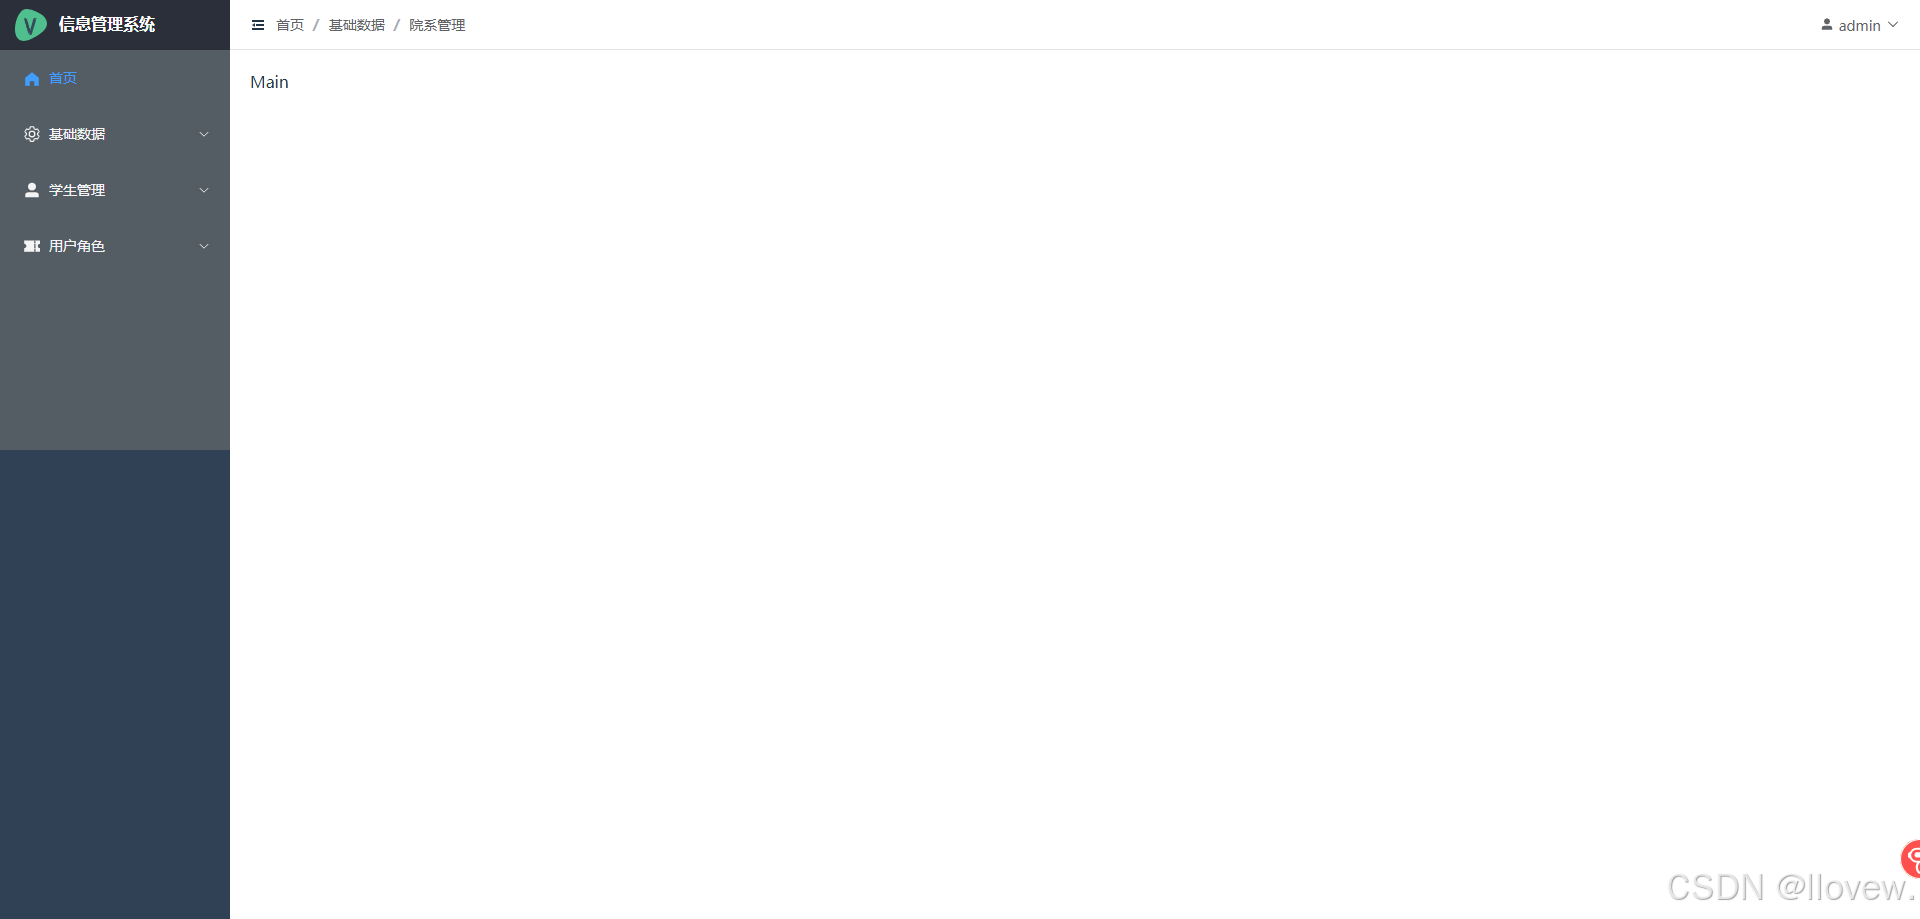
- 侧边栏收缩思路
控制菜单栏收缩---->Menu.vue---><el-menu :collapse=true></el-menu>
操作菜单栏收缩---->Collapse.vue
// 点击按钮实现切换(true/false) Collapse.vue
<script setup lang="ts">
// 导入vue
import {ref} from 'vue'
let isCollapsed = ref(false)
const changeCollapse = ()=>{isCollapsed.value =!isCollapsed.value console.log(isCollapsed.value )
}</script><template><!-- 使用全局定义的折叠图标 --><el-icon><component class="icons" is="Fold" @click="changeCollapse"></component></el-icon>
</template>
<style scoped>
.el-icon{font-style: 22px;margin-right: 10px;
}
</style>
跨组件传值{父子组件---->直接传值{// 父组件定义传递的值// 导入vueimport {ref} from 'vue'// 定义待传递的值let name = ref('admin')// 传递给子组件<template><UserInfo :username='name'></UserInfo></template>// 子组件接收父组件传递过来的值defineProps<{username: string}>();// 调用值{{ username }}}兄弟组件---->vuex
}
2. Vuex实现组件间的传值
vuex是基于vue框架的一个状态管理库。可以管理复杂应用的数据状态,比如兄弟组件的通信、多层嵌套的组件的传值等等
store---store是yuex的核心对象,它记录了整个vue应用的数据状态以及操作数据的方式。
state---就是store操作的数据状态对象,
mutation---提供了一种简单易用的同步的方式改变state的状态。
getter---获取state中数据对象
- vuex安装
// 安装最新版 vuex
npm install vuex@next --save// 新建 store文件夹并在文件夹下新建 index.ts导入vuex模块import { createStore } from 'vuex'// 报错:/node_modules/vuex/types/index.d.ts', but this result could not be resolved when respecting package.json "exports". // 解决报错 node_modules\vuex\package.json在exports字段中添加"types": "./types/index.d.ts"- store对象创建
// 导入 vuex 模块
import { createStore } from 'vuex'
// 定义实体(存储结构)
export interface MyStore {// 控制侧边栏收缩collapse: boolean,
}// 创建store对象
export const store = createStore<MyStore>({// 初始状态state: {collapse: false, // 侧边栏收缩},//  mutations 用于更改 Vuex 的 store 中的状态mutations: {toggleCollapse(state: MyStore) {state.collapse =!state.collapse},},// actions 用于提交 mutations,可以包含异步操作actions: {toggleCollapse({ commit }) {commit('toggleCollapse')},},// getters 用于获取状态的某些派生数据getters: {// 侧边栏是否收缩isCollapse(state: MyStore) {return state.collapse},},
})
// 暴露
export default store;- store对象注册
// 注册到全局变量
import store from './store' // 导入创建的store对象app.use(store).use(router).use(ElementPlus).mount('#app')- 侧边栏收缩功能完成
// Menu.vue
// 组件中调用vuex中定义的store
// 导入usestore的方法
import { useStore } from 'vuex'
// 获取当前vuex的store对象
const store = useStore()
// 导入计算
import { computed } from 'vue'
// 获取store->state中的collapse值
const isCollapse = computed(()=>{return store.getters['isCollapse']
})// 在标签中实现绑定
<el-menu :collapse = isCollapse></el-menu>// 解决侧边栏收缩 logo显示问题 侧边栏不是收缩状态时展示
<MenuLogo class="layout-logo" v-if="!isCollapse"></MenuLogo>// Collaspe.vue
// 导入usestore的方法
import { useStore } from 'vuex'
// 获取当前vuex的store对象
const store = useStore();
// 导入计算
import { computed } from 'vue'
// 获取store->state中的collapse值
const isCollapse = computed(()=>{return store.getters['isCollapse']
})// 点击切换收缩事件
const changeCollapse=()=>{// 切换collapse的值store.commit('toggleCollapse')
}// 使用三元表达式判断收缩图标,此时全局定义的icon图标将失效需重新导入
import { Fold,Expand } from '@element-plus/icons-vue';
<component class="icons" :is="isCollapse? Fold: Expand " @click="changeCollapse"></component>
3. Vue-router实现侧边栏导航
- 实现侧边栏导航
// router/index.ts 配置路由const routes: Array<RouteRecordRaw>= [// 首页{path: "/",name: 'Layout',component: Layout,// 自动跳转redirect: '/dashboard',children:[{path: '/dashboard',name: 'Dashboard',component: () => import('../views/index/Dashboard.vue')}]},// 基础数据--->院系信息、专业信息、教师信息{path: '/basic',name: 'Basic',component: Layout,children: [{path: '/basic/faculty',name: 'Faculty',component: () => import('../views/basic/Faculty.vue')},{path: '/basic/major',name: 'Major',component: () => import('../views/basic/Major.vue')},{path: '/basic/teacher',name: 'Teacher',component: () => import('../views/basic/Teacher.vue')}]},// 学生管理{path: '/student',name:'Student',component: Layout,children: [{path: '/student/info',name: 'StudentInfo',component: () => import('../views/student/Info.vue')},{path: '/student/exam',name: 'StudentExam',component: () => import('../views/student/Exam.vue')},{path: '/student/image',name: 'StudentImage',component: () => import('../views/student/Image.vue')}]},// 用户管理{path: '/user',name: 'User',component: Layout,children: [{path: '/user/account',name: 'UserAccount',component: () => import('../views/user/Account.vue')},{path: '/user/roles',name: 'UserRoles',component: () => import('../views/user/Roles.vue')},{path: '/user/menu',name: 'UserMenu',component: () => import('../views/user/Menu.vue')},{path: '/user/permission',name: 'UserPermission',component: () => import('../views/user/Permission.vue')}]}]// layout/index.vue引入路由在指定区域显示<el-main class="main"><router-view></router-view></el-main>// layout/menu/Menu.vue 配置点击侧边栏切换路由
<el-menu active-text-color="#ffd04b" background-color="#304156" class="el-menu-vertical-demo" default-active="2"text-color="#fff":collapse = isCollapserouter>4. 捕获路由信息自动生成面包屑导航
- 自动生成面包屑导航
// 路由添加 meta字段记录标题名const routes: Array<RouteRecordRaw>= [// 首页{path: "/",name: 'Layout',component: Layout,// 自动跳转redirect: '/dashboard',children:[{path: '/dashboard',name: 'Dashboard',component: () => import('../views/index/Dashboard.vue'),meta: { title: '首页' }}]},// 基础数据--->院系信息、专业信息、教师信息{path: '/basic',name: 'Basic',component: Layout,meta: { title: '基础数据' },children: [{path: '/basic/faculty',name: 'Faculty',component: () => import('../views/basic/Faculty.vue'),meta: { title: '院系信息' }},{path: '/basic/major',name: 'Major',component: () => import('../views/basic/Major.vue'),meta: { title: '专业信息' }},{path: '/basic/teacher',name: 'Teacher',component: () => import('../views/basic/Teacher.vue'),meta: { title: '教师信息' }}]},// 学生管理{path: '/student',name:'Student',component: Layout,meta: { title: '学生管理' },children: [{path: '/student/info',name: 'StudentInfo',component: () => import('../views/student/Info.vue'),meta: { title: '学生信息' }},{path: '/student/exam',name: 'StudentExam',component: () => import('../views/student/Exam.vue'),meta: { title: '考试信息' }},{path: '/student/image',name: 'StudentImage',component: () => import('../views/student/Image.vue'),meta: { title: '学生照片' }}]},// 用户管理{path: '/user',name: 'User',component: Layout,meta: { title: '用户角色' },children: [{path: '/user/account',name: 'UserAccount',component: () => import('../views/user/Account.vue'),meta: { title: '登录账号' }},{path: '/user/roles',name: 'UserRoles',component: () => import('../views/user/Roles.vue'),meta: { title: '角色信息' }},{path: '/user/menu',name: 'UserMenu',component: () => import('../views/user/Menu.vue'),meta: { title: '菜单管理' }},{path: '/user/permission',name: 'UserPermission',component: () => import('../views/user/Permission.vue'),meta: { title: '权限管理' }}]}]// 动态获取面包屑导航标准流程 /layout/header/Bredcum.vue<script setup lang="ts">
import { Ref, ref, watch } from 'vue'// 定义 useRouter模块
import { useRoute,RouteLocationMatched} from "vue-router"
// 定义面包屑集合
const tabs: Ref<RouteLocationMatched[]> = ref([])// 获取路由信息
const route = useRoute();// 函数定义
const getBredCum=()=>{// 在路由中筛选过滤路由匹配信息 --- route.metched --meta --meta.titlelet matched = route.matched.filter(item=>item.meta && item.meta.title)// 获取metched中的第一条 判断是否为首页const first = matched[0]// 判断是否为首页,为首页时将首页绑定在最前边if(first.path !== '/dashboard'){matched = [{path: '/dashboard', meta:{'title':'首页'}} as any].concat(matched)}// 将拼接好的值传递给tabstabs.value = matchedconsole.log(matched)
}getBredCum();watch(()=>route.path, ()=>getBredCum()) // 路由变化时重新获取面包屑
// watch(()=>route.matched, getBredCum, { immediate: true }) // 路由变化时重新获取面包屑</script><template><el-breadcrumb separator="/"><el-breadcrumb-item v-for="item in tabs">{{ item.meta.title }}</el-breadcrumb-item></el-breadcrumb><!-- <el-breadcrumb-item>首页</el-breadcrumb-item><el-breadcrumb-item>基础数据</el-breadcrumb-item><el-breadcrumb-item>院系管理</el-breadcrumb-item> --></template><style scoped></style>5. 学生信息页面布局
- 顶部搜索框布局实现
// views/students/info.vue
<script lang="ts" setup>
import { ref, reactive } from "vue"// 定义存储集合
var Data = reactive({// 定义输入的查询条件q_str: ref(""),// 存储从后台获取的所有院系信息FacultyOptions: reactive([{value:1,label:'计算机学院'},{value:2,label:'外语学院'},]),// 存储选择院系后的值FacultySelected: ref(""),// 存储从后台获取的所有专业信息MajorOptions: reactive([{value:1,label:'计算机专业'},{value:2,label:'外语专业'},]),// 存储选择专业后的值MajorSelected: ref("")
})</script><template><!-- 顶部查询区域   styple="display: flax;"横向显示--><el-form :inline="true"  class="demo-form-inline"><el-form-item label="查询条件"><el-input v-model="Data.q_str" placeholder="请输入查询条件" clearable /></el-form-item><!-- 动态获取院系信息 --><el-form-item label="院系"><el-select v-model="Data.FacultySelected" placeholder="请选择院系"><el-option v-for="item in Data.FacultyOptions":key="item.value":label="item.label":value="item.value" /></el-select></el-form-item><!-- 动态获取专业信息 --><el-form-item label="专业"><el-select v-model="Data.MajorSelected" placeholder="请选择专业"><el-option v-for="item in Data.MajorOptions":key="item.value":label="item.label":value="item.value" /></el-select></el-form-item><el-form-item><el-button type="primary"><!-- 引入方法1 --><el-icon><component class="icons" is="Search"></component></el-icon><span>查询</span></el-button><el-button type="primary"><!-- 引入方法2 --><el-icon><Finished /></el-icon><span>全部</span></el-button><el-button type="primary"><el-icon><Pointer /></el-icon><span>添加</span></el-button></el-form-item></el-form>
</template><style scoped>
.demo-form-inline .el-input {--el-input-width: 220px;
}.demo-form-inline .el-select {--el-select-width: 220px;
}
</style>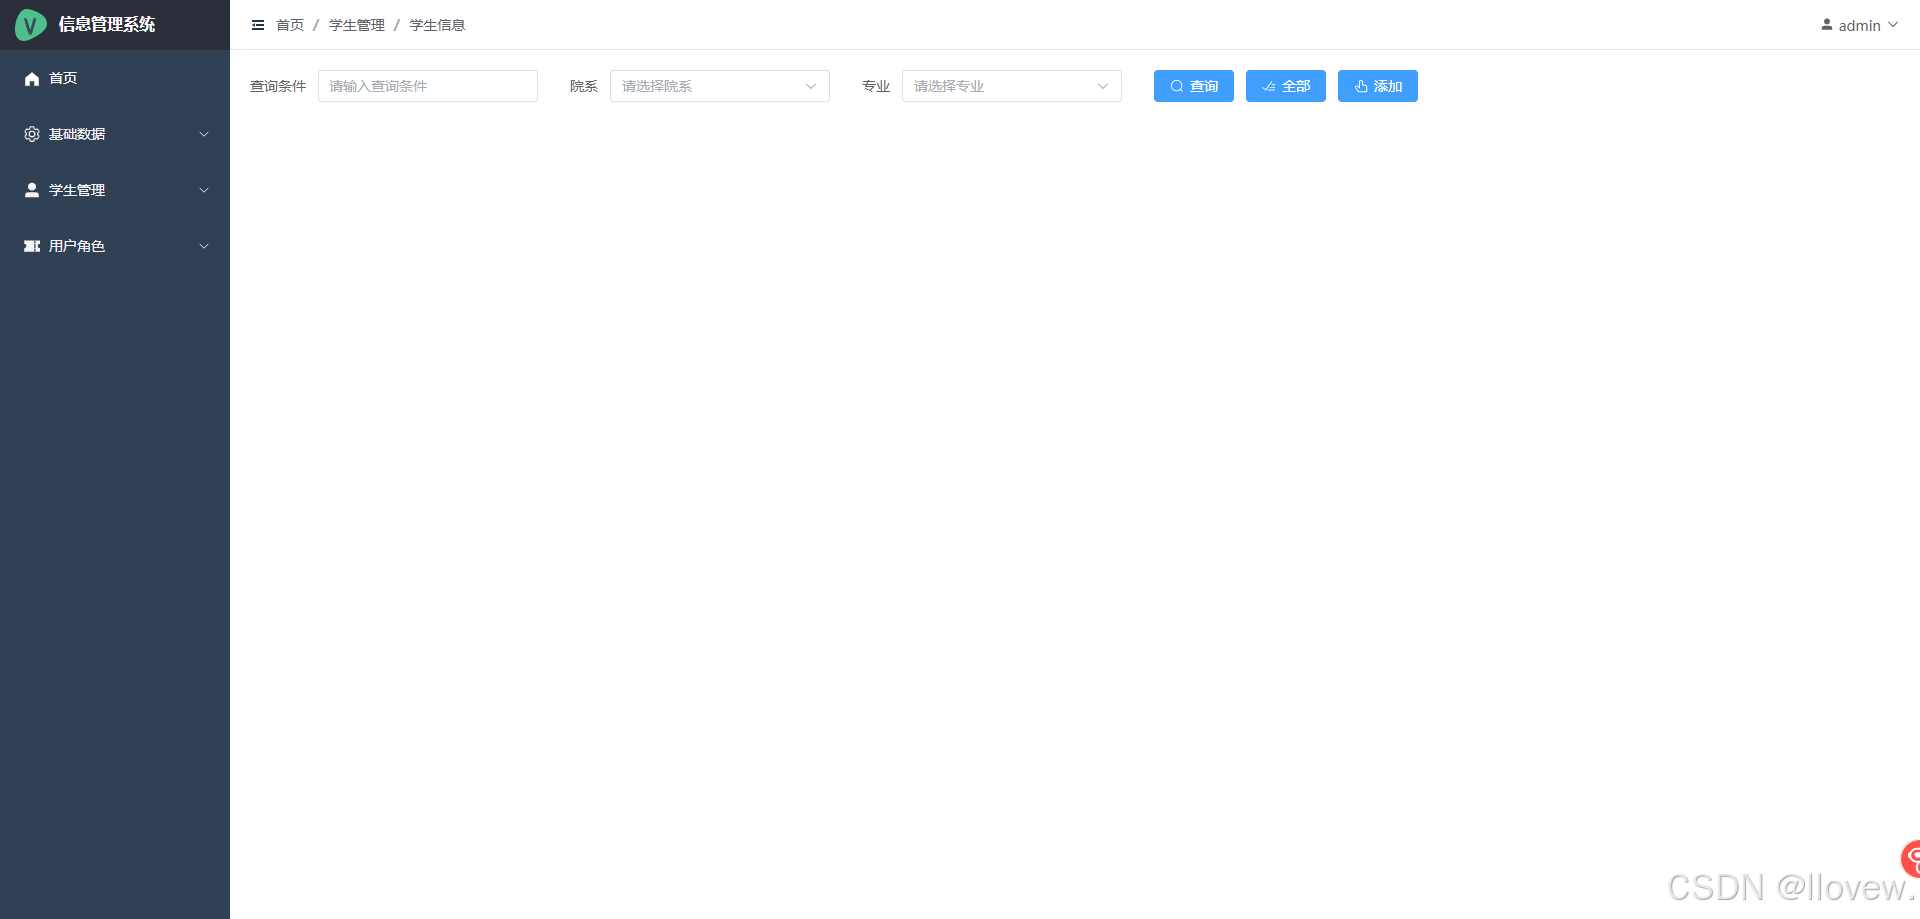
- 学生信息详情布局实现
<script lang="ts" setup>
import { ref, reactive } from "vue"
import {More,Edit,Delete} from "@element-plus/icons-vue"// 定义存储集合
var Data = reactive({// ===表格区域定义====students: reactive([{sno:'95001',name:'张武',gender:'男',birthday: '2001-10-10',faculty: '计算机学院',major:'计算机网络',mobile: '13514623594',email: '123@163.com',address: '郑州市金水区'},{sno:'95001',name:'张武',gender:'男',birthday: '2001-10-10',faculty: '计算机学院',major:'计算机网络',mobile: '13514623594',email: '123@163.com',address: '郑州市金水区'}]),});</script><template><!-- 2.表格信息部分 --><el-table :data="Data.students" stripe border style="width: 100%" :header-cell-style="{ backgroundColor:'#409EFF',color:'#FFF',FontSize:'14px' }"><el-table-column label="序号" type="index" align="center" width="60" /><el-table-column prop="sno" label="学号" align="center" width="80" /><el-table-column prop="name" label="姓名" align="center" width="80" /><el-table-column prop="gender" label="性别" align="center" width="80"  /><el-table-column prop="birthday" label="出生日期" align="center" width="180" /><el-table-column prop="faculty" label="院系" align="center" width="120" /><el-table-column prop="major" label="专业" align="center" width="120" /><el-table-column prop="mobile" label="电话" align="center" width="140" /><el-table-column prop="email" label="Email" align="center" width="180" /><el-table-column prop="address" label="地址" align="center"/><!-- 按钮区域 --><el-table-column label="操作" align="center"><el-button type="primary" :icon="More" circle size="small"/><el-button type="warning" :icon="Edit" circle size="small"/><el-button type="danger" :icon="Delete" circle size="small"/></el-table-column></el-table></template><style scoped>
.demo-form-inline .el-input {--el-input-width: 220px;
}.demo-form-inline .el-select {--el-select-width: 220px;
}</style>- 底部分页实现
<script lang="ts" setup>
import { ref, reactive } from "vue"
import {More,Edit,Delete} from "@element-plus/icons-vue"// 定义存储集合
var Data = reactive({// =====分页====// 当前页currentsPage: ref(1),// 每页显示的数据量pageSize: ref(15),// 总数据量所有记录条数total: ref(0),
});// 分页中修改每页的pageSize
const handleSizeChange=()=>{}// 分页中修改每页的currentsPage
const handleCurrentChange=()=>{}
</script><template><!-- 3.分页 currentPage4当前页 pageSize4每页大小 total记录条数 handleSizeChange改变每页大小 handleCurrentChange改变当前页  --><el-pagination style="margin-top: 20px;"backgroundv-model:current-page="Data.currentsPage"v-model:page-size="Data.pageSize":page-sizes="[10, 12, 15, 18,20,25,40,50]"layout="total, sizes, prev, pager, next, jumper":total="Data.total"@size-change="handleSizeChange"@current-change="handleCurrentChange"/>
</template><style scoped>
.demo-form-inline .el-input {--el-input-width: 220px;
}.demo-form-inline .el-select {--el-select-width: 220px;
}</style>- Element Plus中文化
// 全局定义
import zhCn from 'element-plus/es/locale/lang/zh-cn' // 导入中文语言包// 创建app
const app= createApp(App)// 添加 locale:zhCn
app.use(store).use(router).use(ElementPlus,{locale:zhCn}).mount('#app')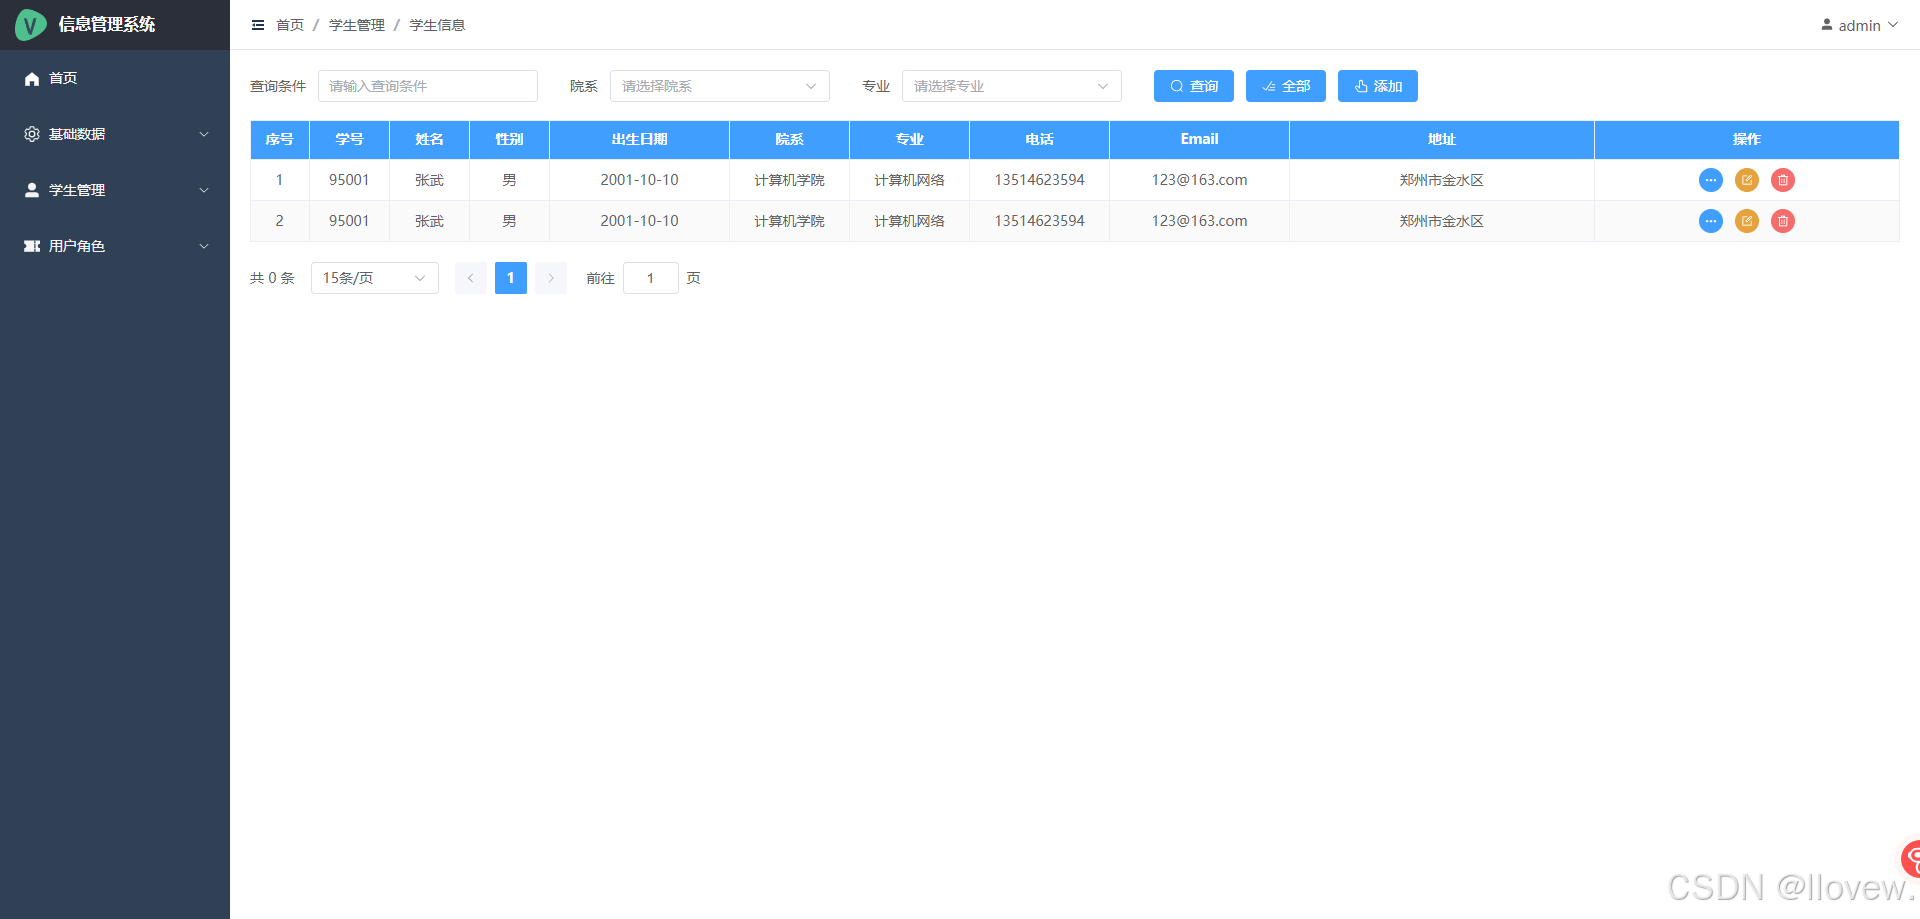
相关文章:
Vue+Element Plus后台管理主界面搭建实现
续接Django REST Framework,使用Vite构建Vue3的前端项目 1. 后台管理系统主界面框架搭建 后台系统主界面搭建 新建后台管理文件目录 完成后台整体布局 // 1.主界面 index.vue<script setup lang"ts"></script><template><el-…...

JAVA—异常
认识异常,学会从报错信息中发现问题,解决问题。并学会构建自定义异常,提醒编程时注意 目录 1.认识异常 2.自定义异常 1.自定义运行时异常 2.自定义编译时异常 3.异常的处理 1.认识异常 异常就是代表程序出现的问题,用来查询B…...

常见八股面试题:Dubbo 和 Spring Cloud Gateway 有什么区别?
大家好,我是鸭鸭! 此答案节选自鸭鸭最近弄的面试刷题神器面试鸭,更多大厂常问面试题,可以点击进行阅读哈! 目前这个面试刷题神器刚出,有网页和小程序双端可以阅读! 回归面试题! …...

k8s分布式存储-ceph
文章目录 Cephdeploy-ceph部署1.系统环境初始化1.1 修改主机名,DNS解析1.2 时间同步1.3 配置apt基础源与ceph源1.4关闭selinux与防火墙1.5 **创建** ceph **集群部署用户** cephadmin1.6分发密钥 2. ceph部署2.1 **安装** ceph 部署工具2.2 **初始化** mon **节点**…...

Redis cluster集群部署
redis搭建集群模式、Cluster模式(6节点,3主3从集群模式,添加删除节点)_redis cluster节点带数据增减-CSDN博客...

Java泛型的理解
前言 泛型是Java中一个比较重要的特性,是于JDK5引入新特性,其主要目的是为了提供编译时的类型安全检测机制和简化代码。本文主要探讨一下泛型的使用。 假如说没有泛型 假如说没有泛型,可以举一个例子: ArrayList list new Ar…...

Linux 照片图像编辑器
前言 照片图像编辑器是一种软件程序,它允许用户对数字照片或图像进行各种编辑和修改。以下是一些常见的功能及其解释: 裁剪与旋转 : 裁剪:移除图像的某些部分,以改善构图或符合特定尺寸要求。旋转:改变图像的方向,可以校正歪斜的照片或者为了艺术效果而旋转。调整亮度…...
【51单片机仿真】基于51单片机设计的智能六位密码锁(匿*输入/密码修改/警示/保存/恢复/初始密码)源码仿真设计文档演示视频——文末资料下载
基于51单片机设计的智能六位密码锁 演示视频 基于51单片机设计的智能六位密码锁 功能简介 - 能够从键盘中输入密码,并相应地在显示器上显示"*" - 能够判断密码是否正确,正确则开锁,错误则输出相应信息 - 能够实现密码的修改 -…...

【Vue3】组件通信之mitt
【Vue3】组件通信之mitt 背景简介开发环境开发步骤及源码总结 背景 随着年龄的增长,很多曾经烂熟于心的技术原理已被岁月摩擦得愈发模糊起来,技术出身的人总是很难放下一些执念,遂将这些知识整理成文,以纪念曾经努力学习奋斗的日…...
状态压缩动态规划——状压dp
状压dp:意思是将状态进行压缩,从而更容易地写出状态转移方程 通常做法:将每个状态(一个集合)用二进制表示,每个位的1就代表着这个编号的元素存在,0就代表着这个编号的元素不存在,如…...

【算法】最短路径算法思路小结
一、基础:二叉树的遍历->图的遍历 提到搜索算法,就不得不说两个最基础的思想: BFS(Breadth First Search)广度优先搜索 DFS(Depth First Search)深度优先搜索 刚开始是在二叉树遍历中接触这…...
zabbix7.0TLS-05-快速入门-触发器
文章目录 1 概述2 查看主机的触发器3 添加触发器3.1 触发器配置项介绍3.2 扩展文档3.2.1 关于配置项中每个键值返回值的说明3.2.2 触发器函数文档 4 验证触发器5 问题5.1 查了问题总列表5.2 查看问题详情5.3 更新处理问题5.4 查看已经处理的问题 6 问题恢复 1 概述 监控项用于…...

vue关于双向数据绑定的骚操作
组件传值大家都知道 直接上代码 computed: {optionModel: {get() {return this.selectedWidget.options;},set(newValue) {this.selectedWidget.options newValue;}}} 我们将optionModel传递给子组件 子组件可以直接修改props 来实现双向数据绑定 但是正常来时我们是不能修…...

基于Jeecgboot3.6.3的vue3版本的流程中仿钉钉流程的鼠标拖动功能支持
因为这个项目license问题无法开源,更多技术支持与服务请加入我的知识星球。 1、因为原先仿钉钉流程里不能进行鼠标拖动来查看流程,所以根据作者提供的信息进行修改,在hooks下增加下面文件useDraggableScroll.ts import { ref, onMounted, on…...
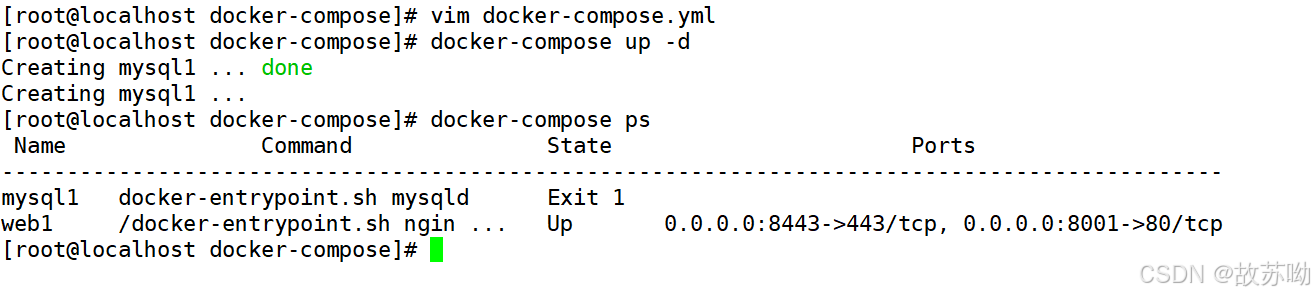
Docker Compse单机编排
一.Docker Compse 介绍 Docker Compose 是一个用于定义和运行多容器 Docker 应用程序的工具。通过 Compose,你可以使用 YAML 文件来配置应用程序的服务、网络和卷,然后使用单个命令创建和启动所有服务。这使得在开发、测试和部署过程中管理多容器应用程…...

“AI+Security”系列第2期(一):对抗!大模型自身安全的攻防博弈
近日,由安全极客、Wisemodel 社区和 InForSec 网络安全研究国际学术论坛联合主办的“AISecurity”系列第 2 期——对抗!大模型自身安全的攻防博弈线上活动如期举行。本次活动邀请了君同未来创始人兼 CEO 韩蒙、前阿里云高级安全专家郑瀚、ChaMd5 AI 组负…...

Python Static Typing: 提升代码可靠性与可读性的使用技巧
💝💝💝欢迎莅临我的博客,很高兴能够在这里和您见面!希望您在这里可以感受到一份轻松愉快的氛围,不仅可以获得有趣的内容和知识,也可以畅所欲言、分享您的想法和见解。 推荐:「storm…...

Datawhale多模态赛事(1)
赛事说明:https://tianchi.aliyun.com/competition/entrance/532251/introduction?spma2c22.12281925.0.0.2f307137p8qZmp 学习平台:https://linklearner.com/home 第一天 1.报名赛道学习赛事 https://tianchi.aliyun.com/competition/entrance/53225…...

云手机在海外社交媒体运营中的作用
随着社交媒体的全球普及,海外社交媒体运营成为众多企业与个人提升品牌影响力和扩大市场份额的重要策略。在这一进程中,海外云手机以其独特的功能,为海外社交媒体运营提供了强大的支持。 那么,海外云手机在海外社交媒体运营中究竟扮…...

Ubuntu怎么进入救援模式或单用户模式
进入救援模式(Rescue Mode)或单用户模式(Single User Mode)的方法取决于你所使用的Linux发行版。以下是通用的步骤,适用于大多数基于GRUB引导的系统,如Ubuntu、Debian、CentOS等: 重启你的系统。…...

基于SpringBoot + Vue的定制化设计服务平台
文章目录前言一、详细操作演示视频二、具体实现截图三、技术栈1.前端-Vue.js2.后端-SpringBoot3.数据库-MySQL4.系统架构-B/S四、系统测试1.系统测试概述2.系统功能测试3.系统测试结论五、项目代码参考六、数据库代码参考七、项目论文示例结语前言 💛博主介绍&#…...

告别第三方平台!手把手教你用photo-sphere-viewer在小程序H5里嵌入VR全景图
告别第三方平台!手把手教你用photo-sphere-viewer在小程序H5里嵌入VR全景图 在数字化营销日益重要的今天,VR全景展示已经成为房地产、家居、旅游等行业提升用户体验的标配功能。传统做法是依赖第三方VR云服务平台,但这往往意味着高昂的费用、…...

OpenClaw技能开发指南:为SecGPT-14B定制专属安全检测模块
OpenClaw技能开发指南:为SecGPT-14B定制专属安全检测模块 1. 为什么需要为SecGPT-14B开发OpenClaw技能? 去年我在做安全审计时,经常需要手动将二进制文件上传到不同检测平台,再人工整理漏洞报告。这种重复劳动让我开始思考&…...

Linux系统线程数量限制与优化指南
1. 进程与线程基础概念回顾在深入探讨进程能创建多少线程之前,我们需要先明确几个基本概念。进程是操作系统资源分配的基本单位,而线程则是CPU调度的基本单位。每个进程至少包含一个主线程,这个主线程可以创建其他子线程。线程与进程最大的区…...
完全指南:从入门到流片前的最后一道防线】)
【芯片后仿(Post-Silicon Simulation)完全指南:从入门到流片前的最后一道防线】
一、什么是后仿?为什么要做后仿?后仿,全称Post Netlist Simulation(Post-Sim)或Gate Level Simulation(GLS),是指在RTL代码综合成门级网表后,通过反标SDF(Sta…...
用于函数寻优研究附Matlab代码)
一种改进的鹈鹕优化算法(IPOA)用于函数寻优研究附Matlab代码
✅作者简介:热爱科研的Matlab仿真开发者,擅长数据处理、建模仿真、程序设计、完整代码获取、论文复现及科研仿真。🍎 往期回顾关注个人主页:Matlab科研工作室🍊个人信条:格物致知,完整Matlab代码及仿真咨询…...

欧洲发布Euro-Office引发OnlyOffice强烈抗议
欧洲企业Ionos和Nextcloud联合推出了Euro-Office,这是基于OnlyOffice云办公套件的分支版本,专为对数字主权有顾虑的组织而设计,此举引发了原开发商的愤怒回应。几天前,以德国自托管云服务商Nextcloud为首的"欧洲企业和社区组…...
)
保姆级教程:用AutoDL租4090显卡,在PyCharm里远程复现具身智能论文PAI0(附完整避坑清单)
零基础实战:AutoDLPyCharm复现PAI0具身智能论文全流程指南 第一次接触云端GPU服务器和远程开发?别担心,这篇教程会手把手带你用AutoDL租用4090显卡,并通过PyCharm实现无缝远程开发,完整复现具身智能领域的前沿论文PAI0…...

Chrome for Testing 终极配置指南:5个实战技巧让浏览器自动化测试更高效
Chrome for Testing 终极配置指南:5个实战技巧让浏览器自动化测试更高效 【免费下载链接】chrome-for-testing 项目地址: https://gitcode.com/gh_mirrors/ch/chrome-for-testing Chrome for Testing 是 GoogleChromeLabs 团队专门为浏览器自动化测试设计的…...
开尔文电桥在功率半导体中的实战解析)
桥式电路(三)开尔文电桥在功率半导体中的实战解析
1. 从测量误差到功率革命:开尔文电桥的前世今生 1862年的实验室里,威廉汤姆森(后来的开尔文勋爵)正为小电阻测量中的诡异误差头疼不已。他发现当被测电阻低于1Ω时,连接点的接触电阻和引线电阻会彻底扭曲测量结果——这…...