【Kubernetes】linux centos安装部署Kubernetes集群
【Kubernetes】centos安装Kubernetes集群
1、环境准备
系统centos7
配置yum源参考文章 Centos系统换yum源
yum -y update
步骤1-3是所有主机都要配置,主机名和hosts配置完后可以使用工具命令同步

1.1 主机
一主二从
| 主机名 | ip |
|---|---|
| k8smaster | 192.168.59.148 |
| k8snode1 | 192.168.59.149 |
| k8snode2 | 192.168.59.150 |
分别设置主机名并添加hosts映射
hostnamectl set-hostname k8smaster
vim /etc/hosts192.168.59.148 k8smaster
192.168.59.149 k8snode1
192.168.59.150 k8snode2
配置参考,127.0.0.1 也要加上当前主机名

测试

1.2 关闭selinux和firewalld
systemctl stop firewalld
systemctl disable firewalld
sed -i 's/enforcing/disabled/' /etc/selinux/config
setenforce 0
1.3 禁止swap分区
swapoff -a
1.4 将桥接的IPv4流量传递到iptables的链
cat > /etc/sysctl.d/k8s.conf << EOF
net.ipv4.ip_forward = 1
net.ipv4.tcp_tw_recycle = 0
net.bridge.bridge-nf-call-ip6tables = 1
net.bridge.bridge-nf-call-iptables = 1
EOF
sysctl --system
2、安装部署docker
安装推荐文章 Linux环境下docker安装
简单的docker安装
yum install ca-certificates curl -y
yum install docker-ce docker-ce-cli containerd.io docker-buildx-plugin docker-compose-plugin -y
配置参考
vim /etc/docker/daemon.json
{
"registry-mirrors": ["https://hub-mirror.c.163.com","https://registry.aliyuncs.com","https://registry.docker-cn.com","https://docker.mirrors.ustc.edu.cn"],
"data-root": "/data/docker",
"exec-opts": ["native.cgroupdriver=systemd"],
"log-driver": "json-file",
"log-opts": { "max-size": "300m","max-file": "3" },
"live-restore": true
}
#查看是否启动
service docker status
service docker start #启动
#设置开机自启
systemctl enable docker && systemctl restart docker && systemctl status docker#基本信息
docker info
docker-compose安装 docker-compose版本要自己去github看
containerd 配置文件参考
vim /etc/containerd/conf.toml
disabled_plugins = []
imports = []
oom_score = 0
plugin_dir = ""
required_plugins = []
root = "/var/lib/containerd"
state = "/run/containerd"
temp = ""
version = 2[cgroup]path = ""[debug]address = ""format = ""gid = 0level = ""uid = 0[grpc]address = "/run/containerd/containerd.sock"gid = 0max_recv_message_size = 16777216max_send_message_size = 16777216tcp_address = ""tcp_tls_ca = ""tcp_tls_cert = ""tcp_tls_key = ""uid = 0[metrics]address = ""grpc_histogram = false[plugins][plugins."io.containerd.gc.v1.scheduler"]deletion_threshold = 0mutation_threshold = 100pause_threshold = 0.02schedule_delay = "0s"startup_delay = "100ms"[plugins."io.containerd.grpc.v1.cri"]device_ownership_from_security_context = falsedisable_apparmor = falsedisable_cgroup = falsedisable_hugetlb_controller = truedisable_proc_mount = falsedisable_tcp_service = trueenable_selinux = falseenable_tls_streaming = falseenable_unprivileged_icmp = falseenable_unprivileged_ports = falseignore_image_defined_volumes = falsemax_concurrent_downloads = 3max_container_log_line_size = 16384netns_mounts_under_state_dir = falserestrict_oom_score_adj = falsesandbox_image = "registry.aliyuncs.com/google_containers/pause:3.6"selinux_category_range = 1024stats_collect_period = 10stream_idle_timeout = "4h0m0s"stream_server_address = "127.0.0.1"stream_server_port = "0"systemd_cgroup = falsetolerate_missing_hugetlb_controller = trueunset_seccomp_profile = ""[plugins."io.containerd.grpc.v1.cri".cni]bin_dir = "/opt/cni/bin"conf_dir = "/etc/cni/net.d"conf_template = ""ip_pref = ""max_conf_num = 1[plugins."io.containerd.grpc.v1.cri".containerd]default_runtime_name = "runc"disable_snapshot_annotations = truediscard_unpacked_layers = falseignore_rdt_not_enabled_errors = falseno_pivot = falsesnapshotter = "overlayfs"[plugins."io.containerd.grpc.v1.cri".containerd.default_runtime]base_runtime_spec = ""cni_conf_dir = ""cni_max_conf_num = 0container_annotations = []pod_annotations = []privileged_without_host_devices = falseruntime_engine = ""runtime_path = ""runtime_root = ""runtime_type = ""[plugins."io.containerd.grpc.v1.cri".containerd.default_runtime.options][plugins."io.containerd.grpc.v1.cri".containerd.runtimes][plugins."io.containerd.grpc.v1.cri".containerd.runtimes.runc]base_runtime_spec = ""cni_conf_dir = ""cni_max_conf_num = 0container_annotations = []pod_annotations = []privileged_without_host_devices = falseruntime_engine = ""runtime_path = ""runtime_root = ""runtime_type = "io.containerd.runc.v2"[plugins."io.containerd.grpc.v1.cri".containerd.runtimes.runc.options]BinaryName = ""CriuImagePath = ""CriuPath = ""CriuWorkPath = ""IoGid = 0IoUid = 0NoNewKeyring = falseNoPivotRoot = falseRoot = ""ShimCgroup = ""SystemdCgroup = true[plugins."io.containerd.grpc.v1.cri".containerd.untrusted_workload_runtime]base_runtime_spec = ""cni_conf_dir = ""cni_max_conf_num = 0container_annotations = []pod_annotations = []privileged_without_host_devices = falseruntime_engine = ""runtime_path = ""runtime_root = ""runtime_type = ""[plugins."io.containerd.grpc.v1.cri".containerd.untrusted_workload_runtime.options][plugins."io.containerd.grpc.v1.cri".image_decryption]key_model = "node"[plugins."io.containerd.grpc.v1.cri".registry]config_path = ""[plugins."io.containerd.grpc.v1.cri".registry.auths][plugins."io.containerd.grpc.v1.cri".registry.configs][plugins."io.containerd.grpc.v1.cri".registry.configs."k8smaster:5000".tls]insecure_skip_verify = true[plugins."io.containerd.grpc.v1.cri".registry.headers][plugins."io.containerd.grpc.v1.cri".registry.mirrors][plugins."io.containerd.grpc.v1.cri".registry.mirrors."k8smaster:5000"]endpoint = ["http://k8smaster:5000"][plugins."io.containerd.grpc.v1.cri".x509_key_pair_streaming]tls_cert_file = ""tls_key_file = ""[plugins."io.containerd.internal.v1.opt"]path = "/opt/containerd"[plugins."io.containerd.internal.v1.restart"]interval = "10s"[plugins."io.containerd.internal.v1.tracing"]sampling_ratio = 1.0service_name = "containerd"[plugins."io.containerd.metadata.v1.bolt"]content_sharing_policy = "shared"[plugins."io.containerd.monitor.v1.cgroups"]no_prometheus = false[plugins."io.containerd.runtime.v1.linux"]no_shim = falseruntime = "runc"runtime_root = ""shim = "containerd-shim"shim_debug = false[plugins."io.containerd.runtime.v2.task"]platforms = ["linux/amd64"]sched_core = false[plugins."io.containerd.service.v1.diff-service"]default = ["walking"][plugins."io.containerd.service.v1.tasks-service"]rdt_config_file = ""[plugins."io.containerd.snapshotter.v1.aufs"]root_path = ""[plugins."io.containerd.snapshotter.v1.btrfs"]root_path = ""[plugins."io.containerd.snapshotter.v1.devmapper"]async_remove = falsebase_image_size = ""discard_blocks = falsefs_options = ""fs_type = ""pool_name = ""root_path = ""[plugins."io.containerd.snapshotter.v1.native"]root_path = ""[plugins."io.containerd.snapshotter.v1.overlayfs"]root_path = ""upperdir_label = false[plugins."io.containerd.snapshotter.v1.zfs"]root_path = ""[plugins."io.containerd.tracing.processor.v1.otlp"]endpoint = ""insecure = falseprotocol = ""[proxy_plugins][stream_processors][stream_processors."io.containerd.ocicrypt.decoder.v1.tar"]accepts = ["application/vnd.oci.image.layer.v1.tar+encrypted"]args = ["--decryption-keys-path", "/etc/containerd/ocicrypt/keys"]env = ["OCICRYPT_KEYPROVIDER_CONFIG=/etc/containerd/ocicrypt/ocicrypt_keyprovider.conf"]path = "ctd-decoder"returns = "application/vnd.oci.image.layer.v1.tar"[stream_processors."io.containerd.ocicrypt.decoder.v1.tar.gzip"]accepts = ["application/vnd.oci.image.layer.v1.tar+gzip+encrypted"]args = ["--decryption-keys-path", "/etc/containerd/ocicrypt/keys"]env = ["OCICRYPT_KEYPROVIDER_CONFIG=/etc/containerd/ocicrypt/ocicrypt_keyprovider.conf"]path = "ctd-decoder"returns = "application/vnd.oci.image.layer.v1.tar+gzip"[timeouts]"io.containerd.timeout.bolt.open" = "0s""io.containerd.timeout.shim.cleanup" = "5s""io.containerd.timeout.shim.load" = "5s""io.containerd.timeout.shim.shutdown" = "3s""io.containerd.timeout.task.state" = "2s"[ttrpc]address = ""gid = 0uid = 0
3、部署k8s基础命令
3.1 添加k8s阿里云的yum源
cat > /etc/yum.repos.d/kubernetes.repo << EOF[kubernetes]
name=Kubernetes
baseurl=https://mirrors.aliyun.com/kubernetes/yum/repos/kubernetes-el7-x86_64
enabled=1
gpgcheck=0
repo_gpgcheck=0
gpgkey=https://mirrors.aliyun.com/kubernetes/yum/doc/yum-key.gpg https://mirrors.aliyun.com/kubernetes/yum/doc/rpm-package-key.gpg
EOF
或者用vim
vim /etc/yum.repos.d/kubernetes.repo
[kubernetes]
name=Kubernetes
baseurl=https://mirrors.aliyun.com/kubernetes/yum/repos/kubernetes-el7-x86_64
enabled=1
gpgcheck=0
repo_gpgcheck=0
gpgkey=https://mirrors.aliyun.com/kubernetes/yum/doc/yum-key.gpg https://mirrors.aliyun.com/kubernetes/yum/doc/rpm-package-key.gpg
3.2 查看最新可安装的软件
yum --disablerepo="*" --enablerepo="kubernetes" list available

3.3 安装kubeadm、kubectl、kubelet
我这里装的版本是1.28.2
yum install -y kubelet-1.28.2 kubeadm-1.28.2 kubectl-1.28.2
systemctl start kubelet
systemctl enable kubelet
#查看错误日志
journalctl -u kubelet
4、部署集群
查询各个组件的版本
kubeadm config images list

4.1 初始化master
只要在主节点上执行
kubeadm init --kubernetes-version=1.28.13 \
--apiserver-advertise-address=192.168.59.148 \
--image-repository registry.aliyuncs.com/google_containers \
--service-cidr=10.140.0.0/16 \
--pod-network-cidr=10.244.0.0/16
参数注释:
–apiserver-advertise-address
指明用Master的哪个interface与Cluster 的其他节点通信。 如果Master有多个interface, 建议明确指定, 如果 不指定, kubeadm会自动选择有默认网关的interface。
–pod-network-cidr
选择一个Pod网络插件,并检查它是否需要在初始化Master时指定一些参数,它的值取决于你在下一步选择的哪个网络网络插件,这里选择Flannel的网络插件参数为 10.244.0.0/16。Calico网络为192.168.0.0/16。参考:Installing a pod network add-on
-service-cidr
选择service网络
–image-repository
使用kubeadm config images pull来预先拉取初始化需要用到的镜像,用来检查是否能连接到Kubenetes的Registries。Kubenetes默认Registries地址是k8s.gcr.io,很明显,在国内并不能访问gcr.io,因此在kubeadm v1.13之前的版本,安装起来非常麻烦,但是在1.13版本中终于解决了国内的痛点,其增加了一个–image-repository参数,默认值是k8s.gcr.io,我们将其指定为国内镜像地址:registry.aliyuncs.com/google_containers。
–kubernetes-version
默认值是stable-1,会导致从https://dl.k8s.io/release/stable-1.txt下载最新的版本号,我们可以将其指定为固定版本来跳过网络请求。
4.2 报错以及问题处理
查看报错命令
journalctl -xeu kubelet
问题一
node节点也要注释掉
[init] Using Kubernetes version: v1.28.13
[preflight] Running pre-flight checks
error execution phase preflight: [preflight] Some fatal errors occurred:
[ERROR CRI]: container runtime is not running: output: time=“2024-09-12T14:01:03+08:00” level=fatal msg=“validate service connection: CRI v1 runtime API is not implemented for endpoint “unix:///var/run/containerd/containerd.sock”: rpc error: code = Unimplemented desc = unknown service runtime.v1.RuntimeService”
, error: exit status 1
[preflight] If you know what you are doing, you can make a check non-fatal with--ignore-preflight-errors=...
To see the stack trace of this error execute with --v=5 or higher
查看版本没问题,看看有没有启动
[root@localhost home]# containerd -v
containerd containerd.io 1.6.33 d2d58213f83a351ca8f528a95fbd145f5654e957
[root@localhost home]# docker -v
Docker version 26.1.4, build 5650f9b
编辑以下文件,将下面一行内容注释掉
vim /etc/containerd/config.toml
#disabled_plugins = [“cri”]
原因:containerd安装的默认禁用(重点)
使用安装包安装的containerd会默认禁用作为容器运行时的功能,即安装包安装containerd后默认禁用containerd作为容器运行时
这个时候使用k8s就会报错了,因为没有容器运行时可以用
开启方法就是将/etc/containerd/config.toml文件中的disabled_plugins的值的列表中不包含cri
修改后重启containerd才会生效
systemctl restart containerd
问题二
如果kubernets初始化时失败后,第二次再次执行会初始化命令会报错,这时需要进行重置
[root@localhost home]# kubeadm init --kubernetes-version=1.28.13 --apiserver-advertise-address=192.168.59.148 --image-repository registry.aliyuncs.com/google_containers --service-cidr=10.140.0.0/16 --pod-network-cidr=10.244.0.0/16
[init] Using Kubernetes version: v1.28.13
[preflight] Running pre-flight checks
error execution phase preflight: [preflight] Some fatal errors occurred:
[ERROR Port-6443]: Port 6443 is in use
[ERROR Port-10259]: Port 10259 is in use
[ERROR Port-10257]: Port 10257 is in use
[ERROR FileAvailable–etc-kubernetes-manifests-kube-apiserver.yaml]: /etc/kubernetes/manifests/kube-apiserver.yaml already exists
[ERROR FileAvailable–etc-kubernetes-manifests-kube-controller-manager.yaml]: /etc/kubernetes/manifests/kube-controller-manager.yaml already exists
[ERROR FileAvailable–etc-kubernetes-manifests-kube-scheduler.yaml]: /etc/kubernetes/manifests/kube-scheduler.yaml already exists
[ERROR FileAvailable–etc-kubernetes-manifests-etcd.yaml]: /etc/kubernetes/manifests/etcd.yaml already exists
[ERROR Port-10250]: Port 10250 is in use
[ERROR Port-2379]: Port 2379 is in use
[ERROR Port-2380]: Port 2380 is in use
[ERROR DirAvailable–var-lib-etcd]: /var/lib/etcd is not empty
[preflight] If you know what you are doing, you can make a check non-fatal with--ignore-preflight-errors=...
To see the stack trace of this error execute with --v=5 or higher
解决方法
kubeadm reset
问题三
驱动加载 这个问题我没遇到
执行下面这两个命令
modprobe br_netfilter
bridge
问题四
Unfortunately, an error has occurred:
timed out waiting for the conditionThis error is likely caused by:
- The kubelet is not running
- The kubelet is unhealthy due to a misconfiguration of the node in some way (required cgroups disabled)
If you are on a systemd-powered system, you can try to troubleshoot the error with the following commands:
- ‘systemctl status kubelet’
- ‘journalctl -xeu kubelet’
Additionally, a control plane component may have crashed or exited when started by the container runtime.
To troubleshoot, list all containers using your preferred container runtimes CLI.
Here is one example how you may list all running Kubernetes containers by using crictl:
- ‘crictl --runtime-endpoint unix:///var/run/containerd/containerd.sock ps -a | grep kube | grep -v pause’
Once you have found the failing container, you can inspect its logs with:
- ‘crictl --runtime-endpoint unix:///var/run/containerd/containerd.sock logs CONTAINERID’
error execution phase wait-control-plane: couldn’t initialize a Kubernetes cluster
To see the stack trace of this error execute with --v=5 or higher
使用 journalctl -xeu kubelet 查看报错
failed to resolve reference \"registry.k8s.io/pause:3.6
解决方法:
#生成 containerd 的默认配置文件
containerd config default > /etc/containerd/config.toml
#查看 sandbox 的默认镜像仓库在文件中的第几行
cat /etc/containerd/config.toml | grep -n “sandbox_image”
#使用 vim 编辑器 定位到 sandbox_image,将 仓库地址修改成 registry.aliyuncs.com/google_containers/pause:3.6
vim /etc/containerd/config.toml
sandbox_image = “registry.aliyuncs.com/google_containers/pause:3.6”
#重启 containerd 服务
systemctl daemon-reload
systemctl restart containerd.service
记得要
kubeadm reset
4.3执行成功
Your Kubernetes control-plane has initialized successfully!To start using your cluster, you need to run the following as a regular user:mkdir -p $HOME/.kubesudo cp -i /etc/kubernetes/admin.conf $HOME/.kube/configsudo chown $(id -u):$(id -g) $HOME/.kube/configAlternatively, if you are the root user, you can run:export KUBECONFIG=/etc/kubernetes/admin.confYou should now deploy a pod network to the cluster.
Run "kubectl apply -f [podnetwork].yaml" with one of the options listed at:https://kubernetes.io/docs/concepts/cluster-administration/addons/Then you can join any number of worker nodes by running the following on each as root:kubeadm join 192.168.59.148:6443 --token 3otopj.v2r7x7gcpa4j1tv3 \--discovery-token-ca-cert-hash sha256:b881ce5117a2ed28cb4f86963b462cc77976194c33c9314dbf4647f011354dc1
初始化完成后会生成一串命令用于node节点的加入
4.4关于token
token一般24小时候就会过期
查看当前token
[root@localhost home]# kubeadm token list
TOKEN                     TTL         EXPIRES                USAGES                   DESCRIPTION                                                EXTRA GROUPS
3otopj.v2r7x7gcpa4j1tv3   23h         2024-09-13T06:41:42Z   authentication,signing   The default bootstrap token generated by 'kubeadm init'.   system:bootstrappers:kubeadm:default-node-token
查看本机sha256值
openssl x509 -pubkey -in /etc/kubernetes/pki/ca.crt | openssl rsa -pubin -outform der
重新生成token
kubeadm token create
重新生成token并打印出join命令
kubeadm token create --print-join-command
如果要加入master节点,需要先生成certificate-key(1.16版本前参数为–experimental-upload-certs,1.16及1.16版本以后为–upload-certs)
kubeadm init phase upload-certs --upload-certs
结合上面join和certs的(同样,1.16版本前参数为–experimental-control-plane --certificate-key ,1.16及1.16版本以后为–control-plane --certificate-key)
kubeadm join 192.168.59.148:6443 --token fpjwdf.p9bnbqf7cpvf1amc --discovery-token-ca-cert-hash sha256:dd3cb5208a4ca032e85a5a30b9b02f963aff2fece13045cf8c74d7b9ed7f6098 --control-plane --certificate-key 820908fa5d83b9a7314a58147b80d0dc81b4f7469c9c8f72fb49b4fba2652c29
4.5配置kubectl
执行上面返回的命令
mkdir -p $HOME/.kube
sudo cp -i /etc/kubernetes/admin.conf $HOME/.kube/config
sudo chown $(id -u):$(id -g) $HOME/.kube/config
root用户执行永久生效
echo "export KUBECONFIG=/etc/kubernetes/admin.conf" > /etc/profile.d/kubeconfig.sh
source /etc/profile.d/kubeconfig.sh
不然就临时生效
export KUBECONFIG=/etc/kubernetes/admin.conf
将admin.conf拷贝到其他需要使用kunectl命令的node节点
scp /etc/kubernetes/admin.conf root@192.168.59.149:/etc/kubernetes/
scp /etc/kubernetes/admin.conf root@192.168.59.150:/etc/kubernetes/
一样执行生效
export KUBECONFIG=/etc/kubernetes/admin.conf
或者
echo “export KUBECONFIG=/etc/kubernetes/admin.conf” > /etc/profile.d/kubeconfig.sh
source /etc/profile.d/kubeconfig.sh
4.6加入节点
在除master外其他node节点执行上面的join命令,加入k8s集群
kubeadm join 192.168.59.148:6443 --token 3otopj.v2r7x7gcpa4j1tv3 --discovery-token-ca-cert-hash sha256:b881ce5117a2ed28cb4f86963b462cc77976194c33c9314dbf4647f011354dc1
加入成功
[root@localhost home]# kubeadm join 192.168.59.148:6443 --token 3otopj.v2r7x7gcpa4j1tv3 --discovery-token-ca-cert-hash sha256:b881ce5117a2ed28cb4f86963b462cc77976194c33c9314dbf4647f011354dc1
[preflight] Running pre-flight checks
[preflight] Reading configuration from the cluster...
[preflight] FYI: You can look at this config file with 'kubectl -n kube-system get cm kubeadm-config -o yaml'
[kubelet-start] Writing kubelet configuration to file "/var/lib/kubelet/config.yaml"
[kubelet-start] Writing kubelet environment file with flags to file "/var/lib/kubelet/kubeadm-flags.env"
[kubelet-start] Starting the kubelet
[kubelet-start] Waiting for the kubelet to perform the TLS Bootstrap...This node has joined the cluster:
* Certificate signing request was sent to apiserver and a response was received.
* The Kubelet was informed of the new secure connection details.Run 'kubectl get nodes' on the control-plane to see this node join the cluster.
查看节点
[root@localhost home]# kubectl get nodes
NAME        STATUS     ROLES           AGE   VERSION
k8smaster   NotReady   control-plane   32m   v1.28.2
k8snode1    NotReady   <none>          13s   v1.28.2
k8snode2    NotReady   <none>          5s    v1.28.2
4.7移除节点node
不移除的可以直接下一步
[root@localhost flanneld]# kubectl drain k8snode2 --delete-local-data --force --ignore-daemonsets
Flag --delete-local-data has been deprecated, This option is deprecated and will be deleted. Use --delete-emptydir-data.
node/k8snode2 cordoned
Warning: ignoring DaemonSet-managed Pods: kube-system/kube-proxy-p8cxh
evicting pod tigera-operator/tigera-operator-748c69cf45-9clh2pod/tigera-operator-748c69cf45-9clh2 evicted
node/k8snode2 drained
[root@localhost flanneld]# kubectl get nodes
NAME        STATUS                        ROLES           AGE     VERSION
k8smaster   Ready                         control-plane   3h13m   v1.28.2
k8snode1    NotReady                      <none>          161m    v1.28.2
k8snode2    NotReady,SchedulingDisabled   <none>          161m    v1.28.2
[root@localhost flanneld]# [root@localhost flanneld]# kubectl delete node k8snode2
node "k8snode2" deleted
[root@localhost flanneld]# pwd
/data/flanneld
[root@localhost flanneld]# cd /etc/kubernetes/
[root@localhost kubernetes]# ll
总用量 32
-rw-------. 1 root root 5650 9月  12 14:41 admin.conf
-rw-------. 1 root root 5682 9月  12 14:41 controller-manager.conf
-rw-------. 1 root root 1982 9月  12 14:41 kubelet.conf
drwxr-xr-x. 2 root root  113 9月  12 14:41 manifests
drwxr-xr-x. 3 root root 4096 9月  12 14:41 pki
-rw-------. 1 root root 5626 9月  12 14:41 scheduler.conf
[root@localhost kubernetes]# kubeadm reset -f
[reset] Reading configuration from the cluster...
[reset] FYI: You can look at this config file with 'kubectl -n kube-system get cm kubeadm-config -o yaml'
[preflight] Running pre-flight checks
[reset] Deleted contents of the etcd data directory: /var/lib/etcd
[reset] Stopping the kubelet service
[reset] Unmounting mounted directories in "/var/lib/kubelet"
[reset] Deleting contents of directories: [/etc/kubernetes/manifests /var/lib/kubelet /etc/kubernetes/pki]
[reset] Deleting files: [/etc/kubernetes/admin.conf /etc/kubernetes/kubelet.conf /etc/kubernetes/bootstrap-kubelet.conf /etc/kubernetes/controller-manager.conf /etc/kubernetes/scheduler.conf]The reset process does not clean CNI configuration. To do so, you must remove /etc/cni/net.dThe reset process does not reset or clean up iptables rules or IPVS tables.
If you wish to reset iptables, you must do so manually by using the "iptables" command.If your cluster was setup to utilize IPVS, run ipvsadm --clear (or similar)
to reset your system's IPVS tables.The reset process does not clean your kubeconfig files and you must remove them manually.
Please, check the contents of the $HOME/.kube/config file.
[root@localhost kubernetes]# ls
manifests  pki# 重新加入
上面的 kubeadm join
5、安装CNI网络插件
master上执行,安装flannel 网络插件
下载yaml文件,网咯会有波动,可以多wget几次
wget https://raw.githubusercontent.com/coreos/flannel/master/Documentation/kube-flannel.yml
注意,net-conf.json的Network配置 要是上面init pod-network-cidr的网段地址
vim kube-flannel.yml

安装插件
kubectl apply -f kube-flannel.yml
kubectl get pods -n kube-flannel
kubectl get nodes

出现问题
网络实际没连上
k8s flannel网络插件国内镜像docker拉取不到 docker.io/flannel/flannel:v0.25.6
解决方案:手动到github下载,然后docker构建
下载这两个 根据kube-flannel.yml里面的版本去找
flannel:v0.25.6
flannel-cni-plugin:v1.5.1-flannel2

[root@localhost flanneld]# docker import flannel-v0.25.6-linux-amd64.tar.gz flannel/flannel:v0.25.6
sha256:5c76b00ff15dfc6d452f1dcce31d7508e13363c9ab9beeddd90dd1a6204fcab8
[root@localhost flanneld]# docker import cni-plugin-flannel-linux-amd64-v1.5.1-flannel2.tgz flannel/flannel-cni-plugin:v1.5.1-flannel2
sha256:fd42d9ebb5885a5889bb0211e560b04b18dab401e3b63e777d4d1f358a847df6
构建成功会有两个包

将这两个打成tar包
[root@localhost flanneld]# docker images
REPOSITORY                   TAG               IMAGE ID       CREATED          SIZE
flannel/flannel-cni-plugin   v1.5.1-flannel2   fd42d9ebb588   12 minutes ago   2.54MB
flannel/flannel              v0.25.6           5c76b00ff15d   12 minutes ago   42.8MB
[root@localhost flanneld]# docker save flannel/flannel:v0.25.6
cowardly refusing to save to a terminal. Use the -o flag or redirect
[root@localhost flanneld]# docker save flannel/flannel:v0.25.6 -o flannel-v0.25.6.tar
[root@localhost flanneld]# ll
总用量 55832
-rw-r--r--. 1 root root  1080975 9月  12 16:30 cni-plugin-flannel-linux-amd64-v1.5.1-flannel2.tgz
-rw-r--r--. 1 root root 13305488 9月  12 16:15 flannel-v0.25.6-linux-amd64.tar.gz
-rw-------. 1 root root 42772992 9月  12 16:55 flannel-v0.25.6.tar
-rw-r--r--. 1 root root     4345 9月  12 15:41 kube-flannel.yml
[root@localhost flanneld]# docker save flannel/flannel-cni-plugin:v1.5.1-flannel2 -o cni-plugin-flannel-linux-amd64-v1.5.1-flannel2.tar
[root@localhost flanneld]# docker images
REPOSITORY                   TAG               IMAGE ID       CREATED          SIZE
flannel/flannel-cni-plugin   v1.5.1-flannel2   fd42d9ebb588   14 minutes ago   2.54MB
flannel/flannel              v0.25.6           5c76b00ff15d   15 minutes ago   42.8MB
[root@localhost flanneld]# ll
总用量 58336
-rw-------. 1 root root  2560512 9月  12 16:56 cni-plugin-flannel-linux-amd64-v1.5.1-flannel2.tar
-rw-r--r--. 1 root root  1080975 9月  12 16:30 cni-plugin-flannel-linux-amd64-v1.5.1-flannel2.tgz
-rw-r--r--. 1 root root 13305488 9月  12 16:15 flannel-v0.25.6-linux-amd64.tar.gz
-rw-------. 1 root root 42772992 9月  12 16:55 flannel-v0.25.6.tar
-rw-r--r--. 1 root root     4345 9月  12 15:41 kube-flannel.yml
[root@localhost flanneld]#
将tar镜像压缩包,导入到containerd的k8s.io命名空间中
[root@localhost flanneld]# ll
总用量 58336
-rw-------. 1 root root  2560512 9月  12 16:56 cni-plugin-flannel-linux-amd64-v1.5.1-flannel2.tar
-rw-r--r--. 1 root root  1080975 9月  12 16:30 cni-plugin-flannel-linux-amd64-v1.5.1-flannel2.tgz
-rw-r--r--. 1 root root 13305488 9月  12 16:15 flannel-v0.25.6-linux-amd64.tar.gz
-rw-------. 1 root root 42772992 9月  12 16:55 flannel-v0.25.6.tar
-rw-r--r--. 1 root root     4345 9月  12 15:41 kube-flannel.yml
[root@localhost flanneld]# sudo ctr -n k8s.io images import cni-plugin-flannel-linux-amd64-v1.5.1-flannel2.tar
unpacking docker.io/flannel/flannel-cni-plugin:v1.5.1-flannel2 (sha256:2e67e1ceda143a11deca57c0bd3145c9a1998d78d1084e3028c26ae6ceea233f)...done
[root@localhost flanneld]# sudo ctr -n k8s.io images import flannel-v0.25.6.tar
unpacking docker.io/flannel/flannel:v0.25.6 (sha256:7dcf8fbbc9e9acbe2e5e3e7321b74aa357a5f4246152f6539da903370fc3f999)...done
[root@localhost flanneld]#
检查是否成功
sudo ctr -n k8s.io i check | grep flannel

然后修改 kube-flannel.yml 文件

---
kind: Namespace
apiVersion: v1
metadata:name: kube-flannellabels:k8s-app: flannelpod-security.kubernetes.io/enforce: privileged
---
kind: ClusterRole
apiVersion: rbac.authorization.k8s.io/v1
metadata:labels:k8s-app: flannelname: flannel
rules:
- apiGroups:- ""resources:- podsverbs:- get
- apiGroups:- ""resources:- nodesverbs:- get- list- watch
- apiGroups:- ""resources:- nodes/statusverbs:- patch
---
kind: ClusterRoleBinding
apiVersion: rbac.authorization.k8s.io/v1
metadata:labels:k8s-app: flannelname: flannel
roleRef:apiGroup: rbac.authorization.k8s.iokind: ClusterRolename: flannel
subjects:
- kind: ServiceAccountname: flannelnamespace: kube-flannel
---
apiVersion: v1
kind: ServiceAccount
metadata:labels:k8s-app: flannelname: flannelnamespace: kube-flannel
---
kind: ConfigMap
apiVersion: v1
metadata:name: kube-flannel-cfgnamespace: kube-flannellabels:tier: nodek8s-app: flannelapp: flannel
data:cni-conf.json: |{"name": "cbr0","cniVersion": "0.3.1","plugins": [{"type": "flannel","delegate": {"hairpinMode": true,"isDefaultGateway": true}},{"type": "portmap","capabilities": {"portMappings": true}}]}net-conf.json: |{"Network": "10.244.0.0/16","EnableNFTables": false,"Backend": {"Type": "vxlan"}}
---
apiVersion: apps/v1
kind: DaemonSet
metadata:name: kube-flannel-dsnamespace: kube-flannellabels:tier: nodeapp: flannelk8s-app: flannel
spec:selector:matchLabels:app: flanneltemplate:metadata:labels:tier: nodeapp: flannelspec:affinity:nodeAffinity:requiredDuringSchedulingIgnoredDuringExecution:nodeSelectorTerms:- matchExpressions:- key: kubernetes.io/osoperator: Invalues:- linuxhostNetwork: truepriorityClassName: system-node-criticaltolerations:- operator: Existseffect: NoScheduleserviceAccountName: flannelinitContainers:- name: install-cni-pluginimage: docker.io/flannel/flannel-cni-plugin:v1.5.1-flannel2imagePullPolicy: Nevercommand:- cpargs:- -f- /flannel- /opt/cni/bin/flannelvolumeMounts:- name: cni-pluginmountPath: /opt/cni/bin- name: install-cniimage: docker.io/flannel/flannel:v0.25.6imagePullPolicy: Nevercommand:- cpargs:- -f- /etc/kube-flannel/cni-conf.json- /etc/cni/net.d/10-flannel.conflistvolumeMounts:- name: cnimountPath: /etc/cni/net.d- name: flannel-cfgmountPath: /etc/kube-flannel/containers:- name: kube-flannelimage: docker.io/flannel/flannel:v0.25.6imagePullPolicy: Nevercommand:- /opt/bin/flanneldargs:- --ip-masq- --kube-subnet-mgrresources:requests:cpu: "100m"memory: "50Mi"securityContext:privileged: falsecapabilities:add: ["NET_ADMIN", "NET_RAW"]env:- name: POD_NAMEvalueFrom:fieldRef:fieldPath: metadata.name- name: POD_NAMESPACEvalueFrom:fieldRef:fieldPath: metadata.namespace- name: EVENT_QUEUE_DEPTHvalue: "5000"volumeMounts:- name: runmountPath: /run/flannel- name: flannel-cfgmountPath: /etc/kube-flannel/- name: xtables-lockmountPath: /run/xtables.lockvolumes:- name: runhostPath:path: /run/flannel- name: cni-pluginhostPath:path: /opt/cni/bin- name: cnihostPath:path: /etc/cni/net.d- name: flannel-cfgconfigMap:name: kube-flannel-cfg- name: xtables-lockhostPath:path: /run/xtables.locktype: FileOrCreate
先删除
kubectl delete -f kube-flannel.yml
再构建
kubectl apply -f kube-flannel.yml
还是失败了,最后找了个大佬的github

编辑kube-flannel.yml

加上 m.daocloud.io/ 前缀
[root@k8smaster flanneld]# kubectl get nodes
NAME        STATUS   ROLES           AGE   VERSION
k8smaster   Ready    control-plane   19h   v1.28.2
[root@k8smaster flanneld]# kubectl get pods -n kube-flannel
NAME                    READY   STATUS    RESTARTS   AGE
kube-flannel-ds-g8mng   1/1     Running   0          8m52s
卸载命令 kubectl delete -f kube-flannel.yml
安装calico
我这里直接 kubeadm reset 了 重新来一遍,master和node节点都reset,init的时候–pod-network-cidr=192.168.0.0/16,calico是192.168.0.0
calico官方地址
kubectl create -f https://raw.gitmirror.com/projectcalico/calico/v3.27.2/manifests/tigera-operator.yaml
wget https://raw.gitmirror.com/projectcalico/calico/v3.27.2/manifests/custom-resources.yaml
vim custom-resources.yaml
#把里边cidr:ip 更换,根据你pod-network-cidr的参数更换
cidr: 10.244.0.0/16

构建
kubectl create -f custom-resources.yaml
查看
kubectl get pod -A

最后还是不行,启动不了,也是网络问题
相关文章:
【Kubernetes】linux centos安装部署Kubernetes集群
【Kubernetes】centos安装Kubernetes集群 1、环境准备 系统centos7 配置yum源参考文章 Centos系统换yum源 yum -y update 步骤1-3是所有主机都要配置,主机名和hosts配置完后可以使用工具命令同步 1.1 主机 一主二从 主机名ipk8smaster192.168.59.148k8snode11…...

canlog-vci can记录仪,速采仪如何用VBDSP进行解析曲线
如下图所示,VBDSP支持绘制解析曲线 添加解析曲线步骤 (1)在线播放DBC解析曲线 ① 添加要解析的规则,自定义规则/DBC解析规则、J1939协议、CANopen协议; ② 选中设备,点击“分析”栏中的“曲线”࿰…...
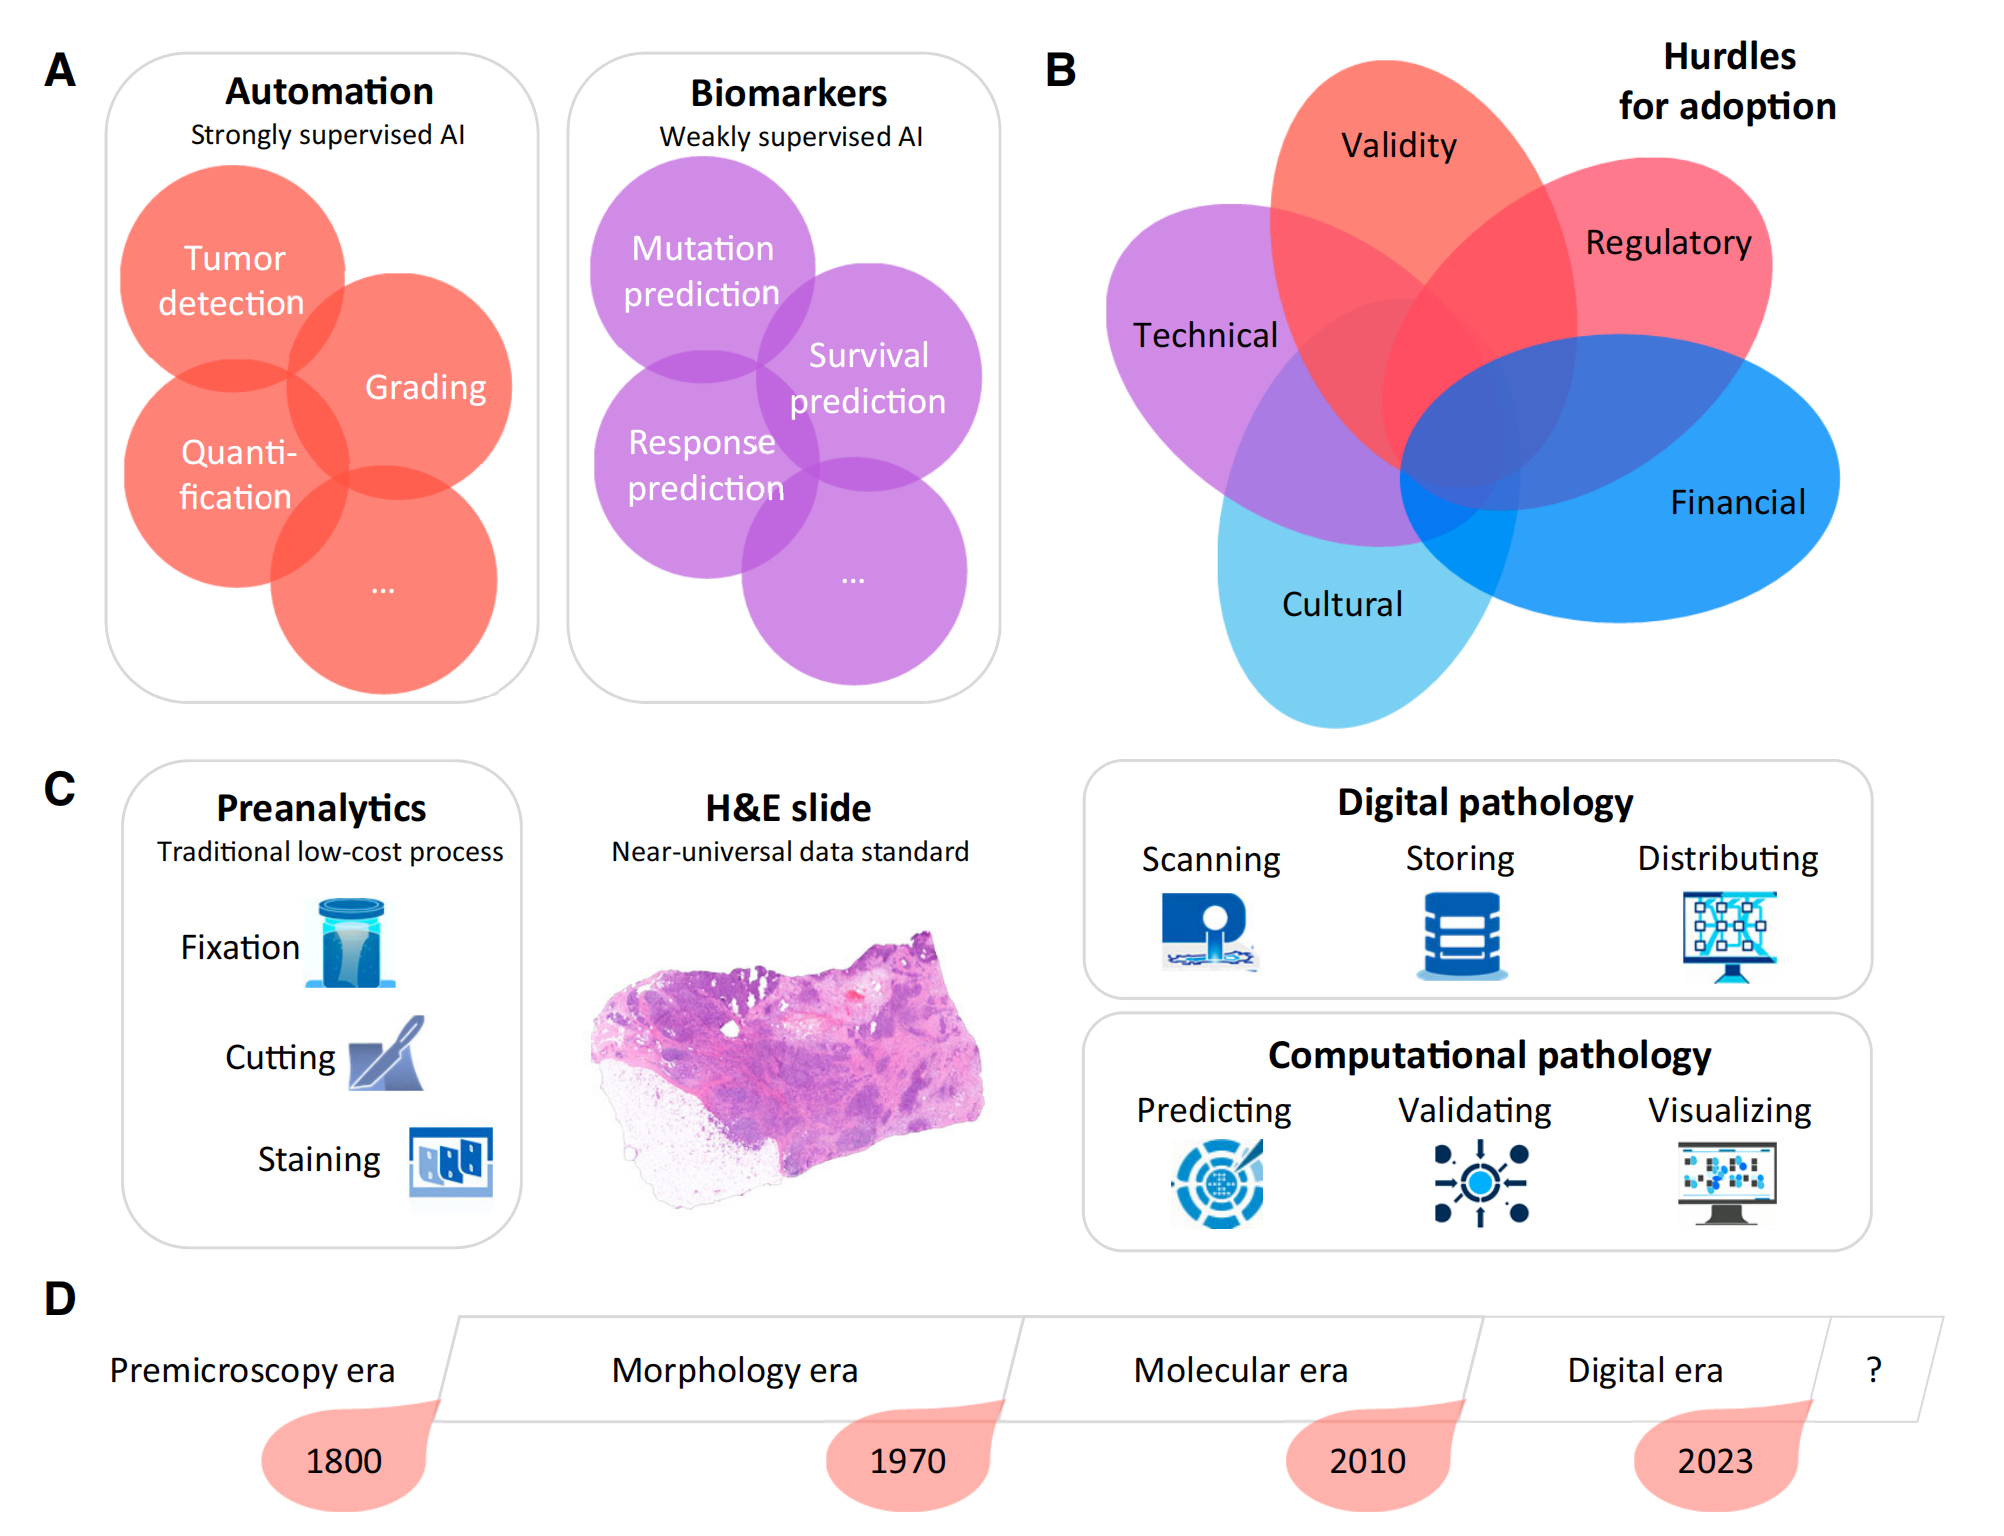
JCO|病理AI是精准医疗的未来吗?|个人观点·24-09-13
小罗碎碎念 今日顶刊:JCO 这篇文章于24-09-11发表于J Clin Oncol,目前IF42.1,但是注意,这篇文章是一篇观点类文章,而不是我们常规意义上的那种科研型文章。 我在原作者的基础上补充了很多精美插图,并且根据…...

idea一键自动化部署项目
文章目录 前言一、 IDEA插件安装1. 首先下载 Alibaba Cloud Toolkit 插件2. 插件下载完成后重启IDEA 二、SpringBoot项目准备1. pom.xml 文件2. controller3. 启动类 三、SpringBoot项目jar包部署1. Alibaba Cloud Toolkit 插件服务器配置2. 主机 IP、用户名、密码 点击测试链接…...

Mybatis-plus复习篇
文章目录 1.MyBatis-plus基础1.1.mybatis-plus简介1.2.基本使用1.3.注解映射主键生成策略 1.4.命名转换问题1.5.关闭命名转换功能 2.BaseMapper核心接口 1.MyBatis-plus基础 1.1.mybatis-plus简介 MyBatis-Plus(简称 MP)是一个 MyBatis的增强工具&…...

Leetcode 109.有序链表转换二叉搜索树(Medium)
给定一个单链表的头节点 head ,其中的元素 按升序排序 ,将其转换为 平衡 二叉搜索树。 示例 1: 输入: head [-10,-3,0,5,9] 输出: [0,-3,9,-10,null,5] 解释: 一个可能的答案是[0,-3,9,-10,null,5],它表示所示的高度…...

[数据集][目标检测]河道垃圾检测数据集VOC+YOLO格式2274张8类别
数据集格式:Pascal VOC格式YOLO格式(不包含分割路径的txt文件,仅仅包含jpg图片以及对应的VOC格式xml文件和yolo格式txt文件) 图片数量(jpg文件个数):2274 标注数量(xml文件个数):2274 标注数量(txt文件个数):2274 标注…...

python vtk 绘制圆柱体和包围盒
基本的代码如下, import vtkcylinder vtk.vtkCylinderSource() cylinder.SetRadius(3.0) cylinder.SetHeight(10.0) cylinder.SetResolution(50)boundsFilter vtk.vtkOutlineFilter() boundsFilter.SetInputConnection(cylinder.GetOutputPort())mapper vtk.vtk…...

Fisco Bcos 2.11.0通过网络和本地二进制文件搭建单机节点联盟链网络(搭建你的第一个区块链网络)
Fisco Bcos 2.11.0通过网络和本地二进制文件搭建单机节点联盟链网络(搭建你的第一个区块链网络) 文章目录 Fisco Bcos 2.11.0通过网络和本地二进制文件搭建单机节点联盟链网络(搭建你的第一个区块链网络)前言一、Ubuntu依赖安装二、创建操作目录, 下载build_chain.sh脚本2.1 先…...

【Canvas与表盘】绘制黄蓝两色简约表盘
【成图】 【代码】 <!DOCTYPE html> <html lang"utf-8"> <meta http-equiv"Content-Type" content"text/html; charsetutf-8"/> <head><title>黄蓝卡通手表</title><style type"text/css">…...

大数据-128 - Flink 并行度设置 细节详解 全局、作业、算子、Slot
点一下关注吧!!!非常感谢!!持续更新!!! 目前已经更新到了: Hadoop(已更完)HDFS(已更完)MapReduce(已更完&am…...
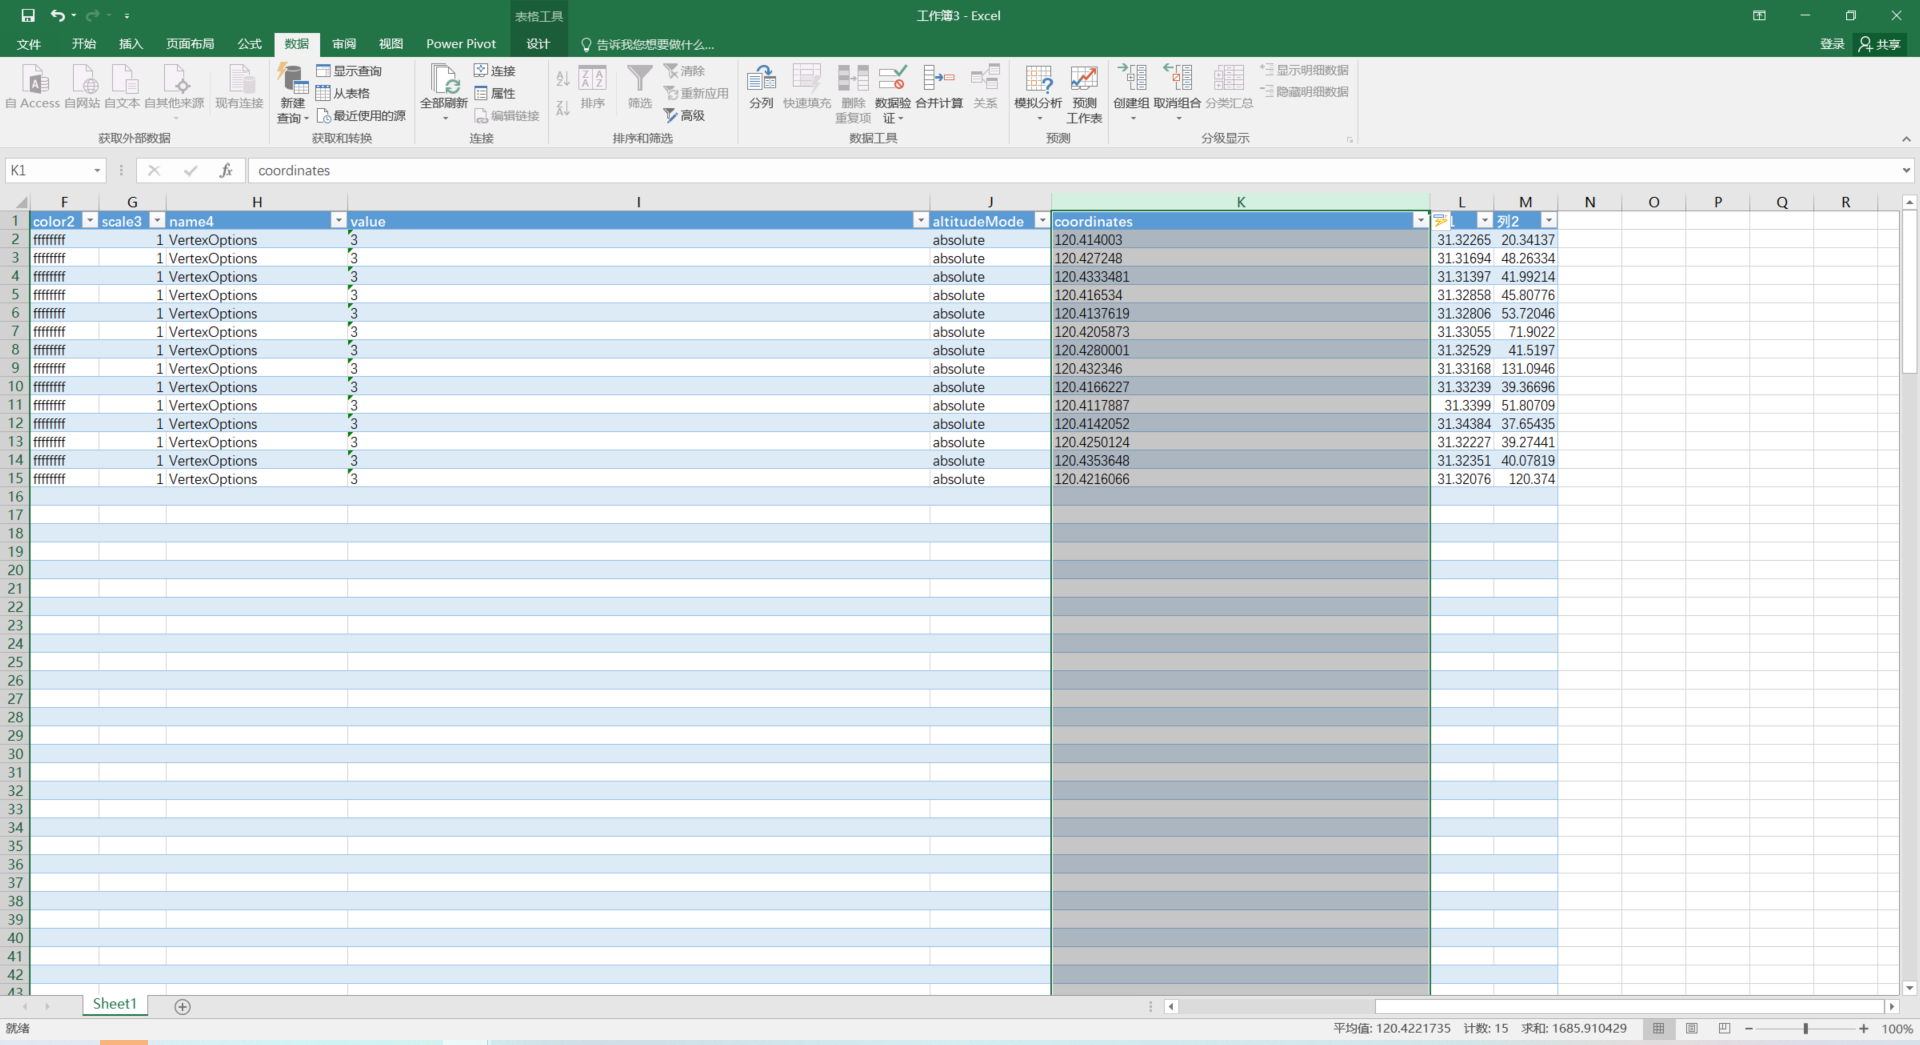
图新地球-将地图上大量的地标点批量输出坐标到csv文件【kml转excel】
0.序 有很多用户需要在卫星影像、或者无人机航测影像、倾斜模型上去标记一些地物的位置(如电线杆塔、重点单位、下水盖等) 标记的位置最终又需要提交坐标文本文件给上级单位或者其他部门使用,甚至需要转为平面直角坐标。 本文的重点是通过of…...

Git提交有乱码
服务器提交记录如图 可知application.properties中文注释拉黄线 ,提示Unsupported characters for the charset ISO-8859-1 打开settings - Editor - File Encodings 因为我们项目的其他文件都是UTF-8,所以,我们将默认值都改成UTF-8 然后…...

leetcode hot100_part4_子串
2024/4/20—4/21 560.和为K的子数组 前缀和哈希表,做二叉树的时候也有这个套路。注意细节,遍历到当前前缀和的时候是先找结果个数还是先加入哈希?应该先找结果个数,不然的话,当前位置也算上了(因为是前缀和…...

Spring Cloud之三 网关 Gateway
1:Intellij 新建项目 spring-cloud-gateway 2:pom.xml <?xml version"1.0" encoding"UTF-8"?> <project xmlns"http://maven.apache.org/POM/4.0.0"xmlns:xsi"http://www.w3.org/2001/XMLSchema-instance"xsi:schemaLoca…...

Linux 进程1
进程 在linux系统中,触发任何一个事件时系统会将其定义为一个进程(一个程序开始执行),系统会给这个进程分配一个进程ID统称为PID。 程序:通常是二进制文件,放置于存储媒介如硬盘中。 进程:当存…...
)
LeetCode: 2552. 统计上升四元组 动态规划 时间复杂度O(n*n)
2552. 统计上升四元组 today 2552. 统计上升四元组 题目描述 给你一个长度为n下标从 0 开始的整数数组 nums ,它包含1到n的所有数字,请你返回上升四元组的数目。 如果一个四元组 (i, j, k, l) 满足以下条件,我们称它是上升的:…...

Unity 编辑器设置中文
在 Unity 编辑器中,你可以按照以下步骤将语言设置为中文: 步骤: 1. 打开 Unity 编辑器。 2. 在顶部菜单栏,依次点击 Edit > Preferences(在 macOS 上是 Unity > Preferences)。 3. 在弹出的 Preferen…...

springboot-创建连接池
操作数据库 代码开发步骤: pom.xml文件配置依赖properties文件配置连接数据库信息(连接池用的是HikariDataSource)数据库连接池开发 configurationproperties和value注解从properties文件中取值bean方法开发 service层代码操作数据库 步骤&am…...

matlab绘制不同区域不同色彩的图,并显示数据(代码)
绘图结果如下: 代码如下: A为绘图的数据,每个数据对应着上图中的一个区域,数据大小决定区域的颜色 % 假设有一系列的数据点 Arand(5,6); %A为绘图的数据,数据大小决定颜色 wei_shu%.3f; %代表数据保留三位小…...
)
NISSHINBO日清纺 NJW4104U2-05A-TE1 SOT-89-5 线性稳压器(LDO)
特性通过AEC-Q100 1级认证(仅T1规格)低静态电流:典型值5.5μA(A版本),典型值5.0μA(B版本)工作电压4.0V至40V工作温度Ta -40C至125C输出电压精度:V0 1.0%(T…...

毕业论文开挂指南:好写作AI助你实现学术写作“降维打击”
写论文这件事,你需要的不是更拼命的自己,而是一套颠覆认知的思维加速器 深夜的自习室,你面前的Word文档还停留在那行刺眼的光标,而这已经是你刷的第三个整晚了。论文进度:0字。 你开始怀疑人生:明明看了那…...

MogFace-large保姆级教程:Gradio界面汉化、按钮定制与结果样式美化
MogFace-large保姆级教程:Gradio界面汉化、按钮定制与结果样式美化 1. 教程简介 大家好,今天我们来聊聊如何玩转MogFace-large这个人脸检测神器。如果你正在寻找一个准确率高、使用简单的人脸检测工具,那么MogFace-large绝对是你的不二选择…...

光度立体三维重建中的光源标定:从理论到Matlab实践
1. 光度立体三维重建与光源标定的基础概念 想象一下你正在用手电筒照射一个苹果,随着手电筒角度的变化,苹果表面的明暗也会跟着改变。光度立体三维重建就是利用这个原理,通过分析物体在不同光照条件下的明暗变化,来还原物体的三维…...

UniApp扫码插件性能横评:从MLKit毫秒级到ZXing经典方案的实战选型
1. UniApp扫码插件选型指南:为什么性能如此重要 扫码功能已经成为现代移动应用的标配,从电商购物到物流追踪,从票务核验到社交互动,几乎每个场景都需要快速、稳定的扫码体验。但在实际开发中,很多团队都会遇到这样的困…...
深入解析:原理、实现与应用)
生成对抗网络(GANs)深入解析:原理、实现与应用
生成对抗网络(GANs)深入解析:原理、实现与应用 1. 背景介绍 生成对抗网络(Generative Adversarial Networks,简称GANs)是深度学习领域的一项重大突破,由Ian Goodfellow等人于2014年提出。GANs通…...
)
PHP低代码表单引擎安全红线清单(XSS/CSRF/表达式注入/Schema越权共7类高危漏洞实测防御方案)
第一章:PHP低代码表单引擎安全红线总览低代码表单引擎在加速业务交付的同时,也因动态字段生成、运行时逻辑注入、元数据驱动等特性,天然放大了Web安全风险面。PHP作为主流后端语言,在此类引擎中常承担表单渲染、数据校验、流程路由…...

FastAPI 2.0流式响应必须立即升级的4项配置——PyPI最新2.0.10已强制校验,旧版部署将在Q3自动降级为同步模式
第一章:FastAPI 2.0流式响应架构演进与强制校验机制解析FastAPI 2.0 对流式响应(StreamingResponse)进行了底层重构,将 ASGI 生命周期与 Pydantic v2 的严格校验深度耦合,彻底分离了响应生成与序列化阶段。这一演进使开…...

自动化测试面试中常见的问题
一、测试用例再执行点击元素时失败,导致整个测试用例失败。如何提高点击元素的成功率?解决办法:selenium是在点击元素时是通过元素定位的方式找到元素的,要提高点击的成功率,必须保证找到元素的定位方式准确。但是在自动化工程的…...

OmAgent性能优化技巧:10个方法提升你的AI代理运行效率
OmAgent性能优化技巧:10个方法提升你的AI代理运行效率 【免费下载链接】OmAgent [EMNLP-2024] Build multimodal language agents for fast prototype and production 项目地址: https://gitcode.com/gh_mirrors/om/OmAgent OmAgent是一个用于构建多模态语言…...