【开发】后端框架——Spring
前置知识:JSP&Servlet
学习视频:https://www.bilibili.com/video/BV1WE411d7Dv?spm_id_from=333.999.0.0
-
IoC:控制反转
IoC的理解:IoC思想,IoC怎么创建对象,IoC是Spring的核心
依赖注入三种方式:构造器、set方法、第三方
-
Bean的作用域:2+4
单例与原型
request,session,appication=websocket
-
Bean属性的自动装配:四种
xml显示配置
隐式自动配置(ByName——参数名,ByType——参数类型)
注解
实现配置类:不用xml配置,把配置项作为类属性
-
Bean的生命周期
-
代理模式
-
AOP
Spring
Spring简介
解决企业级应用开发的复杂性创建,简化开发
轻量级控制反转(IOC)和面向切面编程(AOP)的容器框架
- 2002,interface21 Spring框架雏形
- Spring理念:整合现有的框架
- SSH:Struct2 + Spring + Hibernate
- SSM:SpringMVC + Spring + MyBatis
官网
文档地址
各版本文档
下载地址
<dependency><groupId>org.springframework</groupId><artifactId>spring-webmvc</artifactId><version>5.3.3</version>
</dependency>
<dependency><groupId>org.springframework</groupId><artifactId>spring-jdbc</artifactId><version>5.3.3</version>
</dependency>
优点
- 开源的框架
- 轻量级的、非入侵式的框架
- 控制反转(IOC)、面向切面编程(AOP)
- 支持事务处理
- 对框架整合的支持
弊端:发展太久,配置十分繁琐
- 配置地狱
组成
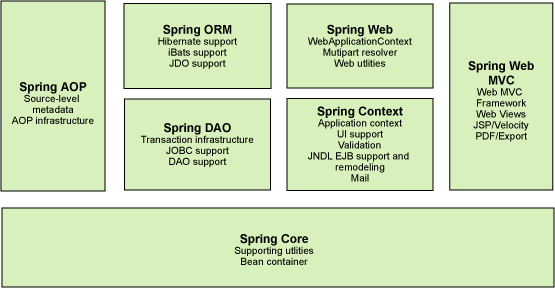
拓展
- Spring Boot:快速开发脚手架
- 快速开发单个微服务
- 约定大于配置
- Spring Cloud:协调
- 基于Spring Boot实现
- 微服务的整合
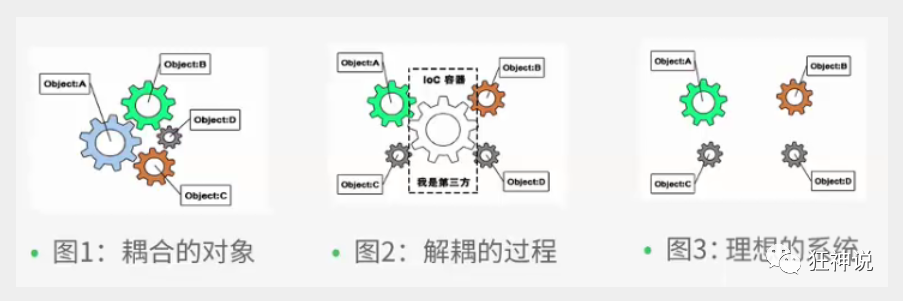
IoC容器
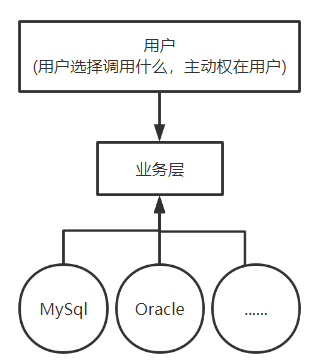
为什么有IoC思想
以JDBC连接数据库为例
原先

-
UserDao接口
public interface UserDao {public void getUser(); } -
UserDaoImpl实现类
//UserDaoImpl.class public class UserDaoImpl implements UserDao{public void getUser(){System.out.println("获取用户数据");} }//UserDaoMysqlImpl public class UserDaoMysqlImpl implements UserDao{public void getUser(){System.out.println("MySql获取用户数据");} }//UserDaoOracleImpl public class UserDaoOracleImpl implements UserDao{public void getUser(){System.out.println("Oracle实现获取用户数据");} } -
UserService业务接口
public interface UserService {public void getUser(); } -
UserServicelmpl业务实现类
public class UserServiceImpl implements UserService{private UserDao userDao = new UserDaoMysqlImpl();// = new UserDaoOracleImpl();// = new UserDaoImpl();public void getUser(){userDao.getUser();} } -
MyTest
public class MyTest {public static void main(String[] args) {//用户实际调用的是业务层UserService userService = new UserServiceImpl();userService.getUser();}
}
IoC雏形
-
UserDao接口
public interface UserDao {public void getUser(); } -
UserDaoImpl实现类
//UserDaoImpl.class public class UserDaoImpl implements UserDao{public void getUser(){System.out.println("获取用户数据");} }//UserDaoMysqlImpl public class UserDaoMysqlImpl implements UserDao{public void getUser(){System.out.println("MySql获取用户数据");} }//UserDaoOracleImpl public class UserDaoOracleImpl implements UserDao{public void getUser(){System.out.println("Oracle实现获取用户数据");} } -
UserService业务接口
public interface UserService {public void getUser(); } -
UserServicelmpl业务实现类
public class UserServiceImpl implements UserService{private UserDao userDao;public void setUserDao(UserDao userDao){this.userDao = userDao;}public void getUser(){userDao.getUser();} } -
MyTest
public class MyTest {public static void main(String[] args) {//用户实际调用的是业务层UserService userService = new UserServiceImpl();((UserServiceImpl)userService).setUserDao(new UserDaoOracleImpl());userService.getUser();}
}
控制反转关键
public void setUserDao(UserDao userDao){this.userDao = userDao;
}
之前,程序主动创建对象,控制权在程序
使用set注入,程序变成了被动接收对象
- 程序员不用再去管理对象的创建
- 系统的耦合性降低,更加专注在业务实现上,这是IOC的原型
IoC是Spring框架的核心
控制反转是一种通过描述(XML或注解)及第三方去生产或获取特定对象的方式
-
可使用XML配置
采用XML方式配置Bean,Bean的定义与实现分离
-
使用注解配置
采用注解方式将Bean的定义和实现合为一体
Bean的定义信息直接以注解的形式定义在实现类中,从而达到零配置目的
IOC是一种设计思想,DI(依赖注入)是实现IOC的一种方法,在Spring中实现IoC的是IoC容器
控制反转:获得对象的方式反转
- 程序由主动创建对象变为被动接收对象
依赖注入
- 利用set方法进行注入
Spring通过IoC容器完成对实例的创建,装配,管理
- 不再需要改动程序,要实现不同的操作,只需在xml配置文件中进行修改
相关jar包
Theorg.springframework.beansandorg.springframework.contextpackages are the basis for Spring Framework’s IoC container.
<dependency><groupId>org.springframework</groupId><artifactId>spring-beans</artifactId><version>5.2.0.RELEASE</version>
</dependency>
<dependency><groupId>org.springframework</groupId><artifactId>spring-context</artifactId><version>5.2.0.RELEASE</version>
</dependency>
xml方式
beans.xml
<?xml version="1.0" encoding="UTF-8"?>
<beans xmlns="http://www.springframework.org/schema/beans"xmlns:xsi="http://www.w3.org/2001/XMLSchema-instance"xsi:schemaLocation="http://www.springframework.org/schema/beanshttps://www.springframework.org/schema/beans/spring-beans.xsd"><bean id="userServiceImpl" class="com.kuang.service.UserServiceImpl"><property name="userDao" ref="userDaoMysqlImpl"/></bean></beans>
获取IoC容器(Spring的Context对象)中类资源
The BeanFactory interface provides an advanced configuration mechanism capable of managing any type of object. ApplicationContext is a sub-interface of BeanFactory.
BeanFactory 定义了能够管理所有类的配置机制,ApplicationContext 是其子接口
ApplicationContext applicationContext = new ClassPathXmlApplicationContext("");
The ApplicationContext is the interface for an advanced factory capable of maintaining a registry of different beans and their dependencies. By using the method T getBean(String name, Class<T> requiredType), you can retrieve instances of your beans.
ApplicationContext 是维护不同bean及其相关依赖的注册工厂
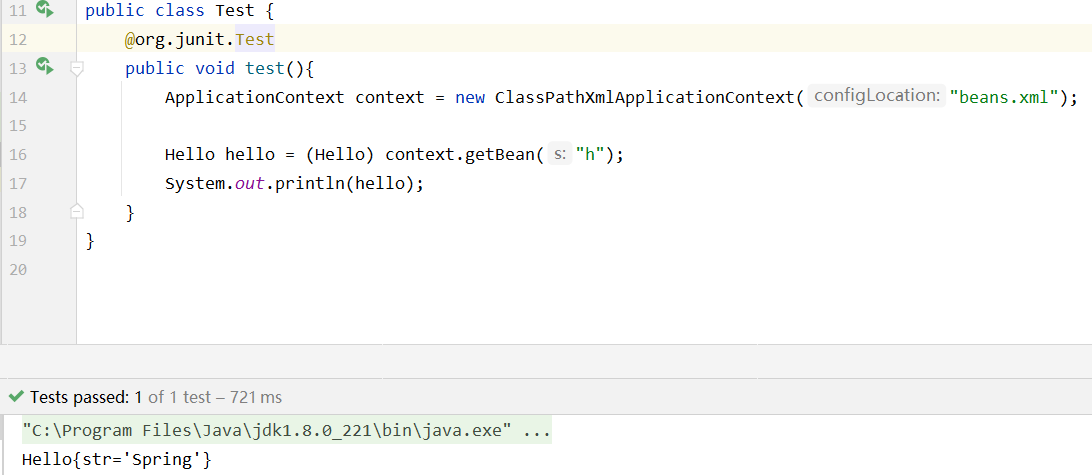
test
@Test
public void test(){ApplicationContext applicationContext = new ClassPathXmlApplicationContext("beans.xml");//对象由主动创建变为被动接收UserService userService = (UserServiceImpl) applicationContext.getBean("userServiceImpl");userService.getUser();
}
Spring配置
bean
<bean id="hello" class="com.kuang.pojo.Hello" name="hello2,u2"><constructor-arg name="str" value="Spring"/>
</bean>
<bean> 中配置的是交给IoC容器管理的类资源
- The
property nameelement refers to the name of the JavaBean property - and the
refelement refers to the name of another bean definition.
The id attribute is a string that identifies the individual bean definition.
The class attribute defines the type of the bean and uses the fully qualified classname.
全限定名:包名.类型
If you want to introduce other aliases for the bean, you can also specify them in the name attribute, separated by a comma (,), semicolon (;), or white space
bean别名——alias
<bean id="hello" class="com.kuang.pojo.Hello"><constructor-arg name="str" value="Spring"/>
</bean><alias name="hello" alias="h"/>
import
将多个配置文件导入到一个,便于统一管理
<!--applicationContext.xml-->
<import resource="beans1.xml">
<import resource="beans2.xml">
<import resource="beans3.xml">
依赖注入
- 依赖:bean对象的创建依赖于IoC容器
- 注入:bean对象中的所有属性,由容器来注入
1. IoC创建对象方式——构造器注入
在配置文件加载时,容器中管理的对象就已被初始化
默认使用无参构造器创建对象
使用有参构造器构造对象
-
下标赋值-index
<bean id="hello" class="com.kuang.pojo.Hello"><constructor-arg index="0" value="Spring"/> </bean> -
参数类型匹配-type
<bean id="hello" class="com.kuang.pojo.Hello"><constructor-arg type="java.lang.String" value="Spring"/> </bean> -
直接通过参数名设置-name
<bean id="hello" class="com.kuang.pojo.Hello"><constructor-arg name="str" value="Spring"/>
</bean>
2. set注入
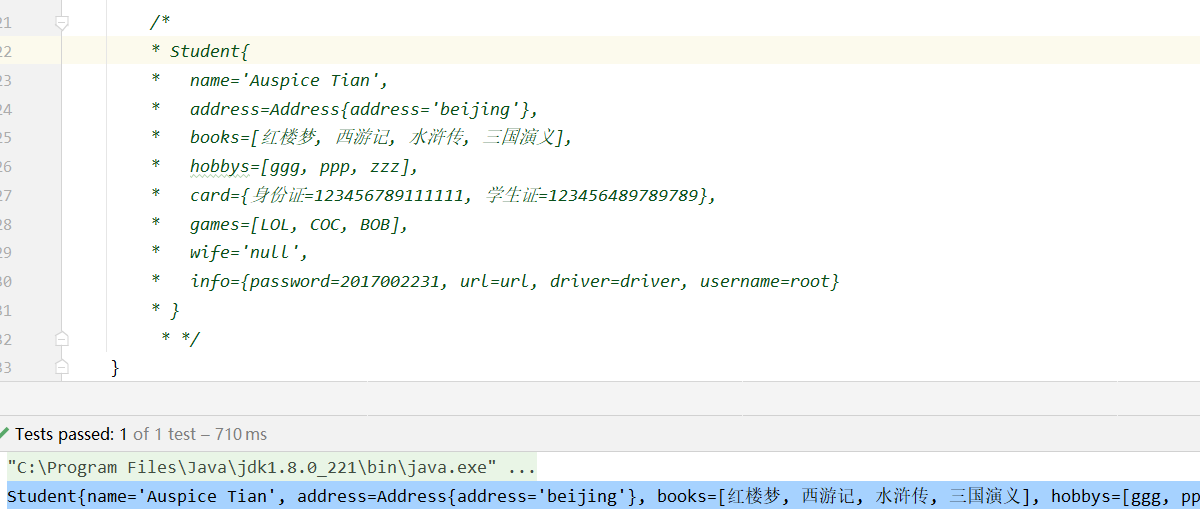
public class Student {private String name;//基本数据类型 DIprivate Address address;//引用数据类型 DIprivate String[] books;//数组 DIprivate List<String> hobbys;//List DIprivate Map<String,String> card;// Map DIprivate Set<String> games;//Set DIprivate String wife;//null DIprivate Properties info;//properties DI
}
基本数据类型
<bean id="student" class="com.kuang.pojo.Student"><property name="name" value="Auspice Tian"/>
</bean>
bean
<bean id="beijing" class="com.kuang.pojo.Address"><property name="address" value="北京"/>
</bean><bean id="student" class="com.kuang.pojo.Student"><property name="address" value="beijing"/>
</bean>
array
<property name="books"><array><value>红楼梦</value><value>西游记</value><value>水浒传</value><value>三国演义</value></array>
</property>
list
<property name="hobbys"><list><value>ggg</value><value>ppp</value><value>zzz</value></list>
</property>
map
<property name="card"><map><entry key="身份证" value="123456789111111"/><entry key="学生证" value="123456489789789"/></map>
</property>
set
<property name="games"><set><value>LOL</value><value>COC</value><value>BOB</value></set>
</property>
null
<property name="wife"><null></null>
</property>
property
<property name="info"><props><prop key="driver">driver</prop><prop key="url">url</prop><prop key="username">root</prop><prop key="password">2017002231</prop></props>
</property>
第三方注入
可直接注入基本数据类型和bean
p-namespace(set注入)
导入约束:xmlns:p=“http://www.springframework.org/schema/p”
<beans xmlns="http://www.springframework.org/schema/beans"xmlns:xsi="http://www.w3.org/2001/XMLSchema-instance"xmlns:p="http://www.springframework.org/schema/p"xsi:schemaLocation="http://www.springframework.org/schema/beanshttps://www.springframework.org/schema/beans/spring-beans.xsd"><bean name="john-modern" class="com.example.Person"p:name="John Doe"p:spouse-ref="jane"/><bean name="jane" class="com.example.Person"><property name="name" value="Jane Doe"/></bean><!--等价于<bean name="john-classic" class="com.example.Person"><property name="name" value="John Doe"/><property name="spouse" ref="jane"/></bean>-->
</beans>
c-namespace(constructor注入)
导入约束:xmlns:c=“http://www.springframework.org/schema/c”
<beans xmlns="http://www.springframework.org/schema/beans"xmlns:xsi="http://www.w3.org/2001/XMLSchema-instance"xmlns:c="http://www.springframework.org/schema/c"xsi:schemaLocation="http://www.springframework.org/schema/beanshttps://www.springframework.org/schema/beans/spring-beans.xsd"><bean id="beanTwo" class="x.y.ThingTwo"/><bean id="beanThree" class="x.y.ThingThree"/><!-- traditional declaration with optional argument names --><bean id="beanOne" class="x.y.ThingOne"><constructor-arg name="thingTwo" ref="beanTwo"/><constructor-arg name="thingThree" ref="beanThree"/><constructor-arg name="email" value="something@somewhere.com"/></bean><!-- c-namespace declaration with argument names --><bean id="beanOne" class="x.y.ThingOne" c:thingTwo-ref="beanTwo"c:thingThree-ref="beanThree"c:email="something@somewhere.com"/></beans>
Bean Scopes(作用域)
<bean id="student" class="com.kuang.pojo.Student" scope="singleton | prototype">
| Scope | Description |
|---|---|
| singleton | (Default) Scopes a single bean definition to a single object instance for each Spring IoC container.全局唯一 |
| prototype | Scopes a single bean definition to any number of object instances. |
| request | Scopes a single bean definition to the lifecycle of a single HTTP request. That is, each HTTP request has its own instance of a bean created off the back of a single bean definition. Only valid in the context of a web-aware Spring ApplicationContext. |
| session | Scopes a single bean definition to the lifecycle of an HTTP Session. Only valid in the context of a web-aware Spring ApplicationContext. |
| application | Scopes a single bean definition to the lifecycle of a ServletContext. Only valid in the context of a web-aware Spring ApplicationContext. |
| websocket | Scopes a single bean definition to the lifecycle of a WebSocket. Only valid in the context of a web-aware Spring ApplicationContext. |
Singleton(单例模式)-单线程

- 全局唯一,共享同一对象
prototype(原型模式)-多线程
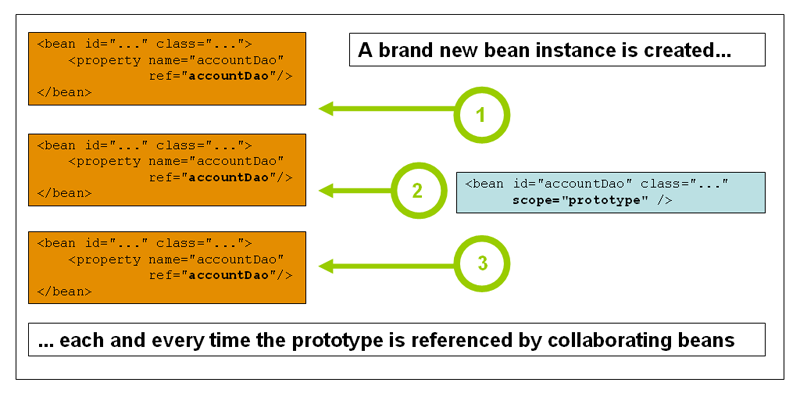
- 每次getBean()都会得到新的对象
Bean的自动装配
Spring会在上下文中自动寻找,自动装配属性
在xml中显式配置
<bean id="cat" class="com.kuang.pojo.Cat" />
<bean id="dog" class="com.kuang.pojo.Dog" /><bean id="person" class="com.kuang.pojo.Person"><property name="cat" ref="cat"/><property name="dog" ref="dog"/><property name="name" value="Auspice Tian"/>
</bean>
隐式自动装配Bean
ByName自动装配
setter的形参名与容器中的bean.id相同
bean的id唯一
- java.lang.NullPointerException
<bean id="person" class="com.kuang.pojo.Person" autowire="byName" />
ByType自动装配
属性类型与bean类型相同
与属性类型相同的Bean唯一
- expected single matching bean but found 2: cat1,cat2
<bean id="person" class="com.kuang.pojo.Person" autowire="byType" />
使用注解自动装配
最佳实践:XML用于管理Bean,注解用于管理属性注入
Spring 2.5开始支持注解开发,JDK1.5支持注解
在Spring4之后,若使用注解开发,还必须保证 aop包 导入
-
导入约束
xmlns:context=“http://www.springframework.org/schema/context”
xsi:schemaLocation=“http://www.springframework.org/schema/beans https://www.springframework.org/schema/beans/spring-beans.xsd http://www.springframework.org/schema/context https://www.springframework.org/schema/context/spring-context.xsd”
-
配置注解的支持
<context:annotation-config/> -
指定要扫描的包,该包下的注解会生效
<context:component-scan base-package="com.kuang.pojo"/>
<?xml version="1.0" encoding="UTF-8"?>
<beans xmlns="http://www.springframework.org/schema/beans"       xmlns:xsi="http://www.w3.org/2001/XMLSchema-instance"xmlns:context="http://www.springframework.org/schema/context"       xsi:schemaLocation="http://www.springframework.org/schema/beans https://www.springframework.org/schema/beans/spring-beans.xsd     http://www.springframework.org/schema/contexthttps://www.springframework.org/schema/context/spring-context.xsd"><context:component-scan base-package="com.kuang.pojo"/><context:annotation-config/>
</beans>
@Component——bean
组件,放在类上,说明这个类被Spring管理,就是Bean
/*
* @Component 相当于<bean id="user" class="com.kuang.pojo.User"/>
* */
@Component
public class User {private String name = "Auspice Tian";/* setters and getters */
}
衍生注解
在Web开发中,会按照MVC分层,与@Component等价
- Dao
@Repository
- Service
@Service
- Controller
@Controller
@Value("")——属性
通过注解注入,在属性与属性的setters()上注入等价
@Component
public class User {@Value("Auspice Tian")private String name;@Value("Auspice Tian")public void setName(String name) {this.name = name;}
}
注解实现自动装配
@AutoWired
- 相当于byType
- 在 bean属性 或 setters 上注解
@AutoWired(required=false):表示该注解修饰的内容可以为空- CONSTRUCTOR、METHOD、PARAMETER、FIELD、ANNOTATION_TYPE
@Qualifier(value="cat1111")
- 通过bean.id指定容器中装配的Bean
- 当IoC Container环境复杂,搭配使用
@Nullable:表示这个注解修饰的内容允许为Null
- METHOD、PARAMETER、FIELD
@Resource
@Resource(name="指定bean.id")- 当 ByName失效,通过ByType找到唯一的类型匹配的Bean
作用域
@Scope("")
- singleton
- prototype
在java中显式配置——零配置xml
JavaConfig是Spring的子项目,Spring4后,称为核心功能

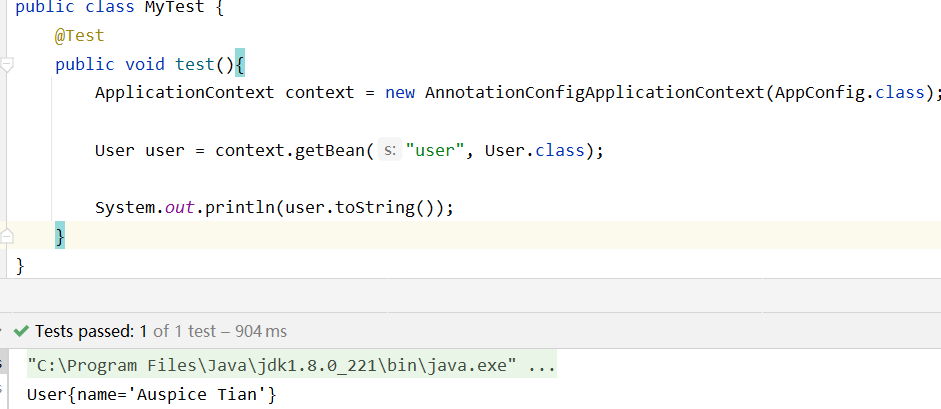
//com.config.AppConfig.java@Configuration
//相当于<beans> 由IoC容器托管,被@Component注解
@Import(AppConfig2.class)//导入其他配置文件
@ComponentScan("com.kuang")//指定扫描的包,使包下注解生效
public class AppConfig {@Bean/* 注册一个Bean 相当于<bean>* 返回值类型相当于 bean.class* 函数名相当于bean.id* */public User user(){return new User(); //返回要注入到容器中的对象}
}

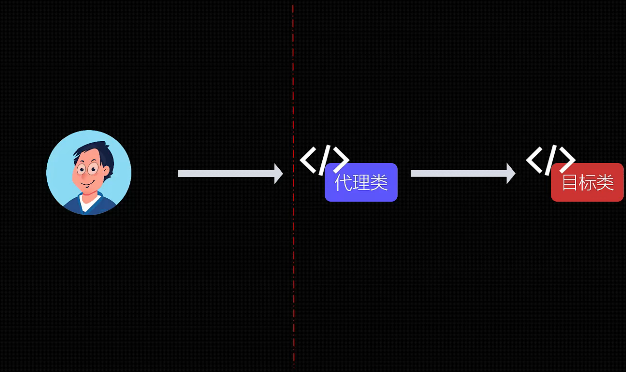
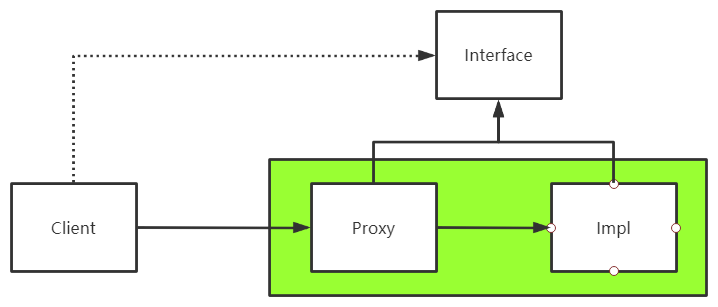
代理模式
对目标类的调用由直接调用变为间接调用
为什么引入代理模式
在代理类调用目标类之前和之后做一些预处理和后处理操作,用来扩展一些不属于目标类的功能
比如:可以在方法开始和结束前记录日志;在方法执行前进行额外的参数校验;进行事务管理,权限校验
- 抽象角色:接口或抽象类表示
- 真实角色:被代理角色
- 代理角色:代理真实角色
- 客户:访问代理对象
静态代理(静态生成代理类)
在程序运行之前,就为给真实角色编写并编译了代理角色的代码,生成代理角色的字节码文件,在程序运行时,直接运行这些字节码文件
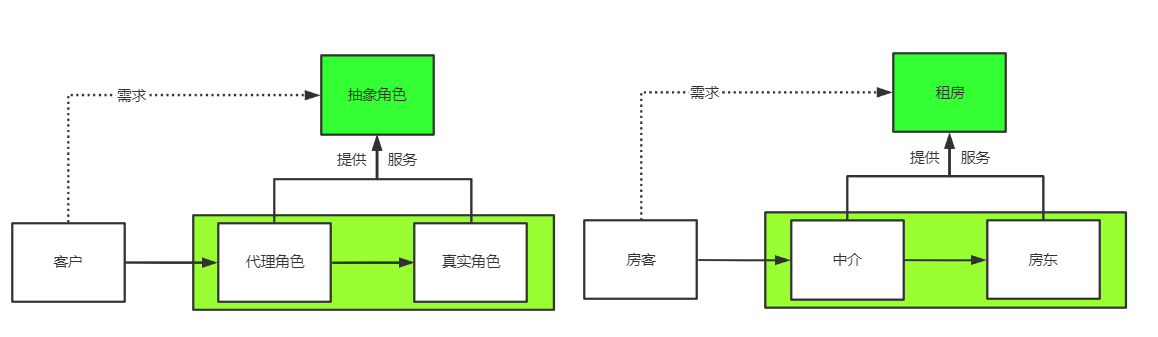
如在租房的服务中:
-
抽象角色
/* 抽象角色 */ public interface Rent {public void rent(); } -
真实角色
/* 真实角色 */ public class Host implements Rent{public void rent(){System.out.println("房东出租房子");} } -
代理角色
/* 代理角色 */ public class Agent implements Rent{Host host;public Agent(Host host) {this.host = host;}public void rent(){visit();host.rent();assign();fare();}public void visit(){System.out.println("预约看房");}public void assign(){System.out.println("签合同");}public void fare(){System.out.println("收中介费");} } -
客户访问代理角色
/* 客户 */
public class Client {public static void main(String[] args) {Host host = new Host();Agent agent = new Agent(host);agent.rent();}
}
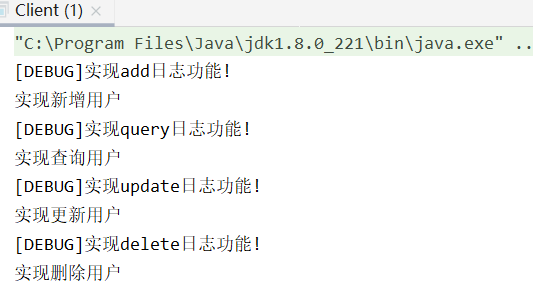
在实现日志功能时
-
抽象角色
/*用户服务:抽象角色*/ public interface UserDao {public void add();public void delete();public void update();public void query(); } -
真实角色
/*实现用户服务功能:真实角色*/ public class UserDaoImpl implements UserDao {@Overridepublic void add() {System.out.println("实现新增用户");}@Overridepublic void delete() {System.out.println("实现删除用户");}@Overridepublic void update() {System.out.println("实现更新用户");}@Overridepublic void query() {System.out.println("实现查询用户");} } -
代理角色
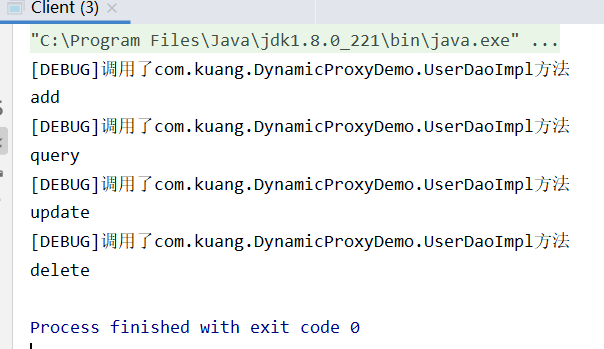
public class Proxy implements UserDao{UserDaoImpl user;public void setUser(UserDaoImpl user) {this.user = user;}@Overridepublic void add() {log("add");user.add();}@Overridepublic void delete() {log("delete");user.delete();}@Overridepublic void update() {log("update");user.update();}@Overridepublic void query() {log("query");user.query();}public void log(String msg){System.out.println("[DEBUG]实现"+msg+"日志功能!");} } -
用户
/*使用用户功能:客户*/
public class Client {public static void main(String[] args) {UserDaoImpl user = new UserDaoImpl();Proxy proxy = new Proxy();proxy.setUser(user);proxy.add();proxy.query();proxy.update();proxy.delete();}
}
静态代理特点
优点:
- 真实角色操作更为简单,不用关注公共业务
- 公共业务交给代理角色,实现业务分工
- 公共业务发生扩展,方便集中管理
缺点:
- 每个真实角色都会产生一个代理角色,代码量增多 --> 动态代理
动态代理(反射生成代理类)
在运行态,通过反射自动生成代理角色
- 动态代理的代理类利用反射动态生成
- 代理的是接口
分类
- 基于接口的动态代理——JDK动态代理
- 基于类的动态代理——cglib
- java字节码——Javasist
代理类与调用处理接口
java.lang.reflect.Proxy ,实现 InvocationHandler 接口,实现它的 invoke() 方法
-
获取代理类
public static Object newProxyInstance(ClassLoader loader,@NotNull Class<?>[] interfaces,@NotNull reflect.InvocationHandler h)//params loader – the class loader to define the proxy class interfaces – the list of interfaces for the proxy class to implement h – the invocation handler to dispatch method invocations to //return a proxy instance with the specified invocation handler of a proxy class that is defined by the specified class loader and that implements the specified interfaces -
Interface InvocationHandler:When a method(抽象角色–>接口) is invoked on a proxy instance, the method invocation is encoded and dispatched to the invoke method of its invocation handler.每个被代理实例都有一个关联的调用处理程序
静态代理对应的动态代理
-
抽象角色
public interface Rent {public void rent(); } -
真实角色
public class Host implements Rent{public void rent(){System.out.println("房东要出租房屋!");} } -
动态代理角色
调用处理程序动态生成代理角色、绑定真实角色
//代理处理程序:自动生成代理类 public class ProxyInvocationHandler implements InvocationHandler {//需要被代理的抽象角色-->接口Rent rent;//通过DI注入真实角色public void setRent(Rent rent) {this.rent = rent;}//生成代理角色public Object getProxy(){return Proxy.newProxyInstance(//抽象角色的类加载器rent.getClass().getClassLoader(),//抽象角色的接口rent.getClass().getInterfaces(), //该抽象角色的代理处理程序this); }//处理代理类实例;返回结果@Overridepublic Object invoke(Object proxy, Method method, Object[] args) throws Throwable {visit();Object result = method.invoke(rent,args);assign();fare();return result;}/*公共业务*/public void visit(){System.out.println("看房");}public void assign(){System.out.println("签合同");}public void fare(){System.out.println("中介费");} } -
客户
public class Client {public static void main(String[] args) {//真实角色Host host = new Host();//通过InvocationHandler处理要被调用的抽象角色ProxyInvocationHandler pih = new ProxyInvocationHandler();//调用处理程序与真实角色的绑定pih.setRent(host);//生成代理角色Rent proxy = (Rent)pih.getProxy();proxy.rent();}
}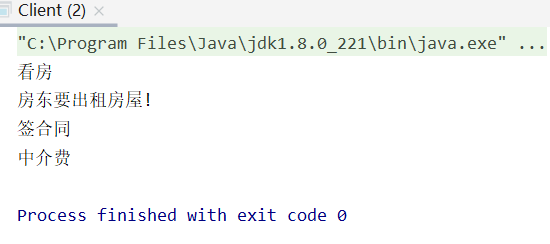
-
抽象角色–>接口
public interface UserDao {public void add();public void delete();public void update();public void query(); } -
真实角色–>被代理类
public class UserDaoImpl implements UserDao{@Overridepublic void add() {System.out.println("add");}@Overridepublic void delete() {System.out.println("delete");}@Overridepublic void update() {System.out.println("update");}@Overridepublic void query() {System.out.println("query");} } -
动态代理角色
调用处理程序–>动态生成代理类的程序
public class ProxyInvocationHandler implements InvocationHandler {//被调用的接口——>抽象角色private Object target;//注入真实角色public void setTarget(Object target) {this.target = target;}//返回代理类public Object getProxy(){return Proxy.newProxyInstance(target.getClass().getClassLoader(),target.getClass().getInterfaces(),this);}@Overridepublic Object invoke(Object proxy, Method method, Object[] args) throws Throwable {log(target.getClass().getName());Object result = method.invoke(this.target,args);return result;}/*公共业务*/public void log(String msg){System.out.println("[DEBUG]调用了"+msg+"方法");} } -
客户
public class Client {public static void main(String[] args) {//定义调用处理程序ProxyInvocationHandler pih = new ProxyInvocationHandler();//调用处理程序与将代理角色与真实角色绑定pih.setTarget(new UserDaoImpl());//获取代理角色,,代理的是接口UserDao proxy = (UserDao) pih.getProxy();proxy.add();proxy.query();proxy.update();proxy.delete();}
}
好处
- 一个动态代理类代理的是一个接口,对应的是一类业务
- 一个动态代理类可以代理实现同一接口多个类
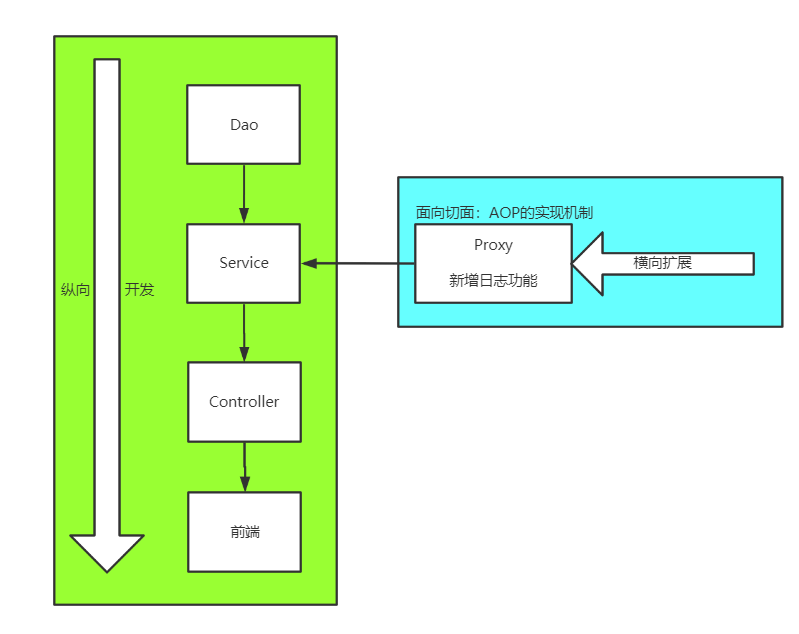
Spring AOP
AOP简介
(Aspect Oriented Programming):面向切面编程
通过 预编译方式和动态代理 实现程序功能的统一维护的技术,就是 Spring对动态代理的实现
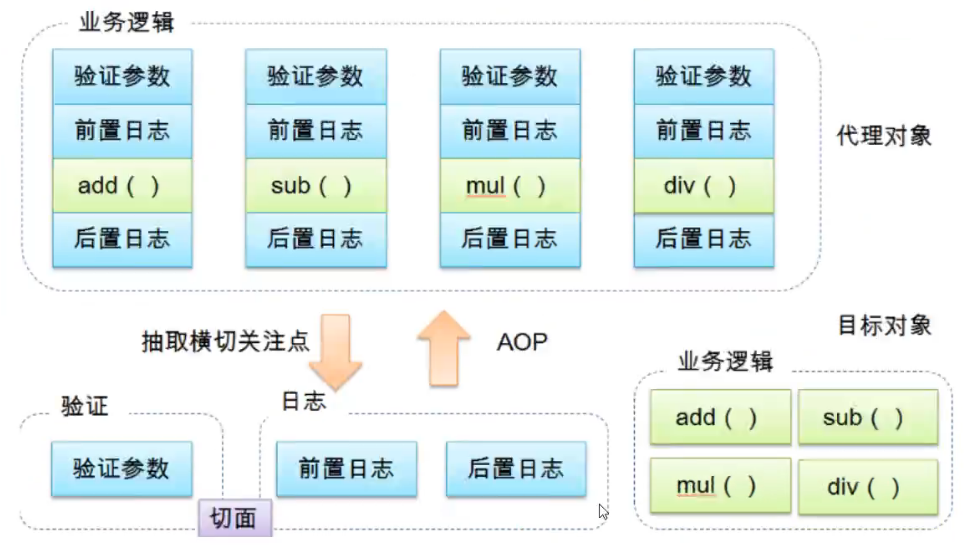
提供声明式事务;允许用户自定义切面
- 横切关注点 公共业务 :跨越应用程序多个模块的方法或功能(公共业务),与业务逻辑无关,但需要关注的部分。如:日志,安全,缓存,事务
- 切面(aspect) 代理角色 :横切关注点被模块化的对象–>类
- 通知(advisor) 真实角色中的invoke()实现的公共业务 :切面必须完成的工作–>类中的方法
- 目标(impl) 真实角色 :被通知对象–>真实角色
- 切入点(pointcut) 通知的插入位置 :切面指定地点
- 连接点(JointPoint):切入点对应的执行点
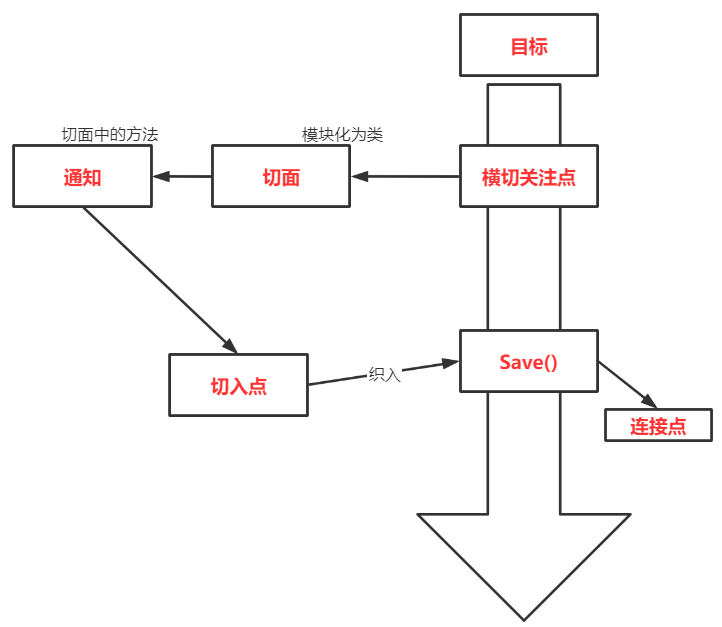
AOP与动态代理的对应
将Service层抽象为的接口作为 抽象角色 ,Service的实现类作为 真实角色 。Spring为我们完成了动态代理中 代理角色(即 Aspect 可以理解为一个代理)的创建,我们需要做的是
- 实现代理角色中的公共业务,即
invoke()方法中公共函数,对应于 通知Advice - 用xml的方式将真实角色与代理角色绑定
- 通过实现切点接口或者在xml配置通知对应的切点表达式确定通知的位置
若使用自定义切面,则只需要在切面中实现通知,切入点由注解定义,然后将切面注册到IoC容器中
日志切面
方法一:实现切入点通知
实现这些切点通知,在配置文件中配置这些切点通知作用在哪些Bean上
| 通知类型 | 连接点 | 需实现的接口 |
|---|---|---|
| 前置通知 | 方法前 | org.springframework.aop.MethodBeforeAdvice; |
| 后置通知 | 方法后 | org.springframework.aop.AfterReturningAdvice |
| 环绕通知 | 方法前后 | org.aopalliance.intercept.MethodInterceptor |
| 异常抛出通知 | 方法抛出异常时 | org.springframework.aop.ThrowsAdvice |
| 引介通知 | 类中新增方法或属性 | org.springframework.aop.IntroductionInterceptor |
定义接口–>抽象角色
public interface UserService {public void add();public void delete();public int select();public void update();
}
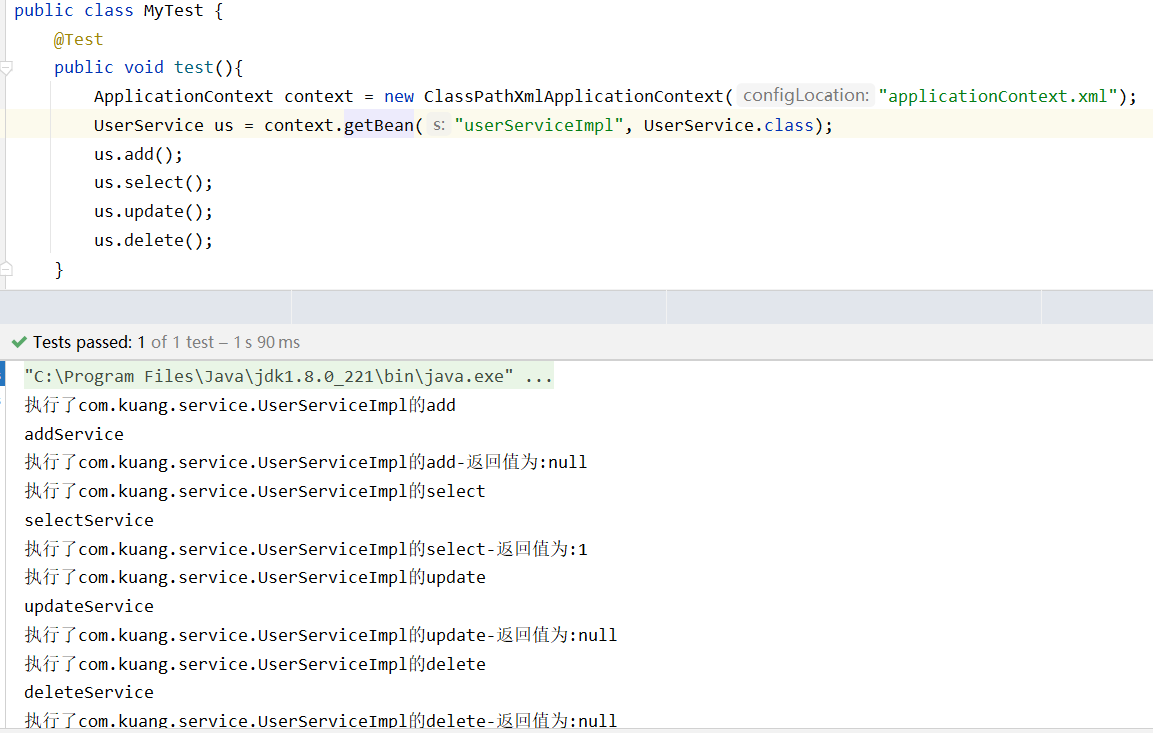
接口实现–>真实角色
public class UserServiceImpl implements UserService{@Overridepublic void add() {System.out.println("addService");}@Overridepublic void delete() {System.out.println("deleteService");}@Overridepublic int select() {System.out.println("selectService");return 1;}@Overridepublic void update() {System.out.println("updateService");}
}
实现通知接口–>代理中的公共业务
/*代理要做的公共业务 通知 Log.java
* implements 通过Advice定义切入点pointcut
* */
public class Log implements MethodBeforeAdvice {/** method:要执行的目标对象的方法* objects:参数* o:目标对象 target-->接口* */@Overridepublic void before(Method method, Object[] objects, Object o) throws Throwable {System.out.println("执行了"+o.getClass().getName()+"的"+method.getName());}
}
/*代理对象的一个公共业务-->通知 AfterLog.java* implements 通过Advice定义切入点pointcut
* */
public class AfterLog implements AfterReturningAdvice {@Override/** o:返回值* method:要执行的目标对象的方法* objects:args* o1:目标对象 target-->接口* */public void afterReturning(Object o, Method method, Object[] objects, Object o1) throws Throwable {System.out.println("执行了"+o1.getClass().getName()+"的"+method.getName()+"-返回值为:"+o);}
}
IoC配置——applicationContext.xml
<?xml version="1.0" encoding="UTF-8"?>
<beans xmlns="http://www.springframework.org/schema/beans"xmlns:xsi="http://www.w3.org/2001/XMLSchema-instance"xmlns:aop="http://www.springframework.org/schema/aop"xsi:schemaLocation="http://www.springframework.org/schema/beanshttps://www.springframework.org/schema/beans/spring-beans.xsdhttp://www.springframework.org/schema/aophttps://www.springframework.org/schema/aop/spring-aop.xsd"><!--注册bean--><bean id="userServiceImpl" class="com.kuang.service.UserServiceImpl"/><bean id="log" class="com.kuang.log.Log"/><bean id="afterlog" class="com.kuang.log.AfterLog"/><!--配置aop--><aop:config><!--定义切入点expression(要执行的位置)--><aop:pointcut id="pc_userService" expression="execution(* com.kuang.service.UserServiceImpl.*(..))" /><!--配置通知--><aop:advisor advice-ref="log" pointcut="execution(* com.kuang.service.UserServiceImpl.*(..))"/><aop:advisor advice-ref="afterlog" pointcut-ref="pc_userService"/></aop:config>
</beans>
aop:expression
格式
execution( modifiers-pattern?
ret-type-pattern declaring-type-pattern?
name-pattern(param-pattern) throws-pattern?)
- ret-type-pattern、name-pattern、param-pattern是必须的
- ret-type-pattern:该方法的返回类型必须是什么才能使连接点匹配
- param-pattern:
- ()匹配不带参数的方法
- (…)匹配任意数量(零个或多个)的参数
- (*)模式与采用任何类型的一个参数的方法匹配
- (*,String)与采用两个参数的方法匹配。第一个可以是任何类型,而第二个必须是字符串
测试
方法二:自定义通知接口
自定义切面,在配置文件中将切面中的通知与切点表达式绑定
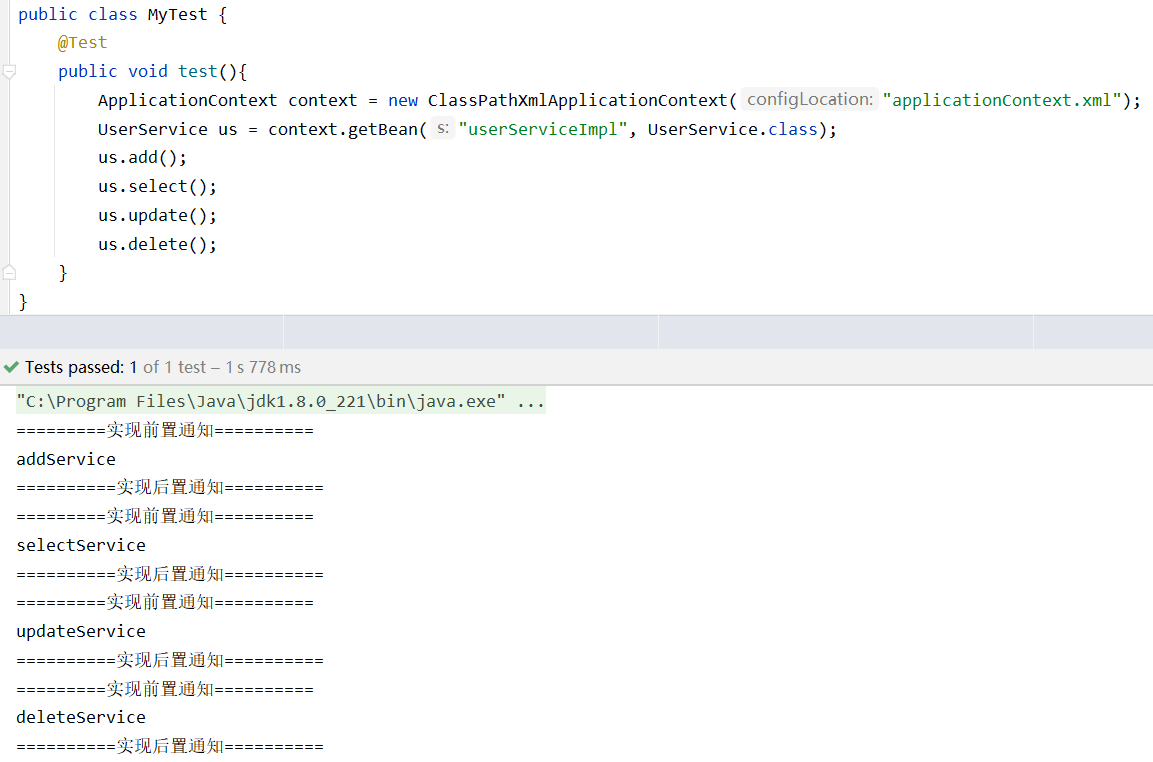
自定义切面
public class DiyAspect {public void before(){System.out.println("=========实现前置通知==========");}public void after(){System.out.println("==========实现后置通知==========");}
}
定义切入点&切面绑定
<!--方式二:配置aop-->
<bean id="diy" class="com.kuang.advisor.DiyAspect" />
<aop:config><aop:pointcut id="pc_userService" expression="execution(* com.kuang.service.UserServiceImpl.*(..))" /><aop:aspect ref="diy"><aop:before method="before" pointcut-ref="pc_userService"/><aop:after method="after" pointcut-ref="pc_userService"/></aop:aspect>
</aop:config>
Test
方法三:注解实现AOP
利用内置注解,实现切面内的通知
由注解决定通知相对于主逻辑切点的位置
- @Before:前置通知
- @After:后置通知
- @AfterReturn:返回后通知
- @AfterThrowing:出现异常后通知
- @Around:环绕通知
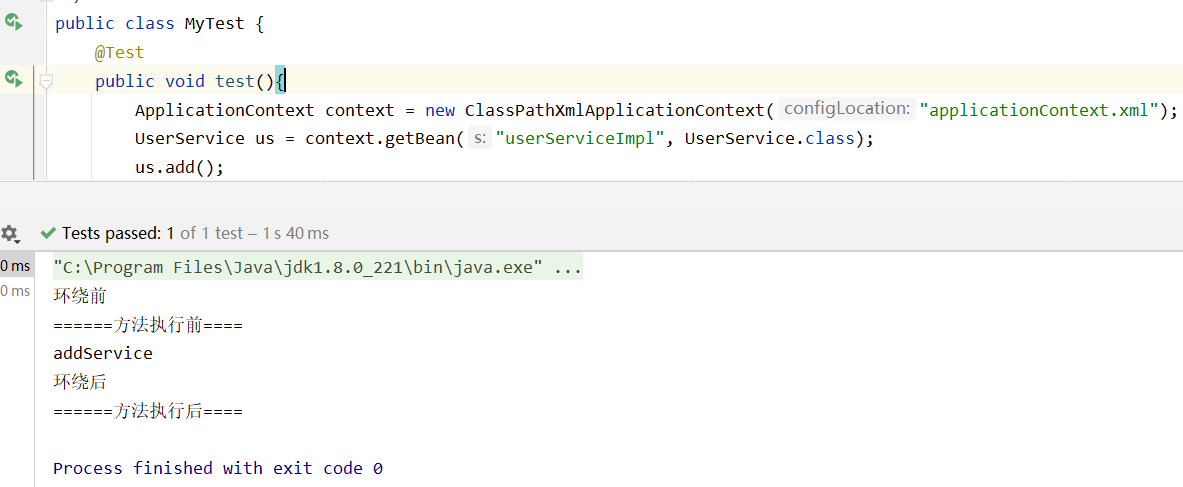
自定义切面
@Aspect
@Component
public class AnnotationAspect {@Before("execution(* com.kuang.service.UserServiceImpl.*(..))")public void before(){System.out.println("======方法执行前====");}@After("execution(* com.kuang.service.UserServiceImpl.*(..))")public void after(){System.out.println("======方法执行后====");}@Around("execution(* com.kuang.service.UserServiceImpl.*(..))")//public void around(ProceedingJoinPoint jp) throws Throwable {System.out.println("环绕前");jp.proceed();System.out.println("环绕后");}
}
开启注解支持 <aop:aspectj-autoproxy/>
切面注册到IoC容器
<bean id="diyaspect" class="com.kuang.Aspect.AnnotationAspect" />
<!--开启注解aop-->
<aop:aspectj-autoproxy/>
Test
Bean的生命周期
Spring Bean从创建到被销毁的过程,叫Bean的生命周期
-
定义Bean,创建BeanDefinition实例,BeanDefinition类中定义了很多属性用于描述Bean,如beanClass(Bean的类型),scope(一个Bean的作用范围),primary,islazy,dependsOn(创建之前所依赖的其他Bean),initMethodName(初始化方法)等
-
构造方法推断,最终选出一个构造方法
-
实例化,利用构造方法反射得到一个实例。在Spring中,可以通过
PostProcessor对Bean的实例化过程进行干预 -
属性填充,被
@AutoWired或者@Resource注解的属性,需要进行属性填充 -
初始化前,由
@PostConstruct注解的方法进行初始化前操作 -
初始化:Spring提供了初始化机制,可以通过实现
InitializingBean接口中的afterpropertiesSet()方法或 由@Bean中initMethod属性指出初始化方法,完成Bean的自定义赋值或校验 -
初始化后处理
如果当前Bean实现了
ApplicationListener接口,把它添加到事件监听器列表中若开启了AOP,则判断当前实例的中的方法是否是某一切面的切点,若是,则生成代理对象作为Bean,注册到Spring容器中
-
在初始化后,生成真正的Bean,将Bean注册到Spring容器以及缓存中
-
当Spring上下文销毁时,会将其中所有的Bean一并销毁
其中重要的部分是Bean的创建过程
Bean的创建大体步骤
1)利用Class的构造方法,反射得到对应的对象
//定义一个Bean
@Component
public class Userservice{public void test(){}
}public class Test{public static void main(String[] args){//创建一个Spring容器AnnotationConfigApplication applicationContext = new AnnotationContext(AppConfig.class);//从容器中获取userService BeanapplicationContext.getBean("userService".Userservice.class);}
}
2)给Bean中的属性赋值
//新定义一个
@Component
public class OrderService{}//定义一个Bean
@Component
public class Userservice{//自动注入另一个Bean@Autowiredprivate OrderService orderService;public void test(){}
}public class Test{public static void main(String[] args){//创建一个Spring容器AnnotationConfigApplication applicationContext = new AnnotationContext(AppConfig.class);//从容器中获取userService BeanapplicationContext.getBean("userService".Userservice.class);}
}
3)自定义部分属性的初始化
public class User{}@Component
public class OrderService{}//定义一个Bean
@Component
public class Userservice implement InitializingBean{//自动注入另一个Bean@Autowiredprivate OrderService orderService;private User defaultuser;@Overridepublic void afterPropertiesSet(){//其他的自定义初始化动作}@PostConstructpublic void xxx(){//其他的自定义初始化动作}public void test(){}
}public class Test{public static void main(String[] args){//创建一个Spring容器AnnotationConfigApplication applicationContext = new AnnotationContext(AppConfig.class);//从容器中获取userService BeanapplicationContext.getBean("userService".Userservice.class);}
}
4)若开启AOP且是切面的一个切点,则生成一个代理对象
@Aspect
@Component
public class MyAspect{public AspectBefore(){@Before("execution(public void packageName.service.Uservice.test())")System.out.println("Before");}
}
判断是否进行AOP:
在定义一个切面时,会用 @Aspect ,@Component 注解切面,此时将切面的切点与当前实例进行比较。
若切点匹配成功,则进行动态代理,产生代理对象
UserserviceProxy extends Userservice{private Userservice targer;@Overridepublic test(){//执行切面的代理逻辑System.out.println("Before");target.test();}
}
代理对象不做属性填充
Bean创建的完整步骤
- 推断构造方法——AutowiredAnnotationBeanPostProcessor
- 通过反射机制和构造器,生成实例
- 处理beanDefinition,找出可被填充的属性
- 属性填充
- 若有
@PostConstruct注解的方法,则进行相应的初始化前操作 - 初始化时:先调用实现了
InitializingBean接口的afterPropertiesSet()方法 ,再调用@Bean中的initMethod属性配置的初始化方法 - 初始化后会进行一些后处理,将实现了
ApplicationListener接口的Bean添加到事件监听器列表中 - 若开启了AOP,则判断当前实例是否是某一切面的切点,若是,则生成代理对象作为Bean,注册到Spring容器中
构造器推断
若有被 @Autowired 注解的构造器,则调用该构造器
若有参和无参构造方法同时存在,优先选无参构造器
若只有一个构造器,则使用唯一的构造器
若没有声明构造器,则用无参构造器
若没有无参构造器且有多个有参构造器,则抛出异常
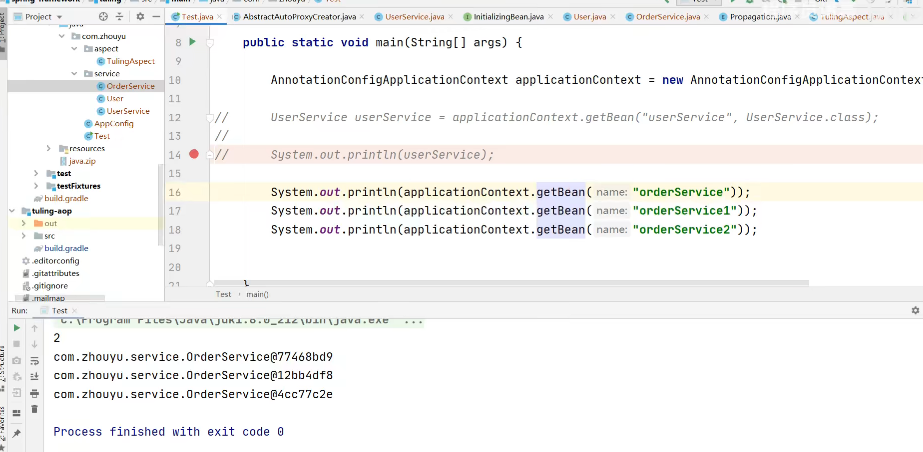
单例Bean和单例模式
Spring容器中同一个类可以有多个不同名称的Bean
单例模式:一个类只有一个实例
单例Bean:一个Spring容器只有一个同类型的同名Bean
applicationContext.getBean("orderService")执行多次,得到的是同一个Bean
@Component//配置类
public class AppConfig{@Beanpublic OrderService orderservice1(){return new OrderService();}@Beanpublic OrderService orderservice1(){return new OrderService();}@Beanpublic OrderService orderservice2(){return new OrderService();}
}
执行后,
属性填充
被 @Autowired 注解的属性,从Spring容器中找合适的Bean给属性赋值
- 先根据类型找(ByType)找到同类型的Bean
- 第一轮筛选,会剔除
@Bean(autowiredCandidate=false)的Bean - 若被
@Qualifier("")注解中指明Bean所在的目标分组,第二轮筛选会剔除不在该分组的Bean - 若有
@Primary注解的Bean,则选择主Bean注入 - 若
@Priority()设置了Bean的不同优先级,选择优先级最高的Bean注入 - 若ByType找到多个同类型的Bean,但ByName找不到Bean,则会报错
整合MyBatis
方式一
导包

<dependencies><dependency><groupId>junit</groupId><artifactId>junit</artifactId><version>4.13</version><scope>test</scope></dependency><!--mybatis--><dependency><groupId>org.mybatis</groupId><artifactId>mybatis</artifactId><version>3.5.6</version></dependency><dependency><groupId>mysql</groupId><artifactId>mysql-connector-java</artifactId><version>8.0.16</version></dependency><!--spring IoC--><dependency><groupId>org.springframework</groupId><artifactId>spring-webmvc</artifactId><version>5.3.3</version></dependency><!--Spring JDBC,版本不一致会包driverClassName相关的错--><dependency><groupId>org.springframework</groupId><artifactId>spring-jdbc</artifactId><version>5.3.3</version></dependency><!--Spring AOP--><dependency><groupId>org.aspectj</groupId><artifactId>aspectjweaver</artifactId><version>1.9.4</version></dependency><!--Spring整合Mybatis--><dependency><groupId>org.mybatis</groupId><artifactId>mybatis-spring</artifactId><version>2.0.6</version></dependency><dependency><groupId>org.projectlombok</groupId><artifactId>lombok</artifactId><version>1.18.16</version></dependency>
</dependencies><build><resources><resource><!-- 使得directory目录下的资源可以被导出 --><directory>src/main/java</directory><!-- 设置可被识别通过的文件类型 --><includes><include>**/*.properties</include><include>**/*.xml</include></includes><filtering>true</filtering></resource><resource><!-- 使得directory目录下的资源可以被导出 --><directory>src/main/resources</directory><!-- 设置可被识别通过的文件类型 --><includes><include>**/*.properties</include><include>**/*.xml</include></includes><filtering>true</filtering></resource></resources>
</build>
pojo
配置mybatis-config.xml
<?xml version="1.0" encoding="UTF-8" ?>
<!DOCTYPE configurationPUBLIC "-//mybatis.org//DTD Config 3.0//EN""http://mybatis.org/dtd/mybatis-3-config.dtd">
<configuration><typeAliases><package name=""/></typeAliases><settings><setting name="" value=""/></settings>
</configuration>
mapper.xml(数据访问层)
<?xml version="1.0" encoding="UTF-8" ?>
<!DOCTYPE mapperPUBLIC "-//mybatis.org//DTD Config 3.0//EN""http://mybatis.org/dtd/mybatis-3-mapper.dtd">
<mapper namespace="com.kuang.mapper.UserMapper"><select id="getUsers" resultType="user">select *from mybatis.user;</select>
</mapper>
Spring整合Mybatis——spring-mybatis.xml
<?xml version="1.0" encoding="UTF-8"?>
<beans xmlns="http://www.springframework.org/schema/beans"xmlns:xsi="http://www.w3.org/2001/XMLSchema-instance"xmlns:aop="http://www.springframework.org/schema/aop"xsi:schemaLocation="http://www.springframework.org/schema/beanshttps://www.springframework.org/schema/beans/spring-beans.xsdhttp://www.springframework.org/schema/aophttps://www.springframework.org/schema/aop/spring-aop.xsd"><!--配置数据源 使用Spring的数据源替换mybatis的数据源--><bean id="dataSource" class="org.springframework.jdbc.datasource.DriverManagerDataSource"><property name="driverClassName" value="com.mysql.cj.jdbc.Driver"/><property name="url" value="jdbc:mysql://localhost:3306/mybatis?useSSL=true&useUnicode=true&characterEncoding=utf-8&serverTimezone=UTC"/><property name="username" value="root"/><property name="password" value="2017002231"/></bean><!--配置SqlSessionFactory--><bean id="sqlSessionFactory" class="org.mybatis.spring.SqlSessionFactoryBean"><property name="dataSource" ref="dataSource"/><!--绑定,mybatis配置文件--><property name="configLocation" value="classpath:mybatis-config.xml"/><property name="mapperLocations" value="classpath:com/kuang/mapper/*.xml"/></bean><!--配置SqlSession 只能使用构造器注入--><bean id="sqlSession" class="org.mybatis.spring.SqlSessionTemplate"><constructor-arg name="sqlSessionFactory" ref="sqlSessionFactory"/></bean>
</beans>
+从properties文件导入
#db.properties
mysql_driver=com.mysql.cj.jdbc.Driver
mysql_url=jdbc:mysql://localhost:3306/mybatis?useSSL=true&useUnicode=true&characterEncoding=utf-8&serverTimezone=UTC
root=root
root_pwd=2017002231
<beans xmlns:context="http://www.springframework.org/schema/context"
xsi:schemaLocation="http://www.springframework.org/schema/contexthttps://www.springframework.org/schema/context/spring-context.xsd"><context:property-placeholder location="classpath:db.properties"/>
mapperImpl
public class UserMapperImpl implements UserMapper{private SqlSessionTemplate sqlSession;public void setSqlSession(SqlSessionTemplate sqlSession) {this.sqlSession = sqlSession;}@Overridepublic List<User> getUsers() {UserMapper userMapper = sqlSession.getMapper(UserMapper.class);return userMapper.getUsers();}
}
spring-mapper.xml——mapper层bean注入Spring
<?xml version="1.0" encoding="UTF-8"?>
<beans xmlns="http://www.springframework.org/schema/beans"xmlns:xsi="http://www.w3.org/2001/XMLSchema-instance"xmlns:aop="http://www.springframework.org/schema/aop"xsi:schemaLocation="http://www.springframework.org/schema/beanshttps://www.springframework.org/schema/beans/spring-beans.xsdhttp://www.springframework.org/schema/aophttps://www.springframework.org/schema/aop/spring-aop.xsd"><import resource="spring-mybatis.xml"/><bean id="userMapper" class="com.kuang.mapper.UserMapperImpl"><property name="sqlSession" ref="sqlSession"/></bean>
</beans>
applicationContext.xml——Bean整合
<?xml version="1.0" encoding="UTF-8"?>
<beans xmlns="http://www.springframework.org/schema/beans"xmlns:xsi="http://www.w3.org/2001/XMLSchema-instance"xmlns:aop="http://www.springframework.org/schema/aop"xsi:schemaLocation="http://www.springframework.org/schema/beanshttps://www.springframework.org/schema/beans/spring-beans.xsdhttp://www.springframework.org/schema/aophttps://www.springframework.org/schema/aop/spring-aop.xsd"><import resource="spring-mapper.xml"/></beans>
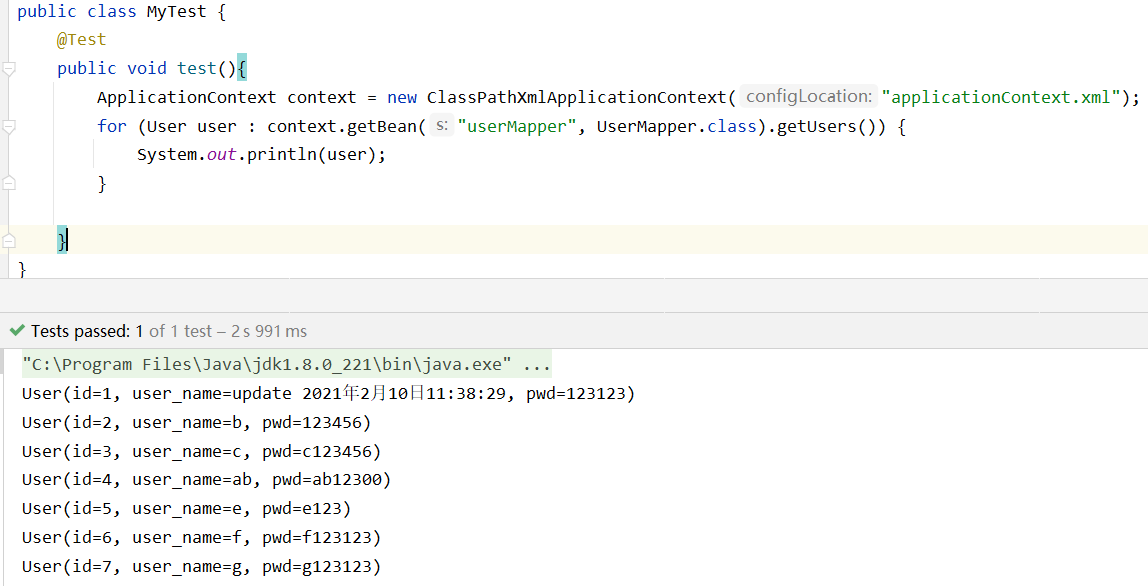
测试
ApplicationContext context = new ClassPathXmlApplicationContext("applicationContext.xml");UserMapper userMapper = context.getBean("userMapper", UserMapper.class);List<User> users = userMapper.getUsers();
for (User user : users) {System.out.println(user);
}
方式二
导包

<dependencies><dependency><groupId>junit</groupId><artifactId>junit</artifactId><version>4.13</version><scope>test</scope></dependency><!--mybatis--><dependency><groupId>org.mybatis</groupId><artifactId>mybatis</artifactId><version>3.5.6</version></dependency><dependency><groupId>mysql</groupId><artifactId>mysql-connector-java</artifactId><version>8.0.16</version></dependency><!--spring IoC--><dependency><groupId>org.springframework</groupId><artifactId>spring-webmvc</artifactId><version>5.3.3</version></dependency><!--Spring JDBC,版本不一致会包driverClassName相关的错--><dependency><groupId>org.springframework</groupId><artifactId>spring-jdbc</artifactId><version>5.3.3</version></dependency><!--Spring AOP--><dependency><groupId>org.aspectj</groupId><artifactId>aspectjweaver</artifactId><version>1.9.4</version></dependency><!--Spring整合Mybatis--><dependency><groupId>org.mybatis</groupId><artifactId>mybatis-spring</artifactId><version>2.0.6</version></dependency><dependency><groupId>org.projectlombok</groupId><artifactId>lombok</artifactId><version>1.18.16</version></dependency>
</dependencies><build><resources><resource><!-- 使得directory目录下的资源可以被导出 --><directory>src/main/java</directory><!-- 设置可被识别通过的文件类型 --><includes><include>**/*.properties</include><include>**/*.xml</include></includes><filtering>true</filtering></resource><resource><!-- 使得directory目录下的资源可以被导出 --><directory>src/main/resources</directory><!-- 设置可被识别通过的文件类型 --><includes><include>**/*.properties</include><include>**/*.xml</include></includes><filtering>true</filtering></resource></resources>
</build>
配置mybatis-config.xml
<?xml version="1.0" encoding="UTF-8" ?>
<!DOCTYPE configurationPUBLIC "-//mybatis.org//DTD Config 3.0//EN""http://mybatis.org/dtd/mybatis-3-config.dtd">
<configuration><typeAliases><package name=""/></typeAliases><settings><setting name="" value=""/></settings>
</configuration>
pojo
db.properties–>spring-mybatis.xml
mysqlDriver=com.mysql.cj.jdbc.Driver
mysqlUrl=jdbc:mysql://localhost:3306/mybatis?useSSL=true&useUnicode=true&characterEncoding=utf-8&serverTimezone=UTC
root=root
rootPassword=2017002231
<?xml version="1.0" encoding="UTF-8"?>
<beans xmlns="http://www.springframework.org/schema/beans"xmlns:xsi="http://www.w3.org/2001/XMLSchema-instance"xmlns:aop="http://www.springframework.org/schema/aop"xmlns:context="http://www.springframework.org/schema/context"xsi:schemaLocation="http://www.springframework.org/schema/beanshttps://www.springframework.org/schema/beans/spring-beans.xsdhttp://www.springframework.org/schema/aophttps://www.springframework.org/schema/aop/spring-aop.xsdhttp://www.springframework.org/schema/context https://www.springframework.org/schema/context/spring-context.xsd"><context:property-placeholder location="db.properties"/><!--配置数据源 使用Spring的数据源替换mybatis的数据源--><bean id="dataSource" class="org.springframework.jdbc.datasource.DriverManagerDataSource"><property name="driverClassName" value="${mysqlDriver}"/><property name="url" value="${mysqlUrl}"/><property name="username" value="${root}"/><property name="password" value="${rootPassword}"/></bean><bean id="sqlSessionFactory" class="org.mybatis.spring.SqlSessionFactoryBean"><property name="dataSource" ref="dataSource"/><property name="configLocation" value="classpath:mybatis-config.xml"/><property name="mapperLocations" value="classpath:com/kuang/mapper/*.xml"/></bean>
</beans>
mapper.java
mapper.xml
<?xml version="1.0" encoding="UTF-8" ?>
<!DOCTYPE mapperPUBLIC "-//mybatis.org//DTD Config 3.0//EN""http://mybatis.org/dtd/mybatis-3-mapper.dtd">
<mapper namespace=""><select id="getUsers" resultType="user">select * from mybatis.user;</select>
</mapper>
mapperImpl.java
继承 Spring的SqlSession类
public class UserMapperImpl extends SqlSessionDaoSupport implements UserMapper {@Overridepublic List<User> getUsers(){return getSqlSession().getMapper(UserMapper.class).getUsers();}
}
mapperImpl注册到Spring——springMapper.xml
<?xml version="1.0" encoding="UTF-8"?>
<beans xmlns="http://www.springframework.org/schema/beans"xmlns:xsi="http://www.w3.org/2001/XMLSchema-instance"xmlns:aop="http://www.springframework.org/schema/aop"xsi:schemaLocation="http://www.springframework.org/schema/beanshttps://www.springframework.org/schema/beans/spring-beans.xsdhttp://www.springframework.org/schema/aophttps://www.springframework.org/schema/aop/spring-aop.xsd"><import resource="spring-mybatis.xml" /><bean id="userMapper" class="com.kuang.mapper.UserMapperImpl"><property name="sqlSessionFactory" ref="sqlSessionFactory"/></bean>
</beans>
整合Beans——applicationContext.xml
<?xml version="1.0" encoding="UTF-8"?>
<beans xmlns="http://www.springframework.org/schema/beans"xmlns:xsi="http://www.w3.org/2001/XMLSchema-instance"xsi:schemaLocation="http://www.springframework.org/schema/beanshttps://www.springframework.org/schema/beans/spring-beans.xsd"><import resource="spring-mapper.xml"/></beans>
测试
声明式事务
事务
- 原子性
- 数据一致性、完整性问题
ACID:
原子性(Atom)
一致性(Consistent)
隔离性(Isolation):多个事务并发执行,防止数据损坏
持久性(durablity):事务一旦提交,无论系统发生什么问题,结果都不会被影响
<!--userMapper.xml-->
<mapper namespace="com.kuang.mapper.UserMapper"><select id="getUsers" resultType="user">select * from mybatis.user;</select><insert id="addUser" parameterType="user">insert into user (id,user_name,pwd) values (#{id},#{user_name},#{pwd});</insert><!--有错--><delete id="deleteUser">deletes from user where id = #{id};</delete>
</mapper>
public void op(){User user = new User(10,"transaction","123123");addUser(user);deleteUser(10);
}
- 虽然op执行失败,但addUser成功
声明式事务——AOP
<bean id="transaction" class="org.springframework.jdbc.datasource.DataSourceTransactionManager"><property name="dataSource" ref="dataSource"/>
</bean><!--为哪些方法配置事务通知-->
<tx:advice id="txAdvice" transaction-manager="transaction"><tx:attributes><tx:method name="*" propagation="REQUIRED"/></tx:attributes>
</tx:advice><aop:config><aop:pointcut id="pc_tx" expression="execution(* com.kuang.mapper.*.*(..))"/><aop:advisor advice-ref="txAdvice" pointcut-ref="pc_tx"/>
</aop:config>
相关文章:
【开发】后端框架——Spring
前置知识:JSP&Servlet 学习视频:https://www.bilibili.com/video/BV1WE411d7Dv?spm_id_from333.999.0.0 IoC:控制反转 IoC的理解:IoC思想,IoC怎么创建对象,IoC是Spring的核心 依赖注入三种方式&#x…...

vue中的自定义指令
前言 说到 vue 中的自定义指令,相信大家都不陌生。在官网中是这么说的,除了核心功能默认内置的指令 (v-model 和 v-show),vue 也允许注册自定义指令。那什么时候会用到自定义指令呢?代码复用和抽象的主要形式是组件。然而…...

技术分享及探讨
前言 很高兴给大家做一个技术分享及探讨。 下面给大家分享几个工作遇到有趣的例子。 docker docker 进程 现象 客户的模型导入到BML平台发布预测服务后,模型本身是用django提供的支持。按照本地docker的方式进行调试,kill掉django的进程修改代码…...

人工智能AI
AI 模型。它使用深度神经网络,从数十亿或数万亿个单词中学习,能够生成任何主题或领域的文本。它可以执行各种自然语言任务,如分类、总结、翻译、生成和对话。 大语言模型开发建立在4个核心思想上: 模型 – Models 提示词 - Prompt…...
2022天梯赛补题
题目详情 - L2-041 插松枝 (pintia.cn) 思路:模拟 背包就是个栈,开个stack解决流程思路是,每次取推进器前,尽可能拿背包的,背包拿到不可以时,跳出拿推进器时判断: 如果背包装得下,…...
字节跳动测试岗面试挂在2面,复盘后,我总结了失败原因,决定再战一次...
先说下我基本情况,本科不是计算机专业,现在是学通信,然后做图像处理,可能面试官看我不是科班出身没有问太多计算机相关的问题,因为第一次找工作,字节的游戏专场又是最早开始的,就投递了…...
,crypto模块详解)
Nodejs实现通用的加密和哈希算法(MD5、SHA1、Hmac、AES、Diffie-Hellman、RSA),crypto模块详解
crypto crypto模块的目的是为了提供通用的加密和哈希算法(hash)。用纯JavaScript代码实现这些功能不是不可能,但速度会非常慢。Nodejs用C/C++实现这些算法后,通过cypto这个模块暴露为JavaScript接口,这样用起来方便,运行速度也快。 MD5和SHA1 MD5是一种常用的哈希算法,…...
测试行业3年经验,从大厂裸辞后,面试阿里、字节全都一面挂,被面试官说我的水平还不如应届生
测试员可以先在大厂镀金,以后去中小厂毫无压力,基本不会被卡,事实果真如此吗?但是在我身上却是给了我很大一巴掌... 所谓大厂镀金只是不卡简历而已,如果面试答得稀烂,人家根本不会要你。况且要不是大厂出来…...

安卓悬浮窗口, 丝滑双指缩放视频窗口
最重要的事情说前面: demo源码:https://github.com/5800LDW/ProjectFloatingWindow前言:1.跨应用的浮动窗口在网上很多资料, 就不细说了。2.双指缩放View 也很多资料, 可参考:https://blog.csdn.net/zxq614/article/details/88873729正文下面进入正题, 如何把上述结合起来, 下面…...

300左右哪款蓝牙耳机适合学生用?四款便宜质量好的蓝牙耳机推荐
近年来,随着蓝牙耳机的发展,不管是音质、外观、佩戴还是降噪都有了很大的提升。但是我们在入手蓝牙耳机时,最好还是根据预算和需求入手。在此,我来给预算在三百内的朋友推荐几款便宜质量好的蓝牙耳机,可以当个参考。 …...

桥梁设计模式
介绍 Java桥梁模式(也称桥接模式)(Bridge Pattern)是一种设计模式,它将抽象和实现分离,使它们可以独立地变化.它通过一个大类或者一系列紧密关联的类拆分成两个独立的层次结构来实现这种分离,其中一个层次结构包含抽象类或接口,另一个层次结构包含实现类.桥梁模式使得抽象类和…...
)
【华为OD机试 2023最新 】 新员工座位(C++)
文章目录 题目描述输入描述输出描述用例题目解析C++题目描述 工位由序列F1,F2…Fn组成,Fi值为0、1或2。其中0代表空置,1代表有人,2代表障碍物。 1、某一空位的友好度为左右连续老员工数之和, 2、为方便新员工学习求助,优先安排友好度高的空位, 给出工位序列,求所有空…...

蓝桥杯刷题第二十二天
第一题:受伤的皇后题目描述有一个 nn 的国际象棋棋盘(n 行 n 列的方格图),请在棋盘中摆放 n 个受伤的国际象棋皇后,要求:任何两个皇后不在同一行。任何两个皇后不在同一列。如果两个皇后在同一条 45 度角的…...

CentOS从gcc 4.8.5 升级到gcc 8.3.1
gcc -v查看当前gcc版本。 sudo yum install centos-release-scl-rh安装centos-release-scl-rh。 sudo yum install devtoolset-8-build安装devtoolset-8-build。 显示“Complete!”表示安装成功。 sudo yum install devtoolset-8-gdb安装devtoolset-8-gdb。 显示“Comple…...
【人人都能读标准】12. 原始类型的编码形式
本文为《人人都能读标准》—— ECMAScript篇的第12篇。我在这个仓库中系统地介绍了标准的阅读规则以及使用方式,并深入剖析了标准对JavaScript核心原理的描述。 ECMAScript有7种原始类型,分别是Undefined、Null、Boolean、String、Number、BigInt、Symbo…...

VUE进行前后端交互
目录 一、 跨域 1. 什么是跨域? 2. 什么是本域? 3. 浏览器请求的三种报错 二、SpringBoot解决跨域问题其他前后端跨域请求解决方案 1. SpringBoot上直接添加CrossOrigin 2. 处理跨域请求的Configuration 3. 采用过滤器的方式 3.1 方式一 3.2 方式…...

ThingsBoard Gateway:物联网设备数据采集与集成的强大解决方案
文章目录ThingsBoard Gateway:物联网设备数据采集与集成的强大解决方案1\. ThingsBoard Gateway:概述2\. 主要特点与优势3\. 应用场景4\. 如何使用ThingsBoard Gateway:物联网设备数据采集与集成的强大解决方案 随着物联网(IoT&a…...

什么是镜像/raid
镜像(Mirroring)是一种文件存储形式,是冗余的一种类型,一个磁盘上的数据在另一个磁盘上存在一个完全相同的副本即为镜像。可以把许多文件做成一个镜像文件,与GHOST等程序放在一个盘里用GHOST等软件打开后,又…...
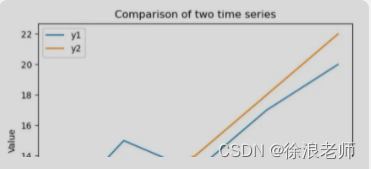
【Python】如何有效比较两个时间序列在图形上的相似度?
文章目录前言一、1.准备二、实操1.使用Matplotlib可视化比较两个时间序列2.计算两个时间序列的相关系数:3.使用Python实现动态时间规整算法(DTW):总结前言 比较两个时间序列在图形上是否相似,可以通过以下方法&#x…...
JavaEE-常见的锁策略和synchronized的锁机制
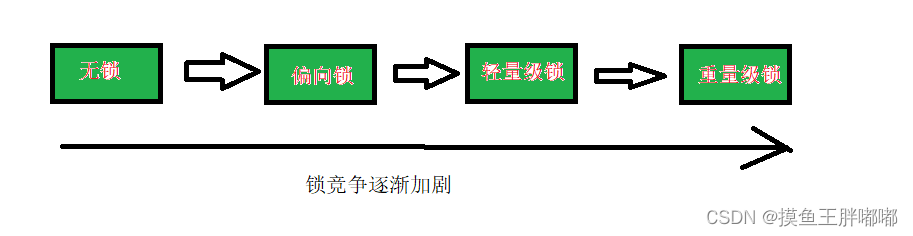
目录常见的锁策略乐观锁和悲观锁轻量级锁和重量级锁自旋锁和挂起等待锁普通互斥锁和读写锁公平锁和非公平锁可重入锁和不可重入锁synchronized的锁机制synchronized特性锁升级/锁膨胀锁消除锁粗化常见的锁策略 乐观锁和悲观锁 乐观锁和悲观锁主要是看主要是锁竞争的激烈程度.…...

告别‘纸片人’:在Unity URP里给角色注入灵魂——皮肤透光、发丝细节与眼神光的调校指南
告别‘纸片人’:在Unity URP里给角色注入灵魂——皮肤透光、发丝细节与眼神光的调校指南 在独立游戏开发中,角色往往是玩家情感投射的核心载体。一个缺乏生命力的角色模型,即使建模精度再高,也会让玩家产生"纸片人"的疏…...

雨夜便利店的光,刚好够照亮你这一秒的疲惫
雨声比闹钟更懂你凌晨一点十七分,耳机里循环着一首没名字的 lo-fi beat,窗外的雨没停,也没下大,就那么轻轻敲着空调外机和生锈的铁皮棚。你站在楼道口犹豫要不要出门买泡面,其实不是饿,是心里空了一小块&am…...

群晖NAS进阶指南:借助Docker容器部署全能DDNS服务,实现多平台域名与公网IP智能同步
1. 为什么需要全能DDNS服务? 家里有群晖NAS的朋友可能都遇到过这样的烦恼:明明设置了外网访问,但过几天就失效了。这是因为大多数家庭宽带分配的都是动态公网IP,运营商会定期更换你的IP地址。想象一下,这就像你的手机…...
开源语言模型项目实践:从Transformer核心到训练调优全解析
1. 项目概述:一个开源语言模型的实践与探索最近在GitHub上看到一个名为“angeluriot/Language_model”的项目,点进去一看,是个挺有意思的语言模型实现。虽然项目标题很简单,但内容却涵盖了从数据处理、模型构建到训练推理的完整链…...

NomNom终极指南:3个技巧让你轻松掌控《无人深空》存档
NomNom终极指南:3个技巧让你轻松掌控《无人深空》存档 【免费下载链接】NomNom NomNom is the most complete savegame editor for NMS but also shows additional information around the data youre about to change. You can also easily look up each item indi…...

Sketch Find and Replace插件终极指南:如何快速批量替换设计文本
Sketch Find and Replace插件终极指南:如何快速批量替换设计文本 【免费下载链接】Sketch-Find-And-Replace Sketch plugin to do a find and replace on text within layers 项目地址: https://gitcode.com/gh_mirrors/sk/Sketch-Find-And-Replace 你是否曾…...

掌握Windows 11精简艺术:Tiny11Builder实战手册
掌握Windows 11精简艺术:Tiny11Builder实战手册 【免费下载链接】tiny11builder Scripts to build a trimmed-down Windows 11 image. 项目地址: https://gitcode.com/GitHub_Trending/ti/tiny11builder 你是否曾因Windows 11的臃肿而烦恼?老旧设…...

你还在迷信AI的回答?2026年,信息主权争夺战已全面打响
一、AI信息乱象:个人与企业的双重困境 (一)个人用户:深陷“AI虚假陷阱”,决策毫无安全感2026年的今天,AI大模型的“幻觉缺陷”非但没有消失,反而因模型参数膨胀而变得更加隐蔽。用户向豆包询问某…...
)
别再折腾源码编译了!Ubuntu 20.04下用apt-get一键安装Asterisk PBX(附SIP账号配置详解)
别再折腾源码编译了!Ubuntu 20.04下用apt-get一键安装Asterisk PBX(附SIP账号配置详解) 如果你正在寻找一种快速搭建企业级电话系统的方法,那么Asterisk PBX绝对值得考虑。作为开源PBX领域的标杆,Asterisk提供了完整的…...

一站式解决Windows程序运行问题的Visual C++运行库修复指南
一站式解决Windows程序运行问题的Visual C运行库修复指南 【免费下载链接】vcredist AIO Repack for latest Microsoft Visual C Redistributable Runtimes 项目地址: https://gitcode.com/gh_mirrors/vc/vcredist 你是否曾经遇到过打开软件时突然弹窗提示"缺少msv…...