谷粒商城笔记+踩坑(18)——购物车
目录
一、环境搭建
1.1、购物车模块初始化
1.2、动静资源处理
1.3、页面跳转配置
二、数据模型分析
2.1、购物车需求
2.1.1、离线购物车和在线购物车需求、数据库选择redis
2.1.2、购物车数据结构
2.2、模型类抽取,Cart和CartItem
2.3、Redis依赖和配置、SpringSession配置类
三、ThreadLocal 用户身份鉴别
3.1、需求分析
3.2、传输对象封装临时用户id,userKey,是否有临时用户
3.3、创建购物车常量类
3.4、自定义拦截器,临时用户信息放到ThreadLocal<>
3.5、把拦截器添加到WebMvcConfigurer配置类
3.6、Controller处理购物车请求
四、添加商品到购物车
4.1、前端页面修改
4.2、Controller
4.3、service
4.3.1、远程查询sku的组合信息
4.3.2、远程查询sku的组合信息
4.3.3、异步编排,自定义线程池配置类
4.3.4、添加购物车业务实现
4.4、刷新页面不断发请求问题,RedirectAttribute
4.4.0、分析
4.4.1、改成重定向到添加成功页面并查询购物车数据
4.4.2、Service层 CartServiceImpl 实现类编写 获取购物车某个购物项方法
4.4.3、success页面修改
五、获取购物车
六、选中购物项[是否选中]
七、修改购物项数量
7.1、前端 cartList.html 页面修改
7.2、后端 接口编写
八、删除购物项
8.1、前端修改
8.2、后端接口
一、环境搭建
1.1、购物车模块初始化
第一步、创建gulimall-cart服务,并进行降版本处理
<parent><groupId>org.springframework.boot</groupId><artifactId>spring-boot-starter-parent</artifactId><version>2.1.8.RELEASE</version><relativePath/> <!-- lookup parent from repository -->
</parent>
<groupId>com.atguigu</groupId>
<artifactId>gulimall-cart</artifactId>
<version>0.0.1-SNAPSHOT</version>
<name>gulimall-cart</name>
<description>购物车</description>
<properties><java.version>1.8</java.version><spring-cloud.version>Greenwich.SR3</spring-cloud.version>
</properties>


第二步、hosts添加域名映射
# Gulimall Host Start
127.0.0.1 gulimall.cn
127.0.0.1 search.gulimall.cn
127.0.0.1 item.gulimall.cn
127.0.0.1 auth.gulimall.cn
127.0.0.1 cart.gulimall.cn
# Gulimall Host End
第三步、导入公共模块依赖
<dependency><groupId>com.atguigu.gulimall</groupId><artifactId>gulimall-common</artifactId><version>0.0.1-SNAPSHOT</version>
</dependency>
因为目前不用数据库,故排除掉
@SpringBootApplication(exclude = DataSourceAutoConfiguration.class)
public class GulimallCartApplication {public static void main(String[] args) {SpringApplication.run(GulimallCartApplication.class, args);}}
第四步、bootstrap.yml添加nacos配置
server.port=40000spring.application.name=gulimall-cart
spring.cloud.nacos.discovery.server-addr=127.0.0.1:8848
第五步、为启动类添加注解,开启服务注册和发现
@EnableFeignClients
@EnableDiscoveryClient
@SpringBootApplication(exclude = DataSourceAutoConfiguration.class)
public class GulimallCartApplication {public static void main(String[] args) {SpringApplication.run(GulimallCartApplication.class, args);}}
第六步、修改网关,给购物车配置路由
- id: gulimall_cart_routeuri: lb://gulimall-cartpredicates:- Host=cart.gulimall.cn
1.2、动静资源处理
-
静:将资料中购物车文件夹下的所有的静态资源复制到服务器的:
mydata/nginx/html/static/cart目录下 -
动:将资料中购物车文件夹下的 两个页面复制到 gulimall-cart服务的
templates目录下 -
替换掉网页中的所有资源申请路径
1.3、页面跳转配置
需求:实现页面的跳转
- 当我们在商品详情页
item.html点击加入购物车之后,跳转到加入成功页success.html- 在成功页
success.html点击 购物车 进入购物车列表页cartList.html- 在成功页
success.html点击 查看商品详情 跳转到该商品的详情页- 在 首页
index.html中点击我的购物车也跳转到 购物车列表页cartList.html
gulimall-product 服务中的 Item.html
<div class="box-btns-two"><a href="http://cart.gulimall.cn/addToCart">加入购物车</a>
</div>//......<div class="nav_top_three"><a href="http://cart.gulimall.cn/cart.html">我的购物车</a><span class="glyphicon glyphicon-shopping-cart"></span><div class="nav_top_three_1"><img src="/static/item/img/44.png"/>购物车还没有商品,赶紧选购吧!</div>
</div>
Gulimall-cart 服务中 success.html 页面
<div class="bg_shop"><a class="btn-tobback" href="http://item.gulimall.cn/3.html">查看商品详情</a><a class="btn-addtocart" href="http://cart.gulimall.cn/cart.html"id="GotoShoppingCart"><b></b>去购物车结算</a>
</div>
Gulimall-cart 服务中 success.html 页面
<div class="one_top_left"><a href="http://gulimall.cn" class="one_left_logo"><img src="/static/cart/img/logo1.jpg"></a><a href="/static/cart#" class="one_left_link">购物车</a>
</div>//.....<li><a href="http://gulimall.cn">首页</a>
</li>
Gulimall-cart 服务中的 CartController类中添加映射
@Controller
public class CartController {@GetMapping("/cart.html")public String cartListPage(){return "cartList";}/*** 添加商品到购物车* @return*/@GetMapping("/addToCart")public String addToCart() {return "success";}
}
二、数据模型分析
2.1、购物车需求
2.1.1、离线购物车和在线购物车需求、数据库选择redis
需求描述
离线购物车:
-
用户可在 未登录状态 下将商品添加到购物车 [ 用户离线临时购物车 ]。浏览器即使关闭,下次进入,临时购物车数据都在。
在线购物车:
-
用户可以在 登录状态 下将商品添加到购物车 [ 用户在线购物车 ]。登录之后,会将离线购物车的数据全部合并过来,并清空离线购物车;
- 购物功能
- 用户可以使用购物车一起结算下单
- 添加商品到购物车
- 用户可以查询自己的购物车
- 用户可以在购物车中修改购买商品的数量
- 用户可以在购物车中删除商品
- 在购物车中展示商品优惠信息
- 提示购物车商品价格变化
数据存储:
购物车是一个读多写多的场景,因此放入数据库并不合适,但购物车又需要持久化,因此这里我们选用Redis的持久化机制存储购物车数据。
redis默认是内存数据库,所有数据存在内存,
2.1.2、购物车数据结构

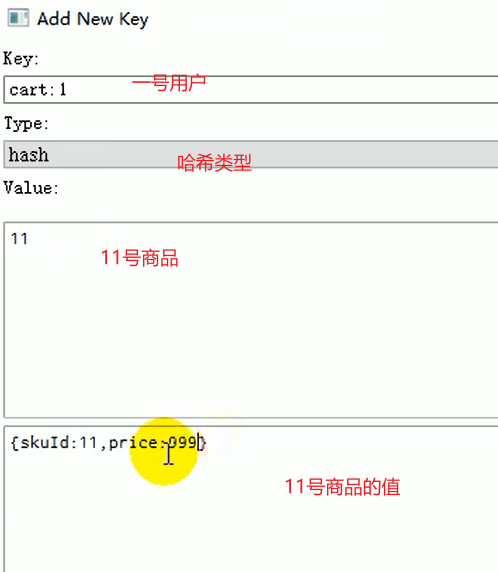
购物车Redis的Hash进行存储,key是用户标识码例如gulimall:cart:1,值是一个个CartItem
Redis中 每个用户的购物车 都是由各个购物项组成,根据分析这里使用 Hash进行存储比较合适:
- Map<String k1,Map<String k2,CartltemInfo>>
- K1:用户标识
- Map<String k2,CartltemInfo>
- K2 :商品Id
- CartltemInfo :购物项详情
2.2、模型类抽取,Cart和CartItem

- Cart
需要计算的属性,必须重写它的get方法,保证每次获取属性都会进行计算- 计算商品的总数量
- 计算商品类型数量
- 计算商品的总价
注意:
- 这里不用@Data,自己生成getter和setter方法,主要为了数量、金额等属性自定义计算方法。例如Cart里的商品数量通过CartItem列表计算总数量。
- 金额相关数据必须用BigDecimal类型,进行精确的运算
package com.atguigu.cart.vo;
/*** Description: 整体购物车*  这里不用@Data,自己生成getter和setter方法,主要为了数量、金额等属性自定义计算方法。*  例如Cart里的商品数量通过CartItem列表计算总数量。*/
public class Cart {/*** 购物车子项信息*/List<CartItem> items;/*** 商品的总数量*/private Integer countNum;/*** 商品类型数量*/private Integer countType;/*** 商品总价*/private BigDecimal totalAmount;/*** 减免价格*/private BigDecimal reduce = new BigDecimal("0");//需要计算的属性,必须重写它的get方法,保证每次获取属性都会进行计算public List<CartItem> getItems() {return items;}public void setItems(List<CartItem> items) {this.items = items;}public Integer getCountNum() {int count = 0;if (items!=null && items.size()>0) {for (CartItem item : items) {countNum += item.getCount();}}return count;}public Integer getCountType() {int count = 0;if (items!=null && items.size()>0) {for (CartItem item : items) {countNum += 1;}}return count;}public BigDecimal getTotalAmount() {BigDecimal amount = new BigDecimal("0");// 1、计算购物项总价if (items!=null && items.size()>0) {for (CartItem item : items) {BigDecimal totalPrice = item.getTotalPrice();amount = amount.add(totalPrice);}}// 2、减去优惠总价BigDecimal subtract = amount.subtract(getReduce());return subtract;}public BigDecimal getReduce() {return reduce;}public void setReduce(BigDecimal reduce) {this.reduce = reduce;}
}
- CartItem
- 计算小计价格
package com.atguigu.cart.vo;
/*** Description: 购物项内容。*  这里不用@Data,自己生成getter和setter方法,主要为了数量、金额等属性自定义计算方法。*  例如Cart里的商品数量通过CartItem列表计算总数量。*/
public class CartItem {/*** 商品Id*/private Long skuId;/*** 商品是否被选中(默认被选中)*/private Boolean check = true;/*** 商品标题*/private String title;/*** 商品图片*/private String image;/*** 商品套餐信息*/private List<String> skuAttr;/*** 商品价格*/private BigDecimal price;/*** 数量*/private Integer count;/*** 小计价格*/private BigDecimal totalPrice;public Long getSkuId() {return skuId;}public void setSkuId(Long skuId) {this.skuId = skuId;}public Boolean getCheck() {return check;}public void setCheck(Boolean check) {this.check = check;}public String getTitle() {return title;}public void setTitle(String title) {this.title = title;}public String getImage() {return image;}public void setImage(String image) {this.image = image;}public List<String> getSkuAttr() {return skuAttr;}public void setSkuAttr(List<String> skuAttr) {this.skuAttr = skuAttr;}public BigDecimal getPrice() {return price;}public void setPrice(BigDecimal price) {this.price = price;}public Integer getCount() {return count;}public void setCount(Integer count) {this.count = count;}/*** 动态计算当前的总价* @return*/public BigDecimal getTotalPrice() {return this.price.multiply(new BigDecimal("" + this.count));}public void setTotalPrice(BigDecimal totalPrice) {this.totalPrice = totalPrice;}
}
2.3、Redis依赖和配置、SpringSession配置类
1、导入redis和SpringSession的依赖
<dependency><groupId>org.springframework.session</groupId><artifactId>spring-session-data-redis</artifactId>
</dependency>
<dependency><groupId>org.springframework.boot</groupId><artifactId>spring-boot-starter-data-redis</artifactId>
</dependency>
2、编写配置
# 配置redis
spring.redis.host=124.222.223.222
spring.redis.port=6379
3、添加SpringSession配置类(自定义Session配置类)
作用:配置类设置session使用json序列化,并放大作用域(自定义)。
将 gulimall-auth-server 服务中 /com/atguigu/gulimall/auth/config路径下的GulimallSessionConfig.java配置类复制到 gulimall-cart服务的config包下:
package com.atguigu.cart.config;@Configuration
public class GulimallSessionConfig {@Beanpublic CookieSerializer cookieSerializer() {DefaultCookieSerializer cookieSerializer = new DefaultCookieSerializer();cookieSerializer.setDomainName("gulimall.cn");cookieSerializer.setCookieName("GULISESSION");return cookieSerializer;}@Beanpublic RedisSerializer<Object> springSessionDefaultRedisSerializer() {return new GenericJackson2JsonRedisSerializer();}
}
三、ThreadLocal 用户身份鉴别
3.1、需求分析
需求:
- 用户登录,访问Session中的用户信息
- 用户未登录
- Cookie中有 user-key,则表示有临时用户
- Cookie中没有 user-key,则表示没有临时用户
- 创建一个封装 并返回 user-key
ThreadLocal:同一个线程共享数据
- 核心原理是:Map<Thread,Object> threadLocal
- 在每个线程中都创建了一个 ThreadLocalMap 对象,每个线程可以访问自己内部 ThreadLocalMap 对象内的 value。线程之间互不干扰
已知:
- 一次请求进来: 拦截器 ==>> Controller ==>> Service ==>> dao 用的都是同一个线程

(1)用户身份鉴别方式
- 当用户登录之后点击购物车,则进行用户登录
- 用户未登录的时候点击购物车,会为临时用户生成一个name为user-key的cookie临时标识,过期时间为一个月,以后每次浏览器进行访问购物车的时候都会携带user-key。user-key 是用来标识和存储临时购物车数据的
(2)使用ThreadLocal 进行用户身份鉴别信息传递
- 在调用购物车的接口前,先通过session信息判断是否登录,并分别进行用户身份信息的封装
- session有用户信息则进行用户登录 userInfoTo.setUserId(member.getId());
- session中没有用户信息
- cookie中携带 user-key,则表示有临时用户,把user-key进行用户身份信息的封装: userInfoTo.setUserKey(cookie.getValue());
userInfoTo.setTempUser(true); 并标识携带user-key - cookie中未携带 user-key,则表示没有临时用户,进行分配
- cookie中携带 user-key,则表示有临时用户,把user-key进行用户身份信息的封装: userInfoTo.setUserKey(cookie.getValue());
- 将信息封装好放进ThreadLocal
- 在调用购物车的接口后,若cookie中未携带 user-key,则分配临时用户,让浏览器保存
user-key在cookie里,标识用户身份,第一次使用购物车,都会给一个临时用户信息,浏览器保存cookie后,每次访问都会从cookie中取到user-key。
3.2、传输对象封装临时用户id,userKey,是否有临时用户
传输对象,起名to。
package com.atguigu.cart.vo;@ToString
@Data
public class UserInfoTo {private Long userId;private String userKey; private boolean tempUser = false;   // 判断是否有临时用户
}
3.3、创建购物车常量类
package com.atguigu.common.constant;public class CartConstant {public static final String TEMP_USER_COOKIE_NAME = "user-key";public static final int TEMP_USER_COOKIE_TIMEOUT = 60*60*24*30;
}
3.4、自定义拦截器,临时用户信息放到ThreadLocal<>
业务流程:
- 在执行目标方法之前,检测cookie里的userKey,如果没有则新建用户传输对象,userKey设为随机uuid
- 将用户传输对象封装进ThreadLocal。
- 在执行目标方法之后,创建cookie并,设置作用域和过期时间,让浏览器保存
购物车模块
package com.xx.gulimall.cart.interceptor;/*** @Description: 在执行目标方法之前,判断用户的登录状态.并封装传递给controller目标请求**/public class CartInterceptor implements HandlerInterceptor {//创建ThreadLocal<>对象,同一个线程共享数据public static ThreadLocal<UserInfoTo> toThreadLocal = new ThreadLocal<>();/**** 目标方法执行之前*/@Overridepublic boolean preHandle(HttpServletRequest request, HttpServletResponse response, Object handler) throws Exception {UserInfoTo userInfoTo = new UserInfoTo();HttpSession session = request.getSession();//1.从session获得当前登录用户的信息MemberResponseVo memberResponseVo = (MemberResponseVo) session.getAttribute(LOGIN_USER);if (memberResponseVo != null) {//2.1 如果用户登录了,给用户传输对象添加iduserInfoTo.setUserId(memberResponseVo.getId());}
//        3.获取cookieCookie[] cookies = request.getCookies();
//        如果cookie不为空,找到和"user-key"同名的cookie,设置userKey,标记临时用户if (cookies != null && cookies.length > 0) {for (Cookie cookie : cookies) {//user-keyString name = cookie.getName();if (name.equals(TEMP_USER_COOKIE_NAME)) {userInfoTo.setUserKey(cookie.getValue());//标记为已是临时用户userInfoTo.setTempUser(true);}}}//如果没有临时用户一定分配一个临时用户,userKey是临时id。if (StringUtils.isEmpty(userInfoTo.getUserKey())) {String uuid = UUID.randomUUID().toString();userInfoTo.setUserKey(uuid);}//目标方法执行之前,将用户传输信息放到ThreadLocal里,同一个线程共享数据。toThreadLocal.set(userInfoTo);return true;}/*** 业务执行之后,分配临时用户来浏览器保存*/@Overridepublic void postHandle(HttpServletRequest request, HttpServletResponse response, Object handler, ModelAndView modelAndView) throws Exception {//获取当前用户的值UserInfoTo userInfoTo = toThreadLocal.get();//如果没有临时用户则保存一个临时用户,并延长cookie过期时间,扩大cookie域,实现子域名共享cookie。if (!userInfoTo.getTempUser()) {//创建一个cookieCookie cookie = new Cookie(TEMP_USER_COOKIE_NAME, userInfoTo.getUserKey());//扩大作用域cookie.setDomain("gulimall.com");//设置过期时间cookie.setMaxAge(TEMP_USER_COOKIE_TIMEOUT);response.addCookie(cookie);}}@Overridepublic void afterCompletion(HttpServletRequest request, HttpServletResponse response, Object handler, Exception ex) throws Exception {}
}
3.5、把拦截器添加到WebMvcConfigurer配置类
添加拦截器的配置,不能只把拦截器加入容器中,不然拦截器不生效的
package com.atguigu.cart.config;@Configuration
public class GulimallWebConfig implements WebMvcConfigurer {@Overridepublic void addInterceptors(InterceptorRegistry registry) {registry.addInterceptor(new CartInterceptor()).addPathPatterns("/**");}
}
3.6、Controller处理购物车请求
package com.atguigu.cart.controller;@Controller
public class CartController {/*** 去往用户购物车页面*  浏览器有一个cookie:user-key 用来标识用户身份,一个月后过期*  如果第一次使用京东的购物车功能,都会给一个临时用户身份;浏览器以后保存,每次访问都会带上这个cookie;* 登录:Session有* 没登录:按照cookie里面的user-key来做。*  第一次:如果没有临时用户,帮忙创建一个临时用户。* @return*/@GetMapping(value = "/cart.html")public String cartListPage(Model model) throws ExecutionException, InterruptedException {//快速得到用户信息:id,user-key// UserInfoTo userInfoTo = CartInterceptor.toThreadLocal.get();CartVo cartVo = cartService.getCart();model.addAttribute("cart",cartVo);return "cartList";}
}
四、添加商品到购物车
在gulimall-product模块,修改添加购物车按钮
4.1、前端页面修改
第一步、修改item页面
点击 加入购物车 按钮时,发送请求:
http://cart.gulimall.cn/addToCart?skuId=?&num=?
- skuId:当前商品的skuId
- num: 当前商品加入购物车的数量


$("#addToCartA").click(function () {var num = $("#numInput").val();var skuId = $(this).attr("skuId");location.href = "http://cart.gulimall.cn/addToCart?skuId="+skuId+"&num="+num;
});
第二步、修改 success页面

业务逻辑:
- 保存在Redis中的key
- 如果用户已经登录,则存储在Redis中的key,则是用户的Id
- 如果用户没有登录,则存在在Redis中的key,是临时用户对应的
user-key
- 购物车保存
- 若当前商品已经存在购物车,只需增添数量
- 否则需要查询商品购物项所需信息,并添加新商品至购物车
4.2、Controller
1、Controller层接口 CartController类 编写添加商品到购物车方法
/*** 添加商品到购物车* @param skuId 商品的skuid* @param num   添加的商品数量* @return*/
@GetMapping("/addToCart")
public String addToCart(@RequestParam("skuId") Long skuId,@RequestParam("num") Integer num,Model model) throws ExecutionException, InterruptedException {CartItem cartItem = cartService.addToCart(skuId,num);model.addAttribute("item",cartItem);return "success";
}
4.3、service
4.3.1、远程查询sku的组合信息
在gulimall-cart 服务中编写远程调用feign接口
package com.atguigu.cart.feign;@FeignClient("gulimall-product")
public interface ProductFeignService {@GetMapping("/product/skusaleattrvalue/stringlist/{skuId}")List<String> getSkuSaleAttrValues(@PathVariable("skuId") Long skuId);
}
4.3.2、远程查询sku的组合信息
Gulimall-product 服务中
- Controller层编写查询sku的组合信息
@RestController
@RequestMapping("product/skusaleattrvalue")
public class SkuSaleAttrValueController {@Autowiredprivate SkuSaleAttrValueService skuSaleAttrValueService;@GetMapping("/stringlist/{skuId}")public List<String> getSkuSaleAttrValues(@PathVariable("skuId") Long skuId){return  skuSaleAttrValueService.getSkuSaleAttrValuesAsStringList(skuId);}//....
}
Service层实现类 SkuSaleAttrValueServiceImpl 中编写方法
@Override
public List<String> getSkuSaleAttrValuesAsStringList(Long skuId) {SkuSaleAttrValueDao dao = this.baseMapper;return dao.getSkuSaleAttrValuesAsStringList(skuId);
}
Dao层xml的SQL语句 SkuSaleAttrValueDao.xml
<select id="getSkuSaleAttrValuesAsStringList" resultType="java.lang.String">SELECT CONCAT(attr_name,":",attr_value) FROM pms_sku_sale_attr_value WHERE sku_id=#{skuId};
</select>
在gulimall-cart 服务中编写远程调用feign接口
package com.atguigu.cart.feign;@FeignClient("gulimall-product")
public interface ProductFeignService {@RequestMapping("/product/skuinfo/info/{skuId}")R getSkuInfo(@PathVariable("skuId") Long skuId);@GetMapping("/product/skusaleattrvalue/stringlist/{skuId}")List<String> getSkuSaleAttrValues(@PathVariable("skuId") Long skuId);
}
4.3.3、异步编排,自定义线程池配置类
假设 远程查询sku的组合信息 查询需要1秒,远程查询sku的组合信息有需要1.5秒,那总耗时就需要2.5秒。
若使用异步编排的话,只需要1.5秒。
1、 将gulimall-product中 com/atguigu/gulimall/product/config 路径下的 MyThreadConfig、ThreadPoolConfigProperties类复制到 gulimall-cart 服务下的 config 路径下:
package com.atguigu.cart.config;@Configuration
public class MyThreadConfig {@Beanpublic ThreadPoolExecutor threadPoolExecutor(ThreadPoolConfigProperties pool) {return new ThreadPoolExecutor(pool.getCoreSize(),pool.getMaxSize(),pool.getKeepAliveTime(),TimeUnit.SECONDS,new LinkedBlockingDeque<>(100000),Executors.defaultThreadFactory(),new ThreadPoolExecutor.AbortPolicy());}
}
package com.atguigu.cart.config;@ConfigurationProperties(prefix = "gulimall.thread")    /自动注入
@Component
@Data
public class ThreadPoolConfigProperties {private Integer coreSize;private Integer maxSize;private Integer keepAliveTime;
}
2、配置 线程池
# 配置线程池
gulimall.thread.core-size: 20
gulimall.thread.max-size: 200
gulimall.thread.keep-alive-time: 10
4.3.4、添加购物车业务实现
CartServiceImpl
@Slf4j
@Service
public class CartServiceImpl implements CartService {@AutowiredStringRedisTemplate redisTemplate;@AutowiredProductFeignService productFeignService;@AutowiredThreadPoolExecutor executor;// 用户标识前缀private final String CART_PREFIX = "gulimall:cart:";@Slf4j
@Service("cartService")
public class CartServiceImpl implements CartService {@Autowiredprivate StringRedisTemplate redisTemplate;@Autowiredprivate ProductFeignService productFeignService;@Autowiredprivate ThreadPoolExecutor executor;@Overridepublic CartItemVo addToCart(Long skuId, Integer num) throws ExecutionException, InterruptedException {//1.拿到要操作的购物车redis操作器信息BoundHashOperations<String, Object, Object> cartOps = getCartOps();//2.判断Redis是否有该商品的信息String productRedisValue = (String) cartOps.get(skuId.toString());if (StringUtils.isEmpty(productRedisValue)) {
//2.1如果没有就添加数据//添加新的商品到购物车(redis)CartItemVo cartItemVo = new CartItemVo();//开启第一个异步任务,存商品基本信息CompletableFuture<Void> getSkuInfoFuture = CompletableFuture.runAsync(() -> {//远程调用商品模块查询当前要添加商品的sku信息R productSkuInfo = productFeignService.getInfo(skuId);SkuInfoVo skuInfo = productSkuInfo.getData("skuInfo", new TypeReference<SkuInfoVo>() {});//sku信息数据赋值给单个CartItemcartItemVo.setSkuId(skuInfo.getSkuId());cartItemVo.setTitle(skuInfo.getSkuTitle());cartItemVo.setImage(skuInfo.getSkuDefaultImg());cartItemVo.setPrice(skuInfo.getPrice());cartItemVo.setCount(num);}, executor);//开启第二个异步任务,存商品属性信息CompletableFuture<Void> getSkuAttrValuesFuture = CompletableFuture.runAsync(() -> {//2、远程查询skuAttrValues组合信息List<String> skuSaleAttrValues = productFeignService.getSkuSaleAttrValues(skuId);cartItemVo.setSkuAttrValues(skuSaleAttrValues);}, executor);//等待所有的异步任务全部完成CompletableFuture.allOf(getSkuInfoFuture, getSkuAttrValuesFuture).get();String cartItemJson = JSON.toJSONString(cartItemVo);cartOps.put(skuId.toString(), cartItemJson);return cartItemVo;} else {
//2.2 购物车有此商品,修改数量即可CartItemVo cartItemVo = JSON.parseObject(productRedisValue, CartItemVo.class);cartItemVo.setCount(cartItemVo.getCount() + num);//修改redis的数据String cartItemJson = JSON.toJSONString(cartItemVo);cartOps.put(skuId.toString(),cartItemJson);return cartItemVo;}}/*** 获取到要操作的购物车* @return*/private  BoundHashOperations<String, Object, Object> getCartOps() {UserInfoTo userInfoTo = CartInterceptor.threadLocal.get();// 1、判断用户有没有登录String cartKey = "";   if (userInfoTo.getUserId() != null){// 用户已登录,则存储在Redis中的key 是 用户的IdcartKey = CART_PREFIX+userInfoTo.getUserId();} else {// 用户没有登录,则存在在Redis中的key 是 临时用户对应的 `user-key`cartKey = CART_PREFIX+userInfoTo.getUserKey();}// 绑定hashBoundHashOperations<String, Object, Object> operations = redisTemplate.boundHashOps(cartKey);return operations;}
}

4.4、刷新页面不断发请求问题,RedirectAttribute
4.4.0、分析
目前问题:
不断刷新“添加成功” 页面,会不断发请求,数量会不断增长:

解决办法,这里修改逻辑:
- 在controller的addToCart方法里添加商品
- 商品添加完跳转到成功页面我们改为改成重定向另一个方法,专门查询数据跳转到成功页面
4.4.1、改成重定向到添加成功页面并查询购物车数据
/*** 添加商品到购物车* @param skuId 商品的skuid* @param num   添加的商品数量* @return* RedirectAttributes*  ra.addFlashAttribute(, ) :将数据放在session里面可以在页面里取出,但是只能取一次*  ra.addAttribute(,); 将数据放在url后面*/
@GetMapping("/addToCart")
public String addToCart(@RequestParam("skuId") Long skuId,@RequestParam("num") Integer num,RedirectAttributes ra) throws ExecutionException, InterruptedException {cartService.addToCart(skuId,num);ra.addAttribute("skuId", skuId);return "redirect:http://cart.gulimall.cn/addToCartSuccess.html";
}/*** 跳转到成功页* @param skuId* @param model* @return*/
@GetMapping("/addToCartSuccess.html")
public String addToCartSuccessPage(@RequestParam("skuId") Long skuId,Model model) {// 重定向到成功页面,再次查询购物车数据CartItem cartItem = cartService.getCartItem(skuId);model.addAttribute("item",cartItem);return "success";
}
4.4.2、Service层 CartServiceImpl 实现类编写 获取购物车某个购物项方法
@Override
public CartItem getCartItem(Long skuId) {BoundHashOperations<String, Object, Object> cartOps = getCartOps();String str = (String) cartOps.get(skuId.toString());CartItem cartItem = JSON.parseObject(str, CartItem.class);return cartItem;
}
4.4.3、success页面修改
<div class="success-wrap"><div class="w" id="result"><div class="m succeed-box"><div th:if="${item!=null}" class="mc success-cont"><div class="success-lcol"><div class="success-top"><b class="succ-icon"></b><h3 class="ftx-02">商品已成功加入购物车</h3></div><div class="p-item"><div class="p-img"><a href="/static/cart/javascript:;" target="_blank"><imgstyle="height: 60px;width:60px;" th:src="${item.image}"></a></div><div class="p-info"><div class="p-name"><a th:href="'http://item.gulimall.cn/'+${item.skuId}+'.html'"th:text="${item.title}">TCL 55A950C 55英寸32核人工智能 HDR曲面超薄4K电视金属机身(枪色)</a></div><div class="p-extra"><span class="txt" th:text="'数量:'+${item.count}">  数量:1</span></div></div><div class="clr"></div></div></div><div class="success-btns success-btns-new"><div class="success-ad"><a href="/#none"></a></div><div class="clr"></div><div class="bg_shop"><a class="btn-tobback" th:href="'http://item.gulimall.cn/'+${item.skuId}+'.html'">查看商品详情</a><a class="btn-addtocart" href="http://cart.gulimall.cn/cart.html"id="GotoShoppingCart"><b></b>去购物车结算</a></div></div></div><div th:if="${item==null}" class="mc success-cont"><h2>购物车中无商品</h2><a href="http://gulimall.cn">去购物</a></div></div></div>
</div>
五、获取购物车
-
若用户未登录,则使用user-key获取Redis中购物车数据
-
若用户登录,则使用userId获取Redis中购物车数据,并将
- user-key 对应的临时购物车数据 与
- 用户购物车数据
合并 并删除临时购物车。
第一步、Controller层 CartController 类编写方法
@Controller
public class CartController {@AutowiredCartService cartService;@GetMapping("/cart.html")public String cartListPage(Model model) throws ExecutionException, InterruptedException {Cart cart = cartService.getCart();model.addAttribute("cart",cart);return "cartList";}
第二步、编写Service层 方法
package com.atguigu.cart.service;public interface CartService {//..../*** 获取购物车某个购物项* @param skuId* @return*/CartItem getCartItem(Long skuId);/*** 获取整个购物车* @return*/Cart getCart() throws ExecutionException, InterruptedException;/*** 清空购物车数据* @param cartKey*/void clearCart(String cartKey);
}
实现类 CartServiceImpl 方法:
@Override
public CartItem getCartItem(Long skuId) {BoundHashOperations<String, Object, Object> cartOps = getCartOps();String str = (String) cartOps.get(skuId.toString());CartItem cartItem = JSON.parseObject(str, CartItem.class);return cartItem;
}/*** 获取购物车里面的数据* @param cartKey* @return*/private List<CartItemVo> getCartItems(String cartKey) {//获取购物车里面的所有商品BoundHashOperations<String, Object, Object> operations = redisTemplate.boundHashOps(cartKey);List<Object> values = operations.values();if (values != null && values.size() > 0) {List<CartItemVo> cartItemVoStream = values.stream().map((obj) -> {String str = (String) obj;CartItemVo cartItem = JSON.parseObject(str, CartItemVo.class);return cartItem;}).collect(Collectors.toList());return cartItemVoStream;}return null;}
@Override
public Cart getCart() throws ExecutionException, InterruptedException {Cart cart = new Cart();UserInfoTo userInfoTo = CartInterceptor.threadLocal.get();if (userInfoTo.getUserId()!=null){// 1、登录状态String cartKey = CART_PREFIX + userInfoTo.getUserId();// 2、如果临时购物车的数据还没有合并,则合并购物车String tempCartKey = CART_PREFIX + userInfoTo.getUserKey();List<CartItem> tempCartItems = getCartItems(tempCartKey);if (tempCartItems!=null) {// 临时购物车有数据,需要合并for (CartItem item : tempCartItems) {addToCart(item.getSkuId(),item.getCount());}// 清除临时购物车的数据clearCart(tempCartKey);}// 3、删除临时购物车// 4、获取登录后的购物车数据List<CartItem> cartItems = getCartItems(cartKey);cart.setItems(cartItems);} else {// 2、没登录状态String cartKey = CART_PREFIX + userInfoTo.getUserKey();// 获取临时购物车的所有项List<CartItem> cartItems = getCartItems(cartKey);cart.setItems(cartItems);}return cart;
}@Override
public void clearCart(String cartKey) {// 直接删除该键redisTemplate.delete(cartKey);
}
第三步、修改购物车前端页面 cartList.html

测试结果:

六、选中购物项[是否选中]
**第一步、**Controller层方法编写
gulimall-cart 服务com/atguigu/cart/controller/ 路径下 CartController.java类中添加映射方法
@GetMapping("/checkItem")
public String checkItem(@RequestParam("skuId") Long skuId,@RequestParam("check") Integer check) {cartService.checkItem(skuId,check);return "redirect:http://cart.gulimall.cn/cart.html";
}
**第二步、**Service层实现类方法中编写是否选中购物项方法
/*** 勾选购物项* @param skuId* @param check*/
void checkItem(Long skuId, Integer check);
gulimall-cart 服务中 com/atguigu/cart/service/impl/ 路径下 CartServiceImpl.java 实现类:
@Override
public void checkItem(Long skuId, Integer check) {BoundHashOperations<String, Object, Object> cartOps = getCartOps();CartItem cartItem = getCartItem(skuId);cartItem.setCheck(check==1?true:false);String s = JSON.toJSONString(cartItem);cartOps.put(skuId.toString(),s);
}
第三步、页面修改

$(".itemCheck").click(function () {var skuId = $(this).attr("skuId");var check = $(this).prop("checked");location.href = "http://cart.gulimall.cn/checkItem?skuId="+skuId+"&check="+(check?1:0);
});

七、修改购物项数量
7.1、前端 cartList.html 页面修改
前端 cartList.html 页面修改
<li><p style="width:80px" th:attr="skuId=${item.skuId}"><span class="countOpsBtn">-</span><span class="countOpsNum" th:text="${item.count}">5</span><span class="countOpsBtn">+</span></p>
</li>
$(".countOpsBtn").click(function () {var skuId = $(this).parent().attr("skuId");var num = $(this).parent().find(".countOpsNum").text();location.href = "http://cart.gulimall.cn/countItem?skuId="+skuId+"&num="+num;
});
7.2、后端 接口编写
后端 接口编写
- Controller 层 接口编写
修改“com.atguigu.gulimall.cart.controller.CartController”类,代码如下:
@GetMapping("/countItem")
public String countItem(@RequestParam("skuId") Long skuId,@RequestParam("num") Integer num) {cartService.countItem(skuId,num);return "redirect:http://cart.gulimall.cn/cart.html";
}
Service 层编写
/*** 修改购物项数量* @param skuId* @param num*/
void countItem(Long skuId, Integer num);
修改“com.atguigu.gulimall.cart.service.impl.CartServiceImpl”类,代码如下:
@Override
public void countItem(Long skuId, Integer num) {BoundHashOperations<String, Object, Object> cartOps = getCartOps();CartItem cartItem = getCartItem(skuId);cartItem.setCount(num);cartOps.put(skuId.toString(),JSON.toJSONString(cartItem));
}
八、删除购物项
8.1、前端修改


8.2、后端接口
CartController
@GetMapping("/deleteItem")
public String deleteItem(@RequestParam("skuId") Long skuId) {cartService.deleteItem(skuId);return "redirect:http://cart.gulimall.cn/cart.html";
}
CartServiceImpl.java
/*** 删除购物项* @param skuId*/
@Override
public void deleteItem(Long skuId) {BoundHashOperations<String, Object, Object> cartOps = getCartOps();cartOps.delete(skuId.toString());
}
相关文章:
谷粒商城笔记+踩坑(18)——购物车
目录 一、环境搭建 1.1、购物车模块初始化 1.2、动静资源处理 1.3、页面跳转配置 二、数据模型分析 2.1、购物车需求 2.1.1、离线购物车和在线购物车需求、数据库选择redis 2.1.2、购物车数据结构 2.2、模型类抽取,Cart和CartItem 2.3、Redis依赖和配置、…...

进阶C语言:指针笔试题
在学习完进阶C指针之后,可以来做一些笔试题来进行提升、巩固,小编在这里给大家分享几道比较有意思的笔试题 目录 一、笔试题1: 二、笔试题2 三、笔试题3: 四、笔试题4: 五、笔试题5: 编辑 六、笔试题…...
基于SSM(jsp)的宿舍管理系统
带项目源码和数据库文件 MySQL 导入即可用 可作为毕设参考 框架:SSM 1.1功能需求 本系统的设计目的是为了让老师可以随时随地的关注学生的在校情情况,方便老师对学生在校情况的添加、修改、删除和查询,实时关注学生的安全问题。该系统能…...

Java Web应用开发——作业四
一.单项选择题(共3题,30.0分) 1 如何获取一个 Cookie[]( ) A、 request.getCookies() B、 request.getCookie() C、 response.getCookies() D、 response.getCookie() 正确答案: A 2 ( )隐…...
基于ASP的反垃圾邮件管理系统的设计与实现
随着Internet的迅速普及,电子邮件以其快捷、方便、低成本的特点逐渐成为人们进行信息交流的主要媒介之一,但是随之而来的垃圾邮件也越来越泛滥。垃圾邮件占用了有限的存储、计算和网络资源,耗费了用户大量的处理时间,影响和干扰了…...
2010年9月计算机二级JAVA笔试试题及答案
一、选择题(每小题2分,共70分) 下列各题A)、B)、C)、D)四个选项中,只有一个选项是正确的。请将正确选项填涂在答题卡相应位置上,答在试卷上不得分。 (1&…...
博客让谷歌或是百度收录
参考以下大佬的博客教程 Hexo框架(六):SEO优化及站点被搜索引擎收录设置 | 你真是一个美好的人类 第一步 安装百度和 Google 的站点地图生成插件: npm install hexo-generator-baidu-sitemap --save npm install hexo-generator-sitemap --save 然后来…...

机器学习分类算法评价指标
一. 分类评价指标 对机器学习算法的性能进行评估时,不仅需要有效可行的实验估计方法,还需要有衡量模型泛化能力的评价指标,这就是算法评价指标。分类算法的评价指标一般有准确率,精确率,召回率,F1-score&a…...

Socks5代理服务器示例详解
Go语言中变量的声明和JavaScript很像,使用var关键字,变量的声明、定义有好几种形式 变量和常量 // 声明并初始化一个变量 var m int 10 // 声明初始化多个变量 var i, j, k 1, 2, 3 // 多个变量的声明(注意小括号的使用) var(no intname string ) //…...

使用 Docker 和 Nginx 反向代理访问 ChatGPT API
在许多应用程序中,我们需要从一个外部服务中获取数据。然而,由于种种原因(例如跨域问题、API 访问限制等),我们可能无法直接从客户端访问这些服务。这时,反向代理可以成为我们的救星。在这篇文章中…...

[前端笔记038]vue2之vueRouter、elementUI
前言 本笔记参考视频,尚硅谷:BV1Zy4y1K7SH p117 - p135 相关理解 vue 的一个插件库,专门用来实现SPA 应用单页 Web 应用(single page web application,SPA),整个应用只有一个完整的页面点击页面中的导航…...

ChatGPT使用案例之操作Excel
ChatGPT使用案例之操作Excel 微软已经通过其官网宣布,正在将其基于GPT-4的人工智能(AI)技术植入到其Office办公软件当中,该功能名为“Microsoft 365 Copilot”。微软称其是基于大语言模型的下一代AI生产力技术,目前已经向部分商业用户开放。 Microsoft 365 负责人Jared …...

【算法基础】(二)数据结构 --- 单链表
✨个人主页:bit me ✨当前专栏:算法基础 🔥专栏简介:该专栏主要更新一些基础算法题,有参加蓝桥杯等算法题竞赛或者正在刷题的铁汁们可以关注一下,互相监督打卡学习 🌹 🌹 dz…...

STL容器之<multiset>
文章目录测试环境multiset介绍头文件模块类定义对象构造初始化元素访问元素插入和删除元素查找容器大小迭代器其他函数测试环境 系统:ubuntu 22.04.2 LTS 64位 gcc版本:11.3.0 编辑器:vsCode 1.76.2 multiset介绍 关联式容器。元素是唯一的…...
(附python示例代码))
python实战应用讲解-【numpy专题篇】numpy常见函数使用示例(三)(附python示例代码)
目录 Python numpy.finfo()函数 Python Numpy MaskedArray.masked_less()函数 Python Numpy MaskedArray.masked_less_equal()函数 Python Numpy MaskedArray.masked_not_equal()函数 Python Numpy MaskedArray masked_outside()函数 Python Numpy MaskedArray.masked_wh…...

【Android笔记89】Android之全局加载框Gloading的使用
这篇文章,主要介绍Android之全局加载框Gloading的使用。 目录 一、Gloading全局加载框 1.1、Gloading介绍 1.2、Gloading运行效果 1.3、Gloading的使用...

php微信小程序java+Vue高校课程课后辅导在线教育系统nodejs+python
目 录 1绪论 1 1.1项目研究的背景 1 1.2开发意义 1 1.3项目研究现状及内容 5 1.4论文结构 5 2开发技术介绍 7 2.1 B/S架构 7 2.2 MySQL 介绍 7 2.3 MySQL环境配置 7 2.5微信小程序技术 8 3系统分析 9 3.1可行性分析 9 3.1.1技术可行性 9 3.1.2经济可行性 9 3.1.3操作可行性 10 …...
公司刚来的00后真卷,上班还没2年,跳到我们公司起薪20k....
都说00后躺平了,但是有一说一,该卷的还是卷。 这不,前段时间我们公司来了个00后,工作都没两年,跳槽到我们公司起薪18K,都快接近我了。后来才知道人家是个卷王,从早干到晚就差搬张床到工位睡觉了…...

Intel 处理器 macOS降级到Big Sur
1 创建可引导的 macOS 安装器 将移动硬盘作安装 Mac 操作系统的启动磁盘。 创建可引导安装器需要满足的条件 移动硬盘(格式化为 Mac OS 扩展格式),至少有 14GB 可用空间已下载 macOS Big Sur的安装器 2 下载 macOS macOS Big Sur安装器会…...
【网络安全】记一次红队渗透实战项目
一、信息收集 信息收集非常重要,有了信息才能知道下一步该如何进行,接下来将用 nmap 来演示信息收集 1、nmap 扫描存活 IP 由于本项目环境是 nat 模式需要项目 IP 地址,扫描挖掘本地的 IP 地址信息: 本机 IP 为:192…...
)
用Python和OpenCV手把手教你搞定自动驾驶图像坐标系转换(附NuScenes数据集实战代码)
用Python和OpenCV手把手教你搞定自动驾驶图像坐标系转换(附NuScenes数据集实战代码) 自动驾驶技术的核心在于让车辆"看懂"周围环境,而坐标系转换正是连接物理世界与数字世界的桥梁。想象一下,当一辆自动驾驶汽车行驶在…...

Flutter GetX实战:从Provider迁移到GetX,我的开发效率提升了多少?
Flutter GetX实战:从Provider迁移到GetX的效率革命 当Flutter开发团队面临状态管理方案的选择时,往往会陷入一种甜蜜的烦恼——官方推荐的Provider虽然稳定可靠,但第三方库GetX却以"全家桶"式的解决方案不断吸引开发者的目光。作为…...

基于AI智能体的渗透测试框架:从自动化到智能协同的范式转变
1. 项目概述:一个面向渗透测试的智能体框架最近在整理自己的工具链时,发现了一个挺有意思的项目,叫GH05TCREW/pentestagent。乍一看这个名字,你可能会觉得这又是一个“缝合怪”式的自动化渗透工具,把Nmap、SQLmap之类的…...

ViGEmBus终极指南:Windows游戏手柄模拟驱动的完整解决方案
ViGEmBus终极指南:Windows游戏手柄模拟驱动的完整解决方案 【免费下载链接】ViGEmBus Windows kernel-mode driver emulating well-known USB game controllers. 项目地址: https://gitcode.com/gh_mirrors/vi/ViGEmBus 你是否曾经遇到过这样的情况ÿ…...

技能工程化框架:从标准化定义到编排实战
1. 项目概述:从“技能”到“智能”的工程化桥梁在当今的软件开发领域,尤其是涉及复杂交互和自动化流程的场景,我们常常会听到“技能”这个词。它听起来很抽象,但如果你拆解过任何一款智能助手、自动化机器人或者一个大型的业务流程…...

C++定时器避坑指南:线程安全、资源泄漏与时间轮参数怎么调?一次讲清楚
C定时器避坑指南:线程安全、资源泄漏与时间轮参数调优实战 在分布式系统和高并发场景中,定时器如同系统的心跳机制,其稳定性直接决定服务可靠性。去年某电商平台大促期间,由于定时任务堆积导致的雪崩效应,造成近千万损…...

终极罗技PUBG鼠标宏配置指南:5步告别压枪烦恼
终极罗技PUBG鼠标宏配置指南:5步告别压枪烦恼 【免费下载链接】logitech-pubg PUBG no recoil script for Logitech gaming mouse / 绝地求生 罗技 鼠标宏 项目地址: https://gitcode.com/gh_mirrors/lo/logitech-pubg 还在为《绝地求生》中疯狂上跳的枪口而…...

从零构建本地化AI代码助手:架构、微调与工程实践
1. 项目概述:从零构建你自己的Claude代码助手最近在开发者社区里,一个名为“build-your-claude-code-from-scratch”的项目引起了我的注意。这个标题本身就充满了吸引力——它暗示着一种可能性:我们是否能够不依赖任何现成的、闭源的商业API&…...

告别手动框选!用SUSTechPOINTS的V键批量标注,5分钟搞定一帧点云
解锁SUSTechPOINTS的V键批量标注:点云处理效率革命 在自动驾驶与机器人研发领域,点云标注是构建高精度感知模型的基础环节,但传统逐帧手动标注方式往往成为项目进度的瓶颈。我曾参与过一个城市级点云数据集标注项目,团队最初采用常…...

轻量级服务器监控面板:从原理到部署实战
1. 项目概述:一个开源监控面板的诞生最近在折腾服务器和容器化应用,发现一个挺普遍的需求:当你手头有几台服务器,上面跑着几个Docker容器,或者一些自己写的服务,你总想知道它们现在“活”得怎么样。CPU是不…...