FFMPEG录屏(21)--- Linux 下基于X11枚举所有可见窗口,并获取标题、图标、缩略图、进程路径等信息
在 Linux X11 下枚举窗口并获取窗口信息
在 Linux 系统中,X11 是一个非常流行的窗口系统,它提供了丰富的 API 用于管理和操作窗口。在这篇博客中,我们将详细介绍如何使用 X11 枚举当前系统中的窗口,并获取它们的标题、截图、进程路径、进程图标等信息。
环境准备
首先,我们需要安装一些必要的库和工具:
sudo apt-get install libx11-dev libxcomposite-dev libxext-dev
枚举窗口
我们将使用 X11 提供的 XQueryTree 函数来枚举当前系统中的所有窗口。以下是一个简单的示例代码:
#include <X11/Xlib.h>
#include <X11/Xatom.h>
#include <vector>
#include <string>
#include <iostream>struct WindowInfo {::Window window;std::string title;std::string process_path;std::vector<uint8_t> icon_data;int icon_width;int icon_height;
};std::vector<WindowInfo> enum_windows(Display *display) {std::vector<WindowInfo> windows;::Window root = DefaultRootWindow(display);::Window parent;::Window *children;unsigned int num_children;if (XQueryTree(display, root, &root, &parent, &children, &num_children)) {for (unsigned int i = 0; i < num_children; ++i) {WindowInfo info;info.window = children[i];// 获取窗口标题XTextProperty window_name;if (XGetWMName(display, children[i], &window_name) && window_name.value) {info.title = (char *)window_name.value;XFree(window_name.value);}// 获取进程路径Atom pid_atom = XInternAtom(display, "_NET_WM_PID", True);if (pid_atom != None) {Atom actual_type;int actual_format;unsigned long nitems, bytes_after;unsigned char *prop = nullptr;if (XGetWindowProperty(display, children[i], pid_atom, 0, 1, False, XA_CARDINAL,&actual_type, &actual_format, &nitems, &bytes_after, &prop) == Success && nitems > 0) {pid_t pid = *(pid_t *)prop;XFree(prop);char path[1024];snprintf(path, sizeof(path), "/proc/%d/exe", pid);char exe_path[1024];ssize_t len = readlink(path, exe_path, sizeof(exe_path) - 1);if (len != -1) {exe_path[len] = '\0';info.process_path = exe_path;}}}// 获取窗口图标Atom icon_atom = XInternAtom(display, "_NET_WM_ICON", True);if (icon_atom != None) {Atom actual_type;int actual_format;unsigned long nitems, bytes_after;unsigned char *prop = nullptr;if (XGetWindowProperty(display, children[i], icon_atom, 0, (~0L), False, AnyPropertyType,&actual_type, &actual_format, &nitems, &bytes_after, &prop) == Success && nitems > 0) {unsigned long *data = (unsigned long *)prop;info.icon_width = data[0];info.icon_height = data[1];info.icon_data.assign((uint8_t *)(data + 2), (uint8_t *)(data + 2 + info.icon_width * info.icon_height));XFree(prop);}}windows.push_back(info);}XFree(children);}return windows;
}int main() {Display *display = XOpenDisplay(NULL);if (!display) {std::cerr << "Failed to open display" << std::endl;return -1;}std::vector<WindowInfo> windows = enum_windows(display);for (const auto &window : windows) {std::cout << "Window ID: " << window.window << std::endl;std::cout << "Title: " << window.title << std::endl;std::cout << "Process Path: " << window.process_path << std::endl;std::cout << "Icon Size: " << window.icon_width << "x" << window.icon_height << std::endl;std::cout << std::endl;}XCloseDisplay(display);return 0;
}
获取窗口截图
为了获取窗口的截图,我们可以使用 XGetImage 函数。以下是一个示例代码:
#include <X11/Xlib.h>
#include <X11/Xutil.h>
#include <vector>
#include <iostream>
#include <fstream>void save_ximage_to_ppm(const char *filename, XImage *image) {std::ofstream ofs(filename, std::ios::binary);ofs << "P6\n" << image->width << " " << image->height << "\n255\n";for (int y = 0; y < image->height; ++y) {for (int x = 0; x < image->width; ++x) {unsigned long pixel = XGetPixel(image, x, y);unsigned char r = (pixel & image->red_mask) >> 16;unsigned char g = (pixel & image->green_mask) >> 8;unsigned char b = (pixel & image->blue_mask);ofs.put(r).put(g).put(b);}}
}void capture_window(Display *display, ::Window window, const char *filename) {XWindowAttributes attributes;XGetWindowAttributes(display, window, &attributes);XImage *image = XGetImage(display, window, 0, 0, attributes.width, attributes.height, AllPlanes, ZPixmap);if (image) {save_ximage_to_ppm(filename, image);XDestroyImage(image);}
}int main() {Display *display = XOpenDisplay(NULL);if (!display) {std::cerr << "Failed to open display" << std::endl;return -1;}::Window root = DefaultRootWindow(display);capture_window(display, root, "screenshot.ppm");XCloseDisplay(display);return 0;
}
结合所有功能
我们可以将上述功能结合起来,创建一个完整的程序来枚举窗口并获取它们的标题、截图、进程路径、进程图标等信息。
#include <X11/Xlib.h>
#include <X11/Xatom.h>
#include <X11/Xutil.h>
#include <vector>
#include <string>
#include <iostream>
#include <fstream>struct WindowInfo {::Window window;std::string title;std::string process_path;std::vector<uint8_t> icon_data;int icon_width;int icon_height;
};void save_ximage_to_ppm(const char *filename, XImage *image) {std::ofstream ofs(filename, std::ios::binary);ofs << "P6\n" << image->width << " " << image->height << "\n255\n";for (int y = 0; y < image->height; ++y) {for (int x = 0; x < image->width; ++x) {unsigned long pixel = XGetPixel(image, x, y);unsigned char r = (pixel & image->red_mask) >> 16;unsigned char g = (pixel & image->green_mask) >> 8;unsigned char b = (pixel & image->blue_mask);ofs.put(r).put(g).put(b);}}
}void capture_window(Display *display, ::Window window, const char *filename) {XWindowAttributes attributes;XGetWindowAttributes(display, window, &attributes);XImage *image = XGetImage(display, window, 0, 0, attributes.width, attributes.height, AllPlanes, ZPixmap);if (image) {save_ximage_to_ppm(filename, image);XDestroyImage(image);}
}std::vector<WindowInfo> enum_windows(Display *display) {std::vector<WindowInfo> windows;::Window root = DefaultRootWindow(display);::Window parent;::Window *children;unsigned int num_children;if (XQueryTree(display, root, &root, &parent, &children, &num_children)) {for (unsigned int i = 0; i < num_children; ++i) {WindowInfo info;info.window = children[i];// 获取窗口标题XTextProperty window_name;if (XGetWMName(display, children[i], &window_name) && window_name.value) {info.title = (char *)window_name.value;XFree(window_name.value);}// 获取进程路径Atom pid_atom = XInternAtom(display, "_NET_WM_PID", True);if (pid_atom != None) {Atom actual_type;int actual_format;unsigned long nitems, bytes_after;unsigned char *prop = nullptr;if (XGetWindowProperty(display, children[i], pid_atom, 0, 1, False, XA_CARDINAL,&actual_type, &actual_format, &nitems, &bytes_after, &prop) == Success && nitems > 0) {pid_t pid = *(pid_t *)prop;XFree(prop);char path[1024];snprintf(path, sizeof(path), "/proc/%d/exe", pid);char exe_path[1024];ssize_t len = readlink(path, exe_path, sizeof(exe_path) - 1);if (len != -1) {exe_path[len] = '\0';info.process_path = exe_path;}}}// 获取窗口图标Atom icon_atom = XInternAtom(display, "_NET_WM_ICON", True);if (icon_atom != None) {Atom actual_type;int actual_format;unsigned long nitems, bytes_after;unsigned char *prop = nullptr;if (XGetWindowProperty(display, children[i], icon_atom, 0, (~0L), False, AnyPropertyType,&actual_type, &actual_format, &nitems, &bytes_after, &prop) == Success && nitems > 0) {unsigned long *data = (unsigned long *)prop;info.icon_width = data[0];info.icon_height = data[1];info.icon_data.assign((uint8_t *)(data + 2), (uint8_t *)(data + 2 + info.icon_width * info.icon_height));XFree(prop);}}windows.push_back(info);}XFree(children);}return windows;
}int main() {Display *display = XOpenDisplay(NULL);if (!display) {std::cerr << "Failed to open display" << std::endl;return -1;}std::vector<WindowInfo> windows = enum_windows(display);for (const auto &window : windows) {std::cout << "Window ID: " << window.window << std::endl;std::cout << "Title: " << window.title << std::endl;std::cout << "Process Path: " << window.process_path << std::endl;std::cout << "Icon Size: " << window.icon_width << "x" << window.icon_height << std::endl;// 保存窗口截图std::string screenshot_filename = "screenshot_" + std::to_string(window.window) + ".ppm";capture_window(display, window.window, screenshot_filename.c_str());std::cout << "Screenshot saved to: " << screenshot_filename << std::endl;std::cout << std::endl;}XCloseDisplay(display);return 0;
}
需要注意获取ICON数据时候的特殊处理
在 get_window_icon 函数中,对于不同架构(32位和64位)的实现有所不同,这是因为在不同架构下,数据的存储方式和处理方式有所不同。以下是对该函数中不同架构实现的原因和方法的详细解释。
原因
-
数据存储方式不同:
- 在32位架构下,
unsigned long类型的大小是32位(4字节)。 - 在64位架构下,
unsigned long类型的大小是64位(8字节),但实际数据只使用了低32位,高32位是填充的。
- 在32位架构下,
-
数据处理方式不同:
- 在32位架构下,可以直接复制整个内存块,因为数据是连续存储的。
- 在64位架构下,需要逐个元素处理,因为每个元素是64位的,但实际数据只使用了低32位。
方法
32位架构实现
在32位架构下,直接复制整个内存块,因为数据是连续存储的,且每个元素的大小是32位。
#if defined(TRAA_ARCH_32_BITS)icon_data.assign(prop + 2 * sizeof(unsigned long), prop + nitems * sizeof(unsigned long));
#endif
这里使用 std::vector::assign 方法将图标数据从 prop 中复制到 icon_data 向量中。prop + 2 * sizeof(unsigned long) 跳过了前两个元素(宽度和高度),prop + nitems * sizeof(unsigned long) 表示复制整个内存块。
64位架构实现
在64位架构下,需要逐个元素处理,因为每个元素是64位的,但实际数据只使用了低32位。
#elif defined(TRAA_ARCH_64_BITS)// TODO: this can be optimized by using some SIMD instructions.icon_data.resize(width * height * desktop_frame::bytes_per_pixel);for (int y = 0; y < height; y++) {for (int x = 0; x < width; x++) {unsigned long pixel = data[2 + y * width + x];icon_data[(y * width + x) * desktop_frame::bytes_per_pixel + 3] = (pixel >> (24)) & 0xff; // Bicon_data[(y * width + x) * desktop_frame::bytes_per_pixel + 2] = (pixel >> (16)) & 0xff; // Gicon_data[(y * width + x) * desktop_frame::bytes_per_pixel + 1] = (pixel >> (8)) & 0xff;  // Ricon_data[(y * width + x) * desktop_frame::bytes_per_pixel + 0] = pixel & 0xff;           // A}}
#endif
这里逐个像素处理,将每个像素的ARGB值提取出来并存储到 icon_data 向量中。具体步骤如下:
-
调整
icon_data的大小:icon_data.resize(width * height * desktop_frame::bytes_per_pixel);调整
icon_data的大小以容纳所有像素数据。 -
逐个像素处理:
for (int y = 0; y < height; y++) {for (int x = 0; x < width; x++) {unsigned long pixel = data[2 + y * width + x];icon_data[(y * width + x) * desktop_frame::bytes_per_pixel + 3] = (pixel >> (24)) & 0xff; // Bicon_data[(y * width + x) * desktop_frame::bytes_per_pixel + 2] = (pixel >> (16)) & 0xff; // Gicon_data[(y * width + x) * desktop_frame::bytes_per_pixel + 1] = (pixel >> (8)) & 0xff;  // Ricon_data[(y * width + x) * desktop_frame::bytes_per_pixel + 0] = pixel & 0xff;           // A}
}
逐个像素处理,将每个像素的ARGB值提取出来并存储到
icon_data向量中。
总结
在 get_window_icon 函数中,对于不同架构的不同实现是为了适应32位和64位架构下数据存储和处理方式的不同。在32位架构下,可以直接复制整个内存块,而在64位架构下,需要逐个元素处理,以确保数据的正确性。
PS
Copilot生成的博客,还算有点乱和抓不住重点细节…感兴趣的去看源码吧还是,细节都在代码里了.
源码传送
traa
相关文章:
--- Linux 下基于X11枚举所有可见窗口,并获取标题、图标、缩略图、进程路径等信息)
FFMPEG录屏(21)--- Linux 下基于X11枚举所有可见窗口,并获取标题、图标、缩略图、进程路径等信息
在 Linux X11 下枚举窗口并获取窗口信息 在 Linux 系统中,X11 是一个非常流行的窗口系统,它提供了丰富的 API 用于管理和操作窗口。在这篇博客中,我们将详细介绍如何使用 X11 枚举当前系统中的窗口,并获取它们的标题、截图、进程…...
)
mybatis resultMap标签注意事项(pageHelper结合使用的坑)
背景 使用pageHelper时,发现分页数据异常,经过排查发现是resultMap 的问题。 resultMap介绍 在使用mybatis时,我们经常会使用在xml文件中编写一些复杂的sql语句,例如多表的join,在映射实体类时,又会使用…...

100种算法【Python版】第33篇——Tonelli-Shanks算法
本文目录 1 模素数下的二次剩余问题2 算法原理2.1 背景知识2.2 算法步骤3 算法示例4 python代码5 算法应用1 模素数下的二次剩余问题 在数论中,给定一个素数 p p p 和一个整数 n n n...

深度学习基础知识-全连接层
全连接(Fully Connected,简称 FC)层是深度学习神经网络中一种基本的层结构。它主要用于神经网络的最后几层,将高层特征映射到输出空间中。全连接层对数据的每个输入节点与每个输出节点进行连接,用于实现输入特征和输出…...

ffmpeg 提取mp4文件中的音频文件并保存
要从一个 MP4 文件中提取音频并保存为单独的音频文件,可以使用 ffmpeg 工具。以下是一个简单的命令示例: 命令格式 ffmpeg -i input.mp4 -vn -acodec copy output.mp3 参数解释 -i input.mp4: 指定输入文件为 input.mp4。 -vn: 禁用视频流࿰…...

【MySQL 保姆级教学】 复合查询--超级详细(10)
复合查询 1. 复合查询的作用2. 创建将进行操作的表2.1 员工表 emp2.2 部门表 dept2.3 薪资等级表 3. 基本查询回顾4. 多表查询4.1 多表查询的定义4.2 笛卡尔积4.3 内连接 inner join4.4 交叉连接 cross join4.5 左外连接 left join4.6 右外连接 right join4.7 自连接 5. 子查询…...
ONLYOFFICE:数字化办公的创新解决方案与高效协作平台
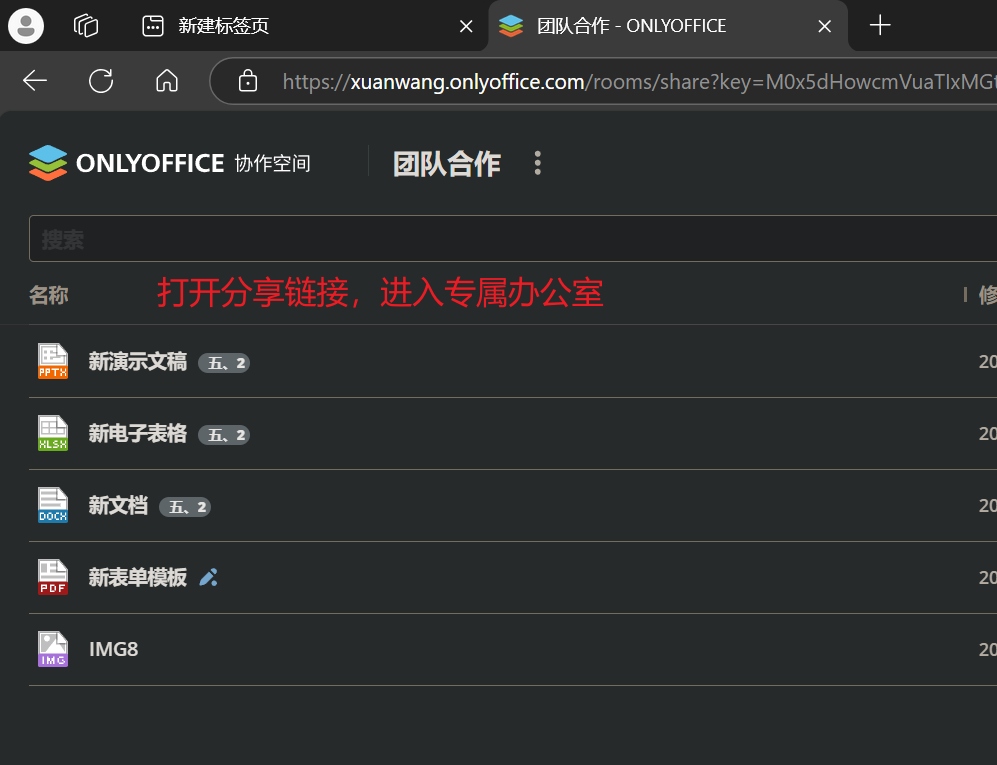
目录 前言—— 关于 ONLYOFFICE 桌面编辑器 1.首页介绍 2.电子表格 功能介绍 适用场景 3.ONLYOFFICE 在线Word功能 4.ONLYOFFICE 在线PPT功能 5.共同办公室 6.探索其他 总结 前言—— 在数字化办公的时代,传统的办公软件常常让人感到束缚与低效。而 ONLY…...

编译Kernel时遇到“error: ‘linux/compiler_types.h‘ file not found“的解决方法
问题描述: 在下载了一份安卓13项目的代码后进行make bootimage编译时遇到了下面编译报错: In file included from /home/bspuser/scode/kernel/msm-4.19/include/uapi/linux/stat.h:5: In file included from /home/bspuser/scode/kernel/msm-4.19/inc…...

开发之翼:划时代的原生鸿蒙应用市场开发者服务
前言 随着"纯血鸿蒙" HarmonyOS NEXT在原生鸿蒙之夜的正式发布,鸿蒙生态正以前所未有的速度蓬勃发展。据知已有超过15000个鸿蒙原生应用和元服务上架,覆盖18个行业,通用办公应用覆盖全国3800万多家企业。原生鸿蒙操作系统降低了接…...

代码随想录一刷——1.两数之和
当我们需要查询一个元素是否出现过,或者一个元素是否在集合里的时候,就要第一时间想到哈希法。 C: unordered_map class Solution { public: vector<int> twoSum(vector<int>& nums, int target) { unordered_map<int…...

vue自定义组件实现v-model双向数据绑定
一、Vue2 实现自定义组件双向数据绑定 ① v-model 实现双向数据绑定 在vue2中,子组件上使用v-model的值默认绑定到子组件的props.value属性上,由于子组件不能改变父组件传来的属性,所以需要通过$emit触发事件使得父组件中数据的变化…...

excel指定单元格输入相同的值,比如给D1~D10000输入现在的值
注意,一点不用用WPS,不然运行宏是会报:Droiact-Module1,第1行等Λ列语法错误: Unexpected identifier 步骤 1,altF11打开宏 2,输入脚本 3,点击运行按钮 成功后会看看到...

中国最强乳企伊利,三个季度净赚超百亿
伊利三季度的业绩完全超出了市场预期。 在一个飞天茅台都在不断跌价的消费趋势里,伊利三季度扣非净利润的同比增幅达到13.4%。大部分机构和投资者,都没料到伊利这一次的表现如此强悍。这一次,伊利在“大气层”。 并且,伊利前三季…...

SpringBoot源码解析(二):启动流程之引导上下文DefaultBootstrapContext
SpringBoot源码系列文章 SpringBoot源码解析(一):启动流程之SpringApplication构造方法 SpringBoot源码解析(二):启动流程之引导上下文DefaultBootstrapContext 目录 前言一、入口二、DefaultBootstrapContext1、BootstrapRegistry接口2、BootstrapCon…...

配置elk插件安全访问elk前台页面
编辑els配置文件vim elasticsearch.yml,添加以下配置文件 用elk用户,启动els服务 关闭防火墙,查看els启动是否成功,通过是否启动java进程来判断 或者通过查看是否启动9200和9300端口来判断是否启动 交互模式启动密码配置文件interactive表示交…...

[操作系统作业]页面置换算法实现(C++)
💓博主csdn个人主页:小小unicorn ⏩专栏分类:linux 🚚代码仓库:小小unicorn的代码仓库🚚 🌹🌹🌹关注我带你学习编程知识 目录 必做题代码分析(重点以时间统计…...

前端技术月刊-2024.11
本月技术月刊聚焦于前端技术的最新发展和业务实践。业界资讯部分,React Native 0.76 版本发布,带来全新架构;Deno 2.0 和 Node.js 23 版本更新,推动 JavaScript 生态进步;Flutter 团队规模缩减,引发社区关注…...
)
搜索引擎语法大全(Google、bing、baidu)
搜索引擎语法大全 搜索引擎语法通常指的是在搜索引擎中使用特定的运算符和语法来优化搜索结果。 提高搜索精度:使用特定的语法可以帮助用户更精确地找到相关信息,避免无关结果。例如,通过使用引号搜索确切短语,可以确保搜索结果包…...

java设计模式之行为型模式(11种)
行为型模式 行为型模式用于描述程序在运行时复杂的流程控制,即描述多个类或对象之间怎样相互协作共同完成单个对象都无法单独完成的任务,它涉及算法与对象间职责的分配。 行为型模式分为类行为模式和对象型模式,前者采用继承机制来在类间分派…...

微服务系列一:基础拆分实践
目录 前言 一、认识微服务 1.1 单体架构 VS 微服务架构 1.2 微服务的集大成者:SpringCloud 1.3 微服务拆分原则 1.4 微服务拆分方式 二、微服务拆分入门步骤 :以拆分商品模块为例 三、服务注册订阅与远程调用:以拆分购物车为例 3.1 …...

C++:std::is_convertible
C++标志库中提供is_convertible,可以测试一种类型是否可以转换为另一只类型: template <class From, class To> struct is_convertible; 使用举例: #include <iostream> #include <string>using namespace std;struct A { }; struct B : A { };int main…...
阿里云ACP云计算备考笔记 (5)——弹性伸缩
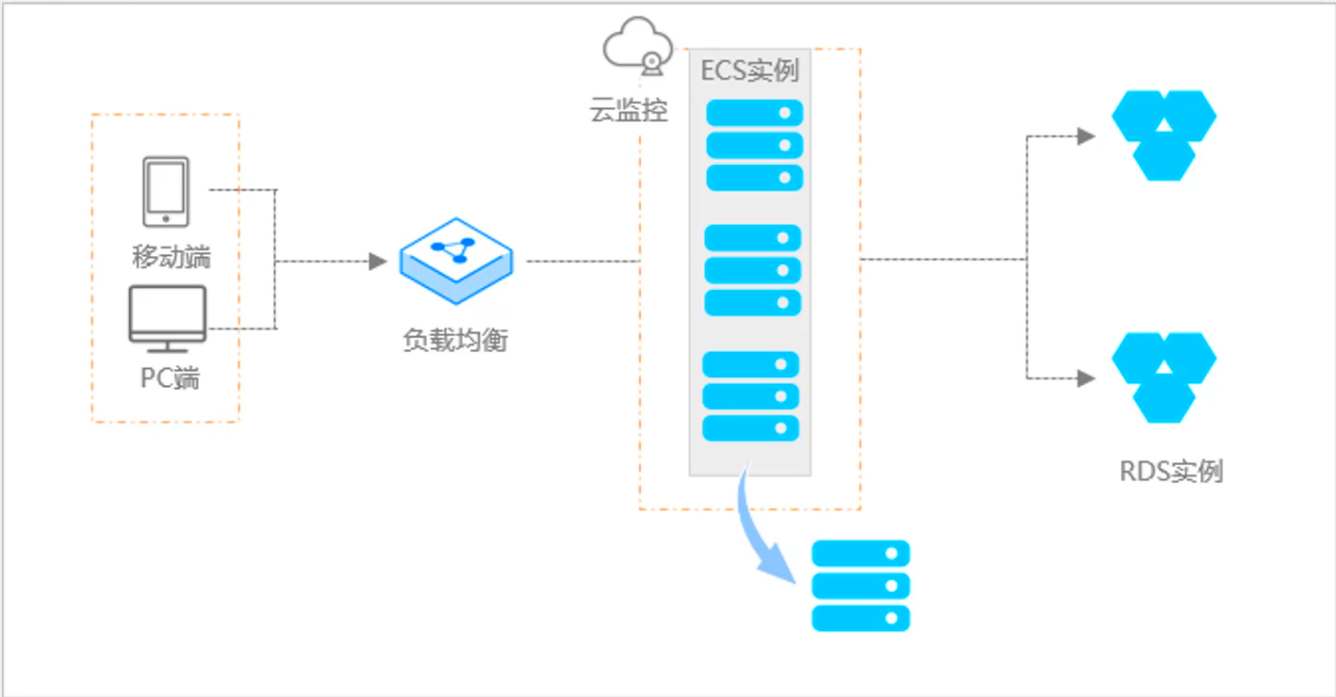
目录 第一章 概述 第二章 弹性伸缩简介 1、弹性伸缩 2、垂直伸缩 3、优势 4、应用场景 ① 无规律的业务量波动 ② 有规律的业务量波动 ③ 无明显业务量波动 ④ 混合型业务 ⑤ 消息通知 ⑥ 生命周期挂钩 ⑦ 自定义方式 ⑧ 滚的升级 5、使用限制 第三章 主要定义 …...

STM32标准库-DMA直接存储器存取
文章目录 一、DMA1.1简介1.2存储器映像1.3DMA框图1.4DMA基本结构1.5DMA请求1.6数据宽度与对齐1.7数据转运DMA1.8ADC扫描模式DMA 二、数据转运DMA2.1接线图2.2代码2.3相关API 一、DMA 1.1简介 DMA(Direct Memory Access)直接存储器存取 DMA可以提供外设…...
苍穹外卖--缓存菜品
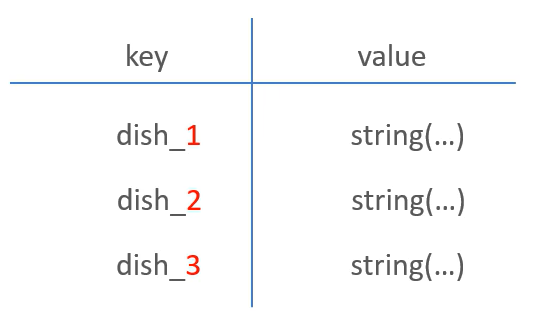
1.问题说明 用户端小程序展示的菜品数据都是通过查询数据库获得,如果用户端访问量比较大,数据库访问压力随之增大 2.实现思路 通过Redis来缓存菜品数据,减少数据库查询操作。 缓存逻辑分析: ①每个分类下的菜品保持一份缓存数据…...
Python基于历史模拟方法实现投资组合风险管理的VaR与ES模型项目实战
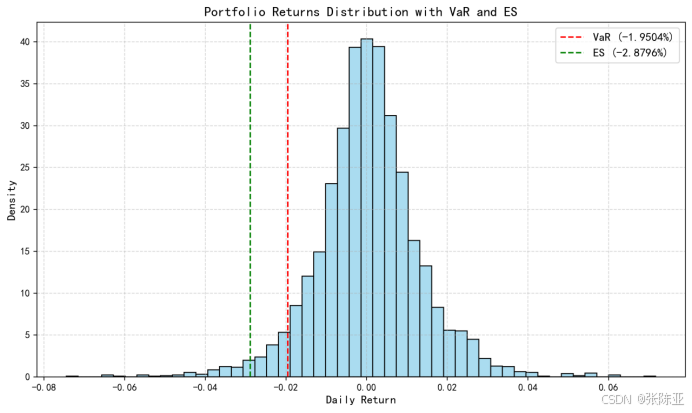
说明:这是一个机器学习实战项目(附带数据代码文档),如需数据代码文档可以直接到文章最后关注获取。 1.项目背景 在金融市场日益复杂和波动加剧的背景下,风险管理成为金融机构和个人投资者关注的核心议题之一。VaR&…...
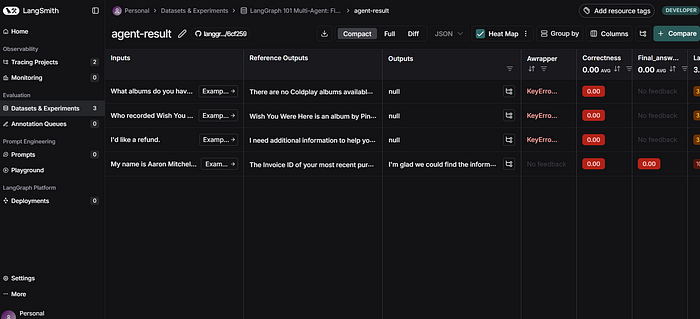
使用LangGraph和LangSmith构建多智能体人工智能系统
现在,通过组合几个较小的子智能体来创建一个强大的人工智能智能体正成为一种趋势。但这也带来了一些挑战,比如减少幻觉、管理对话流程、在测试期间留意智能体的工作方式、允许人工介入以及评估其性能。你需要进行大量的反复试验。 在这篇博客〔原作者&a…...

CRMEB 中 PHP 短信扩展开发:涵盖一号通、阿里云、腾讯云、创蓝
目前已有一号通短信、阿里云短信、腾讯云短信扩展 扩展入口文件 文件目录 crmeb\services\sms\Sms.php 默认驱动类型为:一号通 namespace crmeb\services\sms;use crmeb\basic\BaseManager; use crmeb\services\AccessTokenServeService; use crmeb\services\sms\…...
)
uniapp 集成腾讯云 IM 富媒体消息(地理位置/文件)
UniApp 集成腾讯云 IM 富媒体消息全攻略(地理位置/文件) 一、功能实现原理 腾讯云 IM 通过 消息扩展机制 支持富媒体类型,核心实现方式: 标准消息类型:直接使用 SDK 内置类型(文件、图片等)自…...

SpringAI实战:ChatModel智能对话全解
一、引言:Spring AI 与 Chat Model 的核心价值 🚀 在 Java 生态中集成大模型能力,Spring AI 提供了高效的解决方案 🤖。其中 Chat Model 作为核心交互组件,通过标准化接口简化了与大语言模型(LLM࿰…...

算法打卡第18天
从中序与后序遍历序列构造二叉树 (力扣106题) 给定两个整数数组 inorder 和 postorder ,其中 inorder 是二叉树的中序遍历, postorder 是同一棵树的后序遍历,请你构造并返回这颗 二叉树 。 示例 1: 输入:inorder [9,3,15,20,7…...
