freetype学习总结
freetype学习总结
目录
- freetype学习总结
- 1. LCD显示字符问题引入
- 2. freetype概念
- 2.1 嵌入式设备使用FreeType的方法步骤
- 2.2 嵌入式设备使用FreeType的注意事项
- 3. freetype官方C示例
- 3.1 example1.c源码
- 4. 嵌入式设备上使用FreeType的简单示例
- 4.1 简单示例代码
- 4.2 代码分析
- 5. 交叉编译freetype
- 5.1 确定头文件、库文件在工具链中的目录
- 5.2 交叉编译、安装libpng
- 5.3 交叉编译、安装freetype
- 6. 使用freetype在LCD显示矢量字体
- 6.1 在LCD上显示一个矢量字体
- 6.1.1 使用wchar_t获得字符的UNICODE值
- 6.1.2 使用freetype得到位图
- 6.1.3 在屏幕上显示位图
- 6.1.4 交叉编译代码
- 6.1.5 测试
- 6.2 在LCD上令矢量字体旋转某个角度
- 6.2.1 代码分析
- 6.2.2 交叉编译代码
- 6.2.3 测试
- 6.3 使用freetype显示一行文字
- 6.3.1 使用freetype显示一行文字的方法
- 6.3.1.1笛卡尔坐标系
- 6.3.1.2 每个字符的大小可能不同
- 6.3.1.3 在指定位置显示一行文字
- 6.3.1.4 freetype的几个重要数据结构
- 6.3.2 使用freetype显示一行文字源码
- 6.3.3 代码分析
- 6.3.3.1 计算一行文字的外框
- 6.3.3.2 调整原点并绘制
- 6.3.4 交叉编译代码
- 6.3.5 测试
基于韦东山IMX6ULL开发板和配套资料中LCD屏幕学习
freetype库资料包:开源的字体引擎库 freetype 和字体文件 simsun.ttc,资料包括:
1、freetype-2.10.2.tar.xz
2、freetype-doc-2.10.2.tar.xz
3、libpng-1.6.37.tar.xz
4、zlib-1.2.11.tar.gz
5、simsun.ttc文件,freetype可以直接使用
freetype 依赖于 libpng, libpng 又依赖于 zlib,所以我们应该:先编译安装 zlib,再编译安装 libpng,最后编译安装 freetype。 但是,有些工具链里有 zlib, 那就不用编译安装 zlib。
freetype官方文档:FreeType Documentation
1. LCD显示字符问题引入
在使用字库点阵的方式在LCD上显示英文字母、汉字时,大小固定,如果放大缩小则会模糊甚至有锯齿出现,为了解决这个问题,引用矢量字体。
矢量字体形成分三步:
- 确定关键点
- 使用数学曲线(贝塞尔曲线)连接头键点
- 填充闭合区线内部空间
以字母“A”为例,它的的关键点如图中的黄色所示:

再用数学曲线(比如贝塞尔曲线)将关键点都连接起来,得到一系列的封闭的曲线,如图所示:

最后把封闭空间填满颜色,就显示出一个A字母,如图所示:

如果需要放大或者缩小字体,关键点的相对位置是不变的,只要数学曲线平滑,字体就不会变形。
在嵌入式设备上移植开源的字体渲染引擎freetype,调用对应的API接口,提供字体文件,就可以让freetype库帮我们取出关键点、实现闭合曲线,填充颜色,达到显示矢量字体的目的。
2. freetype概念
FreeType是一个开源的字体渲染引擎,它能够加载和渲染多种格式的字体文件,如TrueType(.ttf)、OpenType(.otf)等。FreeType提供了一组API来处理字体数据,包括字符的加载、渲染以及获取字符的各种信息(例如字形边界框、位图等)。它被广泛应用于各种需要显示文本的应用程序中,尤其是在那些需要高质量文本渲染的地方。
2.1 嵌入式设备使用FreeType的方法步骤
- 安装 FreeType 库:
- 下载FreeType源码。
- 配置并编译FreeType以适应你的目标平台。
- 将编译好的库文件和头文件部署到你的开发环境中。
- 编写代码:
- 初始化FreeType库。
- 加载字体文件。
- 设置字体大小。
- 渲染指定的字符或字符串。
- 处理渲染后的位图数据。
- 清理资源。
- 集成到图形系统:
- 根据你的嵌入式系统的图形库(如SDL,OpenGL ES,或者自定义的绘图函数),将渲染后的位图绘制到屏幕上。
2.2 嵌入式设备使用FreeType的注意事项
- 内存限制:嵌入式设备可能有严格的内存限制,因此要确保 FreeType 的配置和使用不会占用过多内存。
- 性能优化:根据嵌入式设备的性能特性,对 FreeType 的使用进行优化,比如选择合适的字体大小和渲染选项。
- 字体文件大小:考虑存储空间限制,选择合适大小的字体文件。
- 跨平台兼容性:确保 FreeType 的编译设置与你的目标硬件平台兼容。
3. freetype官方C示例
3.1 example1.c源码
/* example1.c                                                      */
/*                                                                 */
/* This small program shows how to print a rotated string with the */
/* FreeType 2 library.                                             */#include <stdio.h>
#include <string.h>
#include <math.h>#include <ft2build.h>
#include FT_FREETYPE_H#define WIDTH   640
#define HEIGHT  480/* origin is the upper left corner */
unsigned char image[HEIGHT][WIDTH];/* Replace this function with something useful. */void
draw_bitmap( FT_Bitmap*  bitmap,FT_Int      x,FT_Int      y)
{FT_Int  i, j, p, q;FT_Int  x_max = x + bitmap->width;FT_Int  y_max = y + bitmap->rows;/* for simplicity, we assume that `bitmap->pixel_mode' *//* is `FT_PIXEL_MODE_GRAY' (i.e., not a bitmap font)   */for ( i = x, p = 0; i < x_max; i++, p++ ){for ( j = y, q = 0; j < y_max; j++, q++ ){if ( i < 0      || j < 0       ||i >= WIDTH || j >= HEIGHT )continue;image[j][i] |= bitmap->buffer[q * bitmap->width + p];}}
}void
show_image( void )
{int  i, j;for ( i = 0; i < HEIGHT; i++ ){for ( j = 0; j < WIDTH; j++ )putchar( image[i][j] == 0 ? ' ': image[i][j] < 128 ? '+': '*' );putchar( '\n' );}
}int
main( int     argc,char**  argv )
{FT_Library    library;FT_Face       face;FT_GlyphSlot  slot;FT_Matrix     matrix;                 /* transformation matrix */FT_Vector     pen;                    /* untransformed origin  */FT_Error      error;char*         filename;char*         text;double        angle;int           target_height;int           n, num_chars;if ( argc != 3 ){fprintf ( stderr, "usage: %s font sample-text\n", argv[0] );exit( 1 );}filename      = argv[1];                           /* first argument     */text          = argv[2];                           /* second argument    */num_chars     = strlen( text );angle         = ( 25.0 / 360 ) * 3.14159 * 2;      /* use 25 degrees     */target_height = HEIGHT;error = FT_Init_FreeType( &library );              /* initialize library *//* error handling omitted */error = FT_New_Face( library, filename, 0, &face );/* create face object *//* error handling omitted *//* use 50pt at 100dpi */error = FT_Set_Char_Size( face, 50 * 64, 0,100, 0 );                /* set character size *//* error handling omitted *//* cmap selection omitted;                                        *//* for simplicity we assume that the font contains a Unicode cmap */slot = face->glyph;/* set up matrix */matrix.xx = (FT_Fixed)( cos( angle ) * 0x10000L );matrix.xy = (FT_Fixed)(-sin( angle ) * 0x10000L );matrix.yx = (FT_Fixed)( sin( angle ) * 0x10000L );matrix.yy = (FT_Fixed)( cos( angle ) * 0x10000L );/* the pen position in 26.6 cartesian space coordinates; *//* start at (300,200) relative to the upper left corner  */pen.x = 300 * 64;pen.y = ( target_height - 200 ) * 64;for ( n = 0; n < num_chars; n++ ){/* set transformation */FT_Set_Transform( face, &matrix, &pen );/* load glyph image into the slot (erase previous one) */error = FT_Load_Char( face, text[n], FT_LOAD_RENDER );if ( error )continue;                 /* ignore errors *//* now, draw to our target surface (convert position) */draw_bitmap( &slot->bitmap,slot->bitmap_left,target_height - slot->bitmap_top );/* increment pen position */pen.x += slot->advance.x;pen.y += slot->advance.y;}show_image();FT_Done_Face    ( face );FT_Done_FreeType( library );return 0;
}/* EOF */
4. 嵌入式设备上使用FreeType的简单示例
4.1 简单示例代码
在嵌入式设备上使用FreeType来加载字体并渲染字符 “A”,然后假设你有一个自定义的绘图函数draw_pixel来在屏幕上绘制点。
代码:
#include <ft2build.h>
#include FT_FREETYPE_H
#include <stdio.h>
#include <stdlib.h>// 假设这是你的绘图函数
void draw_pixel(int x, int y, unsigned char color) {// 实现具体的绘图逻辑// 这里只是一个示例printf("Draw pixel at (%d, %d) with color %u\n", x, y, color);
}int main() {FT_Library ft;if (FT_Init_FreeType(&ft)) {fprintf(stderr, "Could not init FreeType Library\n");return 1;}FT_Face face;if (FT_New_Face(ft, "/path/to/your/fontfile.ttf", 0, &face)) {fprintf(stderr, "Could not open font\n");return 1;}FT_Set_Pixel_Sizes(face, 0, 24);if (FT_Load_Char(face, 'A', FT_LOAD_RENDER)) {fprintf(stderr, "Could not load character 'A'\n");return 1;}FT_Bitmap bitmap = face->glyph->bitmap;int width = bitmap.width;int height = bitmap.rows;unsigned char* buffer = bitmap.buffer;for (int y = 0; y < height; ++y) {for (int x = 0; x < width; ++x) {if (buffer[y * width + x] > 0) {int screen_x = 100 + x;int screen_y = 100 + y;draw_pixel(screen_x, screen_y, 255);}}}FT_Done_Face(face);FT_Done_FreeType(ft);return 0;
}
4.2 代码分析
代码分析参考官方freetype教程:


- 包含必要的头文件:
#include <ft2build.h>
#include FT_FREETYPE_H
#include <stdio.h>
#include <stdlib.h>


- 初始化FreeType库:
FT_Library ft;
if (FT_Init_FreeType(&ft)) {fprintf(stderr, "Could not init FreeType Library\n");exit(1);
}


- 加载字体文件:
FT_Face face;
if (FT_New_Face(ft, "/path/to/your/fontfile.ttf", 0, &face)) {fprintf(stderr, "Could not open font\n");exit(1);
}


- 设置字体大小:
FT_Set_Pixel_Sizes(face, 0, 24); // 设置为24像素高


- 加载置顶字符:
if (FT_Load_Char(face, 'A', FT_LOAD_RENDER)) {fprintf(stderr, "Could not load character 'A'\n");exit(1);
}


- 获取位图信息:
FT_Bitmap bitmap = face->glyph->bitmap;
int width = bitmap.width;
int height = bitmap.rows;
unsigned char* buffer = bitmap.buffer;


- 绘制位图:
// 假设 draw_pixel(x, y, color) 是绘图函数
for (int y = 0; y < height; ++y) {for (int x = 0; x < width; ++x) {if (buffer[y * width + x] > 0) {  // 如果像素不透明int screen_x = 100 + x;  // 假设起始位置是 (100, 100)int screen_y = 100 + y;draw_pixel(screen_x, screen_y, 255);  // 使用白色绘制}}
}
- 清理资源:
FT_Done_Face(face);
FT_Done_FreeType(ft);


5. 交叉编译freetype
freetype 依赖于 libpng, libpng 又依赖于 zlib,所以我们应该:先编译安装 zlib,再编译安装 libpng,最后编译安装 freetype。 但是,有些工具链里有 zlib, 那就不用编译安装 zlib。文章开头资料包中包含需要的库。
基于IMX6ULL开发板验证,使用对于的工具链对freetype交叉编译。
5.1 确定头文件、库文件在工具链中的目录
先设置交叉编译工具链:
export ARCH=arm
export CROSS_COMPILE=arm-buildroot-linux-gnueabihf-
export PATH=$PATH:/home/book/100ask_imx6ull-sdk/ToolChain/arm-buildroot-linux-gnueabihf_sdk-buildroot/bin
IMX6ULL开发板为例,它的工具链是arm-buildroot-linuxgnueabihf-gcc,可以执行以下命令:
echo 'main(){}' | arm-buildroot-linux-gnueabihf-gcc -E -v -
可以确定头文件的系统目录为:
/home/book/100ask_imx6ull-sdk/ToolChain/arm-buildroot-linux-gnueabihf_sdk-buildroot/bin/../lib/gcc/arm-buildroot-linux-gnueabihf/7.5.0/include

库文件的系统目录为:
/home/book/100ask_imx6ull-sdk/ToolChain/arm-buildroot-linux-gnueabihf_sdk-buildroot/bin/../lib/gcc/arm-buildroot-linux-gnueabihf/7.5.0/../../../../arm-buildroot-linux-gnueabihf/lib

5.2 交叉编译、安装libpng
先把freetype-2.10.2.tar.xz 、freetype-doc-2.10.2.tar.xz 、libpng-1.6.37.tar.xz 、zlib-1.2.11.tar.gz库的压缩文件上传到Ubuntu:

freetype依赖于libpng,所以需要先编译、安装libpng。命令如下:
tar xJf libpng-1.6.37.tar.xz
cd libpng-1.6.37/
./configure --host=arm-buildroot-linux-gnueabihf --prefix=$PWD/tmp
make
make install
cd tmp
cp include/* -rf /home/book/100ask_imx6ull-sdk/ToolChain/arm-buildroot-linux-gnueabihf_sdk-buildroot/bin/../lib/gcc/arm-buildroot-linux-gnueabihf/7.5.0/include
cp lib/* -rfd /home/book/100ask_imx6ull-sdk/ToolChain/arm-buildroot-linux-gnueabihf_sdk-buildroot/bin/../lib/gcc/arm-buildroot-linux-gnueabihf/7.5.0/../../../../arm-buildroot-linux-gnueabihf/lib
5.3 交叉编译、安装freetype
命令如下:
tar xJf freetype-2.10.2.tar.xz
cd freetype-2.10.2
./configure --host=arm-buildroot-linux-gnueabihf -prefix=$PWD/tmp
make
make install
cd tmp
cp include/freetype2/* -rfd /home/book/100ask_imx6ull-sdk/ToolChain/arm-buildroot-linux-gnueabihf_sdk-buildroot/bin/../lib/gcc/arm-buildroot-linux-gnueabihf/7.5.0/include
cp lib/* -rfd /home/book/100ask_imx6ull-sdk/ToolChain/arm-buildroot-linux-gnueabihf_sdk-buildroot/bin/../lib/gcc/arm-buildroot-linux-gnueabihf/7.5.0/../../../../arm-buildroot-linux-gnueabihf/lib
6. 使用freetype在LCD显示矢量字体
freetype使用统一的接口来访问多种字体格式文件,从而实现矢量字体显示。关键点(glyph)存在字体文件中,Windows使用的字体文件在c:\Windows\Fonts目录下,扩展名为TTF的都是矢量字库,本次使用实验使用的是新宋字体simsun.ttc,可以在资料包中下载。
.ttf 和 .ttc 文件都是字体文件格式,但它们之间存在一些关键的区别:
- .ttf (TrueType Font)
- TrueType 字体是一种常见的计算机字体类型,由苹果公司和微软共同开发。
- 这种格式的字体文件通常包含一个单独的字体样式。例如,你可能会有一个文件用于常规样式,另一个文件用于粗体样式等。
- .ttf 文件可以跨平台使用,在 Windows、macOS 以及许多其他操作系统上都可以被支持。
- .ttc (TrueType Collection)
- TrueType Collection 是一种特殊的字体文件格式,它允许将多个 TrueType 字体打包到一个单一的文件中。
- 在 TTC 文件内,你可以找到多个字体变体(如常规、斜体、粗体等),这有助于减少文件大小并提高加载效率,因为相关联的字体数据会被共享。
- 使用 TTC 可以节省磁盘空间,并且在某些情况下可以加快字体加载速度,因为它减少了需要读取的文件数量。
.ttf 文件是单个字体样式的标准容器,而 .ttc 文件则是一个更高效的格式,能够在一个文件中封装多款相关的字体样式。对于用户而言,安装 .ttc 文件就像安装普通的 .ttf文件一样简单,但是背后的数据结构更为紧凑和优化。
freetype对.ttf和.ttc字体格式都支持:

以simsun.ttc为例,该字体文件的格如下:头部含有charmaps,可以使用某种编码值去charmaps中找到它对应的关键点。下图中的“A、B、中、国、韦”等只是glyph的示意图,表示关键点。

Charmaps表示字符映射表,字体文件可能支持哪一些编码,GB2312、UNICODE、BIG5或其他。如果字体文件支持该编码,使用编码值通过charmap就可以找到对应的glyph,一般而言都支持UNICODE码。
一个文字的显示过程可以概括如下(参考4.2 代码分析):
- 给定一个字符可以确定它的编码值(ASCII、UNICODE、GB2312)
- 设置字体大小
- 根据编码值,从文件头部中通过charmap找到对应的关键点(glyph),它会根据字体大小调整关键点
- 把关键点转换为位图点阵
- 在LCD上显示出来
6.1 在LCD上显示一个矢量字体
在LCD上显示一个矢量字体的源码:
#include <sys/mman.h>
#include <sys/types.h>
#include <sys/stat.h>
#include <unistd.h>
#include <linux/fb.h>
#include <fcntl.h>
#include <stdio.h>
#include <string.h>
#include <math.h>
#include <wchar.h>
#include <sys/ioctl.h>
#include <ft2build.h>
#include FT_FREETYPE_H
#include FT_GLYPH_Hint fd_fb;
struct fb_var_screeninfo var;	/* Current var */
int screen_size;
unsigned char *fbmem;
unsigned int line_width;
unsigned int pixel_width;/*********************************************************************** 函数名称: lcd_put_pixel* 功能描述: 在LCD指定位置上输出指定颜色(描点)* 输入参数: x坐标,y坐标,颜色* 输出参数: 无* 返 回 值: 会* 修改日期        版本号     修改人	      修改内容* -----------------------------------------------* 2020/05/12	     V1.0	  zh(angenao)	      创建***********************************************************************/
void lcd_put_pixel(int x, int y, unsigned int color)
{unsigned char *pen_8 = fbmem+y*line_width+x*pixel_width;unsigned short *pen_16;	unsigned int *pen_32;	unsigned int red, green, blue;	pen_16 = (unsigned short *)pen_8;pen_32 = (unsigned int *)pen_8;switch (var.bits_per_pixel){case 8:{*pen_8 = color;break;}case 16:{/* 565 */red   = (color >> 16) & 0xff;green = (color >> 8) & 0xff;blue  = (color >> 0) & 0xff;color = ((red >> 3) << 11) | ((green >> 2) << 5) | (blue >> 3);*pen_16 = color;break;}case 32:{*pen_32 = color;break;}default:{printf("can't surport %dbpp\n", var.bits_per_pixel);break;}}
}/*********************************************************************** 函数名称: draw_bitmap* 功能描述: 根据bitmap位图,在LCD指定位置显示汉字* 输入参数: x坐标,y坐标,位图指针* 输出参数: 无* 返 回 值: 无* 修改日期        版本号     修改人	      修改内容* -----------------------------------------------* 2020/05/12	     V1.0	  zh(angenao)	      创建***********************************************************************/
void
draw_bitmap( FT_Bitmap*  bitmap,FT_Int      x,FT_Int      y)
{FT_Int  i, j, p, q;FT_Int  x_max = x + bitmap->width;FT_Int  y_max = y + bitmap->rows;//printf("x = %d, y = %d\n", x, y);for ( j = y, q = 0; j < y_max; j++, q++ ){for ( i = x, p = 0; i < x_max; i++, p++ ){if ( i < 0      || j < 0       ||i >= var.xres || j >= var.yres )continue;//image[j][i] |= bitmap->buffer[q * bitmap->width + p];lcd_put_pixel(i, j, bitmap->buffer[q * bitmap->width + p]);}}
}int main(int argc, char **argv)
{wchar_t *chinese_str = L"繁";FT_Library	  library;FT_Face 	  face;int error;FT_Vector     pen;FT_GlyphSlot  slot;int font_size = 24;if (argc < 2){printf("Usage : %s <font_file> [font_size]\n", argv[0]);return -1;}if (argc == 3)font_size = strtoul(argv[2], NULL, 0);fd_fb = open("/dev/fb0", O_RDWR);if (fd_fb < 0){printf("can't open /dev/fb0\n");return -1;}if (ioctl(fd_fb, FBIOGET_VSCREENINFO, &var)){printf("can't get var\n");return -1;}line_width  = var.xres * var.bits_per_pixel / 8;pixel_width = var.bits_per_pixel / 8;screen_size = var.xres * var.yres * var.bits_per_pixel / 8;fbmem = (unsigned char *)mmap(NULL , screen_size, PROT_READ | PROT_WRITE, MAP_SHARED, fd_fb, 0);if (fbmem == (unsigned char *)-1){printf("can't mmap\n");return -1;}/* 清屏: 全部设为黑色 */memset(fbmem, 0, screen_size);/* 显示矢量字体 */error = FT_Init_FreeType( &library );			   /* initialize library *//* error handling omitted */error = FT_New_Face( library, argv[1], 0, &face ); /* create face object *//* error handling omitted */	slot = face->glyph;FT_Set_Pixel_Sizes(face, font_size, 0);/* 确定座标:*///pen.x = 0;//pen.y = 0;/* set transformation *///FT_Set_Transform( face, 0, &pen);/* load glyph image into the slot (erase previous one) */error = FT_Load_Char( face, chinese_str[0], FT_LOAD_RENDER );if (error){printf("FT_Load_Char error\n");return -1;}draw_bitmap( &slot->bitmap,var.xres/2,var.yres/2);return 0;
}
6.1.1 使用wchar_t获得字符的UNICODE值
要显示一个字符,首先要确定它的编码值。常用的是UNICODE编码,在程序里使用这样的语句定义字符串时,str中保存的要么是GB2312编码值,要么是UTF-8格式的编码值,即使编译时使用“-fexec-charset=UTF-8”,str中保存的也不是直接能使用的UNICODE值:
char *str = “中”;
如果想在代码中能直接使用UNICODE值,需要使用wchar_t,宽字符,示例代码如下:
01 #include <stdio.h>
02 #include <string.h>
03 #include <wchar.h>
04
05 int main( int argc, char** argv)
06 {
07 		wchar_t *chinese_str = L"中 gif";
08 		unsigned int *p = (wchar_t *)chinese_str;
09 		int i;
10
11 		printf("sizeof(wchar_t) = %d, str's Uniocde: \n", (int)sizeof(wchar_t));
12 		for (i = 0; i < wcslen(chinese_str); i++)
13 		{
14 			printf("0x%x ", p[i]);
15 		}
16 		printf("\n");
17
18 		return 0;
19 }
UTF-8格式保存test_wchar.c,编译、测试命令如下:

每个wchar_t占据4字节,可执行程序里wchar_t中保存的就是字符的UNICODE值。
注意:注意:如果test_wchar.c是以ANSI(GB2312)格式保存,那么需要使用以下命令来编译:
gcc -finput-charset=GB2312 -fexec-charset=UTF-8 -o test_wchar test_wchar.c
6.1.2 使用freetype得到位图
使用 freetype 得到一个字符的位图,需要 4 个步骤:

-
初始化freetype库
158 error = FT_Init_FreeType( &library ); /* initialize library */ -
加载字体文件,保存在&face中
161 error = FT_New_Face( library, argv[1], 0, &face ); /* create face object */
162 /* error handling omitted */
163 slot = face->glyph;
第 163 行是从 face 中获得 FT_GlyphSlot,后面的代码中文字的位图就是保存在 FT_GlyphSlot 里。
-
设置字体大小
165 FT_Set_Pixel_Sizes(face, font_size, 0); -
根据编码值得到位图
使用 FT_Load_Char 函数,就可以实现这 3 个功能:
- 根据编码值获得 glyph_index: FT_Get_Char_Index
- 根据 glyph_idex 取出 glyph: FT_Load_Glyph
- 渲染出位图: FT_Render_Glyph
175 /* load glyph image into the slot (erase previous one) */
176 error = FT_Load_Char( face, chinese_str[0], FT_LOAD_RENDER );
执行 FT_Load_Char 之后,字符的位图被存在 slot->bitmap 里,即 face->glyph->bitmap。
6.1.3 在屏幕上显示位图
位图里的数据格式是怎样的?参考 3.1 example1.c 的代码,可以得到下图:

在屏幕上显示出这些位图:
183 draw_bitmap( &slot->bitmap,
184 			 var.xres/2,
185 			 var.yres/2);
draw_bitmap 函数代码如下,由于位图中每一个像素用一个字节来表示,在0x00RRGGBB 的颜色格式中它只能表示蓝色,所以在 LCD 上显示出来的文字是蓝色的:

6.1.4 交叉编译代码
IMX6ULL使用如下命令编译:
arm-buildroot-linux-gnueabihf-gcc -o freetype_show_font freetype_show_font.c -lfreetype
如果提示以下错误:
freetype_show_font.c:12:10: fatal error: ft2build.h: No such file or directory#include <ft2build.h>^~~~~~~~~~~~
compilation terminated.
之前编译出 freetype 后,得到的 ft2build.h 是位于 freetype2 目录里,把整个 freetype2 目录复制进了工具链里。
但是包括头文件时,用的是“ #include <ft2build.h>”,要么改成:
#include <freetype2/ft2build.h>
要么把工具链里 incldue/freetype2/*.h 复制到上一级目录,使用这种方法:跟 freetype 文档保持一致。执行以下命令:
cd /home/book/100ask_imx6ull-sdk/ToolChain/arm-buildroot-linux-gnueabihf_sdk-buildroot/bin/../lib/gcc/arm-buildroot-linux-gnueabihf/7.5.0/include
mv freetype2/* ./
再次执行以下命令:
arm-buildroot-linux-gnueabihf-gcc -o freetype_show_font freetype_show_font.c -lfreetype
6.1.5 测试
将编译好的 freetype_show_font 文件与 simsun.ttc 字体文件拷贝至开发板,这 2 个文件放在同一个目录下,然后执行以下命令:
./freetype_show_font ./simsun.ttc
或者
./freetype_show_font ./simsun.ttc 300


6.2 在LCD上令矢量字体旋转某个角度
在LCD上令矢量字体旋转某个角度源码:
#include <sys/mman.h>
#include <sys/types.h>
#include <sys/stat.h>
#include <unistd.h>
#include <linux/fb.h>
#include <fcntl.h>
#include <stdio.h>
#include <string.h>
#include <math.h>
#include <wchar.h>
#include <sys/ioctl.h>
#include <ft2build.h>
#include FT_FREETYPE_H
#include FT_GLYPH_Hint fd_fb;
struct fb_var_screeninfo var;	/* Current var */
int screen_size;
unsigned char *fbmem;
unsigned int line_width;
unsigned int pixel_width;/*********************************************************************** 函数名称: lcd_put_pixel* 功能描述: 在LCD指定位置上输出指定颜色(描点)* 输入参数: x坐标,y坐标,颜色* 输出参数: 无* 返 回 值: 会* 修改日期        版本号     修改人	      修改内容* -----------------------------------------------* 2020/05/12	     V1.0	  zh(angenao)	      创建***********************************************************************/
void lcd_put_pixel(int x, int y, unsigned int color)
{unsigned char *pen_8 = fbmem+y*line_width+x*pixel_width;unsigned short *pen_16;	unsigned int *pen_32;	unsigned int red, green, blue;	pen_16 = (unsigned short *)pen_8;pen_32 = (unsigned int *)pen_8;switch (var.bits_per_pixel){case 8:{*pen_8 = color;break;}case 16:{/* 565 */red   = (color >> 16) & 0xff;green = (color >> 8) & 0xff;blue  = (color >> 0) & 0xff;color = ((red >> 3) << 11) | ((green >> 2) << 5) | (blue >> 3);*pen_16 = color;break;}case 32:{*pen_32 = color;break;}default:{printf("can't surport %dbpp\n", var.bits_per_pixel);break;}}
}/*********************************************************************** 函数名称: draw_bitmap* 功能描述: 根据bitmap位图,在LCD指定位置显示汉字* 输入参数: x坐标,y坐标,位图指针* 输出参数: 无* 返 回 值: 无* 修改日期        版本号     修改人	      修改内容* -----------------------------------------------* 2020/05/12	     V1.0	  zh(angenao)	      创建***********************************************************************/
void
draw_bitmap( FT_Bitmap*  bitmap,FT_Int      x,FT_Int      y)
{FT_Int  i, j, p, q;FT_Int  x_max = x + bitmap->width;FT_Int  y_max = y + bitmap->rows;//printf("x = %d, y = %d\n", x, y);for ( j = y, q = 0; j < y_max; j++, q++ ){for ( i = x, p = 0; i < x_max; i++, p++ ){if ( i < 0      || j < 0       ||i >= var.xres || j >= var.yres )continue;//image[j][i] |= bitmap->buffer[q * bitmap->width + p];lcd_put_pixel(i, j, bitmap->buffer[q * bitmap->width + p]);}}
}int main(int argc, char **argv)
{wchar_t *chinese_str = L"繁";FT_Library	  library;FT_Face 	  face;int error;FT_Vector     pen;FT_GlyphSlot  slot;int font_size = 24;FT_Matrix	  matrix;				  /* transformation matrix */double		  angle;if (argc < 3){printf("Usage : %s <font_file> <angle> [font_size]\n", argv[0]);return -1;}angle  = ( 1.0* strtoul(argv[2], NULL, 0) / 360 ) * 3.14159 * 2;	   /* use 25 degrees	 */if (argc == 4)font_size = strtoul(argv[3], NULL, 0);fd_fb = open("/dev/fb0", O_RDWR);if (fd_fb < 0){printf("can't open /dev/fb0\n");return -1;}if (ioctl(fd_fb, FBIOGET_VSCREENINFO, &var)){printf("can't get var\n");return -1;}line_width  = var.xres * var.bits_per_pixel / 8;pixel_width = var.bits_per_pixel / 8;screen_size = var.xres * var.yres * var.bits_per_pixel / 8;fbmem = (unsigned char *)mmap(NULL , screen_size, PROT_READ | PROT_WRITE, MAP_SHARED, fd_fb, 0);if (fbmem == (unsigned char *)-1){printf("can't mmap\n");return -1;}/* 清屏: 全部设为黑色 */memset(fbmem, 0, screen_size);/* 显示矢量字体 */error = FT_Init_FreeType( &library );			   /* initialize library *//* error handling omitted */error = FT_New_Face( library, argv[1], 0, &face ); /* create face object *//* error handling omitted */	slot = face->glyph;FT_Set_Pixel_Sizes(face, font_size, 0);/* 确定座标:*/pen.x = 0;pen.y = 0;/* set up matrix */matrix.xx = (FT_Fixed)( cos( angle ) * 0x10000L );matrix.xy = (FT_Fixed)(-sin( angle ) * 0x10000L );matrix.yx = (FT_Fixed)( sin( angle ) * 0x10000L );matrix.yy = (FT_Fixed)( cos( angle ) * 0x10000L );/* set transformation */FT_Set_Transform( face, &matrix, &pen);/* load glyph image into the slot (erase previous one) */error = FT_Load_Char( face, chinese_str[0], FT_LOAD_RENDER );if (error){printf("FT_Load_Char error\n");return -1;}draw_bitmap( &slot->bitmap,var.xres/2,var.yres/2);return 0;
}
“在LCD上令矢量字体旋转某个角度源码“和“在LCD上显示一个矢量字体的源码”对比:


6.2.1 代码分析


6.2.2 交叉编译代码
IMX6ULL使用如下命令编译:
arm-buildroot-linux-gnueabihf-gcc -o freetype_show_font_angle freetype_show_font_angle.c -lfreetype -lm
6.2.3 测试
将编译好的 freetype_show_font_angle文件与 simsun.ttc 字体文件拷贝至开发板,这 2 个文件放在同一个目录下,然后执行以下命令:
./freetype_show_font_angle ./simsun.ttc 90 200


6.3 使用freetype显示一行文字
6.3.1 使用freetype显示一行文字的方法
在 LCD 上指定一个左上角坐标(x, y),把一行文字显示出来。下图中,文字的外框用虚线表示,外框的左上角坐标就是(x, y)。

6.3.1.1笛卡尔坐标系
在 LCD 的坐标系中,原点在屏幕的左上角。对于笛卡尔坐标系,原点在左下角。 freetype 使用笛卡尔坐标系,在显示时需要转换为 LCD 坐标系。
从下图可知, X 方向坐标值是一样的。
在 Y 方向坐标值需要换算,假设 LCD 的高度是 V。
在 LCD 坐标系中坐标是(x, y),那么它在笛卡尔坐标系中的坐标值为(x, V-y)。
反过来也是一样的,在笛卡尔坐标系中坐标是(x, y),那么它在 LCD 坐标系中坐标值为(x, V-y)。

6.3.1.2 每个字符的大小可能不同
在使用 FT_Set_Pixel_Sizes 函数设置字体大小时,这只是“期望值”。比如“百问网 www.100ask.net”,如果把“ .”显示得跟其他汉字一样大,不好看。
所以在显示一行文字时,后面文字的位置会受到前面文字的影响。
freetype 字体的尺寸(freetype Metrics),参考 4.2 代码分析中官方freetype教程中“Managing Glyphs”教程:

在显示一行文字时,这些文字会基于同一个基线来绘制位图:baseline。
在 baseline 上,每一个字符都有它的原点(origin),比如上图中 baseline左边的黑色圆点就是字母“ g”的原点。当前 origin 加上 advance 就可以得到下一个字符的 origin,比如上图中 baseline 右边的黑色圆点。在显示一行中多个文件字时,后一个文字的原点依赖于前一个文字的原点及 advance。
字符的位图是有可能越过 baseline 的,比如上图中字母“ g”在 baseline下方还有图像。
上图中红色方框内就是字母“g”所点据的位图,它的四个角落不一定与原点重合。
上图中那些xMin、xMax、yMin、yMax如何获得?可以使用FT_Glyph_Get_CBox函数获得一个字体的这些参数,将会保存在一个FT_BBox结构体中,以后想计算一行文字的外框时要用到这些信息:

6.3.1.3 在指定位置显示一行文字
要显示一行文字时,每一个字符都有自己外框: xMin、 xMax、 yMin、 yMax。把这些字符的 xMin、 yMin 中的最小值取出来,把这些字符的 xMax、 yMax 中的最大值取出来,就可以确定这行文字的外框了。
如下图,在指定位置(x, y)显示一行文字:

- 先指定第 1 个字符的原点 pen 坐标为(0, 0),计算出它的外框
- 再计算右边字符的原点,也计算出它的外框,把所有字符都处理完后就可以得到一行文字的整体外框:假设外框左上角坐标为(x’, y’)
- 想在(x, y)处显示这行文字,调整一下 pen 坐标即可。 pen 为(0, 0)时对应左上角(x’, y’);那么左上角为(x, y)时就可以算出pen 为(x-x’, y-y’)
6.3.1.4 freetype的几个重要数据结构
参考4.2代码分析中官方freetype文档
FT_Library:
对应 freetype 库,使用 freetype 之前要先调用以下代码:
FT_Library library; /* 对应 freetype 库 */
error = FT_Init_FreeType( &library ); /* 初始化 freetype 库 */
FT_Face:
它对应一个矢量字体文件,在源码中使用 FT_New_Face 函数打开字体文件后,就可以得到一个 face。
为什么称之为 face?
估计是文字都是写在二维平面上的吧,正对着人脸?不用管原因了,总之认为它对应一个字体文件就可以。
代码如下:
error = FT_New_Face(library, font_file, 0, &face ); /* 加载字体文件 */
FT_GlyphSlot:
插槽?用来保存字符的处理结果:比如转换后的 glyph、位图,如下图:

一个 face 中有很多字符,生成一个字符的点阵位图时,位图保存在哪里?保存在插槽中: face->glyph。
生成第 1 个字符位图时,它保存在 face->glyph 中;生成第 2 个字符位图时,也会保存在 face->glyph 中,会覆盖第 1 个字符的位图。
代码如下:
FT_GlyphSlot slot = face->glyph; /* 插槽: 字体的处理结果保存在这里 */
FT_Glyph:
字体文件中保存有字符的原始关键点信息,使用 freetype 的函数可以放大、缩小、旋转,这些新的关键点保存在插槽中(注意:位图也是保存在插槽中)。
新的关键点使用 FT_Glyph 来表示,可以使用这样的代码从 slot 中获得glyph:
error = FT_Get_Glyph(slot , &glyph);
FT_BBox:
FT_BBox 结构体定义如下,它表示一个字符的外框,即新 glyph 的外框:

可以使用以下代码从 glyph 中获得这些信息:
FT_Glyph_Get_CBox(glyph, FT_GLYPH_BBOX_TRUNCATE, &bbox );
示例代码:

6.3.2 使用freetype显示一行文字源码
#include <sys/mman.h>
#include <sys/types.h>
#include <sys/stat.h>
#include <unistd.h>
#include <linux/fb.h>
#include <fcntl.h>
#include <stdio.h>
#include <string.h>
#include <math.h>
#include <wchar.h>
#include <sys/ioctl.h>#include <ft2build.h>
#include FT_FREETYPE_H
#include FT_GLYPH_Hint fd_fb;
struct fb_var_screeninfo var;   /* Current var */
struct fb_fix_screeninfo fix;   /* Current fix */
int screen_size;
unsigned char *fbmem;
unsigned int line_width;
unsigned int pixel_width;/* color : 0x00RRGGBB */
void lcd_put_pixel(int x, int y, unsigned int color)
{unsigned char *pen_8 = fbmem+y*line_width+x*pixel_width;unsigned short *pen_16; unsigned int *pen_32;   unsigned int red, green, blue;  pen_16 = (unsigned short *)pen_8;pen_32 = (unsigned int *)pen_8;switch (var.bits_per_pixel){case 8:{*pen_8 = color;break;}case 16:{/* 565 */red   = (color >> 16) & 0xff;green = (color >> 8) & 0xff;blue  = (color >> 0) & 0xff;color = ((red >> 3) << 11) | ((green >> 2) << 5) | (blue >> 3);*pen_16 = color;break;}case 32:{*pen_32 = color;break;}default:{printf("can't surport %dbpp\n", var.bits_per_pixel);break;}}
}/*********************************************************************** 函数名称: draw_bitmap* 功能描述: 根据bitmap位图,在LCD指定位置显示汉字* 输入参数: x坐标,y坐标,位图指针* 输出参数: 无* 返 回 值: 无* 修改日期        版本号     修改人        修改内容* -----------------------------------------------* 2020/05/12        V1.0     zh(angenao)         创建***********************************************************************/
void
draw_bitmap( FT_Bitmap*  bitmap,FT_Int      x,FT_Int      y)
{FT_Int  i, j, p, q;FT_Int  x_max = x + bitmap->width;FT_Int  y_max = y + bitmap->rows;//printf("x = %d, y = %d\n", x, y);for ( j = y, q = 0; j < y_max; j++, q++ ){for ( i = x, p = 0; i < x_max; i++, p++ ){if ( i < 0      || j < 0       ||i >= var.xres || j >= var.yres )continue;//image[j][i] |= bitmap->buffer[q * bitmap->width + p];lcd_put_pixel(i, j, bitmap->buffer[q * bitmap->width + p]);}}
}int compute_string_bbox(FT_Face       face, wchar_t *wstr, FT_BBox  *abbox)
{int i;int error;FT_BBox bbox;FT_BBox glyph_bbox;FT_Vector pen;FT_Glyph  glyph;FT_GlyphSlot slot = face->glyph;/* 初始化 */bbox.xMin = bbox.yMin = 32000;bbox.xMax = bbox.yMax = -32000;/* 指定原点为(0, 0) */pen.x = 0;pen.y = 0;/* 计算每个字符的bounding box *//* 先translate, 再load char, 就可以得到它的外框了 */for (i = 0; i < wcslen(wstr); i++){/* 转换:transformation */FT_Set_Transform(face, 0, &pen);/* 加载位图: load glyph image into the slot (erase previous one) */error = FT_Load_Char(face, wstr[i], FT_LOAD_RENDER);if (error){printf("FT_Load_Char error\n");return -1;}/* 取出glyph */error = FT_Get_Glyph(face->glyph, &glyph);if (error){printf("FT_Get_Glyph error!\n");return -1;}/* 从glyph得到外框: bbox */FT_Glyph_Get_CBox(glyph, FT_GLYPH_BBOX_TRUNCATE, &glyph_bbox);/* 更新外框 */if ( glyph_bbox.xMin < bbox.xMin )bbox.xMin = glyph_bbox.xMin;if ( glyph_bbox.yMin < bbox.yMin )bbox.yMin = glyph_bbox.yMin;if ( glyph_bbox.xMax > bbox.xMax )bbox.xMax = glyph_bbox.xMax;if ( glyph_bbox.yMax > bbox.yMax )bbox.yMax = glyph_bbox.yMax;/* 计算下一个字符的原点: increment pen position */pen.x += slot->advance.x;pen.y += slot->advance.y;}/* return string bbox */*abbox = bbox;
}int display_string(FT_Face     face, wchar_t *wstr, int lcd_x, int lcd_y)
{int i;int error;FT_BBox bbox;FT_Vector pen;FT_Glyph  glyph;FT_GlyphSlot slot = face->glyph;/* 把LCD坐标转换为笛卡尔坐标 */int x = lcd_x;int y = var.yres - lcd_y;/* 计算外框 */compute_string_bbox(face, wstr, &bbox);/* 反推原点 */pen.x = (x - bbox.xMin) * 64; /* 单位: 1/64像素 */pen.y = (y - bbox.yMax) * 64; /* 单位: 1/64像素 *//* 处理每个字符 */for (i = 0; i < wcslen(wstr); i++){/* 转换:transformation */FT_Set_Transform(face, 0, &pen);/* 加载位图: load glyph image into the slot (erase previous one) */error = FT_Load_Char(face, wstr[i], FT_LOAD_RENDER);if (error){printf("FT_Load_Char error\n");return -1;}/* 在LCD上绘制: 使用LCD坐标 */draw_bitmap( &slot->bitmap,slot->bitmap_left,var.yres - slot->bitmap_top);/* 计算下一个字符的原点: increment pen position */pen.x += slot->advance.x;pen.y += slot->advance.y;}return 0;
}int main(int argc, char **argv)
{wchar_t *wstr = L"百问网www.100ask.net";FT_Library    library;FT_Face       face;int error;FT_BBox bbox;int font_size = 24;int lcd_x, lcd_y;if (argc < 4){printf("Usage : %s <font_file> <lcd_x> <lcd_y> [font_size]\n", argv[0]);return -1;}lcd_x = strtoul(argv[2], NULL, 0);      lcd_y = strtoul(argv[3], NULL, 0);      if (argc == 5)font_size = strtoul(argv[4], NULL, 0);      fd_fb = open("/dev/fb0", O_RDWR);if (fd_fb < 0){printf("can't open /dev/fb0\n");return -1;}if (ioctl(fd_fb, FBIOGET_VSCREENINFO, &var)){printf("can't get var\n");return -1;}if (ioctl(fd_fb, FBIOGET_FSCREENINFO, &fix)){printf("can't get fix\n");return -1;}line_width  = var.xres * var.bits_per_pixel / 8;pixel_width = var.bits_per_pixel / 8;screen_size = var.xres * var.yres * var.bits_per_pixel / 8;fbmem = (unsigned char *)mmap(NULL , screen_size, PROT_READ | PROT_WRITE, MAP_SHARED, fd_fb, 0);if (fbmem == (unsigned char *)-1){printf("can't mmap\n");return -1;}/* 清屏: 全部设为黑色 */memset(fbmem, 0, screen_size);error = FT_Init_FreeType( &library );              /* initialize library */error = FT_New_Face( library, argv[1], 0, &face ); /* create face object */FT_Set_Pixel_Sizes(face, font_size, 0);display_string(face, wstr, lcd_x, lcd_y);return 0;
}
6.3.3 代码分析
6.3.3.1 计算一行文字的外框
一行文字中:后一个字符的原点=前一个字符的原点+advance。所以要计算一行文字的外框,需要按照排列顺序处理其中的每一个字符。代码如下:
102 int compute_string_bbox(FT_Face face, wchar_t *wstr, FT_BBox *abbox)
103 {
104 	int i;
105 	int error;
106 	FT_BBox bbox;
107 	FT_BBox glyph_bbox;
108 	FT_Vector pen;
109 	FT_Glyph glyph;
110 	FT_GlyphSlot slot = face->glyph;
111
112 	/* 初始化 */
113 	bbox.xMin = bbox.yMin = 32000;
114 	bbox.xMax = bbox.yMax = -32000;
115
116 	/* 指定原点为(0, 0) */
117 	pen.x = 0;
118 	pen.y = 0;
119
120 	/* 计算每个字符的 bounding box */
121 	/* 先 translate, 再 load char, 就可以得到它的外框了 */
122 	for (i = 0; i < wcslen(wstr); i++)
123 	{
124 		/* 转换: transformation */
125 		FT_Set_Transform(face, 0, &pen);
126
127 		/* 加载位图: load glyph image into the slot (erase previous one) */
128 		error = FT_Load_Char(face, wstr[i], FT_LOAD_RENDER);
129 		if (error)
130 		{
131 			printf("FT_Load_Char error\n");
132 			return -1;
133 		}
134
135 		/* 取出 glyph */
136 		error = FT_Get_Glyph(face->glyph, &glyph);
137 		if (error)
138 		{
139 			printf("FT_Get_Glyph error!\n");
140 			return -1;
141 		}
142
143 		/* 从 glyph 得到外框: bbox */
144 		FT_Glyph_Get_CBox(glyph, FT_GLYPH_BBOX_TRUNCATE, &glyph_bbox);
145
146 		/* 更新外框 */
147 		if ( glyph_bbox.xMin < bbox.xMin )
148 			bbox.xMin = glyph_bbox.xMin;
149
150 		if ( glyph_bbox.yMin < bbox.yMin )
151 			bbox.yMin = glyph_bbox.yMin;
152
153 		if ( glyph_bbox.xMax > bbox.xMax )
154 			bbox.xMax = glyph_bbox.xMax;
155
156 		if ( glyph_bbox.yMax > bbox.yMax )
157 			bbox.yMax = glyph_bbox.yMax;
158
159 		/* 计算下一个字符的原点: increment pen position */
160 		pen.x += slot->advance.x;
161 		pen.y += slot->advance.y;
162 	}
163
164 	/* return string bbox */
165 	*abbox = bbox;
166 }
6.3.3.2 调整原点并绘制
代码如下:
169 int display_string(FT_Face face, wchar_t *wstr, int lcd_x, int lcd_y)
170 {
171 	int i;
172 	int error;
173 	FT_BBox bbox;
174 	FT_Vector pen;
175 	FT_Glyph glyph;
176 	FT_GlyphSlot slot = face->glyph;
177
178 	/* 把 LCD 坐标转换为笛卡尔坐标 */
179 	int x = lcd_x;
180 	int y = var.yres - lcd_y;
181
182 	/* 计算外框 */
183 	compute_string_bbox(face, wstr, &bbox);
184
185 	/* 反推原点 */
186 	pen.x = (x - bbox.xMin) * 64; /* 单位: 1/64 像素 */
187 	pen.y = (y - bbox.yMax) * 64; /* 单位: 1/64 像素 */
188
189 	/* 处理每个字符 */
190 	for (i = 0; i < wcslen(wstr); i++)
191 	{
192 		/* 转换: transformation */
193 		FT_Set_Transform(face, 0, &pen);
194
195 		/* 加载位图: load glyph image into the slot (erase previous one) */
196 		error = FT_Load_Char(face, wstr[i], FT_LOAD_RENDER);
197 		if (error)
198 		{
199 			printf("FT_Load_Char error\n");
200 			return -1;
201 		}
202
203 		/* 在 LCD 上绘制: 使用 LCD 坐标 */
204 		draw_bitmap( &slot->bitmap,
205 				slot->bitmap_left,
206 				var.yres - slot->bitmap_top);
207
208 		/* 计算下一个字符的原点: increment pen position */
209 		pen.x += slot->advance.x;
210 		pen.y += slot->advance.y;
211 	}
212
213 	return 0;
214 }
6.3.4 交叉编译代码
IMX6ULL使用如下命令编译:
arm-buildroot-linux-gnueabihf-gcc -o show_line show_line.c -lfreetype
6.3.5 测试
将编译好的 show_line 文件与 simsun.ttc 字体文件拷贝至开发板,这 2个文件放在同一个目录下,然后执行以下命令(其中的 3 个数字分别表示 LCD 的X 坐标、 Y 坐标、字体大小):
./freetype_show_font_angle ./simsun.ttc 90 200


基于freetyp的基础使用,可以进行更复杂的LCD操作。
相关文章:
freetype学习总结
freetype学习总结 目录 freetype学习总结1. LCD显示字符问题引入2. freetype概念2.1 嵌入式设备使用FreeType的方法步骤2.2 嵌入式设备使用FreeType的注意事项 3. freetype官方C示例3.1 example1.c源码 4. 嵌入式设备上使用FreeType的简单示例4.1 简单示例代码4.2 代码分析 5. …...

上海亚商投顾:沪指缩量调整 华为概念股午后爆发
上海亚商投顾前言:无惧大盘涨跌,解密龙虎榜资金,跟踪一线游资和机构资金动向,识别短期热点和强势个股。 一.市场情绪 市场全天震荡调整,沪指、深成指午后跌超1%,创业板指一度跌逾2%,尾盘跌幅有…...

操作系统与进程【单身狗定制版】
大家好呀 我是浪前 今天给大家讲解的是操作系统与进程 祝愿所有点赞关注的人,身体健康,一夜暴富,升职加薪迎娶白富美!!! 点我领取迎娶白富美大礼包 前言: 我们今天我们来学习操作系统 当然啦,操作系统是一个很庞大的…...

监听el-table中 自定义封装的某个组件的值发现改变调用函数
监听el-table中 自定义封装的某个组件的值发现改变调用函数 当你在一个 el-table 中使用封装的自定义组件作为单元格内容时,监听这个组件的值变化并调用函数,可以通过以下步骤实现: 创建自定义组件:首先创建一个自定义的 Vue 组…...
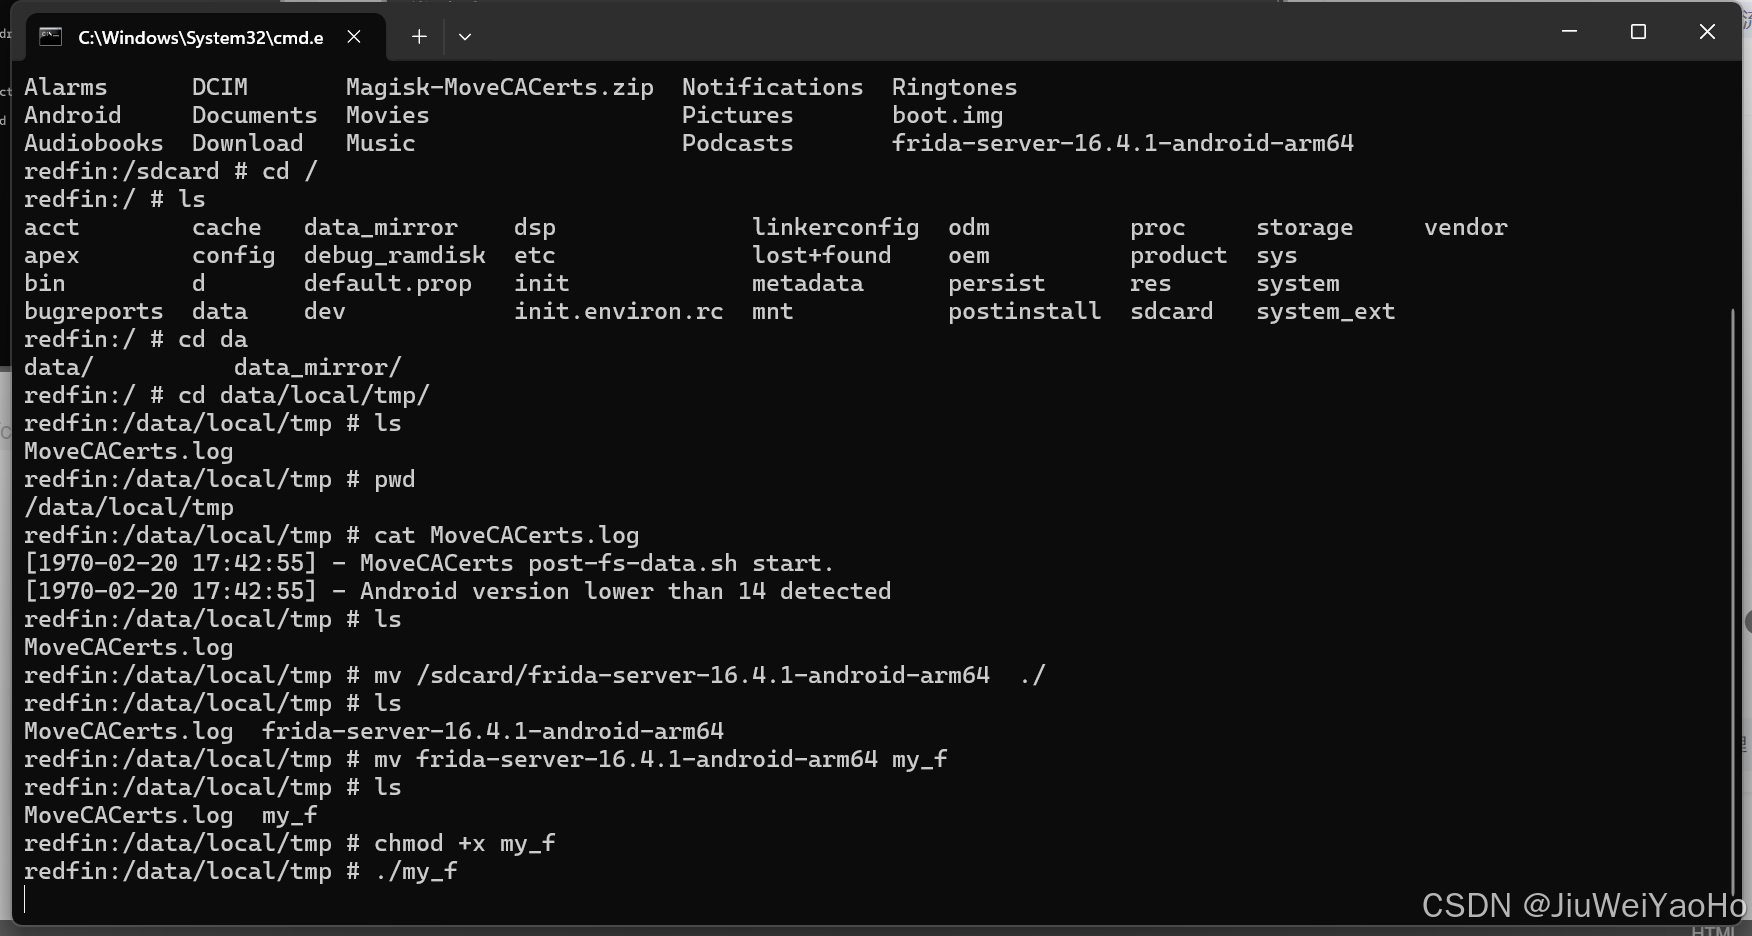
frida安装
开始安装 frida https://github.com/frida/frida/releases 下载安装的时候查看自己手机是多少位的 adb shell getprop ro.product.cpu.abi # 按照自己的机型下载进行解压里面有个文件放入到手机中开始进入手机 然后按照下面的图执行命令 其中log 我只是看了下 不需要执行因为刚…...

链表详解(三)
目录 链表功能实现链表的查找SLNode* SLFind(SLNode* phead, SLNDataType x)代码 链表任意位置前插入void SLInsert(SLNode**pphead,SLNode* pos, SLNDataType x)代码 链表任意位置前删除void SLErase(SLNode**pphead,SLNode* pos)代码 链表任意位置后插…...

【RESP问题】RESP.app GUI for Redis 连接不上redis服务器
问题描述: 在使用RESP的时候出现地址和密码正确但是连接不上Redis服务器的情况,但是由于在之前我是修改过Redis的配置文件的,所以现在怀疑是防火墙的问题。 问题解决: 在[rootlocalhost ~]下输入以下命令打开防火墙 #放通6379/…...

【github 有趣项目】AMULE
官方网站github ‘All-platform’ P2P client based on eMule电骡社区文档 下载&安装 去官方网站下载(社区版一般版本较新),解压版解压打开即可。 点击“下一页”,输入名称,后边全都下一步即可 通过upnp设置端…...

【WRF数据准备】土地利用类型分类标准:USGS+MODIS IGBP 21
【WRF数据准备】土地利用类型分类标准:USGSMODIS IGBP 21 WRF常用土地类型分类MODIS IGBP 21USGSNLCD Landuse 选择土地利用分类标准替换城市土地类型后更改土地利用分类参考 WRF常用土地类型分类 WRF中土地利用类型最高分辨率是30s,且主要分为MODIS和U…...

KVM虚拟机迁移:无缝迁徙,重塑云上未来
作者简介:我是团团儿,是一名专注于云计算领域的专业创作者,感谢大家的关注 座右铭: 云端筑梦,数据为翼,探索无限可能,引领云计算新纪元 个人主页:团儿.-CSDN博客 目录 前言&#…...

CSS常见适配布局方式
在网页设计中,布局是确保内容按预期显示的关键部分。CSS 提供了多种布局方式,每种方式都有其特定的用途和优势。以下是您提到的五种布局方式的详细解释: 1. 流式布局(百分比布局) 概述: 流式布局…...

ArkUI常用布局:构建响应式和高效的用户界面
在HarmonyOS应用开发中,ArkUI作为用户界面开发框架,提供了多种布局方式来帮助开发者构建响应式和高效的用户界面。本文将详细介绍ArkUI中的常用布局方式,包括线性布局、层叠布局、弹性布局、相对布局、栅格布局、列表和轮播布局,并…...

论面向服务架构设计及其应用
一、引言 企业应用集成(Enterprise Application Integration,EAI)是企业实现信息系统协同工作的关键途径,尤其是在当前多系统、多平台并存的企业环境下,集成需求愈发显著。面向服务架构(Service-Oriented …...

HTML5 + CSS3 + JavaScript 编程语言学习教程
HTML5 CSS3 JavaScript 编程语言学习教程 欢迎来到这篇关于 HTML5、CSS3 和 JavaScript 的详细学习教程!无论你是初学者还是有一定基础的开发者,这篇文章都将帮助你深入理解这三种技术的核心概念、语法和应用。 目录 HTML5 1.1 HTML5 简介1.2 HTML5 …...

Java日志脱敏——基于logback MessageConverter实现
背景简介 日志脱敏 是常见的安全需求,最近公司也需要将这一块内容进行推进。看了一圈网上的案例,很少有既轻量又好用的轮子可以让我直接使用。我一直是反对过度设计的,而同样我认为轮子就应该是可以让人拿去直接用的。所以我准备分享两篇博客…...

在 Ubuntu 22.04 上部署Apache 服务, 访问一张照片
要在 Ubuntu 22.04 上部署一张照片,使其可以通过 Apache 访问,你可以按照以下步骤进行操作: 1. 安装 Apache(如果尚未安装) 如果你还没有安装 Apache,可以使用以下命令: sudo apt update sud…...
)
从0学习React(10)
示例代码: const columns: ProColumns<API.BasicInfoItem>[] [{title: 设备编码,dataIndex: deviceCode,ellipsis: true,width: 40,},{title: 设备名称,dataIndex: deviceName,ellipsis: true,width: 50,},{title: 产线-工序,dataIndex: deviceClassifyName…...

Redis-结构化value对象的类型
文章目录 一、Redis的结构化value对象类型的介绍二、Redis的这些结构化value对象类型的通用操作查看指定key的数据类型查看所有的key判断指定key是否存在为已存在的key进行重命名为指定key设置存活时间pexpire与expire 查看指定Key的存活时间为指定key设置成永久存活 三、Redis…...

【QT】Qt对话框
个人主页~ Qt窗口属性~ Qt窗口 五、对话框2、Qt内置对话框(1)Message Box(2)QColorDialog(3)QFileDialog(4)QFontDialog(5)QInputDialog 五、对话框 2、Qt内…...
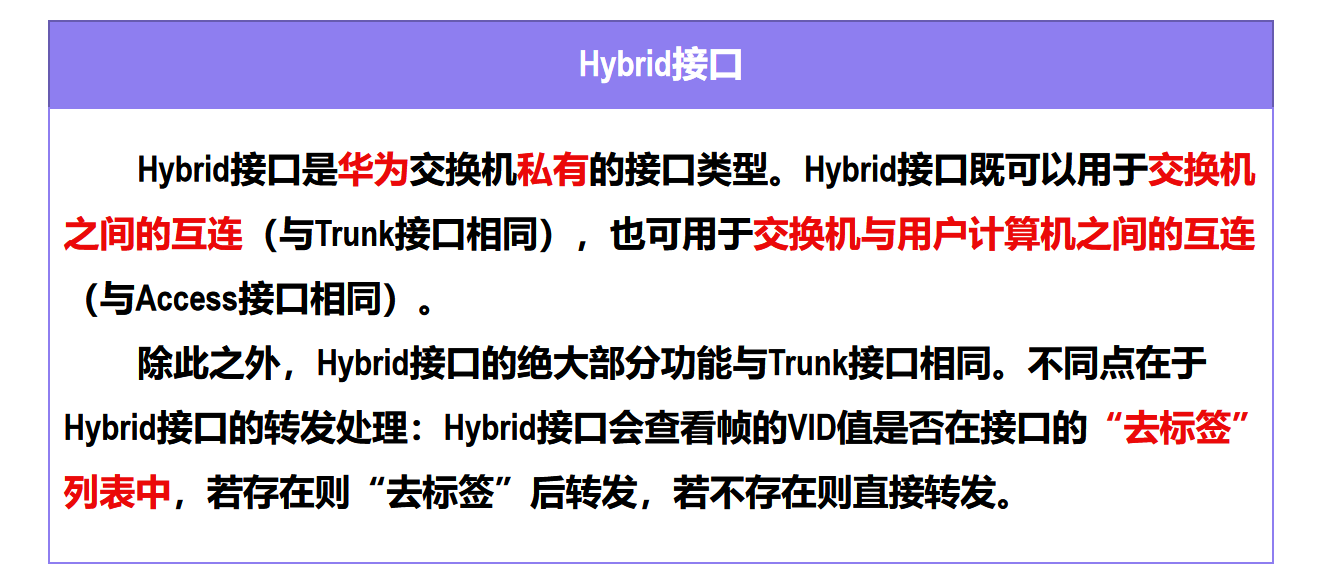
【计算机网络篇】数据链路层(14)虚拟局域网VLAN(概述,实现机制)
文章目录 🛸虚拟局域网VLAN🍔虚拟局域网VLAN的实现机制🥚IEEE 802.1Q帧🥚以太网交换机的接口类型🗒️例一:在一个交换机上不进行人为的VLAN划分,交换机各接口默认属于VLAN1且类型为Access的情况…...

Tftpd32/Tftpd64不止是TFTP!手把手教你玩转它的DHCP和Syslog服务器功能
Tftpd32/Tftpd64:解锁DHCP与Syslog服务的隐藏潜力当大多数人提起Tftpd32/Tftpd64时,第一反应往往是它作为TFTP服务器的功能。这款轻量级工具确实在文件传输领域表现出色,但它的能力远不止于此。今天,我们将深入探索这款软件中两个…...

别再死记硬背SMO公式了!用Python手写一个SVM分类器,带你一步步拆解SMO核心逻辑
用Python手写SVM分类器:代码驱动理解SMO算法核心在机器学习领域,支持向量机(SVM)以其优秀的分类性能和坚实的数学基础著称。然而,许多学习者在理解其核心算法——序列最小优化(SMO)时,往往被复杂的数学推导所困扰。本文将采用一种…...

ARM PMU性能监控单元原理与实践指南
1. ARM PMU性能监控单元概述性能监控单元(PMU)是现代ARM处理器中用于硬件级性能分析的核心组件。它通过一组可编程的硬件计数器,实现对处理器内部各种关键事件的精确测量。这些事件涵盖了从指令执行、缓存访问到内存子系统行为等处理器活动的…...

嵌入式快速原型开发:基于Sceptre平台与LPC2148的实战指南
1. 项目概述:Sceptre,一个被低估的嵌入式快速原型利器 在嵌入式开发的世界里,我们总是在寻找那个“刚刚好”的平台:它要足够强大,能跑复杂的算法;要足够小巧,能塞进各种外壳;要足够便…...

FT231XQ USB串口桥接板设计解析与实战应用指南
1. 项目概述:从FT232R到FT231XQ的USB串口桥接板演进在嵌入式开发和硬件调试的日常工作中,一个可靠、小巧且功能清晰的USB转串口(UART)桥接板(Breakout Board, 简称BoB)几乎是工程师手边的标配工…...

Owl-Alpha 新手快速上手指南
在处理大规模数据或构建高性能应用时,我们常常会遇到一个棘手的问题:如何在不阻塞主线程的情况下,高效地执行耗时任务?无论是处理图像、解析大型文件,还是进行复杂的数学运算,传统的单线程模式往往会让界面…...

WTF Auto Layout? 实战:10个常见约束冲突案例解析与解决方案
WTF Auto Layout? 实战:10个常见约束冲突案例解析与解决方案 【免费下载链接】wtfautolayout The source code for Why The Failure, Auto Layout? 项目地址: https://gitcode.com/gh_mirrors/wt/wtfautolayout 在iOS开发中,Auto Layout是构建灵…...

DLA功耗优化验证:tegrastats实战指南
重磅预告:本专栏将独家连载系列丛书《智能体视觉技术与应用》部分精华内容,该书是世界首套系统阐述“因式智能体”视觉理论与实践的专著,特邀美国 TypeOne 公司首席科学家、斯坦福大学博士 Bohan 担任技术顾问。Bohan先生师从美国三院院士、“…...

终极解决方案:Windows Cleaner免费开源工具,3步彻底解决C盘爆红问题
终极解决方案:Windows Cleaner免费开源工具,3步彻底解决C盘爆红问题 【免费下载链接】WindowsCleaner Windows Cleaner——专治C盘爆红及各种不服! 项目地址: https://gitcode.com/gh_mirrors/wi/WindowsCleaner 你是否也经历过这样的…...

清华大学学位论文LaTeX模板:30分钟快速排版终极指南
清华大学学位论文LaTeX模板:30分钟快速排版终极指南 【免费下载链接】thuthesis LaTeX Thesis Template for Tsinghua University 项目地址: https://gitcode.com/gh_mirrors/th/thuthesis 还在为论文格式烦恼吗?清华大学官方LaTeX模板thuthesis让…...