STM32ZET6-USART使用
一、原理说明
STM32自带通讯接口

通讯目的

通信方式:
全双工:通信时可以双方同时通信。
半双工:通信时同一时间只能一个设备发送数据,其他设备接收。
单工:只能一个设备发送到另一个设备,例如USART只有TX线。
时钟类型:
异步:约定传输速率,例如波特率相同,约定起始信号(和结束信号、帧头帧尾等进行约束和校验)进行传输。
优点是节省了硬件资源,缺点是在传输过程中停止会传输失败,不能中途暂停,而且难以用软件模拟,只能使用硬件传输。
同步:有一根单独的时钟线,通过时钟信号控制传输时的速率。
优点是在传输过程中可以中断(停止时钟信号即可停止),停止后可以继续传输,并且可以使用软件模拟时钟信号和通信,无硬件资源时可以牺牲引脚来使用。
传输类型:
单端:通过信号和GND的电平差来区分高低电平,需要把通信双方的GND接到一起,否则容易受到干扰。
差分:通过两根线的差分电平来判断高低电平通信,抗干扰信号更强,传输距离更远。
(USB尽量共地)
设备拓扑类型:
点对点:设备1-1通信,可能需要寻址,以确定
点对多:设备1-n通信
多对多:设备n-n通信
串口协议:

CH340可以将串口转换为USB协议,可以直接插在电脑上。
陀螺仪传感器可以测量角速度加速度等姿态参数,可以接串口和I2C。
蓝牙串口模块,可以和蓝牙设备互联,实现手机遥控单片机的功能。
串口接线图:

电平标准:

串口协议的软件定义:

RB8和TB8是奇偶校验位,可选择是否使用。一般需要校验位,则选择9bit数据,不需要校验位则选择8bit。
波特率:每秒传输码元的个数,可能每个码元包含信息量不止1bit,单位为码元/s,或者为bund。
比特率:每秒传输bit的速率。单位bit/s,或者bps。在二进制调制的情况下一个码元就是一个bit。
奇偶校验:
奇校验表示,包括校验位和数据位,发送的1为奇数个。例如发送0x0F,则发送 111100001
串口波形实例:
起始位为低电平,默认线上高电平,结束位为高电平(方便区分两个连续数据包)。


STM32的USART外设:

UART和USART类似,但是只支持时钟输出,不支持时钟输入。
同步模式是支持CLK时钟输出、硬件流控制表示传输时可通过从设备反馈 来控制主设备的发送 防止从设备处理慢导致数据丢失。DMA是串口支持DMA数据转运。STM32的串口协议也可支持智能卡、IrDA(红外通信)、LIN(局域网)等设备。
STM32-USART内部原理:

发送数据寄存器TDR和接收数据寄存器RDR使用同一块存储区域。nRTS高速主机当前是否可以接收数据。nCTS用于接收从机nRTS信号的引脚,判断从机当前是否可以接收。n代表低电平有效。串口使用SCLK可以兼容SPI。若不知道对方波特率,可以通过SCLK计算得到并传出输出。
唤醒单元用来实现串口挂载多设备,可以给串口分配地址。总线上对应发送的地址设备会进行通信。
TXE发送寄存器空。
RXNE接收寄存器非空。

USART波形及配置:
 一般配置9bit字长,都会使用校验位。若不是用校验位,则第九位为载荷bit。
选择8bit字长最好无校验位,若有校验位,那么有效载荷7bit。每次发送不够1byte。

停止位高电平,一般用1bit。
USART结构图:
 USART起始位侦测原理:


 波特率分频(分频后还有16倍分频):
例如USART1波特率9600,那么9600 = 72000000/(16*DIV);DIV = 468.785。放入寄存器为111010100.11
USB转串口模块的内部电路图:

不同数据模式:

二、实例
1、串口发送,OLED接收
接线图:

引脚定义:


重构printf函数:

printf输出汉字需要增加--no-multibyte-chars配置,防止中文乱码
--no-multibyte-chars

接收时需要用相同的编码方式


若utf-8兼容性不好,可更换GB2312编码方式。串口接收汉字,需要收发的两方编码方式相同。
main.c
#include "stdio.h"
#include "stm32f10x.h"                  // Device header
#include "Delay.h"
#include "OLED.h"
#include "Serial.h"
uint8_t SendDataA[3] = {0x01,0x02,0x03};
char *Char = "Hello Word!!!";
int32_t zNum = 23213;
int main(void){OLED_Init();Serial_Init();OLED_ShowString(1,1,"AD0:0000");OLED_ShowString(2,1,"AD1:0000");while(1){Delay_ms(1000);//Serial_SendByte(0x41);//发送十六进制0x41//Serial_SendByte('A');//发送字符A,同0x41.逻辑为发送A-底层0x41发送-串口底层接收0x41-可现实字符或十六进制数//Serial_SendByte(SendDataA[0]);//发送1byte数据//Serial_SendByteArray(&SendDataA[0],3);//发送指定长度字节数组//Serial_SendString(Char);发送字符串//Serial_SendSignedNum(zNum,4);//printf打印串口方法1//printf("Num = %d\r\n" , 666);// \r\n为字符换行,printf通过重定向打印串口//printf打印串口方法2//不使用重定向格式化字符串来串口打印,所有的串口都有可以用//char String[100];//sprintf(String,"Num = %d\r\n" , 666);//使用sprintf进行格式化,然后使用串口进行输出//Serial_SendString(String);//打印Num = 666\r\n//printf打印串口方法3//Serial_printf("Num = %d\r\n" , 666);//发送汉字字符串-接收需要和发送时相同的编码方式Serial_printf("你好!");}return 0;
}
Serial.h
#ifndef __SERIAL_H
#define __SERIAL_H
#include "stm32f10x.h"                  // Device header
#include "stdio.h"
void Serial_Init(void);
void Serial_SendByte(uint8_t Byte);
void Serial_SendByteArray(uint8_t *ByteArray,uint16_t length);
void Serial_SendString(char *Char);
void Serial_SendSignedNum(int32_t Num,uint16_t length);
void Serial_SendNum(int32_t Num,uint16_t length);
void Serial_printf(char *format,...);
#endif
Serial.c
#include "stm32f10x.h"                  // Device header
#include "math.h"
#include "stdio.h"
#include "stdarg.h"
/*** @brief 初始化USART1,通过USART1进行收发* @param  *     @arg * @param  *     @arg * @retval None*/
void Serial_Init(void){RCC_APB2PeriphClockCmd(RCC_APB2Periph_GPIOA,ENABLE);RCC_APB2PeriphClockCmd(RCC_APB2Periph_USART1,ENABLE);GPIO_InitTypeDef GPIO_InitStructure;GPIO_InitStructure.GPIO_Mode = GPIO_Mode_IPU;//上拉输入.GPIO_InitStructure.GPIO_Pin = GPIO_Pin_10;GPIO_InitStructure.GPIO_Speed = GPIO_Speed_50MHz;GPIO_Init(GPIOA,&GPIO_InitStructure);GPIO_InitStructure.GPIO_Mode = GPIO_Mode_AF_PP;//上拉输入GPIO_InitStructure.GPIO_Pin = GPIO_Pin_9;GPIO_InitStructure.GPIO_Speed = GPIO_Speed_50MHz;GPIO_Init(GPIOA,&GPIO_InitStructure);USART_InitTypeDef USART_InitStructure;USART_InitStructure.USART_BaudRate = 9600;USART_InitStructure.USART_HardwareFlowControl = USART_HardwareFlowControl_None;//硬件流控制USART_InitStructure.USART_Mode = USART_Mode_Rx | USART_Mode_Tx;USART_InitStructure.USART_Parity = USART_Parity_No;USART_InitStructure.USART_WordLength = USART_WordLength_8b;USART_InitStructure.USART_StopBits = USART_StopBits_1;USART_Init(USART1,&USART_InitStructure);USART_Cmd(USART1,ENABLE);
}
/*** @brief 串口发送1byte* @param  *     @arg * @param  *     @arg * @retval None*/
void Serial_SendByte(uint8_t Byte){USART_SendData(USART1,Byte);while(USART_GetFlagStatus(USART1,USART_FLAG_TXE) == RESET);//发送缓冲不为空则等待
}/*** @brief 发送字节数组* @param  数组指针*     @arg * @param  长度*     @arg * @retval None*/
void Serial_SendByteArray(uint8_t *ByteArray,uint16_t length){for(int i = 0 ; i<length ;  i++){Serial_SendByte(ByteArray[i]);}
}/*** @brief 发送一个字符串* @param  *     @arg * @param  *     @arg * @retval None*/
void Serial_SendString(char *String){int i = 0;for(i=0;String[i]!='\0';i++){Serial_SendByte(String[i]);}
}/*** @brief 以字符形式发送有符号数字* @param  *     @arg * @param  *     @arg * @retval None*/
void Serial_SendSignedNum(int32_t Num,uint16_t length){if(Num>=0){Serial_SendByte(0x2B);//加号}else{Serial_SendByte(0x2D);//减号Num = -Num;}//Num = abs(Num); abs处理int数据所以不适用for(int i=1;i<=length;i++){Serial_SendByte((Num/(uint32_t)pow(10,length-i)%10)+'0');}
}/*** @brief 以字符形式发送无符号数字* @param  *     @arg * @param  *     @arg * @retval None*/
void Serial_SendNum(int32_t Num,uint16_t length){for(int i=1;i<=length;i++){Serial_SendByte((Num/(uint32_t)pow(10,length-i)%10)+'0');}
}/*** @brief 重定向fputc函数,到串口1即Serial_SendByte函数,使用micor提供的精简库*     @arg fputc是printf函数的底层,printf打印时就是调用fputc单个打印,通过重定向可以在串口打印* @param  *     @arg * @param  *     @arg * @retval None*/
int fputc(int ch,FILE *f)
{Serial_SendByte(ch);return ch;
}/*** @brief 重构v sprintf,完成printf打印串口*     @arg sprintf只能接收直接写的参数,vsprintf可以接收封装格式参数* @param  format:接收格式化字符串*     @arg * @param  ...:可变参数列表,用来接收剩余参数*     @arg * @retval None*/
void Serial_printf(char *format,...){char String[100];va_list arg;//定义一个参数列表变量va_start(arg,format);//从format位置开始接收参数列表,放在arg中vsprintf(String,format,arg);//将打印参数arg格式化为format格式字符串,最好放入打印字符串变量Stringva_end(arg);//释放参数表Serial_SendString(String);//发送格式化后的字符串
}
2、串口发送+接收,串口收到数据后将数据返回
main.c
#include "stdio.h"
#include "stm32f10x.h"                  // Device header
#include "Delay.h"
#include "OLED.h"
#include "Serial.h"int main(void){OLED_Init();Serial_Init();OLED_ShowString(1,1,"Rx:00");while(1){Serial1Rx();OLED_ShowHexNum(1,4,Serial1_RxData,2);//显示1byte接收的十六进制数}return 0;
}
Serial.c
#include "stm32f10x.h"                  // Device header
#include "math.h"
#include "stdio.h"
#include "stdarg.h"
uint8_t Serial1_RxData;
uint8_t Serial1_Flag;
/*** @brief 初始化USART1,通过USART1进行收发* @param  *     @arg * @param  *     @arg * @retval None*/
void Serial_Init(void){RCC_APB2PeriphClockCmd(RCC_APB2Periph_GPIOA,ENABLE);RCC_APB2PeriphClockCmd(RCC_APB2Periph_USART1,ENABLE);GPIO_InitTypeDef GPIO_InitStructure;GPIO_InitStructure.GPIO_Mode = GPIO_Mode_IPU;//上拉输入.GPIO_InitStructure.GPIO_Pin = GPIO_Pin_10;GPIO_InitStructure.GPIO_Speed = GPIO_Speed_50MHz;GPIO_Init(GPIOA,&GPIO_InitStructure);GPIO_InitStructure.GPIO_Mode = GPIO_Mode_AF_PP;//上拉输入GPIO_InitStructure.GPIO_Pin = GPIO_Pin_9;GPIO_InitStructure.GPIO_Speed = GPIO_Speed_50MHz;GPIO_Init(GPIOA,&GPIO_InitStructure);USART_InitTypeDef USART_InitStructure;USART_InitStructure.USART_BaudRate = 9600;USART_InitStructure.USART_HardwareFlowControl = USART_HardwareFlowControl_None;//硬件流控制USART_InitStructure.USART_Mode = USART_Mode_Rx | USART_Mode_Tx;USART_InitStructure.USART_Parity = USART_Parity_No;USART_InitStructure.USART_WordLength = USART_WordLength_8b;USART_InitStructure.USART_StopBits = USART_StopBits_1;USART_Init(USART1,&USART_InitStructure);USART_ITConfig(USART1,USART_IT_RXNE,ENABLE);NVIC_PriorityGroupConfig(NVIC_PriorityGroup_2);//NVIC配置-中断优先级和中断对应通道使能 stm32f10x.hNVIC_InitTypeDef NVIC_InitStructure;NVIC_InitStructure.NVIC_IRQChannel = USART1_IRQn;//NVIC_InitStructure.NVIC_IRQChannelCmd  = ENABLE;NVIC_InitStructure.NVIC_IRQChannelPreemptionPriority = 1;NVIC_InitStructure.NVIC_IRQChannelSubPriority = 1;NVIC_Init(&NVIC_InitStructure);USART_Cmd(USART1,ENABLE);
}
/*** @brief 串口发送1byte* @param  *     @arg * @param  *     @arg * @retval None*/
void Serial_SendByte(uint8_t Byte){USART_SendData(USART1,Byte);while(USART_GetFlagStatus(USART1,USART_FLAG_TXE) == RESET);//发送缓冲不为空则等待
}/*** @brief USART1中断函数,接收的数据返回* @param  *     @arg * @param  *     @arg * @retval None	*		@arg 中断函数名在startup_stm32f10x_md.s中*/
void USART1_IRQHandler(void){if(USART_GetITStatus(USART1,USART_IT_RXNE) == SET){Serial1_RxData = USART_ReceiveData(USART1);Serial1_Flag = 1;USART_ClearITPendingBit(USART1,USART_IT_RXNE);}
}/*** @brief 配合USART1_IRQHandler串口1中断,中断后处理行为* @param  *     @arg * @param  *     @arg * @retval None*/
void Serial1Rx(void){if(Serial1_Flag){Serial_SendByte(Serial1_RxData);Serial1_Flag = 0;}
}/*** @brief 发送字节数组* @param  数组指针*     @arg * @param  长度*     @arg * @retval None*/
void Serial_SendByteArray(uint8_t *ByteArray,uint16_t length){for(int i = 0 ; i<length ;  i++){Serial_SendByte(ByteArray[i]);}
}/*** @brief 发送一个字符串* @param  *     @arg * @param  *     @arg * @retval None*/
void Serial_SendString(char *String){int i = 0;for(i=0;String[i]!='\0';i++){Serial_SendByte(String[i]);}
}/*** @brief 以字符形式发送有符号数字* @param  *     @arg * @param  *     @arg * @retval None*/
void Serial_SendSignedNum(int32_t Num,uint16_t length){if(Num>=0){Serial_SendByte(0x2B);//加号}else{Serial_SendByte(0x2D);//减号Num = -Num;}//Num = abs(Num); abs处理int数据所以不适用for(int i=1;i<=length;i++){Serial_SendByte((Num/(uint32_t)pow(10,length-i)%10)+'0');}
}/*** @brief 以字符形式发送无符号数字* @param  *     @arg * @param  *     @arg * @retval None*/
void Serial_SendNum(int32_t Num,uint16_t length){for(int i=1;i<=length;i++){Serial_SendByte((Num/(uint32_t)pow(10,length-i)%10)+'0');}
}/*** @brief 重定向fputc函数,到串口1即Serial_SendByte函数,使用micor提供的精简库*     @arg fputc是printf函数的底层,printf打印时就是调用fputc单个打印,通过重定向可以在串口打印* @param  *     @arg * @param  *     @arg * @retval None*/
int fputc(int ch,FILE *f)
{Serial_SendByte(ch);return ch;
}/*** @brief 重构v sprintf,完成printf打印串口*     @arg sprintf只能接收直接写的参数,vsprintf可以接收封装格式参数* @param  format:接收格式化字符串*     @arg * @param  ...:可变参数列表,用来接收剩余参数*     @arg * @retval None*/
void Serial_printf(char *format,...){char String[100];va_list arg;//定义一个参数列表变量va_start(arg,format);//从format位置开始接收参数列表,放在arg中vsprintf(String,format,arg);//将打印参数arg格式化为format格式字符串,最好放入打印字符串变量Stringva_end(arg);//释放参数表Serial_SendString(String);//发送格式化后的字符串
}/*** @brief 串口1接收,查询方式,接收到的数据返回* @param  *     @arg * @param  *     @arg * @retval None*/
void Serial_Get(void){if(USART_GetFlagStatus(USART1,USART_FLAG_RXNE) == SET){uint8_t Get_Data = USART_ReceiveData(USART1);Serial_SendByte(Get_Data);};
}
Serial.h
#ifndef __SERIAL_H
#define __SERIAL_H
#include "stm32f10x.h"                  // Device header
#include "stdio.h"
extern uint8_t Serial1_Flag;
extern uint8_t Serial1_RxData;
void Serial_Init(void);
void Serial_SendByte(uint8_t Byte);
void Serial_SendByteArray(uint8_t *ByteArray,uint16_t length);
void Serial_SendString(char *Char);
void Serial_SendSignedNum(int32_t Num,uint16_t length);
void Serial_SendNum(int32_t Num,uint16_t length);
void Serial_printf(char *format,...);
void Serial_Get(void);
void Serial1Rx(void);
#endif
3、数据包收发,收发Hex数据包

程序功能和逻辑:
1、按钮按下,对应STM32发送Hex数据包,OLED显示发送Hex数据。每次按按钮数据包递增。
2、串口发送Hex数据包,对应OLED显示接收的Hex数据(当接收到正确的数据包会进行处理,把接受的数据包也发送,接受的错误的数据包不会发送,但OLED也会显示。)。

Hex数据包格式

可变长数据包可能导致:数据和包尾重合,导致误判。
对于这种情况, 可对数据进行限幅,然后包头包尾在限幅之外。或者尽量使用定长数据包,然后尽量增加包头包尾的数量,并尽量让数据不能呈现包头包尾的状态。
对于Hex数据包最好选择定长带包头包尾,可以避免接收错误。
如果载荷不会和包头包尾重复,那么选择可变包长。
Hex通信协议为:
发送:
按下按键STM32发送0xFF 0x01 0x02 0x03 0x04 0xFE,以0xFF为包头,0xFE为包尾,中间4byte为数据,每次发送数据字节递增。
接收:
通过串口助手发送0xFF 0xXX 0xXX 0xXX 0xXX 0xFE,共6byte,其中以0xFF为包头,0xFE为包尾,中间4byte为数据。STM32接收后通过OLED显示数据字节。
Hex数据包接收:

main.c
#include "stdio.h"
#include "stm32f10x.h"                  // Device header
#include "Delay.h"
#include "OLED.h"
#include "Serial.h"
#include "Button.h"
int main(void){OLED_Init();Serial_Init();Button1_Init();OLED_ShowString(1,1,"Tx:");OLED_ShowString(3,1,"Rx:");while(1){Serial1Rx();GetButton_Send();OLED_ShowHexNum(4,1,Serial1_RxPacket[0],2);OLED_ShowHexNum(4,4,Serial1_RxPacket[1],2);OLED_ShowHexNum(4,7,Serial1_RxPacket[2],2);OLED_ShowHexNum(4,10,Serial1_RxPacket[3],2);OLED_ShowHexNum(2,1,Serial1_TxPacket[0],2);OLED_ShowHexNum(2,4,Serial1_TxPacket[1],2);OLED_ShowHexNum(2,7,Serial1_TxPacket[2],2);OLED_ShowHexNum(2,10,Serial1_TxPacket[3],2);}return 0;
}
Serial.c
#include "stm32f10x.h"                  // Device header
#include "math.h"
#include "stdio.h"
#include "stdarg.h"
uint8_t Serial1_RxData;
uint8_t Serial1_RxFlag;//接收数据包标志位
uint8_t Serial1_RxPacket[4];//接收数据包
uint8_t Serial1_TxPacket[4] = {0x01,0x02,0x03,0x04};//发送数据包
/*** @brief 初始化USART1,通过USART1进行收发* @param  *     @arg * @param  *     @arg * @retval None*/
void Serial_Init(void){RCC_APB2PeriphClockCmd(RCC_APB2Periph_GPIOA,ENABLE);RCC_APB2PeriphClockCmd(RCC_APB2Periph_USART1,ENABLE);GPIO_InitTypeDef GPIO_InitStructure;GPIO_InitStructure.GPIO_Mode = GPIO_Mode_IPU;//上拉输入.GPIO_InitStructure.GPIO_Pin = GPIO_Pin_10;GPIO_InitStructure.GPIO_Speed = GPIO_Speed_50MHz;GPIO_Init(GPIOA,&GPIO_InitStructure);GPIO_InitStructure.GPIO_Mode = GPIO_Mode_AF_PP;//上拉输入GPIO_InitStructure.GPIO_Pin = GPIO_Pin_9;GPIO_InitStructure.GPIO_Speed = GPIO_Speed_50MHz;GPIO_Init(GPIOA,&GPIO_InitStructure);USART_InitTypeDef USART_InitStructure;USART_InitStructure.USART_BaudRate = 9600;USART_InitStructure.USART_HardwareFlowControl = USART_HardwareFlowControl_None;//硬件流控制USART_InitStructure.USART_Mode = USART_Mode_Rx | USART_Mode_Tx;USART_InitStructure.USART_Parity = USART_Parity_No;USART_InitStructure.USART_WordLength = USART_WordLength_8b;USART_InitStructure.USART_StopBits = USART_StopBits_1;USART_Init(USART1,&USART_InitStructure);USART_ITConfig(USART1,USART_IT_RXNE,ENABLE);NVIC_PriorityGroupConfig(NVIC_PriorityGroup_2);//NVIC配置-中断优先级和中断对应通道使能 stm32f10x.hNVIC_InitTypeDef NVIC_InitStructure;NVIC_InitStructure.NVIC_IRQChannel = USART1_IRQn;//NVIC_InitStructure.NVIC_IRQChannelCmd  = ENABLE;NVIC_InitStructure.NVIC_IRQChannelPreemptionPriority = 1;NVIC_InitStructure.NVIC_IRQChannelSubPriority = 1;NVIC_Init(&NVIC_InitStructure);USART_Cmd(USART1,ENABLE);
}
/*** @brief 串口发送1byte* @param  *     @arg * @param  *     @arg * @retval None*/
void Serial_SendByte(uint8_t Byte){USART_SendData(USART1,Byte);while(USART_GetFlagStatus(USART1,USART_FLAG_TXE) == RESET);//发送缓冲不为空则等待
}/*** @brief 发送字节数组* @param  数组指针*     @arg * @param  长度*     @arg * @retval None*/
void Serial_SendByteArray(uint8_t *ByteArray,uint16_t length){for(int i = 0 ; i<length ;  i++){Serial_SendByte(ByteArray[i]);}
}/*** @brief 根据数据包发送数据数组* @param  *     @arg * @param  *     @arg * @retval None*/
void Serial1Tx_HexPacket(void){Serial_SendByte(0xFF);//发送包头Serial_SendByteArray(Serial1_TxPacket,4);Serial_SendByte(0xFE);//发送包尾
}/*** @brief 配合USART1_IRQHandler串口1接收中断,对接收到的数据进行处理* @param  *     @arg * @param  *     @arg * @retval None*/
void Serial1Rx(void){if(Serial1_RxFlag){for(int i=0;i<4;i++){Serial1_TxPacket[i] = Serial1_RxPacket[i];}Serial1Tx_HexPacket();Serial1_RxFlag = 0;}
}/*** @brief 配合USART1_IRQHandler串口1接收中断,接收到的Hex数据包进行判断,* @param  *     @arg * @param  *     @arg * @retval None*/
void Serial1Rx_HexPacket(void){static uint8_t RxState = 0;//接收状态机static uint8_t RxDataFlag = 0;//接收数据下标/*0/1 :包头1 :数据2 :包尾*/Serial1_RxData = USART_ReceiveData(USART1);//接收数据if(RxState == 0){//等待接收包头if(Serial1_RxData == 0xFF){//如果获取包头RxState = 1;RxDataFlag = 0;//在每次接收数据前清0,更稳定}}else if(RxState == 1){//等待数据Serial1_RxPacket[RxDataFlag] = Serial1_RxData;RxDataFlag++;if(RxDataFlag>=4){RxState = 2;}}else if(RxState == 2){//等待包尾if(Serial1_RxData == 0xFE){//等待包尾RxState = 0;Serial1_RxFlag = 1;//标志接收到了正确的数据包标志位}else{RxState = 0;//如果接收的不是包尾,则丢弃数据包}}}/*** @brief USART1中断函数,接收的数据返回* @param  *     @arg * @param  *     @arg * @retval None	*		@arg 中断函数名在startup_stm32f10x_md.s中*/
void USART1_IRQHandler(void){if(USART_GetITStatus(USART1,USART_IT_RXNE) == SET){Serial1Rx_HexPacket();//开始接收数据USART_ClearITPendingBit(USART1,USART_IT_RXNE);}
}
Serial.h
#ifndef __SERIAL_H
#define __SERIAL_H
#include "stm32f10x.h"                  // Device header
#include "stdio.h"
extern uint8_t Serial1_RxData;
extern uint8_t Serial1_RxFlag;
extern uint8_t Serial1_RxPacket[];
extern uint8_t Serial1_TxPacket[];
void Serial_Init(void);
void Serial_SendByte(uint8_t Byte);
void Serial_SendByteArray(uint8_t *ByteArray,uint16_t length);
void Serial1Rx(void);
void Serial1Rx_HexPacket(void);
void Serial1Tx_HexPacket(void);
#endif
Button.h
#ifndef __BUTTON_H
#define __BUTTON_H
#include "stm32f10x.h"                  // Device headervoid Button1_Init(void);
void GetButton_Send(void);
#endif
Button.c
#include "stm32f10x.h"                  // Device header
#include "Delay.h"
#include "Serial.h"
/*** @brief 初始化引脚B1地开信号接收Button,A1推挽输出控制LED* @param  *     @arg * @param  *     @arg * @retval None*/
void Button1_Init(void){RCC_APB2PeriphClockCmd(RCC_APB2Periph_GPIOA,ENABLE);RCC_APB2PeriphClockCmd(RCC_APB2Periph_GPIOB,ENABLE);GPIO_InitTypeDef  GPIO_InitStructure;GPIO_InitStructure.GPIO_Mode = GPIO_Mode_Out_PP;GPIO_InitStructure.GPIO_Pin = GPIO_Pin_1;GPIO_InitStructure.GPIO_Speed = GPIO_Speed_50MHz;GPIO_Init(GPIOA,&GPIO_InitStructure);GPIO_InitStructure.GPIO_Mode = GPIO_Mode_IPU;GPIO_InitStructure.GPIO_Pin = GPIO_Pin_1;GPIO_InitStructure.GPIO_Speed = GPIO_Speed_50MHz;GPIO_Init(GPIOB,&GPIO_InitStructure);GPIO_SetBits(GPIOA,GPIO_Pin_1);//高电平
}/*** @brief * @param  *     @arg * @param  *     @arg * @retval None*/
void GetButton_Send(void){if(GPIO_ReadInputDataBit(GPIOB,GPIO_Pin_1) == RESET){Delay_ms(20);while(GPIO_ReadInputDataBit(GPIOB,GPIO_Pin_1) == RESET);Delay_ms(20);Serial1_TxPacket[0]++;Serial1_TxPacket[1]++;Serial1_TxPacket[2]++;Serial1_TxPacket[3]++;Serial1Tx_HexPacket();}
}
4、数据包收发,收发文本数据包

程序功能逻辑:
1、按钮按下,灯开关,对应STM32发送开关灯文本数据包,OLED显示发送的文本数据
2、串口发送开关灯Hex数据包,对应开关灯,对应OLED显示接收的Hex数据,STM32发送开关灯文本数据包包反馈
文本数据包格式:

使用文本数据包,中间数据基本上都是字母,不会和包头包尾重复。可使用不定长数据包。
通常用换行做包尾,这样在打印时就是一行一行显示,相对Hex数据包解析效率低。
文本数据包通信协议为:
发送:
按下按键STM32交替发送@ LED_ON\r\n和@LED_OFF\r\n,对应LED开关,以@为包头,\r\n为包尾(换行),LED_ON和LED_OFF为数据。并在OLED显示
接收:
通过串口助手发送@ LED_ON\r\n和@LED_OFF\r\n,对应LED开关,其中以@为包头,\r\n为包尾(换行),LED_ON和LED_OFF为数据。并通过OLED显示数据字节。当STM32接收到错误指令时报故。
文本数据包接收:

main.c
#include "stdio.h"
#include "stm32f10x.h"                  // Device header
#include "Delay.h"
#include "OLED.h"
#include "Serial.h"
#include "Button.h"
int main(void){OLED_Init();Serial_Init();Button1_Init();OLED_ShowString(1,1,"Tx:");OLED_ShowString(2,1,"@LED_OFF");OLED_ShowString(3,1,"Rx:");OLED_ShowString(4,1,"@LED_OFF");while(1){GetButton_LED();Serial1TextRx();}return 0;
}
代码讲解

Serial.c
#include "stm32f10x.h"                  // Device header
#include "math.h"
#include "stdio.h"
#include "stdarg.h"
#include "OLED.h"
#include "Button.h"
#include "String.h"
uint8_t Serial1_RxData;//接收数据字节
uint8_t Serial1_RxFlag;//接收完整数据包标志位
char Serial1_RxTextPacket[100];//接收文本数据包
/*** @brief 初始化USART1,通过USART1进行收发* @param  *     @arg * @param  *     @arg * @retval None*/
void Serial_Init(void){RCC_APB2PeriphClockCmd(RCC_APB2Periph_GPIOA,ENABLE);RCC_APB2PeriphClockCmd(RCC_APB2Periph_USART1,ENABLE);GPIO_InitTypeDef GPIO_InitStructure;GPIO_InitStructure.GPIO_Mode = GPIO_Mode_IPU;//上拉输入.GPIO_InitStructure.GPIO_Pin = GPIO_Pin_10;GPIO_InitStructure.GPIO_Speed = GPIO_Speed_50MHz;GPIO_Init(GPIOA,&GPIO_InitStructure);GPIO_InitStructure.GPIO_Mode = GPIO_Mode_AF_PP;//上拉输入GPIO_InitStructure.GPIO_Pin = GPIO_Pin_9;GPIO_InitStructure.GPIO_Speed = GPIO_Speed_50MHz;GPIO_Init(GPIOA,&GPIO_InitStructure);USART_InitTypeDef USART_InitStructure;USART_InitStructure.USART_BaudRate = 9600;USART_InitStructure.USART_HardwareFlowControl = USART_HardwareFlowControl_None;//硬件流控制USART_InitStructure.USART_Mode = USART_Mode_Rx | USART_Mode_Tx;USART_InitStructure.USART_Parity = USART_Parity_No;USART_InitStructure.USART_WordLength = USART_WordLength_8b;USART_InitStructure.USART_StopBits = USART_StopBits_1;USART_Init(USART1,&USART_InitStructure);USART_ITConfig(USART1,USART_IT_RXNE,ENABLE);NVIC_PriorityGroupConfig(NVIC_PriorityGroup_2);//NVIC配置-中断优先级和中断对应通道使能 stm32f10x.hNVIC_InitTypeDef NVIC_InitStructure;NVIC_InitStructure.NVIC_IRQChannel = USART1_IRQn;//NVIC_InitStructure.NVIC_IRQChannelCmd  = ENABLE;NVIC_InitStructure.NVIC_IRQChannelPreemptionPriority = 1;NVIC_InitStructure.NVIC_IRQChannelSubPriority = 1;NVIC_Init(&NVIC_InitStructure);USART_Cmd(USART1,ENABLE);
}
/*** @brief 串口发送1byte* @param  *     @arg * @param  *     @arg * @retval None*/
void Serial_SendByte(uint8_t Byte){USART_SendData(USART1,Byte);while(USART_GetFlagStatus(USART1,USART_FLAG_TXE) == RESET);//发送缓冲不为空则等待
}/*** @brief 发送一个字符串* @param  *     @arg * @param  *     @arg * @retval None*/
void Serial_SendString(char *String){int i = 0;for(i=0;String[i]!='\0';i++){Serial_SendByte(String[i]);}
}/*** @brief 根据数据包发送文本数据数组* @param  *     @arg * @param  *     @arg * @retval None*/
void Serial1Tx_TextPacket(void){Serial_SendByte('@');//发送包头if(GPIO_ReadInputDataBit(GPIOA,GPIO_Pin_1)==RESET){Serial_SendString("LED_ON");}else{Serial_SendString("LED_OFF");}Serial_SendByte('\r');//发送包尾Serial_SendByte('\n');//发送包尾}/*** @brief 配合USART1_IRQHandler串口1接收中断,对接收到的文本数据进行处理* @param  *     @arg * @param  *     @arg * @retval None*/
void Serial1TextRx(void){if(Serial1_RxFlag){OLED_ShowString(4,1,"                ");OLED_ShowString(4,1,Serial1_RxTextPacket);if(strcmp(Serial1_RxTextPacket,"LED_OFF") == 0){LED_OFF(GPIOA,GPIO_Pin_1);}else if(strcmp(Serial1_RxTextPacket,"LED_ON") == 0){LED_ON(GPIOA,GPIO_Pin_1);}else{OLED_ShowString(2,1,"Rx_Error");Serial_SendString("Rx_Error\r\n");}Serial1_RxFlag = 0;}
}/*** @brief 配合USART1_IRQHandler串口1接收中断,接收到的Text数据包进行判断,* @param  *     @arg * @param  *     @arg * @retval None*/
void Serial1Rx_TextPacket(void){static uint8_t RxState = 0;//接收状态机static uint8_t RxDataFlag = 0;//接收数据下标/*0/1 :包头1 :数据2 :包尾*/Serial1_RxData = USART_ReceiveData(USART1);//接收数据if(RxState == 0){//等待接收包头if(Serial1_RxData == '@'){//如果获取包头RxState = 1;RxDataFlag = 0;//在每次接收数据前清0,更稳定}}else if(RxState == 1){//等待数据if(Serial1_RxData != '\r'){Serial1_RxTextPacket[RxDataFlag] = Serial1_RxData;RxDataFlag++;}else{RxState = 2;}		}else if(RxState == 2){//等待包尾if(Serial1_RxData == '\n'){//等待包尾RxState = 0;Serial1_RxTextPacket[RxDataFlag] = '\0';Serial1_RxFlag = 1;//标志接收到了正确的数据包标志位}else{RxState = 0;//如果接收的不是包尾,则丢弃数据包}}
}/*** @brief USART1中断函数,接收的数据返回* @param  *     @arg * @param  *     @arg * @retval None	*		@arg 中断函数名在startup_stm32f10x_md.s中*/
void USART1_IRQHandler(void){if(USART_GetITStatus(USART1,USART_IT_RXNE) == SET){//Serial1Rx_HexPacket();//开始接收数据Serial1Rx_TextPacket();USART_ClearITPendingBit(USART1,USART_IT_RXNE);}
}
代码讲解:
Serial1TextRx未放在中断内,减少消耗软件资源(减少中断时间占用)
Serial.h
#ifndef __SERIAL_H
#define __SERIAL_H
#include "stm32f10x.h"                  // Device header
#include "stdio.h"
extern uint8_t Serial1_RxData;
extern uint8_t Serial1_RxFlag;
extern char Serial1_RxTextPacket[];
void Serial_Init(void);
void Serial_SendByte(uint8_t Byte);
void Serial_SendString(char *Char)void Serial1TextRx(void);
void Serial1Tx_TextPacket(void);
void Serial1Rx_TextPacket(void);
#endif
Button.c
#include "stm32f10x.h"                  // Device header
#include "Delay.h"
#include "Serial.h"
#include "OLED.h"
/*** @brief 初始化引脚B1地开信号接收Button,A1推挽输出控制LED* @param  *     @arg * @param  *     @arg * @retval None*/
void Button1_Init(void){RCC_APB2PeriphClockCmd(RCC_APB2Periph_GPIOA,ENABLE);RCC_APB2PeriphClockCmd(RCC_APB2Periph_GPIOB,ENABLE);GPIO_InitTypeDef  GPIO_InitStructure;GPIO_InitStructure.GPIO_Mode = GPIO_Mode_Out_PP;GPIO_InitStructure.GPIO_Pin = GPIO_Pin_1;GPIO_InitStructure.GPIO_Speed = GPIO_Speed_50MHz;GPIO_Init(GPIOA,&GPIO_InitStructure);GPIO_InitStructure.GPIO_Mode = GPIO_Mode_IPU;GPIO_InitStructure.GPIO_Pin = GPIO_Pin_1;GPIO_InitStructure.GPIO_Speed = GPIO_Speed_50MHz;GPIO_Init(GPIOB,&GPIO_InitStructure);GPIO_SetBits(GPIOA,GPIO_Pin_1);//高电平
}
/*** @brief LED关闭,OLED显示@LED_OFF,并且串口发送@LED_OFF\r\n* @param  *     @arg * @param  *     @arg * @retval None*/
uint8_t LED_OFF(GPIO_TypeDef* GPIOx,uint16_t GPIO_Pin){GPIO_WriteBit(GPIOx,GPIO_Pin,Bit_SET);//关闭LEDOLED_ShowString(2,1,"@LED_OFF        ");Serial1Tx_TextPacket();//串口发送return 1;
}/*** @brief LED打开,OLED显示@LED_ON,并且串口发送@LED_ON* @param  *     @arg * @param  *     @arg * @retval None*/
uint8_t LED_ON(GPIO_TypeDef* GPIOx,uint16_t GPIO_Pin){GPIO_WriteBit(GPIOx,GPIO_Pin,Bit_RESET);//打开LEDOLED_ShowString(2,1,"@LED_ON         ");Serial1Tx_TextPacket();//串口发送return 0;
}/*** @brief 获取B1的Button是否按下,按下则控制LED反转* @param  *     @arg * @param  *     @arg * @retval None*/
void GetButton_LED(void){if(GPIO_ReadInputDataBit(GPIOB,GPIO_Pin_1) == RESET){Delay_ms(20);while(GPIO_ReadInputDataBit(GPIOB,GPIO_Pin_1) == RESET);Delay_ms(20);if(GPIO_ReadInputDataBit(GPIOA,GPIO_Pin_1) == RESET){LED_OFF(GPIOA,GPIO_Pin_1);}else{LED_ON(GPIOA,GPIO_Pin_1);}}
}
代码讲解:


Button.h
#ifndef __BUTTON_H
#define __BUTTON_H
#include "stm32f10x.h"                  // Device headervoid Button1_Init(void);
uint8_t LED_OFF(GPIO_TypeDef* GPIOx,uint16_t GPIO_Pin);
uint8_t LED_ON(GPIO_TypeDef* GPIOx,uint16_t GPIO_Pin);
void GetButton_LED(void);
#endif
程序逻辑:
按下按钮:GetButton_LED -> GetButton_LED -> LED_ON/LED_OFF -> GPIO_WriteBit/OLED_ShowString/Serial1Tx_TextPacket
发送控制指令:USART1_IRQHandler->Serial1Rx_TextPacket->Serial1TextRx->LED_ON/LED_OFF -> GPIO_WriteBit/OLED_ShowString/Serial1Tx_TextPacket
反思
本节程序模块之间的耦合性太高,应该针对不同的模块进行不同的功能封装,然后统一调用即可。不应该在一个模块程序中调用另一个模块程序。
例如:串口模块中尽量只写串口函数,若需要串口相关返回和处理,增加标志位返回函数或者全局变量即可。LED控制和按钮采集,应该只写LED控制和按钮采集。在主函数中,应该进行采集控制和通信函数的调用。每个模块库应该保持整洁和低耦性,方便理解和使用。
相关文章:
STM32ZET6-USART使用
一、原理说明 STM32自带通讯接口 通讯目的 通信方式: 全双工:通信时可以双方同时通信。 半双工:通信时同一时间只能一个设备发送数据,其他设备接收。 单工:只能一个设备发送到另一个设备,例如USART只有…...

es自动补全(仅供自己参考)
elasticssearch提供了CompletionSuggester查询来实现自动补全功能。这个查询会匹配以用户输入内容开头的词条并返回。为了提高补全查询效率,对于文档中字段的类型有一些约束: 查询类型必须是:completion 字段内容是多个补全词条形成的数组 P…...
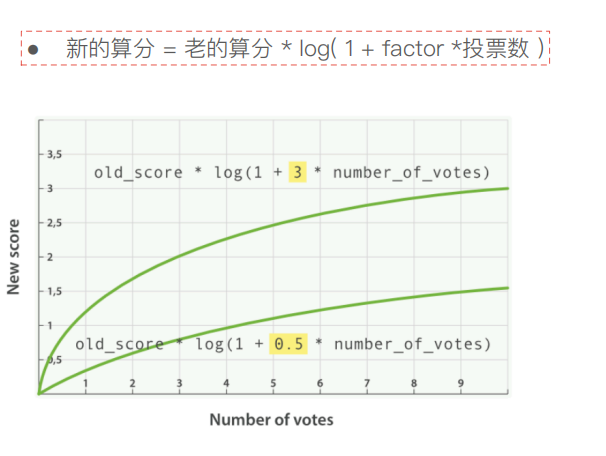
13-综合排序:Function Score Query 优化算分
使用了 function_score 查询来根据某个字段的值对查询结果进行打分。以下是该查询的主要部分: query: 包含了实际执行搜索的部分,在这里包括一个 multi_match 查询。 multi_match:用于在多个字段上执行相同的查询。 query:设置…...
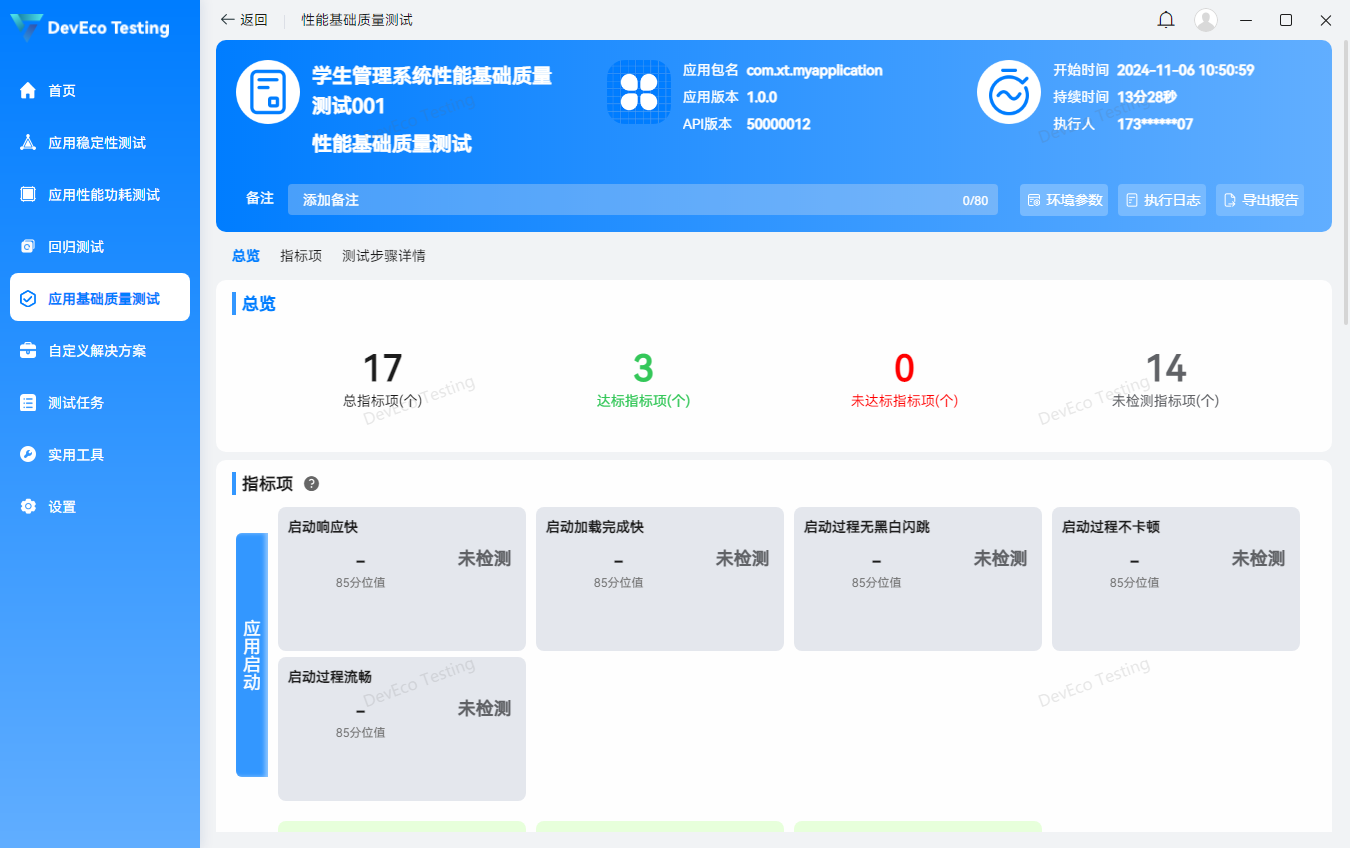
鸿蒙应用App测试-专项测试(DevEco Testing)
注意:大家记得先学通用测试在学专项测试 鸿蒙应用App测试-通用测试-CSDN博客 注意:博主有个鸿蒙专栏,里面从上到下有关于鸿蒙next的教学文档,大家感兴趣可以学习下 如果大家觉得博主文章写的好的话,可以点下关注&am…...

RabbitMQ设置消息过期时间
RabbitMQ设置消息过期时间 1、过期消息(死信)2、设置消息过期的两种方式2.1、设置单条消息的过期时间2.1.1、配置文件application.yml2.1.2、配置类RabbitConfig2.1.3、发送消息业务类service(核心代码)2.1.4、启动类2.1.5、依赖文…...

大数据-209 数据挖掘 机器学习理论 - 梯度下降 梯度下降算法调优
点一下关注吧!!!非常感谢!!持续更新!!! 目前已经更新到了: Hadoop(已更完)HDFS(已更完)MapReduce(已更完&am…...

粒子群优化双向深度学习!PSO-BiTCN-BiGRU-Attention多输入单输出回归预测
粒子群优化双向深度学习!PSO-BiTCN-BiGRU-Attention多输入单输出回归预测 目录 粒子群优化双向深度学习!PSO-BiTCN-BiGRU-Attention多输入单输出回归预测效果一览基本介绍程序设计参考资料 效果一览 基本介绍 1.Matlab实现PSO-BiTCN-BiGRU-Attention粒子…...

排序算法简介
直接插入排序: 将第一个元素视为已排序的序列,其余元素视为未排序序列。 逐个处理:从第二个元素开始,逐个将当前元素插入到已排序序列的适当位置,直到所有元素都被插入。 插入过程:对于每个待…...

(没有跳过联网激活)导致使用微软账号激活电脑---修改为本地账户和英文名字
修改为本地账户和英文名字 前言微软账号,本地账号与用户名基本知识账户管理方式一方式2 查看账户的sid并且修改文件夹名字和系统变量修改注册表和建立软件路径超链接注意事项总结 前言 当没有联网激活新买的电脑时候,这个就不用看了 当你是联网激活的时…...
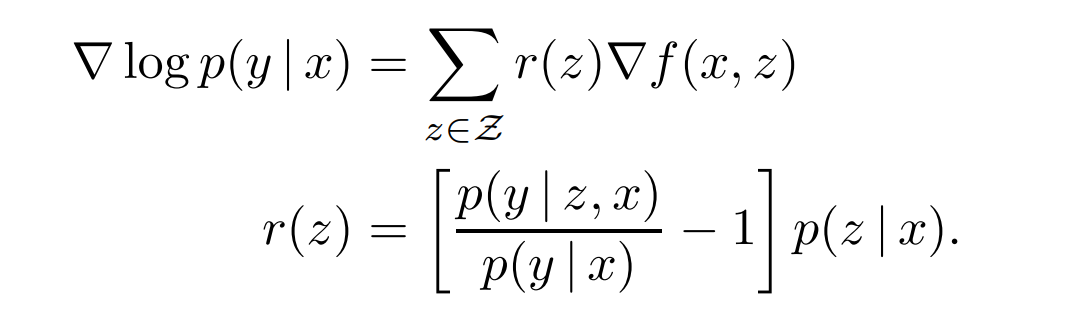
[论文粗读][REALM: Retrieval-Augmented Language Model Pre-Training
引言 今天带来一篇检索增强语言模型预训练论文笔记——REALM: Retrieval-Augmented Language Model Pre-Training。这篇论文是在RAG论文出现之前发表的。 为了简单,下文中以翻译的口吻记录,比如替换"作者"为"我们"。 语言模型预训练…...
:网络缓存调优)
flink 内存配置(五):网络缓存调优
flink 内存配置(一):设置Flink进程内存 flink 内存配置(二):设置TaskManager内存 flink 内存配置(三):设置JobManager内存 flink 内存配置(四)…...

set和map的使用
目录 1.关联式容器 2.键值对 3.set 3.1set的模版参数列表 3.2对set的修改 3.2.1insert 3.2.2 erase 3.2.3clear 3.2.4swap 3.2.5 find 3.3set的迭代器 3.4set的容量 4.map 4.1对map的修改 4.1.1insert 4.1.2erase 4.1.3swap 4.1.4clear 4.2map的迭代器 4.3opera…...
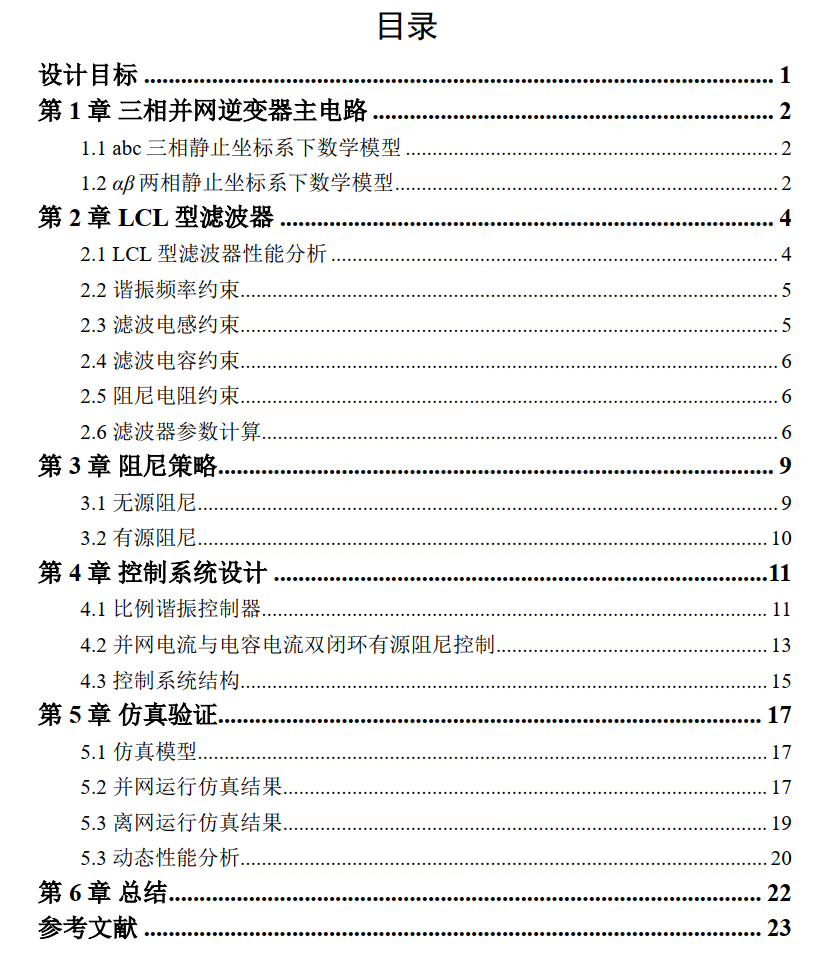
LCL三相并网逆变器simulink仿真+说明文档
背景描述: 详细解析了LCL三相并网逆变器的工作原理,强调了准PR比例谐振控制的重要性,讨论了电感、电容参数选择及保护电路设计。通过仿真结果展示了逆变器性能优化的方法,以提升系统效率和稳定性。 模型介绍: 整体模…...

从0开始深度学习(24)——填充和步幅
1 填充 在上一节中,我们的卷积步骤如下: 可以发现输入是 3 3 3\times3 33,输出是 2 2 2\times2 22,这样可能会导致原始图像的边界丢失了许多有用信息,如果应用多层卷积核,累积丢失的像素就更多了&#…...

CPU Study - Instructions Fetch
参考来源:《超标量处理器设计》—— 姚永斌 N-Way CPU 取指问题 如果CPU可以在每个周期内同时解码N条指令,则此类CPU为N-Way超标量处理器。 N-Way超标量处理器需要每个周期从I-Cache中至少取得N条指令,这N条指令成为一组Fetch Group。 为了…...
 Round 1~7)
GJ Round (2024.9) Round 1~7
前言: 点此返回 GJ Round 目录 博客园可能食用更佳 Round 1 (9.10) A 洛谷 P10059 Choose 不难发现结论:记长度为 L L L 时对应的 X X X 最大值为 f ( L ) f(L) f(L),则 f ( L ) f(L) f(L) 单调不降 那么就可以考虑使用二分求出最小的…...

【CMCL】多模态情感识别的跨模态对比学习
abstract 近年来,多模态情感识别因其能够通过整合多模态信息来提高情感识别的准确性而受到越来越多的关注。然而,模态差异导致的异质性问题对多模态情感识别提出了重大挑战。在本文中,我们提出了一个新的框架——跨模态对比学习(…...

输入/输出系统
一、I/O 系统基本概念(了解即可) 1. 输入/输出系统 【总结】: “I/O” 就是 “输入 / 输出”(Input/Output),I/O 设备就是可以将数据输入到计算机,或者可以接收计算机输出数据的外部设备。 输…...

asp.net+uniapp养老助餐管理系统 微信小程序
文章目录 项目介绍具体实现截图技术介绍mvc设计模式小程序框架以及目录结构介绍错误处理和异常处理java类核心代码部分展示详细视频演示源码获取 项目介绍 以往流浪猫狗的救助网站相关信息的管理,都是工作人员手工统计。这种方式不但时效性低,而且需要查…...

部署istio应用未能产生Envoy sidecar代理
1. 问题描述及原因分析 在部署Prometheus、Grafana、Zipkin、Kiali监控度量Istio的第2.2章节,部署nginx应用,创建的pod并没有产生Envoy sidecar代理,仅有一个应用容器运行中 故在随后的prometheus中也没有产生指标istio_requests_total。通…...

Dism++:Windows系统维护的终极免费工具,一键解决卡顿和更新问题
Dism:Windows系统维护的终极免费工具,一键解决卡顿和更新问题 【免费下载链接】Dism-Multi-language Dism Multi-language Support & BUG Report 项目地址: https://gitcode.com/gh_mirrors/di/Dism-Multi-language 你是否曾为Windows系统运行…...

NotebookLM视频转文字API未公开的底层协议解析:如何绕过30分钟时长限制并批量处理TB级教学视频
更多请点击: https://intelliparadigm.com 第一章:NotebookLM视频转文字功能概览与官方限制边界 NotebookLM 是 Google 推出的面向研究者与知识工作者的 AI 助手,其核心能力之一是基于用户上传的内容(如 PDF、网页、音频…...

意法半导体STM32F407VET6代理商
在当今快速发展的电子行业中,选择一家可靠且专业的微控制器(MCU)供应商至关重要。对于那些正在寻找意法半导体STM32F407VET6系列单片机解决方案的企业而言,深圳市粤科源兴科技有限公司凭借其优质的服务、合理的价格及充足的库存量…...

从账单明细看Taotoken计费模式的透明与可追溯性
🚀 告别海外账号与网络限制!稳定直连全球优质大模型,限时半价接入中。 👉 点击领取海量免费额度 从账单明细看Taotoken计费模式的透明与可追溯性 对于将大模型API集成到产品中的团队而言,成本控制与核算是一个核心的工…...

BarrageGrab:如何构建企业级跨平台直播数据采集系统?
BarrageGrab:如何构建企业级跨平台直播数据采集系统? 【免费下载链接】BarrageGrab 抖音快手bilibili直播弹幕wss直连,非系统代理方式,无需多开浏览器窗口 项目地址: https://gitcode.com/gh_mirrors/ba/BarrageGrab 在直播…...

Parsec虚拟显示驱动实战教程:5步创建完美游戏串流显示环境
Parsec虚拟显示驱动实战教程:5步创建完美游戏串流显示环境 【免费下载链接】parsec-vdd ✨ Perfect virtual display for game streaming 项目地址: https://gitcode.com/gh_mirrors/pa/parsec-vdd Parsec虚拟显示驱动(Parsec VDD)是一…...

机器学习的几何本质:形状、距离与意义的三层重构
1. 这不是数学课,而是一场关于“机器如何看懂世界”的底层解剖你有没有想过,当一台机器识别出照片里是一只猫,它到底“看见”了什么?不是毛色、不是胡须、不是圆眼睛——它看见的是一组高维空间里的点云分布,是这些点之…...

FreeMove终极指南:Windows磁盘空间优化利器,轻松释放C盘数十GB空间
FreeMove终极指南:Windows磁盘空间优化利器,轻松释放C盘数十GB空间 【免费下载链接】FreeMove Move directories without breaking shortcuts or installations 项目地址: https://gitcode.com/gh_mirrors/fr/FreeMove 还在为Windows系统C盘空间不…...

E-Hentai Downloader:三步解决漫画批量下载与打包难题的实用指南
E-Hentai Downloader:三步解决漫画批量下载与打包难题的实用指南 【免费下载链接】E-Hentai-Downloader Download E-Hentai archive as zip file 项目地址: https://gitcode.com/gh_mirrors/eh/E-Hentai-Downloader 还在为手动保存上百张漫画图片而烦恼吗&am…...

嵌入式工控机在AGV叉车中的核心应用与工程实践
1. 项目概述:当AGV叉车遇上嵌入式工控机在制造业和物流仓储领域,智能AGV(自动导引运输车)叉车早已不是什么新鲜概念。但真正深入到项目一线,你会发现,从“能跑起来”到“跑得稳、算得准、管得好”ÿ…...