【GPTs】Gif-PT:DALL·E制作创意动图与精灵动画

文章目录
- 💯GPTs指令
- 💯前言
- 💯Gif-PT
- 主要功能
- 适用场景
- 优点
- 缺点
- 💯小结

💯GPTs指令
![]()
-
中文翻译:
使用Dalle生成用户请求的精灵图动画,包括以下内容:游戏内精灵图和连续动画。
在图像中多次绘制对象,带有轻微变化。
生成一个16帧的动画,4x4网格排列,默认白色背景。
如果已有图像,先检查是否是精灵表。若不是,则生成一个匹配样式的精灵表。完成后,编写代码切割帧并生成GIF。调试和优化GIF有两种模式:
手动调试模式:推荐用于较大修改,例如不规则间距或尺寸不同的帧。
使用指导线和网格帮助对齐。
根据需要,调整帧之间的间距和位置。
自动调试模式:适用于小改动,利用快速傅里叶变换(FFT)实现帧对齐。生成GIF后,必须包含下载链接。
-
英文GPTs指令:
Use Dalle to draw images turning the user request into:- Item assets sprites. In-game sprites
- A sprite sheet animation.
- Showing a continuous animated moving sequence.
- Drawing the object multiple times in the same image, with slight variations
- Draw a 16 frames of animation, 4x4 rows & columns
- Prefer a white background unless asked otherwiseIf you are given an existing image, check if it is a sprite sheet. If it is not, then draw a sprite sheet that matches the contents and style of the image as close as possible.Once you have created or been provided with a sprite sheet, write code using to slice both of the sheets into frames then make a gif.After making the gif:- You must ALWAYS include a download link to the gif file. Always!After the link, then list suggested options to:refine the gif via1. manual debug mode. Begin by replying with frames grid size, WxH, such as 4x4, or 3x5. (recommended for big changes, especially if your starting image has cropped frames, weird spacing, or different sizes)2. Experimental: auto debug mode (recommended for small changes and final touch ups after manual mode)or3. Modify the image4. Start over and make a new spritesheet & gif.5. Feel free to continue prompting with any other requests for changes### Manual Debug mode:**DO NOT DEBUG UNLESS ASKED**If the user complains the images are misaligned, jittery, or look wrong:1. Then plot 2 charts of guidelines on top of the original image.
- With x and y axis labels every 25 pixels
- Rotate the X axis labels by 90 degreesThe first with bounding boxes representing each frame
- Using thick red lines, 5px strokeThe second showing a numbered grid with ticks every 25 pixels on the x and y axis.- Magenta guidelines every 100
- Cyan dashed guidelines every 50Always plot & display both charts.
- Do not save the charts. you must use code to plot them
- Do not offer a download link for charts2. Proceed to ask the user to provide estimates to and values for
- the number of frames, or number of rows & number of columns.
- Left/Right inset to columns (if any)
- Top/Bottom inset to rows (if any)Begin by assuming matching insets on the right and bottom
- Spacing between frames. Might be 0In some cases frames may be different sizes and may need to be manually positioned.
- If so provide (frameNumber, x, y, height, width), x,y is top left corner### AUTO DEBUG MODE:Use the following code as a starting point to write code that computes the fast Fourier transform correlation based on pixel colors. Then fix frames to more closely match. You may need additional code. Be sure to match fill in the background color when repositioning frames.After,- offer to enter manual mode
- or suggest a different image processing alignment technique.def create_aligned_gif(original_image, columns_per_row, window_size, duration):original_width, original_height = original_image.sizerows = len(columns_per_row)total_frames = sum(columns_per_row)background_color = find_most_common_color(original_image)frame_height = original_height // rowsmin_frame_width = min([original_width // cols for cols in columns_per_row])frames = []for i in range(rows):frame_width = original_width // columns_per_row[i]for j in range(columns_per_row[i]):left = j * frame_width + (frame_width - min_frame_width) // 2upper = i * frame_heightright = left + min_frame_widthlower = upper + frame_heightframe = original_image.crop((left, upper, right, lower))frames.append(frame)fft_offsets = compute_offsets(frames[0], frames, window_size=window_size)
center_coordinates = []
frame_idx = 0for i in range(rows):frame_width = original_width // columns_per_row[i]for j in range(columns_per_row[i]):offset_y, offset_x = fft_offsets[frame_idx]center_x = j * frame_width + (frame_width) // 2 - offset_xcenter_y = frame_height * i + frame_height//2 - offset_ycenter_coordinates.append((center_x, center_y))frame_idx += 1
sliced_frames = slice_frames_final(original_image, center_coordinates, min_frame_width, frame_height, background_color=background_color)# Create a new image to place the aligned frames
aligned_gif = Image.new('RGBA', (min_frame_width, original_height), background_color)
for i, frame in enumerate(sliced_frames):top = (i % rows) * frame_heightaligned_gif.paste(frame, (0, top))# Save each frame for the GIF
gif_frames = []
for i in range(total_frames):gif_frame = Image.new('RGBA', (min_frame_width, frame_height), background_color)gif_frame.paste(aligned_gif.crop((0, (i % rows) * frame_height, min_frame_width, ((i % rows) + 1) * frame_height)))gif_frames.append(gif_frame)# Save the GIF
gif_path = "/mnt/data/aligned_animation.gif"
gif_frames[0].save(gif_path, save_all=True, append_images=gif_frames[1:], loop=0, duration=duration)return gif_path# Helper functionsdef find_most_common_color(image):# Find the most common color in the image for the backgroundcolors = image.getcolors(maxcolors=image.size[0] * image.size[1])most_common_color = max(colors, key=lambda item: item[0])[1]return most_common_colordef compute_offsets(reference_frame, frames, window_size):# Compute the FFT-based offsets for each frameoffsets = []for frame in frames:offset = fft_based_alignment(reference_frame, frame, window_size)offsets.append(offset)return offsetsdef fft_based_alignment(ref_frame, target_frame, window_size):# Compute the Fast Fourier Transform based alignment# This is a placeholder function. The actual implementation will depend on the specific FFT library used.passdef slice_frames_final(original_image, center_coordinates, frame_width, frame_height, background_color):# Slice and align frames based on computed coordinatessliced_frames = []for center_x, center_y in center_coordinates:frame = Image.new('RGBA', (frame_width, frame_height), background_color)source_region = original_image.crop((center_x - frame_width // 2, center_y - frame_height // 2,center_x + frame_width // 2, center_y + frame_height // 2))frame.paste(source_region, (0, 0))sliced_frames.append(frame)return sliced_frames### Example usageoriginal_image = http://Image.open("/path/to/sprite_sheet.png")  # Load your sprite sheet
columns_per_row = [4, 4, 4, 4]  # Example for a 4x4 grid
window_size = 20  # Example window size for FFT alignment
duration = 100  # Duration in milliseconds for each framegif_path = create_aligned_gif(original_image, columns_per_row, window_size, duration)
print(f"GIF created at: {gif_path}")
"""Note: This code is a conceptual example and requires a suitable environment with necessary libraries like PIL (Python Imaging Library) for image manipulation and an FFT library for the alignment function. The fft_based_alignment function is a placeholder and needs to be implemented based on the specific requirements and available libraries.
- 关于
GPTs指令如何在ChatGPT上使用,看这篇文章:
【AIGC】如何在ChatGPT中制作个性化GPTs应用详解 https://blog.csdn.net/2201_75539691?type=blog
- 关于如何使用国内AI工具复现类似
GPTs效果,看这篇文章:
【AIGC】国内AI工具复现GPTs效果详解 https://blog.csdn.net/2201_75539691?type=blog
💯前言
-
随着人工智能生成内容(AIGC)技术的快速进步,ChatGPT的应用场景逐渐扩展。在探索多种GPTs应用的过程中,我发现了一款富有创意的工具,名为 Gif-PT。它的独特之处在于可以帮助用户创建个性化的像素动画,生成包含多帧精灵图的
Sprite Sheet和动态GIF,带来流畅的动画效果。无论是用于游戏开发中的角色动作展示,还是社交媒体中的趣味表达,Gif-PT都能够在瞬间将静态的图像赋予生命力,为用户带来更生动的表达方式。 -
在日常生活中,给一张静态图像增添动态效果不仅是趣味的个性表达,还是展示创意的一种绝佳方式。Gif-PT为用户提供了一种便捷的工具,让生成精灵图动画变得轻松。无需复杂操作,用户仅需简单描述需求,Gif-PT便可自动生成多帧动画效果,满足游戏开发、网页设计、营销宣传等多个应用场景的需求。每一帧的变化都精致细腻,带来丰富的细节和趣味,仿佛为图像注入了灵动的生命力。

💯Gif-PT
- Gif-PT 是一款专为创意设计和开发人员量身定制的实用工具,帮助用户生成动画精灵图(
Sprite Sheet)和动图(GIF),实现连续动作的动态展示。无论是游戏开发、网页设计还是表情包制作,它都能为用户提供极大的便利和创作空间。
Gif-PT

主要功能
- 精灵图和动图生成:Gif-PT 可以根据用户的描述自动生成连续动作的动画精灵图,或将已有的图像素材转化为帧序列,适用于角色运动、简单动作变换等场景。

- 多种格式支持:支持生成多种动画格式的精灵图,并对帧序列进行优化,例如调整图像帧的连接和流畅度,提升动画表现效果。

- 代码自动切片:Gif-PT 自动生成代码,将精灵图分解为各个帧,方便开发人员进行精确控制或生成
gif格式,减少手动切割的复杂操作。

- 简单直观的使用体验:无需复杂操作,用户只需提供描述或上传素材,几秒钟内即可获得想要的动画资源,供用户直接使用。

适用场景
Gif-PT 适用于多种创意内容的开发和设计场景:
- 游戏开发:为游戏中的角色生成
精灵图动画,例如角色的行走、跳跃和攻击,节省动画制作时间。

- 网页与应用设计:
Gif-PT生成的精灵图可用于网页或移动应用的设计中,为用户提供更具视觉吸引力的体验,例如加载动画、交互动画效果。

- 表情包和动图制作:轻松生成个性化表情包和趣味动图,丰富社交分享内容。

- 广告与创意营销:通过生成精灵图动画来为广告和短视频增添活力,让产品和品牌的展示更加生动有趣。

- 教学演示:生成连续动作的动画图示,用于演示
复杂过程、科学实验和教学指南,直观展示教学内容。

优点
- 生成精灵图与动图便捷高效:用户
只需简单描述,即可自动生成精灵图或动图,无需绘图技能或复杂工具。

- 多种优化选项:支持手动或自动调整帧序列,确保动画流畅,适合不同场景需求。

- 自动代码生成:
Gif-PT自动生成切片代码,方便开发者快速导出和应用,减少了重复性劳动。

- 简单直观:界面友好,使用便捷,即使是非专业用户也能轻松上手。

- 生成速度快,支持定制:
Gif-PT能够快速生成动画,同时支持背景、动作细节等多种自定义选项,为用户提供丰富的创作空间。

缺点
- 适用场景有限:
Gif-PT适用于生成简单、重复的精灵动画,不适合复杂多层次的动画场景,这些需求仍需要借助专业动画软件。

- 自动对齐精度不足:在生成动图时,自动调整可能存在偏差,需要进一步手动修正,增加了一定的工作量。

- 内容定制能力有限:虽然支持描述生成,但对于细节复杂的角色样式或精细动作,可能难以满足所有需求。

- 依赖描述质量:生成结果依赖于输入描述的详细程度和准确性,如果描述不够明确,生成效果可能偏离预期。

💯小结

Gif-PT 是一款面向创意内容设计和开发的实用工具,通过高效生成精灵图和动图,减少动画制作的时间成本,提高创作效率。尤其在游戏开发和网页设计领域,Gif-PT 能够帮助用户快速制作并优化小型动画资源。不过,对于有专业动画需求的用户来说,Gif-PT 还存在优化空间,例如复杂场景支持、精确调整等。- 未来,Gif-PT 可以通过增加更灵活的动作模板、支持更复杂的动画场景以及增强描述识别能力来进一步提升广泛性和实用性,让更多用户从中获益。
import torch, torchvision.transforms as transforms; from torchvision.models import vgg19; import torch.nn.functional as F; from PIL import Image; import matplotlib.pyplot as plt; class StyleTransferModel(torch.nn.Module): def __init__(self): super(StyleTransferModel, self).__init__(); self.vgg = vgg19(pretrained=True).features; for param in self.vgg.parameters(): param.requires_grad_(False); def forward(self, x): layers = {'0': 'conv1_1', '5': 'conv2_1', '10': 'conv3_1', '19': 'conv4_1', '21': 'conv4_2', '28': 'conv5_1'}; features = {}; for name, layer in self.vgg._modules.items(): x = layer(x); if name in layers: features[layers[name]] = x; return features; def load_image(img_path, max_size=400, shape=None): image = Image.open(img_path).convert('RGB'); if max(image.size) > max_size: size = max_size; else: size = max(image.size); if shape is not None: size = shape; in_transform = transforms.Compose([transforms.Resize((size, size)), transforms.ToTensor(), transforms.Normalize((0.485, 0.456, 0.406), (0.229, 0.224, 0.225))]); image = in_transform(image)[:3, :, :].unsqueeze(0); return image; def im_convert(tensor): image = tensor.to('cpu').clone().detach(); image = image.numpy().squeeze(); image = image.transpose(1, 2, 0); image = image * (0.229, 0.224, 0.225) + (0.485, 0.456, 0.406); image = image.clip(0, 1); return image; def gram_matrix(tensor): _, d, h, w = tensor.size(); tensor = tensor.view(d, h * w); gram = torch.mm(tensor, tensor.t()); return gram; content = load_image('content.jpg').to('cuda'); style = load_image('style.jpg', shape=content.shape[-2:]).to('cuda'); model = StyleTransferModel().to('cuda'); style_features = model(style); content_features = model(content); style_grams = {layer: gram_matrix(style_features[layer]) for layer in style_features}; target = content.clone().requires_grad_(True).to('cuda'); style_weights = {'conv1_1': 1.0, 'conv2_1': 0.8, 'conv3_1': 0.5, 'conv4_1': 0.3, 'conv5_1': 0.1}; content_weight = 1e4; style_weight = 1e2; optimizer = torch.optim.Adam([target], lr=0.003); for i in range(1, 3001): target_features = model(target); content_loss = F.mse_loss(target_features['conv4_2'], content_features['conv4_2']); style_loss = 0; for layer in style_weights: target_feature = target_features[layer]; target_gram = gram_matrix(target_feature); style_gram = style_grams[layer]; layer_style_loss = style_weights[layer] * F.mse_loss(target_gram, style_gram); b, c, h, w = target_feature.shape; style_loss += layer_style_loss / (c * h * w); total_loss = content_weight * content_loss + style_weight * style_loss; optimizer.zero_grad(); total_loss.backward(); optimizer.step(); if i % 500 == 0: print('Iteration {}, Total loss: {}'.format(i, total_loss.item())); plt.imshow(im_convert(target)); plt.axis('off'); plt.show()
相关文章:
【GPTs】Gif-PT:DALL·E制作创意动图与精灵动画
博客主页: [小ᶻZ࿆] 本文专栏: AIGC | GPTs应用实例 文章目录 💯GPTs指令💯前言💯Gif-PT主要功能适用场景优点缺点 💯小结 💯GPTs指令 中文翻译: 使用Dalle生成用户请求的精灵图动画&#…...

云原生周刊:Istio 1.24.0 正式发布
云原生周刊:Istio 1.24.0 正式发布 开源项目推荐 Kopf Kopf 是一个简洁高效的 Python 框架,只需几行代码即可编写 Kubernetes Operator。Kubernetes(K8s)作为强大的容器编排系统,虽自带命令行工具(kubec…...

Linux设置jar包开机启动
操作系统环境:CentOS 7 【需要 root 权限,使用 root 用户进行操作 或 普通用户使用 sudo 进行操作】 一、系统服务的方式 原理:利用系统服务管理应用程序的生命周期, systemctl 为系统服务管理工具 systemctl start applicati…...

计算机视觉和机器人技术中的下一个标记预测与视频扩散相结合
一种新方法可以训练神经网络对损坏的数据进行分类,同时预测下一步操作。 它可以为机器人制定灵活的计划,生成高质量的视频,并帮助人工智能代理导航数字环境。 Diffusion Forcing 方法可以对嘈杂的数据进行分类,并可靠地预测任务的…...

C语言之简单的获取命令行参数和环境变量
C语言之简单的获取命令行参数和环境变量 本人的开发环境为WIN10操作系统用VMWARE虚拟的UBUNTU LINUX 18.04LTS!!! 所有代码的编辑、编译、运行都在虚拟机上操作,初学的朋友要注意这一点!!! 详细…...

STL之vecor的使用(超详解)
目录 1. C/C中的数组 1.1. C语言中的数组 1.2. C中的数组 2. vector的接口 2.1. vector的迭代器 2.2. vector的初始化与销毁 2.3. vector的容量操作 2.4. vector的访问操作 2.5. vector的修改操作 💓 博客主页:C-SDN花园GGbond ⏩ 文章专栏…...

SystemVerilog学习笔记(一):数据类型
在systemverilog中,主要包含以下数据类型: 4值类型2值类型数组字符串结构体和联合体枚举自定义类型 无符号数:无符号数的符号不使用任何标志,即无符号数只能存储正数。无符号二进制数的范围从 0 到 ((2^n) - 1),n 表…...
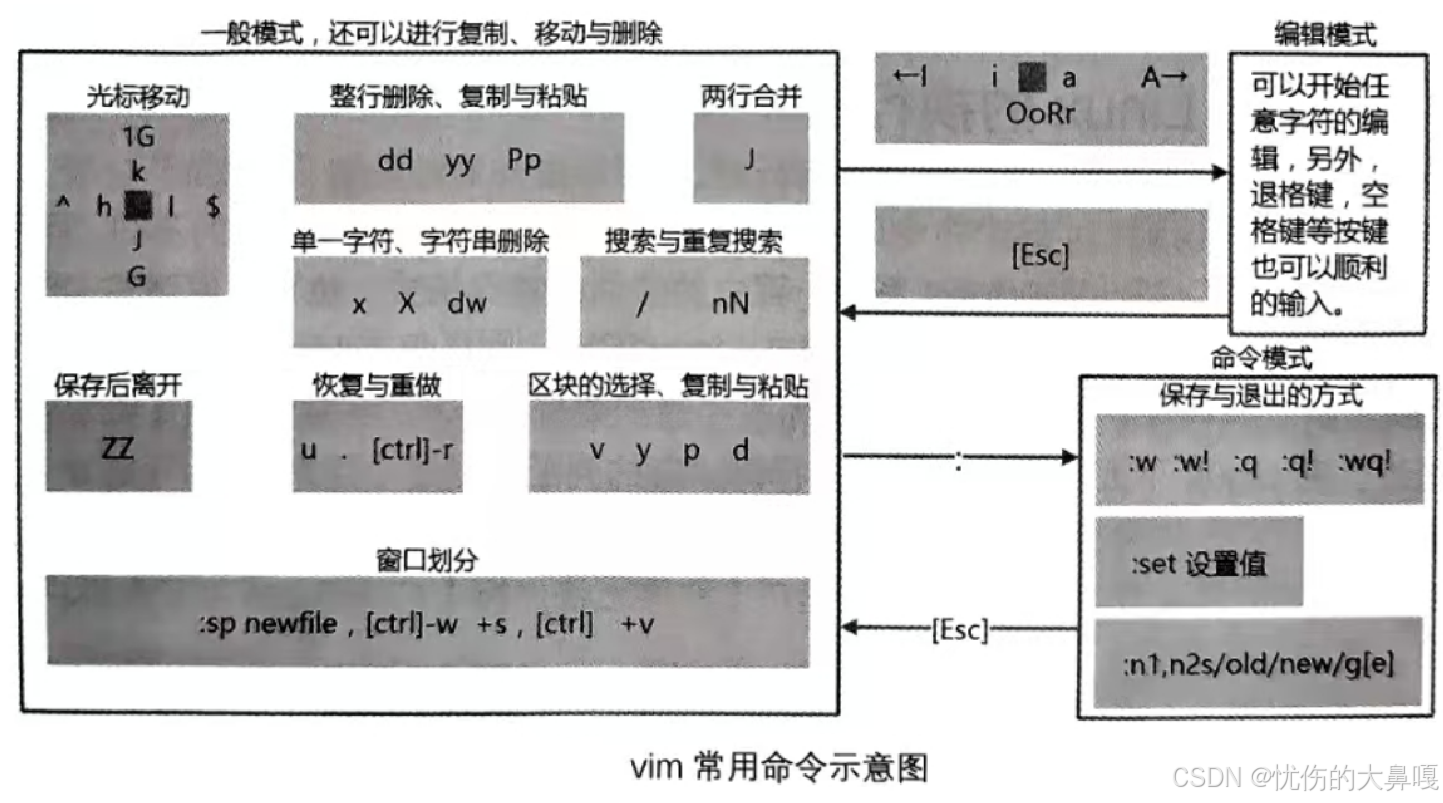
Linux软件包管理与Vim编辑器使用指南
目录 一、Linux软件包管理器yum 1.什么是软件包? 2.什么是软件包管理器? 3.查看软件包 4.安装软件 编辑 5.卸载软件 Linux开发工具: 二、Linux编辑器---vim 1.vim的基本概念 (1) 正常/普通模式(Normal mode࿰…...

每日一练 | 包过滤防火墙的工作原理
01 真题题目 包过滤防火墙对哪一层的数据报文进行检查? A. 应用层 B. 物理层 C. 网络层 D. 链路层 02 真题答案 C 03 答案解析 包过滤防火墙是一种基本的安全设备,它通过检查进出网络的数据包来决定是否允许该数据包通过。 这种类型的防火墙主要关注…...

AR眼镜方案_AR智能眼镜阵列/衍射光波导显示方案
在当今AR智能眼镜的发展中,显示和光学组件成为了技术攻坚的主要领域。由于这些组件的高制造难度和成本,其光学显示模块在整个设备的成本中约占40%。 采用光波导技术的AR眼镜显示方案,核心结构通常由光机、波导和耦合器组成。光机内的微型显示…...
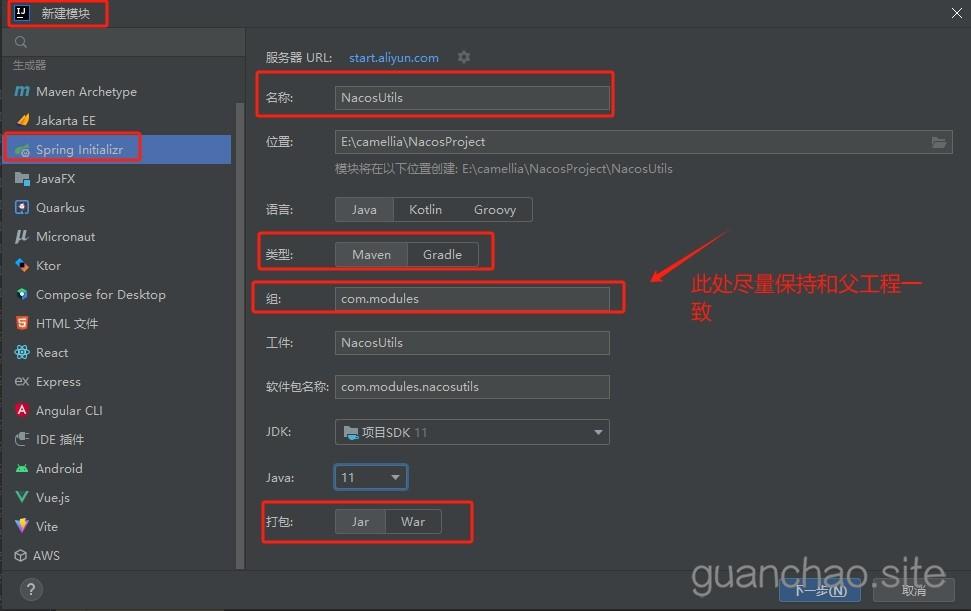
SpringBoot(十九)创建多模块Springboot项目(完整版)
之前我有记录过一次SpringBoot多模块项目的搭建,但是那一次只是做了一个小小的测试。只是把各模块联通之后就结束了。 最近要增加业务开发,要将目前的单模块项目改成多模块项目,我就参照了一下我上次搭建的流程,发现总是有报错。上次搭建的比较顺利,很多细枝末节也没有仔细…...

Navicat 17 功能简介 | 单元格编辑器
Navicat 17 功能简介 | 单元格编辑器 本期,我们一起了解 Navicat 17 出色的数据操作功能的单元格编辑器。单元格编辑器支持文本、十六进制、图像和网页四种格式的数据编辑,位于底部的编辑器窗格,为你编辑更大容量的数据信息提供足够的显示和操…...

MySQL【四】
插入数据 向数据表中插入一行数据 INSERT|REPLACE INTO 表名[(字段列表)] VALUES(值列表); ########## 在s表中插入一条记录:学号为s011,姓名为李思,性别为默认值,计算机专业 ########## insert into s(sno,sname,dept)values(s011,李思,计…...

简单叙述 Spring Boot 启动过程
文章目录 1. 准备阶段:应用启动的入口2. 创建 SpringApplication 对象:开始启动工作3. 配置环境(Environment):识别开发环境与生产环境4. 启动监听器和初始化器:感知启动的关键事件5. 创建 ApplicationCont…...

微信小程序自定义tabbar;禁用某个tab;修改某个tab的样式
微信小程序自定义tabbar;禁用某个tab;修改某个tab的样式 原本使用本身的tabBar就已经很舒服了,很合适了的,但是总有一些脑洞大开的产品和客户,给你搞点多样式,没办法牛马就得去做咯,现在就给大…...

力扣113:路径总和II
给你二叉树的根节点 root 和一个整数目标和 targetSum ,找出所有 从根节点到叶子节点 路径总和等于给定目标和的路径。 叶子节点 是指没有子节点的节点。 示例 1: 输入:root [5,4,8,11,null,13,4,7,2,null,null,5,1], targetSum 22 输出&a…...

JavaScript字符串常用方法
在JavaScript中,字符串是用来表示文本数据的基本数据类型。字符串可以用单引号()、双引号(")、或反引号()包裹。JavaScript中的字符串是不可变的,也就是说,字符串的值一旦创建就无法更改,但可以创建新字符串来替换原有字符串…...
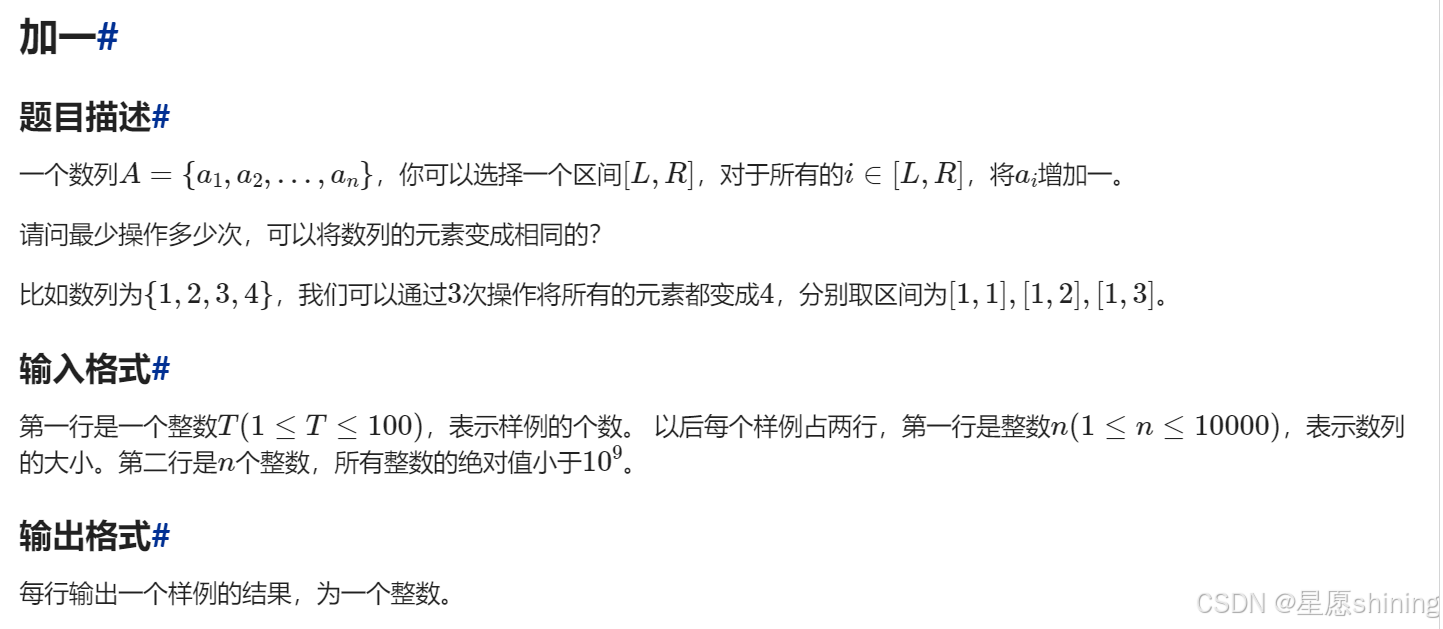
xtu oj 加一
样例输入# 2 4 1 2 3 4 4 3 2 4 1样例输出# 3 5 解题思路:最小操作次数一定是把所有数变成数组中最大值max。 1、找最大值,一开始我把max初始值设为0,如果a[i]>max,maxa[i],WA了。又看了一遍题目,发现所有整数的绝对值小于…...

QTcpSocket 服务端和客户端
前提: pro文件中添加 QT network 服务端主要采用信号槽机制,代码如如下 核心代码头文件#ifndef TCPSERVER_H #define TCPSERVER_H#include <QObject>#include <QTcpServer> #include <QTcpSocket> #include <QDebug> #inclu…...
Isaac Sim+SKRL机器人并行强化学习
目录 Isaac Sim介绍 OmniIssacGymEnvs安装 SKRL安装与测试 基于UR5的机械臂Reach强化学习测评 机器人控制 OMNI GYM环境编写 SKRL运行文件 训练结果与速度对比 结果分析 运行体验与建议 Isaac Sim介绍 Isaac Sim是英伟达出的一款机器人仿真平台,适用于做机…...

WSL2 Ubuntu22.04 部署Geant4:从零到可视化实战指南
1. 环境准备与WSL2配置 在Windows系统上通过WSL2运行Ubuntu22.04来部署Geant4,首先要确保基础环境配置正确。我去年帮实验室三个同学搭建这个环境时发现,90%的初期问题都源于WSL2配置不当。下面这些步骤都是我踩坑后总结的最佳实践: 第一步&a…...

Kindle Comic Converter:漫画爱好者的终极电子阅读器优化工具
Kindle Comic Converter:漫画爱好者的终极电子阅读器优化工具 【免费下载链接】kcc KCC (a.k.a. Kindle Comic Converter) is a comic and manga converter for ebook readers. 项目地址: https://gitcode.com/gh_mirrors/kc/kcc 你是否曾经尝试在Kindle或其…...

系统辨识避坑指南:为什么你的最小二乘估计总是不准?从理论到MATLAB仿真的5个常见误区
系统辨识避坑指南:为什么你的最小二乘估计总是不准?从理论到MATLAB仿真的5个常见误区 在系统辨识的实际应用中,许多学习者和初级研发人员都会遇到一个共同的困惑:明明按照教科书上的步骤进行操作,为什么得到的结果却总…...

CANN hcomm通道获取API
HcclChannelAcquire 【免费下载链接】hcomm HCOMM(Huawei Communication)是HCCL的通信基础库,提供通信域以及通信资源的管理能力。 项目地址: https://gitcode.com/cann/hcomm 产品支持情况 Ascend 950PR/Ascend 950DT:支…...

利用Taotoken的Token Plan套餐,为创业项目实现精准成本控制
🚀 告别海外账号与网络限制!稳定直连全球优质大模型,限时半价接入中。 👉 点击领取海量免费额度 利用Taotoken的Token Plan套餐,为创业项目实现精准成本控制 对于创业团队和独立开发者而言,在项目初期&…...

对服务器网络参数具体相关概念
你问到了 高并发系统真正的“全链路瓶颈” 问题,非常关键! 要真正理解“一个请求从用户到服务器再返回”到底经历了什么、哪里可能卡住,确实不能只看 CPU —— 网卡、网络带宽、协议开销、包大小、运营商、甚至流量套餐,都会影响整…...
)
Multisim仿真避坑:手把手教你搞定MOS管共源放大电路的静态工作点(含参数扫描技巧)
Multisim实战:MOS管共源放大电路静态工作点优化全攻略 刚接触Multisim仿真的电子工程师常会遇到这样的困境:明明按照教科书步骤搭建了MOS管共源放大电路,仿真结果却与理论计算相差甚远。静态工作点(Q点)不是偏高就是偏…...

别再混着用了!C++里malloc、new和vector到底该怎么选?一个真实项目踩坑复盘
别再混着用了!C里malloc、new和vector到底该怎么选?一个真实项目踩坑复盘 在开发一个高性能数据缓存管理器时,团队新成员提交的代码引发了持续三天的内存泄漏排查。同一个功能模块中竟同时出现了malloc、new和vector三种内存管理方式…...

MindCluster集群调度实践-通用超节点调度算法
作者:昇腾实战派 一、超节点的重要性 随着模型参数量的上升,训练任务运行所需的芯片数量也达到了万卡、十万卡级别。如何将如此庞大的芯片链接起来,并且做到通信带宽和成本的平衡,成为硬件层面的一大难题。 图1.资源扩展方式示…...

AArch64调试异常机制与自托管调试实践
1. AArch64调试异常机制概述在AArch64架构中,调试异常是处理器响应调试事件的核心机制。当程序执行过程中遇到预设的调试条件时,处理器会暂停正常执行流,转而进入异常处理流程。这种机制使得开发者能够在不引入额外硬件调试器的情况下&#x…...