Android 使用OpenGLES + MediaPlayer 获取视频截图

概述
Android 获取视频缩略图的方法通常有:
- ContentResolver: 使用系统数据库
- MediaMetadataRetriever: 这个是android提供的类,用来获取本地和网络media相关文件的信息
- ThumbnailUtils: 是在android2.2(api8)之后新增的一个,该类为我们提供了三个静态方法供我们使用。
- MediaExtractor 与MediaMetadataRetriever类似
然而, 这几种方法存在一定的局限性, 比如, ContentResolver需要视频文件已经通过mediascanner 添加到系统数据库中, 使用MediaMetadataRetriever不支持某些格式等等. 常规的格式比如MP4, MKV, 这些接口还是很实用的.
对于系统不支持的播放的格式比如AVI等, 需要一个更丰富的接口或方法来获取视频的缩略图. 于是尝试使用OpenGLES 离屏渲染 + MediaPlayer来提取视频画面作为缩略图.
参考代码
参考:ExtractMpegFramesTest.java 改动, 使用MediaPlayer, 理论上, 只要使用MediaPlayer可以播放的视频, 都可以提取出视频画面.
import android.annotation.SuppressLint;
import android.graphics.Bitmap;
import android.graphics.SurfaceTexture;
import android.media.MediaPlayer;
import android.opengl.EGL14;
import android.opengl.EGLConfig;
import android.opengl.EGLContext;
import android.opengl.EGLDisplay;
import android.opengl.EGLSurface;
import android.opengl.GLES10;
import android.opengl.GLES11Ext;
import android.opengl.GLES20;
import android.os.Build;
import android.util.Log;
import android.view.Surface;import java.nio.ByteBuffer;
import java.nio.ByteOrder;
import java.nio.FloatBuffer;
import java.nio.IntBuffer;import javax.microedition.khronos.opengles.GL10;public class VideoFrameExtractorGL extends Thread implements MediaPlayer.OnSeekCompleteListener {final String TAG = "VFEGL";private MediaPlayer mediaPlayer;private Surface surface;private int bitmapWidth, bitmapHeight;private int textureId;private SurfaceTexture surfaceTexture;final Object drawLock = new Object();// Shader代码private String vertexShaderCode ="#version 300 es\n" +"in vec4 position;\n" +"in vec2 texCoord;\n" +"uniform mat4 uSTMatrix;\n" +"out vec2 vTexCoord;\n" +"\n" +"void main() {\n" +"    // \n" +"    float curvature = -0.5; // 曲率值,负值表示凹面\n" +"    vec4 pos = position;\n" +"    //pos.z = curvature * (pos.x * pos.x + pos.y * pos.y);\n" +"\n" +"    //if(pos.x > 0.0001) pos.y += 0.2;\n" +"\n" +"    gl_Position = pos;\n" +"    vTexCoord = (uSTMatrix * vec4(texCoord, 0.0, 1.0)).xy;\n" +"}";private String fragmentShaderCode ="#version 300 es\n" +"#extension GL_OES_EGL_image_external : require\n" +"precision mediump float;\n" +"\n" +"in vec2 vTexCoord;\n" +"uniform samplerExternalOES sTexture;\n" +"out vec4 fragColor;\n" +"\n" +"void main() {\n" +"    fragColor = texture(sTexture, vTexCoord);\n" +"}\n";protected float[] mSTMatrix = new float[16];protected int mProgram;private int mPositionHandle;private int mTexCoordHandle;private int mSTMatrixHandle;// 顶点坐标和纹理坐标private final float[] squareCoords = {-1.0f,  1.0f,   // top left1.0f,  1.0f,   // top right-1.0f, -1.0f,   // bottom left1.0f, -1.0f    // bottom right};private final float[] textureCoords = {0.0f, 0.0f,   // top left1.0f, 0.0f,   // top right0.0f, 1.0f,   // bottom left1.0f, 1.0f    // bottom right};private FloatBuffer vertexBuffer;private FloatBuffer textureBuffer;// EGL相关变量private EGLDisplay eglDisplay;private EGLContext eglContext;private EGLSurface eglSurface;boolean isPrepared = false;long videoDuration = 0;int videoWidth, videoHeight;String mPath;// 构造函数,初始化MediaPlayer并设置渲染大小public VideoFrameExtractorGL(String videoFile, int bitmapWidth, int bitmapHeight, OnFrameExtractListener l) {this.bitmapWidth = bitmapWidth;this.bitmapHeight = bitmapHeight;mPath = videoFile;setOnFrameExtractListener(l);}@Overridepublic void run() {mediaPlayer = new MediaPlayer();mediaPlayer.setVolume(0, 0);mediaPlayer.setOnSeekCompleteListener(this);initializeEGL();   // 初始化EGL环境initializeOpenGL(); // 初始化OpenGL离屏渲染环境try {mediaPlayer.setDataSource(mPath);mediaPlayer.setOnPreparedListener(new MediaPlayer.OnPreparedListener() {@Overridepublic void onPrepared(MediaPlayer mediaPlayer) {Log.d(TAG, "onPrepared start playing");isPrepared = true;videoDuration = mediaPlayer.getDuration();videoWidth = mediaPlayer.getVideoWidth();videoHeight = mediaPlayer.getVideoHeight();mediaPlayer.start();}});mediaPlayer.prepareAsync();} catch (Exception e) {e.printStackTrace();}int timeout = 20;while(!isPrepared){try {sleep(30);timeout--;if(timeout < 0){break;}} catch (InterruptedException ignore) {}}while(mediaPlayer != null) {drawFrameLoop();}}// 初始化EGL环境@SuppressLint("NewApi")private void initializeEGL() {Log.d(TAG, "initializeEGL");// 1. 获取默认的EGL显示设备eglDisplay = EGL14.eglGetDisplay(EGL14.EGL_DEFAULT_DISPLAY);if (eglDisplay == EGL14.EGL_NO_DISPLAY) {throw new RuntimeException("Unable to get EGL14 display");}// 2. 初始化EGLint[] version = new int[2];if (!EGL14.eglInitialize(eglDisplay, version, 0, version, 1)) {throw new RuntimeException("Unable to initialize EGL14");}// 3. 配置EGLint[] configAttributes = {EGL14.EGL_RED_SIZE, 8,EGL14.EGL_GREEN_SIZE, 8,EGL14.EGL_BLUE_SIZE, 8,EGL14.EGL_ALPHA_SIZE, 8,EGL14.EGL_RENDERABLE_TYPE, EGL14.EGL_OPENGL_ES2_BIT,EGL14.EGL_NONE};EGLConfig[] eglConfigs = new EGLConfig[1];int[] numConfigs = new int[1];EGL14.eglChooseConfig(eglDisplay, configAttributes, 0, eglConfigs, 0, 1, numConfigs, 0);if (numConfigs[0] == 0) {throw new IllegalArgumentException("No matching EGL configs");}EGLConfig eglConfig = eglConfigs[0];// 4. 创建EGL上下文int[] contextAttributes = {EGL14.EGL_CONTEXT_CLIENT_VERSION, 2,EGL14.EGL_NONE};eglContext = EGL14.eglCreateContext(eglDisplay, eglConfig, EGL14.EGL_NO_CONTEXT, contextAttributes, 0);if (eglContext == null) {throw new RuntimeException("Failed to create EGL context");}// 5. 创建离屏渲染的EGL Surfaceint[] surfaceAttributes = {EGL14.EGL_WIDTH, bitmapWidth,EGL14.EGL_HEIGHT, bitmapHeight,EGL14.EGL_NONE};eglSurface = EGL14.eglCreatePbufferSurface(eglDisplay, eglConfig, surfaceAttributes, 0);if (eglSurface == null) {throw new RuntimeException("Failed to create EGL Surface");}// 6. 绑定上下文if (!EGL14.eglMakeCurrent(eglDisplay, eglSurface, eglSurface, eglContext)) {throw new RuntimeException("Failed to bind EGL context");}}// 初始化OpenGL ES的离屏渲染,使用帧缓冲区private void initializeOpenGL() {Log.d(TAG, "initializeOpenGL");// 创建纹理并绑定int[] textureIds = new int[1];GLES20.glGenTextures(1, textureIds, 0);textureId = textureIds[0];// 绑定纹理并绘制//GLES20.glActiveTexture(GLES20.GL_TEXTURE0);GLES20.glBindTexture(GLES11Ext.GL_TEXTURE_EXTERNAL_OES, textureId);GLES20.glTexParameterf(GLES11Ext.GL_TEXTURE_EXTERNAL_OES, GLES20.GL_TEXTURE_MIN_FILTER,GLES20.GL_NEAREST);GLES20.glTexParameterf(GLES11Ext.GL_TEXTURE_EXTERNAL_OES, GLES20.GL_TEXTURE_MAG_FILTER,GLES20.GL_LINEAR);GLES20.glTexParameteri(GLES11Ext.GL_TEXTURE_EXTERNAL_OES, GLES20.GL_TEXTURE_WRAP_S,GLES20.GL_CLAMP_TO_EDGE);GLES20.glTexParameteri(GLES11Ext.GL_TEXTURE_EXTERNAL_OES, GLES20.GL_TEXTURE_WRAP_T,GLES20.GL_CLAMP_TO_EDGE);surfaceTexture = new SurfaceTexture(textureId);surfaceTexture.setOnFrameAvailableListener(new SurfaceTexture.OnFrameAvailableListener() {@Overridepublic void onFrameAvailable(SurfaceTexture surfaceTexture) {Log.d(TAG, "onFrameAvailable");synchronized (drawLock){drawLock.notifyAll();}}});// 创建Surface与MediaPlayer绑定surface = new Surface(surfaceTexture);mediaPlayer.setSurface(surface);// 初始化着色器createProgram(vertexShaderCode, fragmentShaderCode);// 在构造函数中初始化缓冲区vertexBuffer = ByteBuffer.allocateDirect(squareCoords.length * 4).order(ByteOrder.nativeOrder()).asFloatBuffer().put(squareCoords);vertexBuffer.position(0);textureBuffer = ByteBuffer.allocateDirect(textureCoords.length * 4).order(ByteOrder.nativeOrder()).asFloatBuffer().put(textureCoords);textureBuffer.position(0);}// 创建着色器程序private void createProgram(String vertexSource, String fragmentSource) {int vertexShader = loadShader(GLES20.GL_VERTEX_SHADER, vertexSource);int fragmentShader = loadShader(GLES20.GL_FRAGMENT_SHADER, fragmentSource);mProgram = GLES20.glCreateProgram();GLES20.glAttachShader(mProgram, vertexShader);GLES20.glAttachShader(mProgram, fragmentShader);GLES20.glLinkProgram(mProgram);GLES20.glUseProgram(mProgram);mPositionHandle = GLES20.glGetAttribLocation(mProgram, "position");mTexCoordHandle = GLES20.glGetAttribLocation(mProgram, "texCoord");mSTMatrixHandle = GLES20.glGetUniformLocation(mProgram, "uSTMatrix");}// 加载着色器private int loadShader(int type, String shaderSource) {int shader = GLES20.glCreateShader(type);GLES20.glShaderSource(shader, shaderSource);GLES20.glCompileShader(shader);return shader;}final Object extractLock = new Object();int targetPosOfVideo;boolean seeking = false;//if ignore time check, add extracting to check if notify callback//or else, it will notify after player is started.boolean extracting = false;@SuppressLint("WrongConstant")public void extract(int posOfVideoInMs){synchronized (extractLock) {targetPosOfVideo = posOfVideoInMs;seeking = true;extracting = true;while (!isPrepared) {Log.w(TAG, "extract " + posOfVideoInMs + " ms failed: MediaPlayer is not ready.");try {Thread.sleep(15);} catch (InterruptedException ignore) {}}{if (Build.VERSION.SDK_INT >= Build.VERSION_CODES.O) {mediaPlayer.seekTo(posOfVideoInMs, MediaPlayer.SEEK_NEXT_SYNC);}else{mediaPlayer.seekTo(posOfVideoInMs);}}try {Log.d(TAG, "extract " + posOfVideoInMs + " ms, and start extractLock wait");extractLock.wait();} catch (InterruptedException e) {e.printStackTrace();}}}public void extract(float posRatio){while(!isPrepared){try {sleep(10);} catch (InterruptedException e) {throw new RuntimeException(e);}}int pos = (int)(posRatio * videoDuration);extract(pos);}// 截取指定时间的图像帧private void drawFrameLoop() {synchronized (drawLock) {long pos = mediaPlayer.getCurrentPosition();Log.d(TAG, "drawFrameLoop at " + pos  + " ms");surfaceTexture.updateTexImage();surfaceTexture.getTransformMatrix(mSTMatrix);GLES20.glViewport(0, 0, bitmapWidth, bitmapHeight);GLES10.glClearColor(color[0], color[1], color[2], 1.0f); // 设置背景颜色为黑色GLES10.glClear(GL10.GL_COLOR_BUFFER_BIT); // 清除颜色缓冲区GLES20.glUseProgram(mProgram);// 传递顶点数据vertexBuffer.position(0);GLES20.glEnableVertexAttribArray(mPositionHandle);GLES20.glVertexAttribPointer(mPositionHandle, 2, GLES20.GL_FLOAT, false, 0, vertexBuffer);// 传递纹理坐标数据textureBuffer.position(0);GLES20.glEnableVertexAttribArray(mTexCoordHandle);GLES20.glVertexAttribPointer(mTexCoordHandle, 2, GLES20.GL_FLOAT, false, 0, textureBuffer);// 传递纹理矩阵GLES20.glUniformMatrix4fv(mSTMatrixHandle, 1, false, mSTMatrix, 0);// 绘制纹理GLES20.glDrawArrays(GLES20.GL_TRIANGLE_STRIP, 0, vertexBuffer.limit() / 2);Bitmap bm = toBitmap();if(extracting && !seeking) {boolean notifyCallback = ignoreTimeCheck || (targetPosOfVideo > 0 && pos >= targetPosOfVideo);if(notifyCallback) {targetPosOfVideo = 0;if (oel != null) oel.onFrameExtract(this, bm);synchronized (extractLock) {Log.d(TAG, "drawFrameLoop notify extractLock");extractLock.notify();}}}try{drawLock.wait();}catch(Exception ignore){}}}public boolean isDone(){return mediaPlayer != null && targetPosOfVideo <= mediaPlayer.getCurrentPosition();}public Bitmap getBitmap(){return toBitmap();}IntBuffer pixelBuffer;private Bitmap toBitmap(){// 读取帧缓冲区中的像素if(pixelBuffer == null){pixelBuffer = IntBuffer.allocate(bitmapWidth * bitmapHeight);}else {pixelBuffer.rewind();}GLES20.glReadPixels(0, 0, bitmapWidth, bitmapHeight, GLES20.GL_RGBA, GLES20.GL_UNSIGNED_BYTE, pixelBuffer);// 创建Bitmap并将像素数据写入Bitmap bitmap = Bitmap.createBitmap(bitmapWidth, bitmapHeight, Bitmap.Config.ARGB_8888);pixelBuffer.position(0);bitmap.copyPixelsFromBuffer(pixelBuffer);return bitmap;}// 释放资源@SuppressLint("NewApi")public void release() {if (mediaPlayer != null) {mediaPlayer.release();}mediaPlayer = null;synchronized (drawLock){try {drawLock.wait(100);} catch (InterruptedException e) {e.printStackTrace();}drawLock.notifyAll();}if (surface != null) {surface.release();}if (eglSurface != null) {EGL14.eglDestroySurface(eglDisplay, eglSurface);}if (eglContext != null) {EGL14.eglDestroyContext(eglDisplay, eglContext);}if (eglDisplay != null) {EGL14.eglTerminate(eglDisplay);}GLES20.glDeleteTextures(1, new int[]{textureId}, 0);}float[] color = {0, 0, 0, 1f};public void setColor(float r, float g, float b){color[0] = r; color[1] = g; color[2] = b;}OnFrameExtractListener oel;public void setOnFrameExtractListener(OnFrameExtractListener l){oel = l;}@Overridepublic void onSeekComplete(MediaPlayer mediaPlayer) {Log.d(TAG, "onSeekComplete pos=" + mediaPlayer.getCurrentPosition());seeking = false;}public interface OnFrameExtractListener{void onFrameExtract(VideoFrameExtractorGL vfe, Bitmap bm);}public static Bitmap[] extractBitmaps(int[] targetMs, String path, int bmw, int bmh){final int len = targetMs.length;final Bitmap[] bms = new Bitmap[len];VideoFrameExtractorGL vfe = new VideoFrameExtractorGL(path, bmw, bmh, new OnFrameExtractListener() {int count = 0;@Overridepublic void onFrameExtract(VideoFrameExtractorGL vfe, Bitmap bm) {Log.d("VFEGL", "extractBitmaps");bms[count] = bm;count ++;if(count >= len){vfe.release();}}});vfe.start();for(int pos : targetMs){vfe.extract(pos);}Log.d("VFEGL", "extractBitmaps done");return bms;}boolean ignoreTimeCheck = false;public static Bitmap[] extractBitmaps(String path, int bmw, int bmh,final float durationRatio, final int bitmapCount){final Bitmap[] bms = new Bitmap[bitmapCount];VideoFrameExtractorGL vfe = new VideoFrameExtractorGL(path, bmw, bmh, new OnFrameExtractListener() {int count = 0;@Overridepublic void onFrameExtract(VideoFrameExtractorGL vfe, Bitmap bm) {Log.d("VFEGL", "extractBitmaps");bms[count] = bm;count ++;if(count >= bitmapCount){vfe.release();}}});vfe.start();vfe.ignoreTimeCheck = true;vfe.extract(durationRatio);Log.d("VFEGL", "extractBitmaps done");return bms;}
}
基本的流程如下:
- 初始化MeidaPlayer 用与播放视频
- 初始化OpenGL环境, 绑定Texture 和 SurfaceTexture
- 使用SurfaceTexutre创建Surface, 并为MediaPlayer 设置Surface, 这样视频就会绘制到Surface上
- 通过SurfaceTexture的setOnFrameAvailableListener回调绘制帧数据
- 从OpenGL中提取出glReadPixels提取出像素数据, 填充到Bitmap
调用
Bitmap[] bms = VideoFrameExtractorGL.extractBitmaps(path, 128, 72, 0.5f, bmCount);需注意:
- 注意OpenGLES 的版本, 1.x 不支持离屏渲染, 2.x 需要配合着色器渲染图像
- 构建OpenGL的环境和渲染的工作, 要放在同一个线程中.
参考
Kotlin拿Android本地视频缩略图
Android视频图片缩略图的获取
Android 获取视频缩略图(获取视频每帧数据)的优化方案
37.4 OpenGL离屏渲染环境配置
ExtractMpegFramesTest.java
相关文章:

Android 使用OpenGLES + MediaPlayer 获取视频截图
概述 Android 获取视频缩略图的方法通常有: ContentResolver: 使用系统数据库MediaMetadataRetriever: 这个是android提供的类,用来获取本地和网络media相关文件的信息ThumbnailUtils: 是在android2.2(api8)之后新增的一个,该类为…...

浏览器的事件循环机制
浏览器和Node的事件循环机制 引言浏览器的事件循环机制 引言 由于JS是单线程的脚本语言,所以在同一时间只能做一件事情,当遇到多个任务时,我们不可能一直等待任务完成,这会造成巨大的资源浪费。为了协调时间,用户交互…...

Z2400032基于Java+Mysql+SSM的校园在线点餐系统的设计与实现 代码 论文
在线点餐系统 1.项目描述2. 技术栈3. 项目结构后端前端 4. 功能模块5. 项目实现步骤注意事项 6.界面展示7.源码获取 1.项目描述 本项目旨在开发一个校园在线点餐系统,通过前后端分离的方式,为在校学生提供便捷的餐厅点餐服务,同时方便餐厅和…...

k8s使用的nfs作为sc。
k8s使用的nfs作为sc。 当前出现一个问题: 1.有一个pod他是通过流进行文件解压并写入到nfs服务器对应的目录中。 2.一个大压缩包下有20多个压缩包,递归解压。解压完成后应该是20多个文件夹,文件夹下有.json文件。 3.pod中的程序解压后去找以.j…...

linux下Qt程序部署教程
文章目录 [toc]1、概述2、静态编译安装Qt1.1 安装依赖1.2 静态编译1.3 报错1.4 添加环境变量1.5 下载安装QtCreator 3、配置linuxdeployqt环境1.1 在线安装依赖1.2 使用linuxdeployqt提供的程序1.3 编译安装linuxdeployqt 4、使用linuxdeployqt打包依赖1.1 linuxdeployqt使用选…...
)
tp6 合成两个pdf文件(附加pdf或者替换pdf)
最近在做项目有个需求,项目中需要根据设置的html合同模板自动生成PDF合同供客户下载签署,并根据回传的已签署合同尾页来替换原来未签署合同的尾页,合成新的已签署合同文本。 读取两个PDF文件并合成的 具体代码记录如下: use set…...
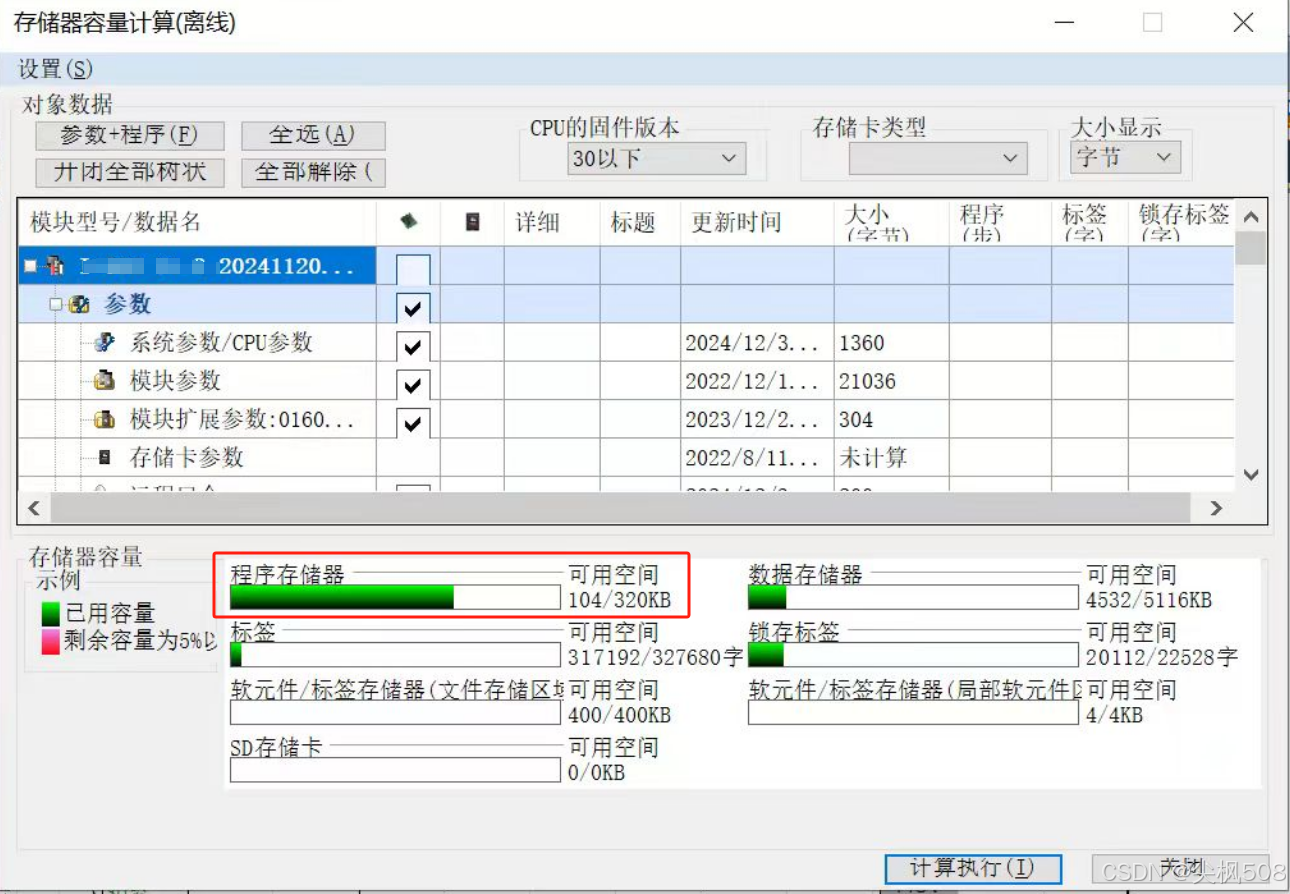
工作:三菱PLC防止程序存储器爆满方法
工作:三菱PLC防止程序存储器爆满方法 一、防止程序存储器爆满方法1、编程时,添加行注释时,记得要选“外围”,这样不会占用PLC程序存储器内存;2、选择“外围”的注释,前面会有个*星号,方便检查 二…...

jmeter 获取唯一全局变量及多线程读写的问题
一、jmeter 获取唯一ID号全局变量 在JMeter中获取唯一ID号并设置为全局变量,可以通过以下几种方法实现: 使用JMeter内置的UUID函数: JMeter提供了一个内置的函数__UUID,可以生成一个随机的UUID,这个UUID是全局唯一的。…...
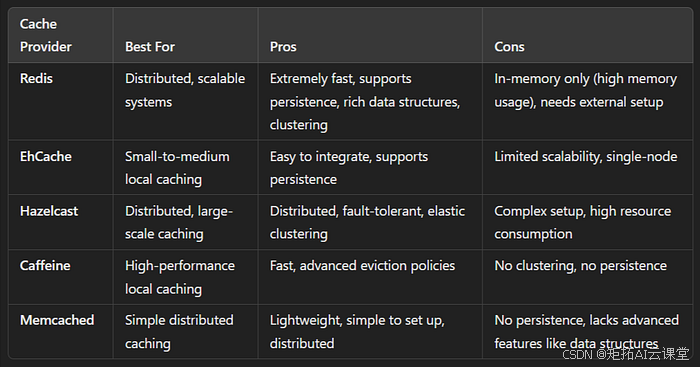
掌握 Spring Boot 中的缓存:技术和最佳实践
缓存是一种用于将经常访问的数据临时存储在更快的存储层(通常在内存中)中的技术,以便可以更快地满足未来对该数据的请求,从而提高应用程序的性能和效率。在 Spring Boot 中,缓存是一种简单而强大的方法,可以…...
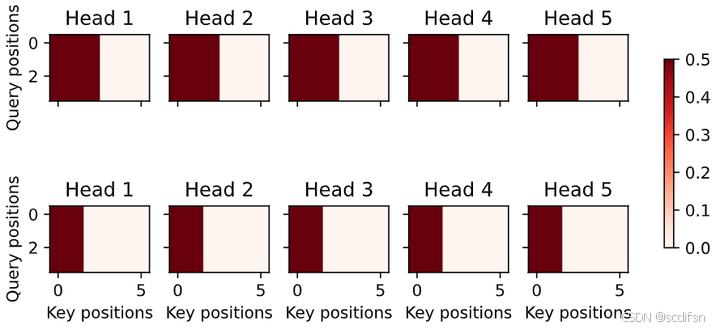
动手学深度学习10.5. 多头注意力-笔记练习(PyTorch)
本节课程地址:多头注意力代码_哔哩哔哩_bilibili 本节教材地址:10.5. 多头注意力 — 动手学深度学习 2.0.0 documentation 本节开源代码:...>d2l-zh>pytorch>chapter_multilayer-perceptrons>multihead-attention.ipynb 多头注…...
)
13 设计模式之外观模式(家庭影院案例)
一、什么是外观模式? 1.定义 在日常生活中,许多人喜欢通过遥控器来控制家中的电视、音响、DVD 播放器等设备。虽然这些设备各自独立工作,但遥控器提供了一个简洁的界面,让用户可以轻松地操作多个设备。而这一设计理念正是 外观模…...
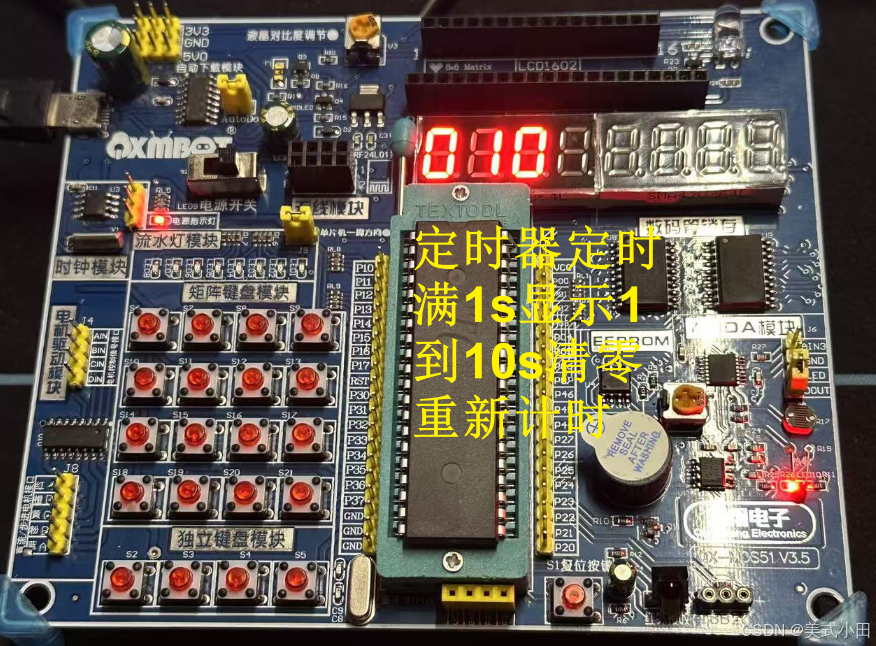
单片机学习笔记 12. 定时/计数器_定时
更多单片机学习笔记:单片机学习笔记 1. 点亮一个LED灯单片机学习笔记 2. LED灯闪烁单片机学习笔记 3. LED灯流水灯单片机学习笔记 4. 蜂鸣器滴~滴~滴~单片机学习笔记 5. 数码管静态显示单片机学习笔记 6. 数码管动态显示单片机学习笔记 7. 独立键盘单片机学习笔记 8…...

Web安全基础实践
实践目标 (1)理解常用网络攻击技术的基本原理。(2)Webgoat实践下相关实验。 WebGoat WebGoat是由著名的OWASP负责维护的一个漏洞百出的J2EE Web应用程序,这些漏洞并非程序中的bug,而是故意设计用来讲授We…...
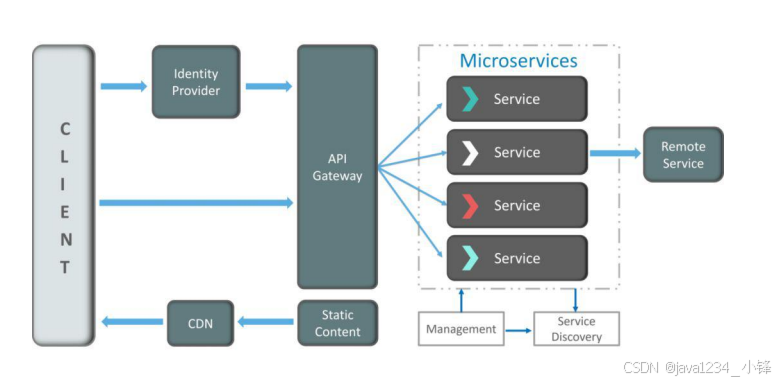
Zookeeper集群数据是如何同步的?
大家好,我是锋哥。今天分享关于【Zookeeper集群数据是如何同步的?】面试题。希望对大家有帮助; Zookeeper集群数据是如何同步的? 1000道 互联网大厂Java工程师 精选面试题-Java资源分享网 Zookeeper集群中的数据同步是通过一种称为ZAB(Zo…...

SpringCloud框架学习(第六部分:Sentinel实现熔断与限流)
目录 十四、SpringCloud Alibaba Sentinel实现熔断与限流 1.简介 2.作用 3.下载安装 4.微服务 8401 整合 Sentinel 入门案例 5.流控规则 (1)基本介绍 (2)流控模式 Ⅰ. 直接 Ⅱ. 关联 Ⅲ. 链路 (3࿰…...
动态规划-----路径问题
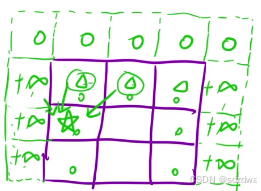
动态规划-----路径问题 下降最小路径和1:状态表示2:状态转移方程3 初始化4 填表顺序5 返回值6 代码实现 总结: 下降最小路径和 1:状态表示 假设:用dp[i][j]表示:到达[i,j]的最小路径 2:状态转…...

Rust循环引用与多线程并发
循环引用与自引用 循环引用的概念 循环引用指的是两个或多个对象之间相互持有对方的引用。在 Rust 中,由于所有权和生命周期的严格约束,直接创建循环引用通常会导致编译失败。例如: // 错误的循环引用示例 struct Node {next: Option<B…...

东方隐侠网安瞭望台第8期
谷歌应用商店贷款应用中的 SpyLoan 恶意软件影响 800 万安卓用户 迈克菲实验室的新研究发现,谷歌应用商店中有十多个恶意安卓应用被下载量总计超过 800 万次,这些应用包含名为 SpyLoan 的恶意软件。安全研究员费尔南多・鲁伊斯上周发布的分析报告称&…...
底部导航栏新增功能按键
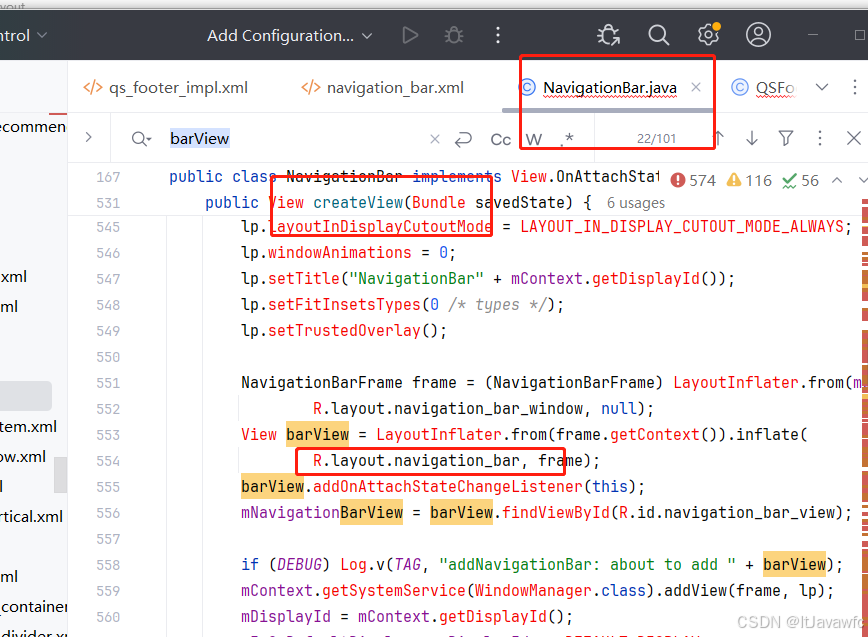
场景需求: 在底部导航栏添加power案件,单击息屏,长按 关机 如下实现图 借此需求,需要掌握技能: 底部导航栏如何实现新增、修改、删除底部导航栏流程对底部导航栏部分样式如何修改。 比如放不下、顺序排列、坑点如…...
C++ 之弦上舞:string 类与多样字符串操作的优雅旋律
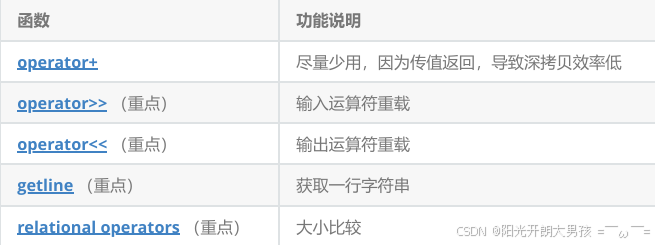
string 类的重要性及与 C 语言字符串对比 在 C 语言中,字符串是以 \0 结尾的字符集合,操作字符串需借助 C 标准库的 str 系列函数,但这些函数与字符串分离,不符合 OOP 思想,且底层空间管理易出错。而在 C 中࿰…...
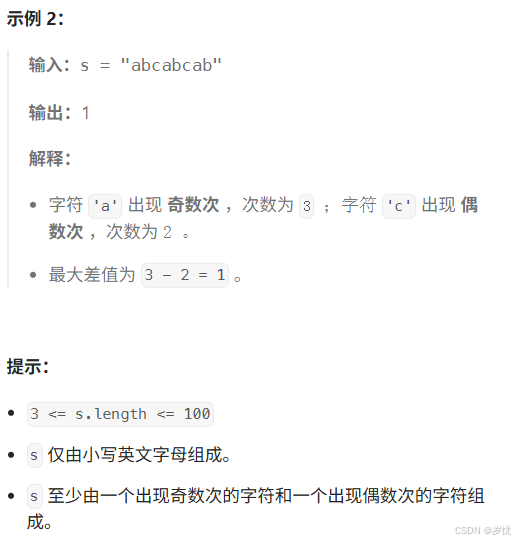
(LeetCode 每日一题) 3442. 奇偶频次间的最大差值 I (哈希、字符串)
题目:3442. 奇偶频次间的最大差值 I 思路 :哈希,时间复杂度0(n)。 用哈希表来记录每个字符串中字符的分布情况,哈希表这里用数组即可实现。 C版本: class Solution { public:int maxDifference(string s) {int a[26]…...

Android Wi-Fi 连接失败日志分析
1. Android wifi 关键日志总结 (1) Wi-Fi 断开 (CTRL-EVENT-DISCONNECTED reason3) 日志相关部分: 06-05 10:48:40.987 943 943 I wpa_supplicant: wlan0: CTRL-EVENT-DISCONNECTED bssid44:9b:c1:57:a8:90 reason3 locally_generated1解析: CTR…...

逻辑回归:给不确定性划界的分类大师
想象你是一名医生。面对患者的检查报告(肿瘤大小、血液指标),你需要做出一个**决定性判断**:恶性还是良性?这种“非黑即白”的抉择,正是**逻辑回归(Logistic Regression)** 的战场&a…...
)
postgresql|数据库|只读用户的创建和删除(备忘)
CREATE USER read_only WITH PASSWORD 密码 -- 连接到xxx数据库 \c xxx -- 授予对xxx数据库的只读权限 GRANT CONNECT ON DATABASE xxx TO read_only; GRANT USAGE ON SCHEMA public TO read_only; GRANT SELECT ON ALL TABLES IN SCHEMA public TO read_only; GRANT EXECUTE O…...
页面渲染流程与性能优化
页面渲染流程与性能优化详解(完整版) 一、现代浏览器渲染流程(详细说明) 1. 构建DOM树 浏览器接收到HTML文档后,会逐步解析并构建DOM(Document Object Model)树。具体过程如下: (…...
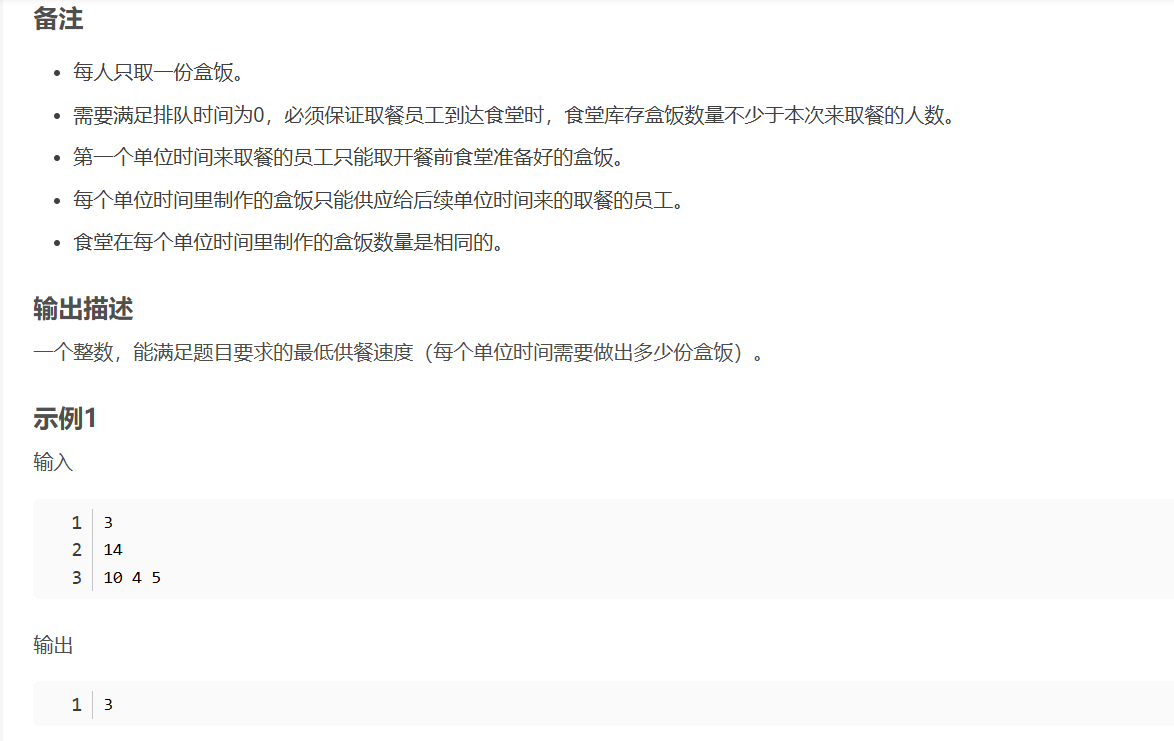
华为OD机试-食堂供餐-二分法
import java.util.Arrays; import java.util.Scanner;public class DemoTest3 {public static void main(String[] args) {Scanner in new Scanner(System.in);// 注意 hasNext 和 hasNextLine 的区别while (in.hasNextLine()) { // 注意 while 处理多个 caseint a in.nextIn…...

MySQL 8.0 OCP 英文题库解析(十三)
Oracle 为庆祝 MySQL 30 周年,截止到 2025.07.31 之前。所有人均可以免费考取原价245美元的MySQL OCP 认证。 从今天开始,将英文题库免费公布出来,并进行解析,帮助大家在一个月之内轻松通过OCP认证。 本期公布试题111~120 试题1…...

Java线上CPU飙高问题排查全指南
一、引言 在Java应用的线上运行环境中,CPU飙高是一个常见且棘手的性能问题。当系统出现CPU飙高时,通常会导致应用响应缓慢,甚至服务不可用,严重影响用户体验和业务运行。因此,掌握一套科学有效的CPU飙高问题排查方法&…...
VM虚拟机网络配置(ubuntu24桥接模式):配置静态IP
编辑-虚拟网络编辑器-更改设置 选择桥接模式,然后找到相应的网卡(可以查看自己本机的网络连接) windows连接的网络点击查看属性 编辑虚拟机设置更改网络配置,选择刚才配置的桥接模式 静态ip设置: 我用的ubuntu24桌…...

scikit-learn机器学习
# 同时添加如下代码, 这样每次环境(kernel)启动的时候只要运行下方代码即可: # Also add the following code, # so that every time the environment (kernel) starts, # just run the following code: import sys sys.path.append(/home/aistudio/external-libraries)机…...
