哈希表介绍、实现与封装
哈希表介绍、实现与封装
- 一、哈希概念
- 二、哈希表实现
- 直接定址法
- 其他映射方法介绍
- 1. 哈希冲突
- 2. 负载因子
- 3. 将关键字转为整数
- 4. 设计哈希函数
- 除法散列法 / 除留余数法
- 乘法散列法
- 全域散列法
- 其他方法
- 将关键字转为整数
- 处理哈希冲突
- 开放定址法
- 线性探测
- 二次探测
- 双重散列
- 开放定址法的哈希表结构
- 解决冲突的思路
- 扩容
- 开放定址法代码实现
- 链地址法
- 解决冲突的思路
- 扩容
- 极端场景
- 链地址法代码实现
- 三、链地址法哈希表封装
- HashTable_base
- key 复用
- key / value 复用
- 源码展示
以下代码环境为 VS2022 C++。
一、哈希概念
哈希(hash) 又称散列,是一种组织数据的方式。从译名来看,有散乱排列的意思。本质就是通过哈希函数把关键字 key 跟存储位置建立一个映射关系,查找时通过这个哈希函数计算出 key 存储的位置,进行快速查找。
二、哈希表实现
直接定址法
当关键字的范围比较集中时,直接定址法是非常简单高效的方法,比如一组关键字都在 [ 0 , 99 ] 之间,那么我们开一个 100 个数的数组,每个关键字的值直接就是存储位置的下标。再比如一组关键字的值都在 [ a , z ] 的小写字母,我们开一个 26 个数的数组,每个关键字的ACSII码 - 小写字母a的ACSII码 就是存储位置的下标。
也就是说直接定址法本质是用关键字计算出一个绝对位置或者相对位置。
void test1()
{int nums[100] = { 0 };			// 直接定址法int arr[10] = { 2, 93, 38, 56, 51, 22, 88, 38, 56, 31 };for (int i = 0; i < 10; ++i){++nums[arr[i]];				// 统计}for (int i = 0; i < 100; ++i){if (nums[i] == 1)			// 排序打印{cout << i << " ";}}cout << endl;
}void test2()
{string str = "abcdefggaaecea";int count[26] = { 0 };for (char ch : str){++count[ch - 'a'];			// ch - 'a' 相对位置}for (int i = 0; i < 26; ++i){if (count[i] > 0)			// 统计字母出现次数{cout << (char)(i + 'a') << ":" << count[i] << endl;}}cout << endl;
}
直接定址法的缺点也非常明显,当关键字的范围比较分散时,很浪费内存甚至内存不够用。
其他映射方法介绍
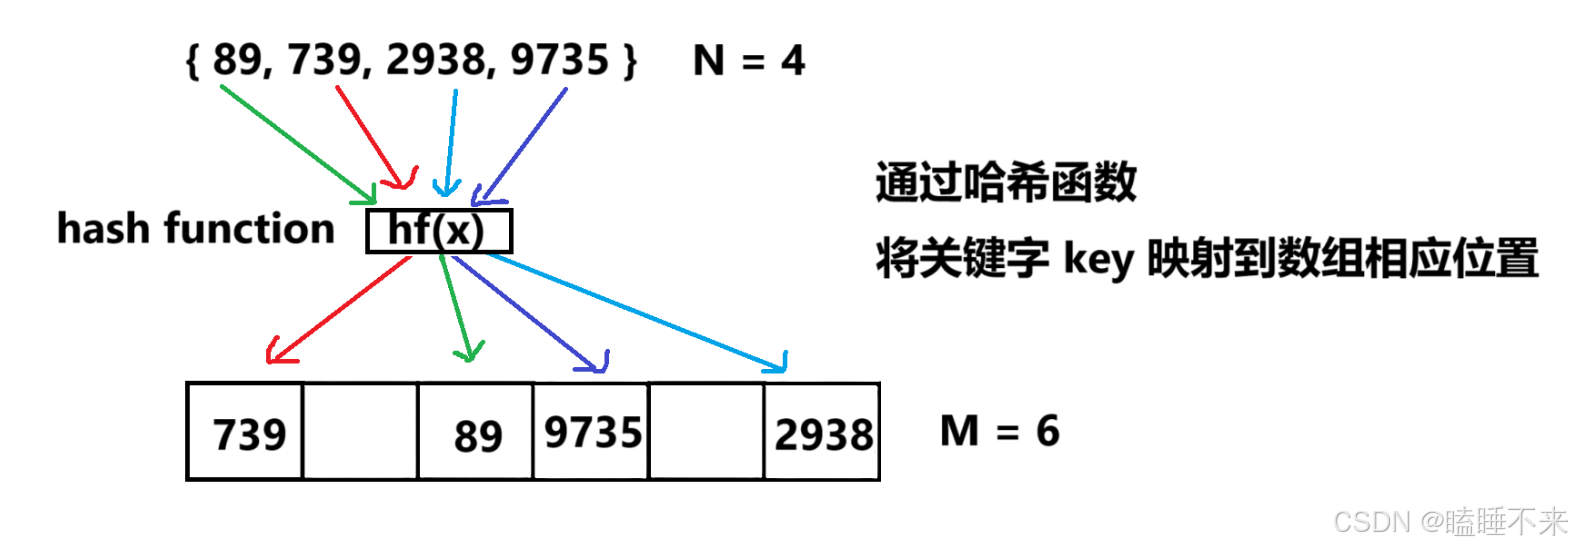
假设我们只有数据范围是 [ 0 , 9999 ] 的 N 个值,我们要映射到一个 M 个空间的数组中(一般情况下 M >= N),那么就要借助哈希函数(hash function) hf,将关键字 key 映射到数组的 hf(key) 位置,要注意的是 hf(key) 计算出的值必须在 [ 0 , M ) 之间。
1. 哈希冲突
上述存在一个问题,两个不同的 key 可能会映射到同一个位置去,这种问题我们叫做哈希冲突,或者哈希碰撞。理想情况是找出一个好的哈希函数避免冲突,但在实际场景中,冲突是不可避免的,所以我们需要尽可能设计出优秀的哈希函数,减少冲突次数的同时,也要去设计出解决冲突的方案。
2. 负载因子
假设哈希表中已经映射存储了 N 个值,哈希表的大小为 M,那么 负载因子 = N / M,负载因子有些地方也翻译为 载荷因子 或 装载因子 等,他的英文为 load factor。负载因子越大,哈希冲突的概率越高,空间利用率越高;负载因子越小,哈希冲突的概率越低,空间利用率越低。
3. 将关键字转为整数
我们将关键字映射到数组中的位置,一般是使用整数做映射计算,如果不是整数,需要转换成整数,这个细节我们后面代码实现中再进行细节展示。
4. 设计哈希函数
一个好的哈希函数应该让 N 个关键字被等概率均匀的散列分布到哈希表的 M 个空间中,但实际中却很难做到,我们需要尽量往这个方向去设计。
除法散列法 / 除留余数法
-
除法散列法也叫做除留余数法,顾名思义,假设哈希表的大小为 M,那么通过 key 除以 M 的余数作为映射位置的下标,也就是哈希函数为:hf(key) = key % M。
-
当使用除法散列法时,要尽量避免 M 为某些值,如 2 的幂,10 的幂等。如果是 2 ^ x,那么 key % 2 ^ x 本质相当于保留 key 的后 x 位,后 x 位相同的值,计算出的哈希值都是一样的,就冲突了。如:{ 63 , 31 } 看起来没有关联的值,如果 M 是 16,也就是 2 ^ 4,那么计算出的哈希值都是 15,因为 63 的二进制后 8 位是 00111111,31 的二进制后 8 位是 00011111。如果是 10 ^ x,就更明显了,保留的都是 10 进值的后 x 位,如:{ 112, 12312 },如果 M 是 100,也就是 10 ^ 2,那么计算出的哈希值都是 12。
-
当使用除法散列法时,建议 M 取不太接近 2 的整数次幂的一个质数(素数)。
需要说明的是有一种做法很巧妙:Java 的 HashMap 采用除法散列法时就是 2 的整数次幂做哈希表的大小 M,这种做法不用取模,可以直接位运算,相比于取模,位运算更高效一些。但这不是单纯的去位运算,比如 M 是 2 ^ 16 次方,本质是取后 16 位,那么用 key’ = key >> 16,然后把 key 和 key’ 异或的结果作为哈希值。也就是说我们映射出的值还是在 [ 0 , M ) 范围内,但尽量让 key 所有的位都参与计算,这样映射出的哈希值更均匀一些即可。
乘法散列法
-
乘法散列法对哈希表大小 M 没有要求,它的大思路第一步:用关键字 K 乘上常数 A (0 < A < 1),并抽取出 k * A 的小数部分。第二步:后再用 M 乘以 k * A 的小数部分,再向下取整。
-
hf(key) = floor(M × ( (A × key) % 1.0 ) ),其中 floor 表示对表达式进行下取整,A∈(0 , 1),这里最重要的是 A 的值应该如何设定,Knuth 认为 A = 0.6180339887…(黄金分割点) 比较好。
-
乘法散列法对哈希表大小 M 是没有要求的,假设 M 为 1024,key 为 1234,A = 0.6180339887,A * key = 762.6539420558,取小数部分为 0.6539420558,M × ( ( A × key ) % 1.0 ) = 0.6539420558 * 1024 = 669.6366651392,那么 hf(1234) = 669。
全域散列法
-
如果存在一个恶意的对手,他针对我们提供的散列函数,特意构造出一个发生严重冲突的数据集。比如让所有关键字全部落入同一个位置中,这种情况是可能存在的,只要散列函数是公开且确定的,就可以实现此攻击。解决方法自然是见招拆招,给散列函数增加随机性,攻击者就无法找出确定可以导致最坏情况的数据。这种方法叫做全域散列。
-
hf(key) = ( ( a × key + b ) % P ) % M,P 需要选一个足够大的质数,a 可以随机选 [ 1 , P - 1 ] 之间的任意整数,b 可以随机选 [ 0 , P - 1 ] 之间的任意整数,这些函数构成了一个 P * ( P - 1 ) 组全域散列函数组。假设 P = 17,M = 6,a = 3, b = 4, 则 hf(8) = ( ( 3 × 8 + 4 ) % 17 ) % 6 = 5
-
需要注意每次初始化哈希表时,随机选取全域散列函数组中的一个散列函数使用,后续增删查改都固定使用这个散列函数,否则每次哈希都是随机选一个散列函数,插入是一个散列函数,查找又是另一个散列函数,会导致找不到插入的 key。
其他方法
哈希函数采用的方法还有平方取中法、折叠法、随机数法、数学分析法等,这些方法相对更适用于一些局限的特定场景,这里不过多介绍。
将关键字转为整数
当 key 是 string 等类型时,key 不能取模,那么我们需要给 HashTable 增加一个仿函数,这个仿函数支持把 key 转换成一个可以取模的整形,如果 key 可以转换为整形并且不容易冲突,那么这个仿函数就用默认参数即可,如果这个 key 不能转换为整形,我们就需要自己实现一个仿函数传给这个参数,实现这个仿函数的要求是尽量让 key 的每个值都参与到计算中,让不同的 key 转换出的整形值不同。string 做哈希表的 key 非常常见,所以我们可以考虑把 string 特化一下。
typedef unsigned int Hash_mapping;template<class Key>struct defaultHashFunc{Hash_mapping operator()(const Key& key) const{return key; // 隐式类型转换}};template<> // 特化struct defaultHashFunc<std::string> {Hash_mapping operator()(const std::string& key) const{Hash_mapping the_map = 0;for (char ch : key) // 将每个字符都参与映射{the_map += ch; the_map *= 131;}return the_map;}};
处理哈希冲突
实践中哈希表一般是选择除法散列法作为哈希函数,下面使用的哈希函数都是除法散列法。当然,哈希表无论选择哪种哈希函数也避免不了冲突。插入数据时,解决冲突主要有两种方法,开放定址法和链地址法。
开放定址法
在开放定址法中所有的元素都放到哈希表里,当一个关键字 key 用哈希函数计算出的位置冲突了,则按照某种规则找到一个没有存储数据的位置进行存储,开放定址法中负载因子一定是小于的。这里介绍三种规则:线性探测、二次探测、双重探测。
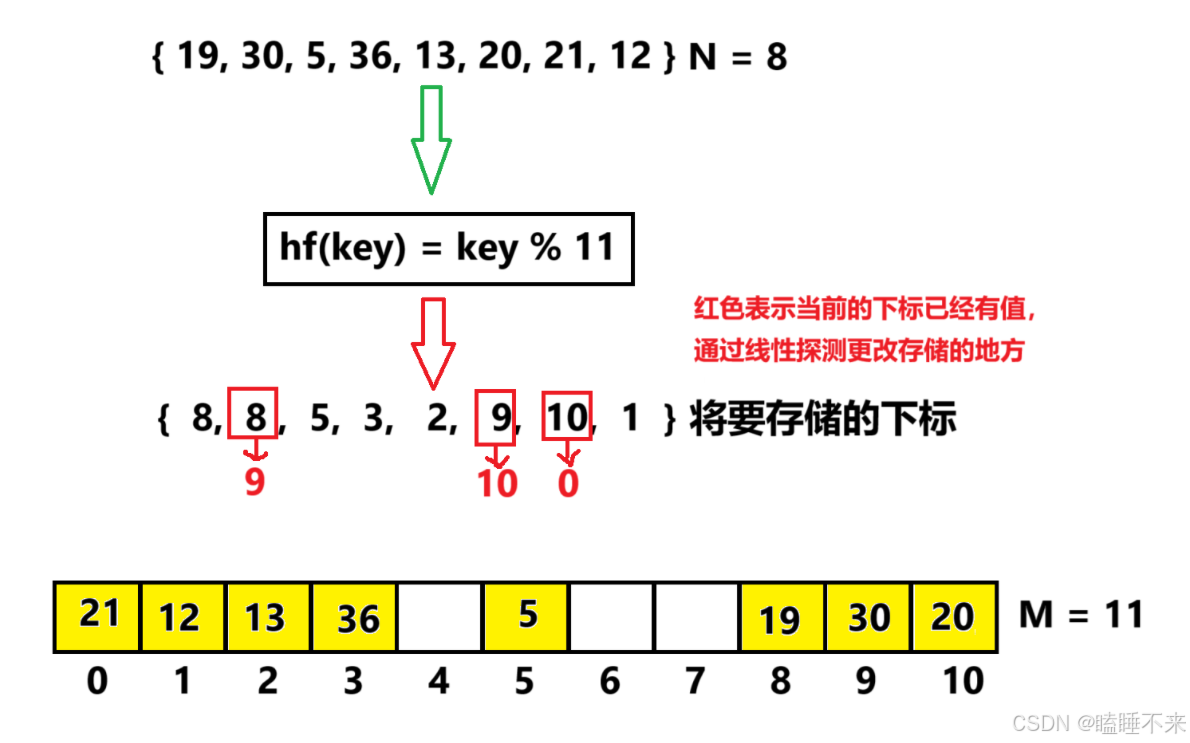
线性探测
-
从发生冲突的位置开始,依次线性向后探测,直到寻找到下一个没有存储数据的位置为止,如果走到哈希表尾,则回绕到哈希表头的位置。
-
hf(key) = hash0 = key % M,, hash0 位置冲突了,则线性探测公式为:hc(key , i) = hashi = (hash0 + i) % M, i = {1, 2, 3, …, M − 1},因为负载因子小于1,则最多探测 M - 1 次,一定能找到一个存储 key 的位置。
-
线性探测比较简单且容易实现,线性探测的问题假设,hash0 位置连续冲突,hash0,hash1,hash2 位置已经存储数据了,后续映射到 hash0,hash1,hash2,hash3 的值都会争夺 hash3 位置,这种现象叫做群集 / 堆积。下面的二次探测可以一定程度改善这个问题。
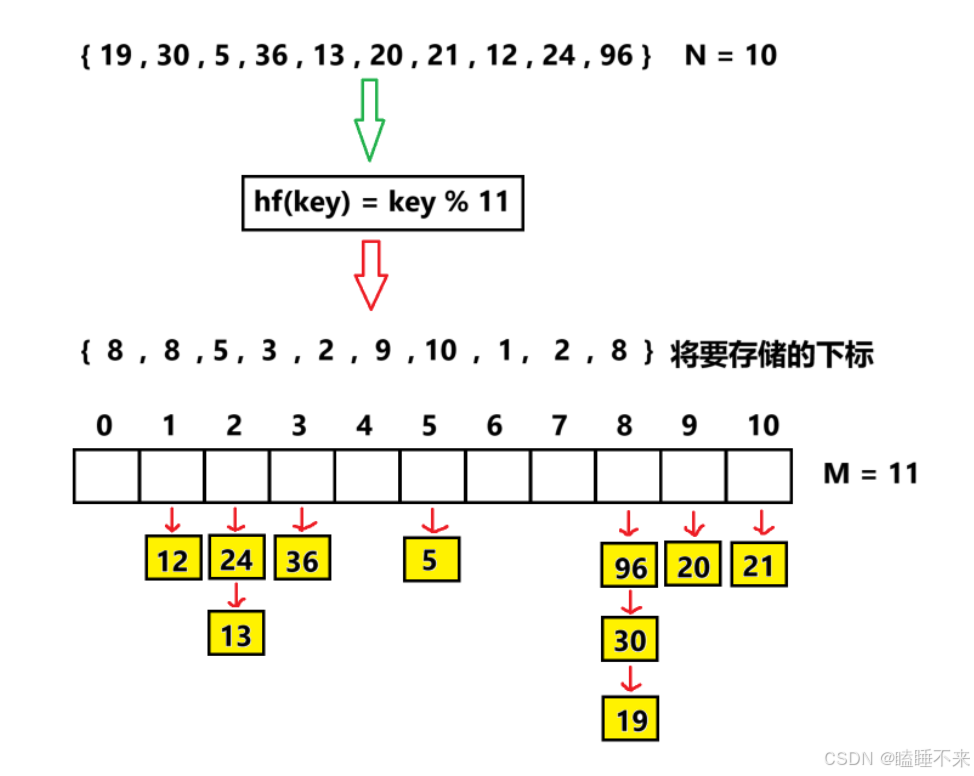
下面演示 { 19 , 30 , 5 , 36 , 13 , 20 , 21 , 12 } 这一组值映射到 M = 11 的表中。
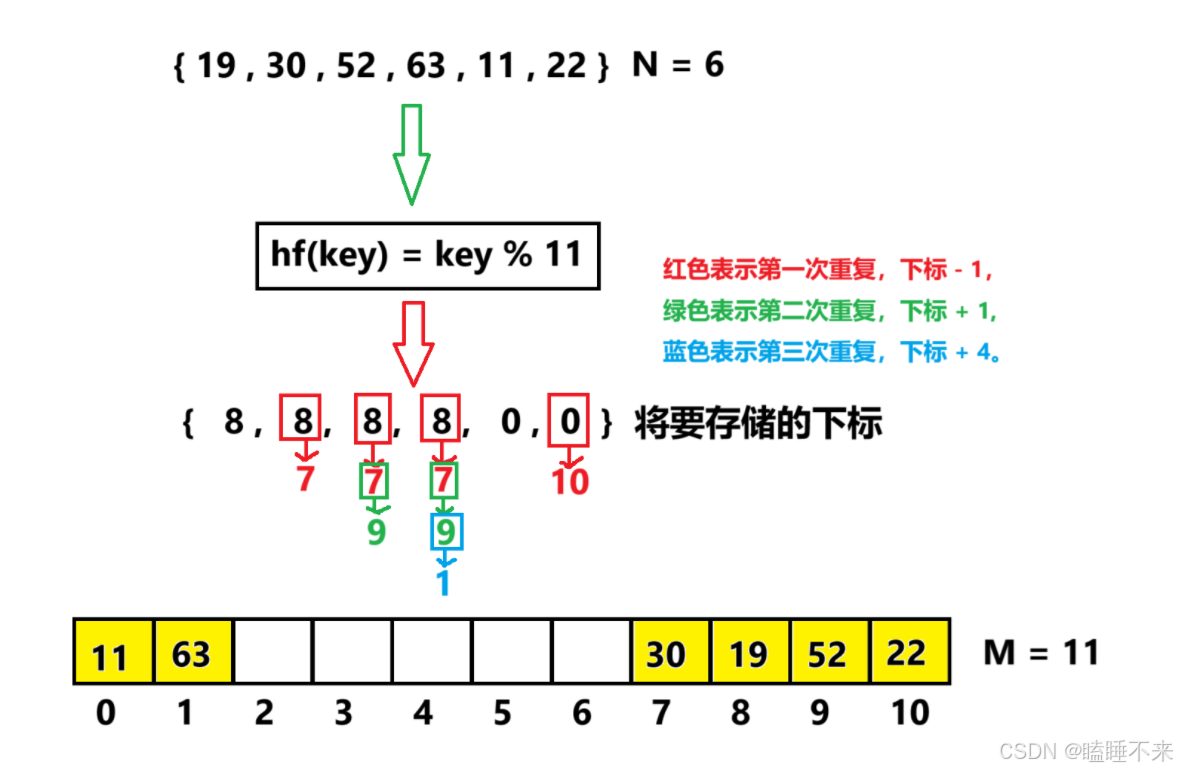
二次探测
-
从发生冲突的位置开始,依次左右按二次方跳跃式探测,直到寻找到下一个没有存储数据的位置为止,如果往右走到哈希表尾,则回绕到哈希表头的位置;如果往左走到哈希表头,则回绕到哈希表尾的位置。
-
hf(key) = hash0 = key % M , hash0 位置冲突了,则二次探测公式为:
hc(key , i) = hashi = (hash0 ± i ^ 2 ) % M, i = {1, 2, 3, …, M / 2 }。 -
二次探测当 hashi = (hash0 − i ^ 2 ) % M 时,当 hashi < 0 时,需要hashi += M。
-
下面演示 { 19 , 30 , 52 , 63 , 11 , 22 } 这一组值映射到 M = 11 的表中。
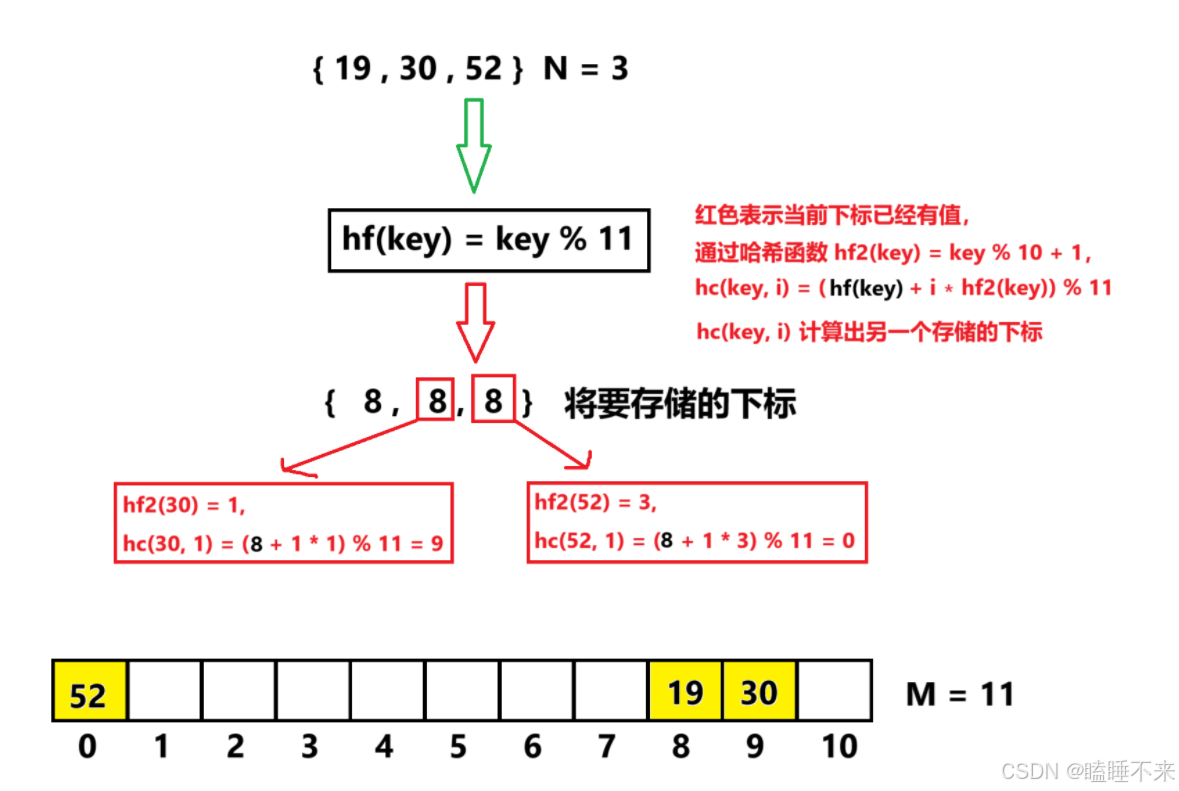
双重散列
-
第一个哈希函数计算出的值发生冲突,使用第二个哈希函数计算出一个跟 key 相关的偏移量值,不断往后探测,直到寻找到下一个没有存储数据的位置为止。
-
hf1(key) = hash0 = key % M , hash0 位置冲突了,则双重探测公式为:
hc(key , i) = hashi = (hash0 + i ∗ hf2(key)) % M, i = { 1, 2, 3, …, M }。 -
要求 hf2(key) < M 且 hf2(key) 和 M 互为质数,有两种简单的取值方法:1.当 M 为 2 整数幂时,hf2(key) 从 [ 0 ,M - 1 ] 任选一个奇数;2.当 M 为质数时,hf2(key) = key % (M − 1) + 1。
-
保证 hf2(key) 与 M 互质是因为根据固定的偏移量所寻址的所有位置将形成一个群,若最大公约数 p = gcd(M, hf1(key) ) > 1,那么所能寻址的位置的个数为 M / P < M,使得对于一个关键字来说无法充分利用整个散列表。举例来说,若初始探查位置为 1,偏移量为 3,整个散列表大小为 12,那么所能寻址的位置为 { 1, 4, 7, 10 },寻址个数为 12 / gcd(12, 3) = 4
-
下面演示 { 19 , 30 , 52 } 这一组值映射到 M = 11 的表中,设 hf2(key) = key % 10 + 1
开放定址法的哈希表结构
解决冲突的思路
要注意的是这里需要给每个存储值的位置加一个状态标识,否则删除一些值以后,会影响后面冲突的值查找。如下图,我们删除 30,会导致查找 20 失败,当我们给每个位置加一个状态标识 { EXIST , EMPTY , DELETE } ,删除 30 就可以不用删除值,而是把状态改为 DELETE ,那么查找 20 时是遇到 EMPTY 没有找到才能退出,不然可以找到 20。

扩容
我们实现的哈希表负载因子控制在 0.7 以后进行扩容,这里按照 2 倍扩容,但是同时我们要保持哈希表大小是一个质数,第一个是质数,2 倍后就不是质数了。如何解决?一种方案就是上述除法散列法中我们讲的 Java HashMap 的使用 2 的整数幂,但是计算时不能直接取模的改进方法。另外一种方案是 SGI版本的STL中哈希表使用的方法,给了一个近似 2 倍的质数表,每次去质数表获取扩容后的大小。
这里我们使用的是 SGI 版本的 STL 中哈希表使用的方法:
static const int prime_num = 28;int getNextPrime(int num) // 近似 2 倍的质数表{static const Hash_mapping prime_list[prime_num] ={53, 97, 193, 389, 769,1543, 3079, 6151, 12289, 24593,49157, 98317, 196613, 393241, 786433,1572869, 3145739, 6291469, 12582917, 25165843,50331653, 100663319, 201326611, 402653189, 805306457,1610612741, 3221225473, 4294967291,};int left = 0;int right = prime_num - 1;while (left < right) //二分查找{int mid = left + ((right - left) >> 1);if (prime_list[mid] <= num){left = mid + 1;}else{right = mid;}}return prime_list[left];}
开放定址法代码实现
开放定址法在实践中,不如下面讲的链地址法,因为开放定址法解决冲突不管使用哪种方法,占用的都是哈希表中的空间,始终存在互相影响的问题。所以开放定址法,我们简单选择线性探测实现即可。
#pragma once#include <iostream>
#include <string>
#include <vector>// 以下采用开放定址法,即线性探测解决冲突
namespace my
{typedef unsigned int Hash_mapping;template<class Key>struct defaultHashFunc{Hash_mapping operator()(const Key& key) const{return key;}};template<>struct defaultHashFunc<std::string>{Hash_mapping operator()(const std::string& key) const{Hash_mapping the_map = 0;for (char ch : key){the_map += ch;the_map *= 131;}return the_map;}};template<class Key>struct defaultEqualTo{bool operator()(const Key& key1, const Key& key2) const{return key1 == key2;}};template<class Key, class Value, class HashFunc = defaultHashFunc<Key>, class EqualTo = defaultEqualTo<Key>>class HashTable{typedef std::pair<Key, Value> Type;enum State{EMPTY = 0,EXIST,DELETE};struct HashData{Type _data;State _state = EMPTY;};typedef HashData Data;typedef Data* pData;static const constexpr HashFunc _hashFunc = HashFunc();static const constexpr EqualTo _equal_to = EqualTo();std::vector<Data> _table;size_t _size = 0;			// 表中存储数据个数private:static const int prime_num = 28;int getNextPrime(int num)			// 近似 2 倍的质数表{static const Hash_mapping prime_list[prime_num] ={53,			97,			193,		389,		769,1543,		3079,		6151,		12289,		24593,49157,		98317,		196613,		393241,		786433,1572869,	3145739,	6291469,	12582917,	25165843,50331653,	100663319,	201326611,	402653189,	805306457,1610612741,	3221225473,	4294967291,};int left = 0;int right = prime_num - 1;while (left < right)			//二分查找{int mid = left + ((right - left) >> 1);if (prime_list[mid] <= num){left = mid + 1;}else{right = mid;}}return prime_list[left];}void checkCapacity(){if (1.0 * _size / _table.size() < 0.7){return;}HashTable newHashTable;newHashTable._table.resize(getNextPrime(_table.size()));for (auto& e : _table){if (e._state == EXIST){newHashTable.insert(e._data);}}std::swap(newHashTable, *this);}public:HashTable():_table(53){;}template<class InputIterator>HashTable(InputIterator begin, InputIterator end):_table(53){while (begin != end){insert(*begin);++begin;}}HashTable(std::initializer_list<Type> list):_table(53){for (auto& e : list){insert(e);}}bool insert(const Type& data){checkCapacity();Hash_mapping index = _hashFunc(data.first) % _table.size();while (_table[index]._state == EXIST){if (_equal_to(_table[index]._data.first, data.first)){return false;}index = (index + 1) % _table.size();}_table[index]._data = data;_table[index]._state = EXIST;++_size;return true;}pData find(const Key& key) const{Hash_mapping index = _hashFunc(key) % _table.size();while (_table[index]._state != EMPTY){if (_table[index]._state == EXIST && _equal_to(_table[index]._data.first, key)){return &_table[index];}index = (index + 1) % _table.size();}return nullptr;}bool erase(const Key& key){if (_size == 0){return false;}pData aim = find(key);if (aim != nullptr){aim->_state = DELETE;--_size;return true;}else{return false;}}size_t size() const{return _size;}};
}
链地址法
解决冲突的思路
开放定址法所有元素都是放在哈希表里的,而链地址法中所有数据不再直接存储在哈希表中,而是存储一个指针。没有数据映射这个位置时,这个指针为空,有多个数据映射到这个位置时,我们把这些冲突的数据链接成一个链表,挂在哈希表这个位置下面,链地址法也叫做拉链法或者哈希桶。
下面演示 { 19 , 30 , 5 , 36 , 13 , 20 , 21 , 12 , 24 , 96 } 这一组值映射到 M = 11 的表中。
扩容
开放定址法负载因子必须小于 1,链地址法的负载因子没有限制,可以大于 1。STL 中 unordered_xxx 的最大负载因子基本控制在 1,大于 1 就扩容,我们实现也使用这个方式。
极端场景
在极端场景下,某个桶特别长可以考虑使用全域散列法,这样就不容易被针对。但是假设不是被针对,用了全域散列法,在偶然情况下,某个桶依然很长,查找效率低。可以参考 Java8 的 HashMap,当桶的长度超过一定阀值 (8) 时它会把链表转换成红黑树。一般情况下,不断扩容,单个桶很长的场景还是比较少的,我们实现就不搞这么复杂,这个解决极端场景的思路了解一下即可。
链地址法代码实现
#pragma once #include <iostream>
#include <string>
#include <vector>namespace my
{typedef unsigned int Hash_mapping;template<class Type>struct HashNode					// 链地址法{HashNode* _next = nullptr;Type _data;HashNode(const Type& data):_data(data){;}};template<class Key>struct defaultHashFunc{Hash_mapping operator()(const Key& key) const{return key;}};template<>struct defaultHashFunc<std::string>{Hash_mapping operator()(const std::string& key) const{Hash_mapping the_map = 0;for (char ch : key){the_map += ch;the_map *= 131;}return the_map;}};template<class Key>struct defaultEqualTo{bool operator()(const Key& key1, const Key& key2) const{return key1 == key2;}};template<class Key, class Value, class HashFunc = defaultHashFunc<Key>, class EqualTo = defaultEqualTo<Key>>class HashTable{typedef std::pair<Key, Value> Type;typedef HashNode<Type> Node;typedef Node* pNode;static const constexpr HashFunc _hashFunc = HashFunc();static const constexpr EqualTo _equal_to = EqualTo();std::vector<pNode> _table;size_t _size = 0;private:static const int prime_num = 28;int getNextPrime(int num){static const Hash_mapping prime_list[prime_num] ={53,			97,			193,		389,		769,1543,		3079,		6151,		12289,		24593,49157,		98317,		196613,		393241,		786433,1572869,	3145739,	6291469,	12582917,	25165843,50331653,	100663319,	201326611,	402653189,	805306457,1610612741,	3221225473,	4294967291,};int left = 0;int right = prime_num - 1;while (left < right){int mid = left + ((right - left) >> 1);if (prime_list[mid] <= num){left = mid + 1;}else{right = mid;}}return prime_list[left];}void checkCapacity(){if (_size < _table.size()){return;}std::vector<pNode> newTable;newTable.resize(getNextPrime(_table.size()));for (pNode& head : _table)	// 可以不用删除节点,修改它的指针成员链接即可{if (head == nullptr){continue;}pNode cur = head;while (cur != nullptr)					// 链表遍历修改链接{Hash_mapping index = _hashFunc(cur->_data.first) % newTable.size();pNode temp = cur;cur = cur->_next;if (newTable[index] == nullptr)		// 为空{newTable[index] = temp;temp->_next = nullptr;}else								// 否则头插{temp->_next = newTable[index];newTable[index] = temp;}}head = nullptr;}std::swap(_table, newTable);				// 交换即可}public:HashTable():_table(53){}template<class InputIterator>HashTable(InputIterator begin, InputIterator end):_table(53){while (begin != end){insert(*begin);++begin;}}HashTable(std::initializer_list<Type> list):_table(53){for (auto& e : list){insert(e);}}~HashTable(){for (pNode& head : _table)		// 遍历哈希表{if (head == nullptr){continue;}pNode cur = head;			// 检查是否有资源while (cur != nullptr){pNode temp = cur;cur = cur->_next;delete temp;			// 释放}head = nullptr;				// 指针置空}_size = 0;}public:bool insert(const Type& data){checkCapacity();Hash_mapping index = _hashFunc(data.first) % _table.size();pNode cur = _table[index];while (cur != nullptr)		// 检查重复值,有则插入失败{if (_equal_to(cur->_data.first, data.first)){return false;}cur = cur->_next;}pNode newNode = new Node(data);newNode->_next = _table[index];_table[index] = newNode;++_size;					return true;}pNode find(const Key& key) const{if (_size == 0){return nullptr;}Hash_mapping index = _hashFunc(key) % _table.size();pNode cur = _table[index];while (cur != nullptr){if (_equal_to(cur->_data.first, key))	// 找到直接返回地址{return cur;}cur = cur->_next;}return nullptr;						// 否则为空}bool erase(const Key& key){Hash_mapping index = _hashFunc(key) % _table.size();pNode cur = _table[index];pNode prev = cur;if (prev == nullptr)				// 哈希表指针为空 {return false;}else if (_equal_to(prev->_data.first, key))	// 哈希表链接的元素{_table[index] = prev->_next;	// 置空或链接下一个delete prev;--_size;return true;}while (cur != nullptr)				// 寻找{if (_equal_to(cur->_data.first, key)){prev->_next = cur->_next;	delete cur;--_size;return true;}prev = cur;cur = cur->_next;}return false;}size_t size() const{return _size;}};
}
三、链地址法哈希表封装
注意上述中我们设计的只是 key / value 的链地址法哈希表,还有 key 这种类型,这里将两者整合。
HashTable_base
我们先将之前介绍的基础函数都封装到一个模版类,也就是 HashTable_base 里方便后续 key / value 与 key 类型复用:
template<class Type, class Key, class GetKey, class HashFunc, class EqualTo>class HashTable_base{typedef HashNode<Type> Node;typedef Node* pNode;static const constexpr GetKey _getKey = GetKey();static const constexpr EqualTo _equal_to = EqualTo();static const constexpr HashFunc _hashFunc = HashFunc();std::vector<pNode> _table;size_t _size = 0;private:static const int prime_num = 28;int getNextPrime(int num){static const Hash_mapping prime_list[prime_num] ={53, 97, 193, 389, 769,1543, 3079, 6151, 12289, 24593,49157, 98317, 196613, 393241, 786433,1572869, 3145739, 6291469, 12582917, 25165843,50331653, 100663319, 201326611, 402653189, 805306457,1610612741, 3221225473, 4294967291,};int left = 0;int right = prime_num - 1;while (left < right){int mid = left + ((right - left) >> 1);if (prime_list[mid] <= num){left = mid + 1;}else{right = mid;}}return prime_list[left];}void checkCapacity(){if (_size < _table.size()){return;}std::vector<pNode> newTable;newTable.resize(getNextPrime(_table.size()));for (pNode& head : _table) // 可以不用删除节点,修改它的指针成员链接即可{if (head == nullptr){continue;}pNode cur = head;while (cur != nullptr) // 链表遍历修改链接{Hash_mapping index = _hashFunc(_getKey(cur->_data)) % newTable.size();pNode temp = cur;cur = cur->_next;if (newTable[index] == nullptr) // 为空{newTable[index] = temp;temp->_next = nullptr;}else // 否则头插{temp->_next = newTable[index];newTable[index] = temp;}}head = nullptr;}std::swap(_table, newTable); // 交换即可}public:HashTable_base():_table(53){;}template<class InputIterator>HashTable_base(InputIterator begin, InputIterator end):_table(53){while (begin != end){insert(*begin);++begin;}}HashTable_base(std::initializer_list<Type> list):_table(53){for (auto& e : list){insert(e);}}~HashTable_base(){for (pNode& head : _table) // 遍历哈希表{if (head == nullptr){continue;}pNode cur = head; // 检查是否有资源while (cur != nullptr){pNode temp = cur;cur = cur->_next;delete temp; // 释放}head = nullptr; // 指针置空}_size = 0;}public:bool insert(const Type& data){checkCapacity();Hash_mapping index = _hashFunc(_getKey(data)) % _table.size();pNode cur = _table[index];while (cur != nullptr) // 检查重复值,有则插入失败{if (_equal_to(_getKey(cur->_data), _getKey(data))){return false;}cur = cur->_next;}pNode newNode = new Node(data);newNode->_next = _table[index];_table[index] = newNode;++_size;return true;}pNode find(const Key& key) const{if (_size == 0){return nullptr;}Hash_mapping index = _hashFunc(key) % _table.size();pNode cur = _table[index];while (cur != nullptr){if (_equal_to(_getKey(cur->_data), key)) // 找到直接返回地址{return cur;}cur = cur->_next;}return nullptr; // 否则为空}bool erase(const Key& key){Hash_mapping index = _hashFunc(key) % _table.size();pNode cur = _table[index];pNode prev = cur;if (prev == nullptr) // 哈希表指针为空 {return false;}else if (_equal_to(_getKey(prev->_data), key)) // 哈希表链接的元素{_table[index] = prev->_next; // 置空或链接下一个delete prev;--_size;return true;}while (cur != nullptr) // 寻找{if (_equal_to(_getKey(cur->_data), key)){prev->_next = cur->_next;delete cur;--_size;return true;}prev = cur;cur = cur->_next;}return false;}size_t size() const{return _size;}};
key 复用
这里处理节点与 Key 获取,将 HashTable_base 组合为成员加上接口即可
template<class Key, class HashFunc = defaultHashFunc<Key>, class EqualTo = defaultEqualTo<Key>>class HashOne{typedef const Key Type;typedef HashNode<Type> Node;typedef Node* pNode;typedef Node const* const_pNode;struct GetSetKey{const Key& operator()(const Type& data) const{return data;}};HashTable_base<Type, Key, GetSetKey, HashFunc, EqualTo> _hashTable;public:HashOne() = default;template<class InputIterator>HashOne(InputIterator begin, InputIterator end):_hashTable(begin, end){;}HashOne(std::initializer_list<Type> list):_hashTable(list){;}public:bool insert(const Type& data){return _hashTable.insert(data);}bool erase(const Key& key){return _hashTable.erase(key);}const_pNode find(const Key& key) const // const_pNode 防止使用者修改内容{return _hashTable.find(key);}size_t size() const{return _hashTable.size();}};
key / value 复用
同上,这里处理节点与 Key 获取,将 HashTable_base 组合为成员加上接口即可
template<class Key, class Value, class HashFunc = defaultHashFunc<Key>, class EqualTo = defaultEqualTo<Key>>class HashTwo{typedef std::pair<const Key, Value> Type;typedef HashNode<Type> Node;typedef Node* pNode;typedef Node const* const_pNode;struct GetMapKey{const Key& operator()(const Type& data) const{return data.first;}};HashTable_base<Type, Key, GetMapKey, HashFunc, EqualTo> _hashTable;public:HashTwo() = default;template<class InputIterator>HashTwo(InputIterator begin, InputIterator end):_hashTable(begin, end){;}HashTwo(std::initializer_list<Type> list):_hashTable(list){;}public:bool insert(const Type& data){return _hashTable.insert(data);}bool erase(const Key& key){return _hashTable.erase(key);}const_pNode find(const Key& key) const{return _hashTable.find(key);}size_t size() const{return _hashTable.size();}};
源码展示
#pragma once #include <iostream>
#include <string>
#include <vector>namespace my
{template<class Type>struct HashNode{HashNode* _next = nullptr;Type _data;HashNode(const Type& data):_data(data){;}};typedef unsigned int Hash_mapping;template<class Key>struct defaultHashFunc{Hash_mapping operator()(const Key& key) const{return key;			}};template<>						// 特化struct defaultHashFunc<std::string>	{Hash_mapping operator()(const std::string& key) const{Hash_mapping the_map = 0;for (char ch : key)		// 将每个字符都参与映射{the_map += ch;	the_map *= 131;}return the_map;}};template<class Key>struct defaultEqualTo{bool operator()(const Key& key1, const Key& key2) const{return key1 == key2;}};template<class Type, class Key, class GetKey, class HashFunc, class EqualTo>class HashTable_base{typedef HashNode<Type> Node;typedef Node* pNode;static const constexpr GetKey _getKey = GetKey();static const constexpr EqualTo _equal_to = EqualTo();static const constexpr HashFunc _hashFunc = HashFunc();std::vector<pNode> _table;size_t _size = 0;private:static const int prime_num = 28;int getNextPrime(int num){static const Hash_mapping prime_list[prime_num] ={53,			97,			193,		389,		769,1543,		3079,		6151,		12289,		24593,49157,		98317,		196613,		393241,		786433,1572869,	3145739,	6291469,	12582917,	25165843,50331653,	100663319,	201326611,	402653189,	805306457,1610612741,	3221225473,	4294967291,};int left = 0;int right = prime_num - 1;while (left < right){int mid = left + ((right - left) >> 1);if (prime_list[mid] <= num){left = mid + 1;}else{right = mid;}}return prime_list[left];}void checkCapacity(){if (_size < _table.size()){return;}std::vector<pNode> newTable;newTable.resize(getNextPrime(_table.size()));for (pNode& head : _table)	// 可以不用删除节点,修改它的指针成员链接即可{if (head == nullptr){continue;}pNode cur = head;while (cur != nullptr)					// 链表遍历修改链接{Hash_mapping index = _hashFunc(_getKey(cur->_data)) % newTable.size();pNode temp = cur;cur = cur->_next;if (newTable[index] == nullptr)		// 为空{newTable[index] = temp;temp->_next = nullptr;}else								// 否则头插{temp->_next = newTable[index];newTable[index] = temp;}}head = nullptr;}std::swap(_table, newTable);				// 交换即可}public:HashTable_base():_table(53){;}template<class InputIterator>HashTable_base(InputIterator begin, InputIterator end):_table(53){while (begin != end){insert(*begin);++begin;}}HashTable_base(std::initializer_list<Type> list):_table(53){for (auto& e : list){insert(e);}}~HashTable_base(){for (pNode& head : _table)		// 遍历哈希表{if (head == nullptr){continue;}pNode cur = head;			// 检查是否有资源while (cur != nullptr){pNode temp = cur;cur = cur->_next;delete temp;			// 释放}head = nullptr;				// 指针置空}_size = 0;}public:bool insert(const Type& data){checkCapacity();Hash_mapping index = _hashFunc(_getKey(data)) % _table.size();pNode cur = _table[index];while (cur != nullptr)		// 检查重复值,有则插入失败{if (_equal_to(_getKey(cur->_data), _getKey(data))){return false;}cur = cur->_next;}pNode newNode = new Node(data);newNode->_next = _table[index];_table[index] = newNode;++_size;return true;}pNode find(const Key& key) const{if (_size == 0){return nullptr;}Hash_mapping index = _hashFunc(key) % _table.size();pNode cur = _table[index];while (cur != nullptr){if (_equal_to(_getKey(cur->_data), key))	// 找到直接返回地址{return cur;}cur = cur->_next;}return nullptr;									// 否则为空}bool erase(const Key& key){Hash_mapping index = _hashFunc(key) % _table.size();pNode cur = _table[index];pNode prev = cur;if (prev == nullptr)				// 哈希表指针为空 {return false;}else if (_equal_to(_getKey(prev->_data), key))	// 哈希表链接的元素{_table[index] = prev->_next;	// 置空或链接下一个delete prev;--_size;return true;}while (cur != nullptr)				// 寻找{if (_equal_to(_getKey(cur->_data), key)){prev->_next = cur->_next;delete cur;--_size;return true;}prev = cur;cur = cur->_next;}return false;}size_t size() const{return _size;}};template<class Key, class HashFunc = defaultHashFunc<Key>, class EqualTo = defaultEqualTo<Key>>class HashOne{typedef const Key Type;typedef HashNode<Type> Node;typedef Node* pNode;typedef Node const* const_pNode;struct GetSetKey{const Key& operator()(const Type& data) const{return data;}};HashTable_base<Type, Key, GetSetKey, HashFunc, EqualTo> _hashTable;public:HashOne() = default;template<class InputIterator>HashOne(InputIterator begin, InputIterator end):_hashTable(begin, end){;}HashOne(std::initializer_list<Type> list):_hashTable(list){;}public:bool insert(const Type& data){return _hashTable.insert(data);}bool erase(const Key& key){return _hashTable.erase(key);}const_pNode find(const Key& key) const	// const_pNode 防止使用者修改内容{return _hashTable.find(key);}size_t size() const{return _hashTable.size();}};template<class Key, class Value, class HashFunc = defaultHashFunc<Key>, class EqualTo = defaultEqualTo<Key>>class HashTwo{typedef std::pair<const Key, Value> Type;typedef HashNode<Type> Node;typedef Node* pNode;typedef Node const* const_pNode;struct GetMapKey{const Key& operator()(const Type& data) const{return data.first;}};HashTable_base<Type, Key, GetMapKey, HashFunc, EqualTo> _hashTable;public:HashTwo() = default;template<class InputIterator>HashTwo(InputIterator begin, InputIterator end):_hashTable(begin, end){;}HashTwo(std::initializer_list<Type> list):_hashTable(list){;}public:bool insert(const Type& data){return _hashTable.insert(data);}bool erase(const Key& key){return _hashTable.erase(key);}const_pNode find(const Key& key) const{return _hashTable.find(key);}size_t size() const{return _hashTable.size();}};
}
相关文章:
哈希表介绍、实现与封装
哈希表介绍、实现与封装 一、哈希概念二、哈希表实现直接定址法其他映射方法介绍1. 哈希冲突2. 负载因子3. 将关键字转为整数4. 设计哈希函数除法散列法 / 除留余数法乘法散列法全域散列法其他方法 将关键字转为整数处理哈希冲突开放定址法线性探测二次探测双重散列 开放定址法…...

使用vm配置网络
查看本地ip 配置vm网络 配置固定ip vi /etc/sysconfig/network-script/ifcfg-ens33参考 vm使用nat模式,导致vm中docker部署的服务,无法通过局域网中其他机器连接 https://www.cnblogs.com/junwind/p/14345385.html 三张图看懂vm中,三种网…...

OpenStack介绍
OpenStack概述 OpenStack是一个开源的云计算管理平台软件,主要用于构建和管理云计算环境。它允许企业或组织通过数据中心的物理服务器创建和管理虚拟机、存储资源和网络等云计算服务。其核心组件包括计算(Nova)、网络(Neutron)、存储(Cinder、Swift)等。这些组件相互协作…...

力扣93题:复原 IP 地址
力扣93题:复原 IP 地址(C语言实现详解) 题目描述 给定一个只包含数字的字符串 s,复原它并返回所有可能的 IP 地址格式。 有效的 IP 地址需满足以下条件: IP 地址由四个整数(每个整数位于 0 到 255 之间…...

mock.js介绍
mock.js http://mockjs.com/ 1、mock的介绍 *** 生成随机数据,拦截 Ajax 请求。** 通过随机数据,模拟各种场景;不需要修改既有代码,就可以拦截 Ajax 请求,返回模拟的响应数据;支持生成随机的文本、数字…...

React开发 - 技术细节汇总一
React简介 React 是一个声明式,高效且灵活的用于构建用户界面的 JavaScript 库。使用 React 可以将一些简短、独立的代码片段组合成复杂的 UI 界面,这些代码片段被称作“组件”。 ui render (data) -> 单向数据流 MVC // model var myapp {}; // …...
【论文复现】分割万物-SAM
📝个人主页🌹:Eternity._ 🌹🌹期待您的关注 🌹🌹 ❀ 分割万物-SAM 介绍原理分割任务任务预训练zero-shot transfer相关任务 模型Image EncoderPrompt EncoderMask Eecoder消除歧义高效Loss 和训…...

实现RAGFlow-0.14.1的输入框多行输入和消息框的多行显示
一、Chat页面输入框的修改 1. macOS配置 我使用MacBook Pro,chip 是 Apple M3 Pro,Memory是18GB,macOS是 Sonoma 14.6.1。 2. 修改chat输入框代码 目前RAGFlow前端的chat功能,输入的内容是单行的,不能主动使用Shift…...

Pointnet++改进71:添加LFE模块|高效长距离注意力网络
简介:1.该教程提供大量的首发改进的方式,降低上手难度,多种结构改进,助力寻找创新点!2.本篇文章对Pointnet++特征提取模块进行改进,加入LFE模块,提升性能。3.专栏持续更新,紧随最新的研究内容。 目录 1.理论介绍 2.修改步骤 2.1 步骤一 2.2 步骤二 2.3 步骤三 1.理…...

C++STL容器vector容器大小相关函数
目录 前言 主要参考 vector::size vector::max_size vector::resize vector::capacity vector::empty vector::reserve vector::shrink_to_fit 共勉 前言 本文将讨论STL容器vector中与迭代器相关的函数,模板参数T为int类型。 主要参考 cpluscplus.com 侯…...

阿里云CPU超载解决记录
现象:阿里云CPU使用率超90%连续5分钟告警,项目日志error.log中存在heap/gc/limit等内存耗尽等信息,阿里云慢查询日志每日有查询时间很长的参数一直不变的慢sql,linux服务器使用top命令并按c可以看到cpu过大是哪个命令行造成的 分…...

【工具变量】上市公司企业商业信用融资数据(2003-2022年)
一、测算方式:参考《会计研究》张新民老师的做法 净商业信用NTC(应付账款应付票据预收账款)-(应收账款应收票据预付账款),用总资产标准化; 应付账款AP应付账款应付票据预收账款,用总资产标准化 一年以上应付账款比例LAP是企业一年以上(包括一…...

2024数字科技生态大会 | 紫光展锐携手中国电信助力数字科技高质量发展
2024年12月3日至5日,中国电信2024数字科技生态大会在广州举行,通过主题峰会、多场分论坛、重要签约及合作发布等环节,与合作伙伴共绘数字科技发展新愿景。紫光展锐作为中国电信的战略合作伙伴受邀参会,全面呈现了技术、产品创新进…...
概括)
ES语法(一)概括
一、语法 1、请求方式 Elasticsearch(ES)使用基于 JSON 的查询 DSL(领域特定语言)来与数据交互。 一个 ElasticSearch 请求和任何 HTTP 请求一样由若干相同的部件组成: curl -X<VERB> <PROTOCOL>://&l…...

(vue)el-cascader多选级联选择器,值取最后一级的数据
(vue)el-cascader多选级联选择器,取值取最后一级的数据 获取到:[“养殖区”,“鸡棚”,“E5001”] 期望:[“E5001”] 问题: 解决方法 增加change事件方法,处理选中的value值 1.单选 <el-cascaderv-model"tags2":o…...

友思特方案 | 精密制程的光影贴合:半导体制造中的高功率紫外光源
导读 为新能源锂电行业赋能第四站:半导体制造中的高功率紫外光源!稳定输出、灵活控制的曝光设备是新能源/半导体行业高端生产中减少误差、提高效率的核心技术,友思特 ALE 系列 UV LED 紫外光源集合6大优势,为精密制造的健康发展提…...

README写作技巧
做一个项目,首先第一眼看上去要美观,这样才有看下去的动力。做项目亦是如此,如果每一步应付做的话,我想动力也不会太大,最终很大概率会放弃或者进度缓慢。 1.README组成 README是对项目的一个说明,它对观看…...

【密码学】分组密码的工作模式
1.电码本模式(ECB) 优点: 每个数据块独立加密,可并行加密,实现简单。 缺点: 相同明文会产生相同密文,不具备数据完整保护性。 适用于短消息的加密传输 (如一个加密密钥)。 工作流程:用相同的密钥分别对…...

SQL 和 NoSQL 有什么区别?
SQL(Structured Query Language,结构化查询语言)和NoSQL数据库是两种不同类型的数据库管理系统,它们在多个方面存在显著的区别。以下是对SQL和NoSQL主要区别的详细分析: 一、数据存储与模型 SQL数据库 使用关系模型来…...

提升网站流量的关键:AI在SEO关键词优化中的应用
内容概要 在当今数字时代,提升网站流量已成为每个网站管理员的首要任务。而人工智能的技术进步,为搜索引擎优化(SEO)提供了强有力的支持,尤其是在关键词优化方面。关键词是连接用户需求与网站内容的桥梁,其…...

基于ESP32-S2与电子墨水屏的低功耗物联网设备开发实践
1. 项目概述:打造一个会“思考”的本地果蔬日历每次去超市,看着货架上那些跨越了半个地球、反季节出现的果蔬,心里总会有点矛盾。一方面,现代物流的便利性让人惊叹,冬天也能吃到夏天的水果;另一方面&#x…...

汇顶科技入围GSA奖项:中国芯片设计公司的战略聚焦与成长路径分析
1. 项目概述:一次里程碑式的行业认可最近在半导体圈子里,一个消息引起了不小的波澜:汇顶科技成功入围了全球半导体联盟(GSA)2019年度的两大奖项提名。对于不熟悉这个领域的朋友来说,这或许只是一个普通的公…...

浏览器智能体开发指南:从语义驱动到LLM集成的自动化实践
1. 项目概述:一个能“看”会“想”的浏览器智能体最近在折腾自动化工具和智能体(Agent)的时候,发现了一个挺有意思的项目:smouj/agent-browser。光看这个名字,你可能会觉得它只是一个普通的浏览器自动化库&…...

在VSCode中重塑R语言开发体验:vscode-R插件深度解析
在VSCode中重塑R语言开发体验:vscode-R插件深度解析 【免费下载链接】vscode-R R Extension for Visual Studio Code 项目地址: https://gitcode.com/gh_mirrors/vs/vscode-R 你是否曾为R语言开发环境的局限性感到困扰?传统IDE虽然功能齐全&#…...

新手开发者首次使用 Taotoken 从注册到完成第一个 API 调用的全过程体验
🚀 告别海外账号与网络限制!稳定直连全球优质大模型,限时半价接入中。 👉 点击领取海量免费额度 新手开发者首次使用 Taotoken 从注册到完成第一个 API 调用的全过程体验 作为一名刚开始接触大模型应用开发的程序员,我…...

Golang怎么实现HTTP请求取消_Golang如何用context取消正在进行的HTTP请求【实战】
HTTP客户端默认不取消请求是设计选择,需显式通过context.Context传递取消信号;必须用NewRequestWithContext、禁用Client.Timeout、确保Transport组件响应同一ctx。为什么 http.Client 默认不取消请求?Go 的 http.Client 本身不自动响应外部中…...

终极AI分层工具:3分钟让单张图片变专业PSD文件
终极AI分层工具:3分钟让单张图片变专业PSD文件 【免费下载链接】layerdivider A tool to divide a single illustration into a layered structure. 项目地址: https://gitcode.com/gh_mirrors/la/layerdivider 还在为复杂的插画分层工作头疼吗?L…...

开源监控面板OpenClaw:从架构设计到生产部署实战指南
1. 项目概述:一个开源监控面板的诞生 在运维和开发的世界里,监控面板就像是驾驶舱里的仪表盘。没有它,你就是在盲飞。今天要聊的这个项目 xingrz/openclaw-dashboard ,就是一个由社区驱动的开源监控面板解决方案。它的名字很有意…...

UABEA:终极跨平台Unity资源编辑器,免费解锁游戏资源分析新境界
UABEA:终极跨平台Unity资源编辑器,免费解锁游戏资源分析新境界 【免费下载链接】UABEA c# uabe for newer versions of unity 项目地址: https://gitcode.com/gh_mirrors/ua/UABEA UABEA(Unity Asset Bundle Extractor Avalonia&#…...

如何3步获取百度网盘真实下载地址实现满速下载
如何3步获取百度网盘真实下载地址实现满速下载 【免费下载链接】baidu-wangpan-parse 获取百度网盘分享文件的下载地址 项目地址: https://gitcode.com/gh_mirrors/ba/baidu-wangpan-parse 你是否曾被百度网盘的非会员下载速度困扰?当下载重要的工作文件、学…...