PyTorch 的 torch.unbind 函数详解与进阶应用:中英双语
中文版
PyTorch 的 torch.unbind 函数详解与进阶应用
在深度学习中,张量的维度操作是基础又重要的内容。PyTorch 提供了许多方便的工具来完成这些操作,其中之一便是 torch.unbind。与常见的堆叠函数(如 torch.stack)相辅相成,torch.unbind 是分解张量的重要函数。本文将从基础到进阶,详细介绍 torch.unbind 的功能及其与 torch.stack 的组合应用。
什么是 torch.unbind?
torch.unbind 的作用是移除指定维度,并返回一个元组,其中包含移除该维度后的张量序列。换句话说,它将张量沿指定的维度“拆开”。
函数定义
torch.unbind(input, dim=0) → Tuple[Tensor]
参数说明:
input: 要分解的输入张量。dim: 指定需要移除的维度,默认是0(第一个维度)。
返回值:
返回一个元组,每个元素是一个张量,大小为原张量去掉 dim 维度后的形状。
基本用法
示例 1:沿第 0 维度分解
import torch# 创建一个 3x3 的张量
x = torch.tensor([[1, 2, 3],[4, 5, 6],[7, 8, 9]])# 沿第 0 维度(行)分解
result = torch.unbind(x, dim=0)
print(result)  # 输出结果
输出:
(tensor([1, 2, 3]), tensor([4, 5, 6]), tensor([7, 8, 9]))
分解后得到的结果是一个包含 3 个张量的元组,每个张量是原张量的一行。
示例 2:沿第 1 维度分解
# 沿第 1 维度(列)分解
result = torch.unbind(x, dim=1)
print(result)
输出:
(tensor([1, 4, 7]), tensor([2, 5, 8]), tensor([3, 6, 9]))
此时每个张量是原张量的一列。
torch.unbind 的常见应用场景
- 将高维数据拆分为低维数据:例如,将一个批量数据(Batch)按样本分解,或将序列数据按时间步长分解。
- 与循环配合:分解后可以逐个张量操作,例如在处理时间序列、图像分块时非常有用。
- 与
torch.stack联合使用:可以将分解和重新组合操作结合起来,完成张量维度的灵活操作。
进阶:结合 torch.stack 使用
关于stack函数的具体用法,可参考笔者的另一篇博客:深入理解 PyTorch 中的torch.stack函数:中英双语
示例 3:分解后重新堆叠
我们可以使用 torch.unbind 将张量分解成多个子张量,然后通过 torch.stack 将这些子张量重新堆叠成新的张量。
# 创建一个 3x3 的张量
x = torch.tensor([[1, 2, 3],[4, 5, 6],[7, 8, 9]])# 第一步:沿第 0 维分解
unbind_result = torch.unbind(x, dim=0)
print("分解结果:", unbind_result)# 第二步:沿新的维度重新堆叠
stack_result = torch.stack(unbind_result, dim=1)
print("重新堆叠结果:", stack_result)
输出:
分解结果:
(tensor([1, 2, 3]), tensor([4, 5, 6]), tensor([7, 8, 9]))重新堆叠结果:
tensor([[1, 4, 7],[2, 5, 8],[3, 6, 9]])
在这里:
- 第一步使用
torch.unbind沿第 0 维分解,将张量拆分为 3 个张量(每个张量对应原来的行)。 - 第二步使用
torch.stack沿第 1 维重新堆叠,生成了一个新张量,其中每个原张量成为了列。
示例 4:动态调整维度顺序
通过结合 torch.unbind 和 torch.stack,我们可以动态调整张量的维度顺序。
# 创建一个 3x2x2 的三维张量
x = torch.tensor([[[1, 2], [3, 4]],[[5, 6], [7, 8]],[[9, 10], [11, 12]]])# 第一步:沿第 0 维分解为 3 个 2x2 张量
unbind_result = torch.unbind(x, dim=0)# 第二步:沿第 2 维重新堆叠
stack_result = torch.stack(unbind_result, dim=2)
print("最终结果:", stack_result)
输出:
最终结果:
tensor([[[ 1,  5,  9],[ 3,  7, 11]],[[ 2,  6, 10],[ 4,  8, 12]]])
这里,我们通过两步实现了维度的重新排列:
- 使用
torch.unbind沿第 0 维分解。 - 使用
torch.stack沿第 2 维重新组合,从而完成了维度转换。
每一步变化解析
参考笔者的另一篇博客:PyTorch如何通过 torch.unbind 和torch.stack动态调整张量的维度顺序
以示例 4 为例,张量的形状在每一步的变化如下:
- 原始张量形状为
[3, 2, 2]。 - 分解后,得到 3 个形状为
[2, 2]的张量。 - 堆叠时,将这些张量沿新的维度
dim=2组合,最终形状变为[2, 2, 3]。
通过这种分解和堆叠方式,我们可以灵活地操作张量的维度和数据布局。
torch.unbind 的使用注意事项
-
分解后返回的是元组:
- 返回值是一个不可变的元组,而不是列表。如果需要动态修改,可以将其转换为列表。
result = list(torch.unbind(x, dim=0)) -
维度必须存在:
- 如果指定的
dim超出了张量的维度范围,PyTorch 会报错。
- 如果指定的
-
结合其他函数使用:
- 与
torch.stack、torch.cat、torch.split等函数搭配,可以完成更加灵活的张量操作。
- 与
总结
torch.unbind 是一个高效的张量分解工具,在处理高维数据、调整维度顺序时非常有用。结合 torch.stack,它可以实现从拆分到重组的完整操作链。掌握这些函数的灵活用法,可以大大提升张量操作的效率和代码的可读性。
英文版
A Detailed Guide to PyTorch torch.unbind with Advanced Applications Using torch.stack
In deep learning, manipulating tensor dimensions is both fundamental and essential. PyTorch provides powerful tools for this purpose, and one such tool is torch.unbind. It is particularly useful for breaking down tensors into smaller components, often complementing torch.stack in advanced scenarios. This blog post provides a detailed introduction to torch.unbind, its basic functionality, and how to combine it with torch.stack for advanced applications.
What is torch.unbind?
The torch.unbind function removes a specified dimension from a tensor and returns a tuple containing slices of the tensor along that dimension. Simply put, it splits a tensor along a specific axis.
Function Definition
torch.unbind(input, dim=0) → Tuple[Tensor]
Parameters:
input: The tensor to be split.dim: The dimension to be removed (default:0).
Return Value:
A tuple of tensors, where each tensor is a slice of the input tensor along the specified dimension.
Basic Usage
Example 1: Splitting Along Dimension 0
import torch# Create a 3x3 tensor
x = torch.tensor([[1, 2, 3],[4, 5, 6],[7, 8, 9]])# Split along dimension 0 (rows)
result = torch.unbind(x, dim=0)
print(result)
Output:
(tensor([1, 2, 3]), tensor([4, 5, 6]), tensor([7, 8, 9]))
Here, the tensor is split into three tensors, each corresponding to a row of the original tensor.
Example 2: Splitting Along Dimension 1
# Split along dimension 1 (columns)
result = torch.unbind(x, dim=1)
print(result)
Output:
(tensor([1, 4, 7]), tensor([2, 5, 8]), tensor([3, 6, 9]))
This time, the tensor is split into three tensors, each corresponding to a column.
Common Applications of torch.unbind
- Breaking Down Batch Data: For processing samples in a batch individually.
- Handling Sequential Data: For splitting time steps in sequence data.
- Dynamic Tensor Operations: Combining
torch.unbindwith other functions liketorch.stackfor flexible tensor manipulation.
Advanced Usage: Combining torch.unbind with torch.stack
The torch.unbind function pairs perfectly with torch.stack to achieve advanced tensor operations. Let’s explore this combination.
Example 3: Split and Restack
In this example, we will split a tensor into slices and then restack it along a new dimension.
# Create a 3x3 tensor
x = torch.tensor([[1, 2, 3],[4, 5, 6],[7, 8, 9]])# Step 1: Unbind along dimension 0
unbind_result = torch.unbind(x, dim=0)
print("Unbind result:", unbind_result)# Step 2: Restack along dimension 1
stack_result = torch.stack(unbind_result, dim=1)
print("Stack result:", stack_result)
Output:
Unbind result:
(tensor([1, 2, 3]), tensor([4, 5, 6]), tensor([7, 8, 9]))Stack result:
tensor([[1, 4, 7],[2, 5, 8],[3, 6, 9]])
Process:
- The tensor is split into rows using
torch.unbind(along dimension 0). - These rows are then stacked into columns using
torch.stack(along dimension 1).
Example 4: Reordering Dimensions
Using torch.unbind and torch.stack, you can dynamically reorder tensor dimensions.
# Create a 3x2x2 tensor
x = torch.tensor([[[1, 2], [3, 4]],[[5, 6], [7, 8]],[[9, 10], [11, 12]]])# Step 1: Unbind along dimension 0
unbind_result = torch.unbind(x, dim=0)# Step 2: Stack along dimension 2
stack_result = torch.stack(unbind_result, dim=2)
print("Final result:", stack_result)
Output:
Final result:
tensor([[[ 1,  5,  9],[ 3,  7, 11]],[[ 2,  6, 10],[ 4,  8, 12]]])
Explanation:
torch.unbindsplits the tensor along the first dimension (size 3), resulting in three 2×2 tensors.torch.stackthen combines these tensors along a new dimension (dim=2), effectively reordering the dimensions.
Step-by-Step Shape Transformation
Using Example 4, let’s track the shape transformations:
- Input Shape:
[3, 2, 2]. - After
torch.unbind(dim=0): A tuple of 3 tensors, each of shape[2, 2]. - After
torch.stack(dim=2): A new tensor of shape[2, 2, 3].
Key Considerations
-
Output is a Tuple:
- The result of
torch.unbindis a tuple, which is immutable. To modify the result, you can convert it to a list:
result = list(torch.unbind(x, dim=0)) - The result of
-
Dimension Must Exist:
- The specified
dimmust be within the tensor’s dimensions; otherwise, an error will occur.
- The specified
-
Paired with Other Functions:
torch.unbindworks well with functions liketorch.stack,torch.cat, andtorch.splitfor advanced manipulation.
Conclusion
torch.unbind is a powerful tool for splitting tensors into smaller components, and its ability to work seamlessly with other PyTorch functions like torch.stack makes it indispensable for flexible tensor manipulation. Whether you’re working on sequence data, batch processing, or dynamic dimension reordering, mastering torch.unbind will significantly enhance your PyTorch skills.
Try out these examples in your projects to fully understand the potential of torch.unbind!
后记
2024年12月12日22点20分于上海,在GPT4o大模型辅助下完成。
相关文章:

PyTorch 的 torch.unbind 函数详解与进阶应用:中英双语
中文版 PyTorch 的 torch.unbind 函数详解与进阶应用 在深度学习中,张量的维度操作是基础又重要的内容。PyTorch 提供了许多方便的工具来完成这些操作,其中之一便是 torch.unbind。与常见的堆叠函数(如 torch.stack)相辅相成&am…...

四十六:如何使用Wireshark解密TLS/SSL报文?
TLS/SSL是保护网络通信的重要协议,其加密机制可以有效地防止敏感信息被窃取。然而,在调试网络应用或分析安全问题时,解密TLS/SSL流量是不可避免的需求。本文将介绍如何使用Wireshark解密TLS/SSL报文。 前提条件 在解密TLS/SSL报文之前&…...
【人工智能】OpenAI O1模型:超越GPT-4的长上下文RAG性能详解与优化指南
在人工智能(AI)领域,长上下文生成与检索(RAG) 已成为提升自然语言处理(NLP)模型性能的关键技术之一。随着数据规模与应用场景的不断扩展,如何高效地处理海量上下文信息,成…...
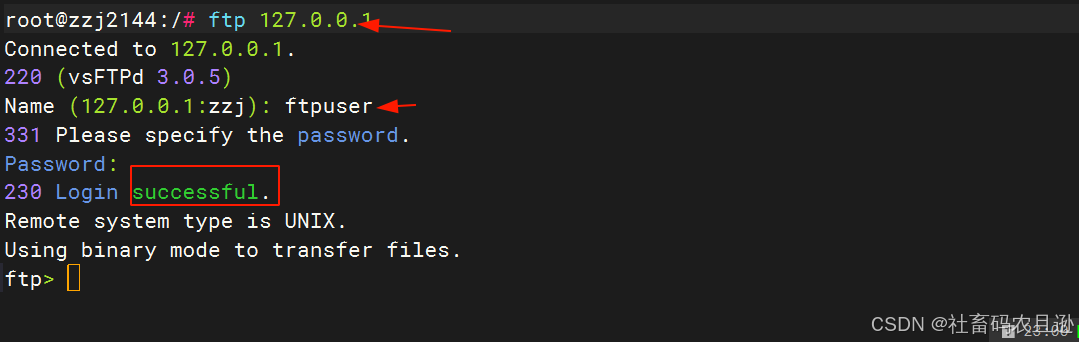
Ubuntu22.04搭建FTP服务器保姆级教程
在网络环境中,文件传输是一项至关重要的任务。FTP(文件传输协议)是一种基于客户端/服务器模式的协议,广泛用于在互联网上传输文件。Ubuntu作为一款流行的Linux发行版,因其稳定性和易用性而广受开发者和系统管理员的喜爱…...

操作系统(4)操作系统的结构
一、无序结构(整体结构或模块组合结构) 1.特点: 以大型表格和队列为中心,操作系统的各部分程序围绕着这些表格进行。操作系统由许多标准的、可兼容的基本单位(称为模块)构成,模块之间通过规定的…...
)
Python数据分析(OpenCV视频处理)
处理视频我们引入的还是numpy 和 OpenCV 的包 引入方式如下: import numpy as np import cv2 我们使用OpenCV来加载本地视频,参数就是你视频的路径就可以 #加载视频 cap cv2.VideoCapture(./1.mp4) 下面我们进行读取视频 #读取视频 flag,frame cap.re…...

跨域 Cookie 共享
跨域请求经常遇到需要携带 cookie 的场景,为了确保跨域请求能够携带用户的认证信息或其他状态,浏览器提供了 withCredentials 这个属性。 如何在 Axios 中使用 withCredentials 为了在跨域请求中携带 cookie,需要在 Axios 配置中设置 withCr…...
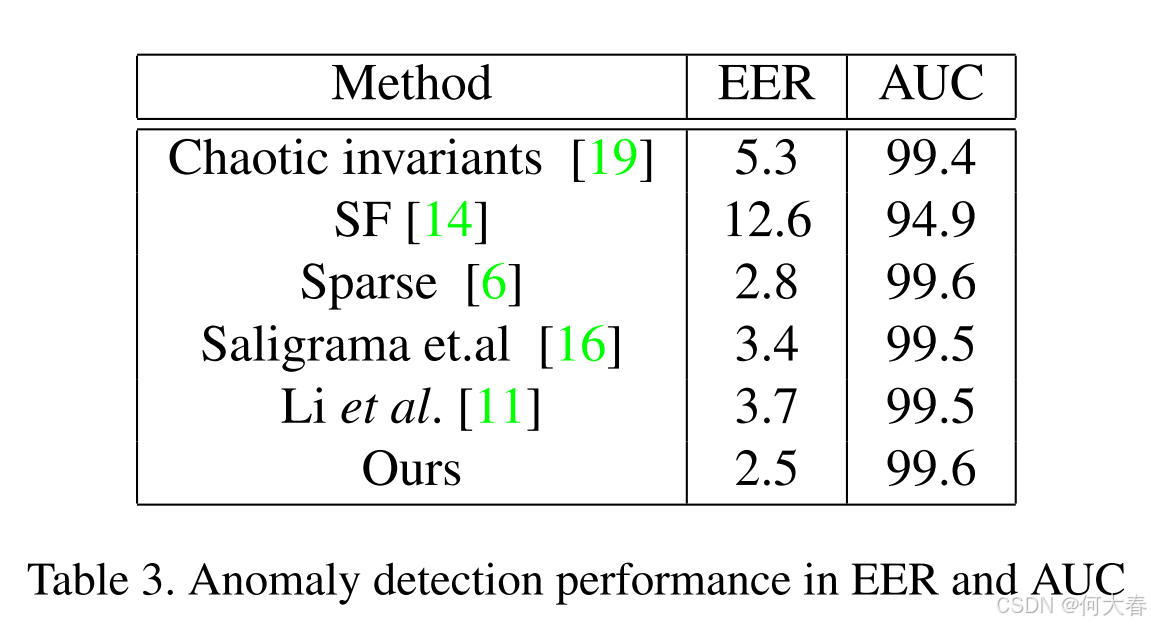
【视频异常检测】Real-Time Anomaly Detection and Localization in Crowded Scenes 论文阅读
文章信息: 发表于:CVPR2015(workshop) 原文链接:https://www.cv-foundation.org/openaccess/content_cvpr_workshops_2015/W04/papers/Sabokrou_Real-Time_Anomaly_Detection_2015_CVPR_paper.pdf Real-Time Anomaly D…...

设计模式12:抽象工厂模式
系列总链接:《大话设计模式》学习记录_net 大话设计-CSDN博客 参考: C设计模式:抽象工厂模式(风格切换案例)_c 抽象工厂-CSDN博客 1.概念 抽象工厂模式(Abstract Factory Pattern)是软件设计…...

论文学习——多种变化环境下基于多种群进化的动态约束多目标优化
论文题目:Multipopulation Evolution-Based Dynamic Constrained Multiobjective Optimization Under Diverse Changing Environments 多种变化环境下基于多种群进化的动态约束多目标优化(Qingda Chen , Member, IEEE, Jinliang Ding , Senior Member, …...
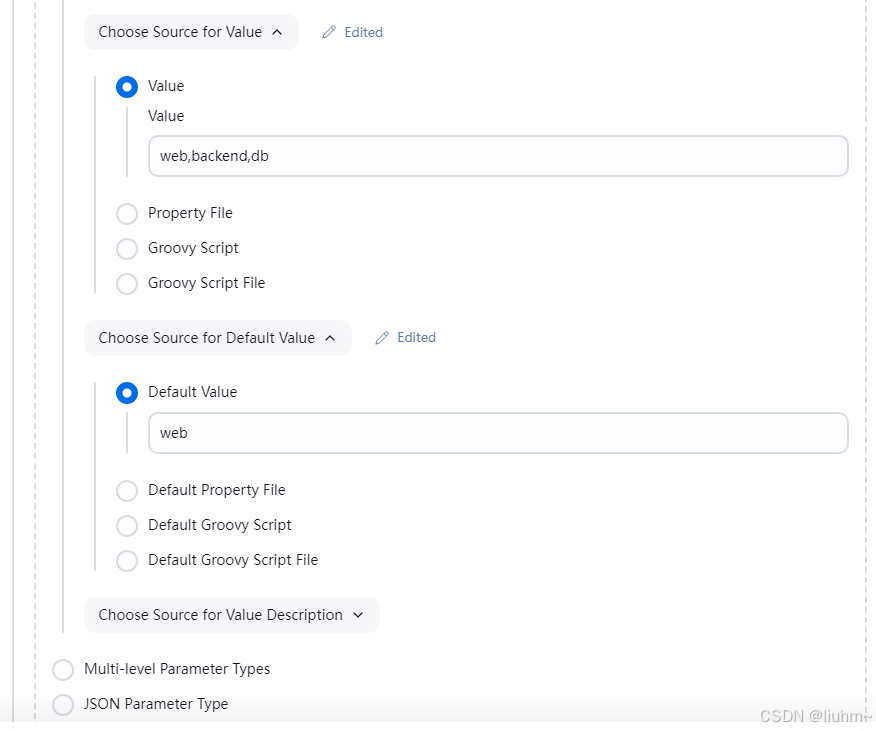
Jenkins参数化构建详解(This project is parameterized)
本文详细介绍了Jenkins中不同类型的参数化构建方法,包括字符串、选项、多行文本、布尔值和git分支参数的配置,以及如何使用ActiveChoiceParameter实现动态获取参数选项。通过示例展示了传统方法和声明式pipeline的语法 文章目录 1. Jenkins的参数化构建1…...
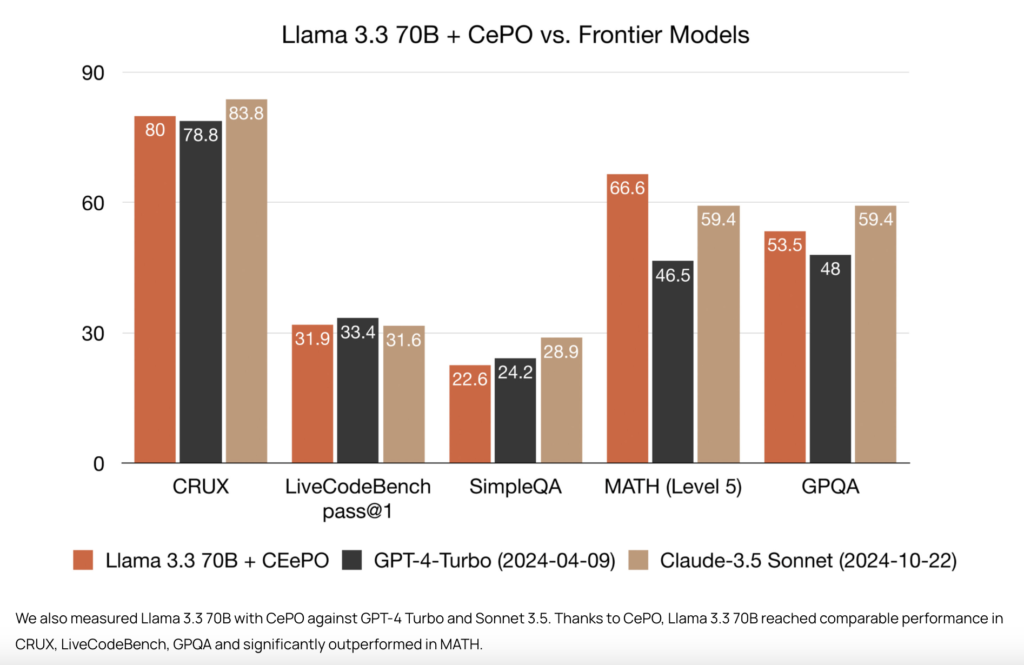
Cerebras 推出 CePO,填补推理与规划能力的关键空白
每周跟踪AI热点新闻动向和震撼发展 想要探索生成式人工智能的前沿进展吗?订阅我们的简报,深入解析最新的技术突破、实际应用案例和未来的趋势。与全球数同行一同,从行业内部的深度分析和实用指南中受益。不要错过这个机会,成为AI领…...

广东省食品销售中高级题库及答案
1.有关食品安全标准的说法正确的是(C)。 A.鼓励性标准 B.推荐性标准 C.强制性标准 D.引导性标准 2.食品经营许可证载明的许可事项发生变化的,食品经营者应当在变化后(D)个工作日内向原发证的食品药品监督管理部门申请变更经营许可。 A.3 B.5 C.7 D.10 3.食品销售经营者对食品…...
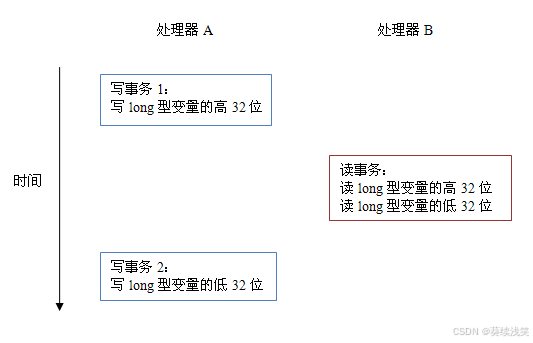
JAVA基础-深入理解Java内存模型(一)-- 重排序与先行发生原则(happens-before)
深入理解Java内存模型(一)-- 重排序 很棒的一个关于Java内存模型系列文章,首先感谢作者,转载自深入理解java内存模型系列文章 ,为了方便阅读,做了一些内容整合和重排版。 提纲 Java线程之间的通信对程序…...

【Lambda】java之lambda表达式stream流式编程操作集合
java之lambda表达式&stream流式编程操作集合 1 stream流概念1.1 中间操作1.1.1 无状态操作1.1.2 有状态操作 1.2 终端操作1.2.1 非短路操作1.2.2 短路操作 2 steam流的生成2.1 方式一:数组转为stream流2.2 方式二:集合转为steam流2.3 方式三…...
家具购物小程序+php
基于微信小程序的家具购物小程序的设计与实现 摘要 随着信息技术在管理上越来越深入而广泛的应用,管理信息系统的实施在技术上已逐步成熟。本文介绍了基于微信小程序的家具购物小程序的设计与实现的开发全过程。通过分析基于微信小程序的家具购物小程序的设计与实…...
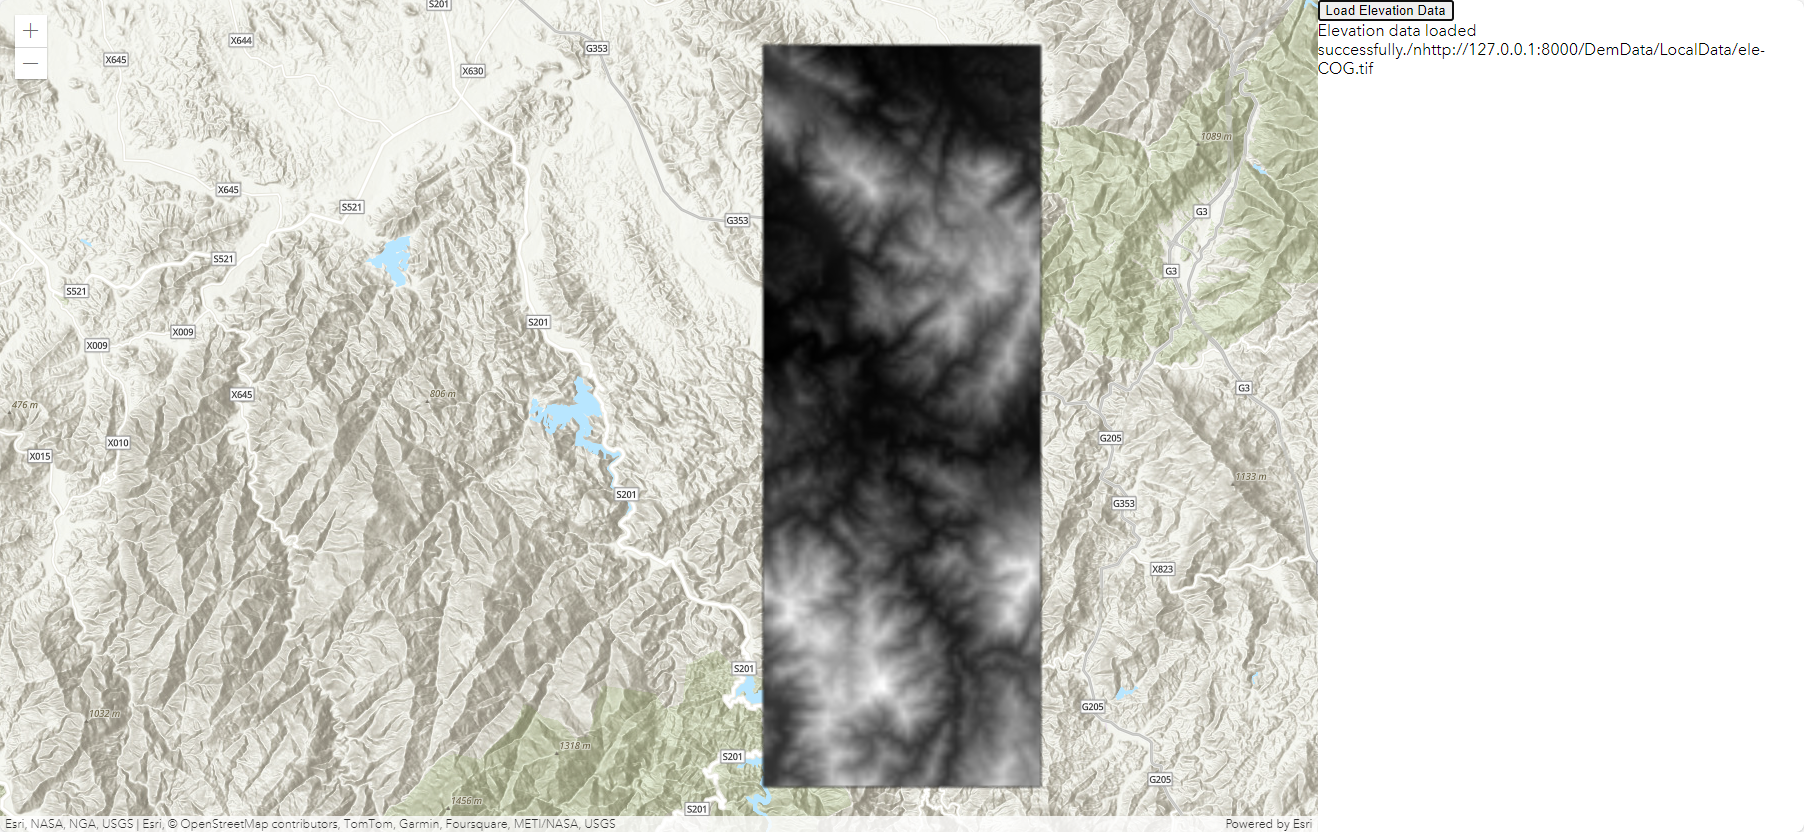
【GIS教程】使用GDAL-Python将tif转为COG并在ArcGIS Js前端加载-附完整代码
目录 一、数据格式 二、COG特点 三、使用GDAL生成COG格式的数据 四、使用ArcGIS Maps SDK for JavaScript加载COG格式数据 一、数据格式 COG(Cloud optimized GeoTIFF)是一种GeoTiff格式的数据。托管在 HTTP 文件服务器上,可以代替geose…...
与cad交互)
VB.net进行CAD二次开发(二)与cad交互
开发过程遇到了一个问题:自制窗口与控件与CAD的交互。 启动类,调用非模式窗口 Imports Autodesk.AutoCAD.Runtime Public Class Class1 //CAD启动界面 <CommandMethod("US")> Public Sub UiStart() Dim myfrom As Form1 New…...

【NLP 11、Adam优化器】
祝你先于春天, 翻过此间铮铮山峦 —— 24.12.8 一、Adam优化器的基本概念 定义 Adam(Adaptive Moment Estimation)是一种基于梯度的优化算法,用于更新神经网络等机器学习模型中的参数。它结合了动量法(Momentum&…...
51单片机应用开发(进阶)---串口接收字符命令
实现目标 1、巩固UART知识; 2、掌握串口接收字符数据; 3、具体实现目标:(1)上位机串口助手发送多字符命令,单片机接收命令作相应的处理(如:openled1 即打开LED1;closeled1 即关…...

AI智能体商业化实战:x402支付技能包集成指南
1. 项目概述:为AI智能体插上商业化的翅膀最近在折腾AI智能体(Agent)的落地应用,发现了一个挺有意思的痛点:怎么让这些能写代码、能处理任务的AI,真正地“赚到钱”?或者说,我们开发者…...

nlpcda高级配置:如何自定义词典和扩展同义词表
nlpcda高级配置:如何自定义词典和扩展同义词表 【免费下载链接】nlpcda 一键中文数据增强包 ; NLP数据增强、bert数据增强、EDA:pip install nlpcda 项目地址: https://gitcode.com/gh_mirrors/nl/nlpcda nlpcda是一款强大的中文数据增…...

Java集成ChatGPT实战:PlexPt SDK核心功能与生产部署指南
1. 项目概述与核心价值如果你是一名Java开发者,最近正琢磨着怎么在自己的应用里集成ChatGPT的能力,比如做个智能客服、代码助手或者内容生成工具,那你大概率已经搜过一圈了。官方的OpenAI API虽然强大,但直接用在Java项目里&#…...
1. 开源套刻精度核心原理)
0401开源光刻机整机控制与量检测系统(A级 中期集中攻坚)1. 开源套刻精度核心原理
开源光刻机整机控制与量检测系统(A级 中期集中攻坚) 1. 开源套刻精度核心原理(全参数开源硬核工程溯源喂饭级量化) 前置硬核声明 本文100%开源所有套刻精度核心参数、误差公式、耦合模型、制程阈值、国产实测短板数据,…...

从零到跑通:Windows下OTB100数据集与Matlab评测环境保姆级避坑指南
从零到跑通:Windows下OTB100数据集与Matlab评测环境保姆级避坑指南 刚接触目标跟踪领域的研究者,往往需要从经典数据集评测开始。OTB(Object Tracking Benchmark)作为目标跟踪领域的基石数据集,包含100个具有挑战性的视…...
)
保姆级教程:在Win10上用VS2022搞定TensorRT 8.5.2.2(含zlibwapi.dll缺失等常见坑点)
从零到一:Windows 10 VS2022 深度集成 TensorRT 8.5 全流程实战 TensorRT 作为 NVIDIA 推出的高性能深度学习推理引擎,能够显著提升模型在 NVIDIA GPU 上的执行效率。但对于 Windows 平台的新手开发者来说,从环境配置到第一个示例程序成功运…...


3步快速上手:Windows电脑直接安装安卓应用的终极指南
3步快速上手:Windows电脑直接安装安卓应用的终极指南 【免费下载链接】APK-Installer An Android Application Installer for Windows 项目地址: https://gitcode.com/GitHub_Trending/ap/APK-Installer 你是否渴望在Windows电脑上直接运行安卓应用ÿ…...

芯片行业变革:开源硬件、可重构芯片与商业模式创新
1. 行业拐点:传统芯片商业模式为何难以为继?干了十几年芯片设计,从流片工程师到项目负责人,我亲眼见证了行业从“黄金时代”到如今“卷成本、卷工艺”的艰难转型。最近和几个老同事聊天,大家不约而同地提到一个词&…...

保姆级教程:手把手教你用Wireshark诊断Ubuntu apt update的‘NOSPLIT’网络认证问题
深度解析Ubuntu apt update的NOSPLIT错误:从网络抓包到安全协议的全链路诊断 当你在Ubuntu终端中满怀期待地输入apt update,却看到一串刺眼的"NOSPLIT"错误时,那种挫败感每个Linux用户都深有体会。这个看似简单的网络错误背后&…...