Spring Boot(快速上手)
Spring Boot
零、环境配置
1. 创建项目


2. 热部署
添加依赖:
<dependency><groupId>org.springframework.boot</groupId><artifactId>spring-boot-devtools</artifactId><optional>true</optional>
</dependency>
配置application.properties文件:
# 热部署生效
spring.devtools.restart.enabled=true
# 设置重启目录
spring.devtools.restart.additional-paths=src/main/java
# 设置classpath目录下的 WEB-INF 文件夹内容修改为不重启
spring.devtools.restart.exclude=static/**
打开设置,快捷方式CTRL + ALT + S,进行如下设置:

一、控制器
在Spring Boot中,控制器(Controller)是处理HTTP请求和返回响应的组件。控制器是Spring MVC框架的一部分,用于实现模型-视图-控制器(MVC)设计模式中的控制器层。
SpringBoot提供了两种注解来表示此类负责接受和处理 HTTP 请求:@Controller和@RestController,如果请求的是页面和数据,使用@Controller;如果只是请求数据,则可以使用@RestController。
默认情况下,@RestController注解会将返回的对象数据转换为JSON格式。
@RestController的使用方法
@RestController		// 注解,表示该类是一个RestController控制器
public class HelloController{@RequestMapping("/user")	// 映射路由public User getUser(){User user = new User();user.setUsername("zhangsan");user.setPassword("123");return user;}
}
// 运行代码后,在浏览器中输入"localhost:8080/user"即可查看返回结果。
通常情况下,所写的控制器放在
controller文件夹下。
二、路由
注解 @RequsetMapping主要负责 URL 的路由映射,可以添加在Controller 类或者具体的方法上。如果添加 Controller 类上,则这个 Controller 中的所有路由映射都会加上此映射规则,如果添加在某个方法上,则只会对当前方法生效。
常用属性参数:
- value 或 path:
- 用途:定义请求的URL路径。
- 说明:
value是@RequestMapping的属性,可以指定一个或多个URL路径。path是@RequestMapping的别名,与value功能相同,但只能指定一个路径。
- method:
- 用途:限制请求的HTTP方法(如GET、POST、PUT、DELETE等)。
- 说明:可以指定一个或多个HTTP方法,只有匹配这些方法的请求才会被映射到相应的处理方法。
- params:
- 用途:根据请求参数的存在与否来决定是否映射请求。
- 说明:可以指定一个或多个参数条件,只有当这些参数在请求中出现时,请求才会被映射。
- headers:
- 用途:根据请求头的存在与否来决定是否映射请求。
- 说明:可以指定一个或多个请求头条件,只有当这些请求头在请求中出现时,请求才会被映射。
- consumes:
- 用途:指定可接受的请求体的媒体类型(如
application/json、text/plain等)。 - 说明:只有当请求的
Content-Type与指定的媒体类型匹配时,请求才会被映射。
- 用途:指定可接受的请求体的媒体类型(如
- produces:
- 用途:指定控制器方法可以产生的媒体类型。
- 说明:这通常用于设置响应的
Content-Type,告诉客户端期望接收的媒体类型。
- name:
- 用途:为映射定义一个名称,方便在其他注解中引用。
- 说明:在大型应用中,使用名称可以简化映射的引用,提高代码的可维护性。
参数传递:
@RequestParam:用于将HTTP请求的查询字符串参数或请求体参数绑定到控制器方法的参数上。如果参数名称一致,可以省略。@PathVariable:用于提取URL中的动态路径变量,并将这些变量传递给控制器方法的参数。@RequestBody:用于接收请求体中的参数,通常用于处理JSON、XML等非表单编码的数据。
实例:
import org.springframework.web.bind.annotation.*;
import xxx.start.entity.User;@RestController
public class ParamsController {@RequestMapping(value = "/getTest1", method = RequestMethod.GET)public String getTest1(){return "GET请求";}@RequestMapping(value = "/getTest2", method = RequestMethod.GET)// 默认情况,方法的参数名要与网址传参的名称一致。public String getTest2(String name, String phone){System.out.println("name" + name);System.out.println("phone" + phone);return "GET请求";}@RequestMapping(value = "/getTest3", method = RequestMethod.GET)// 传参的名称不对应,因此需要使用@RequestParam()进行指定,指定value的话,这样的话参数就必须进行传递,如果这个参数可传可不传就需要required参数public String getTest3(@RequestParam(value = "name", required = false) String name){System.out.println("name" + name);return "GET请求";}// POST请求@RequestMapping(value = "/postTest1", method = RequestMethod.POST)public String postTest1(){return "POST请求";}@RequestMapping(value = "/postTest2", method = RequestMethod.POST)public String postTest2(String username, String password){System.out.println("username" + username);System.out.println("password" + password);return "POST请求";}@RequestMapping(value = "/postTest3", method = RequestMethod.POST)public String postTest3(User user){  // 这里直接使用User类进行接受,需要将User中的属性名称与传参名称保持一致!System.out.println(user);return "POST请求";}@RequestMapping(value = "/postTest4", method = RequestMethod.POST)public String postTest4(@RequestBody User user){  // 处理请求体中的参数System.out.println(user);return "POST请求";}@RequestMapping(value = "/test/**")  // 正则表达式,**可以表示多层而*只能表示一层public String test(){return "通配符请求";}
}
GET方法通常情况是地址传参,如:http://localhost:8080/getTest2?name=张三&phone=123456,这样即将数据传递到了路由getTest2的方法中。
三、文件上传
SpringBoot 工程嵌入的 tomcat 限制了请求的文件大小,每个文件的配置最大为1MB,单次请求的文件总数不能大于10MB,如要更改默认配置,需要在 application.properties 文件中添加如下两个配置:
# 上传的单个文件的大小
spring.servlet.multipart.max-file-size=10MB
# 上传的多个文件的大小
spring.servlet.multipart.max-request-size=100MB
实例:
import org.springframework.web.bind.annotation.PostMapping;
import org.springframework.web.bind.annotation.RestController;
import org.springframework.web.multipart.MultipartFile;import javax.servlet.http.HttpServletRequest;
import java.io.File;
import java.io.IOException;@RestController
public class FileUploadController {@PostMapping("/upload")public String up(String name, MultipartFile photo, HttpServletRequest request) throws IOException {System.out.println(name);// 获取图片原始名称System.out.println(photo.getOriginalFilename());// 获取文件类型System.out.println(photo.getContentType());// "user.dir"表当前工作目录的绝对路径System.out.println(System.getProperty("user.dir"));// 获取web服务器对应的路径,这里获取的是/upload文件夹的路径String path = request.getServletContext().getRealPath("/upload/");System.out.println(path);saveFile(photo, path);return "上传成功";}public void saveFile(MultipartFile photo, String path)throws IOException{// 判断存储的目录是否存在File dir = new File(path);if(!dir.exists()){// 如果不存在就创建目录dir.mkdir();}File file = new File(path + photo.getOriginalFilename());photo.transferTo(file);   // 写入到磁盘文件中}
}
四、拦截器(Interceptor)
SpringBoot定义了HardlerInterceptor接口来实现自定义拦截器的功能。HandlerInterceptor接口定义了preHandle、postHandle、afterCompletion三种方法,通过重写这三种方法实现请求前、请求后等操作。
preHandle:在控制器(Controller)方法执行之前被调用。postHandle:它在请求的控制器方法执行之后、渲染视图之前被调用。afterCompletion:请求处理流程的最后阶段被调用。
拦截器的使用分为两个步骤:1. 定义,2. 注册。
拦截器在定义时,将文件放置在
interceptor文件夹中,使用时将文件放在config文件夹中。
定义拦截器:
import org.springframework.web.servlet.HandlerInterceptor;import javax.servlet.http.HttpServletRequest;
import javax.servlet.http.HttpServletResponse;// 注册一个拦截器
public class LoginInterceptor implements HandlerInterceptor {@Overridepublic boolean preHandle(HttpServletRequest request, HttpServletResponse response, Object handler) throws Exception {// 根据条件来判断是否进行拦截。if("条件"){System.out.println("通过");return true;}else{System.out.println("不通过");return false;}}
}
注册:
-
addPathPatterns:定义拦截的地址,添加的一个拦截器没有 addPathPattern 任何一个 URL 则默认拦截所有请求。 -
excludePathPatterns:定义排除某些地址不被拦截,如果没有 excludePathPatterns 任何一个请求,则默认不放过任何一个请求。import org.springframework.context.annotation.Configuration;
import org.springframework.web.servlet.config.annotation.InterceptorRegistry;
import org.springframework.web.servlet.config.annotation.WebMvcConfigurer;
import xxx.start.interceptor.LoginInterceptor;// 配置类,可以供springboot来读,这里是添加一个拦截器
@Configuration
public class WebConfig implements WebMvcConfigurer {
@Override
public void addInterceptors(InterceptorRegistry registry) {
registry.addInterceptor(new LoginInterceptor()).addPathPatterns(“/user/**”);
}
}
五、RESTFUL
RESTFUL 是目前流行的互联网软件服务架构设计风格。要求客户端使用GET、POST、PUT、DELETE四种表示操作方式的动词对服务端资源进行操作:
- GET用于获取资源
- POST用于新建资源(也可以用于更新资源)
- PUT用于更新资源
- DELETE用于删除资源。
RESTFUL 的特点:资源的表现形式是JSON或者HTML,客户端与服务端之间的交互在请求之间是无状态的,从客户端到服务端的每个请求都包含必须的信息。
HTTP 状态码:
- 1xx:信息,通过传输协议级信息。
- 2xx:成功,表示客户端的请求已成功接受。
- 3xx:重定向,表示客户端必须执行一些其他操作才能完成其请求。
- 4xx:客户端错误,此类错误状态码指向客户端。
- 5xx:服务器错误,服务器负责这些错误状态码。
Spring Boot 实现 RESTFul API:
- SpringBoot 提供的 spring-boot-starter-web 组件完全支持开发RESTFUL API,提供了与REST操作方式(GET、POST、PUT、DELETE对应的注解)
注解
功能
@GetMapping
处理 GET 请求,获取资源
@PostMapping
处理 POST 请求,新增资源
@PutMapping
处理 PUT 请求,更新资源
@DeleteMapping
处理 DELETE 请求,删除资源
@PatchMapping
处理 PATCH 请求,用于更新部分资源
实例:
import io.swagger.annotations.ApiOperation;
import org.springframework.web.bind.annotation.*;
import xxx.start.entity.User;@RestController
public class UserController {@ApiOperation("根据ID获取用户信息")  // swagger的注解@GetMapping("/user/{id}")public String getUserById(@PathVariable int id){System.out.println(id);return "根据ID获取用户信息";}@PostMapping("/user")public String save(User user){return "添加用户";}@PutMapping("/user")public String update(User user){return "更新用户";}@DeleteMapping("/user/{id}")public String deleteById(@PathVariable int id){System.out.println(id);return "根据ID删除用户";}
}
六、Swagger
Swagger 是一个开源的 API 设计和文档工具,由 Tony Tam 于 2010 年创建,它可以帮助开发人员更快、更简单地设计、构建、文档化和测试 RESTful API。Swagger 可以自动生成交互式 API 文档、客户端 SDK、服务器 stub 代码等,从而使开发人员更加容易地开发、测试和部署 API 。
Swagger是一个规范和完整的框架,用于生成、描述、调用和可视化RESTFul风格的web服务,是非常流行的API表达工具。Swagger能够自动生成完善的RESTFul API文档,同时并根据后台代码的修改同步更新,同时提供完整的测试页面来调试API
使用方法:
-
在项目中(pom.xml)引入 springfox-swagger2 和 springfox-swagger-ui 依赖即可。
<!-- 添加swagger2相关功能--> <dependency><groupId>io.springfox</groupId><artifactId>springfox-swagger2</artifactId><version>2.9.2</version> </dependency> <!-- 添加swagger-ui相关功能--> <dependency><groupId>io.springfox</groupId><artifactId>springfox-swagger-ui</artifactId><version>2.9.2</version> </dependency> -
配置Swagger,需要在
config目录中编写配置文件:import org.springframework.context.annotation.Bean; import org.springframework.context.annotation.Configuration; import springfox.documentation.builders.ApiInfoBuilder; import springfox.documentation.builders.PathSelectors; import springfox.documentation.builders.RequestHandlerSelectors; import springfox.documentation.service.ApiInfo; import springfox.documentation.spi.DocumentationType; import springfox.documentation.spring.web.plugins.Docket; import springfox.documentation.swagger2.annotations.EnableSwagger2;@Configuration // 告诉Spring容器,这个类是一个配置类 @EnableSwagger2 // 启用Swagger2功能 public class SwaggerConfig {/** 配置Swagger2相关的bean* */@Beanpublic Docket createRestApi(){return new Docket(DocumentationType.SWAGGER_2).apiInfo(apiInfo()).select().apis(RequestHandlerSelectors.basePackage("xxx")).paths(PathSelectors.any()).build();}// 此处主要是API文档页面显示信息private ApiInfo apiInfo(){return new ApiInfoBuilder().title("演示项目API") // 标题.description("演示项目") // 描述.version("1.0") // 版本.build();} }
注意事项:
-
Spring Boot 2.6.x 之后与 Swagger 有版本冲突问题,需要在
application.properties中加入以下配置:# 解决 swagger 版本与 springboot 版本不匹配的问题 spring.mvc.pathmatch.matching-strategy=ant_path_matcher
使用 Swagger2 进行接口测试:
- 启动项目之后,访问
http://127.0.0.1:8080/swagger-ui.html即可打开自动生成的可视化测试页面。
七、MyBatis-Plus
友情链接:MyBatis-Plus 官方学习网址
MyBatis是一款优秀的数据持久ORM框架,被广泛地应用于系统,MyBatis 能够非常灵活地实现动态 SQL,可以使用 XML 或 注解 来配置和映射原生信息,能够轻松地将 JAVA 的 POJO(Plain Ordinary Java Object,普通的Java对象)与数据库中的表和字段进行映射关联。
MyBatis-Plus(简称 MP)是一个 MyBatis 的增强工具,它在 MyBatis 的基础上只做增强不做改变,旨在简化开发和提高效率
使用方法:
-
在
pom.xml中添加依赖:<!-- MyBatisPlus依赖 --> <dependency><groupId>com.baomidou</groupId><artifactId>mybatis-plus-boot-starter</artifactId><version>3.4.2</version> </dependency> <!-- mysql驱动依赖 --> <dependency><groupId>mysql</groupId><artifactId>mysql-connector-java</artifactId><version>5.1.47</version> </dependency> <!-- 数据库链接池用于向数据库申请多个连接,提高数据库的连接效率 --> <dependency><groupId>com.alibaba</groupId><artifactId>druid-spring-boot-starter</artifactId><version>1.1.20</version> </dependency> -
在
application.properties文件中配置数据库相关信息:# 连接数据库 spring.datasource.type=com.alibaba.druid.pool.DruidDataSource spring.datasource.driver-class-name=com.mysql.jdbc.Driver spring.datasource.url=jdbc:mysql://localhost:3306/mydb?useSSL=false spring.datasource.username=root spring.datasource.password=root mybatis-plus.configuration.log-impl=org.apache.ibatis.logging.stdout.StdOutImpl #关闭mybatis-plus的自动驼峰命名法 mybatis-plus.configuration.map-underscore-to-camel-case=false -
添加 @MapperScan 注解,在 StartApplication 文件(项目启动文件)中添加:
package xxx.start;import org.mybatis.spring.annotation.MapperScan; import org.springframework.boot.SpringApplication; import org.springframework.boot.autoconfigure.SpringBootApplication;@SpringBootApplication @MapperScan("xxx/start/mapper") // 使mapper包中的代码生效,mapper存放映射文件。 public class StartApplication {public static void main(String[] args) {SpringApplication.run(StartApplication.class, args);}} -
创建
mapper文件夹,用于存放 mapper 类,在 mapper 文件夹中操作表的文件,文件名通常为:表名 + Mapper:import com.baomidou.mybatisplus.core.mapper.BaseMapper; import org.apache.ibatis.annotations.Insert; import org.apache.ibatis.annotations.Mapper; import org.apache.ibatis.annotations.Select; import xxx.start.entity.UserChart;import java.util.List; //@Repository @Mapper public interface UserMapper extends BaseMapper<UserChart> { // 使用mybatisplus可以根据userchart表自动找到userchart表 } -
使用 UserMapper 类,创建 UserMapperController 类:
import org.springframework.beans.factory.annotation.Autowired; import org.springframework.web.bind.annotation.GetMapping; import org.springframework.web.bind.annotation.PostMapping; import org.springframework.web.bind.annotation.RestController; import xxx.start.entity.UserChart; import xxx.start.mapper.UserMapper;import java.util.List;// 数据库操作 @RestController public class UserMappingController {@Autowired(required = false) // 会将mapper实例化出来的对象注入到userMapper中private UserMapper userMapper;@GetMapping("/usermap")public List query(){// 直接使用BaseMapper中自带的方法,selectList的值是查询条件,如果为 null 则表示查询全部。List<UserChart> list = userMapper.selectList(null);System.out.println(list);return list; // 返回给前端的数据}@PostMapping("/usermap")public String save(UserChart userChart){int i = userMapper.insert(userChart);if(i > 0){return "插入成功";}else {return "插入失败";}} } -
UserChart 文件,是一个映射文件,用于映射数据库对应的表,放置到
entity文件夹(自建文件夹)中:import com.baomidou.mybatisplus.annotation.IdType; import com.baomidou.mybatisplus.annotation.TableField; import com.baomidou.mybatisplus.annotation.TableId; import com.baomidou.mybatisplus.annotation.TableName;@TableName("userchart") // 另行说明表名为: userchart public class UserChart {@TableId(type= IdType.AUTO)// 表明id是自增的public int id;public String username;public String password;@TableField(value = "birth", exist = true)// value表示对应数据库表中的具体字段,如果属性与字段不一致需要另行设置,exist表示该属性是否为字段,默认为true。public String birthday;public int getId() {return id;}public void setId(int id) {this.id = id;}public String getUsername() {return username;}public void setUsername(String username) {this.username = username;}public String getPassword() {return password;}public void setPassword(String password) {this.password = password;}public String getBirthday() {return birthday;}public void setBirthday(String birthday) {this.birthday = birthday;}@Overridepublic String toString() {return "UserChart{" +"id=" + id +", username='" + username + ''' +", password='" + password + ''' +", birthday='" + birthday + ''' +'}';} }
八、目录结构

相关文章:

Spring Boot(快速上手)
Spring Boot 零、环境配置 1. 创建项目 2. 热部署 添加依赖: <dependency><groupId>org.springframework.boot</groupId><artifactId>spring-boot-devtools</artifactId><optional>true</optional> </dependency&…...

note 41:账务系统开发规范
目录 系统设计 防重控制 流量控制 并发控制 异常处理 备份机制 系统开发 前端队列操作 外系统交互 系统设计 防重控制 对于进入到系统中的数据(文件导入、手工录入、系统直连等)以及本系统发往外…...

基于嵌入式无人机UAV通信系统的实时最优资源分配算法matlab仿真
目录 1.课题概述 2.系统仿真结果 3.核心程序与模型 4.系统原理简介 5.完整工程文件 1.课题概述 基于嵌入式无人机UAV通信系统的实时最优资源分配算法matlab仿真。具体参考文献: 考虑使用UAV作为中继辅助节点的设备到设备(D2D)无线信息和…...

《Vue3实战教程》35:Vue3测试
如果您有疑问,请观看视频教程《Vue3实战教程》 测试 为什么需要测试 自动化测试能够预防无意引入的 bug,并鼓励开发者将应用分解为可测试、可维护的函数、模块、类和组件。这能够帮助你和你的团队更快速、自信地构建复杂的 Vue 应用。与任何应用一…...

【Java设计模式-3】门面模式——简化复杂系统的魔法
在软件开发的世界里,我们常常会遇到复杂的系统,这些系统由多个子系统或模块组成,各个部分之间的交互错综复杂。如果直接让外部系统与这些复杂的子系统进行交互,不仅会让外部系统的代码变得复杂难懂,还会增加系统之间的…...

log4j2的Strategy、log4j2的DefaultRolloverStrategy、删除过期文件
文章目录 一、DefaultRolloverStrategy1.1、DefaultRolloverStrategy节点1.1.1、filePattern属性1.1.2、DefaultRolloverStrategy删除原理 1.2、Delete节点1.2.1、maxDepth属性 二、知识扩展2.1、DefaultRolloverStrategy与Delete会冲突吗?2.1.1、场景一:…...

super_vlan
Super VLAN产生的背景 就经典的酒店例子来说,若是将101房和102房的网络划分在同一个vlan下面,那么101房出现了一个懂得某些安全技术的大佬,就会使得102房的隐私得到严重的隐患 所以这时我们就需要将二层给隔离开,但又要去保证10…...

前端CSS3学习
学习菜鸟教程 火狐-moz- 谷歌 Safari -webkit- 前面都加这个,可能才生效 边框 border: 1px solid #ddd 粗细 样式 样色 经常和border-radius 一块用 border-radius: 50px 20px 第一个左右 第二个右左 border-top-left-radius … box-shadow: 10px 5px 10px 0 #88…...

HTML——58.value和placeholder
<!DOCTYPE html> <html><head><meta charset"UTF-8"><title>value和placeholder属性</title></head><body><!--input元素的type属性:(必须要有)1.指定输入内容的类型2.默认为text,单行文本框-->&l…...

STM32单片机芯片与内部57 SPI 数据手册 寄存器
目录 一、SPI寄存器 1、SPI控制寄存器 1(SPI_CR1)(I2S模式下不使用) 2、SPI控制寄存器 2(SPI_CR2) 3、SPI 状态寄存器(SPI_SR) 4、SPI 数据寄存器(SPI_DR) 5、SPI CRC多项式寄存器(SPI_CRCPR)(I2S模式下不使用) 6、SPI Rx CRC寄存器(SPI_RXCRCR)(I2S模式下不…...

前端异常处理合集
文章目录 前言:思考:一、为什么要处理异常?二、需要处理哪些异常? js 代码处理基本的try...catch语句 Promise 异常Promise 错误处理async/await 全局处理错误捕获window.onerrorwindow.onunhandledrejectionwindow.addEventListe…...

求职:求职者在现场面试中应该注意哪些问题?
求职者在现场面试中需要注意诸多方面的问题 面试前的准备 了解公司信息: 提前通过公司官网、社交媒体账号、新闻报道等渠道,熟悉公司的发展历程、业务范围、企业文化、主要产品或服务等内容。例如,如果是应聘一家互联网科技公司,…...

第2章波动光学引论—抓本质,本质必定简单
1波动光学的电磁理论 1.1波动方程 1)波动方程是通过描述波函数随时间和空间的变化来表达波动的传播和演化。 2)一维波动方程: a.一维波动方程描述了沿着一条直线传播的波动。它的一般形式为: ∂u/∂t v ∂u/∂x 其中ÿ…...

分类模型评估利器-混淆矩阵
相关文章 地理时空动态模拟工具介绍(上) 地理时空动态模拟工具介绍(下)地理时空动态模拟工具的使用方法 前言 混淆矩阵(Confusion Matrix)是机器学习领域中用于评估分类模型性能的一种工具。它通过矩阵的…...

算法题(23):只出现一次的数字
初级: 审题: 需要输出只出现了一次的数据,其他数据均出现了两次 思路: 若不限制空间复杂度: 方法一:哈希表 用哈希映射循环一次,把对应数字出现的次数记录到数组里面,然后再遍历一次…...

@RestController与@Controller区别
区别1: RestController是Controller的升级版 区别2: RestController用于标识一个类作为控制器,并且可以处理HTTP请求。控制器类通常用于接收用户输入并决定返回响应的内容。 RestController通常用于返回JSON或XML数据 区别3:…...

使用ExecutorService和@Async来使用多线程
文章目录 使用ExecutorService和Async来使用多线程采用ExecutorService来使用多线程多线程过程的详细解释注意事项优点 使用Async来使用多线程对比Async和ExecutorService的多线程使用方式使用 ExecutorService 的服务类使用 Async 的服务类异步任务类自定义线程池主应用类解释…...

计算机网络 (19)扩展的以太网
前言 以太网(Ethernet)是一种局域网(LAN)技术,它规定了包括物理层的连线、电子信号和介质访问层协议的内容。以太网技术不断演进,从最初的10Mbps到如今的10Gbps、25Gbps、40Gbps、100Gbps等,已成…...

构造器/构造方法
1. 构造器 1.1 概述 先浏览下面简单代码; class Cons{ // 属性int age;String name; // 方法public void show(){System.out.println("age"age);} } class ConsTest{public static void main(String[] args) {Cons c new Cons();// Cons() 就是…...

异常
目录 1. 异常的概念及使用 1.1 异常的概念 1.2 异常的抛出和捕获 1.3 栈展开 1.4 查找匹配的处理代码 1.5 异常的重新抛出 1.6 异常安全问题 1.7 异常规范 2. 标准库的异常 1. 异常的概念及使用 1.1 异常的概念 异常处理机制允许程序中独⽴开发的部分能够在运⾏时就…...

中南大学无人机智能体的全面评估!BEDI:用于评估无人机上具身智能体的综合性基准测试
作者:Mingning Guo, Mengwei Wu, Jiarun He, Shaoxian Li, Haifeng Li, Chao Tao单位:中南大学地球科学与信息物理学院论文标题:BEDI: A Comprehensive Benchmark for Evaluating Embodied Agents on UAVs论文链接:https://arxiv.…...

Spring AI 入门:Java 开发者的生成式 AI 实践之路
一、Spring AI 简介 在人工智能技术快速迭代的今天,Spring AI 作为 Spring 生态系统的新生力量,正在成为 Java 开发者拥抱生成式 AI 的最佳选择。该框架通过模块化设计实现了与主流 AI 服务(如 OpenAI、Anthropic)的无缝对接&…...

涂鸦T5AI手搓语音、emoji、otto机器人从入门到实战
“🤖手搓TuyaAI语音指令 😍秒变表情包大师,让萌系Otto机器人🔥玩出智能新花样!开整!” 🤖 Otto机器人 → 直接点明主体 手搓TuyaAI语音 → 强调 自主编程/自定义 语音控制(TuyaAI…...
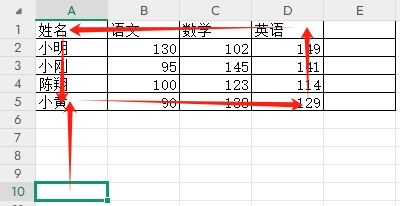
3-11单元格区域边界定位(End属性)学习笔记
返回一个Range 对象,只读。该对象代表包含源区域的区域上端下端左端右端的最后一个单元格。等同于按键 End 向上键(End(xlUp))、End向下键(End(xlDown))、End向左键(End(xlToLeft)End向右键(End(xlToRight)) 注意:它移动的位置必须是相连的有内容的单元格…...

Redis:现代应用开发的高效内存数据存储利器
一、Redis的起源与发展 Redis最初由意大利程序员Salvatore Sanfilippo在2009年开发,其初衷是为了满足他自己的一个项目需求,即需要一个高性能的键值存储系统来解决传统数据库在高并发场景下的性能瓶颈。随着项目的开源,Redis凭借其简单易用、…...
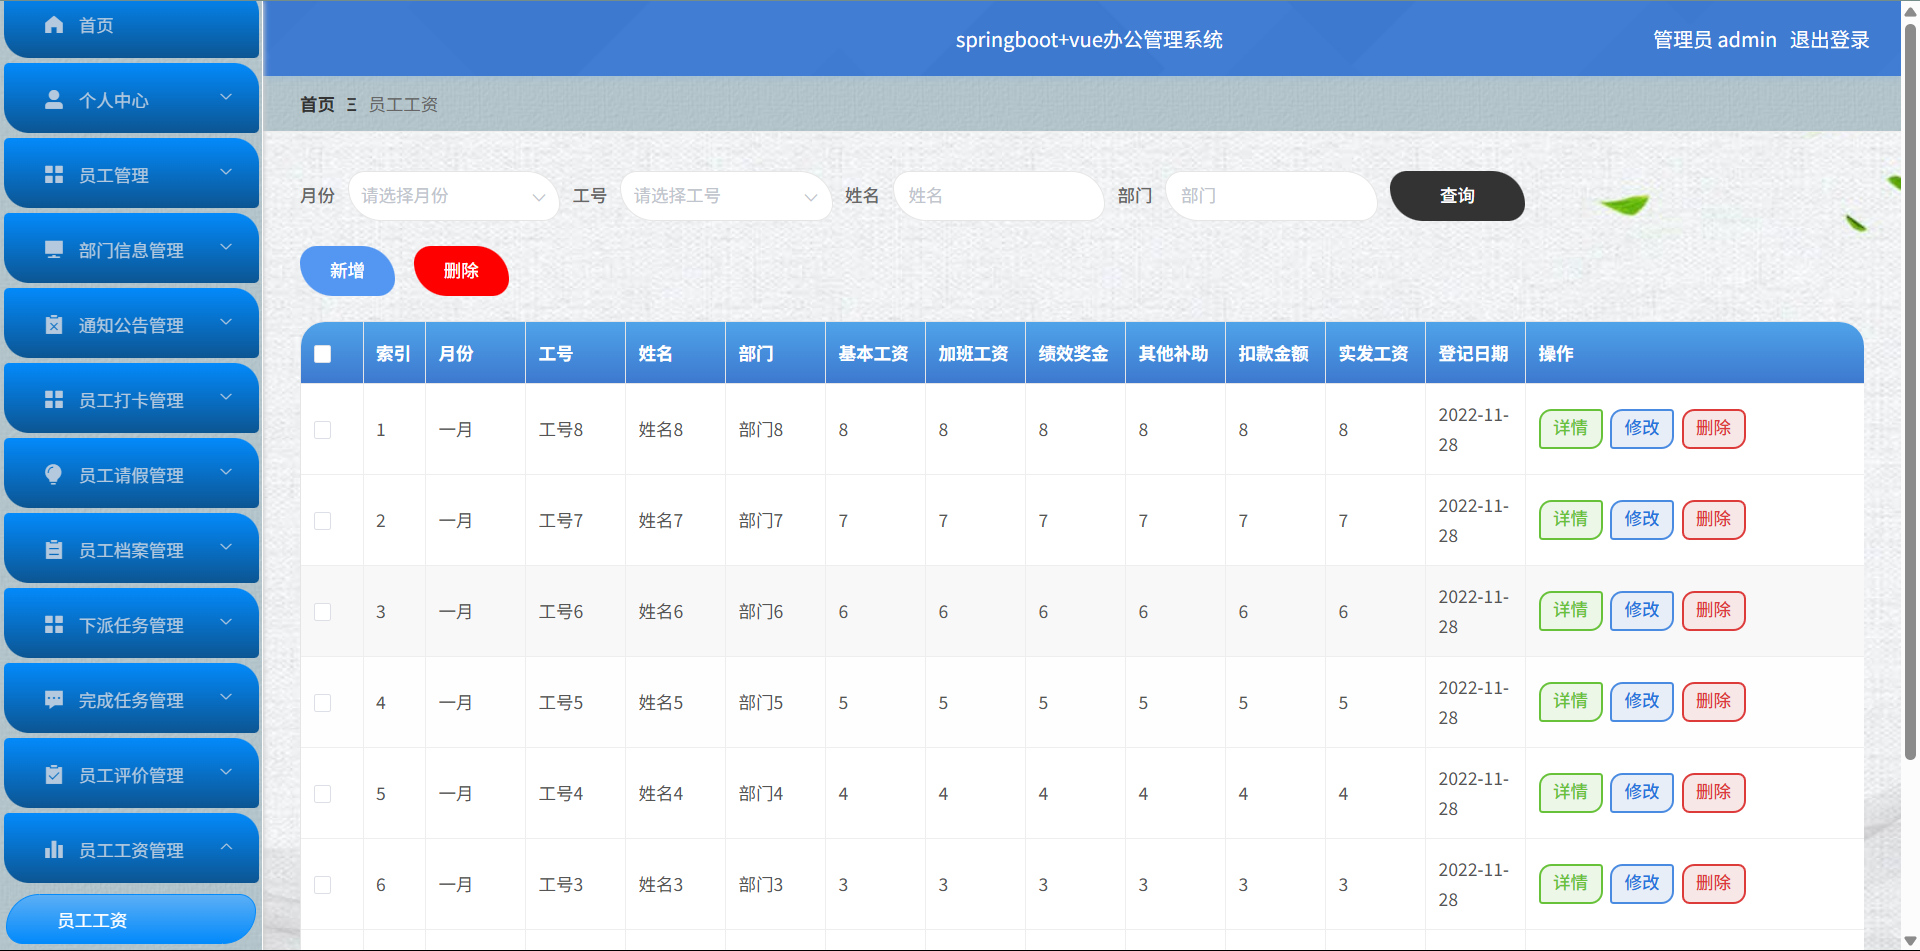
基于Springboot+Vue的办公管理系统
角色: 管理员、员工 技术: 后端: SpringBoot, Vue2, MySQL, Mybatis-Plus 前端: Vue2, Element-UI, Axios, Echarts, Vue-Router 核心功能: 该办公管理系统是一个综合性的企业内部管理平台,旨在提升企业运营效率和员工管理水…...

pycharm 设置环境出错
pycharm 设置环境出错 pycharm 新建项目,设置虚拟环境,出错 pycharm 出错 Cannot open Local Failed to start [powershell.exe, -NoExit, -ExecutionPolicy, Bypass, -File, C:\Program Files\JetBrains\PyCharm 2024.1.3\plugins\terminal\shell-int…...
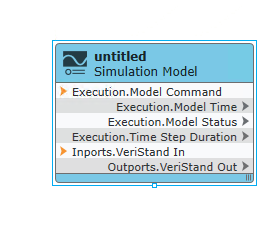
【Veristand】Veristand环境安装教程-Linux RT / Windows
首先声明,此教程是针对Simulink编译模型并导入Veristand中编写的,同时需要注意的是老用户编译可能用的是Veristand Model Framework,那个是历史版本,且NI不会再维护,新版本编译支持为VeriStand Model Generation Suppo…...
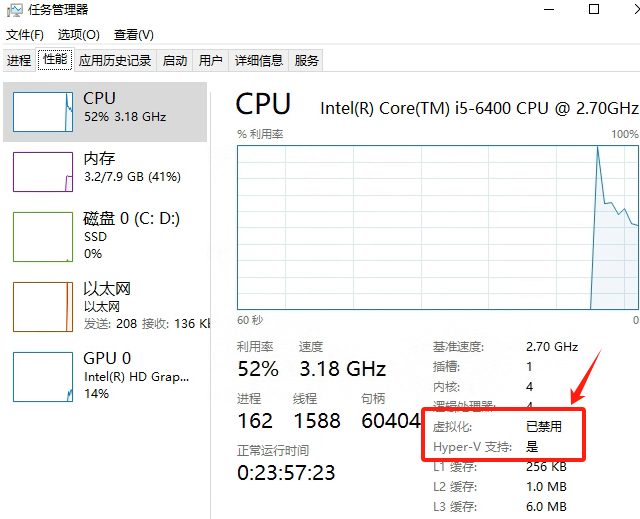
Windows电脑能装鸿蒙吗_Windows电脑体验鸿蒙电脑操作系统教程
鸿蒙电脑版操作系统来了,很多小伙伴想体验鸿蒙电脑版操作系统,可惜,鸿蒙系统并不支持你正在使用的传统的电脑来安装。不过可以通过可以使用华为官方提供的虚拟机,来体验大家心心念念的鸿蒙系统啦!注意:虚拟…...
Linux基础开发工具——vim工具
文章目录 vim工具什么是vimvim的多模式和使用vim的基础模式vim的三种基础模式三种模式的初步了解 常用模式的详细讲解插入模式命令模式模式转化光标的移动文本的编辑 底行模式替换模式视图模式总结 使用vim的小技巧vim的配置(了解) vim工具 本文章仍然是继续讲解Linux系统下的…...
