从react源码看hooks的原理
React暴露出来的部分Hooks
//packages/react/src/React.js
export {...useCallback,useContext,useEffect,useLayoutEffect,useMemo,useReducer,useRef,useState,...
}
功能描述
useState、useReducer: 状态值相关useEffect、useLayoutEffect: 生命周期相关useContext: 状态共享相关useCallback、useMemo: 性能优化相关useRef: 属性相关
源码
export function useContext<T>(Context: ReactContext<T>,unstable_observedBits: number | boolean | void,
): T {const dispatcher = resolveDispatcher();...return dispatcher.useContext(Context, unstable_observedBits);
}export function useState<S>(initialState: (() => S) | S,
): [S, Dispatch<BasicStateAction<S>>] {const dispatcher = resolveDispatcher();return dispatcher.useState(initialState);
}export function useReducer<S, I, A>(reducer: (S, A) => S,initialArg: I,init?: I => S,
): [S, Dispatch<A>] {const dispatcher = resolveDispatcher();return dispatcher.useReducer(reducer, initialArg, init);
}export function useRef<T>(initialValue: T): {|current: T|} {const dispatcher = resolveDispatcher();return dispatcher.useRef(initialValue);
}export function useEffect(create: () => (() => void) | void,  deps: Array<mixed> | void | null,
): void {const dispatcher = resolveDispatcher();return dispatcher.useEffect(create, deps);
}export function useLayoutEffect(create: () => (() => void) | void,  deps: Array<mixed> | void | null,
): void {const dispatcher = resolveDispatcher();return dispatcher.useLayoutEffect(create, deps);
}export function useCallback<T>(callback: T,deps: Array<mixed> | void | null,
): T {const dispatcher = resolveDispatcher();return dispatcher.useCallback(callback, deps);
}export function useMemo<T>(create: () => T,deps: Array<mixed> | void | null,
): T {const dispatcher = resolveDispatcher();return dispatcher.useMemo(create, deps);
}// resolveDispatcher
function resolveDispatcher() {const dispatcher = ReactCurrentDispatcher.current;invariant(...);return dispatcher;
}// ReactCurrentDispatcher
const ReactCurrentDispatcher = {/**   * @internal* @type {ReactComponent}   */current: (null: null | Dispatcher),
};
其实hooks的定义都来自dispatcher,那我们根据Dispatcher依次去看看他们的实际实现。
Dispatcher
export type Dispatcher = {|...useState<S>(initialState: (() => S) | S): [S, Dispatch<BasicStateAction<S>>],useReducer<S, I, A>(reducer: (S, A) => S,initialArg: I,init?: (I) => S,): [S, Dispatch<A>],useContext<T>(context: ReactContext<T>,observedBits: void | number | boolean,): T,useRef<T>(initialValue: T): {|current: T|},useEffect(create: () => (() => void) | void,deps: Array<mixed> | void | null,): void,useLayoutEffect(create: () => (() => void) | void,deps: Array<mixed> | void | null,): void,useCallback<T>(callback: T, deps: Array<mixed> | void | null): T,useMemo<T>(nextCreate: () => T, deps: Array<mixed> | void | null): T,...
|};
很明显这就是各种hooks的定义,但是总归都要是参加到执行的的流程里面去的,函数组件也属于ReactComponent的一种,他也有mount和update阶段。
函数组件Mount阶段
我们在前面提到执行beginWork函数中,我们发现会有tag为FunctionComponent的选项,他会调用updateFunctionComponent进而调用renderWithHooks进行更新。
// packages/react-reconciler/src/ReactFiberBeginWork.old.js
function beginWork(current: Fiber | null,  workInProgress: Fiber,  renderLanes: Lanes,
): Fiber | null {const updateLanes = workInProgress.lanes;switch (workInProgress.tag) {case FunctionComponent: {const Component = workInProgress.type; // 组件类型const unresolvedProps = workInProgress.pendingProps; // 未处理的props...return updateFunctionComponent(current,workInProgress,Component,resolvedProps,renderLanes,);}case ClassComponent: {const Component = workInProgress.type;const unresolvedProps = workInProgress.pendingProps;const resolvedProps =workInProgress.elementType === Component? unresolvedProps: resolveDefaultProps(Component, unresolvedProps);// 渲染classComponentreturn updateClassComponent(current,workInProgress,Component,resolvedProps,renderLanes,);}case HostRoot:...case HostComponent:...case HostText:...}
}
renderWithHooks
export function renderWithHooks<Props, SecondArg>(current: Fiber | null,workInProgress: Fiber,Component: (p: Props, arg: SecondArg) => any,props: Props,secondArg: SecondArg,nextRenderLanes: Lanes,
): any {// 下一个渲染任务的优先级renderLanes = nextRenderLanes;// fiber树currentlyRenderingFiber = workInProgress;...// 重置memoizedState、updateQueue、lanesworkInProgress.memoizedState = null;workInProgress.updateQueue = null;workInProgress.lanes = NoLanes;...if (__DEV__) {...} else {// 判断mount update阶段ReactCurrentDispatcher.current =current === null || current.memoizedState === null? HooksDispatcherOnMount: HooksDispatcherOnUpdate;}
}
- 如果是
mount阶段,则执行HooksDispatcherOnMount,之后再执行reconcileChildren。 - 如果是
update阶段,则执行HooksDispatcherOnUpdate,之后再执行reconcileChildren。
HooksDispatcherOnMount
const HooksDispatcherOnMount: Dispatcher = {useCallback: mountCallback,useContext: readContext,useEffect: mountEffect,useLayoutEffect: mountLayoutEffect,useMemo: mountMemo,useReducer: mountReducer,useRef: mountRef,useState: mountState,...
};
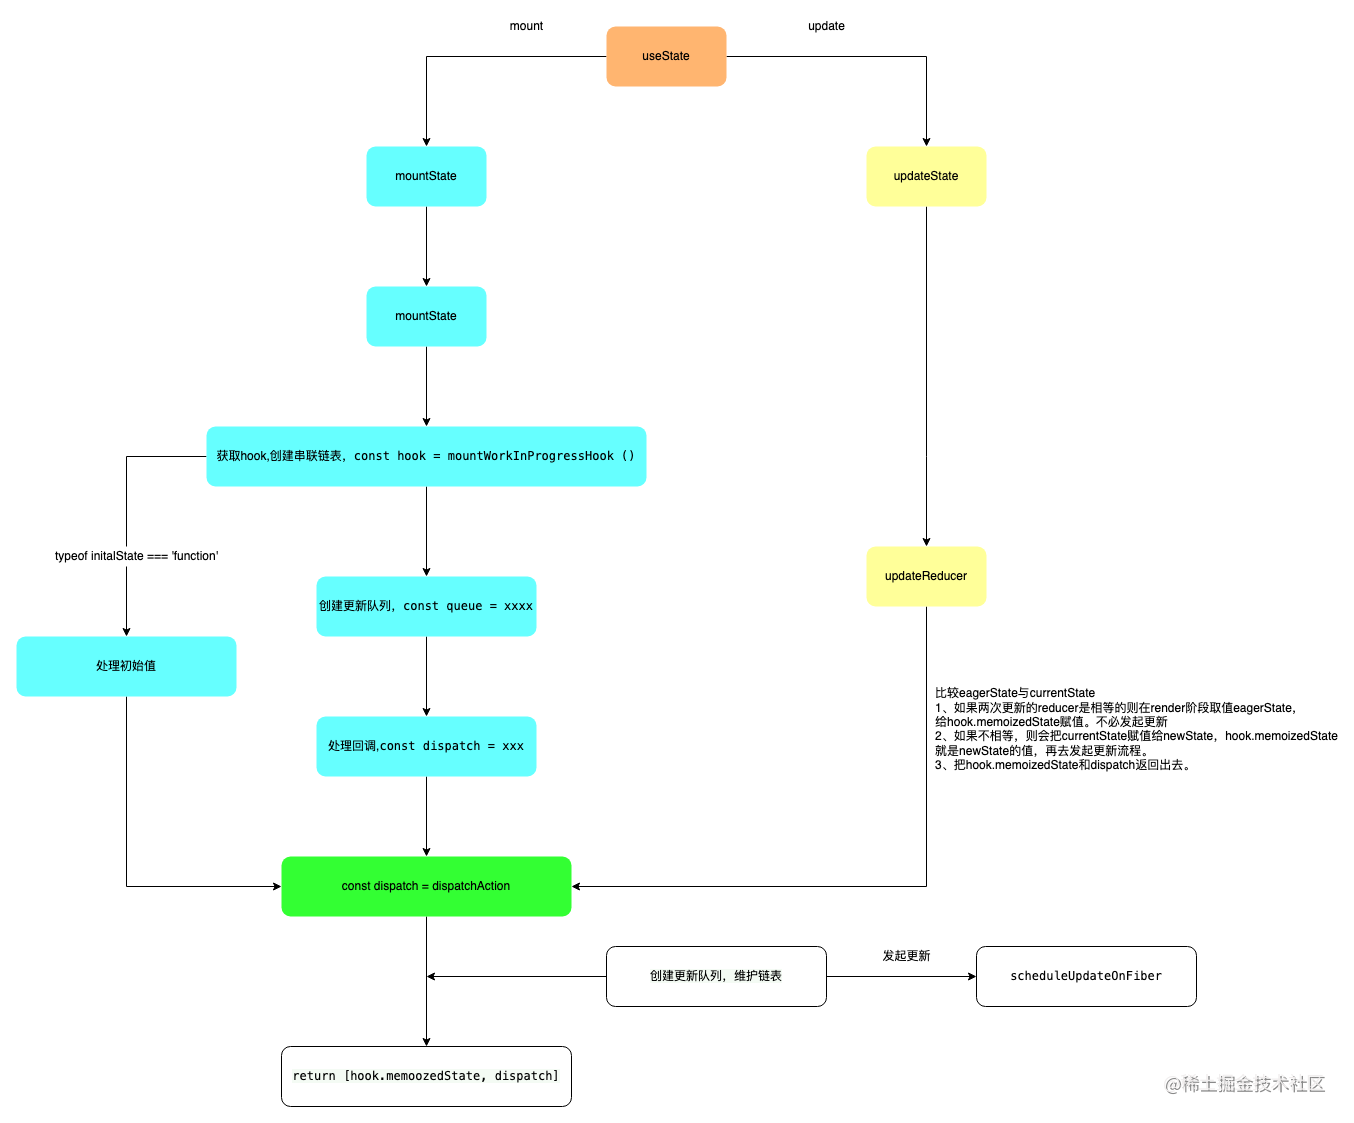
在mount的情况下,每个hook是都有自己对应的mountXxx,useState的对应的就是mountState,不过在讲mountState之前我们要去看一个东西 – type hook,因为实际的开发当中不可能只用一个hook,多个hook他就会形成链表,保存在fiber的memoizedState上面。相关参考视频讲解:进入学习
type Hook
export type Hook = {|memoizedState: any, // 单独的hook唯一值baseState: any, // 初始statebaseQueue: Update<any, any> | null, // 初始更新队列queue: UpdateQueue<any, any> | null, // 更新队列next: Hook | null, // hooks链表下一个指针
|};
那么我们去看看他是如何关联起来的:const hook = mountWorkInProgressHook()
function mountWorkInProgressHook(): Hook {const hook: Hook = {memoizedState: null,baseState: null,baseQueue: null,queue: null,next: null,};if (workInProgressHook === null) {// This is the first hook in the list// 第一个hookcurrentlyRenderingFiber.memoizedState = workInProgressHook = hook;} else {// Append to the end of the list// 往后面添加,形成链表workInProgressHook = workInProgressHook.next = hook;}return workInProgressHook;
}
mountState
function mountState<S>(initialState: (() => S) | S,
): [S, Dispatch<BasicStateAction<S>>] {// 创建并关联hook链表  const hook = mountWorkInProgressHook();// 如果是函数入参,则是把函数的执行结果当做入参if (typeof initialState === 'function') {// $FlowFixMe: Flow doesn't like mixed typesinitialState = initialState();}// 把hook的memoizedState变为初始值hook.memoizedState = hook.baseState = initialState;// 更新队列const queue = (hook.queue = {pending: null,dispatch: null,lastRenderedReducer: basicStateReducer,lastRenderedState: (initialState: any),});// 回调const dispatch: Dispatch<BasicStateAction<S>,> = (queue.dispatch = (dispatchAction.bind(null,currentlyRenderingFiber,queue,): any));// 返回 memoizedState, dispatchreturn [hook.memoizedState, dispatch];
}
根据mountState我们就知道在写useState的时候,解构的语法为什么会解构出想要的东西了。
const [mutation, setMutation] = useState(0) // 纯数字作为初始值
const [mutation, setMutation] = useState(()=>handle(1)) // 函数作为初始值,函数的返回值作为初始值
这里我们遗留了一个问题
- 我们知道第二个参数
dispatch执行的时候会触发渲染更新,以及二次更新,那么他是怎么实现的呢?
针对于上述问题,我们必须去看一下dispatch到底干了什么事情。
const dispatch: Dispatch<BasicStateAction<S>,> = (queue.dispatch = (dispatchAction.bind(null,currentlyRenderingFiber,queue,): any));
dispatchAction
function dispatchAction<S, A>(fiber: Fiber,queue: UpdateQueue<S, A>,action: A,
) {if (__DEV__) {...}// 获取触发更新的时间const eventTime = requestEventTime();// 获取更新优先级const lane = requestUpdateLane(fiber);// 创建更新const update: Update<S, A> = {lane,action,eagerReducer: null,eagerState: null,next: (null: any),};// 维护链表,在update阶段,如果有更新任务则一直延续const pending = queue.pending;if (pending === null) {// This is the first update. Create a circular list.update.next = update;} else {update.next = pending.next;pending.next = update;}// 加入更新队列queue.pending = update;const alternate = fiber.alternate;// 如果是render阶段更新if (fiber === currentlyRenderingFiber ||(alternate !== null && alternate === currentlyRenderingFiber)) {...didScheduleRenderPhaseUpdateDuringThisPass = didScheduleRenderPhaseUpdate = true;} else {if (fiber.lanes === NoLanes &&(alternate === null || alternate.lanes === NoLanes)) {// 当前没有更新,是第一次调用dispatchAction,计算stateconst lastRenderedReducer = queue.lastRenderedReducer;if (lastRenderedReducer !== null) {let prevDispatcher;...try {const currentState: S = (queue.lastRenderedState: any);// render阶段,如果reducer没有变化,直接取值eagerStateconst eagerState = lastRenderedReducer(currentState, action);// render阶段,如果reducer没有变化,直接取值eagerStateupdate.eagerReducer = lastRenderedReducer;update.eagerState = eagerState;if (is(eagerState, currentState)) {// 如果当前的值遇前面的值相同直接返回上一个值,不发起更新return;}} catch (error) {...} finally {...}}}...//更新scheduleUpdateOnFiber(fiber, lane, eventTime);}
}
这里我们可以看到usetate的回调,就是创建更新,维护了一个链表结构,在render阶段我们根据eagerState与这次的currentState比较,决定要不要发起更新,执行scheduleUpdateOnFiber进行更新
函数组件Update阶段
const HooksDispatcherOnUpdate: Dispatcher = {useCallback: updateCallback,useContext: readContext,useEffect: updateEffect,useImperativeHandle: updateImperativeHandle,useLayoutEffect: updateLayoutEffect,useMemo: updateMemo,useReducer: updateReducer,useRef: updateRef,useState: updateState,...
};
update阶段中的useState调用了updateState,而在updateState中再次调用updateReducer
function updateState<S>(initialState: (() => S) | S,
): [S, Dispatch<BasicStateAction<S>>] {//   return updateReducer(basicStateReducer, (initialState: any));
}
在basicStateReducer中进行了如下处理:
function basicStateReducer<S>(state: S, action: BasicStateAction<S>): S {// $FlowFixMe: Flow doesn't like mixed types// 如果更新为函数则是函数执行返回值为更新值return typeof action === 'function' ? action(state) : action;
}
这里也就是说明了我们在写hook的时候:
setMutation(mutation + 1) // 直接赋值
setMutation(()=>handle(1)) // 函数值返回值作为新值赋值
useReducer
function updateReducer<S, I, A>(reducer: (S, A) => S,initialArg: I,init?: I => S,
): [S, Dispatch<A>] {// 获取更新的hookconst hook = updateWorkInProgressHook();const queue = hook.queue;invariant(queue !== null,'Should have a queue. This is likely a bug in React. Please file an issue.',);// 更新queue.lastRenderedReducer = reducer;const current: Hook = (currentHook: any);// The last rebase update that is NOT part of the base state.let baseQueue = current.baseQueue;// 如果最后一个更新还没有完毕,则继续更新const pendingQueue = queue.pending;if (pendingQueue !== null) {// 如果在更新的过程中有新的更新,加入更新队列if (baseQueue !== null) {const baseFirst = baseQueue.next;const pendingFirst = pendingQueue.next;baseQueue.next = pendingFirst;pendingQueue.next = baseFirst;}if (__DEV__) {if (current.baseQueue !== baseQueue) {// Internal invariant that should never happen, but feasibly could in// the future if we implement resuming, or some form of that.console.error('Internal error: Expected work-in-progress queue to be a clone. ' +'This is a bug in React.',);}}current.baseQueue = baseQueue = pendingQueue;queue.pending = null;}if (baseQueue !== null) {// We have a queue to process.const first = baseQueue.next;let newState = current.baseState;let newBaseState = null;let newBaseQueueFirst = null;let newBaseQueueLast = null;let update = first;do {//获取每一个任务的更新优先级const updateLane = update.lane;// 如果当前的执行任务优先级不高,则跳过当前任务,去执行优先级高的任务if (!isSubsetOfLanes(renderLanes, updateLane)) {// Priority is insufficient. Skip this update. If this is the first// skipped update, the previous update/state is the new base// update/state.// 克隆更新任务const clone: Update<S, A> = {lane: updateLane,action: update.action,eagerReducer: update.eagerReducer,eagerState: update.eagerState,next: (null: any),};if (newBaseQueueLast === null) {newBaseQueueFirst = newBaseQueueLast = clone;newBaseState = newState;} else {newBaseQueueLast = newBaseQueueLast.next = clone;}// 如果都是低级任务,则合并优先级currentlyRenderingFiber.lanes = mergeLanes(currentlyRenderingFiber.lanes,updateLane,);markSkippedUpdateLanes(updateLane);} else {// This update does have sufficient priority.if (newBaseQueueLast !== null) {// 如果更新队列还有更新任务const clone: Update<S, A> = {// This update is going to be committed so we never want uncommit// it. Using NoLane works because 0 is a subset of all bitmasks, so// this will never be skipped by the check above.lane: NoLane,action: update.action,eagerReducer: update.eagerReducer,eagerState: update.eagerState,next: (null: any),};// 把更新任务插入到队列末尾newBaseQueueLast = newBaseQueueLast.next = clone;}// 执行每一个reducer获取newState// 如果每一次的reducer相同,则把eagerState赋给newStateif (update.eagerReducer === reducer) {// If this update was processed eagerly, and its reducer matches the// current reducer, we can use the eagerly computed state.newState = ((update.eagerState: any): S);} else {// 否则就需要去发起更新const action = update.action;newState = reducer(newState, action);}}// 继续更新update = update.next;} while (update !== null && update !== first);if (newBaseQueueLast === null) {newBaseState = newState;} else {newBaseQueueLast.next = (newBaseQueueFirst: any);}// Mark that the fiber performed work, but only if the new state is// different from the current state.if (!is(newState, hook.memoizedState)) {markWorkInProgressReceivedUpdate();}// 赋值返回最新状态hook.memoizedState = newState;hook.baseState = newBaseState;hook.baseQueue = newBaseQueueLast;queue.lastRenderedState = newState;}const dispatch: Dispatch<A> = (queue.dispatch: any);return [hook.memoizedState, dispatch];
}
所以,useState大致的执行流程如下:
既然useReducer与useState同为状态钩子,那就来看一看userReducer的实现吧
useReducer的用法
import React, {useReducer} from 'react';
const initialState = {num: 0};
const reducer = (state, action) => {switch(action.type){case 'ad': return {num: state.num + 1};case 'de': return {num: state.num - 1};case 'ch': return {num: state.num * 2};case 'dv': return {num: state.num / 2};    default:return state}
}const App = () => {const [state, dispatch] = useReducer(reducer, initialState);retrun (<div className="App"><h1>{state.num}</h1><div onClick={() => dispatch({type:ad})}>ad</div><div onClick={() => dispatch({type:de})}>de</div><div onClick={() => dispatch({type:ch})}>ch</div><div onClick={() => dispatch({type:dv})}>dv</div></div>)
}export default App
各位可以自行去codeSandBox上面去测试玩耍。
分析上述代码我们可以看到每一个div的点击会绑定一个dispatch,这个dispatch可以实现useState里面的setMutation的功能,维护的state值来自于initialState,action为dispatch的入参,针对于这一些,我们去看看源码。
useReducer的mount阶段
我们根据HooksDispatcherOnMount可以找到在mount阶段,useReducer调用的是mountReducer
mountReducer
function mountReducer<S, I, A>(reducer: (S, A) => S,initialArg: I,init?: I => S,
): [S, Dispatch<A>] {//关联链表const hook = mountWorkInProgressHook();let initialState;if (init !== undefined) {initialState = init(initialArg);} else {initialState = ((initialArg: any): S);}// 保存初始值hook.memoizedState = hook.baseState = initialState;//更新队列const queue = (hook.queue = {pending: null,dispatch: null,lastRenderedReducer: reducer,lastRenderedState: (initialState: any),});// 处理回调const dispatch: Dispatch<A> = (queue.dispatch = (dispatchAction.bind(null,currentlyRenderingFiber,queue,): any));//返回hook.memoizedState与回调return [hook.memoizedState, dispatch];
}
其实这个函数与useState非常类似,只不过他的第一入参为reducer,并且附带了一个可选参数init,官网上面对其称之为惰性初始化。update阶段调用的是updateReducer,在这里不再复述。
生命周期相关的hook
生命周期相关的这里讲解两个useEffect、useLayoutEffect,面试中经常会问到这两个有什么区别,其实他们并没有什么区别,只是执行的时机不同,具体表现为:
useLayoutEffect是在渲染的时候同步执行的,且与componentDidMount、componentDidUpdate执行时机一致,所以在commit阶段中,执行于commitLayoutEffec函数里。useEffect执行是异步的,要等到组件渲染到屏幕上才会去执行。
操作dom性能相关问题为什么修改dom建议放在useLayoutEffect中而不是useEffect中呢?
- 从上述表述中可以看出,只要真实
dom被创建,就会执行useLayoutEffect函数,而我们知道在创建真实dom的时候,节点的属性,样式等等都会被挂到dom节点上面去,一个节点增加属性必定会引起页面的重绘,重排。而useEffect执行时机实在dom渲染到屏幕上面之后,这个时候已经经历过了一次重绘,重排。如果再一次的修改dom必定引起二次重绘、重排,这样来说,性能开销变成了两倍。所以为了减少性能开销,才如此建议。废话少说来看看useEffect的具体实现,mount阶段对应的是mountEffect。
mountEffect
function mountEffect(// 传入的函数useEffect(()=>{},[])create: () => (() => void) | void,  // 依赖deps: Array<mixed> | void | null,
): void {if (__DEV__) {...}}return mountEffectImpl(UpdateEffect | PassiveEffect,HookPassive,create,deps,);
}
mountEffect调用mountEffectImpl
mountEffectImpl
function mountEffectImpl(fiberFlags, hookFlags, create, deps): void {const hook = mountWorkInProgressHook();// 关联链表const nextDeps = deps === undefined ? null : deps;//处理依赖currentlyRenderingFiber.flags |= fiberFlags;// 关联副作用标记// 加入到环形链表中hook.memoizedState = pushEffect(HookHasEffect | hookFlags,create,undefined,nextDeps,);
}
pushEffect
function pushEffect(tag, create, destroy, deps) {// 入参为副作用标记,传入函数,销毁回调,依赖项const effect: Effect = {tag,create,destroy,deps,// Circular// 下一个副作用next: (null: any),};//获取函数组件更新队列let componentUpdateQueue: null | FunctionComponentUpdateQueue = (currentlyRenderingFiber.updateQueue: any);if (componentUpdateQueue === null) {//队列为空,创建队列componentUpdateQueue = createFunctionComponentUpdateQueue();//与fiber更新队列关联起来currentlyRenderingFiber.updateQueue = (componentUpdateQueue: any);componentUpdateQueue.lastEffect = effect.next = effect;} else {//有更新队列const lastEffect = componentUpdateQueue.lastEffect;if (lastEffect === null) {componentUpdateQueue.lastEffect = effect.next = effect;} else {// 处理关联链表const firstEffect = lastEffect.next;lastEffect.next = effect;effect.next = firstEffect;componentUpdateQueue.lastEffect = effect;}}return effect;
}
这里做的事情,无非就是关联componentUpdateQueue与effect,让React去调度执行。
updateEffect
updateEffect执行调用了updateEffectImpl:
// updateEffect
function updateEffect(// 传入函数create: () => (() => void) | void,  // 依赖项deps: Array<mixed> | void | null,
): void {if (__DEV__) {...}return updateEffectImpl(UpdateEffect | PassiveEffect,HookPassive,create,deps,);
}//updateEffectImpl
function updateEffectImpl(fiberFlags, hookFlags, create, deps): void {const hook = updateWorkInProgressHook();// 获取更新hookconst nextDeps = deps === undefined ? null : deps; //依赖项let destroy = undefined; //销毁函数if (currentHook !== null) {const prevEffect = currentHook.memoizedState;destroy = prevEffect.destroy;if (nextDeps !== null) {const prevDeps = prevEffect.deps;// 比较这一次的依赖与上一次的依赖if (areHookInputsEqual(nextDeps, prevDeps)) {// 即使依赖相同,也要讲effect加入链表,保证顺序pushEffect(hookFlags, create, destroy, nextDeps);return;}}}currentlyRenderingFiber.flags |= fiberFlags;//在commit阶段处理effecthook.memoizedState = pushEffect(HookHasEffect | hookFlags,create,destroy,nextDeps,);
}
本着学习到底的精神,我们一起来看看比较两次的依赖,到底是怎么比较的:
areHookInputsEqual
function areHookInputsEqual(nextDeps: Array<mixed>, //当前的依赖prevDeps: Array<mixed> | null,// 上一次的依赖
) {if (__DEV__) {...}// 上一次为空,肯定不一样,则必须更新if (prevDeps === null) {if (__DEV__) {...}return false;}if (__DEV__) {if (nextDeps.length !== prevDeps.length) {...}// 遍历两个依赖数组,根据下标比较for (let i = 0; i < prevDeps.length && i < nextDeps.length; i++) {if (is(nextDeps[i], prevDeps[i])) {continue;}return false;}return true;
}// import is form 'shared/objectIs'
const objectIs: (x: any, y: any) => boolean =// 兼容Object.istypeof Object.is === 'function' ? Object.is : is;// is
function is(x: any, y: any) {return ((x === y && (x !== 0 || 1 / x === 1 / y)) || (x !== x && y !== y) );
}
上述代码介绍了比较两种值是否一样,其中Object.is的浏览器适用版本比较高。做了一次兼容:
上面说了useEffect与useLayoutEffect的结构都是一样的,重点只是在于他们俩的执行时机不一样,那么我们就去深究一下useEffect与useLayoutEffect的执行时机。
生命周期相关的hook的执行时机
我们知道所谓生命周期钩子,那肯定是在某一阶段去执行的,这个阶段就是commit阶段。在commit阶段的commitLayoutEffects函数中执行一系列的生命周期钩子,但是对于函数组件来讲,会调度useEffect的create和destroy,也就是执行schedulePassiveEffects函数。
function schedulePassiveEffects(finishedWork: Fiber) {// 获取更新队列const updateQueue: FunctionComponentUpdateQueue | null = (finishedWork.updateQueue: any);// 获取最后一个effectconst lastEffect = updateQueue !== null ? updateQueue.lastEffect : null;//如果队列没有执行完if (lastEffect !== null) {//把队列里面的最后一个作为开头const firstEffect = lastEffect.next;let effect = firstEffect;do {const {next, tag} = effect;if ((tag & HookPassive) !== NoHookEffect &&(tag & HookHasEffect) !== NoHookEffect) {// 将effect中的destroy和create加入到e//pendingPassiveHookEffectsUnmount//pendingPassiveHookEffectsMount中enqueuePendingPassiveHookEffectUnmount(finishedWork, effect);enqueuePendingPassiveHookEffectMount(finishedWork, effect);}effect = next;} while (effect !== firstEffect);}
}// enqueuePendingPassiveHookEffectMount
export function enqueuePendingPassiveHookEffectMount(fiber: Fiber,  effect: HookEffect,
): void {pendingPassiveHookEffectsMount.push(effect, fiber);if (!rootDoesHavePassiveEffects) {// root上有没有副作用,默认值为falserootDoesHavePassiveEffects = true;scheduleCallback(NormalSchedulerPriority, () => {flushPassiveEffects();return null;});}
}// enqueuePendingPassiveHookEffectUnmount
export function enqueuePendingPassiveHookEffectUnmount(fiber: Fiber,  effect: HookEffect,
): void {pendingPassiveHookEffectsUnmount.push(effect, fiber);if (__DEV__) {fiber.flags |= PassiveUnmountPendingDev;const alternate = fiber.alternate;if (alternate !== null) {alternate.flags |= PassiveUnmountPendingDev;}}if (!rootDoesHavePassiveEffects) {// root上有没有副作用,默认值为falserootDoesHavePassiveEffects = true;scheduleCallback(NormalSchedulerPriority, () => {flushPassiveEffects();return null;});}
}
调度执行flushPassiveEffects
调度执行flushPassiveEffect会把当前正在执行的任务优先级跟后来新增的优先级进行比较。
export function flushPassiveEffects(): boolean {...if (decoupleUpdatePriorityFromScheduler) {// 获得更新优先级const previousLanePriority = getCurrentUpdateLanePriority();try {...return runWithPriority(priorityLevel, flushPassiveEffectsImpl);} finally {...}} else {return runWithPriority(priorityLevel, flushPassiveEffectsImpl);}}return false;
}
flushPassiveEffectsImpl
function flushPassiveEffectsImpl() {// First pass: Destroy stale passive effects.const unmountEffects = pendingPassiveHookEffectsUnmount;pendingPassiveHookEffectsUnmount = [];for (let i = 0; i < unmountEffects.length; i += 2) {const effect = ((unmountEffects[i]: any): HookEffect);const fiber = ((unmountEffects[i + 1]: any): Fiber);const destroy = effect.destroy;effect.destroy = undefined;...if (typeof destroy === 'function') {...} else {try {if (...) {try {startPassiveEffectTimer();destroy();//销毁回调执行} finally {recordPassiveEffectDuration(fiber);}} else {destroy();//销毁回调执行}} catch (error) {...}}}}// Second pass: Create new passive effects.const mountEffects = pendingPassiveHookEffectsMount;pendingPassiveHookEffectsMount = [];for (let i = 0; i < mountEffects.length; i += 2) {const effect = ((mountEffects[i]: any): HookEffect);const fiber = ((mountEffects[i + 1]: any): Fiber);if (__DEV__) {...} else {try {const create = effect.create;if (...) {try {startPassiveEffectTimer();effect.destroy = create();//本次的render的创建函数} finally {recordPassiveEffectDuration(fiber);}} else {effect.destroy = create();//本次的render的创建函数}} catch (error) {...}}}...return true;
}
在这个函数里面就是依次执行上一次的render销毁回调函数、本次的render创建回调函数。而在前面也说过commit流程是无法中断的,只有等所有节点全部commit完,浏览器才会去告知react可以执行自己的调度任务了,也正在此刻useEffect所对应的函数才会去执行,
在生命周期hook里面React帮我们做了一定的性能优化,除了这个还提供了几个手动优化的hook,useMemo和useCallback,那我们来一起瞧瞧吧。
性能优化相关hook
在讲这一部分之前我们应该搞明白一个问题
- 为什么要用
useMemo、useCallback来做性能优化 useMemo、useCallback应该怎么做性能优化- 具体场景是什么
先回答第一个问题,为什么要用他们来做性能优化: 我们要知道,React更新流程中只要组件中props或者state发生了变化,那就是必须从变化顶部更新所有的后代组件,牵一发而动全身。有些组件我们并不想要它重新渲染,它却做了一定量的性能牺牲,用useMemo、useCallback就可以改变这样的局面。那么应该怎么用他们来做性能优化呢,主要体现在三个方面:
- 避免无效的副作用
- 避免无效的累计计算
- 避免无效的重新渲染
因为我们前面讲到useEffect,我们可以期望在依赖发生变更的时候去做我们想要做的事情,例如接口请求
const App = () => {// 只有当parmas发生变化的时候,我们才回去执行fetch()useEffect(()=>{fetch()}, [params])
}
这并不是他们俩的功能呢,没关系,我们可以变着法子让他们俩具有类似功能,不过这就有点牵强了。
那怎么去做无效的计算和无效的重复渲染呢?有这样的一道面试题:
// 点击父组件里面的按钮,会不会在子组件里面打印“子组件渲染了”?如果会,该怎么优化?
import { useState } from "react";// 父组件
export const Parent = () => {console.log("父组件渲染了");const [count, setCount] = useState(0);const increment = () => setCount(count + 1);return (<div><button onClick={increment}>点击次数:{count}</button><Child /></div>);
};// 子组件
export const Child = ({}) => {console.log("子组件渲染了");return <div>子组件</div>;
};
很明显点击父组件,改变了count,整个组件都要重新渲染。肯定会打印的,那怎么优化呢?
import { useState, useMemo } from "react";// 父组件
export const Parent = () => {console.log("父组件渲染了");const [count, setCount] = useState(0);const increment = () => setCount(count + 1);return (<div><button onClick={increment}>点击次数:{count}</button>// 这种写法不太提倡,一般采用的是memo      {useMemo(()=>(<Child />),[])}    </div>);
};// 子组件
export const Child = ({}) => {console.log("子组件渲染了");return <div>子组件</div>;
};//export const Child = memo(({}) => {
//  console.log("子组件渲染了");
//  return <div>子组件</div>;
//});
那么避免无效的计算体现在哪里呢:
import { useState } from "react";const App = () => {const [x, setX] = useState(0);const [y, setY] = useState(1);const caculate = () => {console.log('正在计算中')//庞大的计算,跟x相关的计算return x}return (<div><h4>caculate:{caculate}</h4><h4>x:{x}</h4><h4>y:{y}</h4><div onClick={()=>setX(x + 1)}>x+1</div><div onClick={()=>setY(y + 1)}>y+1</div></div>)
}
上面的代码里面的函数caculate只是一个与x有关的处理逻辑,与y没有关系,但是我们知道,只要触发了render,那么整个脚本就会自上而下执行一遍,很明显,如果这里只触发setY的话,他也会重新执行一遍脚本,而在caculate里面具有大量的耗时计算,那么这个时候,再次重新触发就显得很没有必要,故而我们可以采用useMemo来进行优化。
import { useState } from "react";const App = () => {const [x, setX] = useState(0);const [y, setY] = useState(1);const caculate = useMemo(() => {console.log('正在计算中')//庞大的计算,跟x相关的计算return x},[x]) // 只有x变化的时候,才会重新执行caculatereturn (<div><h4>caculate:{caculate}</h4><h4>x:{x}</h4><h4>y:{y}</h4><div onClick={()=>setX(x + 1)}>x+1</div><div onClick={()=>setY(y + 1)}>y+1</div></div>)
}
useCallback适用于父子组件嵌套,父组件基于属性把方法传递给子组件,保证了每一次父组件更新不会重新创建函数堆,而是获取之前的引用,传递给子组件的属性就没有变化,例如:
// 父组件
import Child from './Child'
const Parent = () => {console.log('父组件渲染了')const [info, setInfo] = useState({name:'一溪之石', age: 18});const [count, setCount] = useState(1);const tansfromChild = () => {//....}//采用useCallback包裹//const tansfromChild = useCallback(() => {//  //....//})const handleSome = () => {setCount(count + 1)}return (<><div onClick={() => handleSome}>父组件</div><Child tansfromChild={tansfromChild} info={info}/></>)
}// 子组件
const Child = ({tansfromChild, info}) => {console.log('子组件渲染了')return (<div onClick={() => tansfromChild}>{info.name}{info.age}</div>)
}
上述代码中点击父组件的函数,必定会使得count + 1,从而会重新渲染父组件,重新创建函数(不考虑info),对于子组件来说,props改变,就一定会发生重新渲染。针对这种情况,我们一般采用用useCallback包裹起来,然后你去执行点击父组件的函数,你发现他依旧是会重新渲染子组件。因为子组件是函数组件。他没有处理props的浅比较,故而每一次的props他都是不一样的。针对于这种问题解决方式:
- 子组件写成
class组件,继承PureComponent(不推荐) - 子组件写成函数组件,用
memo包裹起来。
因为PureComponent里面会有一个shouldComponentUpdate来处理props的浅比较,而memo则也是我们现在需要去探索的东西。所以对于useCallback的使用一定要配合上具有浅比较的组件使用,否则不能优化性能,反而浪费性能。
useMemo适用于大量的计算得出的结果,防止在组建更新的时候,避免不必要的重新计算。
说了这么多,我们还是一起来看看他们是如何实现的吧,根据上面的经验,我们可以在HooksDispatcherOnMount里面找到mountCallback和mountMemo:
mountCallback、mountMemo
// mountCallback
function mountCallback<T>(callback: T, deps: Array<mixed> | void | null): T {const hook = mountWorkInProgressHook(); // 获取hook链表,并关联const nextDeps = deps === undefined ? null : deps; // 依赖hook.memoizedState = [callback, nextDeps]; // 存入memoizedStatereturn callback; // 返回传入的函数
}// mountMemo
function mountMemo<T>(nextCreate: () => T,deps: Array<mixed> | void | null,
): T {const hook = mountWorkInProgressHook(); // 获得hook,关联链表const nextDeps = deps === undefined ? null : deps; // 依赖const nextValue = nextCreate(); // 执行传入函数,把值给nextValuehook.memoizedState = [nextValue, nextDeps]; // 把值和依赖加入到memoizedState中return nextValue; // 把传入函数的执行返回值,返回
}
上述代码简单如斯,mountCallback直接把传入的函数返回出去了,而mountMemo会把传入的函数执行,把返回值返回出去。并没有什么好讲的,我们看看他们怎么更新吧。
updateCallback、updateMemo
// updateCallback
function updateCallback<T>(callback: T, deps: Array<mixed> | void | null): T {const hook = updateWorkInProgressHook(); // 获取更新hookconst nextDeps = deps === undefined ? null : deps; // 依赖// [callback, nextDeps]上一个的hook.memoizedStateconst prevState = hook.memoizedState; if (prevState !== null) { // 上一个hook.memoizedState不为空if (nextDeps !== null) { // 这次也不为空const prevDeps: Array<mixed> | null = prevState[1]; // [callback, nextDeps]取出依赖赋给prevDepsif (areHookInputsEqual(nextDeps, prevDeps)) { // 如果依赖一样,则返回上一次的函数(缓存函数)return prevState[0];}}}// 如果上一次没有,表示首次渲染,则记录函数与依赖项,并返回传入的函数hook.memoizedState = [callback, nextDeps]; return callback;
}//updateMemo
function updateMemo<T>(nextCreate: () => T,deps: Array<mixed> | void | null,
): T {const hook = updateWorkInProgressHook(); // 获取更新hookconst nextDeps = deps === undefined ? null : deps; //依赖const prevState = hook.memoizedState; // 获取上一次的值(缓存值)[nextValue, nextDeps]if (prevState !== null) {// Assume these are defined. If they're not, areHookInputsEqual will warn.if (nextDeps !== null) {const prevDeps: Array<mixed> | null = prevState[1]; // 比较两次依赖if (areHookInputsEqual(nextDeps, prevDeps)) {return prevState[0]; //如果相等就返回上一次的计算结果值}}}// 首次渲染,执行会犯传入函数的结果const nextValue = nextCreate();hook.memoizedState = [nextValue, nextDeps];// 存入hook.memoizedStatereturn nextValue; // 返回计算结果
}
两个函数的更新也是异曲同工,细节都写在了代码里面,也没什么好讲的。
useContext
开始看useContext之前,我们要明白这个hook可以用来干什么。
接收一个 context 对象(
React.createContext的返回值)并返回该 context 的当前值。当前的 context 值由上层组件中距离当前组件最近的<MyContext.Provider>的valueprop 决定。
useContext可以帮助我们跨越组件层级直接传递变量,实现数据共享。Context的作用就是对它所包含的组件树提供全局共享数据的一种技术。
听的云里雾里的?不要担心,说白了就是组件之间传值就完事了,那么你又说了,组件传值我们用props传递不就完毕了吗,为什么还要有这个,太天真。useContext提供的功能是可以跨层级的。
假如有ABCDE五个组件嵌套,你用props传值,是不是要A传到B…一直传到E,但是useContext就可以在E组件里面直接获取到A的状态,举个例子:
const ComponentA = () => {const [count, setCount] = useState(0);return (<div><h4>父级:{count}</h4><ComponentB count={count}/></div>)
}const ComponentB = (count) => {return (<div><h4>父级:{count}</h4><ComponentC count={count} /></div>)
}const ComponentC = (count) => {return (<div><h4>父级:{count}</h4><ComponentD count={count} /></div>)
}const ComponentD = (count) => {return (<div><h4>父级:{count}</h4><ComponentE count={count}/></div>)
}const ComponentE = (count) => {return (<div><h4>来自A父级的count:{count}</h4></div>)
}
这样才能在E组件里面拿到来自A组件的count,但是useContext提供了,直接拿的功能,例如:
// 用createContext创建上下文
const Content = createContext(null);// 在父组件里面用Content.Provider包裹子组件,指定上下文范围
const ComponentA = () => {const [count, setCount] = useState(0);return (<div><h4>父级:{count}</h4><Content.Provider value={{count,setCount}}><ComponentB /></Content.Provider></div>)
}
...const ComponentE = (count) => {// 需要用到的组件里面用useContext接收const [count, setCount] = useContext(Content)return (<div><h4>来自A父级的count:{count}</h4></div>)
}
所以useContext的用法无非就三点:
createContext创建上下文Content.Provider指定上下文useContext使用上下文
既然知道他的用法,那么一起瞧瞧他的实现吧,首先我们肯定要去关注一下createContext:
createContext
export function createContext<T>(defaultValue: T, // 传入的默认值calculateChangedBits: ?(a: T, b: T) => number, // 可选参数处理默认值的变化
): ReactContext<T> {// 没有传入处理函数if (calculateChangedBits === undefined) {calculateChangedBits = null;} else {...}// context对象const context: ReactContext<T> = {$$typeof: REACT_CONTEXT_TYPE,_calculateChangedBits: calculateChangedBits,_currentValue: defaultValue,_currentValue2: defaultValue,_threadCount: 0,Provider: (null: any),Consumer: (null: any),};//context.Providercontext.Provider = {$$typeof: REACT_PROVIDER_TYPE, // element类型_context: context,};let hasWarnedAboutUsingNestedContextConsumers = false;let hasWarnedAboutUsingConsumerProvider = false;let hasWarnedAboutDisplayNameOnConsumer = false;if (__DEV__) {...context.Consumer = Consumer; // dev环境下Consumer就是Consumer} else {context.Consumer = context;// 正常情况下,Consumer用来包裹接收状态的组件的}...return context;
}
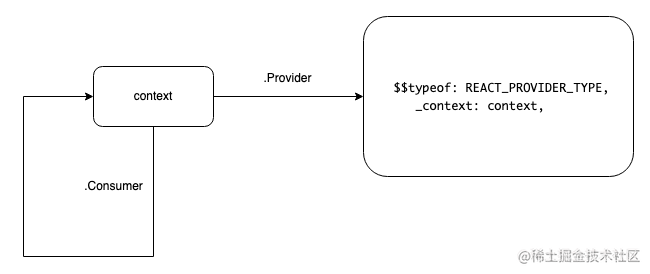
上面的代码主要关注于context.Provider和context.Consumer,先来解释一下他们两个的作用吧。
context.Provider的作用在于规定上下文范围,并提供组件所需要的状态。context.Consumer的作用在于接收传输过来的状态。
eg:
// ComponentA
const ComponentA = () => {const [count, setCount] = useState(0);return (<div><h4>父级:{count}</h4><Content.Provider value={{count,setCount}}><ComponentB /></Content.Provider></div>)
}// ComponentB
const ComponentB = (count) => {// 需要用到的组件里面用useContext接收// const [count, setCount] = useContext(Content)return (<div><context.Consumer>{(count)=><h4>来自A父级的count:{count}</h4>}      </context.Consumer></div>)
}
可见不用从useContext中解构出来,而用<context.Consumer>包裹起来,也是可以达到一样的效果的,他们之间的关系大致可以这样表示:
useContext的执行流程
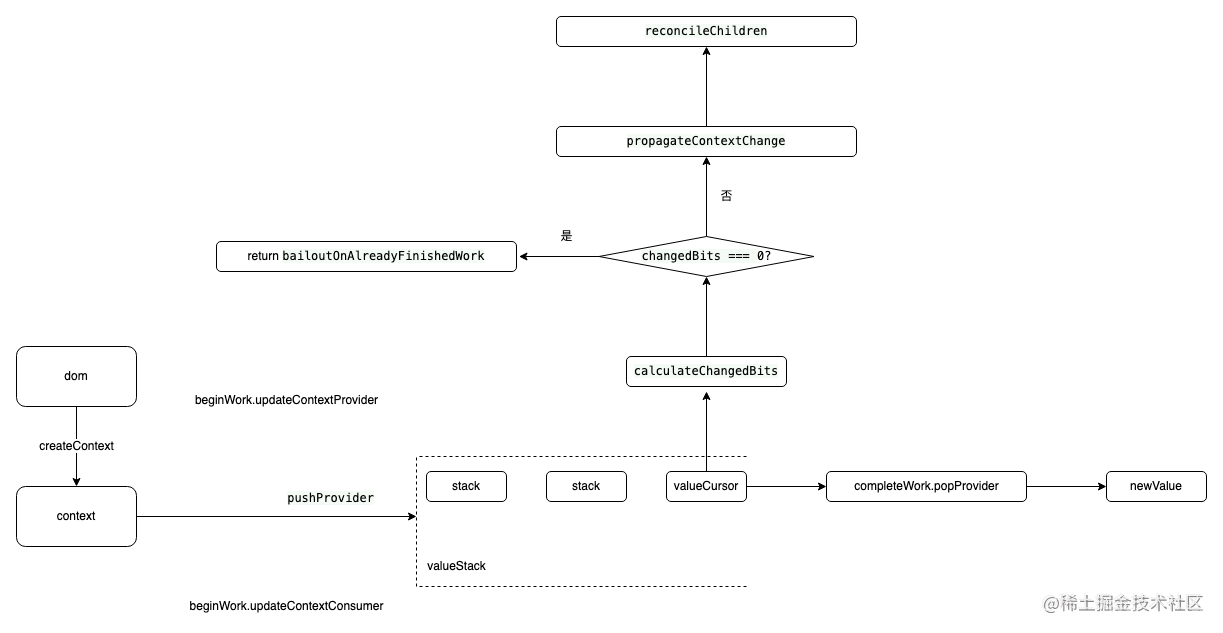
谈到useContext这里就不得不跟react里面的context一起说一下,在react源码中存在一个valueStack和valueCursor用来记录context的历史信息和当前context,didPerformWorkStackCursor用来表示当前的context有没有变化。
//ReactFiberNewContext.old.js
const valueCursor: StackCursor<mixed> = createCursor(null);const didPerformWorkStackCursor: StackCursor<boolean> = createCursor(false);
//ReactFiberStack.old.js
const valueStack: Array<any> = [];
- 在
render阶段的beginWork函数里调用updateContextProvider的时候会执行pushProvider,将新的值push进valueStack中 - 在
render阶段的completeWork函数里调用popProvider,将栈顶contextpop出来
//pushProvider
function pushProvider(providerFiber, nextValue) {var context = providerFiber.type._context;{push(valueCursor, context._currentValue, providerFiber);context._currentValue = nextValue;}
}//popProvider
function popProvider(providerFiber) {var currentValue = valueCursor.current;pop(valueCursor, providerFiber);var context = providerFiber.type._context;{context._currentValue = currentValue;}
}
因为在render阶段,会以深度优先的方式遍历节点,这样在每一层级都可以通过valueCursor拿到最新的值了。上面也讲了createContext的实现,那么在使用的时候useContext又在干了什么呢?我们通过调用可以看到是调用了readContext,而readContext创建了 dependencies并关联到了fiber的dependencies上面。更新阶段再次调用readContext去根据context的变化执行调度更新。
export function readContext<T>(context: ReactContext<T>,observedBits: void | number | boolean,
): T {...if (lastContextWithAllBitsObserved === context) {// Nothing to do. We already observe everything in this context.// 走mount阶段的useContext逻辑} else if (observedBits === false || observedBits === 0) {// Do not observe any updates.} else {// 生成resolvedObservedBitslet resolvedObservedBits; // Avoid deopting on observable arguments or heterogeneous types.if (typeof observedBits !== 'number' ||observedBits === MAX_SIGNED_31_BIT_INT) {// Observe all updates.lastContextWithAllBitsObserved = ((context: any): ReactContext<mixed>);resolvedObservedBits = MAX_SIGNED_31_BIT_INT;} else {resolvedObservedBits = observedBits;}// 生成dependenciesconst contextItem = {context: ((context: any): ReactContext<mixed>),observedBits: resolvedObservedBits,next: null,};if (lastContextDependency === null) {invariant(...);// This is the first dependency for this component. Create a new list.lastContextDependency = contextItem;// fiber dependencies链表的第一个contextcurrentlyRenderingFiber.dependencies = {lanes: NoLanes,firstContext: contextItem,responders: null,};} else {// Append a new context item. // 加入dependencieslastContextDependency = lastContextDependency.next = contextItem;}}return isPrimaryRenderer ? context._currentValue : context._currentValue2;
}
我们再来看一看render阶段react会根据不同的组件类型去执行updateContextProvider,updateContextConsumer。
updateContextProvider
function updateContextProvider(current: Fiber | null,  workInProgress: Fiber,  renderLanes: Lanes,
) {const providerType: ReactProviderType<any> = workInProgress.type;const context: ReactContext<any> = providerType._context;const newProps = workInProgress.pendingProps; // 新的状态const oldProps = workInProgress.memoizedProps;// 上一次的状态const newValue = newProps.value;// 新状态的value...// 把value加入到valueStack中pushProvider(workInProgress, newValue);if (oldProps !== null) {const oldValue = oldProps.value;// 计算context变化的值const changedBits = calculateChangedBits(context, newValue, oldValue);if (changedBits === 0) { // context没有变化// No change. Bailout early if children are the same.if (oldProps.children === newProps.children &&!hasLegacyContextChanged()) {return bailoutOnAlreadyFinishedWork(current,workInProgress,renderLanes,);}} else { // context有变化了// The context value changed. Search for matching consumers and schedule// them to update.propagateContextChange(workInProgress, context, changedBits, renderLanes);}}const newChildren = newProps.children;// context变化,要重新diffreconcileChildren(current, workInProgress, newChildren, renderLanes);return workInProgress.child;
}
上面代码可以看到如果changedBits === 0则表示当前context没有变化。
calculateChangedBits
export function calculateChangedBits<T>(context: ReactContext<T>,newValue: T,oldValue: T,
) {// 两次的props是一样的if (is(oldValue, newValue)) {// No changereturn 0;} else {// 两次props不一样const changedBits =typeof context._calculateChangedBits === 'function'? context._calculateChangedBits(oldValue, newValue): MAX_SIGNED_31_BIT_INT;...return changedBits | 0; // 返回0或者MAX_SIGNED_31_BIT_INT//  MAX_SIGNED_31_BIT_INT = 1073741823,31位调度算法}
}
计算完changedBits之后,如果没有变化就执行bailoutOnAlreadyFinishedWork,跳过当前的节点更新。如果有变化了则执行propagateContextChange去更新当前节点信息。
// bailoutOnAlreadyFinishedWork
function bailoutOnAlreadyFinishedWork(current: Fiber | null,  workInProgress: Fiber,  renderLanes: Lanes,
): Fiber | null {if (current !== null) {// 复用上一次的依赖workInProgress.dependencies = current.dependencies;}...// Check if the children have any pending work.if (!includesSomeLane(renderLanes, workInProgress.childLanes)) {...return null;} else {// 复用孩子节点cloneChildFibers(current, workInProgress);return workInProgress.child;}
}// propagateContextChange
export function propagateContextChange(workInProgress: Fiber,  context: ReactContext<mixed>,  changedBits: number,  renderLanes: Lanes,
): void {// 获得孩子节点信息let fiber = workInProgress.child;if (fiber !== null) {// 有孩子的话,就去关联他的父亲fiber.return = workInProgress;}while (fiber !== null) {let nextFiber;// Visit this fiber.const list = fiber.dependencies; // 遍历fiberif (list !== null) {nextFiber = fiber.child; // 下一个处理的就是fiber的孩子,深度优先let dependency = list.firstContext;while (dependency !== null) { // 遍历dependency链表if (// context变化了dependency.context === context &&(dependency.observedBits & changedBits) !== 0) {if (fiber.tag === ClassComponent) {// 强制调度,创建更新const update = createUpdate(NoTimestamp,pickArbitraryLane(renderLanes),);update.tag = ForceUpdate;// 加入更新队列enqueueUpdate(fiber, update);}// 合并context更新任务的优先级与fiber渲染优先级fiber.lanes = mergeLanes(fiber.lanes, renderLanes);const alternate = fiber.alternate; if (alternate !== null) {alternate.lanes = mergeLanes(alternate.lanes, renderLanes);}// 更新爷爷级别的优先级scheduleWorkOnParentPath(fiber.return, renderLanes);...break;}dependency = dependency.next;}} else if (fiber.tag === ContextProvider) {...} else if (enableSuspenseServerRenderer &&fiber.tag === DehydratedFragment) {...}fiber = nextFiber;}
}
updateContextConsumer
updateContextConsumer中,执行prepareToReadContext判断优先级是否足够加入当前这次render,readContext取到当前context的value。
function updateContextConsumer(current: Fiber | null,  workInProgress: Fiber,  renderLanes: Lanes,
) {let context: ReactContext<any> = workInProgress.type;...const newProps = workInProgress.pendingProps;const render = newProps.children;...// 比一比谁的优先级高,能不能加入到渲染队列里面去prepareToReadContext(workInProgress, renderLanes);// 读取新的valueconst newValue = readContext(context, newProps.unstable_observedBits);let newChildren;...// React DevTools reads this flag.workInProgress.flags |= PerformedWork;// diffreconcileChildren(current, workInProgress, newChildren, renderLanes);return workInProgress.child;
}
所以useContext的执行流程大致如下:
属性相关的hook
对于写原生的朋友来讲,获取一个dom节点直接用document.getElementByXxx,是多么的舒服,react也提供了一种获取节点的hook – useRef eg:
const App = () => {const inputValue = useRef(null);const getValue = () => {console.log(inputValue.current.value)}return (<><input ref={inputValue} type="text" /><button onClick={getValue}>Click</button></>)
}
在input框中输入文字,点击按钮则可以在控制台获取到输入的文字。对比于原生的,它的优势在于省略掉了那些获取操作。useRef如此简单,还是一起来看一下源码吧。根据以往经验,我们找到mountRef函数。
mountRef
function mountRef<T>(initialValue: T): {|current: T|} {const hook = mountWorkInProgressHook();// 获取hook链表const ref = {current: initialValue}; // ref是一个对象 <X ref={xxx} />if (__DEV__) {Object.seal(ref);}// 存入到hook.memoizedState中hook.memoizedState = ref;// 返回 {current: initialValue} 获取通常用x.currentreturn ref;
}
更新阶段的useRef
function updateRef<T>(initialValue: T): {|current: T|} {const hook = updateWorkInProgressHook();// 获取更新的hookreturn hook.memoizedState; // hook返回
}
useRef的执行流程
我们一猜就知道肯定是在某个阶段对具有ref标记的属性标签,进行了某些处理,肯定是render阶段里面做的,我们去render的beginWork里面去找,果然发现 markRef函数。
markRef
const ref = workInProgress.ref;if ((current === null && ref !== null) ||(current !== null && current.ref !== ref)) {// Schedule a Ref effectworkInProgress.flags |= Ref;}
}
但是在查找的过程中,我们还发现位于completeWork函数中也出现了markRef的身影。
function markRef(workInProgress: Fiber) {workInProgress.flags |= Ref;
}
在这里面做的事情就是给带有ref属性的标签打上标记,嗯?打上标记干什么呢,那肯定是在commit阶段去处理啊!那么我们再去找一下commit阶段的commitMutationEffects函数,果不其然,
function commitMutationEffects(root: FiberRoot,  renderPriorityLevel: ReactPriorityLevel,
) {...// flags == 'Ref' ,更新ref currentif (flags & Ref) {const current = nextEffect.alternate;if (current !== null) {commitDetachRef(current); //移除ref}}...
}
在这个函数里面我们发现了对Ref的处理:
- 如果
Ref改变了,且不为null则执行commitDetachRef删掉ref,之后并在commitLayoutEffect中执行commitAttachRef更新ref的值。
commitDetachRef
function commitDetachRef(current: Fiber) {const currentRef = current.ref; //获得当前的refif (currentRef !== null) {// 如果ref是函数则执行if (typeof currentRef === 'function') {currentRef(null);} else {// 否则则返回{current:null}currentRef.current = null;}}
}
commitAttachRef
function commitAttachRef(finishedWork: Fiber) {const ref = finishedWork.ref;if (ref !== null) {const instance = finishedWork.stateNode; // 获得ref实例let instanceToUse;switch (finishedWork.tag) {case HostComponent:instanceToUse = getPublicInstance(instance);break;default:instanceToUse = instance;}// Moved outside to ensure DCE works with this flagif (enableScopeAPI && finishedWork.tag === ScopeComponent) {instanceToUse = instance;}if (typeof ref === 'function') {// 赋值ref(instanceToUse);} else {...ref.current = instanceToUse;}}
}
所以useRef大致执行流程如下:

总结
本文主要讲解了部分hooks的使用与原理,对hook使用更加熟悉了,还有一部分React内置hook的使用请查看官网,还有基于React的扩展ahooks都是值得学习的
相关文章:
从react源码看hooks的原理
React暴露出来的部分Hooks //packages/react/src/React.js export {...useCallback,useContext,useEffect,useLayoutEffect,useMemo,useReducer,useRef,useState,... }功能描述 useState、useReducer: 状态值相关useEffect、useLayoutEffect: 生命周期相关useContext: 状态共…...

空间尺寸对迭代次数的影响
( A, B )---3*30*2---( 1, 0 )( 0, 1 ) ( A, B )---4*30*2---( 1, 0 )( 0, 1 ) 做4个训练集尺寸分别为3行3列,3行4列,4行3列和2行4列的网络。简写为3*3,3*4,4*3,2*4. 保持这4个网络差值结构的形态一致,…...

mininet+flowvisor+floodlight实现网络切片功能
ininetflowvisorfloodlight实现网络切片功能 这个项目所使用的软件flowvisor 和floodlight 都已经过时了网上能找到的资料太少了,整个项目搭建过程中遇到的坑太多了。花了大量的的时间。 有什么问题可提出来,如果我会的话一定会耐心解答的 此项目主要采…...
【C++】十分钟带你入门C++
目录零 内容概括一 C关键字二 命名空间2.1 命名空间定义2.2 命名空间的使用三 C输入和输出四 缺省参数4.1 缺省参数的概念4.2 缺省参数分类五 函数重载5.1 函数重载的概念六 引用6.1 引用概念6.2 引用特性6.3 常引用6.4 使用场景6.5 效率比较6.6 引用和指针的区别七 内联函数7.…...
kettle利用excel文件增量同步一个库的数据(多表一次增量同步)
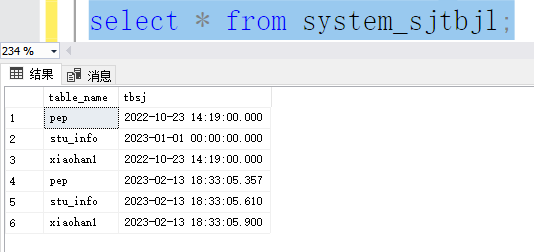
利用excel文件增量同步一个库的数据 现在有sqlserver和mysql两个库上的表在进行同步,mysql上的是源表,sqlserver上是目标表。 mysql : sqlserver : 可以看到sqlserver上表的最近一次同步日期分别是 pep表: 2022-10-23 14:19:00.000 stu_…...
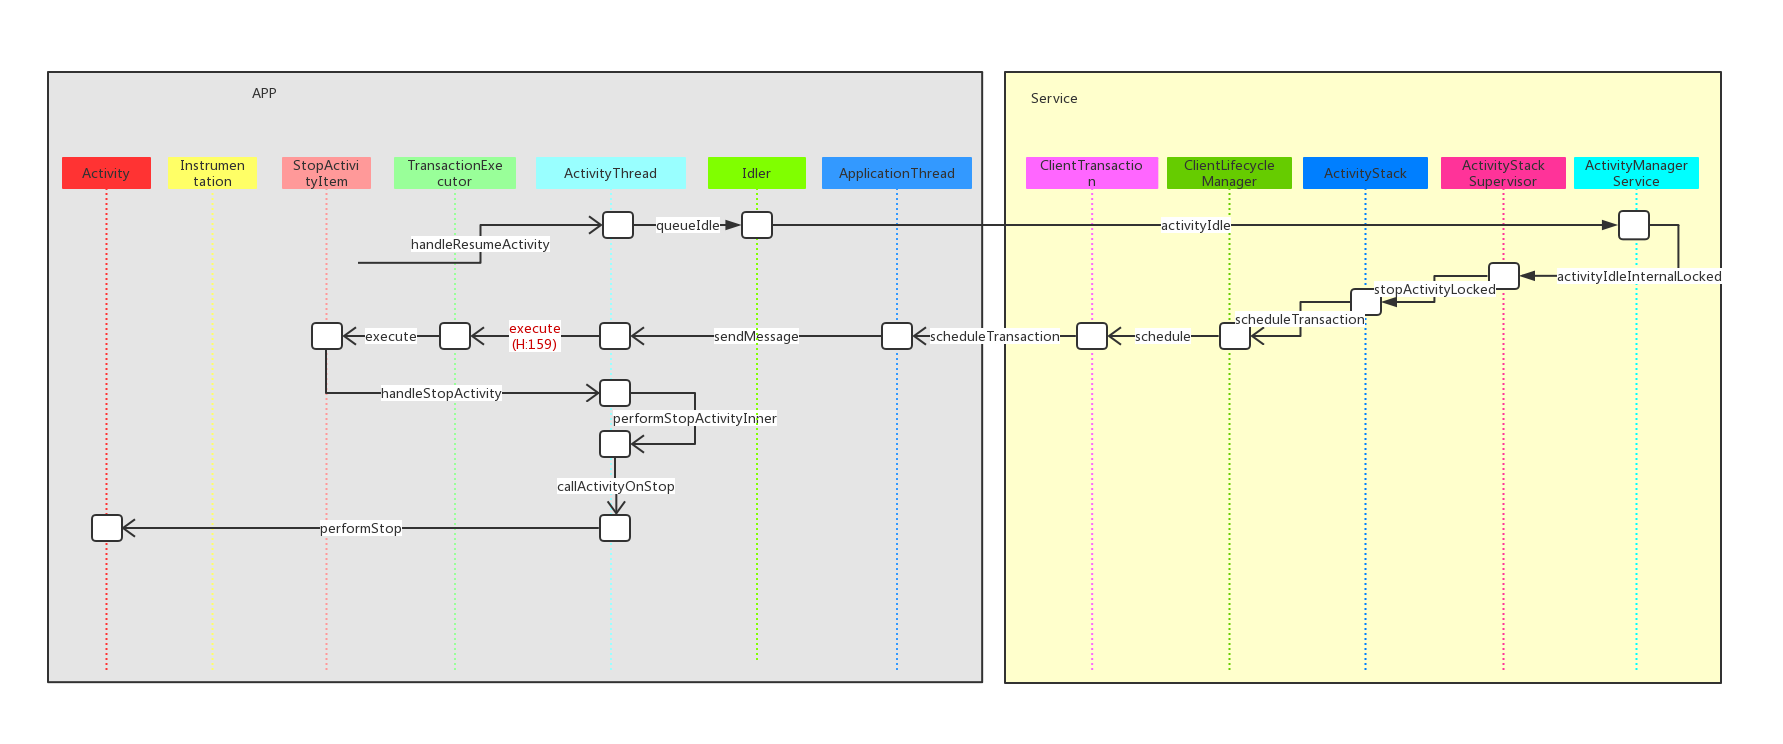
面试题:android中A Activity 打开B Activity,为什么A Activity的onStop()方法最后被调用
如下是一段典型的Activity间切换的日志,从A Activity切换到B Activity:10-17 20:54:42.247: I/com.example.servicetest.AActivity(5817): onCreate() 1166919192 taskID66 10-17 20:54:42.263: I/com.example.servicetest.AActivity(5817): onStart()…...

百度版本gactgpt即将来临,gpt人工智能机器横空出世
百度版本gactgpt即将来临,gpt人工智能机器横空出世,“一言”为定!百度版ChatGPT确认!李彦宏OKR曝光,率先应用于收索业务 gactCBT 大获,当下极有可能成为人工智能的 iPhone 时刻。为了在这场人工智能竞赛中…...
【python--networkx】函数说明+代码讲解
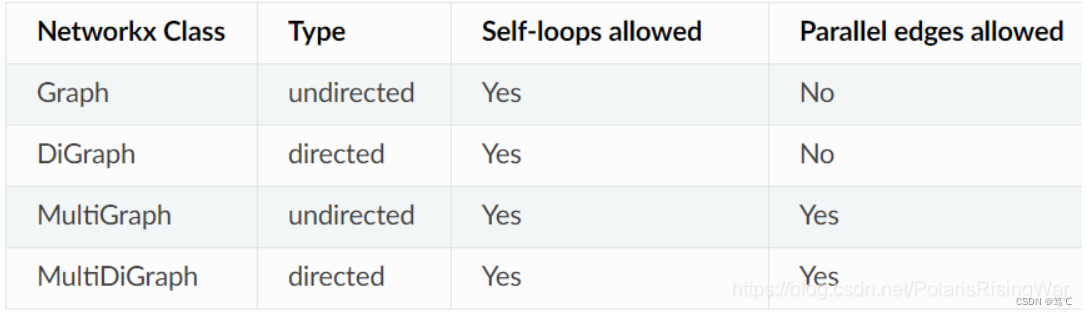
【Python–NetworkX】函数说明代码讲解 文章目录【Python--NetworkX】函数说明代码讲解1. 介绍1.1 前言1.2 图的类型(Graph Types)1.3 常用方法2. 代码示例1. 介绍 1.1 前言 NetworkX是复杂网络研究领域中的常用Python包。 1.2 图的类型(G…...
【Jqgrid分页勾选保存】三步实现表格分页勾选(取消勾选)保存(附源码)
目录1、创建临时存储数组,初始化赋值2、单行选中与取消,调整数组3、全选与取消全选,调整数组4、输出数组保存5、片尾彩蛋【写在前面】表格可以说是在我们的web页面中是最常见的,之前我们介绍过layui表格翻页勾选的实现过程&#x…...

Appium移动自动化测试——app控件获取之uiautomatorviewer
下载手机YY http://yydl.duowan.com/mobile/yymobile_client-android/5.4.2/yymobile_client-5.4.2-881.apk 若链接失效,请自行百度 新建maven空白工程 前置条件:安装eclipse,及其maven插件,请自行百度 新建的工程如下…...
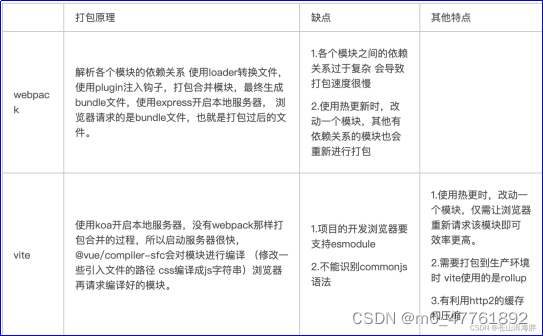
webpack、vite、vue-cli、create-vue 的区别
webpack、vite、vue-cli、create-vue 的区别 首先说结论 Rollup更适合打包库,webpack更适合打包项目应用,vite基于rollup实现了热更新也适合打包项目。 功能工具工具脚手架vue-clicreate-vue构建项目vite打包代码webpackrollup 脚手架:用于初始化&#…...
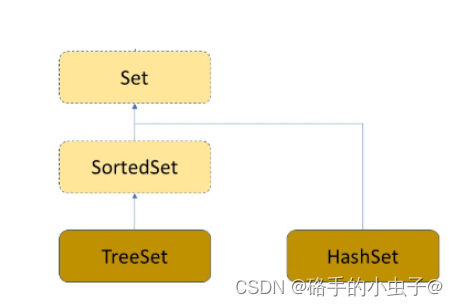
数据结构——TreeMap、TreeSet与HashMap、HashSet
目录 一、Map 1、定义 2、常用方法 3、注意 二、TreeMap 三、HashMap 1、定义 2、冲突定义 3、冲突避免方法——哈希函数设计 (1)、直接定制法(常用) (2)、除留余数法(常用) (3)、平方取中法 &…...

Spring Boot学习篇(十三)
Spring Boot学习篇(十三) shiro安全框架使用篇(五) 1 准备工作 1.1 在SysUserMapper.xml中书写自定义标签 <select id"findRoles" resultType"string">select name from sys_role where id (select roleid from sys_user_role where userid (S…...

微软Bing的AI人工只能对话体验名额申请教程
微软Bing 免费体验名额申请教程流程ChatGPT这东西可太过火了。国外国内,圈里圈外都是人声鼎沸。微软,谷歌,百度这些大佬纷纷出手。连看个同花顺都有GPT概念了,搞技术,做生意的看来都盯上了 流程 下面就讲一下如何申…...

怎么打造WhatsApp Team?SaleSmartly(ss客服)告诉你
关键词:WhatsApp Team SaleSmartly(ss客服) 您是否正在寻找一种让您的团队能够在 WhatsApp协作消息传递的解决方案?拥有了 WhatsApp Team,不仅效率提升,还可以在智能聊天工具中比如SaleSmartly(ss客服&…...

IPV4地址的原理和配置
第三章:IP地址的配置 IPv4(Internet Protocol Version 4)协议族是TCP/IP协议族中最为核心的协议族。它工作在TCP/IP协议栈的网络层,该层与OSI参考模型的网络层相对应。网络层提供了无连接数据传输服务,即网络在发送分…...

软件测试面试准备——(一)Selenium(1)基础问题及自动化测试
滴滴面试:1. 自己负责哪部分功能?农餐对接系统分为了两大子系统,一个是个人订餐系统,二是餐馆、个人与农产品供应商进行农产品交易系统。我主要负责组织测试人员对该系统进行测试。我们测试分为两个阶段:一、功能测试阶…...

AcWing 1230.K倍区间
AcWing 1230. K倍区间 题目描述 给定一个长度为 NNN 的数列,A1,A2,…ANA_1, A_2, … A_NA1,A2,…AN ,如果其中一段连续的子序列 Ai,Ai1,…AjA_i, A_{i1}, … A_jAi,Ai1,…Aj 之和是 KKK 的倍数,我们就称这个区间 [i,j][i,j][i,…...
kubernetes集群部署springcloud项目【AL】【未写完】
kubernetes集群部署springcloud项目【AL】 (先手工做,非自动化) #环境: 192.168.73.138 master 192.168.73.139 node1 192.168.73.140 node2 192.168.73.137 harbor、mysqlgit clone https://github.com/lizhenliang/simple-…...
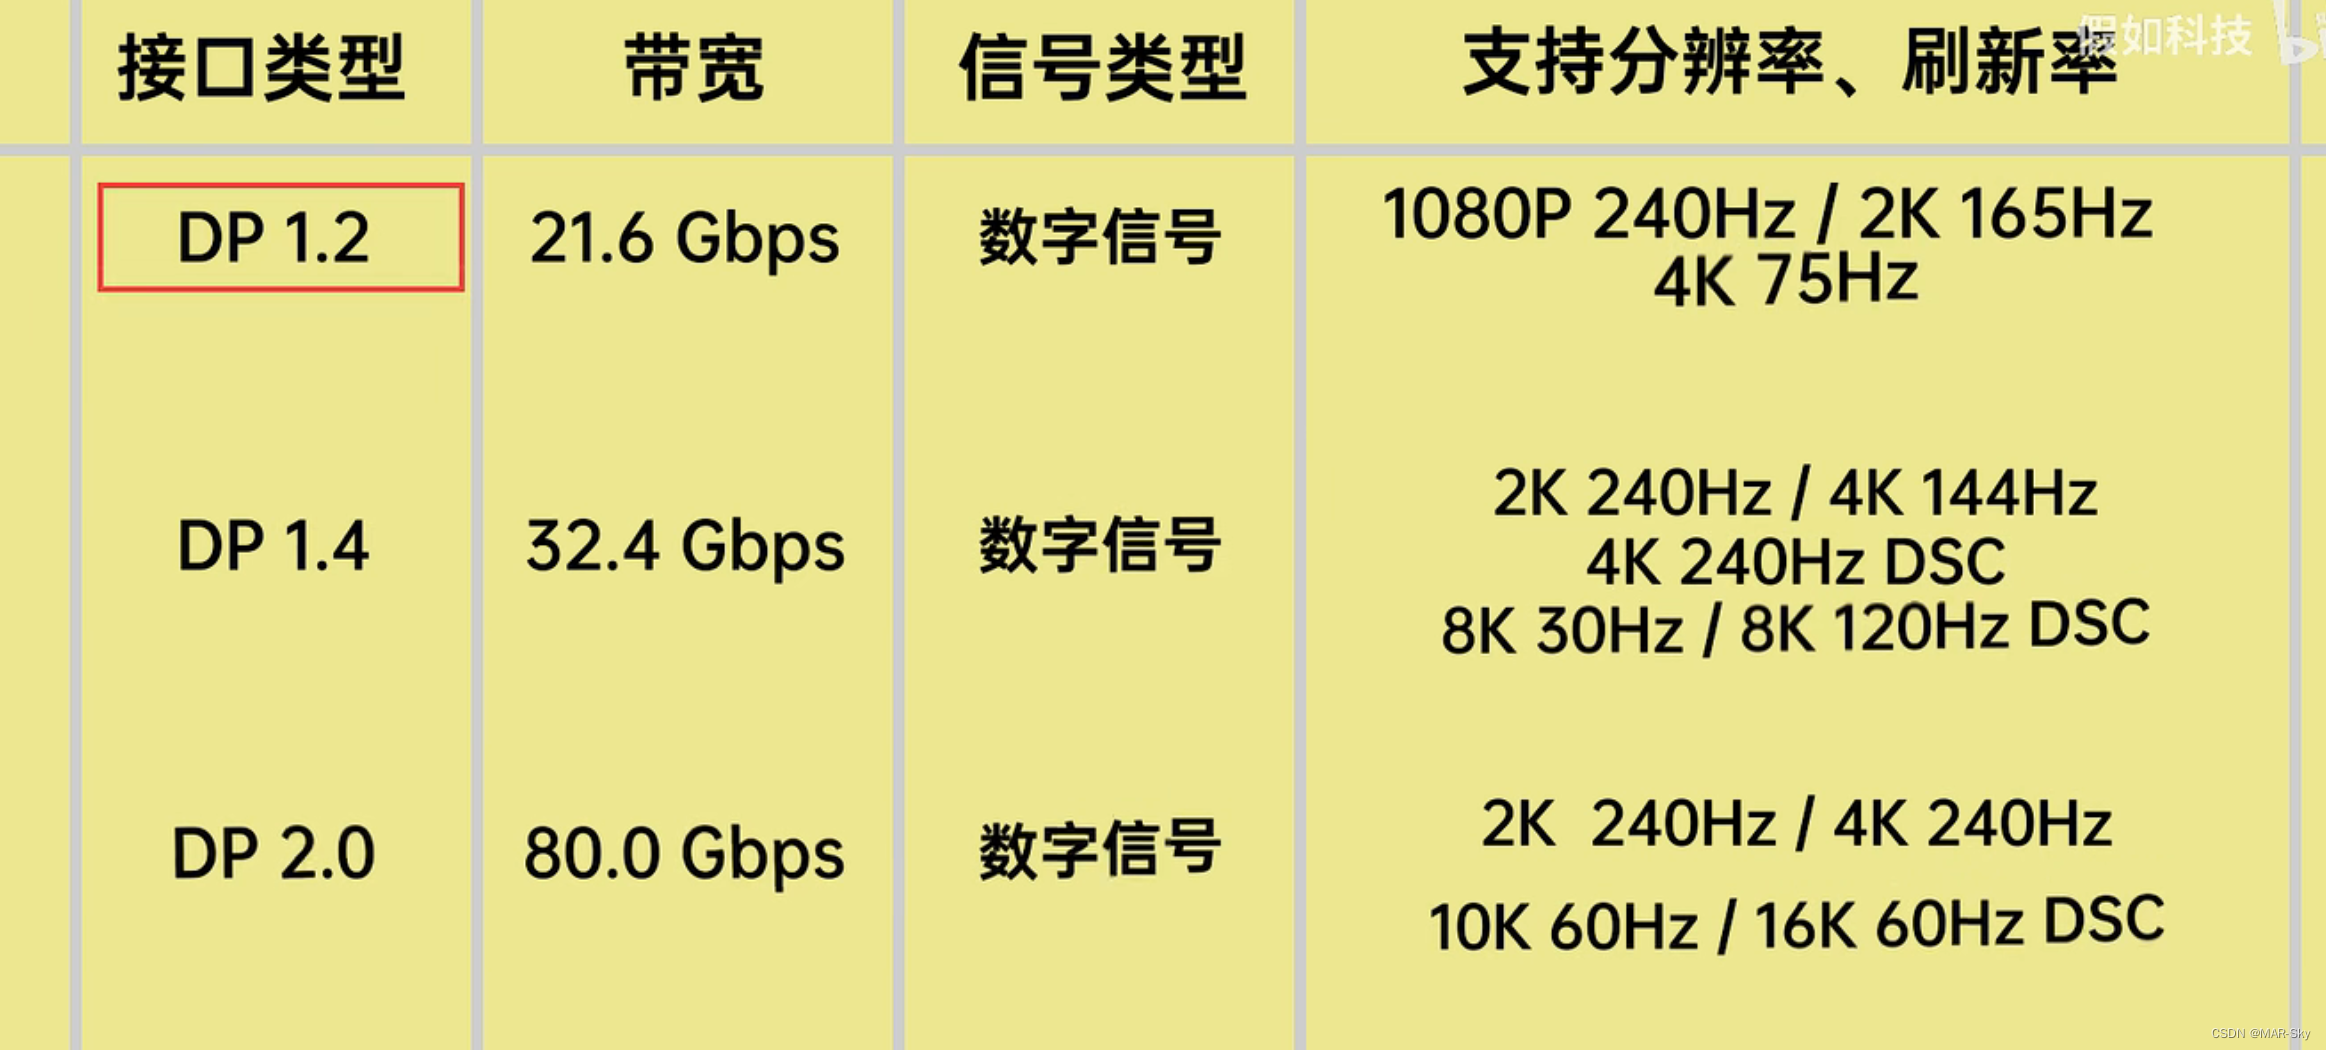
各种音频接口比较
时间 参考:https://www.bilibili.com/video/BV1SL4y1q7GZ/?spm_id_from333.337.search-card.all.click&vd_source00bd76f9d6dc090461cddd9f0deb2d51, https://blog.csdn.net/weixin_43794311/article/details/128941346 接口名字时间公司支持格式…...
)
Python+OpenCV+PyQt5+SVM实现车牌识别系统(源码)
目录 一、项目背景 二、技术介绍 三、功能介绍 四、 代码设计 五、系统实现 一、项目背景 随着我国城市化进程的不断加快,机动车保有量呈现持续快速增长态势。据公安部统计,2024年全国机动车保有量已突破4.5亿辆,其中汽车占比超过80%。…...

端到端AI安家助手:基于WhatsApp的多模态智能体系统架构与实践
1. 项目概述:一个为加拿大新移民设计的端到端AI安家助手如果你刚到一个陌生的国家,面对一堆看不懂的表格、复杂的申请流程和紧迫的截止日期,是不是会感到手足无措?这正是许多加拿大新移民面临的真实困境。49th项目就诞生于这种切身…...

1688代运营公司/月询盘从110涨到235,1688代运营只做了3件事
1688代运营公司/月询盘从110涨到235,1688代运营只做了3件事月询盘从110个上涨到235个,上周有个老客户跟我报喜,说他的店铺询盘涨了139%,翻了一倍还多。他是做运动户外产品的,1688店铺开了4年,但一直运营得不…...

LeRobot:开源机器人学习的终极指南 - 从零到真实世界的AI机器人控制
LeRobot:开源机器人学习的终极指南 - 从零到真实世界的AI机器人控制 【免费下载链接】lerobot 🤗 LeRobot: Making AI for Robotics more accessible with end-to-end learning 项目地址: https://gitcode.com/GitHub_Trending/le/lerobot LeRobo…...

数字时代的计划性抹杀:从强制升级到生态锁定的技术围剿
1. 数字时代的“计划性报废”:从凯迪拉克到小电驴的隐喻 前几天,我在网上申请一张信用卡,过程堪称一场荒诞剧。银行明明通过邮件联系我,也知道我的账号密码,甚至在我通过了“我不是机器人”的图片验证后,却…...

5个Zutilo技巧让你成为Zotero文献管理高手
5个Zutilo技巧让你成为Zotero文献管理高手 【免费下载链接】Zutilo Zotero plugin providing some additional editing features 项目地址: https://gitcode.com/gh_mirrors/zu/Zutilo 还在为Zotero的批量操作烦恼吗?每天面对成百上千的文献条目,…...

3分钟掌握微信聊天记录永久保存:从数据备份到智能分析完全攻略
3分钟掌握微信聊天记录永久保存:从数据备份到智能分析完全攻略 【免费下载链接】WeChatMsg 提取微信聊天记录,将其导出成HTML、Word、CSV文档永久保存,对聊天记录进行分析生成年度聊天报告 项目地址: https://gitcode.com/GitHub_Trending/…...

Spinach印相紧急修复方案:当--v 6.2输出突然丢失青橙分离感时,立即执行的4步CLI热补丁与config.json强制回滚指令
更多请点击: https://intelliparadigm.com 第一章:Spinach印相紧急修复方案:当--v 6.2输出突然丢失青橙分离感时,立即执行的4步CLI热补丁与config.json强制回滚指令 Spinach 6.2 版本在部分 GPU 加速路径下会因色彩空间映射缓存污…...
)
保姆级教程:在Windows 10/11上从源码编译Groops(含Qt环境变量避坑指南)
从零构建Groops编译环境:Windows系统下的完整避坑指南 当你在GNSS数据处理领域深耕时,一款强大的开源工具能让你事半功倍。Groops作为重力场恢复和精密定轨的瑞士军刀,其功能强大但编译过程却可能让新手望而却步。本文将带你一步步穿越编译迷…...

AI工作流引擎:基于DAG与智能体的自动化任务编排实践
1. 项目概述:当AI遇上工作流,一场效率革命的开端 最近在GitHub上看到一个挺有意思的项目,叫 DahnM20/ai-flow 。光看名字,你可能会觉得这又是一个“AI自动化”的玩具,但仔细研究其源码和设计理念后,我发现…...