run方法执行过程分析
文章目录
- run方法核心流程
- SpringApplicationRunListener监听器
- 监听器的配置与加载
- SpringApplicationRunListener源码解析
- 实现类EventPublishingRunListener
- 初始化ApplicationArguments
- 初始化ConfigurableEnvironment
- 获取或创建环境
- 配置环境
- 打印Banner
- Spring应用上下文的创建
- Spring应用上下文的准备
- Spring应用上下文的刷新
- 调用ApplicationRunner和CommandLineRunner
run方法核心流程
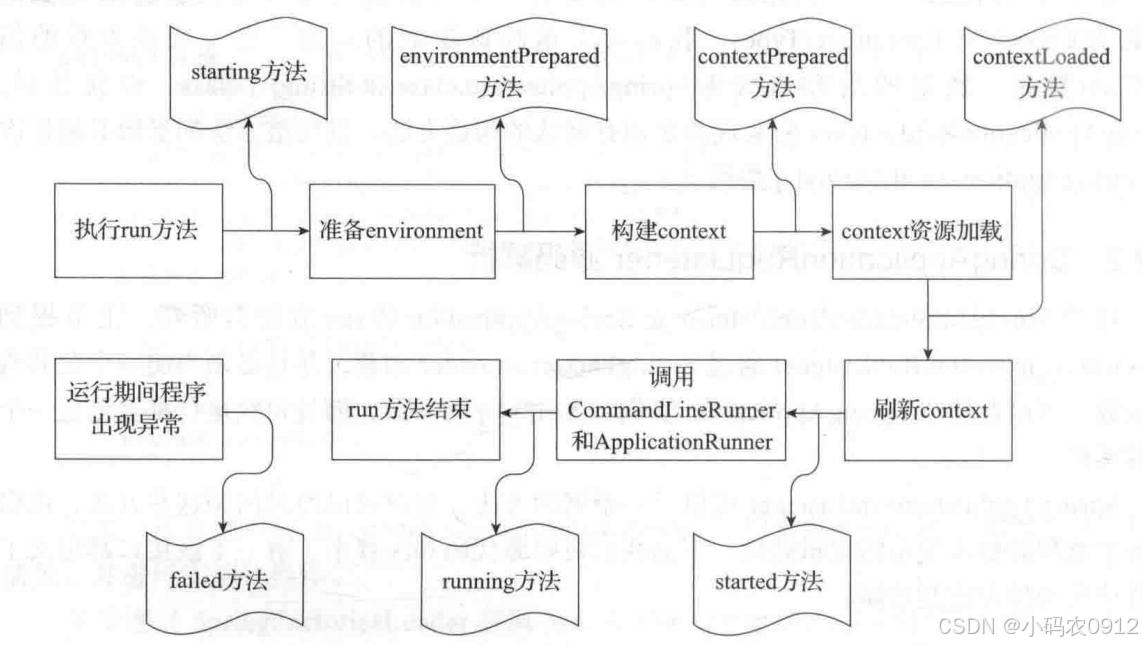
在分析和学习整个run方法的源代码及操作之前,我们先通过下图所示的流程图来看一下SpringApplication调用的run方法处理的核心操作都包含哪些。

上面的流程图可以看出,SpringApplication在run方法中重点做了以下操作。
- 获取监听器和参数配置。
- 打印Banner信息。
- 创建并初始化容器。
- 监听器发送通知。
当然,除了核心操作,run方法运行过程中还涉及启动时长统计、异常报告、启动日志、异常处理等辅助操作。
public ConfigurableApplicationContext run(String... args) {StopWatch stopWatch = new StopWatch();stopWatch.start();ConfigurableApplicationContext context = null;Collection<SpringBootExceptionReporter> exceptionReporters = new ArrayList();this.configureHeadlessProperty();SpringApplicationRunListeners listeners = this.getRunListeners(args);listeners.starting();Collection exceptionReporters;try {// 创建 ApplicationArguments 对象ApplicationArguments applicationArguments = new DefaultApplicationArguments(args);//  加载属性配置ConfigurableEnvironment environment = this.prepareEnvironment(listeners, applicationArguments);this.configureIgnoreBeanInfo(environment);//  打印bannerBanner printedBanner = this.printBanner(environment);// 创建容器context = this.createApplicationContext();//  异常报告器exceptionReporters = this.getSpringFactoriesInstances(SpringBootExceptionReporter.class, new Class[]{ConfigurableApplicationContext.class}, context);//  准备容器this.prepareContext(context, environment, listeners, applicationArguments, printedBanner);// 初始化容器this.refreshContext(context);//  初始化容器后this.afterRefresh(context, applicationArguments);// 停止时长统计stopWatch.stop();//  打印日志if (this.logStartupInfo) {(new StartupInfoLogger(this.mainApplicationClass)).logStarted(this.getApplicationLog(), stopWatch);}//  通知监听器容器启动完成listeners.started(context);this.callRunners(context, applicationArguments);} catch (Throwable var10) {//  异常处理this.handleRunFailure(context, var10, exceptionReporters, listeners);throw new IllegalStateException(var10);}try {//  通知监听器:容器正在运行listeners.running(context);return context;} catch (Throwable var9) {// 异常处理this.handleRunFailure(context, var9, exceptionReporters, (SpringApplicationRunListeners)null);throw new IllegalStateException(var9);}
}
SpringApplicationRunListener监听器
监听器的配置与加载
SpringApplicationRunListeners 可以理解为一个SpringApplicationRunListener的容器,它将SpringApplicationRunListener的集合以构造方法传入,并赋值给其listeners成员变量,然后提供了针对listeners 成员变量的各种遍历操作方法,比如,遍历集合并调用对应的starting、started、running等方法。
SpringApplicationRunListeners 的构建很简单,SpringApplication中getRunListeners方法代码如下:
private SpringApplicationRunListeners getRunListeners(String[] args) {Class<?>[] types = new Class[]{SpringApplication.class, String[].class};return new SpringApplicationRunListeners(logger, this.getSpringFactoriesInstances(SpringApplicationRunListener.class, types, this, args));
}
SpringApplicationRunListeners构造方法的第二个参数便是SpringApplicationRunListener的集合,SpringApplication中调用构造方法时该参数是通过getSpringFactoriesInstances方法获取(都是一样的套路)的,代码如下:
private <T> Collection<T> getSpringFactoriesInstances(Class<T> type, Class<?>[] parameterTypes, Object... args) {// 获取类加载器ClassLoader classLoader = this.getClassLoader();//  加载监听器,并放入set中Set<String> names = new LinkedHashSet(SpringFactoriesLoader.loadFactoryNames(type, classLoader));// 实例化监听器List<T> instances = this.createSpringFactoriesInstances(type, parameterTypes, classLoader, args, names);//  排序AnnotationAwareOrderComparator.sort(instances);return instances;
}
通过方法名便可得知,getSpringFactoriesInstances是用来获取factories配置文件中的注册类,并进行实例化操作。
关于通过SpringFactoriesLoader获取META-INF/spring.factories中对应的配置,构造方法章节已经多次提到,这里不再赞述。SpringApplicationRunListener的注册配置位于spring-boot项目中的spring.factories文件内,SpringBoot默认仅有一个监听器进行了注册,关于其功能后面会专门讲到。
private <T> List<T> createSpringFactoriesInstances(Class<T> type, Class<?>[] parameterTypes, ClassLoader classLoader, Object[] args, Set<String> names) {List<T> instances = new ArrayList(names.size());Iterator var7 = names.iterator();while(var7.hasNext()) {String name = (String)var7.next();try {Class<?> instanceClass = ClassUtils.forName(name, classLoader);Assert.isAssignable(type, instanceClass);Constructor<?> constructor = instanceClass.getDeclaredConstructor(parameterTypes);T instance = BeanUtils.instantiateClass(constructor, args);instances.add(instance);} catch (Throwable var12) {throw new IllegalArgumentException("Cannot instantiate " + type + " : " + name, var12);}}return instances;
}
在上面的代码中,实例化监听器时需要有一个默认的构造方法,且构造方法的参数为Class<?>[]parameterTypes。我们向上追踪该参数的来源,会发现该参数的值为Class数组,数组的内容依次为SpringApplication.class和String[].class。也就是说,SpringApplicationRunListener的实现类必须有默认的构造方法,且构造方法的参数必须依次为SpringApplication和String[]类型。
SpringApplicationRunListener源码解析
接口SpringApplicationRunListener是SpringApplication的run方法监听器。上节提到了 SpringApplicationRunListener通过SpringFactoriesLoader加载,并且必须声明一个公共构造函数,该函数接收SpringApplication实例和String[]的参数,而且每次运行都会创建一个新的实例。
SpringApplicationRunListener提供了一系列的方法,用户可以通过回调这些方法,在启动各个流程时加入指定的逻辑处理。
class SpringApplicationRunListeners {private final Log log;private final List<SpringApplicationRunListener> listeners;SpringApplicationRunListeners(Log log, Collection<? extends SpringApplicationRunListener> listeners) {this.log = log;this.listeners = new ArrayList(listeners);}public void starting() {Iterator var1 = this.listeners.iterator();while(var1.hasNext()) {SpringApplicationRunListener listener = (SpringApplicationRunListener)var1.next();listener.starting();}}public void environmentPrepared(ConfigurableEnvironment environment) {Iterator var2 = this.listeners.iterator();while(var2.hasNext()) {SpringApplicationRunListener listener = (SpringApplicationRunListener)var2.next();listener.environmentPrepared(environment);}}public void contextPrepared(ConfigurableApplicationContext context) {Iterator var2 = this.listeners.iterator();while(var2.hasNext()) {SpringApplicationRunListener listener = (SpringApplicationRunListener)var2.next();listener.contextPrepared(context);}}public void contextLoaded(ConfigurableApplicationContext context) {Iterator var2 = this.listeners.iterator();while(var2.hasNext()) {SpringApplicationRunListener listener = (SpringApplicationRunListener)var2.next();listener.contextLoaded(context);}}public void started(ConfigurableApplicationContext context) {Iterator var2 = this.listeners.iterator();while(var2.hasNext()) {SpringApplicationRunListener listener = (SpringApplicationRunListener)var2.next();listener.started(context);}}public void running(ConfigurableApplicationContext context) {Iterator var2 = this.listeners.iterator();while(var2.hasNext()) {SpringApplicationRunListener listener = (SpringApplicationRunListener)var2.next();listener.running(context);}}public void failed(ConfigurableApplicationContext context, Throwable exception) {Iterator var3 = this.listeners.iterator();while(var3.hasNext()) {SpringApplicationRunListener listener = (SpringApplicationRunListener)var3.next();this.callFailedListener(listener, context, exception);}}private void callFailedListener(SpringApplicationRunListener listener, ConfigurableApplicationContext context, Throwable exception) {try {listener.failed(context, exception);} catch (Throwable var6) {if (exception == null) {ReflectionUtils.rethrowRuntimeException(var6);}if (this.log.isDebugEnabled()) {this.log.error("Error handling failed", var6);} else {String message = var6.getMessage();message = message != null ? message : "no error message";this.log.warn("Error handling failed (" + message + ")");}}}
}
我们通过源代码可以看出,SpringApplicationRunListener为run方法提供了各个运行阶段的监听事件处理功能。
下图展示了在整个run方法的生命周期中SpringApplicationRunListener的所有方法所处的位置,该图可以帮助我们更好地学习run方法的运行流程。在前面run方法的代码中已经看到相关监听方法被调用,后续的源代码中也将涉及对应方法的调用,我们可参考此图以便理解和加深记忆。
实现类EventPublishingRunListener
EventPublishingRunListener是SpringBoot中针对SpringApplicationRunListener接口的唯一内建实现。EventPublishingRunListener使用内置的SimpleApplicationEventMulticaster来广播在上下文刷新之前触发的事件。
默认情况下,SpringBoot在初始化过程中触发的事件也是交由EventPublishingRunListener来代理实现的。
SpringBoot完成基本的初始化之后,会遍历SpringApplication的所有ApplicationListener实例,并将它们与SimpleApplicationEventMulticaster进行关联,方便SimpleApplicationEventMulticaster后续将事件传递给所有的监听器。
EventPublishingRunListener针对不同的事件提供了不同的处理方法,但它们的处理流程基本相同。
public void contextLoaded(ConfigurableApplicationContext context) {ApplicationListener listener;for(Iterator var2 = this.application.getListeners().iterator(); var2.hasNext(); context.addApplicationListener(listener)) {listener = (ApplicationListener)var2.next();if (listener instanceof ApplicationContextAware) {((ApplicationContextAware)listener).setApplicationContext(context);}}this.initialMulticaster.multicastEvent(new ApplicationPreparedEvent(this.application, this.args, context));
}
contextLoaded方法在发布事件之前做了两件事:第一,遍历application的所有监听器实现类,如果该实现类还实现了ApplicationContextAware接口,则将上下文信息设置到该监听器内;第二,将application中的监听器实现类全部添加到上下文中。最后一步才是调用事件广播。
也正是这个方法形成了不同事件广播形式的分水岭,在此方法之前执行的事件广播都是通过multicastEvent来进行的,而该方法之后的方法则均采用publishEvent来执行。这是因为只有到了contextLoaded方法之后,上下文才算初始化完成,才可通过它的publishEvent方法来进行事件的发布。
初始化ApplicationArguments
监听器启动之后,紧接着便是执行ApplicationArguments对象的初始化,ApplicationArguments是用于提供访问运行SpringApplication时的参数。
ApplicationArguments的初始化过程非常简单,只是调用了它的实现类DefaultApplicationArguments并传入main方法中的args参数。
在DefaultApplicationArguments中将参数args封装为Source对象,Source对象是基于Spring框架的SimpleCommandLinePropertySource来实现的。
初始化ConfigurableEnvironment
完成ApplicationArguments参数的准备之后,便开始通过prepareEnvironment方法对ConfigurableEnvironment对象进行初始化操作。
ConfigurableEnvironment接口继承自Environment接口和ConfigurablePropertyResolver,最终都继承自接口PropertyResolverConfigurableEnvironment接口的主要作用是提供当前运行环境的公开接口,比如配置文件profiles各类系统属性和变量的设置、添加、读取、合并等功能。
通过ConfigurableEnvironment接口中方法定义,可以更清楚地了解它的功能,代码如下:
public interface ConfigurableEnvironment extends Environment, ConfigurablePropertyResolver {void setActiveProfiles(String... var1);void addActiveProfile(String var1);void setDefaultProfiles(String... var1);MutablePropertySources getPropertySources();Map<String, Object> getSystemProperties();Map<String, Object> getSystemEnvironment();void merge(ConfigurableEnvironment var1);
}
通过接口提供的方法,我们可以看出ConfigurableEnvironment就是围绕着这个“环境”来提供相应的功能,这也是为什么我们也将它称作“环境”。
了解了ConfigurableEnvironment的功能及方法,我们回归到SpringApplication的流程看相关源代码。run方法中调用prepareEnvironment方法相关代码如下:
private ConfigurableEnvironment prepareEnvironment(SpringApplicationRunListeners listeners, ApplicationArguments applicationArguments) {ConfigurableEnvironment environment = this.getOrCreateEnvironment();this.configureEnvironment((ConfigurableEnvironment)environment, applicationArguments.getSourceArgs());listeners.environmentPrepared((ConfigurableEnvironment)environment);this.bindToSpringApplication((ConfigurableEnvironment)environment);if (!this.isCustomEnvironment) {environment = (new EnvironmentConverter(this.getClassLoader())).convertEnvironmentIfNecessary((ConfigurableEnvironment)environment, this.deduceEnvironmentClass());}ConfigurationPropertySources.attach((Environment)environment);return (ConfigurableEnvironment)environment;
}
通过以上代码可知,prepareEnvironment进行了以下的操作:
- 获取或创建环境。
- 配置环境。
- ConfigurationPropertySources附加到指定环境:将ConfigurationPropertySources附加到指定环境中的第一位,并动态跟踪环境的添加或删除(当前版本新增了该行代码,与最后一步操作相同)。
- 设置listener监听事件:前面章节已经讲过,此处主要针对准备环境的监听。
- 绑定环境到SpringApplication:将环境绑定到name为“spring.main”的目标上。
- 转换环境:判断是否是定制的环境,如果不是定制的,则将环境转换为StandardEnvironment。此时判断条件isCustomEnvironment默认为false,在后面的操作中会将其设置为true,如果为true则不再会进行此转换操作。
- ConfigurationPropertySources附加到指定环境:将ConfigurationPropertySources附加到指定环境中的第一位,并动态跟踪环境的添加或删除操作。
获取或创建环境
SpringApplication类中通过getOrCreateEnvironment方法来获取或创建环境。在该方法中首先判断环境是否为null,如果不为null则直接返回;如果为null,则根据前面推断出来的WebApplicationType类型来创建指定的环境。
配置环境
在获得环境变量对象之后,开始对环境变量和参数进行相应的设置,主要包括转换服务的设置、PropertySources的设置和activeProfiles的设置。
打印Banner
完成环境的基本处理之后,下面就是控制台Banner的打印了。SpringBoot的Banner打印是一个比较酷炫的功能,但又显得有些华而不实,特别是打印图片时启动速度会变慢。
private Banner printBanner(ConfigurableEnvironment environment) {if (this.bannerMode == Mode.OFF) {return null;} else {ResourceLoader resourceLoader = this.resourceLoader != null ? this.resourceLoader : new DefaultResourceLoader(this.getClassLoader());SpringApplicationBannerPrinter bannerPrinter = new SpringApplicationBannerPrinter((ResourceLoader)resourceLoader, this.banner);return this.bannerMode == Mode.LOG ? bannerPrinter.print(environment, this.mainApplicationClass, logger) : bannerPrinter.print(environment, this.mainApplicationClass, System.out);}
}
上面的代码中展示了Banner的开启及打印位置的设置。程序通过Banner.Mode枚举值来判断是否开启Banner打印,此项参数可以在SpringBoot入口nmain方法中通过setBannerMode方法来设置,也可以通过application.properties中的spring.main.banner-mode进行设置。
SpringApplicationBannerPrinter类承载了Banner初始化及打印的核心功能,比如默认如何获取Banner信息、如何根据约定优于配置来默认获得Banner的内容、Banner支持的文件格式等。
而具体打印的信息是由Banner接口的实现类来完成的,比如默认情况下使用SpringBootBanner来打印SpringBoot的版本信息及简单的图形。当然还有通过资源文件打印的ResourceBanner,通过图片打印的ImageBanner等方法。
Spring应用上下文的创建
SpringBoot创建Spring的应用上下文时,如果未指定要创建的类,则会根据之前推断出的类型来进行默认上下文类的创建。
在SpringBoot中通过SpringApplication类中的createApplicationContext来进行应用上下文的创建,代码如下:
protected ConfigurableApplicationContext createApplicationContext() {//  获取容器的类变量Class<?> contextClass = this.applicationContextClass;//  如果为null,则根据Web应用类型按照默认类进行创建if (contextClass == null) {try {switch(this.webApplicationType) {case SERVLET:contextClass = Class.forName("org.springframework.boot.web.servlet.context.AnnotationConfigServletWebServerApplicationContext");break;case REACTIVE:contextClass = Class.forName("org.springframework.boot.web.reactive.context.AnnotationConfigReactiveWebServerApplicationContext");break;default:contextClass = Class.forName("org.springframework.context.annotation.AnnotationConfigApplicationContext");}} catch (ClassNotFoundException var3) {throw new IllegalStateException("Unable create a default ApplicationContext, please specify an ApplicationContextClass", var3);}}return (ConfigurableApplicationContext)BeanUtils.instantiateClass(contextClass);
}
Spring应用上下文的准备
我们在上一节完成了应用上下文的创建工作,SpringApplication继续通过prepareContext方法来进行应用上下文的准备工作。
private void prepareContext(ConfigurableApplicationContext context, ConfigurableEnvironment environment, SpringApplicationRunListeners listeners, ApplicationArguments applicationArguments, Banner printedBanner) {// 设置应用上下文环境context.setEnvironment(environment);// 设置应用上下文后置处理this.postProcessApplicationContext(context);// 初始化contextthis.applyInitializers(context);// 通知监听器上下文准备阶段listeners.contextPrepared(context);// 打印 profileif (this.logStartupInfo) {this.logStartupInfo(context.getParent() == null);this.logStartupProfileInfo(context);}//  获取 ConfigurableListableBeanFactory ConfigurableListableBeanFactory beanFactory = context.getBeanFactory();beanFactory.registerSingleton("springApplicationArguments", applicationArguments);if (printedBanner != null) {beanFactory.registerSingleton("springBootBanner", printedBanner);}if (beanFactory instanceof DefaultListableBeanFactory) {((DefaultListableBeanFactory)beanFactory).setAllowBeanDefinitionOverriding(this.allowBeanDefinitionOverriding);}//  获取全部配置源Set<Object> sources = this.getAllSources();Assert.notEmpty(sources, "Sources must not be empty");//  将获取到的配置源加载到context中this.load(context, sources.toArray(new Object[0]));//  通知监听器 context 加载完成listeners.contextLoaded(context);
}
Spring应用上下文的刷新
Spring应用上下文的刷新,是通过调用SpringApplication中的refreshContext方法来完成的。SpringApplication中refreshContext方法相关代码如下:
private void refreshContext(ConfigurableApplicationContext context) {this.refresh(context);if (this.registerShutdownHook) {try {context.registerShutdownHook();} catch (AccessControlException var3) {}}}protected void refresh(ApplicationContext applicationContext) {Assert.isInstanceOf(AbstractApplicationContext.class, applicationContext);((AbstractApplicationContext)applicationContext).refresh();
}
其中refresh方法调用的是AbstractApplicationContext中的refresh方法,该类属于spring-context包。AbstractApplicationContext的refresh方法更多的是Spring相关的内容。
public void refresh() throws BeansException, IllegalStateException {synchronized(this.startupShutdownMonitor) {this.prepareRefresh();ConfigurableListableBeanFactory beanFactory = this.obtainFreshBeanFactory();this.prepareBeanFactory(beanFactory);try {this.postProcessBeanFactory(beanFactory);this.invokeBeanFactoryPostProcessors(beanFactory);this.registerBeanPostProcessors(beanFactory);this.initMessageSource();this.initApplicationEventMulticaster();this.onRefresh();this.registerListeners();this.finishBeanFactoryInitialization(beanFactory);this.finishRefresh();} catch (BeansException var9) {if (this.logger.isWarnEnabled()) {this.logger.warn("Exception encountered during context initialization - cancelling refresh attempt: " + var9);}this.destroyBeans();this.cancelRefresh(var9);throw var9;} finally {this.resetCommonCaches();}}
}
在上面的代码中,调用finishRefresh方法初始化容器的生命周期处理器并发布容器的生命周期事件之后,Spring应用上下文正式开启,SpringBoot核心特性也随之启动。完成refreshContext方法操作之后,调用afterRefresh方法。
完成以上操作之后,调用SpringApplicationRunListeners的started方法,通知监听器容器启动完成,并调用ApplicationRunner和CommandLineRunner的运行方法。
调用ApplicationRunner和CommandLineRunner
ApplicationRunner和CommandLineRunner是通过 SpringApplication类的callRunners方法来完成的,具体代码如下:
private void callRunners(ApplicationContext context, ApplicationArguments args) {List<Object> runners = new ArrayList();runners.addAll(context.getBeansOfType(ApplicationRunner.class).values());runners.addAll(context.getBeansOfType(CommandLineRunner.class).values());AnnotationAwareOrderComparator.sort(runners);Iterator var4 = (new LinkedHashSet(runners)).iterator();while(var4.hasNext()) {Object runner = var4.next();if (runner instanceof ApplicationRunner) {this.callRunner((ApplicationRunner)runner, args);}if (runner instanceof CommandLineRunner) {this.callRunner((CommandLineRunner)runner, args);}}}以上代码,首先从context中获得类型为ApplicationRunner和CommandLineRunner的Bean,将它们放入List列表中并进行排序。然后再遍历调用其run方法,并将ApplicationArguments参数传入。
SpringBoot提供这两个接口的目的,是为了我们在开发的过程中,通过它们来实现在容器启动时执行一些操作,如果有多个实现类,可通过@Order注解或实现Ordered接口来控制执行顺序。
这两个接口都提供了一个run方法,但不同之处在于:ApplicationRunner中run方法的参数为ApplicationArguments,而CommandLineRunner接口中run方法的参数为String数组。
以上方法执行完成后,会通过SpringApplicationRunListeners的running方法通知监听器:容器此刻已处于运行状态。至此,SpringApplication的run方法执行完毕。
相关文章:
run方法执行过程分析
文章目录 run方法核心流程SpringApplicationRunListener监听器监听器的配置与加载SpringApplicationRunListener源码解析实现类EventPublishingRunListener 初始化ApplicationArguments初始化ConfigurableEnvironment获取或创建环境配置环境 打印BannerSpring应用上下文的创建S…...

关联封号率降70%!2025最新IP隔离方案实操手册
高效运营安全防护,跨境卖家必看的风险规避指南 跨境账号管理的核心挑战:关联封号风险激增 2024年,随着全球电商平台对账号合规的审查日益严苛,“关联封号”已成为跨境卖家最头疼的问题之一。无论是同一IP登录多账号、员工操作失误…...

LeetCode 解题思路 10(Hot 100)
解题思路: 上边: 从左到右遍历顶行,完成后上边界下移(top)。右边: 从上到下遍历右列,完成后右边界左移(right–)。下边: 从右到左遍历底行,完成后…...
ASP.NET Core JWT认证与授权
1.JWT结构 JSON Web Token(JWT)是一种用于在网络应用之间安全传输声明的开放标准(RFC 7519)。它通常由三部分组成,以紧凑的字符串形式表示,在身份验证、信息交换等场景中广泛应用。 2.JWT权限认证 2.1添…...

城市地质安全专题连载⑧ | 强化工程地质安全保障力度,为工程项目全栈护航
作者 | 徐海洋、孙美琴 在城市化进程日益加速的今天,城市地质安全问题日益凸显,成为制约城市可持续发展的关键因素之一。从隧道掘进中的突发灾害,到高层建筑地基的稳定性挑战,再到城市地下空间的开发利用风险,地质安全…...
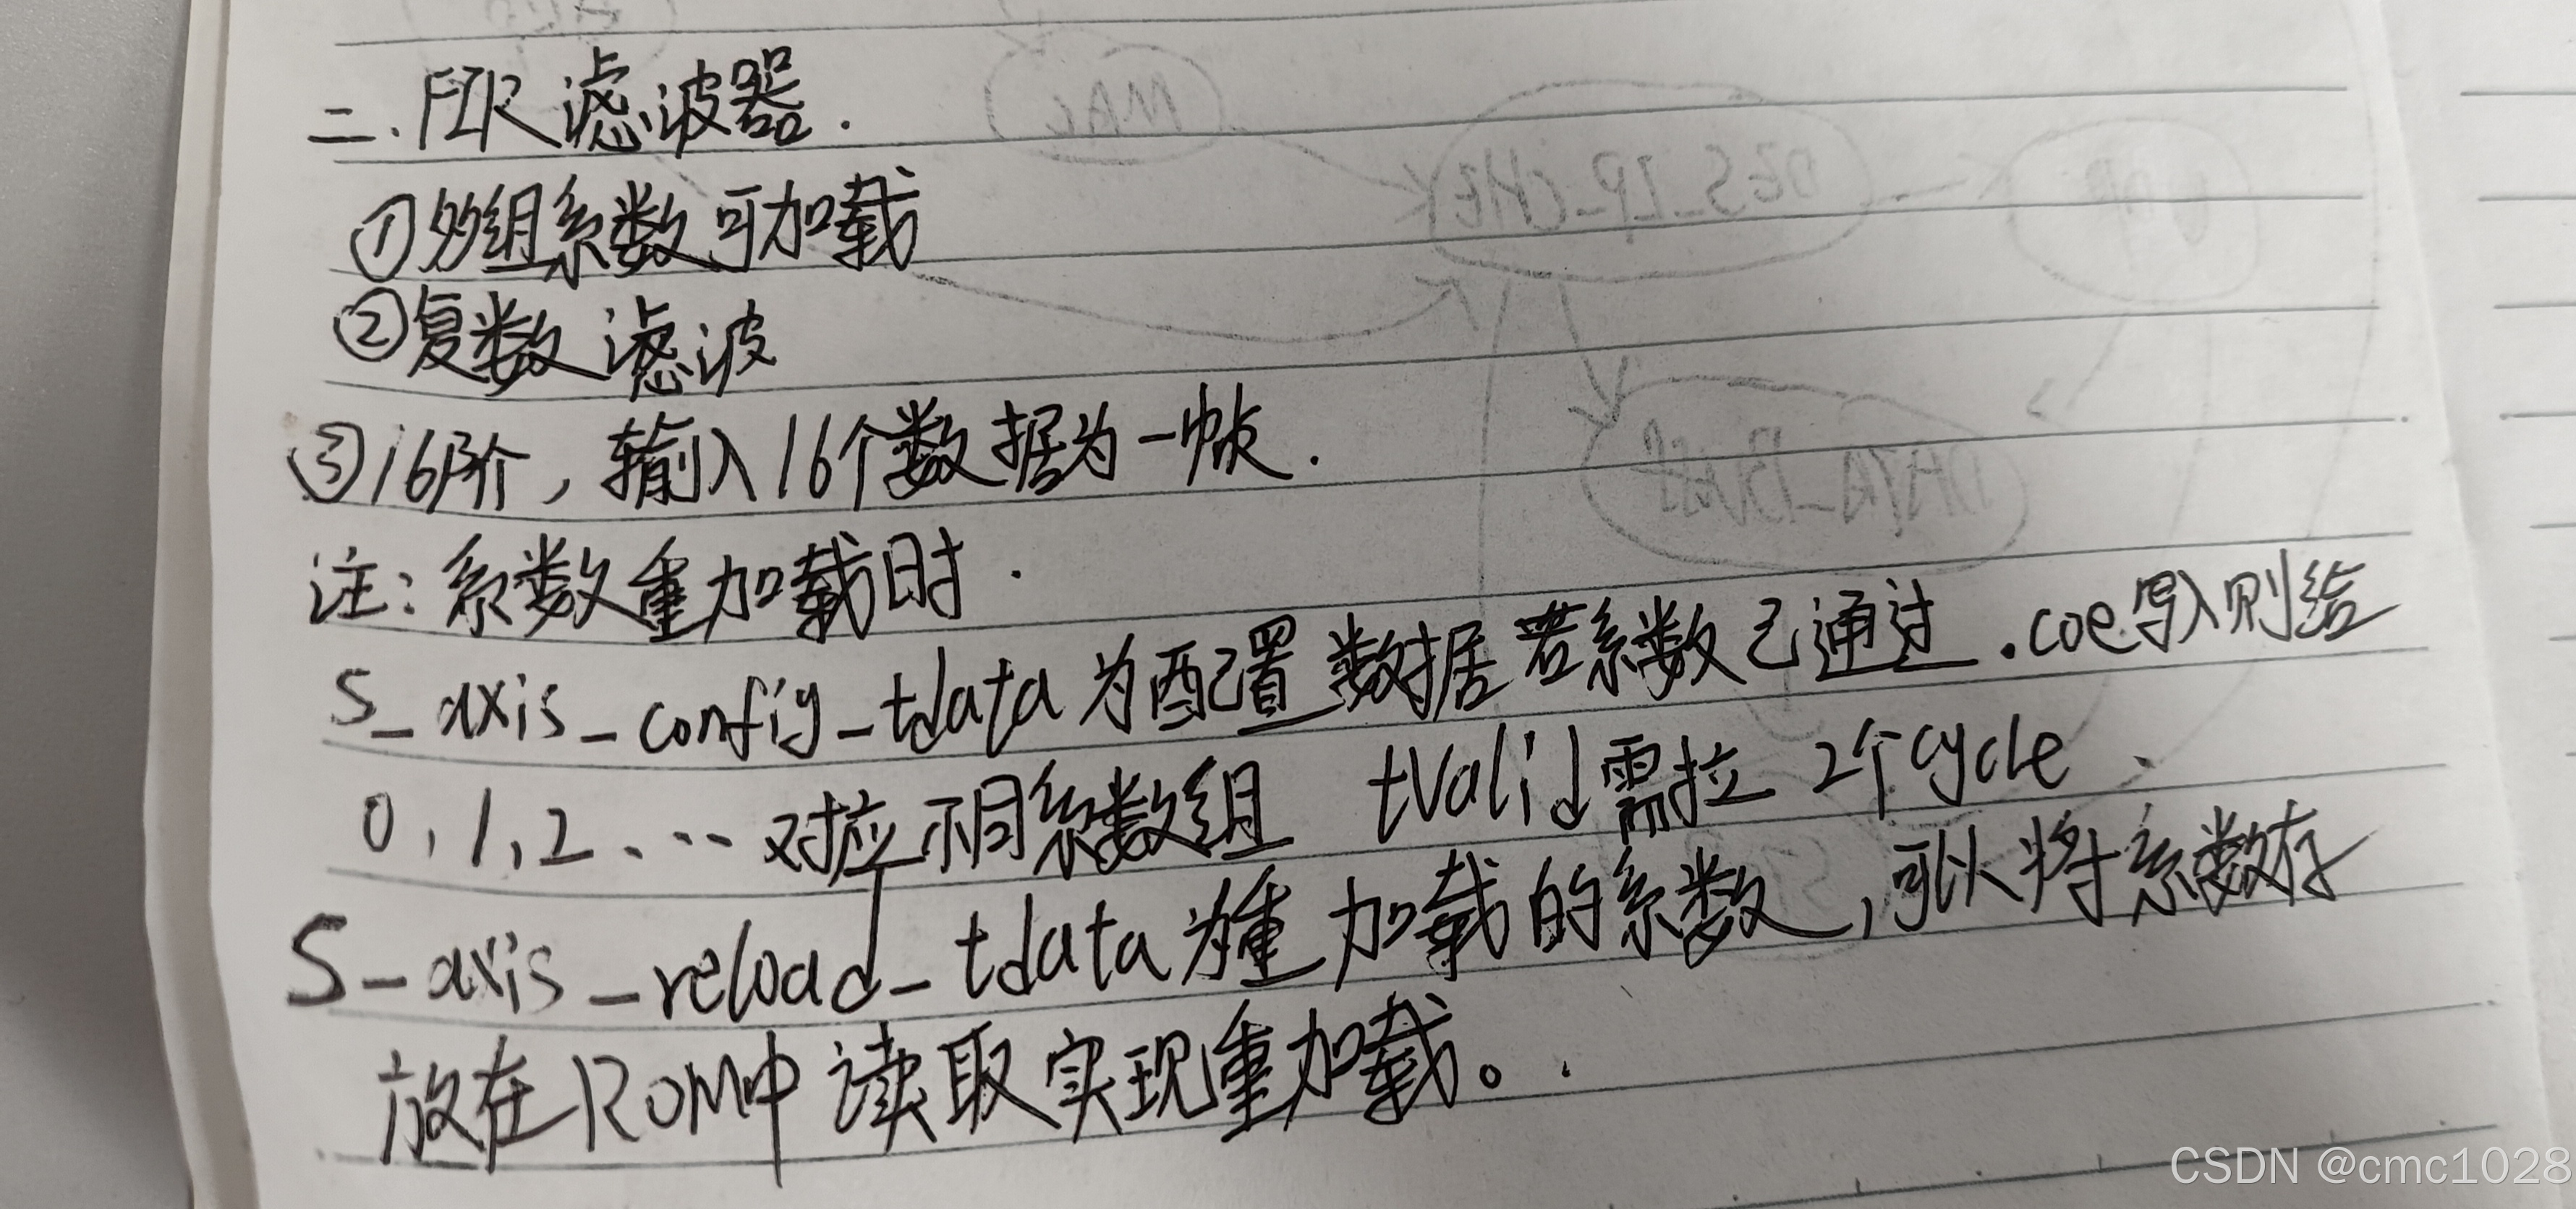
50.xilinx fir滤波器系数重加载如何控制
, 注意:matlab量化后的滤波器系数为有符号数,它是以补码形式存储的,手动计算验证时注意转换为负数对应数值进行计算。...

低代码平台的后端架构设计与核心技术解析
引言:低代码如何颠覆传统后端开发? 在传统开发模式下,一个简单用户管理系统的后端开发需要: 3天数据库设计5天REST API开发2天权限模块对接50个易出错的代码文件 而现代低代码平台通过可视化建模自动化生成,可将开发…...
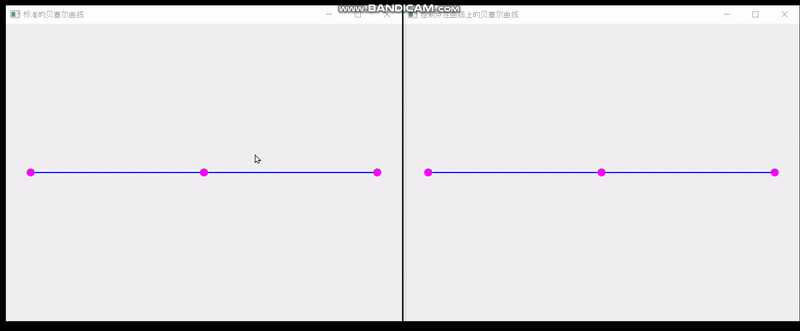
QT实现单个控制点在曲线上的贝塞尔曲线
最终效果: 一共三个文件 main.cpp #include <QApplication> #include "SplineBoard.h" int main(int argc,char** argv) {QApplication a(argc, argv);SplineBoard b;b.setWindowTitle("标准的贝塞尔曲线");b.show();SplineBoard b2(0.0001);b2.sh…...
svn 通过127.0.01能访问 但通过公网IP不能访问,这是什么原因?
连接失败的提示如下 1、SVN的启动方法 方法一: svnserve -d -r /mnt/svn 方法二: svnserve -d --listen-port 3690 -r /mnt/svn 方法三: svnserve -d -r /mnt/svn --listen-host 0.0.0.0 2、首先检查svn服务器是否启动 方法一&#x…...
)
学习DeepSeek V3 与 R1 核心区别(按功能维度分类)
一、定位与架构 V3(通用型模型) 定位:多模态通用大模型,擅长文本生成、多语言翻译、智能客服等多样化任务12。架构:混合专家(MoE)架构,总参数 6710 亿,每次…...

C++中的 互斥量
1.概念: 为什么:线程的异步性,不是按照时间来的!!! C并发以及多线程的秘密-CSDN博客 目的 多线程编程中,当多个线程可能同时访问和修改共享资源时,会导致数据不一致或程序错误。…...
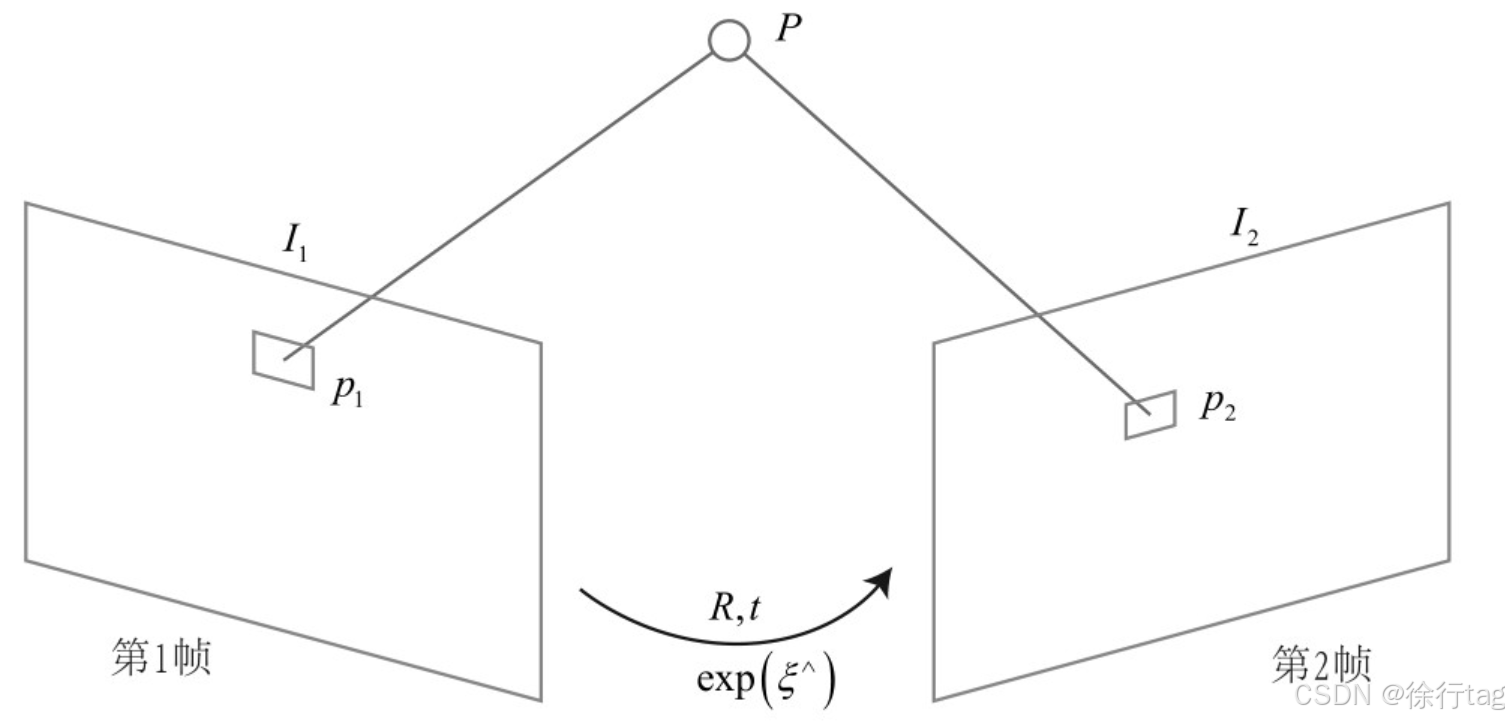
直接法估计相机位姿
引入 在前面的文章:运动跟踪——Lucas-Kanade光流中,我们了解到特征点法存在一些缺陷,并且用光流法追踪像素点的运动来替代特征点法进行特征点匹配的过程来解决这些缺陷。而这篇文章要介绍的直接法则是通过计算特征点在下一时刻图像中的位置…...

PHP动态网站建设
如何配置虚拟主机 1. 学习提纲 本地发布与互联网发布:介绍了如何通过本地IP地址和互联网域名发布网站。 虚拟主机配置与访问:讲解了如何配置虚拟主机,并通过自定义域名访问不同的站点目录。 Web服务器配置:详细说明了如何配置A…...

【gRPC】Java高性能远程调用之gRPC详解
gRPC详解 一、什么是gRPC?二、用proto生成代码2.1、前期准备2.2、protobuf插件安装 三、简单 RPC3.1、开发gRPC服务端3.2、开发gRPC客户端3.3、验证gRPC服务 四、服务器端流式 RPC4.1、开发一个gRPC服务,类型是服务端流4.2、开发一个客户端,调…...

数据结构知识学习小结
一、动态内存分配基本步骤 1、内存分配简单示例: 个人对于示例的理解: 定义一个整型的指针变量p(着重认为它是一个“变量”我觉得可能会更好理解),这个变量用来存地址的,而不是“值”,malloc函…...

分布式锁—2.Redisson的可重入锁一
大纲 1.Redisson可重入锁RedissonLock概述 2.可重入锁源码之创建RedissonClient实例 3.可重入锁源码之lua脚本加锁逻辑 4.可重入锁源码之WatchDog维持加锁逻辑 5.可重入锁源码之可重入加锁逻辑 6.可重入锁源码之锁的互斥阻塞逻辑 7.可重入锁源码之释放锁逻辑 8.可重入锁…...

计算机毕业设计SpringBoot+Vue.js球队训练信息管理系统(源码+文档+PPT+讲解)
温馨提示:文末有 CSDN 平台官方提供的学长联系方式的名片! 温馨提示:文末有 CSDN 平台官方提供的学长联系方式的名片! 温馨提示:文末有 CSDN 平台官方提供的学长联系方式的名片! 作者简介:Java领…...
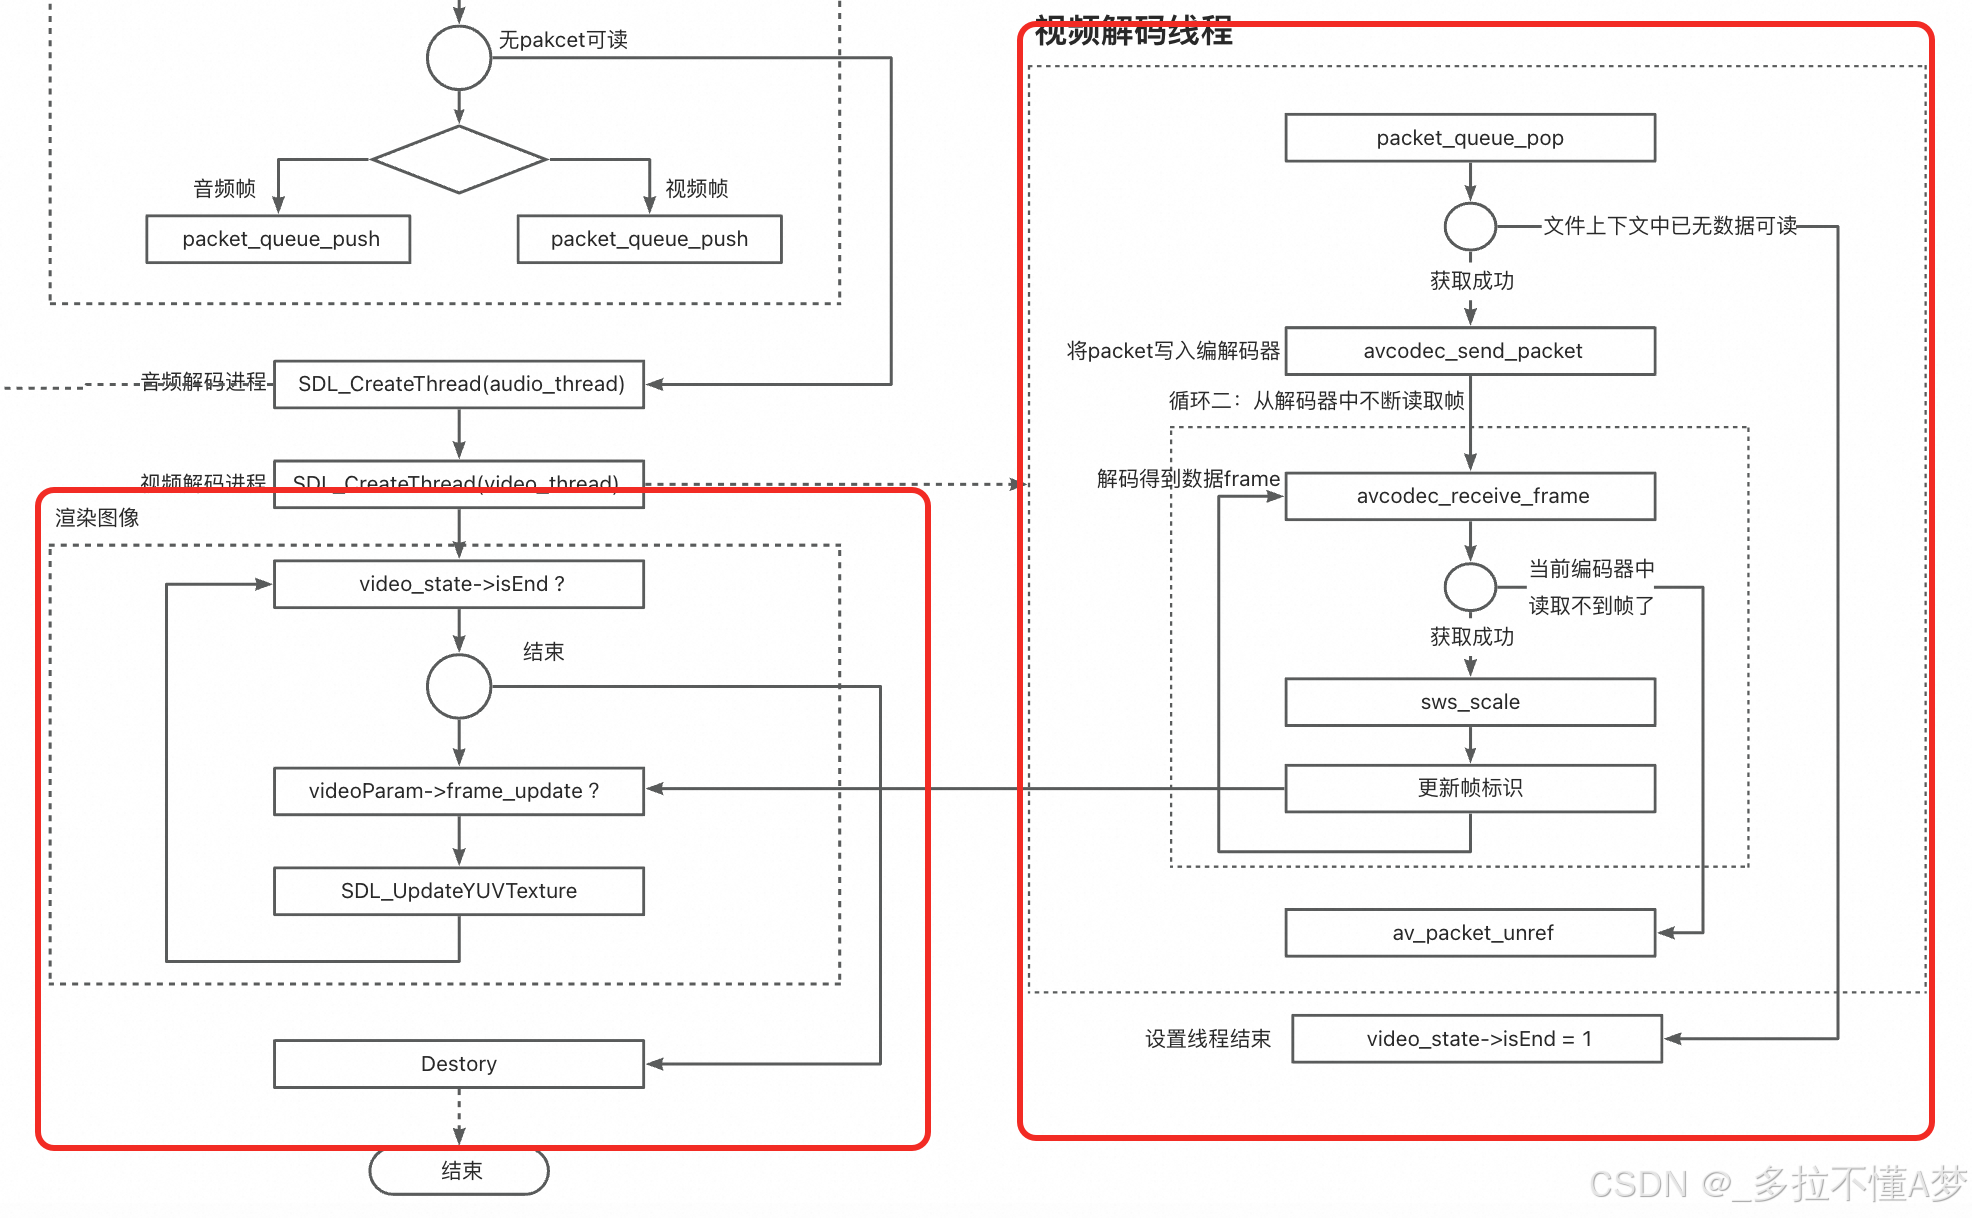
FFmpeg入门:最简单的音视频播放器
FFmpeg入门:最简单的音视频播放器 前两章,我们已经了解了分别如何构建一个简单和音频播放器和视频播放器。 FFmpeg入门:最简单的音频播放器 FFmpeg入门:最简单的视频播放器 本章我们将结合上述两章的知识,看看如何融…...

java 查找两个集合的交集部分数据
利用了Java 8的Stream API,代码简洁且效率高 import java.util.stream.Collectors; import java.util.List; import java.util.HashSet; import java.util.Set;public class ListIntersection {public static List<Long> findIntersection(List<Long> …...

【系统架构设计师】以数据为中心的体系结构风格
目录 1. 说明2. 仓库体系结构风格3. 黑板体系结构风格 1. 说明 1.以数据为中心的体系结构风格主要包括仓库体系结构风格和黑板体系结构风格。 2. 仓库体系结构风格 1.仓库(Repository)是存储和维护数据的中心场所。2.在仓库风格中,有两种不…...

如何彻底移除Windows Defender:13项核心服务完整卸载与系统性能优化终极指南
如何彻底移除Windows Defender:13项核心服务完整卸载与系统性能优化终极指南 【免费下载链接】windows-defender-remover A tool which is uses to remove Windows Defender in Windows 8.x, Windows 10 (every version) and Windows 11. 项目地址: https://gitco…...

对比Taotoken与直接购买官方API在账单清晰度上的差异
🚀 告别海外账号与网络限制!稳定直连全球优质大模型,限时半价接入中。 👉 点击领取海量免费额度 对比Taotoken与直接购买官方API在账单清晰度上的差异 效果展示类,从个人开发者或小团队的实际使用经历出发,…...

ARM项目模板在嵌入式开发中的高效应用
1. ARM项目模板在嵌入式开发中的核心价值在嵌入式系统开发领域,ARM架构处理器凭借其优异的功耗性能比占据着主导地位。作为开发者,我们经常面临这样的困境:每个新项目都要重复搭建基础框架,配置编译工具链,设置调试环境…...

实测Taotoken多模型聚合调用的响应延迟与稳定性观感
🚀 告别海外账号与网络限制!稳定直连全球优质大模型,限时半价接入中。 👉 点击领取海量免费额度 实测Taotoken多模型聚合调用的响应延迟与稳定性观感 在项目开发中,我们常常需要接入不同的大模型来满足多样化的需求。…...

Kubernetes API Server优化:提升集群管理效率
Kubernetes API Server优化:提升集群管理效率 一、Kubernetes API Server概述 1.1 API Server的角色 Kubernetes API Server是Kubernetes集群的核心组件,负责处理所有的REST API请求,是集群内部和外部通信的枢纽。它负责验证和处理请求&#…...

黑苹果配置不再难:Hackintool一站式解决方案让你15分钟搞定驱动问题
黑苹果配置不再难:Hackintool一站式解决方案让你15分钟搞定驱动问题 【免费下载链接】Hackintool The Swiss army knife of vanilla Hackintoshing 项目地址: https://gitcode.com/gh_mirrors/ha/Hackintool 还在为黑苹果的显卡驱动、音频输出和USB识别问题而…...

终极指南:FigmaCN中文插件让设计师告别英文障碍
终极指南:FigmaCN中文插件让设计师告别英文障碍 【免费下载链接】figmaCN 中文 Figma 插件,设计师人工翻译校验 项目地址: https://gitcode.com/gh_mirrors/fi/figmaCN 还在为Figma的全英文界面而烦恼吗?Figma中文插件FigmaCN正是为你…...

移动Git客户端:Android上的完整版本控制解决方案
移动Git客户端:Android上的完整版本控制解决方案 【免费下载链接】MGit A Git client for Android. 项目地址: https://gitcode.com/gh_mirrors/mg/MGit 在移动开发日益普及的今天,开发者需要在不同场景下管理代码版本。移动Git客户端MGit为Andro…...

独立开发者如何利用 Taotoken 统一管理多个 AI 项目支出
🚀 告别海外账号与网络限制!稳定直连全球优质大模型,限时半价接入中。 👉 点击领取海量免费额度 独立开发者如何利用 Taotoken 统一管理多个 AI 项目支出 对于同时维护多个小型 AI 应用或实验项目的独立开发者而言,成…...

【技术解析】VadCLIP:如何让视觉语言模型“看懂”视频异常?
1. VadCLIP是什么?为什么视频异常检测需要它? 想象一下你正在监控室盯着几十块屏幕,突然有个画面闪过一个可疑行为——可能是打架、偷窃或者交通事故。传统监控系统要么依赖人工盯屏(容易疲劳漏检),要么使用…...