智能家居项目(三)之框架设计及框架代码文件工程建立
目录
一、智能家居项目框架设计草图
二、框架代码文件工程建立
三、添加声音识别模块的串口读取功能
一、智能家居项目框架设计草图
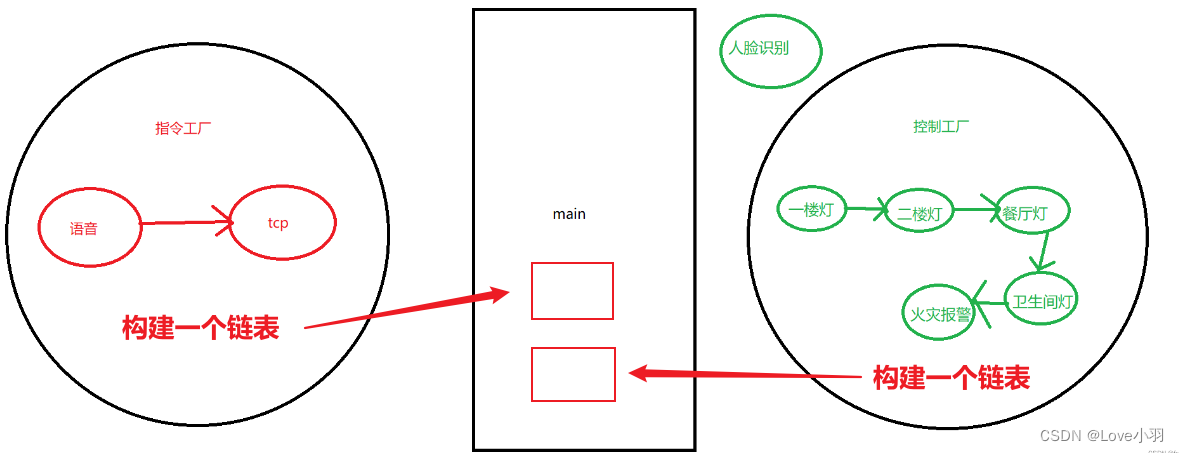
代码思路讲解:
1、一个指令工厂,一个控制工厂,实际上就是通过链表链起来的数据。具体怎么链接起来,就是基于简单工厂模式的类与对象的概念,上一篇文章有学习记录。
2、主函数语音指令程序和tcp指令程序各起一个线程,然后通过指令名字找到对应的控制程序,实现对应的模块的功能。
二、框架代码文件工程建立
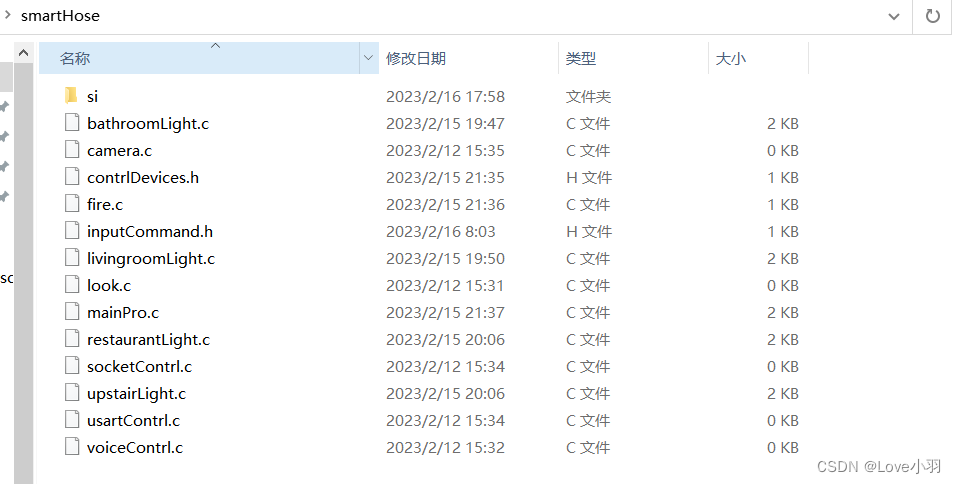
1、在桌面新建一个项目文件夹smartHose,然后在文件夹中创建如下文件:
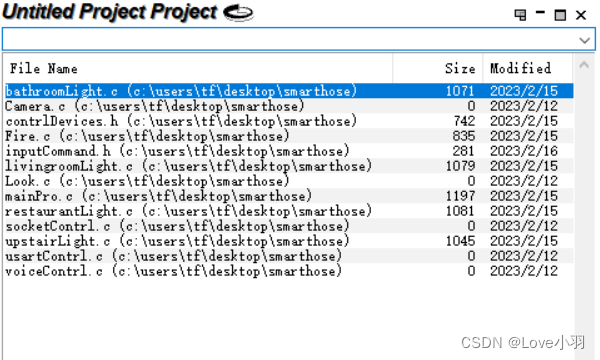
2、把上述的所有文件,都加载到Source lnsight工具中,如下图代表加载完毕
3、创建inputCommand.h头文件
//面向指令工厂的头文件
#include <wiringPi.h>
#include <stdlib.h>struct InputCommander{char commandName[128];             //名字char command[32];                  //指令int (*Init)(char *name,char *ipAdress,char *port);  //操作函数 int (*getCommand)(char *cmd);      //获取数据函数char log[1024];                    //log日志获取struct InputCommander *next;
};
4、创建contrlDevices.h头文件
//设备头文件
#include <wiringPi.h>struct Devices{char deviceName[128]; //名字int status;           //状态int pinNum;           //引脚int (*open)(int pinNum);        //打开int (*close)(int pinNum);       //关闭int (*deviceInit)(int pinNum);  //设备初始化int (*readStatus)();  //火灾int (*changeStatus)(int status);struct Devices *next;
};struct Devices* addBathroomLightToDeviceLink(struct Devices *phead);
struct Devices* addUpstairLightToDeviceLink(struct Devices *phead);
struct Devices* addLivingRoomLightToDeviceLink(struct Devices *phead);
struct Devices* addRestaurantLightToDeviceLink(struct Devices *phead);
struct Devices* addFireToDeviceLink(struct Devices *phead);
5、创建bathroomLight.c文件
//浴室的灯
#include "contrlDevices.h"
#include<stdlib.h>int bathroomLightOpen(int pinNum){digitalWrite(pinNum,LOW);
}
int bathroomLightClose(int pinNum){digitalWrite(pinNum,HIGH);
}
int bathroomLightCloseInit(int pinNum){pinMode(pinNum,OUTPUT);digitalWrite(pinNum,HIGH);
}
int bathroomLightCloseStatus(int status){}
struct Devices bathroomLight={.deviceName = "bathroomLight",.pinNum = 26,.open = bathroomLightOpen,.close = bathroomLightClose,.deviceInit = bathroomLightCloseInit,.changeStatus = bathroomLightCloseStatus};
struct Devices* addBathroomLightToDeviceLink(struct Devices *phead){if(phead == NULL){	return &bathroomLight;}else{bathroomLight.next = phead;phead = &bathroomLight;}
};
6、创建livingroomLight.c文件
#include "contrlDevices.h"
#include<stdlib.h>int livingroomLightOpen(int pinNum){digitalWrite(pinNum,LOW);
}
int livingroomLightClose(int pinNum){digitalWrite(pinNum,HIGH);
}
int livingroomLightCloseInit(int pinNum){pinMode(pinNum,OUTPUT);digitalWrite(pinNum,HIGH);
}
int livingroomLightCloseStatus(int status){}
struct Devices livingroomLight={.deviceName = "livingroomLight",.pinNum = 27,.open = livingroomLightOpen,.close = livingroomLightClose,.deviceInit = livingroomLightCloseInit,.changeStatus = livingroomLightCloseStatus};
struct Devices* addLivingRoomLightToDeviceLink(struct Devices *phead){if(phead == NULL){	return &livingroomLight;}else{livingroomLight.next = phead;phead = &livingroomLight;}
};
7、创建restaurantLight.c文件
#include "contrlDevices.h"
#include<stdlib.h>int restaurantLightOpen(int pinNum){digitalWrite(pinNum,LOW);
}
int restaurantLightClose(int pinNum){digitalWrite(pinNum,HIGH);
}
int restaurantLightCloseInit(int pinNum){pinMode(pinNum,OUTPUT);digitalWrite(pinNum,HIGH);
}
int restaurantLightCloseStatus(int status){}
struct Devices restaurantLight={.deviceName = "restaurantLight",.pinNum = 28,.open = restaurantLightOpen,.close = restaurantLightClose,.deviceInit = restaurantLightCloseInit,.changeStatus = restaurantLightCloseStatus
};
struct Devices* addRestaurantLightToDeviceLink(struct Devices *phead){if(phead == NULL){	return &restaurantLight;}else{restaurantLight.next = phead;phead = &restaurantLight;}
};
8、创建upstairLight.c文件
//二楼灯
#include "contrlDevices.h"
#include<stdlib.h>int upstairLightOpen(int pinNum){digitalWrite(pinNum,LOW);
}
int upstairLightClose(int pinNum){digitalWrite(pinNum,HIGH);
}
int upstairLightCloseInit(int pinNum){pinMode(pinNum,OUTPUT);digitalWrite(pinNum,HIGH);
}
int upstairLightCloseStatus(int status){}
struct Devices upstairLight={.deviceName = "upstairLight",.pinNum = 29,.open = upstairLightOpen,.close = upstairLightClose,.deviceInit = upstairLightCloseInit,.changeStatus = upstairLightCloseStatus
};
struct Devices* addUpstairLightToDeviceLink(struct Devices *phead){if(phead == NULL){	return &upstairLight;}else{upstairLight.next = phead;phead = &upstairLight;}
};
9、创建fire.c文件
//火灾报警
#include "contrlDevices.h"
#include<stdlib.h>int fireIfOrNotInit(int pinNum){pinMode(pinNum,INPUT);digitalWrite(pinNum,HIGH);
}
int fireStatusRead(int pinNum){return digitalRead(pinNum);
}
struct Devices fireIfOrNot={.deviceName = "fireIfOrNot",.pinNum = 25,.deviceInit = fireIfOrNotInit,.readStatus = fireStatusRead};
struct Devices* addFireToDeviceLink(struct Devices *phead){if(phead == NULL){	return &fireIfOrNot;}else{fireIfOrNot.next = phead;phead = &fireIfOrNot;}
};
10、创建mainPro.c主函数文件
#include <stdio.h>
#include "contrlDevices.h"
#include <string.h>
#include "inputCommand.h"struct Devices* findDeviceByName(char* name,struct Devices* phead){struct Devices *tmp = phead;if(phead == NULL){return NULL;}else{while(tmp != NULL){if(strcmp(tmp->deviceName,name) == 0){return tmp;}tmp = tmp->next;}return NULL;}
};int main(){char name [128];struct Devices *tmp = NULL;if(-1 == wiringPiSetup()){return -1;}struct Devices *pdeviceHead = NULL;pdeviceHead = addBathroomLightToDeviceLink(pdeviceHead);pdeviceHead = addUpstairLightToDeviceLink(pdeviceHead);pdeviceHead = addLivingRoomLightToDeviceLink(pdeviceHead);pdeviceHead = addRestaurantLightToDeviceLink(pdeviceHead);pdeviceHead = addFireToDeviceLink(pdeviceHead);while(1){printf("Input:\n");scanf("%s",name);tmp = findDeviceByName(name,pdeviceHead);if(tmp != NULL){tmp->deviceInit(tmp->pinNum);tmp->open(tmp->pinNum);}}//1、指令工厂初始化//2、设备控制工厂初始化//3、线程池建立//3.1、语音线程//3.2、socket线程//3.3、摄像头线程//3.4、火灾线程
}
把上述的代码传到树莓派的终端,用FileZilla传即可,然后执行结果:
gcc mainPro.c upstairLight.c bathroomLight.c livingroomLight.c restaurantLight.c -lwiringPi -o test1

效果演示:(虽然没有装到实际的智能家居里,但是小灯亮了,说明程序是可以正常用的🤭)

三、添加声音识别模块的串口读取功能
这里主要通过主控芯片树莓派的串口跟语音模块连接。
树莓派的T接语音模块的R
树莓派的R接语音模块的T
然后就是供电
我们先把语音模块的代码整合到指令链表当中去:
1.语音控制设备voiceContrl.c
#include "inputCommand.h"
#include <stdlib.h>
#include <wiringPi.h>
#include <stdio.h>
#include <wiringSerial.h>
#include <unistd.h>//串口int voiceInit(struct InputCommander *voicer,char *ipAdress,char *port){ //声音初始化int fd;if((fd = serialOpen(voicer->deviceName,9600)) == -1){  //初始化串口,波特率9600exit(-1);}voicer->fd = fd;return fd;
}
int voiceGetCommand(struct InputCommander *voicer){int nread = 0;nread = (voicer->fd,voicer->command,sizeof(voicer->command));if(nread == 0){printf("usart for voice read over time\n");}else{return nread;}
}
struct InputCommander voiceContrl = {.commandName = "voice", .deviceName = "dev/ttyAMA0",.command = {'\0'},.Init = voiceInit,.getCommand = voiceGetCommand,.log = {'\0'},.next = NULL,};
struct InputCommander* addvoiceContrlToInputCommandLink(struct InputCommander *phead){if(phead == NULL){return &voiceContrl;}else{voiceContrl.next = phead;phead = &voiceContrl;}
};
2.控制设备的头文件inputCommand.h
//面向指令工厂的头文件
#include <wiringPi.h>
#include <stdlib.h>struct InputCommander{char commandName[128];  //声音的名字char command[32];       char deviceName[128];   //串口的名字int (*Init)(struct InputCommander *voicer,char *ipAdress,char *port); int (*getCommand)(struct InputCommander *voicer);char log[1024];int fd;struct InputCommander *next;};
struct InputCommander* addvoiceContrlToInputCommandLink(struct InputCommander *phead);
3.在mainPro.c主函数中添加语音模块的函数
#include <stdio.h>
#include "contrlDevices.h"
#include <string.h>
#include "inputCommand.h"struct Devices* findDeviceByName(char* name,struct Devices* phead){struct Devices *tmp = phead;if(phead == NULL){return NULL;}else{while(tmp != NULL){if(strcmp(tmp->deviceName,name) == 0){return tmp;}tmp = tmp->next;}return NULL;}
};
int main(){char name [128];struct Devices *tmp = NULL;if(-1 == wiringPiSetup()){return -1;}struct Devices        *pdeviceHead = NULL;   //设备工厂struct InputCommander *pCommandHead = NULL;  //指令工厂pdeviceHead = addBathroomLightToDeviceLink(pdeviceHead);pdeviceHead = addUpstairLightToDeviceLink(pdeviceHead);pdeviceHead = addLivingRoomLightToDeviceLink(pdeviceHead);pdeviceHead = addRestaurantLightToDeviceLink(pdeviceHead);pdeviceHead = addFireToDeviceLink(pdeviceHead);  //火灾pCommandHead = addvoiceContrlToInputCommandLink(pCommandHead); //串口while(1){printf("Input:\n");scanf("%s",name);tmp = findDeviceByName(name,pdeviceHead);if(tmp != NULL){tmp->deviceInit(tmp->pinNum);tmp->open(tmp->pinNum);}}
}
4.把上述的代码传到树莓派的终端,用FileZilla传即可,然后执行结果:
gcc mainPro.c upstairLight.c bathroomLight.c fire.c livingroomLight.c restaurantLight.c voiceContrl.c -lwiringPi -o test1

相关文章:
智能家居项目(三)之框架设计及框架代码文件工程建立
目录 一、智能家居项目框架设计草图 二、框架代码文件工程建立 三、添加声音识别模块的串口读取功能 一、智能家居项目框架设计草图 代码思路讲解: 1、一个指令工厂,一个控制工厂,实际上就是通过链表链起来的数据。具体怎么链接起来&…...
全网最全的Ansible中常用模块讲解
目录 前言 一、ansible实现管理的方式 二、Ad-Hoc执行方式中如何获得帮助 三、ansible命令运行方式及常用参数 四、ansible的基本颜色代表信 五、ansible中的常用模块 1、command 2、shell 3、script 4、copy 5、fetch 6、file 7、 unarchive 8、archive 9、h…...

linux程序分析工具
嵌入式调试工具1. nm2. addr2line3. readelf3.1 ELF 文件分类3.2 ELF文件组成3.3使用1. nm nm源于name,是linux下一个文本分析工具,可以罗列指定文件中的符号(函数名、变量,以及符号类型)。 nm命令参数如下: 用法:nm …...
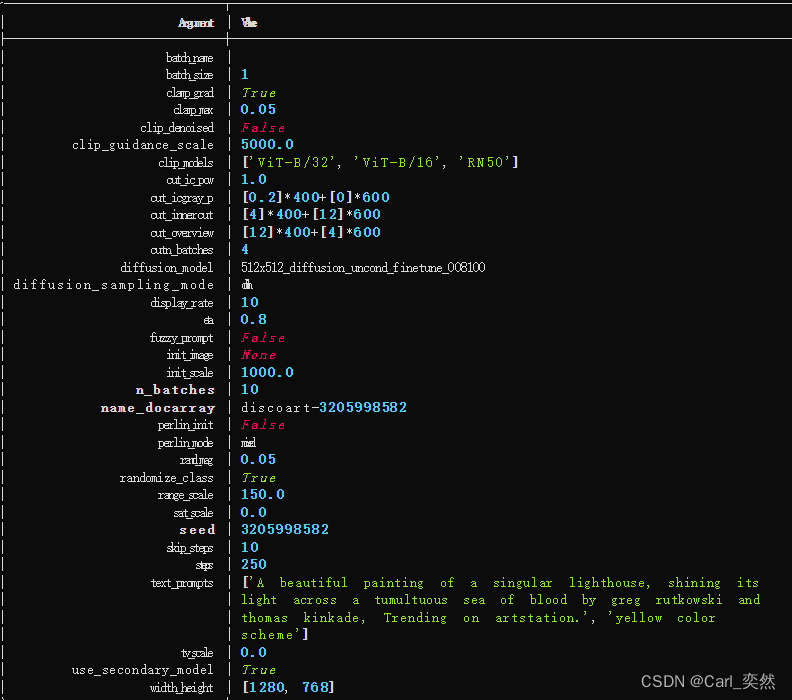
Python3,2分钟掌握Doscoart库,你也能成为艺术家。
2行代码绘制水彩画1、引言2、 代码实战2.1 模块介绍2.2 模块安装2.3 代码示例2.3.1 创建默认图片2.3.2 设置参数创建图片2.3.3 查看设置参数2.3.4 查看配置2.3.5 保存配置2.3.6 加载配置2.3.7 导出配置文件2.3.7 生成Python代码2.3.8 调用文档3、总结1、引言 小屌丝࿱…...

1225057-68-0,Alkyne PEG4 TAMRA-5,四甲基罗丹明-四聚乙二醇-炔基TAMRA红色荧光染料连接剂
中英文别名:CAS号:1225057-68-0 | 英文名:5-TAMRA-PEG4-Alkyne |中文名:5-四甲基罗丹明-四聚乙二醇-炔基物理参数:CASNumber:1225057-68-0Molecular formula:C36H41N3O8Molecular weight&#x…...

Ae:解释素材
所谓解释素材 Interpret Footage,就是通过修改素材的某些属性(像素长宽比、帧速率、颜色配置文件及 Alpha 通道类型等),让它能更好地参与到合成中去。Ae菜单:文件/解释素材快捷键:Ctrl Alt G在项目面板里…...

无文件攻击
无文件攻击是一种高级持续性威胁(APT)的攻击方式,它不会在目标系统的磁盘上留下可执行文件,而是利用系统内置的工具或脚本执行恶意代码,从而绕过传统的安全防护措施。无文件攻击的最大特点就是恶意代码直接在内存中运行…...

JS高级——数据类型
数据类型 基本类型 String: 任意字符串Number: 任意的数字boolean: true/falseundefined: undefinednull: null 对象类型 Object: 任意对象Function 一种特别的对象(可以执行)Array: 一种特别的对象 判断 typeof //不能区分数组与对象、null与obje…...

场景案例│数字员工在银行业的典型应用场景,效率及准确率“双高”
伴随数字经济的高速发展,企业数字化转型步伐不断加快,银行内部信息系统越趋复杂,业务处理的自动化及智能化需求日益旺盛。调查显示,数字员工为60~75%的银行流程带来约30~40%的效能提升,能够全面帮助银行在各场景流程中…...

2023美国大学生数学建模竞赛选题建议
总的来说,这次算是美赛环境题元年,以往没有这么多环境题目,大部分题目都是开放度相当高的题目。C君认为的难度:D>C>AE>BF,开放度:DF>ABE>C。A题 遭受旱灾的植物群落这次A题为环境类题目&…...
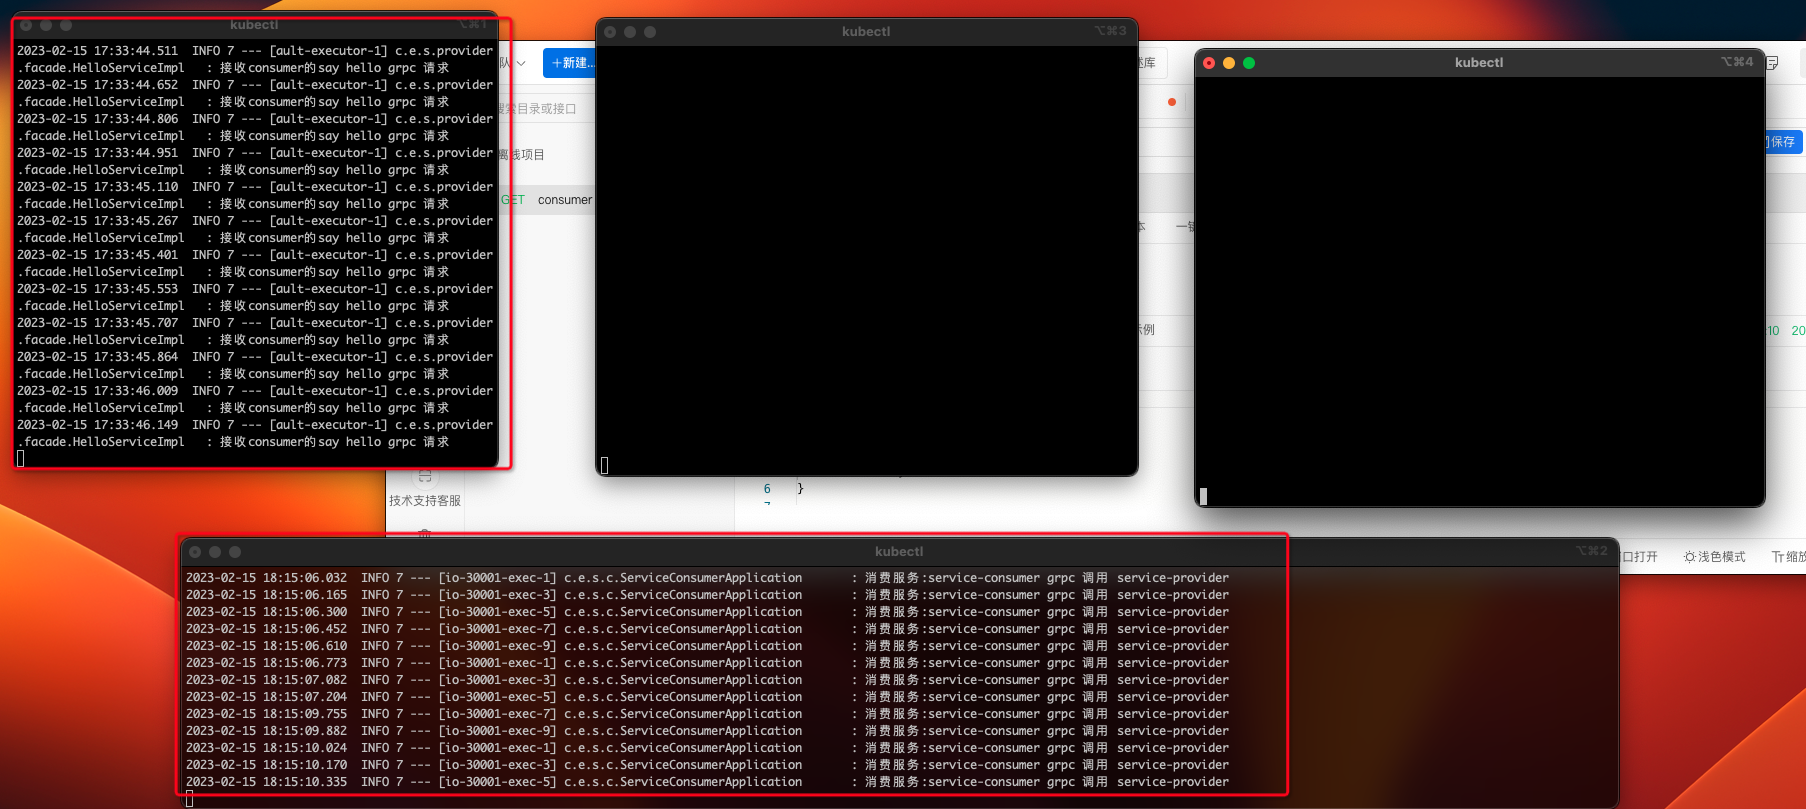
整合K8s+SpringBoot+gRpc
本文使用K8s当做服务注册与发现、配置管理,使用gRpc用做服务间的远程通讯一、先准备K8s我在本地有个K8s单机二、准备service-providerpom<?xml version"1.0" encoding"UTF-8"?> <project xmlns"http://maven.apache.org/POM/4.…...

ROS 教程:使用 Moveit C++ 接口进行拾取和放置任务
文章目录 简介Moveit C++ 接口Gazebo 取放世界初始化界面拾取流程1.移动到原位2.将TCP放在蓝框上方3.打开夹具4. 将 TCP 移近物体5.关闭夹具6. 将 TCP 移至板上方7./8. 降低 TCP 并打开夹具使用 Moveit 避免碰撞将碰撞对象添加到 Moveit 规划组结论参考简介 本教程展示了如何使…...

seo细分和切入点
seo细分和切入点本文重点介绍做SEO网站细分和切入点的方法:当我们的行业和关键词竞争性比较大的时候,我们可以考虑对行业或者产品做细分,从而找到切入点。可以按照以下三个方面进行细分。1、按城市细分例如:A:餐饮培训…...

PyQt5数据库开发1 4.3 QSqlTableModel 之 Qt项目的创建
目录 一、新建Qt项目 1. 编辑资源文件 2. 添加前缀 3. 新建放资源文件的目录 4. 添加图标文件 二、Action 1. 新建打开数据库Action 2. 添加其他Action 三、工具栏 1. 添加工具栏 2. 拖动actOpenDB到工具栏 3. 设置工具栏属性 4. 添加分隔符 5. 添加其他工具 6.…...
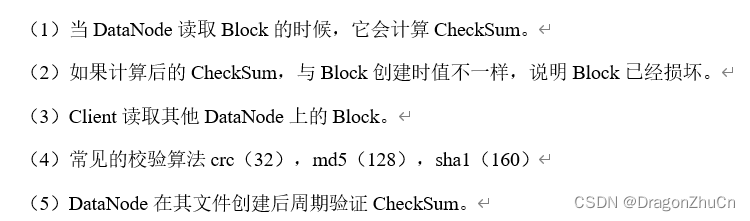
【大数据】第三章:详解HDFS(送尚硅谷笔记和源码)
什么是HDFS HDFS是(Hadoop Distributed File System)的缩写,也即Hadoop分布式文件系统。它通过目录树定位在分布式场景下 在不同服务器主机上的文件。它适用于一次写入,多次读出的场景。 HDFS的优缺点 优点 1,高容…...

27岁想转行IT,还来得及吗?
来不来得及不还是看你自身的意愿和条件,这个问题要问你自己吧! 每个人的能力、看法都不同。面对类似的问题,很多人会把侧重点放在IT上,或者27岁上面。那么我们试着换一个方式来问呢:什么时候适合转行,有哪些…...

Web前端CSS清除浮动的5种方法
在移动端清除浮动布局,常用的5种方法: 使用清除浮动的类;使用overflow属性;使用 flex 布局;使用grid 布局;使用 table 布局。 根据实际情况选择适合的方法,需要注意兼容性和语义性问题。在移动…...

Java:博客系统,实现加盐加密,分页,草稿箱,定时发布
文章目录1. 项目概述2. 准备工作2.1 数据库表格代码2.2 前端代码2.3 配置文件3. 准备项目结构3.1 拷贝前端模板3.2 定义实体类3.3 定义mapper接口和 xml 文件3.4 创建其他包4. 统一数据返回4.1 Result 类4.2 统一数据格式5. 注册5.1 逻辑5.2 验证数据规范性5.3 实现注册5.4 前端…...

JuiceFS 在火山引擎边缘计算的应用实践
火山引擎边缘云是以云计算基础技术和边缘异构算力结合网络为基础,构建在边缘大规模基础设施之上的云计算服务,形成以边缘位置的计算、网络、存储、安全、智能为核心能力的新一代分布式云计算解决方案。边缘存储主要面向适配边缘计算的典型业务场景&#…...

实验06 二叉树遍历及应用2022
A. 【程序填空】二叉树三种遍历题目描述给定一颗二叉树的特定先序遍历结果,空树用字符‘0’表示,例如AB0C00D00表示如下图请完成以下程序填空,建立该二叉树的二叉链式存储结构,并输出该二叉树的先序遍历、中序遍历和后序遍历结果输…...

流处理优化:提高实时数据处理性能
流处理优化:提高实时数据处理性能 一、流处理优化概述 1.1 流处理优化的定义 流处理优化是指通过优化流处理系统的性能、吞吐量和延迟,提高实时数据处理能力的过程。它涉及优化数据处理管道、资源配置和算法实现。 1.2 流处理优化的价值 低延迟ÿ…...

从 Token 消耗到 AI 资产:企业如何把一次调用沉淀成模板、流程、知识库和制度
关键词:Token 管理、AI 资产、模板库、流程化、知识库、制度化、投入产出比 开篇:企业真正要管的不是 Token,而是 Token 之后留下了什么 很多企业开始使用 AI 以后,第一反应是看成本:这个月用了多少 Token,哪个部门调用最多,哪个模型最贵,哪些场景消耗最高。 这当然重…...

智能产品系统架构分析 - 智能办公系统架构分层
方向:方案分析、架构设计、模块分解 智能产品系统架构分析:智能办公系统架构分层。 对智能办公系统进行架构分层分析,给出实例、UML建模、项目结构等。 “智能产品系统架构分析:智能办公系统架构分层”。 包含设备控制、预约管…...

终极实时窗口分辨率调整工具SRWE:打破屏幕限制的完整指南
终极实时窗口分辨率调整工具SRWE:打破屏幕限制的完整指南 【免费下载链接】SRWE Simple Runtime Window Editor 项目地址: https://gitcode.com/gh_mirrors/sr/SRWE 你是否曾为游戏截图分辨率太低而烦恼?是否需要在不同设备上测试UI布局却要反复重…...
)
【2026社工】初级社会工作者历年真题及答案PDF电子版(2010-2025年)
2026年初级社会工作者职业水平考试安排 考试时间: 2026年5月23日 考试科目与形式 科目名称考试形式社会工作实务闭卷笔试社会工作综合能力闭卷笔试 备考资源说明 提供2010-2025年完整历年真题及解析,覆盖全部考试科目,具体功能如下&#…...
)
RT-Thread Sensor框架实战:5分钟搞定INA226电流电压功率监测(含I2C避坑指南)
RT-Thread Sensor框架实战:5分钟搞定INA226电流电压功率监测(含I2C避坑指南) 在嵌入式系统开发中,精准监测电流、电压和功率是许多应用场景的核心需求,无论是电池管理系统、智能硬件功耗分析,还是工业设备状…...

贝叶斯深度学习不确定性估计:集成学习与MC-Dropout实战对比
1. 项目概述:为什么我们需要量化深度学习的不确定性?在自动驾驶汽车识别前方障碍物、医疗AI系统诊断病灶、或者机器人进行精细操作时,一个错误的预测可能导致灾难性的后果。传统的深度神经网络(DNN)在这些任务上表现出…...

WP Pinch:通过MCP协议为WordPress站点集成AI助手管理能力
1. 项目概述:当你的WordPress站点“长出”AI的爪子 如果你和我一样,每天大部分时间都泡在Slack、Telegram或者WhatsApp里,和团队沟通、处理信息,那么你肯定也烦透了那种“这个内容不错,等我回到电脑前再发到网站上”的…...

如何解决QQ音乐下载的歌曲在其他设备上无法播放的问题
如何解决QQ音乐下载的歌曲在其他设备上无法播放的问题 【免费下载链接】qmcflac2mp3 直接将qmcflac文件转换成mp3文件,突破QQ音乐的格式限制 项目地址: https://gitcode.com/gh_mirrors/qm/qmcflac2mp3 你是否曾经在QQ音乐下载了喜欢的歌曲,却发现…...

从布朗运动到伊藤公式:金融随机世界的建模基石
1. 从花粉运动到股票价格:布朗运动的金融启示 1827年,英国植物学家罗伯特布朗在显微镜下观察到花粉颗粒在水中的不规则舞动,这个看似简单的物理现象却在80年后被爱因斯坦用数学语言精确描述。有趣的是,当我们将显微镜换成股票行情…...