Spring学习记录----十五、面向切面编程AOP+十六、Spring对事务的支持
十五、面向切面编程AOP
IoC使软件组件松耦合。AOP让你能够捕捉系统中经常使用的功能,把它转化成组件。
AOP(Aspect Oriented Programming):面向切面编程,面向方面编程。(AOP是一种编程技术)
AOP是对OOP的补充延伸。
AOP底层使用的就是动态代理来实现的。
Spring的AOP使用的动态代理是:JDK动态代理 + CGLIB动态代理技术。Spring在这两种动态代理中灵活切换,如果是代理接口,会默认使用JDK动态代理,如果要代理某个类,这个类没有实现接口,就会切换使用CGLIB。当然,你也可以强制通过一些配置让Spring只使用CGLIB。
15.1 AOP介绍
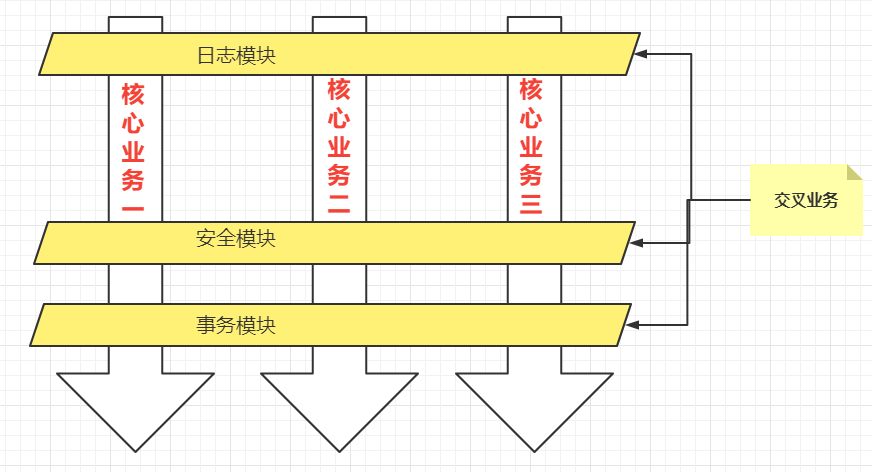
一般一个系统当中都会有一些系统服务,例如:日志、事务管理、安全等。这些系统服务被称为:交叉业务
这些交叉业务几乎是通用的,不管你是做银行账户转账,还是删除用户数据。日志、事务管理、安全,这些都是需要做的。
如果在每一个业务处理过程当中,都掺杂这些交叉业务代码进去的话,存在两方面问题:
- 第一:交叉业务代码在多个业务流程中反复出现,显然这个交叉业务代码没有得到复用。并且修改这些交叉业务代码的话,需要修改多处。
- 第二:程序员无法专注核心业务代码的编写,在编写核心业务代码的同时还需要处理这些交叉业务。
使用AOP可以很轻松的解决以上问题。
请看下图,可以帮助你快速理解AOP的思想:
总结
用一句话总结AOP:将与核心业务无关的代码独立的抽取出来,形成一个独立的组件,然后以横向交叉的方式应用到业务流程当中的过程被称为AOP。
AOP的优点:
- 第一:代码复用性增强。
- 第二:代码易维护。
- 第三:使开发者更关注业务逻辑。
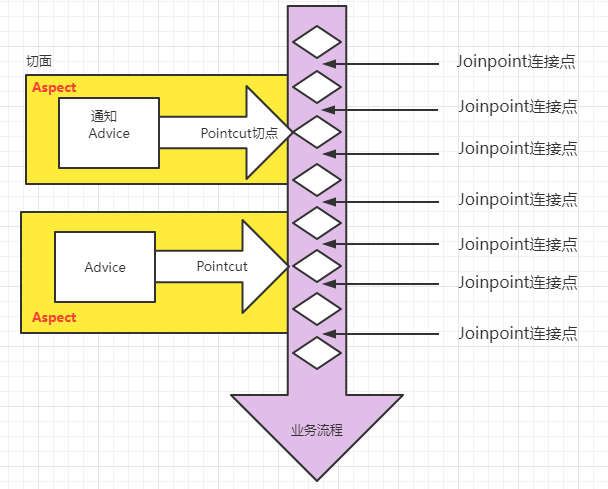
15.2 AOP的七大术语
public class UserService{public void do1(){System.out.println("do 1");}public void do2(){System.out.println("do 2");}public void do3(){System.out.println("do 3");}public void do4(){System.out.println("do 4");}public void do5(){System.out.println("do 5");}// 核心业务方法public void service(){do1();do2();do3();do5();}
}- 连接点 Joinpoint
-
- 在程序的整个执行流程中,可以织入切面的位置。方法的执行前后,异常抛出之后等位置。
- 切点 Pointcut
-
- 在程序执行流程中,真正织入切面的方法。(一个切点对应多个连接点)
- 通知 Advice
-
- 通知又叫增强,就是具体你要织入的代码。
- 通知包括:
-
-
- 前置通知
- 后置通知
- 环绕通知
- 异常通知
- 最终通知
-
- 切面 Aspect
-
- 切点 + 通知就是切面。
- 织入 Weaving
-
- 把通知应用到目标对象上的过程。
- 代理对象 Proxy
-
- 一个目标对象被织入通知后产生的新对象。
- 目标对象 Target
-
- 被织入通知的对象。
通过下图,大家可以很好的理解AOP的相关术语:
15.3 切点表达式
切点表达式用来定义通知(Advice)往哪些方法上切入。
切入点表达式语法格式:
execution([访问控制权限修饰符] 返回值类型 [全限定类名]方法名(形式参数列表) [异常])访问控制权限修饰符:
- 可选项。
- 没写,就是4个权限都包括。
- 写public就表示只包括公开的方法。
返回值类型:
- 必填项。
- * 表示返回值类型任意。
全限定类名:
- 可选项。
- 两个点“..”代表当前包以及子包下的所有类。
- 省略时表示所有的类。
方法名:
- 必填项。
- *表示所有方法。
- set*表示所有的set方法。
形式参数列表:
- 必填项
- () 表示没有参数的方法
- (..) 参数类型和个数随意的方法
- (*) 只有一个参数的方法
- (*, String) 第一个参数类型随意,第二个参数是String的。
异常:
- 可选项。
- 省略时表示任意异常类型。
理解以下的切点表达式:
- service包下所有的类中以delete开始的所有方法
execution(public * com.powernode.mall.service.*.delete*(..))- mall包下所有的类的所有的方法
execution(* com.powernode.mall..*(..))- 所有类的所有方法
execution(* *(..))15.4 使用Spring的AOP
Spring对AOP的实现包括以下3种方式:
- 第一种方式:Spring框架结合AspectJ框架实现的AOP,基于注解方式。
- 第二种方式:Spring框架结合AspectJ框架实现的AOP,基于XML方式。
- 第三种方式:Spring框架自己实现的AOP,基于XML配置方式。
实际开发中,都是Spring+AspectJ来实现AOP。所以我们重点学习第一种和第二种方式。
什么是AspectJ?(Eclipse组织的一个支持AOP的框架。AspectJ框架是独立于Spring框架之外的一个框架,Spring框架用了AspectJ)
AspectJ项目起源于帕洛阿尔托(Palo Alto)研究中心(缩写为PARC)。该中心由Xerox集团资助,Gregor Kiczales领导,从1997年开始致力于AspectJ的开发,1998年第一次发布给外部用户,2001年发布1.0 release。为了推动AspectJ技术和社团的发展,PARC在2003年3月正式将AspectJ项目移交给了Eclipse组织,因为AspectJ的发展和受关注程度大大超出了PARC的预期,他们已经无力继续维持它的发展。
15.4.1 准备工作
使用Spring+AspectJ的AOP需要引入的依赖如下:
- pom.xml
<!--spring context依赖-->
<dependency><groupId>org.springframework</groupId><artifactId>spring-context</artifactId><version>6.0.0-M2</version>
</dependency>
<!--spring aop依赖-->
<dependency><groupId>org.springframework</groupId><artifactId>spring-aop</artifactId><version>6.0.0-M2</version>
</dependency>
<!--spring aspects依赖-->
<dependency><groupId>org.springframework</groupId><artifactId>spring-aspects</artifactId><version>6.0.0-M2</version>
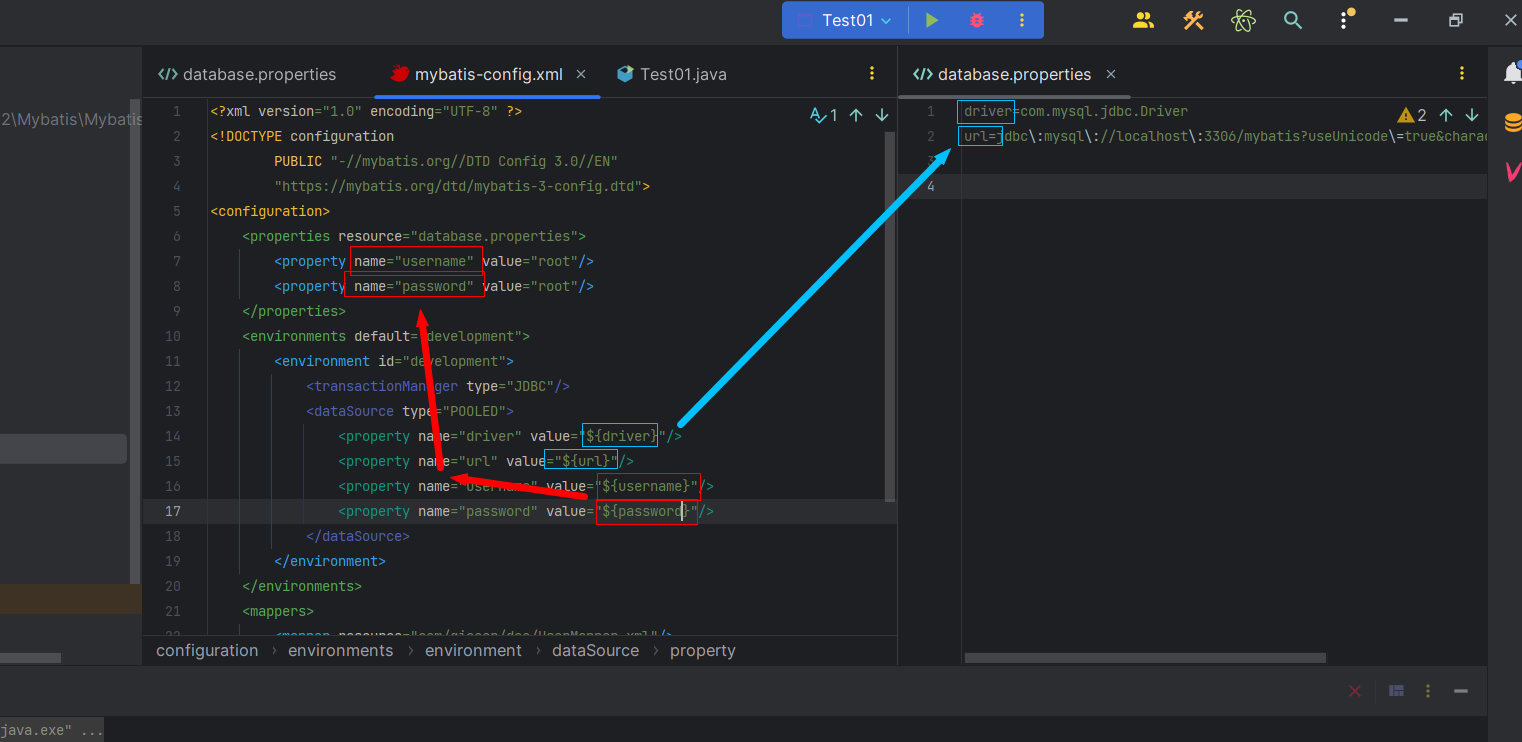
</dependency>Spring配置文件中添加context命名空间和aop命名空间
- spring-aspectj-aop-annotation.xml
<?xml version="1.0" encoding="UTF-8"?>
<beans xmlns="http://www.springframework.org/schema/beans"xmlns:xsi="http://www.w3.org/2001/XMLSchema-instance"xmlns:context="http://www.springframework.org/schema/context"xmlns:aop="http://www.springframework.org/schema/aop"xsi:schemaLocation="http://www.springframework.org/schema/beans http://www.springframework.org/schema/beans/spring-beans.xsdhttp://www.springframework.org/schema/context http://www.springframework.org/schema/context/spring-context.xsdhttp://www.springframework.org/schema/aop http://www.springframework.org/schema/aop/spring-aop.xsd"></beans>
15.4.1.1Spring AOP 基于注解之实现步骤
spring.xml
<?xml version="1.0" encoding="UTF-8"?>
<beans xmlns="http://www.springframework.org/schema/beans"xmlns:xsi="http://www.w3.org/2001/XMLSchema-instance"xmlns:context="http://www.springframework.org/schema/context"xmlns:aop="http://www.springframework.org/schema/aop"xsi:schemaLocation="http://www.springframework.org/schema/beans http://www.springframework.org/schema/beans/spring-beans.xsdhttp://www.springframework.org/schema/context http://www.springframework.org/schema/context/spring-context.xsdhttp://www.springframework.org/schema/aop http://www.springframework.org/schema/aop/spring-aop.xsd"><!--组件扫描--><context:component-scan base-package="com.dong.service"/><!--开启aspectj 自动代理--><!--spring容器在扫描类的时候,查看该类上是否有@Aspect 注解,如果有,则给这个类生成代理对象--><!--proxy-target-class="true"  表示强制使用CGLIB动态代理proxy-target-class="false" 这是默认值,表示接口使用JDK动态代理,反之,使用CGLIB动态代理--><aop:aspectj-autoproxy proxy-target-class="true"/></beans>
UserService.java
package com.dong.service;import org.springframework.stereotype.Service;@Service("userService")
public class UserService {      //目标类public void login(){        //目标方法System.out.println("系统正在验证登录。。。。。。");}
}
LogAspect.java
package com.dong.service;import org.aspectj.lang.annotation.Aspect;
import org.aspectj.lang.annotation.Before;
import org.springframework.stereotype.Component;@Component("logAspect")
@Aspect //切面类是需要使用@Aspect 注解进行标注的
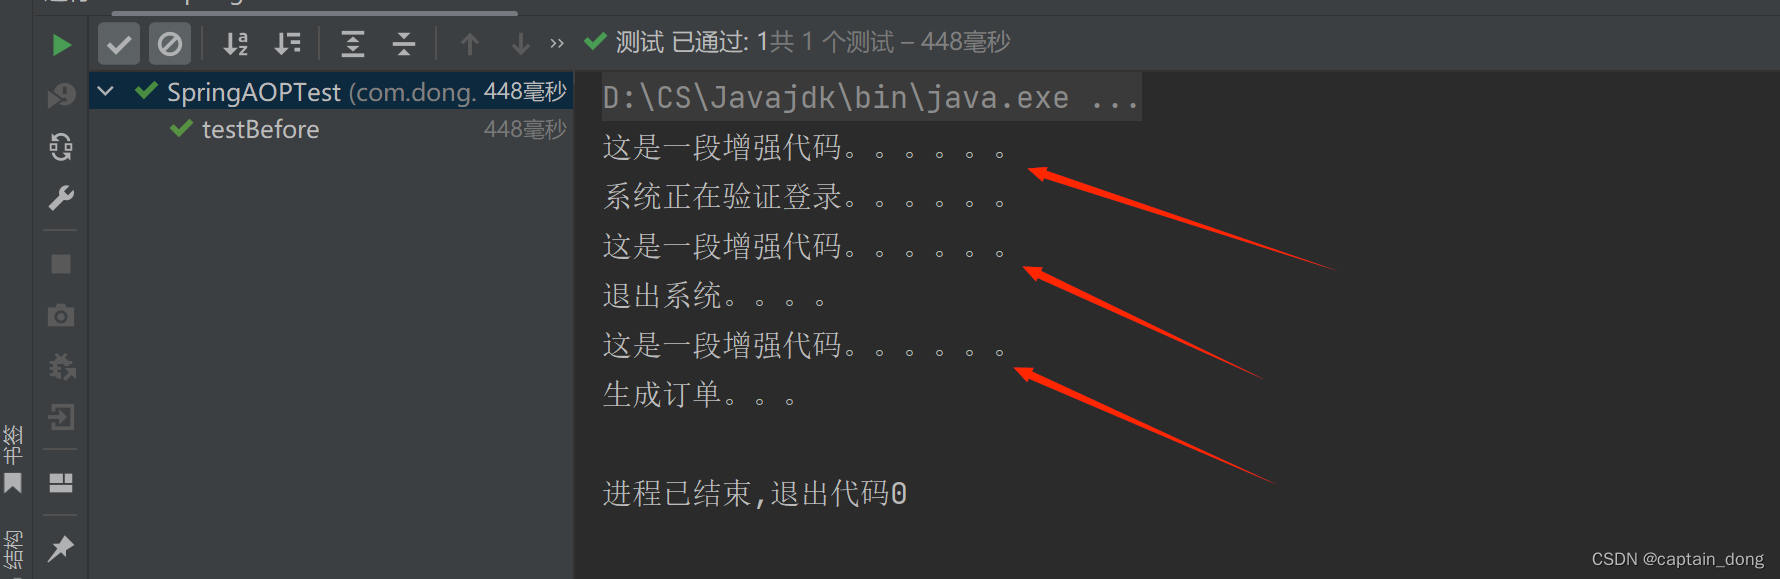
public class LogAspect { //切面//切面= 通知 + 切点//通知就是增强,就是具体的要编写的增强代码//这里通知Advice以方法的形式出现。(因为方法中可以写代码)// @Before注解标注的方法就是一个前置通知@Before("execution(* com.dong.service.UserService.*(..))")public void 增强(){System.out.println("这是一段增强代码。。。。。。");}}
测试类:SpringAOPTest.java
package com.dong.spring6.test;import com.dong.service.UserService;
import org.junit.Test;
import org.springframework.context.ApplicationContext;
import org.springframework.context.support.ClassPathXmlApplicationContext;public class SpringAOPTest {@Testpublic void testBefore(){ApplicationContext applicationContext=new ClassPathXmlApplicationContext("spring.xml");UserService userService = applicationContext.getBean("userService", UserService.class);userService.login();}
}
运行结果
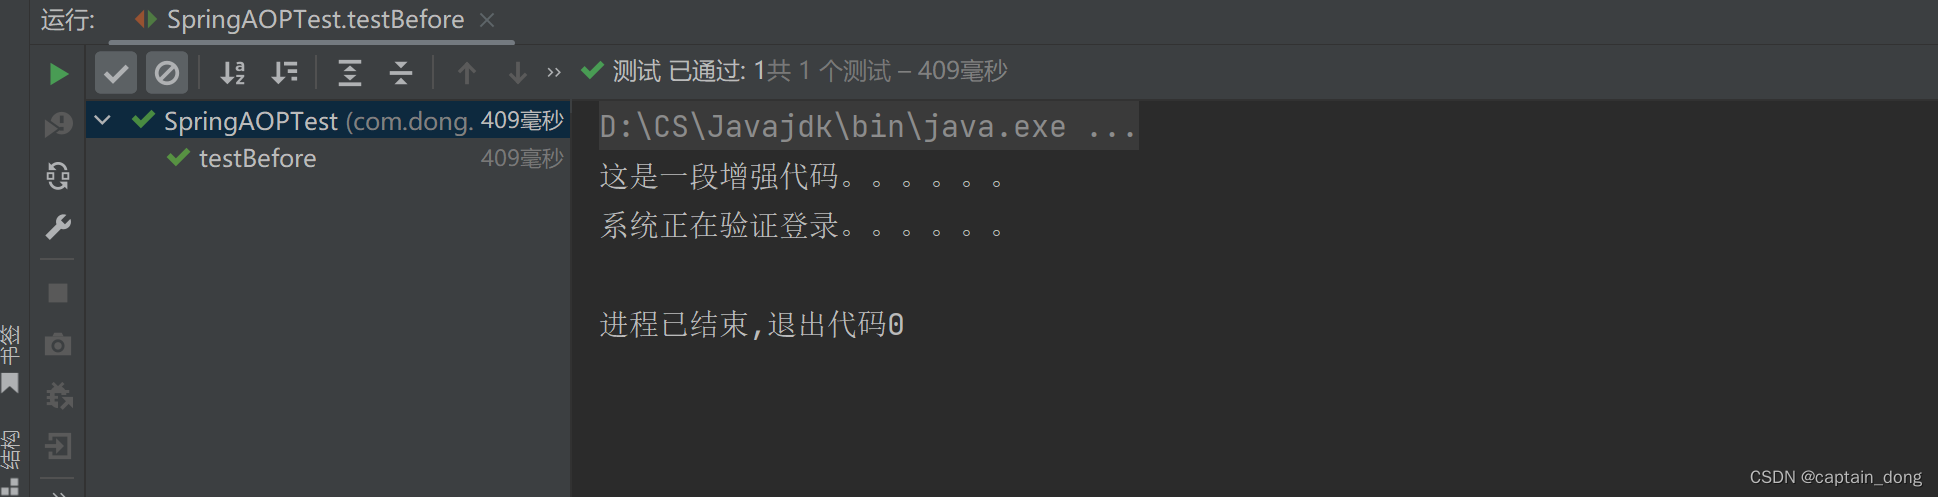
可以看出是一个前置通知。
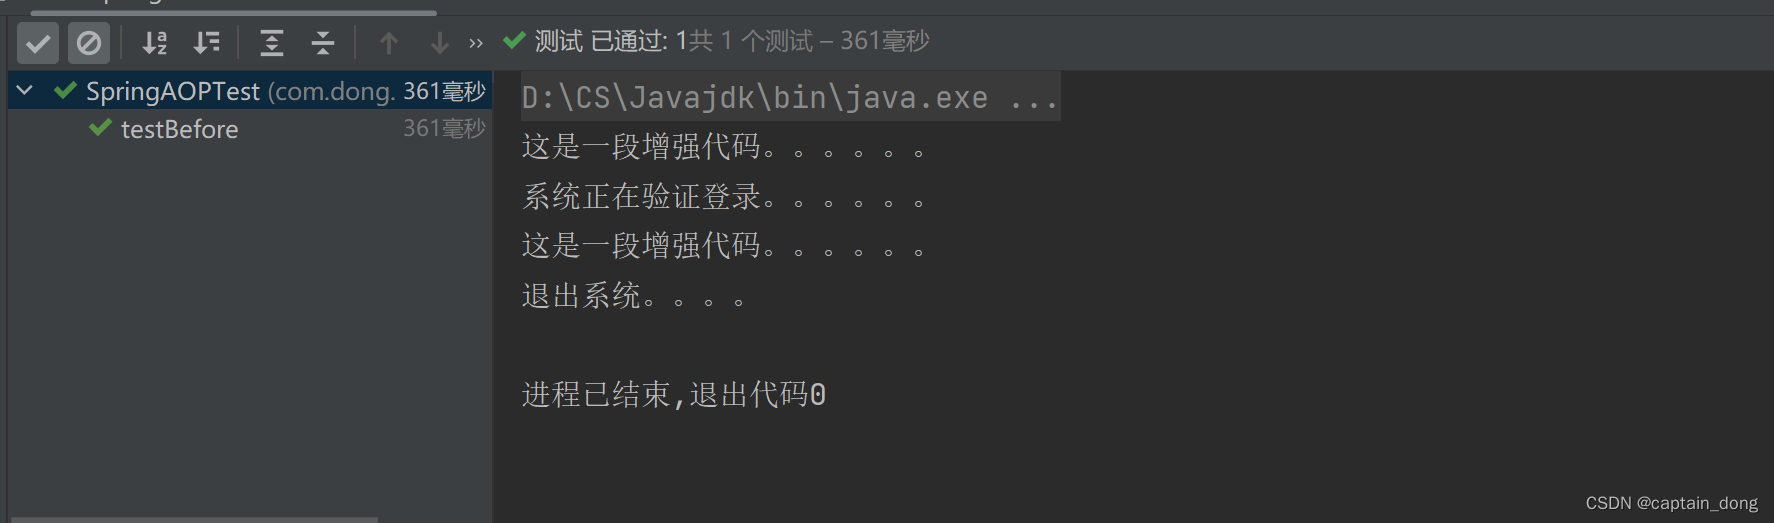
15.4.1.2-Spring AOP 基于注解之切点表达式
代码
package com.dong.service;import org.springframework.stereotype.Service;@Service("userService")
public class UserService {      //目标类public void login(){        //目标方法System.out.println("系统正在验证登录。。。。。。");}public void logout(){System.out.println("退出系统。。。。");}
}
package com.dong.spring6.test;import com.dong.service.UserService;
import org.junit.Test;
import org.springframework.context.ApplicationContext;
import org.springframework.context.support.ClassPathXmlApplicationContext;public class SpringAOPTest {@Testpublic void testBefore(){ApplicationContext applicationContext=new ClassPathXmlApplicationContext("spring.xml");UserService userService = applicationContext.getBean("userService", UserService.class);userService.login();userService.logout();}
}
运行结果:
代码
package com.dong.service;import org.springframework.stereotype.Service;@Service("orderService")
public class OrderService {     //目标类//目标方法public void generate(){System.out.println("生成订单。。。");}
}
package com.dong.service;import org.aspectj.lang.annotation.Aspect;
import org.aspectj.lang.annotation.Before;
import org.springframework.stereotype.Component;@Component("logAspect")
@Aspect //切面类是需要使用@Aspect 注解进行标注的
public class LogAspect {    //切面//切面= 通知 + 切点//通知就是增强,就是具体的要编写的增强代码//这里通知Advice以方法的形式出现。(因为方法中可以写代码)// @Before注解标注的方法就是一个前置通知@Before("execution(* com.dong.service..*(..))")public void 增强(){System.out.println("这是一段增强代码。。。。。。");}}
package com.dong.spring6.test;import com.dong.service.OrderService;
import com.dong.service.UserService;
import org.junit.Test;
import org.springframework.context.ApplicationContext;
import org.springframework.context.support.ClassPathXmlApplicationContext;public class SpringAOPTest {@Testpublic void testBefore(){ApplicationContext applicationContext=new ClassPathXmlApplicationContext("spring.xml");UserService userService = applicationContext.getBean("userService", UserService.class);userService.login();userService.logout();OrderService orderService = applicationContext.getBean("orderService", OrderService.class);orderService.generate();}
}
运行结果
通知类型
通知类型包括:
- 前置通知:@Before 目标方法执行之前的通知
- 后置通知:@AfterReturning 目标方法执行之后的通知
- 环绕通知:@Around 目标方法之前添加通知,同时目标方法执行之后添加通知。
- 异常通知:@AfterThrowing 发生异常之后执行的通知
- 最终通知:@After 放在finally语句块中的通知
代码:
package com.dong.service;import org.aspectj.lang.ProceedingJoinPoint;
import org.aspectj.lang.annotation.*;
import org.springframework.stereotype.Component;@Component("logAspect")
@Aspect //切面类是需要使用@Aspect 注解进行标注的
public class LogAspect { //切面//切面= 通知 + 切点//通知就是增强,就是具体的要编写的增强代码//这里通知Advice以方法的形式出现。(因为方法中可以写代码)// @Before注解标注的方法就是一个前置通知
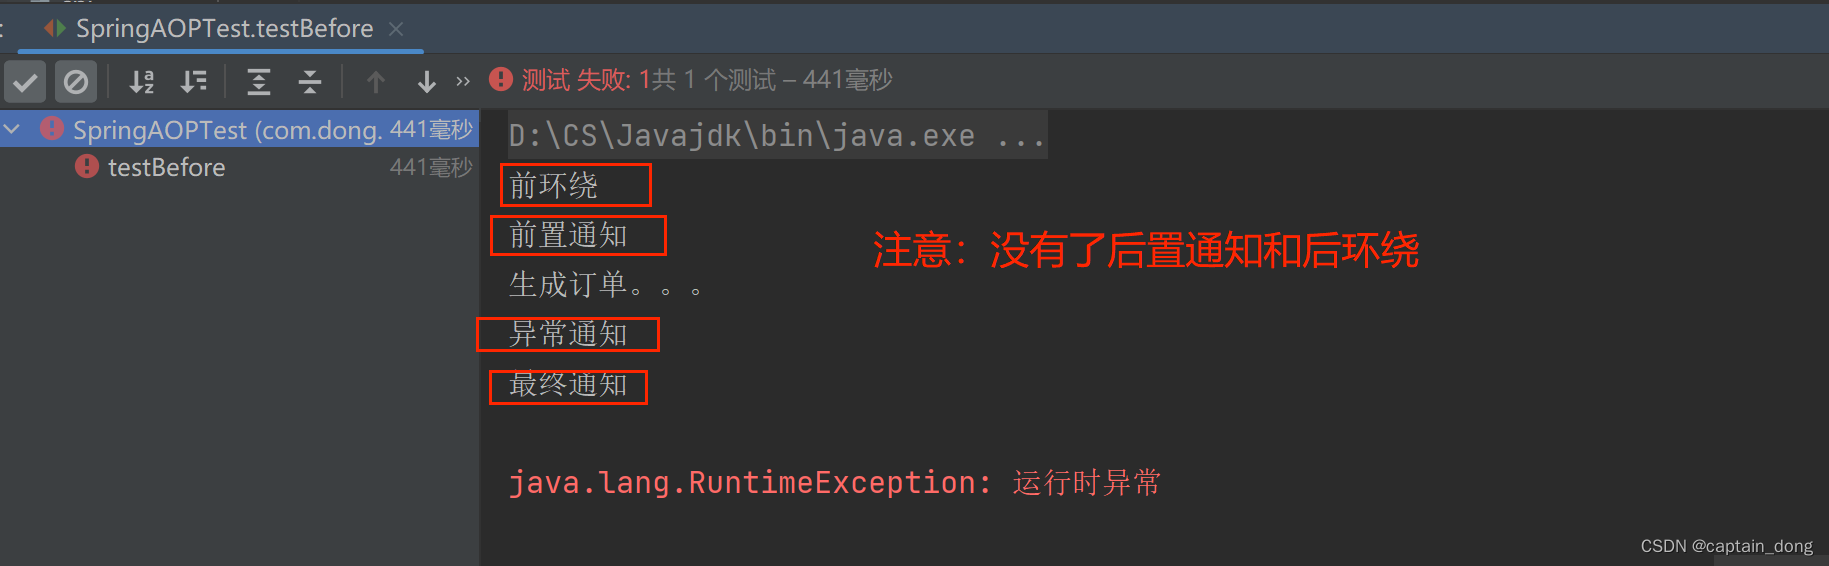
/* @Before("execution(* com.dong.service..*(..))")public void 增强(){System.out.println("这是一段增强代码。。。。。。");}*/@Before("execution(* com.dong.service..*(..))")public void beforeAdvice(){System.out.println("前置通知");}@AfterReturning("execution(* com.dong.service..*(..))")public void afterReturningAdvice(){System.out.println("后置通知");}//环绕通知(环绕是最大的通知,在前置通知之前,在后置通知之后)@Around("execution(* com.dong.service..*(..))")public void aroundAdvice(ProceedingJoinPoint joinPoint) throws Throwable {//前面的代码System.out.println("前环绕");//执行目标joinPoint.proceed(); //执行目标//后面的代码System.out.println("后环绕");}//异常通知
/* @AfterThrowing("execution(* com.dong.service..*(..))")public void afterThrowingAdvice(){System.out.println("异常通知");}*///最终通知(Finally语句块中的通知)@After("execution(* com.dong.service..*(..))")public void afterAdvice(){System.out.println("最终通知");}}
package com.dong.spring6.test;import com.dong.service.OrderService;
import com.dong.service.UserService;
import org.junit.Test;
import org.springframework.context.ApplicationContext;
import org.springframework.context.support.ClassPathXmlApplicationContext;public class SpringAOPTest {@Testpublic void testBefore(){ApplicationContext applicationContext=new ClassPathXmlApplicationContext("spring.xml");/*        UserService userService = applicationContext.getBean("userService", UserService.class);userService.login();userService.logout();*/OrderService orderService = applicationContext.getBean("orderService", OrderService.class);orderService.generate();}
}
运行结果

加上异常:
代码
package com.dong.service;import org.springframework.stereotype.Service;@Service("orderService")
public class OrderService {     //目标类//目标方法public void generate(){System.out.println("生成订单。。。");if (1==1){throw new RuntimeException("运行时异常");}}
}
//异常通知@AfterThrowing("execution(* com.dong.service..*(..))")public void afterThrowingAdvice(){System.out.println("异常通知");}运行结果
切面的先后顺序
我们知道,业务流程当中不一定只有一个切面,可能有的切面控制事务,有的记录日志,有的进行安全控制,如果多个切面的话,顺序如何控制:可以使用@Order注解来标识切面类,为@Order注解的value指定一个整数型的数字,数字越小,优先级越高。
再定义一个切面类,如下:
-
另一个切面类,并设置优先级
package com.dong.spring6.service;import org.aspectj.lang.ProceedingJoinPoint;
import org.aspectj.lang.annotation.*;
import org.springframework.core.annotation.Order;
import org.springframework.stereotype.Component;@Aspect
@Component
@Order(1) //设置优先级
public class YourAspect {@Around("execution(* com.powernode.spring6.service.OrderService.*(..))")public void aroundAdvice(ProceedingJoinPoint proceedingJoinPoint) throws Throwable {System.out.println("YourAspect环绕通知开始");// 执行目标方法。proceedingJoinPoint.proceed();System.out.println("YourAspect环绕通知结束");}@Before("execution(* com.powernode.spring6.service.OrderService.*(..))")public void beforeAdvice(){System.out.println("YourAspect前置通知");}@AfterReturning("execution(* com.powernode.spring6.service.OrderService.*(..))")public void afterReturningAdvice(){System.out.println("YourAspect后置通知");}@AfterThrowing("execution(* com.powernode.spring6.service.OrderService.*(..))")public void afterThrowingAdvice(){System.out.println("YourAspect异常通知");}@After("execution(* com.powernode.spring6.service.OrderService.*(..))")public void afterAdvice(){System.out.println("YourAspect最终通知");}
}
-
设置切面类MyAspect的优先级
package com.dong.spring6.service;import org.aspectj.lang.ProceedingJoinPoint;
import org.aspectj.lang.annotation.*;
import org.springframework.core.annotation.Order;
import org.springframework.stereotype.Component;// 切面类
@Component
@Aspect
@Order(2) //设置优先级
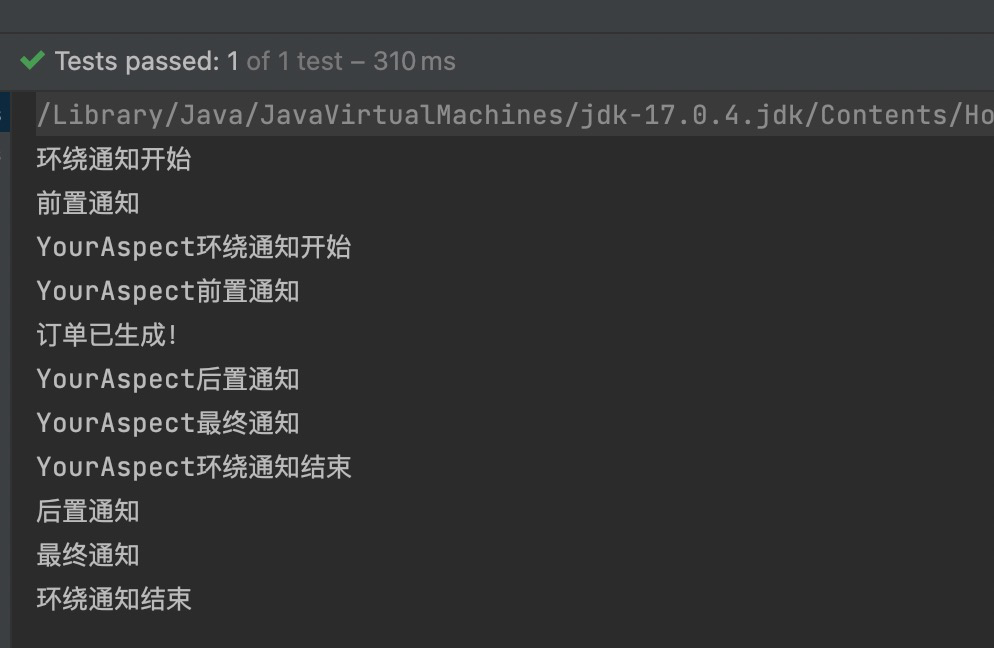
public class MyAspect {@Around("execution(* com.powernode.spring6.service.OrderService.*(..))")public void aroundAdvice(ProceedingJoinPoint proceedingJoinPoint) throws Throwable {System.out.println("环绕通知开始");// 执行目标方法。proceedingJoinPoint.proceed();System.out.println("环绕通知结束");}@Before("execution(* com.powernode.spring6.service.OrderService.*(..))")public void beforeAdvice(){System.out.println("前置通知");}@AfterReturning("execution(* com.powernode.spring6.service.OrderService.*(..))")public void afterReturningAdvice(){System.out.println("后置通知");}@AfterThrowing("execution(* com.powernode.spring6.service.OrderService.*(..))")public void afterThrowingAdvice(){System.out.println("异常通知");}@After("execution(* com.powernode.spring6.service.OrderService.*(..))")public void afterAdvice(){System.out.println("最终通知");}}执行测试程序:
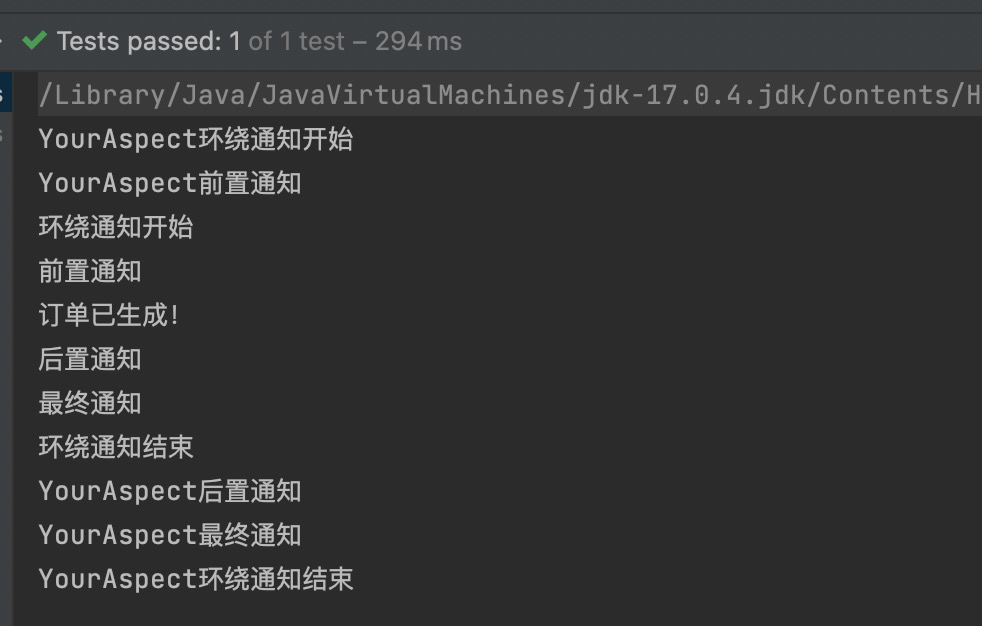
通过修改@Order注解的整数值来切换顺序,执行测试程序:
优化使用切点表达式
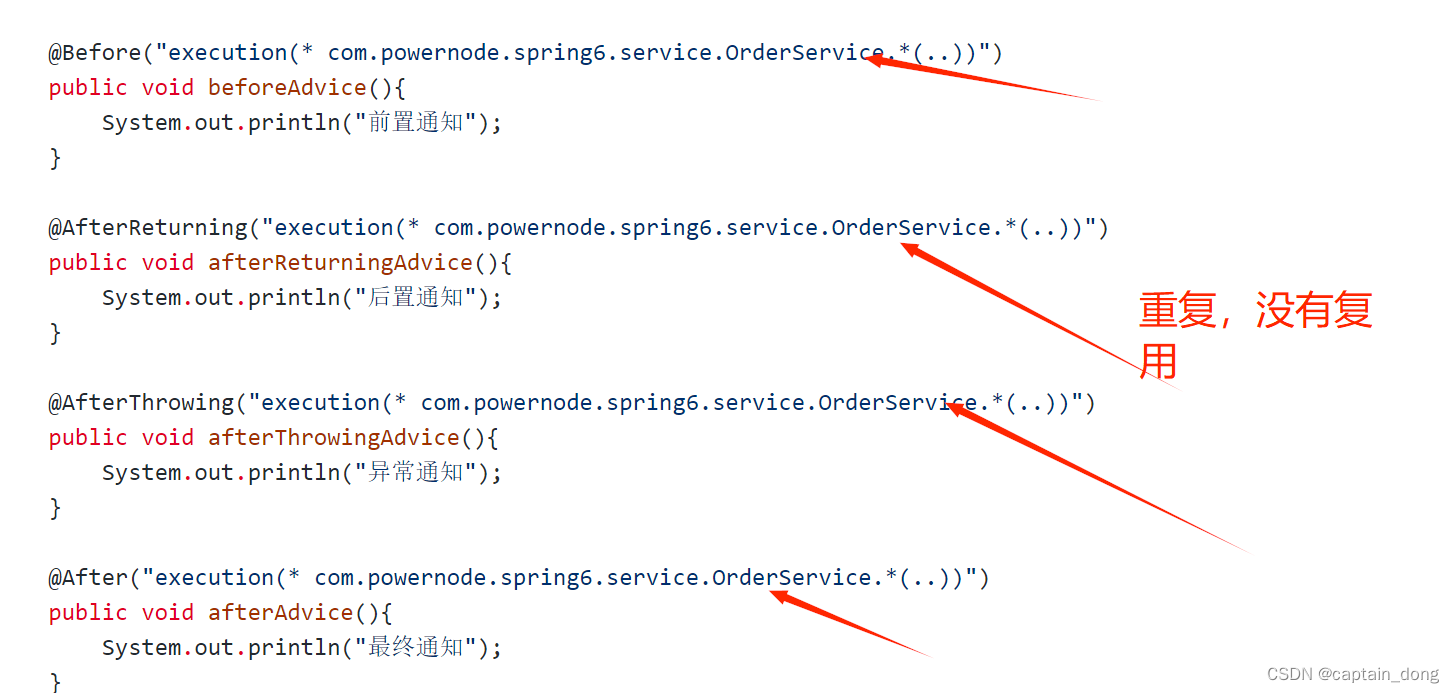
缺点是:
- 第一:切点表达式重复写了多次,没有得到复用。
- 第二:如果要修改切点表达式,需要修改多处,难维护。
可以这样做:将切点表达式单独的定义出来,在需要的位置引入即可。如下:
package com.dong.service;import org.aspectj.lang.ProceedingJoinPoint;
import org.aspectj.lang.annotation.*;
import org.springframework.stereotype.Component;@Component("logAspect")
@Aspect //切面类是需要使用@Aspect 注解进行标注的
public class LogAspect {    //切面//切面= 通知 + 切点//通知就是增强,就是具体的要编写的增强代码//这里通知Advice以方法的形式出现。(因为方法中可以写代码)// @Before注解标注的方法就是一个前置通知
/*    @Before("execution(* com.dong.service..*(..))")public void 增强(){System.out.println("这是一段增强代码。。。。。。");}*///定义通用切点@Pointcut("execution(* com.dong.service..*(..))")public void 通用切点(){//这个方法只是一个标记,方法名随意,方法体中也不需要写任何代码}@Before("通用切点()")public void beforeAdvice(){System.out.println("前置通知");}@AfterReturning("通用切点()")public void afterReturningAdvice(){System.out.println("后置通知");}//环绕通知(环绕是最大的通知,在前置通知之前,在后置通知之后)@Around("通用切点()")public void aroundAdvice(ProceedingJoinPoint joinPoint) throws Throwable {//前面的代码System.out.println("前环绕");//执行目标joinPoint.proceed();    //执行目标//后面的代码System.out.println("后环绕");}//异常通知@AfterThrowing("通用切点()")public void afterThrowingAdvice(){System.out.println("异常通知");}//最终通知(Finally语句块中的通知)@After("通用切点()")public void afterAdvice(){System.out.println("最终通知");}}
使用@Pointcut注解来定义独立的切点表达式。
注意这个@Pointcut注解标注的方法随意,只是起到一个能够让@Pointcut注解编写的位置。
执行测试程序:

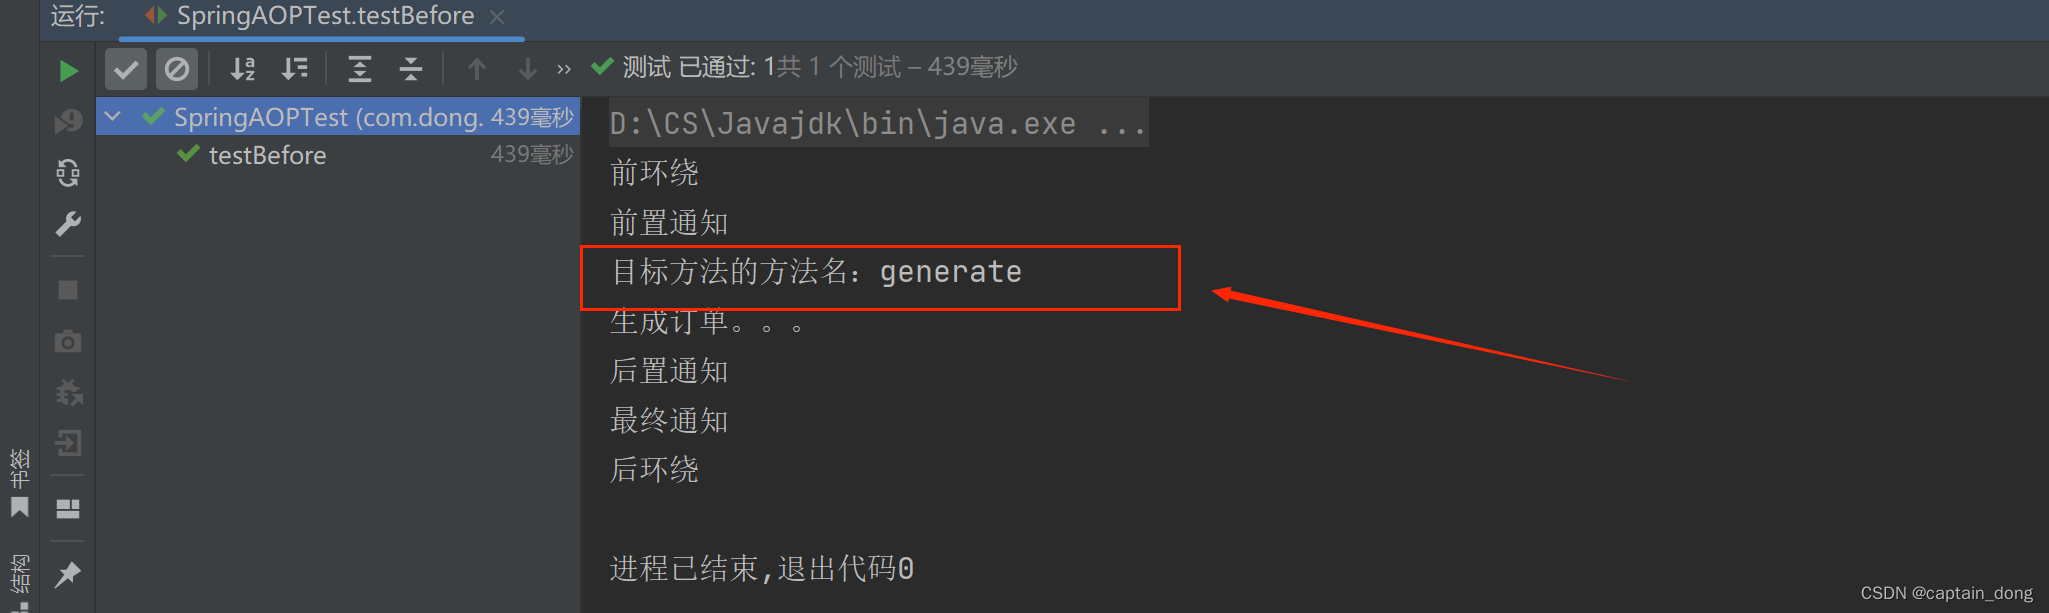
小细节---Spring AOP基于注解之连接点
测试代码
@Before("通用切点()")public void beforeAdvice(JoinPoint joinPoint){System.out.println("前置通知");//这个JoinPoint joinPoint,在Spring容器调用这个方法的时候自动传过来//Signature signature = joinPoint.getSignature();获取目标方法的签名。//通过方法的签名可以获取到一个方法的具体信息。//获取目标方法的方法名System.out.println("目标方法的方法名:"+joinPoint.getSignature().getName());//获取目标方法的的方法修饰符//获取目标方法的方法返回值}运行结果
代码
@Before("通用切点()")public void beforeAdvice(JoinPoint joinPoint){System.out.println("前置通知");//这个JoinPoint joinPoint,在Spring容器调用这个方法的时候自动传过来//Signature signature = joinPoint.getSignature();获取目标方法的签名。//通过方法的签名可以获取到一个方法的具体信息。//获取目标方法的方法名System.out.println("目标方法的方法名:"+joinPoint.getSignature().getName());//获取目标方法的的方法修饰符System.out.println("目标方法的的方法修饰符:"+joinPoint.getSignature().getModifiers());//获取目标方法的方法返回值System.out.println(joinPoint.getSignature());System.out.println("目标方法的的全限定类名:"+joinPoint.getSignature().getDeclaringTypeName());}运行结果

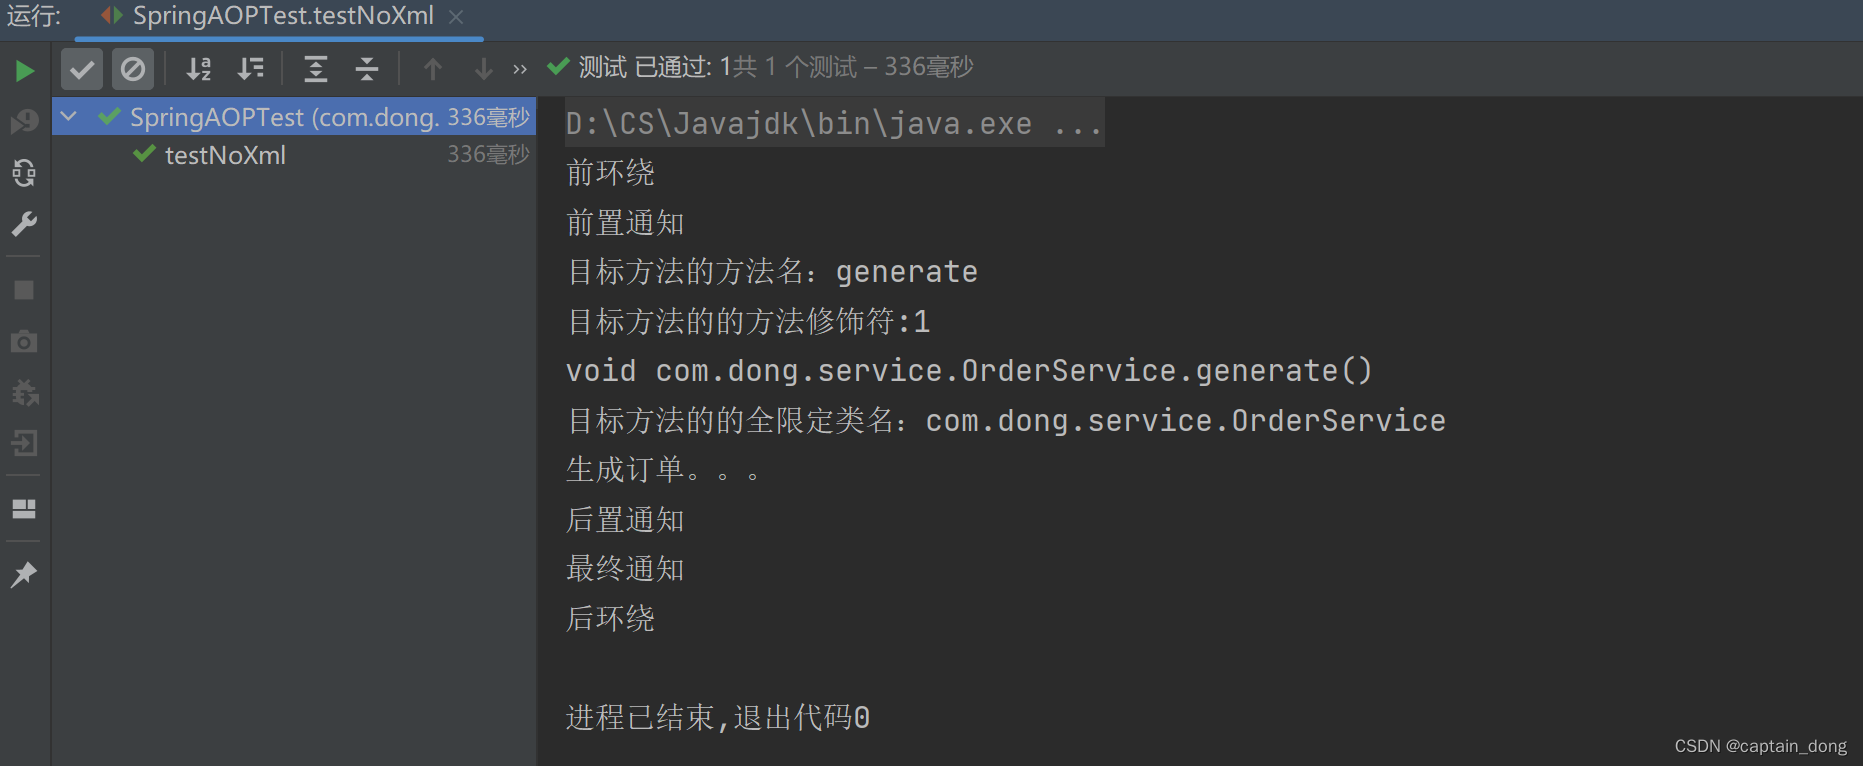
全注解式开发AOP
代码【编写一个类】
package com.dong.service;import org.springframework.context.annotation.ComponentScan;
import org.springframework.context.annotation.Configuration;
import org.springframework.context.annotation.EnableAspectJAutoProxy;@Configuration//代替spring.xml 文件
@ComponentScan({"com.dong.service"})
@EnableAspectJAutoProxy(proxyTargetClass = true)//启用aspect的自动代理
public class SpringConfig {
}
//全注解式开发@Testpublic void testNoXml(){ApplicationContext applicationContext=new AnnotationConfigApplicationContext(SpringConfig.class);OrderService orderService = applicationContext.getBean("orderService", OrderService.class);orderService.generate();}运行结果
15.4.3 基于XML配置方式的AOP(了解)
15.5 AOP的实际案例:事务处理
项目中的事务控制是在所难免的。在一个业务流程当中,可能需要多条DML语句共同完成,为了保证数据的安全,这多条DML语句要么同时成功,要么同时失败。这就需要添加事务控制的代码。例如以下伪代码:
- 伪代码
class 业务类1{public void 业务方法1(){try{// 开启事务startTransaction();// 执行核心业务逻辑step1();step2();step3();....// 提交事务commitTransaction();}catch(Exception e){// 回滚事务rollbackTransaction();}}public void 业务方法2(){try{// 开启事务startTransaction();// 执行核心业务逻辑step1();step2();step3();....// 提交事务commitTransaction();}catch(Exception e){// 回滚事务rollbackTransaction();}}public void 业务方法3(){try{// 开启事务startTransaction();// 执行核心业务逻辑step1();step2();step3();....// 提交事务commitTransaction();}catch(Exception e){// 回滚事务rollbackTransaction();}}
}class 业务类2{public void 业务方法1(){try{// 开启事务startTransaction();// 执行核心业务逻辑step1();step2();step3();....// 提交事务commitTransaction();}catch(Exception e){// 回滚事务rollbackTransaction();}}public void 业务方法2(){try{// 开启事务startTransaction();// 执行核心业务逻辑step1();step2();step3();....// 提交事务commitTransaction();}catch(Exception e){// 回滚事务rollbackTransaction();}}public void 业务方法3(){try{// 开启事务startTransaction();// 执行核心业务逻辑step1();step2();step3();....// 提交事务commitTransaction();}catch(Exception e){// 回滚事务rollbackTransaction();}}
}
//......
可以看到,这些业务类中的每一个业务方法都是需要控制事务的,而控制事务的代码又是固定的格式,都是:
try{// 开启事务startTransaction();// 执行核心业务逻辑//......// 提交事务commitTransaction();
}catch(Exception e){// 回滚事务rollbackTransaction();
}这个控制事务的代码就是和业务逻辑没有关系的“交叉业务”。以上伪代码当中可以看到这些交叉业务的代码没有得到复用,并且如果这些交叉业务代码需要修改,那必然需要修改多处,难维护,怎么解决?
可以采用AOP思想解决。可以把以上控制事务的代码作为环绕通知,切入到目标类的方法当中。接下来我们做一下这件事,有两个业务类,如下:
代码
spring.xml
<?xml version="1.0" encoding="UTF-8"?>
<beans xmlns="http://www.springframework.org/schema/beans"xmlns:xsi="http://www.w3.org/2001/XMLSchema-instance"xmlns:context="http://www.springframework.org/schema/context"xmlns:aop="http://www.springframework.org/schema/aop"xsi:schemaLocation="http://www.springframework.org/schema/beans http://www.springframework.org/schema/beans/spring-beans.xsdhttp://www.springframework.org/schema/context http://www.springframework.org/schema/context/spring-context.xsdhttp://www.springframework.org/schema/aop http://www.springframework.org/schema/aop/spring-aop.xsd"><!--组件扫描--><context:component-scan base-package="com.dong.spring6.service"/><!--启动自动代理--><aop:aspectj-autoproxy/>
</beans>
银行账户的业务类
package com.dong.spring6.service;import org.springframework.stereotype.Service;@Service
public class AccountService {        //目标对象//目标方法//转账的业务方法public void transfer(){System.out.println("银行账户正在完成转账操作....");}//目标方法//取款的业务方法public void withdraw(){System.out.println("正在取款,请稍后......");}
}
订单业务类
package com.dong.spring6.service;import org.springframework.stereotype.Service;@Service
public class OrderService {     //目标对象//目标方法//生成订单的业务方法public void generate(){System.out.println("正在生成订单.....");}//目标方法//订单取消的业务方法public void cancel(){System.out.println("订单取消...");}
}
注意,以上两个业务类已经纳入spring bean的管理,因为都添加了@Component注解。
接下来我们给以上两个业务类的4个方法添加事务控制代码,使用AOP来完成:
事务切面类
package com.dong.spring6.service;import org.aspectj.lang.ProceedingJoinPoint;
import org.aspectj.lang.annotation.Around;
import org.aspectj.lang.annotation.Aspect;
import org.springframework.stereotype.Component;/*** 切面*/
@Component
@Aspect
public class TransactionAspect {@Around("execution(* com.dong.spring6.service..*(..))")public void aroundAdvice(ProceedingJoinPoint joinPoint){//执行目标try {//前环绕System.out.println("开启事务.....");//执行目标joinPoint.proceed();//后环绕System.out.println("提交事务.....");} catch (Throwable e) {System.out.println("回滚事务");}}
}
上述事务控制代码只需要写一次就行了,并且修改起来也没有成本。
编写测试程序:
package com.dong.spring6.test;import com.dong.spring6.service.AccountService;
import com.dong.spring6.service.OrderService;
import org.junit.Test;
import org.springframework.context.ApplicationContext;
import org.springframework.context.annotation.AnnotationConfigApplicationContext;
import org.springframework.context.support.ClassPathXmlApplicationContext;public class AOPRealAppTest {//编程式事务解决方案。@Testpublic void testTransaction(){ApplicationContext applicationContext=new ClassPathXmlApplicationContext("spring.xml");AccountService accountService = applicationContext.getBean("accountService", AccountService.class);OrderService orderService = applicationContext.getBean("orderService", OrderService.class);accountService.transfer();accountService.withdraw();orderService.generate();orderService.cancel();}
}
运行结果

有异常时:
增添代码:
package com.dong.spring6.service;import org.springframework.stereotype.Service;@Service
public class OrderService {     //目标对象//目标方法//生成订单的业务方法public void generate(){System.out.println("正在生成订单.....");}//目标方法//订单取消的业务方法public void cancel(){System.out.println("订单取消...");//空指针异常String s=null;s.toString();}
}
运行结果

15.6 AOP的实际案例:安全日志
需求是这样的:项目开发结束了,已经上线了。运行正常。客户提出了新的需求:凡事在系统中进行修改操作的,删除操作的,新增操作的,都要把这个人记录下来。因为这几个操作是属于危险行为。例如有业务类和业务方法:
spring.xml
<?xml version="1.0" encoding="UTF-8"?>
<beans xmlns="http://www.springframework.org/schema/beans"xmlns:xsi="http://www.w3.org/2001/XMLSchema-instance"xmlns:context="http://www.springframework.org/schema/context"xmlns:aop="http://www.springframework.org/schema/aop"xsi:schemaLocation="http://www.springframework.org/schema/beans http://www.springframework.org/schema/beans/spring-beans.xsdhttp://www.springframework.org/schema/context http://www.springframework.org/schema/context/spring-context.xsdhttp://www.springframework.org/schema/aop http://www.springframework.org/schema/aop/spring-aop.xsd"><!--组件扫描--><context:component-scan base-package="com.dong.spring6"/><!--启动自动代理--><aop:aspectj-autoproxy/>
</beans>
用户业务类
package com.dong.spring6.biz;import org.springframework.stereotype.Service;@Service
public class UserService {public void saveUser(){System.out.println("新增用户信息");}public void deleteUser(){System.out.println("删除用户信息");}public void modifyUser(){System.out.println("修改用户信息");}public void getUser(){System.out.println("获取用户信息");}}
VIP业务类
package com.dong.spring6.biz;import org.springframework.stereotype.Service;@Service
public class VipService {public void saveVip(){System.out.println("新增会员信息");}public void deleteVip(){System.out.println("删除会员信息");}public void modifyVip(){System.out.println("修改会员信息");}public void getVip(){System.out.println("获取会员信息");}}
注意:已经添加了@Servic ( @Component )注解。
接下来我们使用aop来解决上面的需求:
编写一个负责安全的切面类
package com.dong.spring6.biz;import org.aspectj.lang.JoinPoint;
import org.aspectj.lang.annotation.Aspect;
import org.aspectj.lang.annotation.Before;
import org.aspectj.lang.annotation.Pointcut;
import org.springframework.stereotype.Component;import java.text.SimpleDateFormat;
import java.util.Date;@Component
@Aspect
public class SecurityLogAspect {@Pointcut("execution(* com.dong.spring6.biz..save*(..))")public void savePointCut(){}@Pointcut("execution(* com.dong.spring6.biz..delete*(..))")public void deletePointCut(){}@Pointcut("execution(* com.dong.spring6.biz..modify*(..))")public void modifyPointCut(){}@Pointcut("execution(* com.dong.spring6.biz..get*(..))")public void getPointCut(){}@Before("savePointCut()||deletePointCut()||modifyPointCut()")public void beforeAdvice(JoinPoint joinPoint){SimpleDateFormat simpleDateFormat=new SimpleDateFormat("yyyy-MM-dd HH:mm:ss SSS");String nowTime = simpleDateFormat.format(new Date());//输出日志信息System.out.println(nowTime+" zhangsan"+joinPoint.getSignature().getDeclaringTypeName()+"."+joinPoint.getSignature().getName());}
}
测试程序
@Testpublic void testSecurityLog(){ApplicationContext applicationContext=new ClassPathXmlApplicationContext("spring.xml");UserService userService = applicationContext.getBean("userService", UserService.class);VipService vipService = applicationContext.getBean("vipService", VipService.class);userService.saveUser();userService.deleteUser();userService.modifyUser();userService.getUser();vipService.saveVip();vipService.deleteVip();vipService.modifyVip();vipService.getVip();}运行结果

十六、Spring对事务的支持
16.1 事务概述
- 什么是事务
-
- 在一个业务流程当中,通常需要多条DML(insert delete update)语句共同联合才能完成,这多条DML语句必须同时成功,或者同时失败,这样才能保证数据的安全。
- 多条DML要么同时成功,要么同时失败,这叫做事务。
- 事务:Transaction(tx)
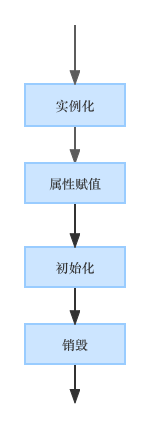
- 事务的四个处理过程:
-
- 第一步:开启事务 (start transaction)
- 第二步:执行核心业务代码
- 第三步:提交事务(如果核心业务处理过程中没有出现异常)(commit transaction)
- 第四步:回滚事务(如果核心业务处理过程中出现异常)(rollback transaction)
- 事务的四个特性:
-
- A 原子性:事务是最小的工作单元,不可再分。
- C 一致性:事务要求要么同时成功,要么同时失败。事务前和事务后的总量不变。
- I 隔离性:事务和事务之间因为有隔离性,才可以保证互不干扰。
- D 持久性:持久性是事务结束的标志。
16.2 引入事务场景
以银行账户转账为例学习事务。两个账户act-001和act-002。act-001账户向act-002账户转账10000,必须同时成功,或者同时失败。(一个减成功,一个加成功, 这两条update语句必须同时成功,或同时失败。)
连接数据库的技术采用Spring框架的JdbcTemplate。
采用三层架构搭建:
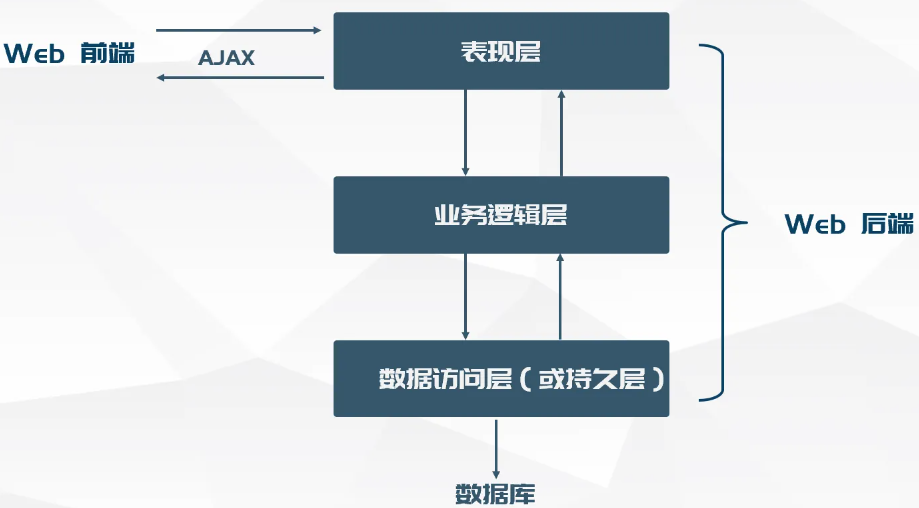
模块名:spring6-013-tx-bank(依赖如下)
pom.xml
<?xml version="1.0" encoding="UTF-8"?>
<project xmlns="http://maven.apache.org/POM/4.0.0"xmlns:xsi="http://www.w3.org/2001/XMLSchema-instance"xsi:schemaLocation="http://maven.apache.org/POM/4.0.0 http://maven.apache.org/xsd/maven-4.0.0.xsd"><modelVersion>4.0.0</modelVersion><groupId>com.dong</groupId><artifactId>spring6-013-tx-bank</artifactId><version>1.0-SNAPSHOT</version><packaging>jar</packaging><!--依赖--><dependencies><!--spring context依赖--><dependency><groupId>org.springframework</groupId><artifactId>spring-context</artifactId><version>6.0.11</version></dependency><!--spring aspects依赖--><dependency><groupId>org.springframework</groupId><artifactId>spring-aspects</artifactId><version>6.0.11</version></dependency><!--junit依赖--><dependency><groupId>junit</groupId><artifactId>junit</artifactId><version>4.13.2</version><scope>test</scope></dependency><!--spring jdbc--><dependency><groupId>org.springframework</groupId><artifactId>spring-jdbc</artifactId><version>6.0.11</version></dependency><!--mysql驱动--><dependency><groupId>mysql</groupId><artifactId>mysql-connector-java</artifactId><version>8.0.33</version></dependency><!--德鲁伊连接池--><dependency><groupId>com.alibaba</groupId><artifactId>druid</artifactId><version>1.2.16</version></dependency><!--@Resource注解--><dependency><groupId>jakarta.annotation</groupId><artifactId>jakarta.annotation-api</artifactId><version>2.1.1</version></dependency></dependencies><properties><maven.compiler.source>19</maven.compiler.source><maven.compiler.target>19</maven.compiler.target><project.build.sourceEncoding>UTF-8</project.build.sourceEncoding></properties></project>
第一步:准备数据库表
表结构

表数据
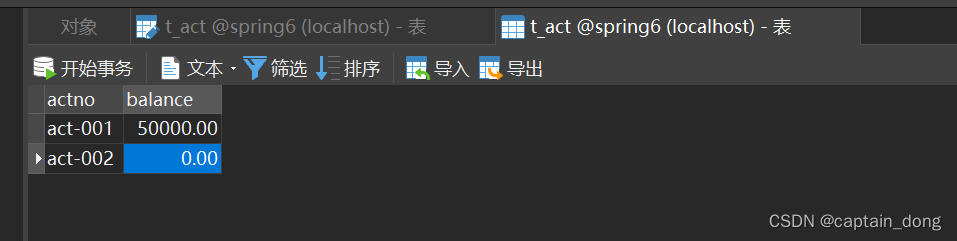
第二步:创建包结构
com.dong.bank.pojo
com.dong.bank.service
com.dong.bank.service.impl
com.dong.bank.dao
com.dong.bank.dao.impl
第三步:准备POJO类
package com.dong.bank.pojo;public class Account {private String actno;private double balance;@Overridepublic String toString() {return "Account{" +"actno='" + actno + '\'' +", balance=" + balance +'}';}public Account() {}public Account(String actno, double balance) {this.actno = actno;this.balance = balance;}public String getActno() {return actno;}public void setActno(String actno) {this.actno = actno;}public double getBalance() {return balance;}public void setBalance(double balance) {this.balance = balance;}
}
第四步:编写持久层
package com.dong.bank.dao;import com.dong.bank.pojo.Account;public interface AccountDao {/*** 根据账号查询账户信息* @param actno* @return*/Account selectByActNo(String actno);/*** 更新账户信息* @param account* @return*/int update(Account account);
}
package com.dong.bank.dao.impl;import com.dong.bank.dao.AccountDao;
import com.dong.bank.pojo.Account;
import jakarta.annotation.Resource;
import org.springframework.jdbc.core.BeanPropertyRowMapper;
import org.springframework.jdbc.core.JdbcTemplate;
import org.springframework.stereotype.Repository;@Repository("accountDao")
public class AccountDaoImpl implements AccountDao {@Resource(name = "jdbcTemplate")private JdbcTemplate jdbcTemplate;@Overridepublic Account selectByActNo(String actno) {String sql="select actno, balance from t_act where actno=?";Account account = jdbcTemplate.queryForObject(sql, new BeanPropertyRowMapper<>(Account.class), actno);return account;}@Overridepublic int update(Account account) {String sql="update t_act set balance=? where actno=?";int count = jdbcTemplate.update(sql, account.getBalance(), account.getActno());return count;}
}
第五步:编写业务层
package com.dong.bank.service;/*** 业务接口* 事务就是在这个接口下控制的*/
public interface AccountService {/*** 转账业务方法* @param fromActno 从这个账户转出* @param toActno   转入这个账户* @param money    转账金额*/void transfer(String fromActno,String toActno,double money);}
package com.dong.bank.service.impl;import com.dong.bank.dao.AccountDao;
import com.dong.bank.pojo.Account;
import com.dong.bank.service.AccountService;
import jakarta.annotation.Resource;
import org.springframework.stereotype.Service;@Service("accountService")
public class AccountServiceImpl implements AccountService {@Resource(name = "accountDao")private AccountDao accountDao;//控制事务,因为在这个方法中要完成所有的转账业务@Overridepublic void transfer(String fromActno, String toActno, double money) {//查询转出账户的余额是否充足Account fromAct = accountDao.selectByActNo(fromActno);if (fromAct.getBalance()<money){throw new RuntimeException("余额不足!!!");}//余额充足Account toAct = accountDao.selectByActNo(toActno);//将内存中的两个对象的余额先修改fromAct.setBalance(fromAct.getBalance()-money);toAct.setBalance(fromAct.getBalance()+money);//数据库更新int count = accountDao.update(fromAct);count+=accountDao.update(toAct);if (count!=2){throw new RuntimeException("转账失败,请联系银行!!!");}}
}
第六步:编写Spring配置文件
<?xml version="1.0" encoding="UTF-8"?>
<beans xmlns="http://www.springframework.org/schema/beans"xmlns:xsi="http://www.w3.org/2001/XMLSchema-instance"xmlns:context="http://www.springframework.org/schema/context"xsi:schemaLocation="http://www.springframework.org/schema/beans http://www.springframework.org/schema/beans/spring-beans.xsdhttp://www.springframework.org/schema/context http://www.springframework.org/schema/context/spring-context.xsd"><!--组件扫描--><context:component-scan base-package="com.dong.bank"/><!--配置数据源--><bean id="dataSource" class="com.alibaba.druid.pool.DruidDataSource"><property name="driverClassName" value="com.mysql.cj.jdbc.Driver"/><property name="url" value="jdbc:mysql://localhost:3306/spring6"/><property name="username" value="root"/><property name="password" value="15088143946Sld"/></bean><!--配置jdbcTemplate--><bean id="jdbcTemplate" class="org.springframework.jdbc.core.JdbcTemplate"><property name="dataSource" ref="dataSource"/></bean></beans>
第七步:编写表示层(测试程序)
代码
package com.dong.bank.test;import com.dong.bank.service.AccountService;
import org.junit.Test;
import org.springframework.context.ApplicationContext;
import org.springframework.context.support.ClassPathXmlApplicationContext;public class SpringTxTest {@Testpublic void testSpringTx(){ApplicationContext applicationContext=new ClassPathXmlApplicationContext("spring.xml");AccountService accountService = applicationContext.getBean("accountService", AccountService.class);try {accountService.transfer("act-001", "act-002", 10000);System.out.println("转账成功。");}catch (Exception e){e.printStackTrace();System.out.println("转账失败。");}}
}
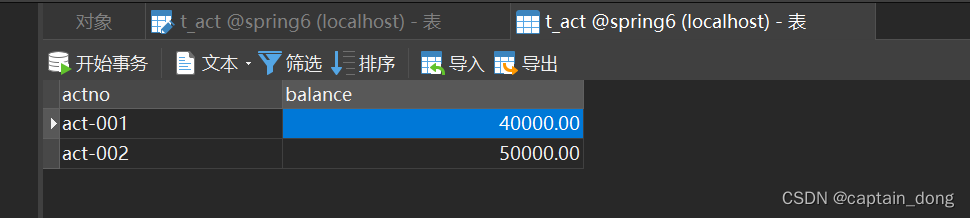
执行结果:

数据变化:
模拟异常
package com.dong.bank.service.impl;import com.dong.bank.dao.AccountDao;
import com.dong.bank.pojo.Account;
import com.dong.bank.service.AccountService;
import jakarta.annotation.Resource;
import org.springframework.stereotype.Service;@Service("accountService")
public class AccountServiceImpl implements AccountService {@Resource(name = "accountDao")private AccountDao accountDao;//控制事务,因为在这个方法中要完成所有的转账业务@Overridepublic void transfer(String fromActno, String toActno, double money) {//第一步:开启事务//第二步:执行核心业务逻辑//查询转出账户的余额是否充足Account fromAct = accountDao.selectByActNo(fromActno);if (fromAct.getBalance()<money){throw new RuntimeException("余额不足!!!");}//余额充足Account toAct = accountDao.selectByActNo(toActno);//将内存中的两个对象的余额先修改fromAct.setBalance(fromAct.getBalance()-money);toAct.setBalance(fromAct.getBalance()+money);//数据库更新int count = accountDao.update(fromAct);count+=accountDao.update(toAct);//模拟异常String s=null;s.toString();if (count!=2){throw new RuntimeException("转账失败,请联系银行!!!");}//第三步:如果执行业务流程过程中,没有异常。提交事务//第四步:如果执行业务流程过程中,有异常,回滚事务}
}
执行结果:

数据库表中数据:
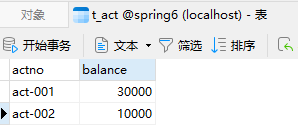
- 转出成功,但是转入失败! 不同步更新!
丢了1万!!!
16.3 Spring对事务的支持
Spring实现事务的两种方式
-
编程式事务
-
- 通过编写代码的方式来实现事务的管理。
-
声明式事务
-
- 基于注解方式
- 基于XML配置方式
Spring事务管理API
Spring对事务的管理底层实现方式是基于AOP实现的。采用AOP的方式进行了封装。所以Spring专门针对事务开发了一套API,API的核心接口如下:
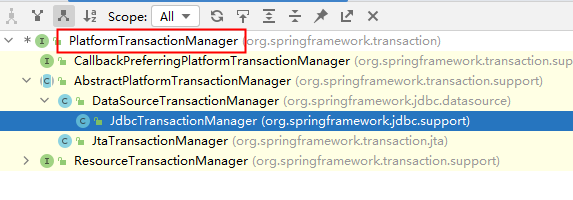
PlatformTransactionManager接口:spring事务管理器的核心接口。在Spring6中它有两个实现:
- DataSourceTransactionManager:支持JdbcTemplate、MyBatis、Hibernate等事务管理。
- JtaTransactionManager:支持分布式事务管理。
如果要在Spring6中使用JdbcTemplate,就要使用DataSourceTransactionManager来管理事务。(Spring内置写好了,可以直接用。)
声明式事务之注解实现方式
- 第一步:在spring配置文件中配置事务管理器。
- 第二步:在spring配置文件中引入tx命名空间。
- 第三步:在spring配置文件中配置“事务注解驱动器”,开始注解的方式控制事务。
- 第四步:在service类上或方法上添加@Transactional注解
在类上添加该注解,该类中所有的方法都有事务。在某个方法上添加该注解,表示只有这个方法使用事务。
相关文章:
Spring学习记录----十五、面向切面编程AOP+十六、Spring对事务的支持
十五、面向切面编程AOP IoC使软件组件松耦合。AOP让你能够捕捉系统中经常使用的功能,把它转化成组件。 AOP(Aspect Oriented Programming):面向切面编程,面向方面编程。(AOP是一种编程技术) …...
)
Color Correction (颜色校正)
介绍 在Unity中,Color Correction (颜色校正) 是一种用于调整场景或游戏画面颜色的技术。其中,Curves(曲线)和Saturation(饱和度)是常用的Color Correction工具。通过Curves,可以对RGB通道进行…...
Unity-缓存池
一、.基础缓存池实现 继承的Singleton脚本为 public class Singleton<T> where T : new() {private static T _instance;public static T GetIstance(){if (_instance null)_instance new T();return _instance;} } 1.PoolManager using System.Collections; using S…...

ubuntu samba 配置常见问题
samba配置: sudo vi /etc/samba/smb.conf [xxx 共享文件名] comment share folder browseable yes writable yes guest ok yes path /workdir/code/favarite create mask 0777 directory mask 0777 sudo /etc/init.d/smbd restart 重启smb服务 以上操作…...

vue3.3-TinyMCE:TinyMCE富文本编辑器基础使用
一、TinyMCE官网 GitHub - tinymce/tinymce TinyMCE中文文档中文手册 二、官网介绍 TinyMCE是一款易用、且功能强大的所见即所得的富文本编辑器。同类程序有:UEditor、Kindeditor、Simditor、CKEditor、wangEditor、Suneditor、froala等等。 TinyMCE的优势&…...
基于以太坊+IPFS的去中心化数据交易方法及平台
自己的论文,哎费事 目录 基于以太坊IPFS的去中心化数据交易方法及平台 基于以太坊IPFS的去中心化数据交易方法及平台 摘要: 数据交易过程中存在数据权属不明和数据安全问题。本文开发了一种基于以太坊IPFS的去中心化数据交易方法及平台。方法包括&am…...

NestJS 的 拦截器 学习
拦截器会用到RxJs,所以在学习拦截器之前可以先了解一下它。 拦截器是使用Injectable()装饰器装饰的类并且实现了接口NestInterceptor。 拦截器受到 AOP(面向切面编程)技术的启发,具有如下的功能: 在方法执行之前/之后绑定额外的逻辑转换函…...
Spring AOP 中的代理对象是怎么创建出来的?
文章目录 1. AOP 用法2. 原理分析2.1 doCreateBean2.2 postProcessAfterInitialization2.3 getAdvicesAndAdvisorsForBean2.3.1 findCandidateAdvisors2.3.2 findAdvisorsThatCanApply2.3.3 extendAdvisors 2.4 createProxy 今天和小伙伴们聊一聊 Spring AOP 中的代理对象是怎么…...

解决@Scope(“prototype“)不生效的问题
目录 Scope(“prototype“)不生效Scope(“prototype“)正确用法——解决Bean多例问题 1.问题,Spring管理的某个Bean需要使用多例2.问题升级3. Spring给出的解决问题的办法(解决Bean链中某个Bean需要多例的问题) Scope(“prototype“)不生效 …...
Mybatis 知识点
Mybatis 知识点 1.1 Mybatis 简介 1.1.1 什么是 Mybatis Mybatis 是一款优秀的持久层框架支持定制化 SQL、存储过程及高级映射Mybatis 几乎避免了所有的 JDBC 代码和手动设置参数以及获取结果集MyBatis 可以使用简单的 XML 或注解来配置和映射原生类型、接口和 Java 的 POJO…...

PHP中关于is,between,in等运算符的用法是什么?
我们学习了解了这么多关于PHP的知识,不知道你们对PHP中关于is,between,in等运算符的用法是什么?是否已经完全掌握了呢,如果没有,那就跟随本篇文章一起继续学习吧 相关推荐:关于PHP中的增删改如…...
2023-07-29:华清远见嵌入式2017年线下班:文件IO笔记
这里写目录标题 华清远见嵌入式2017年线下班:文件IO笔记文件权限文件IO文件创建和打开操作文件关闭操作出错处理创建设备文件 || create || 老师自己忘了文件读操作练习:计算文件的大小?文件写操作练习:打开file1和file2ÿ…...
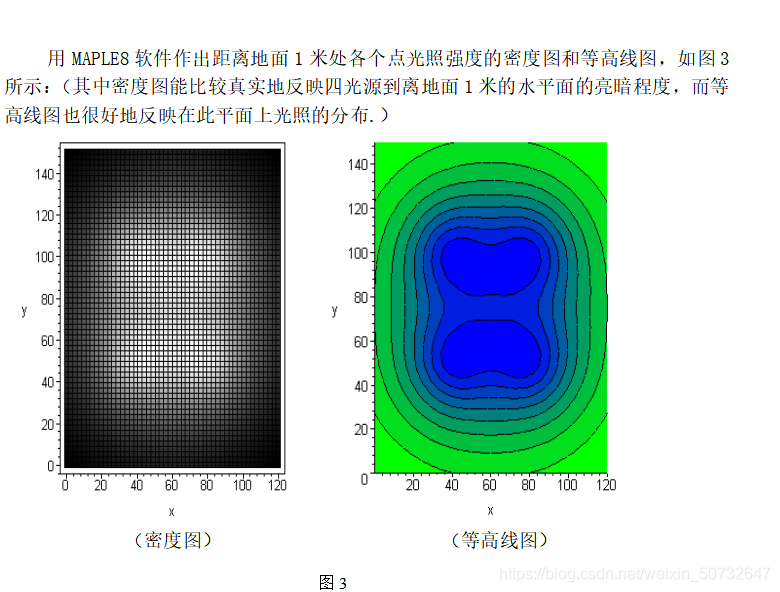
2023年第四届“华数杯”数学建模思路 - 复盘:光照强度计算的优化模型
文章目录 0 赛题思路1 问题要求2 假设约定3 符号约定4 建立模型5 模型求解6 实现代码 0 赛题思路 (赛题出来以后第一时间在CSDN分享) https://blog.csdn.net/dc_sinor?typeblog 1 问题要求 现在已知一个教室长为15米,宽为12米࿰…...
)
Typescript第七章 处理错误(返回null,抛出异常,返回异常,Option类型)
第七章 处理错误 Typescript竭尽所能,把运行时异常转移到编译时。Typescript是功能丰富的系统,加上强大的静态和符号分析能力,包揽了大量辛苦的工作。 但是有些问题是无法避免的,比如网络和文件系统异常,解析用户输入…...

Qt库xcb问题
首先在~/.bashrc中加入 export QT_DEBUG_PLUGINS1然后看具体的报错 查看某个库链接的库: ldd libqxcb.so然后找到真正缺少的库,再在路径下搜索,然后建立软链接。 https://blog.csdn.net/LOVEmy134611/article/details/107212845 https://…...
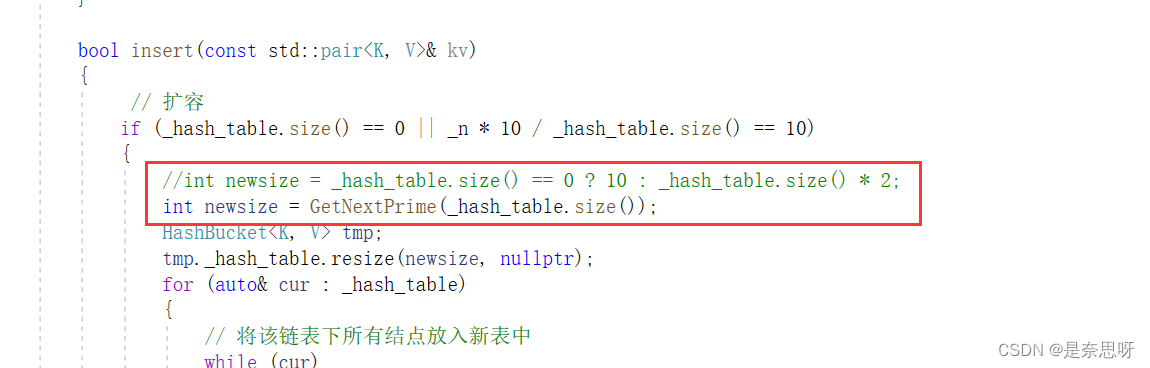
C++ | 哈希表的实现与unordered_set/unordered_map的封装
目录 前言 一、哈希 1、哈希的概念 2、哈希函数 (1)直接定址法 (2)除留余数法 (3)平方取中法(了解) (4)随机数法(了解) 3、哈…...
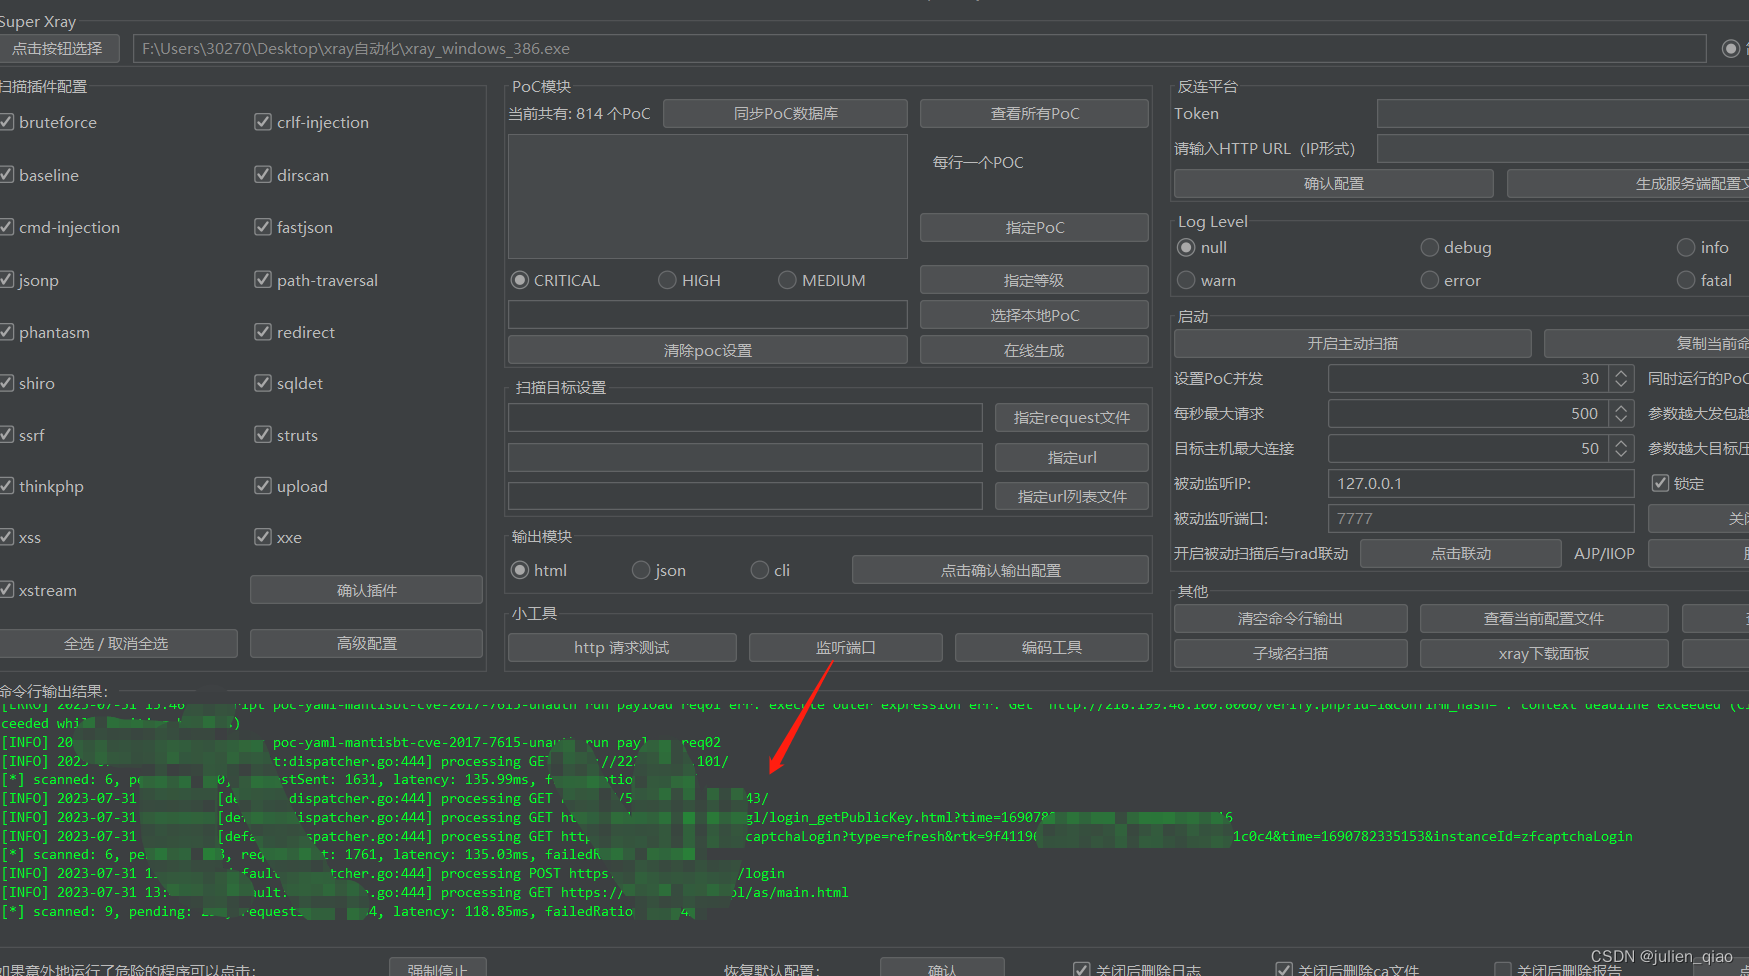
【漏洞挖掘】Xray+rad自动化批量漏洞挖掘
文章目录 前言一、挖掘方法二、使用步骤工具安装使用方法开始挖掘 总结 前言 自动化漏洞挖掘是指利用计算机程序和工具来扫描、分析和检测应用程序、网络和系统中的安全漏洞的过程。这种方法可以帮助安全专家和研究人员更高效地发现和修复潜在的安全威胁,从而提高整…...

Swagger UI教程 API 文档和Node的使用
在团队开发中,一个好的 API 文档可以减少很多交流成本,也可以使一个新人快速上手业务。 前言 swagger ui是一个API在线文档生成和测试的利器,目前发现最好用的。为什么好用?Demo 传送门 支持API自动生成同步的在线文档 这些文档可…...

P5691 [NOI2001] 方程的解数
[NOI2001] 方程的解数 题目描述 已知一个 n n n 元高次方程: ∑ i 1 n k i x i p i 0 \sum\limits_{i1}^n k_ix_i^{p_i} 0 i1∑nkixipi0 其中: x 1 , x 2 , … , x n x_1, x_2, \dots ,x_n x1,x2,…,xn 是未知数, k 1 ,…...

rust里用什么表示字节类型?
在Rust中,字节可以使用 u8 类型来表示。 u8 是一个无符号8位整数类型,可以表示0到255之间的值,对应于一个字节的范围。 以下是一个示例,演示了如何声明和使用字节: fn main() {let byte: u8 65; // 表示字母A的ASCI…...

终极Python金融数据接口:3步掌握免费高效的A股数据获取方案
终极Python金融数据接口:3步掌握免费高效的A股数据获取方案 【免费下载链接】mootdx 通达信数据读取的一个简便使用封装 项目地址: https://gitcode.com/GitHub_Trending/mo/mootdx 在金融数据分析和量化交易领域,获取准确、及时且成本可控的市场…...

从BJT到CMOS:运放偏置电流的前世今生,以及它对高阻抗传感器电路设计的实际影响
从BJT到CMOS:运放偏置电流的前世今生,以及它对高阻抗传感器电路设计的实际影响 在精密测量领域,运算放大器的偏置电流就像一位隐形的"电流小偷",悄无声息地影响着测量精度。想象一下,当你试图测量一个微弱的…...

【AI时代】一句指令复刻所有网页 WEB原型不用愁
【AI时代】一句指令复刻所有网页 WEB原型不用愁“连接 CDP,参考 baidu.com,开发功能原型,1:1 复刻现有页面。”就这么一句话,AI 帮你把原型做出来了。📸 效果对比 原始参考页面生成效果💡 这是 原型开发方式…...

APT32F110 RTC模块深度测评:从硬件原理到低功耗应用实战
1. 项目概述与核心价值最近在捣鼓爱普特APT32F110这块开发板,发现它的RTC(实时时钟)功能挺有意思。对于很多嵌入式项目来说,比如智能家居的定时开关、数据采集设备的定时唤醒、或者简单的电子钟,一个靠谱的RTC模块是必…...

昇腾CANN opbase与算子生态协作:从单一算子到完整计算图
前言 单个算子的性能再高,如果无法和其他算子高效协作,最终端到端的模型推理或训练性能也不会好。一个典型的深度学习模型包含几十到几百个算子,它们之间的数据流、内存分配、执行顺序都需要精心编排。opbase作为所有算子仓库的公共基础&…...

企业微信桌面端深度集成:DLL注入与协议逆向实战
1. 这不是“黑产教程”,而是企业级办公系统集成的现实路径“微信逆向与DLL注入”这八个字,一出来就容易让人联想到灰色地带、安全攻防、甚至违规外挂。但今天我要说的,是另一条路——一条我带团队在三年内落地了7个大型政企客户微信生态集成项…...

JS逆向实战:加密库动态Hook的工程化落地方法
1. 这不是写个console.log就能搞定的事:为什么主流加密库的Hook总在关键时刻失效“JS逆向实战:一键Hook主流加密库的调试与拦截”——看到这个标题,很多刚入行的朋友第一反应是:“不就是给CryptoJS、SM2、RSA.js这些库的encrypt方…...
)
ChatGPT网络错误不是运气问题:用mtr追踪真实路径,定位ISP路由黑洞、中间盒QoS限速与WAF误拦截(附15分钟速查表)
更多请点击: https://codechina.net 第一章:ChatGPT网络错误不是运气问题:用mtr追踪真实路径,定位ISP路由黑洞、中间盒QoS限速与WAF误拦截(附15分钟速查表) ChatGPT连接失败常被归因为“服务器繁忙”或“网…...

UDS_自动化脚本生成_10服务_V01
1、原子元素 1.1 会话原子 Session.Default() Session.Extended() Session.Programming() Session.Developer() 1.2 请求原子 10 01 10 02 10 03 10 76 10 81 10 82 10 83 10 F6 10 04 10 84 10 / 10 01 00 / 10 02 00 / 10 03 00 / 10 76 00 1.3 响应原子 50 01 00 32 01 F4 …...

520遇见AI:猛犸AI智能体训练增长营第15期深圳圆满落幕
一束玫瑰,一场关于未来的对话。 2026年5月20日,猛犸AI智能体训练增长营第15期在深圳南山正式开课。课程伊始,GEO理论奠基人罗小军为每一位到场的100余名学员送上了一束玫瑰花——这一天恰逢520,这束花,是猛犸AI送给每一…...