(el-Table)操作(不使用 ts):Element-plus 中Table 表格组件:多选修改成支持单选及表格相关样式的调整
Ⅰ、Element-plus 提供的 Table 表格组件与想要目标情况的对比:
1、Element-plus 提供 Table 组件情况:
其一、Element-ui 自提供的 Table 代码情况为(示例的代码):
// Element-plus 自提供的代码:
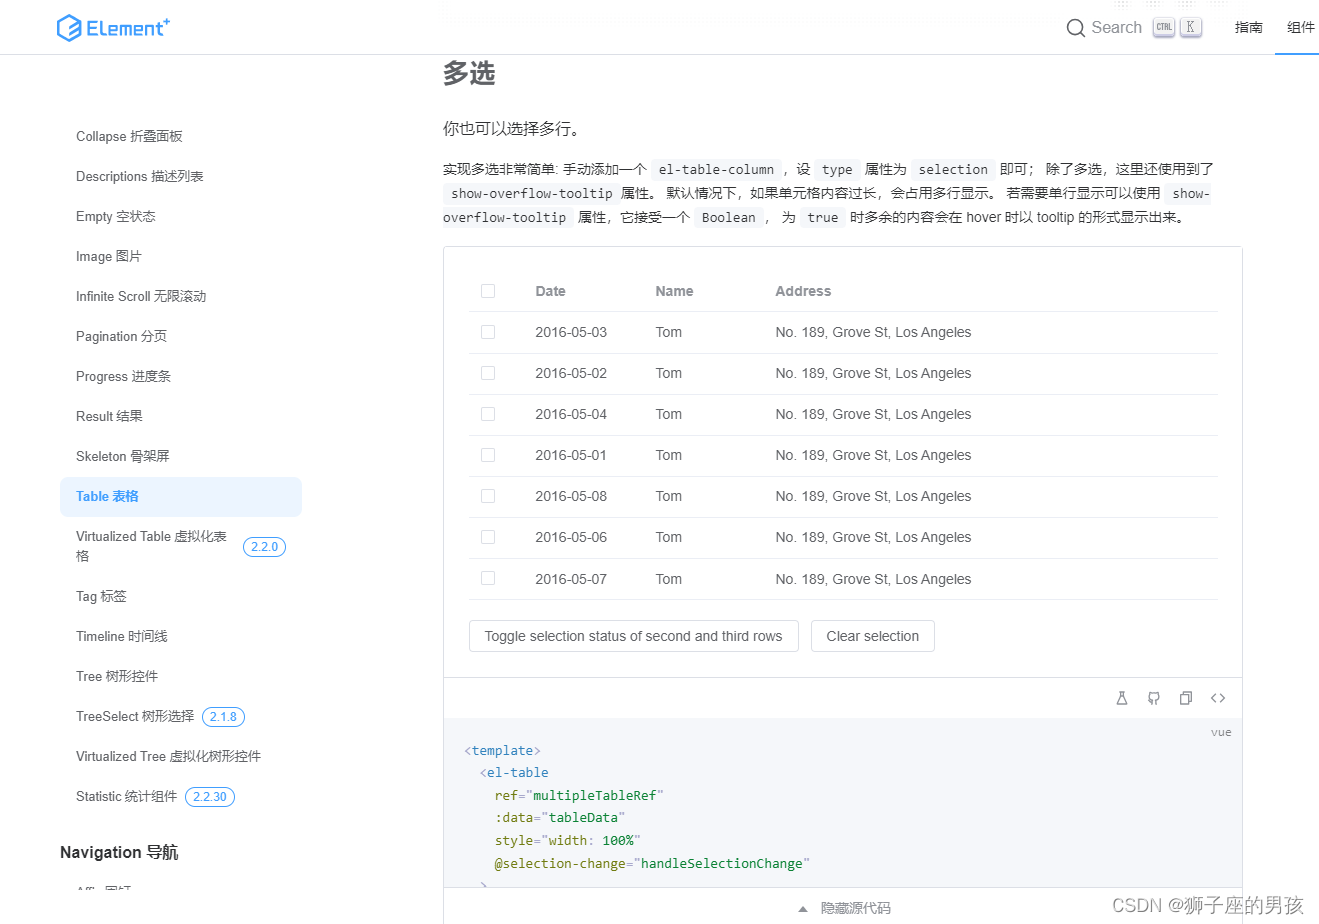
// 此时是使用了 ts 语言环境,但是我在实际项目中并没有使用 ts 语言和环境;<template><el-tableref="multipleTableRef":data="tableData"style="width: 100%"@selection-change="handleSelectionChange"><el-table-column type="selection" width="55" /><el-table-column label="Date" width="120"><template #default="scope">{{ scope.row.date }}</template></el-table-column><el-table-column property="name" label="Name" width="120" /><el-table-column property="address" label="Address" show-overflow-tooltip /></el-table><div style="margin-top: 20px"><el-button @click="toggleSelection([tableData[1], tableData[2]])">Toggle selection status of second and third rows</el-button><el-button @click="toggleSelection()">Clear selection</el-button></div>
</template><script lang="ts" setup>
import { ref } from 'vue'
import { ElTable } from 'element-plus'interface User {date: stringname: stringaddress: string
}const multipleTableRef = ref<InstanceType<typeof ElTable>>()
const multipleSelection = ref<User[]>([])
const toggleSelection = (rows?: User[]) => {if (rows) {rows.forEach((row) => {// TODO: improvement typing when refactor table// eslint-disable-next-line @typescript-eslint/ban-ts-comment// @ts-expect-errormultipleTableRef.value!.toggleRowSelection(row, undefined)})} else {multipleTableRef.value!.clearSelection()}
}
const handleSelectionChange = (val: User[]) => {multipleSelection.value = val
}const tableData: User[] = [{date: '2016-05-03',name: 'Tom',address: 'No. 189, Grove St, Los Angeles',},{date: '2016-05-02',name: 'Tom',address: 'No. 189, Grove St, Los Angeles',},{date: '2016-05-04',name: 'Tom',address: 'No. 189, Grove St, Los Angeles',},{date: '2016-05-01',name: 'Tom',address: 'No. 189, Grove St, Los Angeles',},{date: '2016-05-08',name: 'Tom',address: 'No. 189, Grove St, Los Angeles',},{date: '2016-05-06',name: 'Tom',address: 'No. 189, Grove St, Los Angeles',},{date: '2016-05-07',name: 'Tom',address: 'No. 189, Grove St, Los Angeles',},
]代码地址(直接点击下面 url 跳转):https://element-plus.gitee.io/zh-CN/component/table.html#多选
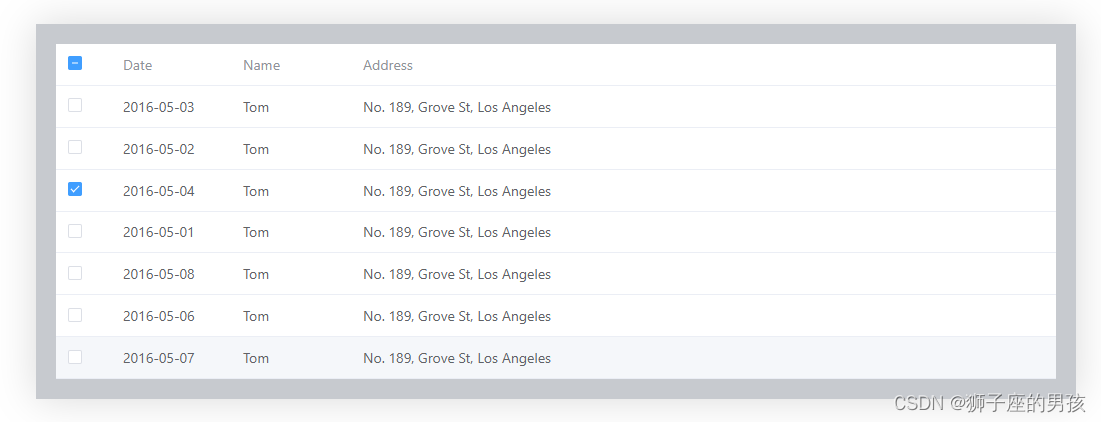
其二、页面的显示情况为:
2、目标想修改后的情况:

Ⅱ、实现 Table 表格组件达到目标效果变化的过程:
1、 Table 表格组件成功引入 vue3 项目的过程(去除了 ts 的语法):
其一、代码:
<template><el-tableref="multipleTableRef":data="tableData"style="width: 100%"@selection-change="handleSelectionChange"><el-table-column type="selection" width="55" /><el-table-column label="Date" width="120"><template #default="scope">{{ scope.row.date }}</template></el-table-column><el-table-column property="name" label="Name" width="120" /><el-table-column property="address" label="Address" show-overflow-tooltip /></el-table>
</template><script setup>import { ref } from 'vue'const tableData =ref([{date: '2016-05-03',name: 'Tom',address: 'No. 189, Grove St, Los Angeles',},{date: '2016-05-02',name: 'Tom',address: 'No. 189, Grove St, Los Angeles',},{date: '2016-05-04',name: 'Tom',address: 'No. 189, Grove St, Los Angeles',},{date: '2016-05-01',name: 'Tom',address: 'No. 189, Grove St, Los Angeles',},{date: '2016-05-08',name: 'Tom',address: 'No. 189, Grove St, Los Angeles',},{date: '2016-05-06',name: 'Tom',address: 'No. 189, Grove St, Los Angeles',},{date: '2016-05-07',name: 'Tom',address: 'No. 189, Grove St, Los Angeles',},
])
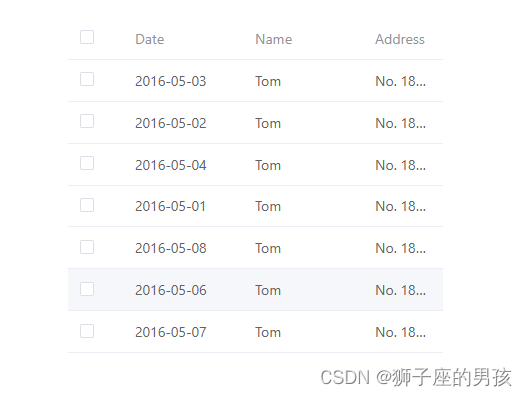
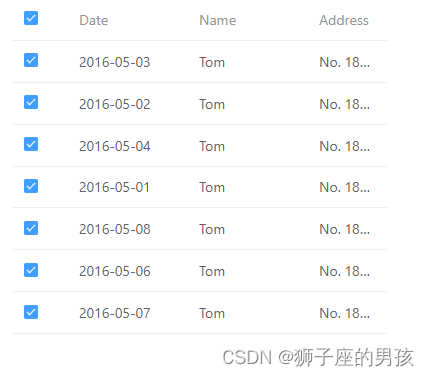
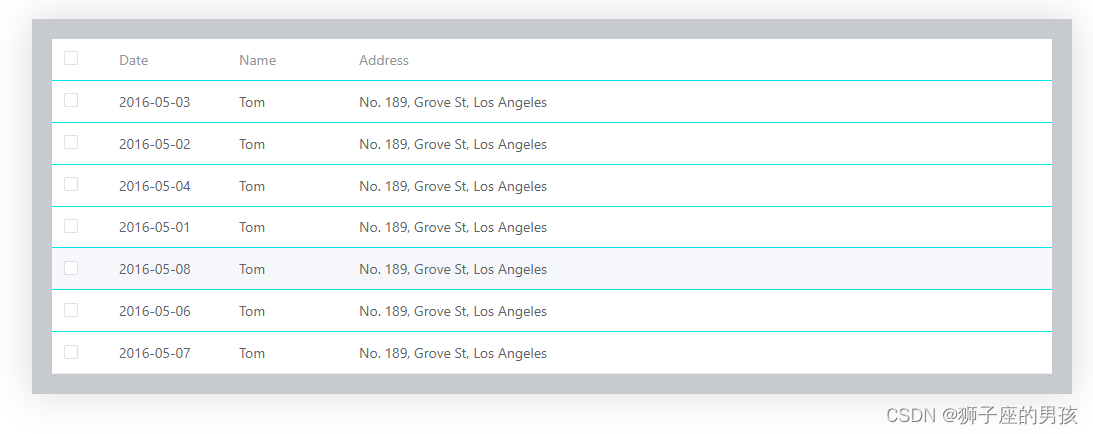
</script><style lang="scss" scoped></style>其二、效果展示:
// 可以看出此时是支持多选的;
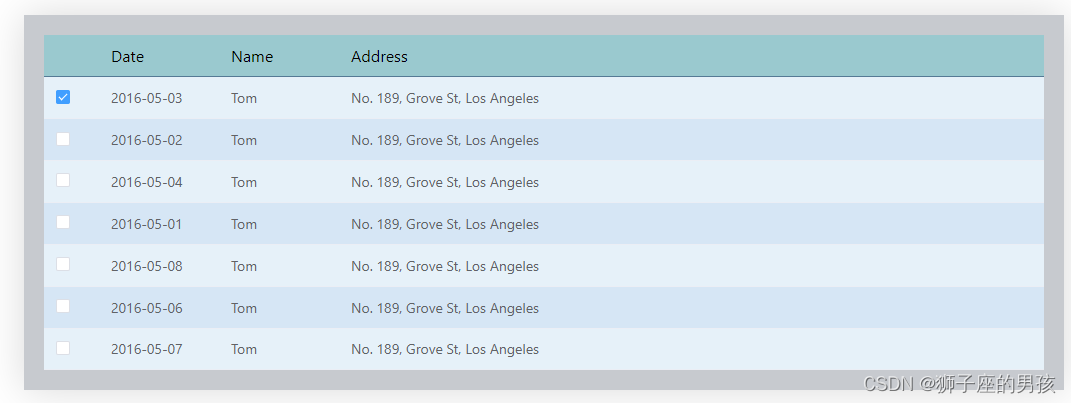
2、 Table 表格组件添加展示样式处理的过程:
其一、代码:
<script setup>
import { ref } from 'vue'const multipleTable = ref('')// do not use same name with ref
const tableData = ref([{date: '2016-05-03',name: 'Tom',address: 'No. 189, Grove St, Los Angeles',},{date: '2016-05-02',name: 'Tom',address: 'No. 189, Grove St, Los Angeles',},{date: '2016-05-04',name: 'Tom',address: 'No. 189, Grove St, Los Angeles',},{date: '2016-05-01',name: 'Tom',address: 'No. 189, Grove St, Los Angeles',},{date: '2016-05-08',name: 'Tom',address: 'No. 189, Grove St, Los Angeles',},{date: '2016-05-06',name: 'Tom',address: 'No. 189, Grove St, Los Angeles',},{date: '2016-05-07',name: 'Tom',address: 'No. 189, Grove St, Los Angeles',},
])// 设置 table 表格中不同行的背景颜色;
const tableRowClassName = (val) => {if(val.rowIndex %2 === 0){return 'double-row'} else {return 'single-row'}
}
</script><template><div class="my_project"><div class="project"><el-tableref="multipleTable":data="tableData"style="width: 1000px":row-class-name="tableRowClassName"><el-table-column type="selection" width="55" /><el-table-column label="Date" width="120"><template #default="scope">{{ scope.row.date }}</template></el-table-column><el-table-column property="name" label="Name" width="120" /><el-table-column property="address" label="Address" show-overflow-tooltip /></el-table></div></div>
</template><style lang="scss" scoped>
.my_project {margin: 30px auto;background-color: #c7cacf;  // 设置整体的背景色(即:表格外的背景颜色);box-shadow: rgba(0, 0, 0, 0.15) 0px 0px 40px 0px;// 设置表格表头的背景色;::v-deep(.el-table th) {background-color: rgb(154, 201, 207);}// 表格表头的下边框;::v-deep(.el-table th.is-leaf) {border-bottom: 1px solid #557A95;font-weight: 700;font-size: 16px;color: black;}// 将表格的每一行悬停的背景色都设置为:transparent(即:没有其他展示),或其它颜色(如:yellowgreen) ;::v-deep(.el-table--enable-row-hover .el-table__body tr:hover > td) {background-color: yellowgreen;}// 设置表格内双行的背景色(如:0,2,4........)::v-deep(.el-table .double-row) {background-color: #e6f1f9;}// 设置表格内单行的背景色(如:1,3,5.......)::v-deep(.el-table .single-row) {background-color: #d6e6f5;}.project {margin: 20px;}
}
</style>
其二、效果展示:
// 此时的悬停颜色设置成了:yellowgreen;

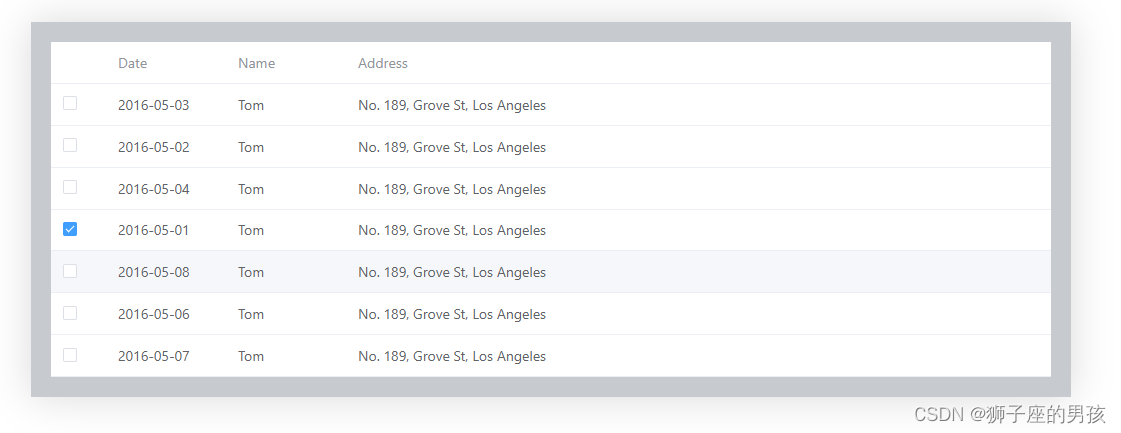
3、 Table 表格组件将支持多选的操作变成支持单选的过程:
其一、代码:
<script setup>
import { ref } from 'vue'const selectData = ref('')
const multipleTable = ref('')
const isDelete = ref(true)// do not use same name with ref
const tableData = ref([{date: '2016-05-03',name: 'Tom',address: 'No. 189, Grove St, Los Angeles',},{date: '2016-05-02',name: 'Tom',address: 'No. 189, Grove St, Los Angeles',},{date: '2016-05-04',name: 'Tom',address: 'No. 189, Grove St, Los Angeles',},{date: '2016-05-01',name: 'Tom',address: 'No. 189, Grove St, Los Angeles',},{date: '2016-05-08',name: 'Tom',address: 'No. 189, Grove St, Los Angeles',},{date: '2016-05-06',name: 'Tom',address: 'No. 189, Grove St, Los Angeles',},{date: '2016-05-07',name: 'Tom',address: 'No. 189, Grove St, Los Angeles',},
])// 此时是将多选操作变成单选操作的函数的过程;
const select = ((selection, row) => {// 清除所有勾选项的操作;// 注意:this.$refs.multipleTable 是 vue2 的语法;// this.$refs.multipleTable.clearSelection()multipleTable.value.clearSelection()// 主要用于将当前勾选的表格状态清除;// 当表格数据都没有被勾选的时候就返回;if(selection.length == 0)  {isDelete.value = truereturn}// 注意:this.$refs.multipleTable 是 vue2 的语法;// this.$refs.multipleTable.toggleRowSelection(row, true);  multipleTable.value.toggleRowSelection(row, true);console.log(selection,1111111);console.log(row,22222222);isDelete.value = false
})// 表格的选中 可以获得当前选中的数据(但和多选变成单选的操作无关;)
const handleSelectionChange = ((val) => {selectData.value = val
})
</script><template><div class="my_project"><div class="project"><el-tableref="multipleTable":data="tableData"style="width: 1000px"@select="select"@selection-change="handleSelectionChange":row-class-name="tableRowClassName"><el-table-column type="selection" width="55" /><el-table-column label="Date" width="120"><template #default="scope">{{ scope.row.date }}</template></el-table-column><el-table-column property="name" label="Name" width="120" /><el-table-column property="address" label="Address" show-overflow-tooltip /></el-table></div></div>
</template><style lang="scss" scoped>
.my_project {margin: 30px auto;background-color: #c7cacf;  // 设置整体的背景色(即:表格外的背景颜色);box-shadow: rgba(0, 0, 0, 0.15) 0px 0px 40px 0px;// 取消多选第一列的展示(即:将多选变成单选的第一步); 取消该样式后,就不会出现多选的情况;但由此可知还有其他的方法来实现单选;::v-deep(.el-table th.el-table__cell:nth-child(1) .cell) {visibility: hidden;}.project {margin: 20px;}
}
</style>
其二、效果展示:
4、关于 Table 表格组件样式设置的其它用法:
其一、给表格头和表格每个 cell 添加样式(方式一):
A、代码:
// 此时用的是 :cell-style="{borderColor:'#01e3ed'}" :header-cell-style="{borderColor:'#01e3ed'}",但好像没有很好的效果,只是将原有的颜色变了而已;
<script setup>
import { ref } from 'vue'const multipleTable = ref('')// do not use same name with ref
const tableData = ref([{date: '2016-05-03',name: 'Tom',address: 'No. 189, Grove St, Los Angeles',},{date: '2016-05-02',name: 'Tom',address: 'No. 189, Grove St, Los Angeles',},{date: '2016-05-04',name: 'Tom',address: 'No. 189, Grove St, Los Angeles',},{date: '2016-05-01',name: 'Tom',address: 'No. 189, Grove St, Los Angeles',},{date: '2016-05-08',name: 'Tom',address: 'No. 189, Grove St, Los Angeles',},{date: '2016-05-06',name: 'Tom',address: 'No. 189, Grove St, Los Angeles',},{date: '2016-05-07',name: 'Tom',address: 'No. 189, Grove St, Los Angeles',},
])
</script><template><div class="my_project"><div class="project"><el-tableref="multipleTable":data="tableData"style="width: 1000px"@select="select"@selection-change="handleSelectionChange":row-class-name="tableRowClassName":cell-style="{borderColor:'#01e3ed'}":header-cell-style="{borderColor:'#01e3ed'}"><el-table-column type="selection" width="55" /><el-table-column label="Date" width="120"><template #default="scope">{{ scope.row.date }}</template></el-table-column><el-table-column property="name" label="Name" width="120" /><el-table-column property="address" label="Address" show-overflow-tooltip /></el-table></div></div>
</template><style lang="scss" scoped>
.my_project {margin: 30px auto;background-color: #c7cacf;  // 设置整体的背景色(即:表格外的背景颜色);box-shadow: rgba(0, 0, 0, 0.15) 0px 0px 40px 0px;.project {margin: 20px;}
}
</style>
B、效果展示:
其二、给表格头和表格每个 cell 添加样式(方式二):
A、代码为:
<script setup>
import { ref } from 'vue'const multipleTable = ref('')// do not use same name with ref
const tableData = ref([{date: '2016-05-03',name: 'Tom',address: 'No. 189, Grove St, Los Angeles',},{date: '2016-05-02',name: 'Tom',address: 'No. 189, Grove St, Los Angeles',},{date: '2016-05-04',name: 'Tom',address: 'No. 189, Grove St, Los Angeles',},{date: '2016-05-01',name: 'Tom',address: 'No. 189, Grove St, Los Angeles',},{date: '2016-05-08',name: 'Tom',address: 'No. 189, Grove St, Los Angeles',},{date: '2016-05-06',name: 'Tom',address: 'No. 189, Grove St, Los Angeles',},{date: '2016-05-07',name: 'Tom',address: 'No. 189, Grove St, Los Angeles',},
])
</script><template><div class="my_project"><div class="project"><el-tableref="multipleTable":data="tableData"style="width: 1000px"@select="select"@selection-change="handleSelectionChange":row-class-name="tableRowClassName"><el-table-column type="selection" width="55" /><el-table-column label="Date" width="120"><template #default="scope">{{ scope.row.date }}</template></el-table-column><el-table-column property="name" label="Name" width="120" /><el-table-column property="address" label="Address" show-overflow-tooltip /></el-table></div></div>
</template><style lang="scss" scoped>
.my_project {margin: 30px auto;background-color: #c7cacf;  // 设置整体的背景色(即:表格外的背景颜色);box-shadow: rgba(0, 0, 0, 0.15) 0px 0px 40px 0px;::v-deep .el-table__body td.el-table__cell {border: 1px solid #557A95;  // 此时是设置表格每一个 cell 的边框颜色(但不包括最外的上下左右边框);// background-color: blue;    // 此时是设置表格的每一个 cell 的背景颜色;}::v-deep(.el-table th.el-table__cell) {// background-color: #e6f1f9;// background-color: red;     // 此时是设置表格头的每一个 cell 的背景颜色;border: 1px solid #557A95;  // 此时是设置表格头的每一个 cell 的边框颜色(但不包括最外的上下左右边框);}.project {margin: 20px;}
}
</style>
B、页面展示为:
// 上右左边框,都有了;

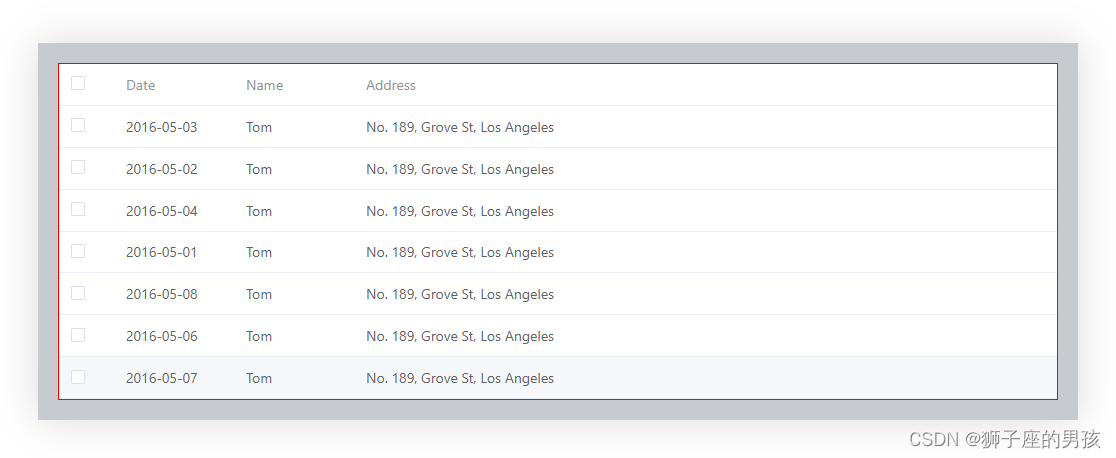
其三、给整个表格添加边框:
A、代码为:
<script setup>
import { ref } from 'vue'const multipleTable = ref('')// do not use same name with ref
const tableData = ref([{date: '2016-05-03',name: 'Tom',address: 'No. 189, Grove St, Los Angeles',},{date: '2016-05-02',name: 'Tom',address: 'No. 189, Grove St, Los Angeles',},{date: '2016-05-04',name: 'Tom',address: 'No. 189, Grove St, Los Angeles',},{date: '2016-05-01',name: 'Tom',address: 'No. 189, Grove St, Los Angeles',},{date: '2016-05-08',name: 'Tom',address: 'No. 189, Grove St, Los Angeles',},{date: '2016-05-06',name: 'Tom',address: 'No. 189, Grove St, Los Angeles',},{date: '2016-05-07',name: 'Tom',address: 'No. 189, Grove St, Los Angeles',},
])
</script><template><div class="my_project"><div class="project"><el-tableref="multipleTable":data="tableData"style="width: 1000px"@select="select"@selection-change="handleSelectionChange":row-class-name="tableRowClassName"><el-table-column type="selection" width="55" /><el-table-column label="Date" width="120"><template #default="scope">{{ scope.row.date }}</template></el-table-column><el-table-column property="name" label="Name" width="120" /><el-table-column property="address" label="Address" show-overflow-tooltip /></el-table></div></div>
</template><style lang="scss" scoped>
.my_project {margin: 30px auto;background-color: #c7cacf;  // 设置整体的背景色(即:表格外的背景颜色);box-shadow: rgba(0, 0, 0, 0.15) 0px 0px 40px 0px;// 此时可以设置整个表格(即:表格最外面)的 border 的值、类型和颜色;::v-deep(.el-table) {border: 1px solid red;}.project {margin: 20px;}
}
</style>
B、页面展示为:
// 此时是通过 border 值将表格外面的颜色发生了变化;
Ⅲ、修改 Table 表格组件达到目标效果的展示(即:多选修改成单选):
1、整体的代码(即:总的代码):
<script setup>
import { ref } from 'vue'const selectData = ref('')
const multipleTable = ref('')
const isDelete = ref(true)// do not use same name with ref
const tableData = ref([{date: '2016-05-03',name: 'Tom',address: 'No. 189, Grove St, Los Angeles',},{date: '2016-05-02',name: 'Tom',address: 'No. 189, Grove St, Los Angeles',},{date: '2016-05-04',name: 'Tom',address: 'No. 189, Grove St, Los Angeles',},{date: '2016-05-01',name: 'Tom',address: 'No. 189, Grove St, Los Angeles',},{date: '2016-05-08',name: 'Tom',address: 'No. 189, Grove St, Los Angeles',},{date: '2016-05-06',name: 'Tom',address: 'No. 189, Grove St, Los Angeles',},{date: '2016-05-07',name: 'Tom',address: 'No. 189, Grove St, Los Angeles',},
])// 设置 table 表格中不同行的背景颜色;
const tableRowClassName = (val) => {if(val.rowIndex %2 === 0){return 'double-row'} else {return 'single-row'}
}const select = ((selection, row) => {// 清除所有勾选项的操作;// 注意:this.$refs.multipleTable 是 vue2 的语法;// this.$refs.multipleTable.clearSelection()multipleTable.value.clearSelection()// 主要用于将当前勾选的表格状态清除;// 当表格数据都没有被勾选的时候就返回;if(selection.length == 0)  {isDelete.value = truereturn}// 注意:this.$refs.multipleTable 是 vue2 的语法;// this.$refs.multipleTable.toggleRowSelection(row, true);  multipleTable.value.toggleRowSelection(row, true);console.log(selection,1111111);console.log(row,22222222);isDelete.value = false
})// 表格的选中 可以获得当前选中的数据
const handleSelectionChange = ((val) => {selectData.value = val
})
</script><template><div class="my_project"><div class="project"><el-tableref="multipleTable":data="tableData"style="width: 1000px"@select="select"@selection-change="handleSelectionChange":row-class-name="tableRowClassName"><el-table-column type="selection" width="55" /><el-table-column label="Date" width="120"><template #default="scope">{{ scope.row.date }}</template></el-table-column><el-table-column property="name" label="Name" width="120" /><el-table-column property="address" label="Address" show-overflow-tooltip /></el-table></div></div>
</template><style lang="scss" scoped>
.my_project {margin: 30px auto;background-color: #c7cacf;  // 设置整体的背景色(即:表格外的背景颜色);box-shadow: rgba(0, 0, 0, 0.15) 0px 0px 40px 0px;// 设置表格表头的背景色;::v-deep(.el-table th) {background-color: rgb(154, 201, 207);}// 表格表头的下边框;::v-deep(.el-table th.is-leaf) {border-bottom: 1px solid #557A95;font-weight: 700;font-size: 16px;color: black;}// 取消多选第一列的展示(即:将多选变成单选的第一步);::v-deep(.el-table th.el-table__cell:nth-child(1) .cell) {visibility: hidden;}// 将表格的每一行悬停的背景色都设置为:transparent(即:没有其他展示),或其它颜色(如:yellowgreen) ;::v-deep(.el-table--enable-row-hover .el-table__body tr:hover > td) {background-color: yellowgreen;}// 设置表格内双行的背景色(如:0,2,4........)::v-deep(.el-table .double-row) {background-color: #e6f1f9;}// 设置表格内单行的背景色(如:1,3,5.......)::v-deep(.el-table .single-row) {background-color: #d6e6f5;}.project {margin: 20px;}
}
</style>
2、整体效果的展示:
Ⅳ、小结:
其一、哪里有不对或不合适的地方,还请大佬们多多指点和交流!
其二、若有转发或引用本文章内容,请注明本博客地址(直接点击下面 url 跳转) https://blog.csdn.net/weixin_43405300,创作不易,且行且珍惜!
其三、有兴趣的话,可以多多关注这个专栏(Vue(Vue2+Vue3)面试必备专栏)(直接点击下面 url 跳转):https://blog.csdn.net/weixin_43405300/category_11525646.html?spm=1001.2014.3001.5482
相关文章:
(el-Table)操作(不使用 ts):Element-plus 中Table 表格组件:多选修改成支持单选及表格相关样式的调整
Ⅰ、Element-plus 提供的 Table 表格组件与想要目标情况的对比: 1、Element-plus 提供 Table 组件情况: 其一、Element-ui 自提供的 Table 代码情况为(示例的代码): // Element-plus 自提供的代码: // 此时是使用了 ts 语言环境…...

【JAVA】变量的作用域与生存周期
个人主页:【😊个人主页】 系列专栏:【❤️初识JAVA】 文章目录 前言变量的作用域变量的生命周期局部变量全局变量 前言 变量,我们学习过程中逃不掉的知识,无论在哪种语言中我们都需要学会去合理的运用它,今…...

中科亿海微FIFO使用
引言 FPGA(现场可编程门阵列)是一种可编程逻辑器件,具有灵活性和可重构性,广泛用于数字电路设计和嵌入式系统开发。在FPGA中,FIFO(First-In, First-Out)是一种常见的存储器结构,用于…...

使用maven打包时如何跳过test,有三种方式
方式一 针对spring项目: <plugin> <groupId>org.apache.maven.plugins</groupId> <artifactId>maven-surefire-plugin</artifactId> <configuration> <skipTests>true</skipTests> </configuration> …...
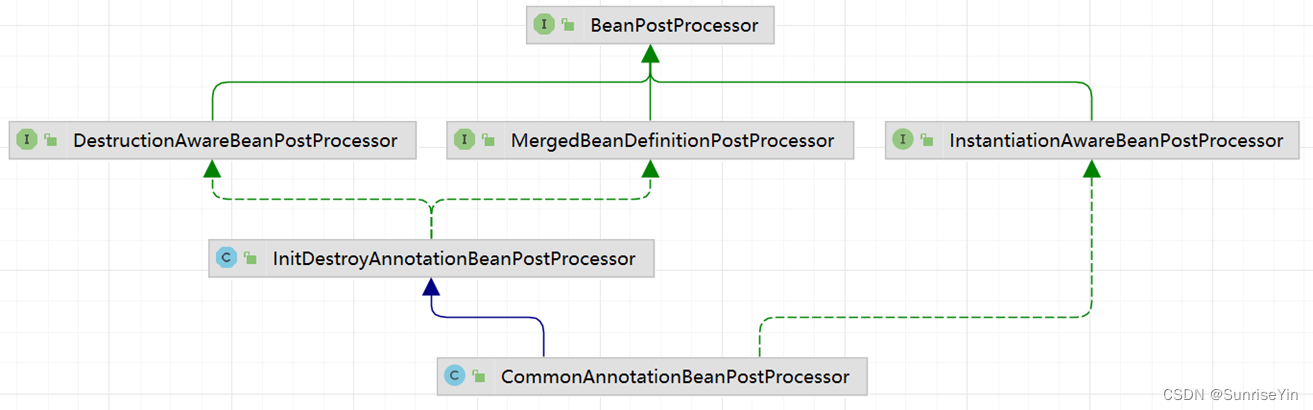
005-Spring 扩展点 :PostProcess
目录 Spring 扩展点 :PostProcess介绍PostProcess大纲文字明细使用方法示例Autowired 功能实现Resource 功能实现 后记 Spring 扩展点 :PostProcess 介绍 Spring 核心做的事情其实很简单就是:控制反转和依赖注入 也就是把 Class 解析为 Bea…...

MFC中的窗体绘制事件函数:OnCtlColor、OnPaint、OnNcPaint、OnDrawItem、OnEraseBkgnd、OnDraw
文章目录 CWnd::OnCtlColorCWnd::OnPaintCWnd::OnNcPaintCWnd::OnDrawItemCWnd::OnEraseBkgndCWnd::InvalidateRectCView::OnDraw 参考:https://learn.microsoft.com/ CWnd::OnCtlColor 即将绘制子控件时,框架会调用此成员函数。 afx_msg HBRUSH OnCt…...

dialogbot:开箱即用的对话机器人解决方案,涵盖问答型对话、任务型对话和聊天型对话等多种场景,为您提供全方位的对话交互体验。
dialogbot:开箱即用的对话机器人解决方案,涵盖问答型对话、任务型对话和聊天型对话等多种场景,支持网络检索问答、领域知识问答、任务引导问答和闲聊问答,为您提供全方位的对话交互体验。 人机对话系统一直是AI的重要方向…...

TCP服务器—实现数据通信
目录 前言 1.接口介绍 2.编写服务器 3.编写客户端 4.编译链接 5.测试 6.总结 前言 今天我们要介绍的是使用TCP协议实现数据通信,相比于之前写的UDP服务器实现数据信,在主体逻辑上并没有差别。客户端向服务器发送信息,服务器接受信息并回…...

基于SpringBoot实现MySQL备份与还原
基于SpringBoot实现MySQL备份与还原,需求是在页面上对所有的平台数据执行备份和恢复操作,那么就需要使用代码去调用MySQL备份和恢复的指令,下面是具体实现步骤; MySQL备份表设计 CREATE TABLE IF NOT EXISTS mysql_backups (id …...

【VUE 监听用户滑动】
监听滑动方法 一. touchstart、touchmove、touchend二.v-touch三. 自定义指令 一. touchstart、touchmove、touchend 在 Vue 中监听用户往哪个方向滑动可以通过添加事件监听器,然后在事件回调函数中判断滑动方向。常用的事件监听器有touchstart、touchmove、touche…...

通义大模型:打造更智能、更灵活的自然语言处理技术
大家好,今天我想向大家介绍一款备受瞩目的自然语言处理技术——通义大模型。作为一种基于深度学习的人工智能技术,通义大模型能够模拟人类的思维方式,实现更智能、更灵活的自然语言处理,为我们的生活和工作带来了极大的便利。 在…...

Go 流程控制
if语句使用 package mainimport "fmt"func main() {score : 700if score 700 {fmt.Println("清华")}//if支持一个初始化语句 初始化语句和条件判断用;分割if a : 700; a 700 {fmt.Println("清华")}}清华 清华if_else使用 package mainimpor…...

Python opennsfw/opennsfw2 图片/视频 鉴黄 笔记
nsfw( Not Suitable for Work)直接翻译就是 工作的时候不适合看,真文雅 nsfw效果,注意底部的分数 大体流程,输入图片/视频,输出0-1之间的数字,一般情况下,Scores < 0.2 认为是非…...
四、Linux中cd、pwd以及相对/绝对路径和特殊路径符
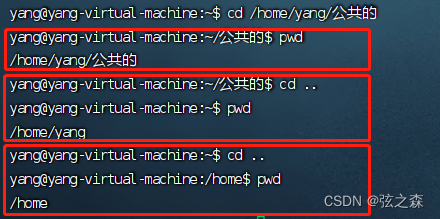
1、cd命令: cd命令可以切换当前工作目录,基础语法是: cd [linux路径] (1)、打开Linux的命令提示行,当前工作目录是home,输入“cd /”,可以切换到根目录下,在根目录下输…...
第八章 CUDA内存应用与性能优化篇(上篇)
cuda教程目录 第一章 指针篇 第二章 CUDA原理篇 第三章 CUDA编译器环境配置篇 第四章 kernel函数基础篇 第五章 kernel索引(index)篇 第六章 kenel矩阵计算实战篇 第七章 kenel实战强化篇 第八章 CUDA内存应用与性能优化篇 第九章 CUDA原子(atomic)实战篇 第十章 CUDA流(strea…...
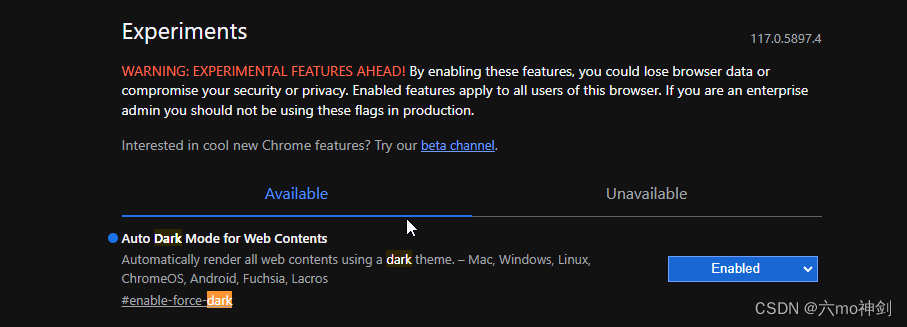
chrome浏览器改为黑色背景
chrome浏览器改为黑色背景 https://blog.csdn.net/yuchen_123456/article/details/127487278 不一样的地方:...
:卷积神经网络入门)
【AI】《动手学-深度学习-PyTorch版》笔记(十七):卷积神经网络入门
AI学习目录汇总 1、从全链接层到卷积 1.1 卷积 我们在前面学习的多层感知机中,已经认识了全链接层,缺点很明显,在稍微大点的网络模型中,参数成指数级别增长。参数量很快就达到数十亿,这样的量级几乎无法计算。为此科学家们想出一个减少参数的方法:卷积。 从全链接层到…...

element-ui table表格,根据缩放自适应
安装依赖 npm install af-table-columnmain.js 中引入依赖, import Vue from vue import ElementUI from element-ui //需要按需引入,先引入vue并引入element-ui import AFTableColumn from af-table-column Vue.use(AFTableColumn)demo样式࿱…...
【electron】electron安装过慢和打包报错:Unable to load file:
文章目录 一、安装过慢问题:二、打包报错:Unable to load file: 一、安装过慢问题: 一直处于安装过程 【解决】 #修改npm的配置文件 npm config edit#添加配置 electron_mirrorhttps://cdn.npm.taobao.org/dist/electron/二、打包报错:Unable to load…...
微服务部署中的动态扩缩容和故障迁移实践经验!快来看看!
随着微服务架构的快速普及,越来越多的组织开始将传统的单体应用转变为分布式的微服务系统。在这种架构下,动态扩缩容和故障迁移变得尤为重要,因为它们能够帮助我们应对不断变化的负载和故障情况。本文将详细介绍动态扩缩容和故障迁移的概念&a…...

5分钟掌握League Akari:英雄联盟终极智能助手使用指南
5分钟掌握League Akari:英雄联盟终极智能助手使用指南 【免费下载链接】League-Toolkit An all-in-one toolkit for LeagueClient. Gathering power 🚀. 项目地址: https://gitcode.com/gh_mirrors/le/League-Toolkit League Akari是一款基于英雄…...

【项目博客】系统基础框架和依赖模块的搭建
在完成系统设计之后,本项目进入工程实现阶段。本阶段的重点是将前期确定的系统架构和技术路线落地为实际可运行的系统,各模块开始从设计转向具体实现,并逐步形成完整的运行环境。 在这一阶段中,项目完成了整体基础架构的搭建。前端…...

C#实战:基于TCP与MLLP协议构建HL7医疗数据接收与解析服务
1. 为什么需要HL7医疗数据接收服务? 医疗信息化系统之间的数据交换一直是个头疼的问题。记得我第一次对接医院HIS系统时,对方只给了一份HL7协议文档,当时完全摸不着头脑。传统的数据库中间表方式虽然简单,但实时性差;W…...

群晖NAS影视库美化:借助tinyMediaManager在Windows端实现精准元数据刮削
1. 为什么需要专业的元数据刮削工具 作为一个影音爱好者,我最头疼的就是整理影视库。从各种渠道下载的电影和剧集,文件名乱七八糟不说,还经常缺少关键信息。记得有一次想在朋友面前炫耀自己精心搭建的家庭影院,结果打开Plex一看&a…...
)
PX4飞控MAVLink数据流优化:如何永久设置IMU输出频率为100Hz(附SD卡配置详解)
PX4飞控MAVLink数据流深度优化:永久锁定IMU 100Hz输出的工程实践 无人机开发者常遇到一个棘手问题:通过QGC临时调整的IMU输出频率会在飞控重启后恢复默认值。这种反复配置不仅低效,更可能在实际飞行中因疏忽导致数据流异常。本文将彻底解决这…...

保姆级教程:在Ubuntu 20.04上配置PCL 1.12,并跑通PPF+ICP点云识别Demo
从零搭建Ubuntu 20.04下的PCL 1.12开发环境:PPFICP点云识别实战指南 在三维视觉和机器人感知领域,点云处理技术正成为不可或缺的核心能力。无论是自动驾驶的环境感知、工业质检中的零件识别,还是AR/VR中的场景重建,都离不开对点云…...

SITS2026邮件生成工具即将关闭免费API配额?倒计时47天——现在掌握这6个Prompt工程黄金指令,永久提效
第一章:SITS2026邮件生成工具即将关闭免费API配额?倒计时47天——现在掌握这6个Prompt工程黄金指令,永久提效 2026奇点智能技术大会(https://ml-summit.org) SITS2026邮件生成服务将于2026年9月30日正式终止免费API调用额度,当前…...

别再死记硬背公式了!用Python+NumPy手把手带你理解B样条曲线的局部支撑性
用PythonNumPy实战B样条曲线:可视化理解局部支撑性 在汽车设计或游戏建模中,设计师经常需要对曲线进行微调——比如只改动车灯轮廓而不影响车门线条。这种"牵一发而不动全身"的特性,正是B样条曲线被称为"工业建模基石"的…...

从邻接矩阵到时空建模:图解GCN与ST-GCN的核心实现
1. 从像素到节点:卷积操作的思维迁移 第一次接触图卷积网络(GCN)时,最让我困惑的是:为什么图像卷积的思路不能直接套用到图数据上?后来在项目中实际处理社交网络数据时才明白,问题的核心在于数据结构的不规则性。传统图…...

终极指南:掌握SSCom串口调试助手的高效跨平台开发
终极指南:掌握SSCom串口调试助手的高效跨平台开发 【免费下载链接】sscom Linux/Mac版本 串口调试助手 项目地址: https://gitcode.com/gh_mirrors/ss/sscom SSCom串口调试助手是一款专为嵌入式开发者和物联网工程师设计的跨平台串口通信工具,支持…...