数据结构——单链表的实现(c语言版)
前言
单链表作为顺序表的一种,了解并且熟悉它的结构对于我们学习更加复杂的数据结构是有一定意义的。虽然单链表有一定的缺陷,但是单链表也有它存在的价值, 它也是作为其他数据结构的一部分出现的,比如在图,哈希表中。
目录
1.链表节点的结构
2.头插头删
3.尾插尾删
4.任意位置的插入和删除
5.查找链表的值和修改链表节点的值
6.销毁链表
7.测试代码
8.全部代码
9.总结
1.链表节点的结构
单链表有节点的值和节点的next指针组成,如图:

typedef int SListDatatype;
typedef struct SListNode
{SListDatatype _data;//存储节点的数据struct SListNode* _next;
}SListNode;
2.头插头删
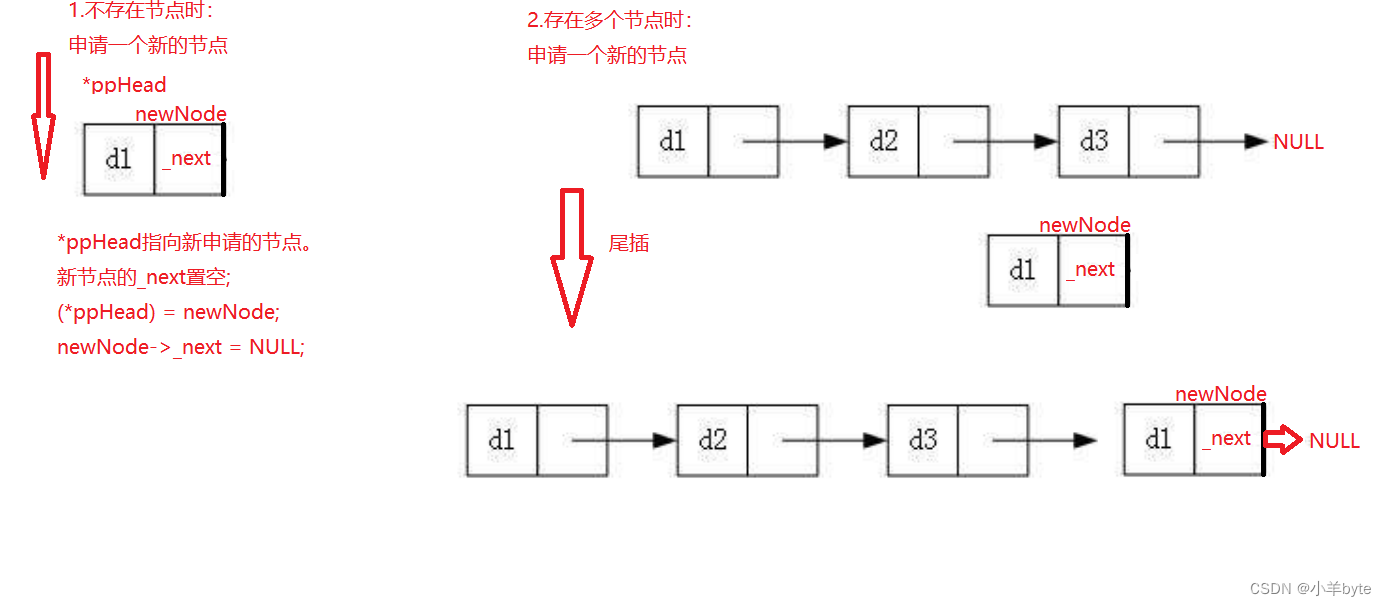
头插分为两种情况,第一种是没有节点的情况,第二种是 有节点的情况。如图:

头删也分为两种情况,如果只有一个节点的时候,直接删除就行了,然后将头结点置空。如果有多个节点,需要先记录头结点,然后再进行删除就可以了。
void SListPushFront(SListNode** ppHead, SListDatatype data)//头插
{SListNode* newNode = SlistBuyNode(data);//申请一个新的节点if (*ppHead == NULL){//链表为空*ppHead = newNode;return;}newNode->_next = (*ppHead);*ppHead = newNode;//对头结点进行链接
}
void SListPopFront(SListNode** ppHead)//头删
{assert(*ppHead);//确保指针的有效性if ((*ppHead)->_next == NULL){//链表只有一个节点free(*ppHead);*ppHead = NULL;return;}//删除头结点,然后更新头结点SListNode* newHead = (*ppHead)->_next;free(*ppHead);*ppHead = newHead;return;
}
3.尾插尾删
尾插也分为链表为空和指针不为空的情况,如果链表为空,申请节点,让链表的头结点指向申请的节点,然后将这个节点的_next置空,如果链表不为空,首先需要找到尾结点,然后将尾结点与这个节点链接起来,再将这个新申请的节点的_next置空。如图:
尾删也分为两种情况:1只有一个节点和2存在多个节点
如果只有一个节点,删除以后需要将头结点置空,防止出现野指针的问题。
如果有多个节点,删除尾结点以后需要将新的尾结点置空。
如图: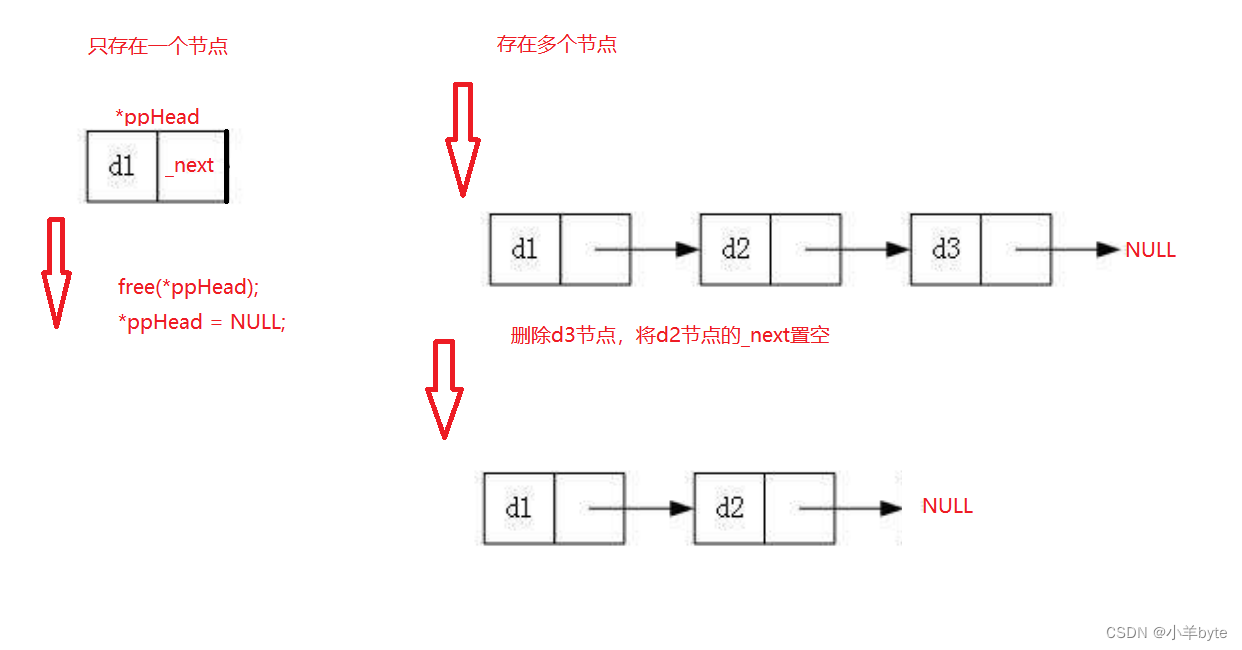
void SListPushBack(SListNode** ppHead, SListDatatype data)//尾插
{SListNode*newNode =  SlistBuyNode(data);//申请一个新的节点if (*ppHead == NULL)//链表为空{*ppHead = newNode;return;}if ((*ppHead)->_next == NULL)//链表只存在一个节点{(*ppHead)->_next = newNode;return;}SListNode* cur = *ppHead;while (cur->_next)//找到尾节点{cur = cur->_next;}cur->_next = newNode;//进行链接return;
}
void SListPopBack(SListNode** ppHead)//尾删
{assert(*ppHead);if (*ppHead == NULL)//链表为空不需要删除{return;}if ((*ppHead)->_next == NULL){free(*ppHead);//链表只有一个节点(*ppHead) = NULL;return;}SListNode* cur = *ppHead;SListNode* prev = NULL;while (cur->_next)//找到尾结点{prev = cur;//保存上一个节点cur = cur->_next;}free(cur);//释放尾结点所在的空间prev->_next = NULL;//将上一个节点的_next置空return;
4.任意位置的插入和删除
由于单链表结构的限制,这里只实现了在pos位置之后的插入和删除,如果删除pos的后一个节点就需要确保pos的后一个节点是存在的,否则就会出现问题。
void SListInsertAfter(SListNode*pos, SListDatatype data)//任意位置的插入,在pos之后插入
{assert(pos);//确保指针不为空SListNode* newNode = SlistBuyNode(data);SListNode* next = pos->_next;pos->_next = newNode;newNode->_next = next;
}
void SListErase(SListNode*pos)//任意位置的删除,pox位置之后的删除
{assert(pos);//确保节点的有效性//如果只有一个节点if (pos->_next )//pos节点的下一个节点存在{SListNode* next = pos->_next;SListNode* nextNext = next->_next;free(next);//删除节点,重新链接pos->_next = nextNext;}
}
5.查找链表的值和修改链表节点的值
遍历链表就可以对链表中的数据进行查找,找到查找的值,就可以对节点的值进行修改。
SListNode* SListFind(SListNode* pHead, SListDatatype data)//查找
{SListNode* cur = pHead;while (cur){if (cur->_data == data)return cur;cur = cur->_next;//迭代向后走}return NULL;//找不到
}
void testSList()
{//查找和修改的测试SListNode* pHead = NULL;SListPushFront(&pHead, 1);SListPushFront(&pHead, 2);SListPushFront(&pHead, 3);SListPushFront(&pHead, 4);SListPushFront(&pHead, 5);SListPushFront(&pHead, 6);SListPrint(pHead);SListNode* node = SListFind(pHead, 5);//查找if (node){//节点的数据node->_data = 50;}SListPrint(pHead);
}
6.销毁链表
void SListDestory(SListNode** ppHead)//销毁
{assert(*ppHead);//确保指针有效性SListNode* cur = *ppHead;while (cur){SListNode* freeNode = cur;cur = cur->_next;free(freeNode);}*ppHead = NULL;
}
7.测试代码
void testSListBack()
{//尾插尾删的测试代码SListNode* pHead = NULL;SListPushBack(&pHead, 1);SListPushBack(&pHead, 2);SListPushBack(&pHead, 3);SListPushBack(&pHead, 4);SListPushBack(&pHead, 5);SListPushBack(&pHead, 6);SListPrint(pHead);SListPopBack(&pHead);SListPopBack(&pHead);SListPopBack(&pHead);SListPopBack(&pHead);SListPopBack(&pHead);SListPopBack(&pHead);}
void testSListFront()
{//头插头删的测试代码SListNode* pHead = NULL;SListPushFront(&pHead, 1);SListPushFront(&pHead, 2);SListPushFront(&pHead, 3);SListPushFront(&pHead, 4);SListPushFront(&pHead, 5);SListPushFront(&pHead, 6);SListPrint(pHead);SListPopFront(&pHead);SListPopFront(&pHead);SListPopFront(&pHead);SListPopFront(&pHead);SListPopFront(&pHead);SListPopFront(&pHead);
}
void testSList()
{//查找和修改的测试SListNode* pHead = NULL;SListPushFront(&pHead, 1);SListPushFront(&pHead, 2);SListPushFront(&pHead, 3);SListPushFront(&pHead, 4);SListPushFront(&pHead, 5);SListPushFront(&pHead, 6);SListPrint(pHead);SListNode* node = SListFind(pHead, 5);//查找if (node){//节点的数据node->_data = 50;}SListPrint(pHead);
}
void TestSList1()
{//对在pos节点之后进行插入和删除的测试SListNode* pHead = NULL;SListPushFront(&pHead, 1);SListPushFront(&pHead, 2);SListPushFront(&pHead, 3);SListPushFront(&pHead, 4);SListPushFront(&pHead, 5);SListPushFront(&pHead, 6);SListPrint(pHead);SListNode* node = SListFind(pHead, 5);//查找if (node){//插入节点SListInsertAfter(node, -2);SListPrint(pHead);SListErase(node);SListPrint(pHead);}SListDestory(&pHead);
}
8.全部代码
//SList.h
#pragma once
#include<stdio.h>
#include<stdlib.h>
#include<string.h>
#include<assert.h>
typedef int SListDatatype;
typedef struct SListNode
{SListDatatype _data;//存储节点的数据struct SListNode* _next;
}SListNode;
SListNode* SlistBuyNode(SListDatatype data);void SListDestory(SListNode** ppHead);//销毁
void SListPushBack(SListNode**ppHead,SListDatatype data);//尾插
void SListPopBack(SListNode** ppHead );//尾删void SListPushFront(SListNode** ppHead, SListDatatype data);//头插
void SListPopFront(SListNode** ppHead);//头删void SListInsertAfter(SListNode* pos, SListDatatype data);//任意位置的插入void SListErase(SListNode*pos);//任意位置的删除SListNode* SListFind(SListNode*pHead, SListDatatype data);//查找
void SListPrint(SListNode* pHead);//显示链表数据
//void SListDestory(SListNode** ppHead);//删除链表
//SList.c
#include"SList.h"SListNode* SlistBuyNode(SListDatatype data)
{SListNode*newNode = (SListNode*)malloc(sizeof(SListNode));if (newNode == NULL){//申请节点失败printf("申请节点失败\n");exit(-1);//暴力返回}newNode->_data = data;//给节点赋值newNode->_next = NULL;return newNode;
}void SListDestory(SListNode** ppHead)//销毁
{assert(*ppHead);//确保指针有效性SListNode* cur = *ppHead;while (cur){SListNode* freeNode = cur;cur = cur->_next;free(freeNode);}*ppHead = NULL;
}
void SListPushBack(SListNode** ppHead, SListDatatype data)//尾插
{SListNode*newNode =  SlistBuyNode(data);//申请一个新的节点if (*ppHead == NULL)//链表为空{*ppHead = newNode;return;}if ((*ppHead)->_next == NULL)//链表只存在一个节点{(*ppHead)->_next = newNode;return;}SListNode* cur = *ppHead;while (cur->_next)//找到尾节点{cur = cur->_next;}cur->_next = newNode;//进行链接return;
}
void SListPopBack(SListNode** ppHead)//尾删
{assert(*ppHead);if (*ppHead == NULL)//链表为空不需要删除{return;}if ((*ppHead)->_next == NULL){free(*ppHead);//链表只有一个节点(*ppHead) = NULL;return;}SListNode* cur = *ppHead;SListNode* prev = NULL;while (cur->_next)//找到尾结点{prev = cur;//保存上一个节点cur = cur->_next;}free(cur);//释放尾结点所在的空间prev->_next = NULL;//将上一个节点的_next置空return;
}
void SListPushFront(SListNode** ppHead, SListDatatype data)//头插
{SListNode* newNode = SlistBuyNode(data);//申请一个新的节点if (*ppHead == NULL){//链表为空*ppHead = newNode;return;}newNode->_next = (*ppHead);*ppHead = newNode;//对头结点进行链接
}
void SListPopFront(SListNode** ppHead)//头删
{assert(*ppHead);//确保指针的有效性if ((*ppHead)->_next == NULL){//链表只有一个节点free(*ppHead);*ppHead = NULL;return;}//删除头结点,然后更新头结点SListNode* newHead = (*ppHead)->_next;free(*ppHead);*ppHead = newHead;return;
}
void SListInsertAfter(SListNode*pos, SListDatatype data)//任意位置的插入,在pos之后插入
{assert(pos);//确保指针不为空SListNode* newNode = SlistBuyNode(data);SListNode* next = pos->_next;pos->_next = newNode;newNode->_next = next;
}
void SListErase(SListNode*pos)//任意位置的删除,pox位置之后的删除
{assert(pos);//确保节点的有效性//如果只有一个节点if (pos->_next )//pos节点的下一个节点存在{SListNode* next = pos->_next;SListNode* nextNext = next->_next;free(next);//删除节点,重新链接pos->_next = nextNext;}
}SListNode* SListFind(SListNode* pHead, SListDatatype data)//查找
{SListNode* cur = pHead;while (cur){if (cur->_data == data)return cur;cur = cur->_next;//迭代向后走}return NULL;//找不到
}
void SListPrint(SListNode* pHead)//显示链表数据
{assert(pHead);//确保指针的有效性SListNode* cur = pHead;while (cur){printf("%d ", cur->_data);printf("->");cur = cur->_next;}printf("NULL\n");
}
//test.c
#include"SList.h"
void testSListBack()
{//尾插尾删的测试代码SListNode* pHead = NULL;SListPushBack(&pHead, 1);SListPushBack(&pHead, 2);SListPushBack(&pHead, 3);SListPushBack(&pHead, 4);SListPushBack(&pHead, 5);SListPushBack(&pHead, 6);SListPrint(pHead);SListPopBack(&pHead);SListPopBack(&pHead);SListPopBack(&pHead);SListPopBack(&pHead);SListPopBack(&pHead);SListPopBack(&pHead);}
void testSListFront()
{//头插头删的测试代码SListNode* pHead = NULL;SListPushFront(&pHead, 1);SListPushFront(&pHead, 2);SListPushFront(&pHead, 3);SListPushFront(&pHead, 4);SListPushFront(&pHead, 5);SListPushFront(&pHead, 6);SListPrint(pHead);SListPopFront(&pHead);SListPopFront(&pHead);SListPopFront(&pHead);SListPopFront(&pHead);SListPopFront(&pHead);SListPopFront(&pHead);
}
void testSList()
{//查找和修改的测试SListNode* pHead = NULL;SListPushFront(&pHead, 1);SListPushFront(&pHead, 2);SListPushFront(&pHead, 3);SListPushFront(&pHead, 4);SListPushFront(&pHead, 5);SListPushFront(&pHead, 6);SListPrint(pHead);SListNode* node = SListFind(pHead, 5);//查找if (node){//节点的数据node->_data = 50;}SListPrint(pHead);
}
void TestSList1()
{//对在pos节点之后进行插入和删除的测试SListNode* pHead = NULL;SListPushFront(&pHead, 1);SListPushFront(&pHead, 2);SListPushFront(&pHead, 3);SListPushFront(&pHead, 4);SListPushFront(&pHead, 5);SListPushFront(&pHead, 6);SListPrint(pHead);SListNode* node = SListFind(pHead, 5);//查找if (node){//插入节点SListInsertAfter(node, -2);SListPrint(pHead);SListErase(node);SListPrint(pHead);}SListDestory(&pHead);
}
int main()
{TestSList1();return 0;
}
9.总结
链表与顺序表区别和联系。顺序表是在数组的基础上实现增删查改的。并且插入时可以动态增长。顺序表的缺陷:可能存在空间的浪费,增容有一定的效率损失,中间或者头部数据的删除,时间复杂度是O(n),因为要挪动数据。这些问题都是由链表来解决的,但是链表也有自己的缺陷,不能随机访问,存在内存碎片等问题。 其实没有哪一种数据结构是完美的,它们都有各自的缺陷,实际中的使用都是相辅相成的。
相关文章:
数据结构——单链表的实现(c语言版)
前言 单链表作为顺序表的一种,了解并且熟悉它的结构对于我们学习更加复杂的数据结构是有一定意义的。虽然单链表有一定的缺陷,但是单链表也有它存在的价值, 它也是作为其他数据结构的一部分出现的,比如在图,哈希表中。…...
【计算机组成原理】24王道考研笔记——第四章 指令系统
第四章 指令系统 一、指令系统 指令是指示计算机执行某种操作的命令,是计算机运行的最小功能单位。一台计算机的所有指令的集合构成该 机的指令系统,也称为指令集。 指令格式: 1.1分类 按地址码数目分类: 按指令长度分类&…...

C#使用FileInfo和DirectoryInfo类来执行文件和文件夹操作
System.IO.FileInfo 和 System.IO.DirectoryInfo 是C#中用于操作文件和文件夹的类,它们提供了许多有用的方法和属性来管理文件和文件夹。 System.IO.FileInfo: FileInfo 类用于操作单个文件的信息和内容。以下是一些常用的方法和属性: Exi…...

每日一学——TCP/IP参考模型
TCP/IP参考模型是一个用于网络通信的分层架构,它定义了一组协议,这些协议实现了计算机之间的数据传输。TCP/IP参考模型分为四层: 应用层(Application Layer):应用层是网络应用程序与网络之间的接口层。它提…...
LAXCUS分布式操作系统:技术创新引领高性能计算与人工智能新时代
随着科技的飞速发展,高性能计算、并行计算、分布式计算、大数据、人工智能等技术在各个领域得到了广泛应用。在这个过程中,LAXCUS分布式操作系统以其卓越的技术创新和强大的性能表现,成为了业界的佼佼者。本文将围绕LAXCUS分布式操作系统的技…...

两只小企鹅(Python实现)
目录 1 和她浪漫的昨天 2 未来的旖旎风景 3 Python完整代码 1 和她浪漫的昨天 是的,春天需要你。经常会有一颗星等着你抬头去看; 和她一起吹晚风吗﹖在春天的柏油路夏日的桥头秋季的公园寒冬的阳台; 这世界不停开花,我想放进你心里一朵&am…...

Linux | 使用wget命令调用服务接口
关注wx: CodingTechWork 引言 在docker容器中,想要调用某个服务接口,发现没有安装curl命令,但是有wget命令。本次总结一下wget的使用。 wget命令实践 容器访问 查看容器 docker ps进入容器 docker exec -it <container_id&…...

POJ Prime Path 埃氏筛法+广度优先搜索
思路:用埃氏筛法打个表,然后bfs即可 #include <iostream> #include <queue> using namespace std; typedef long long ll; ll inf 0x3f3f3f3f3f3f3f3f; bool isPrime[10007]; ll d[10007]; int tenPow[10]; int mint; void initTenPow() {…...

React React Native
文章目录 ReactReact vs Vue快速上手React,核心知识点JSX例子 组件虚拟DOM基于 React 的 UI 库跟Java、ObjectC交互 React Native基于 React Native 的 UI 库 React && React NativeReact && React Native 框架 React React 是一个用于构建用户界面…...
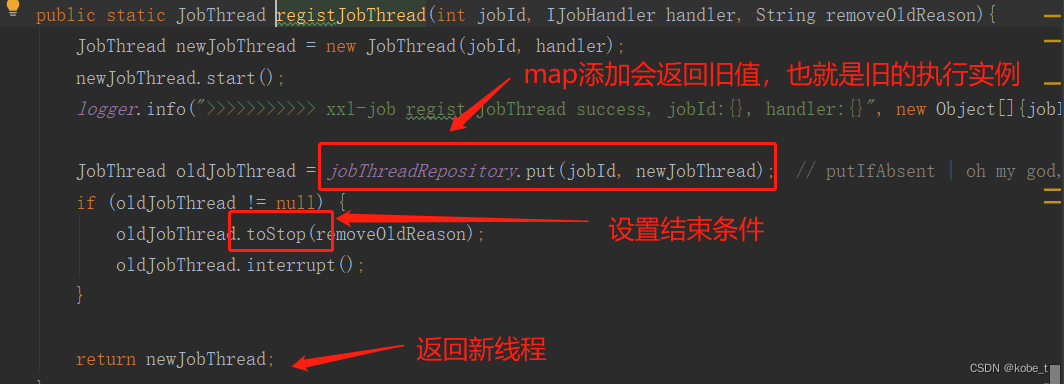
分布式定时任务系列5:XXL-job中blockingQueue的应用
传送门 分布式定时任务系列1:XXL-job安装 分布式定时任务系列2:XXL-job使用 分布式定时任务系列3:任务执行引擎设计 分布式定时任务系列4:任务执行引擎设计续 Java并发编程实战1:java中的阻塞队列 引子 这篇文章的…...
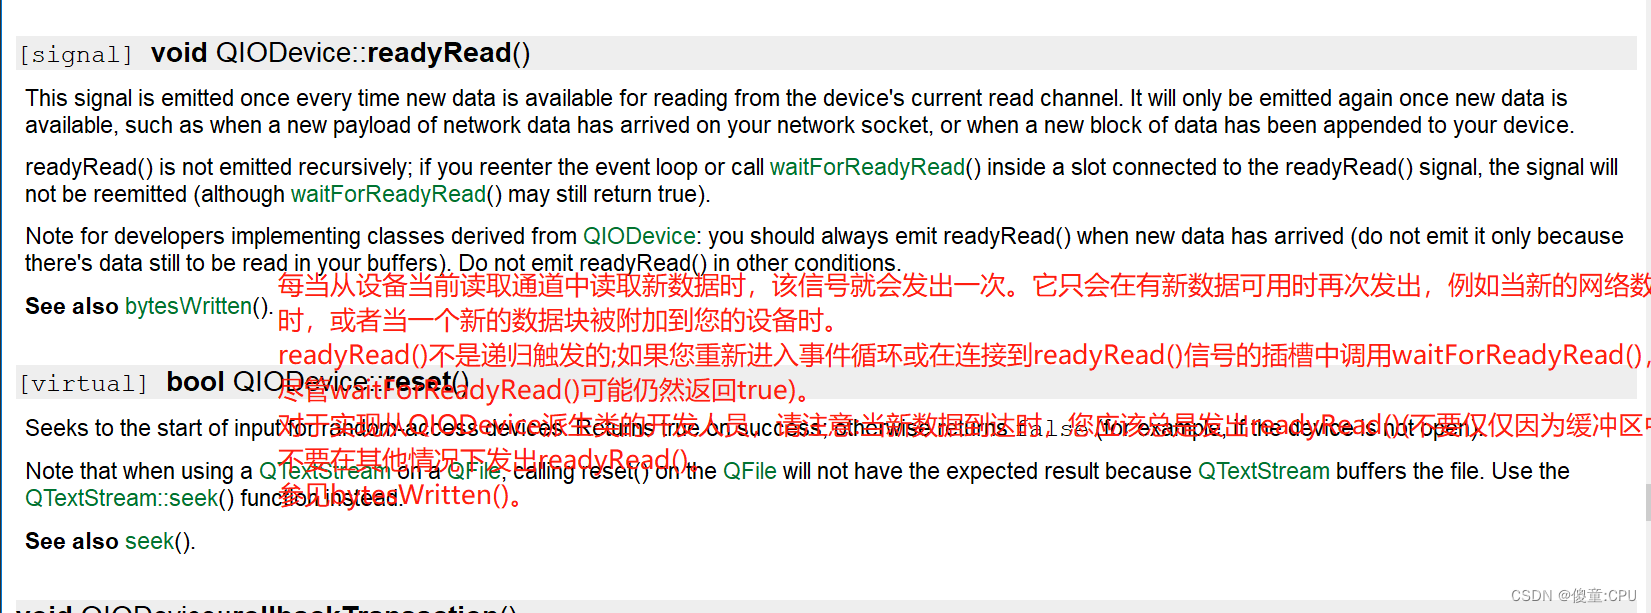
QT网络编程之TCP
QT网络编程之TCP TCP 编程需要用到俩个类: QTcpServer 和 QTcpSocket。 #------------------------------------------------- # # Project created by QtCreator 2023-08-...
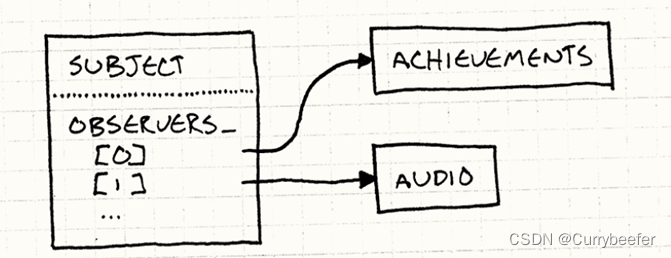
《游戏编程模式》学习笔记(四) 观察者模式 Observer Pattern
定义 观察者模式定义了对象间的一种一对多的依赖关系,当一个对象的状态发生改变时,所有依赖于它的对象都得到通知并被自动更新。 这是定义,看不懂就看不懂吧,我接下来举个例子慢慢说 为什么我们需要观察者模式 我们看一个很简…...
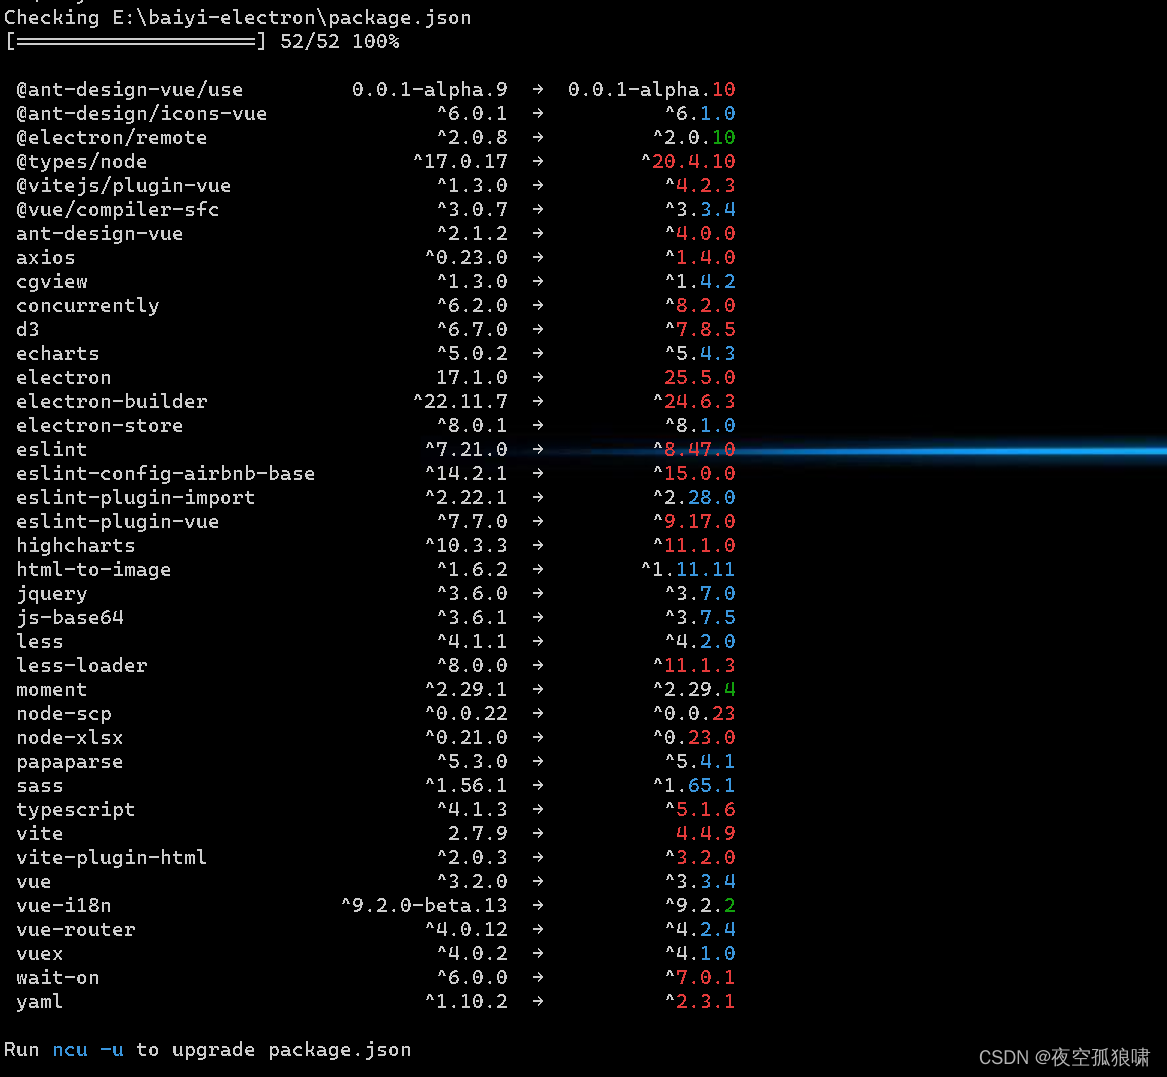
前端一键升级 package.json里面的依赖包管理
升级需谨慎 前端一键升级 package.json里面的依赖包管理 安装:npm-check-updates npm i npm-check-updates -g缩写 ncu 在项目根目录里面执行 ncu 如图:...
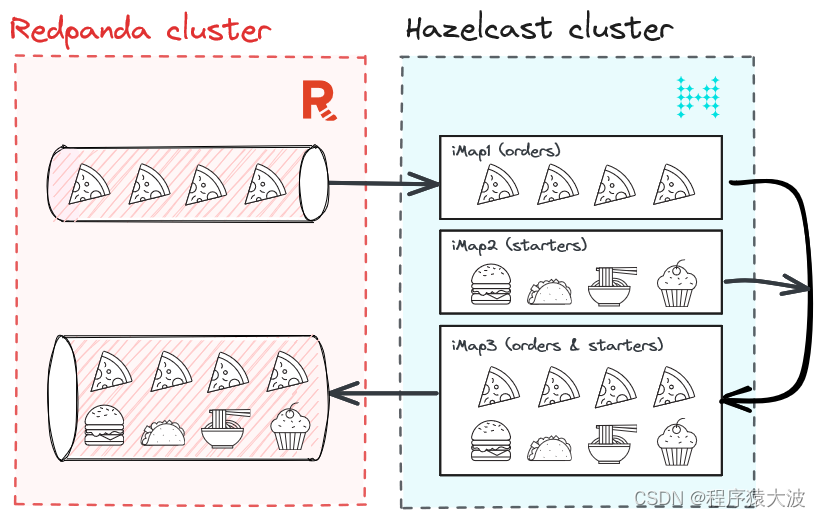
当速度很重要时:使用 Hazelcast 和 Redpanda 进行实时流处理
在本教程中,了解如何构建安全、可扩展、高性能的应用程序,以释放实时数据的全部潜力。 在本教程中,我们将探索 Hazelcast 和 Redpanda 的强大组合,以构建对实时数据做出反应的高性能、可扩展和容错的应用程序。 Redpanda 是一个流…...

筛法求欧拉函数
思路: (1)若要分别求1~n每个数的欧拉函数值,则复杂度O(n*n^0.5),超时; (2)于是考虑用欧拉筛进行求取; (3)欧拉筛:基于线…...

consul限制注册的ip
假设当前服务器的ip是:192.168.56.130 1、允许 所有ip 注册(验证可行) consul agent -server -ui -bootstrap-expect1 -data-dir/usr/local/consul -nodedevmaster -advertise192.168.56.130 -bind0.0.0.0 -client0.0.0.0 2、只允许 当前ip 注册 consul agent -…...

用AI攻克“智能文字识别创新赛题”,这场大学生竞赛掀起了什么风潮?
文章目录 一、前言1.1 大赛介绍1.2 项目背景 二、基于智能文字场景个人财务管理创新应用2.1 作品方向2.2 票据识别模型2.2.1 文本卷积神经网络TextCNN2.2.2 Bert 预训练微调2.2.3 模型对比2.2.4 效果展示 2.3 票据文字识别接口 三、未来展望 一、前言 1.1 大赛介绍 中国大学生…...

EJB基本概念和使用
一、EJB是什么? EJB是sun的JavaEE服务器端组件模型,是一种规范,设计目标与核心应用是部署分布式应用程序。EJB2.0过于复杂,EJB3.0的推出减轻了开发人员进行底层开发的工作量,它取消或最小化了很多(以前这些是必须实现)…...

神经网络基础-神经网络补充概念-09-m个样本的梯度下降
概念 当应用梯度下降算法到具有 m 个训练样本的逻辑回归问题时,我们需要对每个样本计算梯度并进行平均,从而更新模型参数。这个过程通常称为批量梯度下降(Batch Gradient Descent)。 代码实现 import numpy as npdef sigmoid(z…...
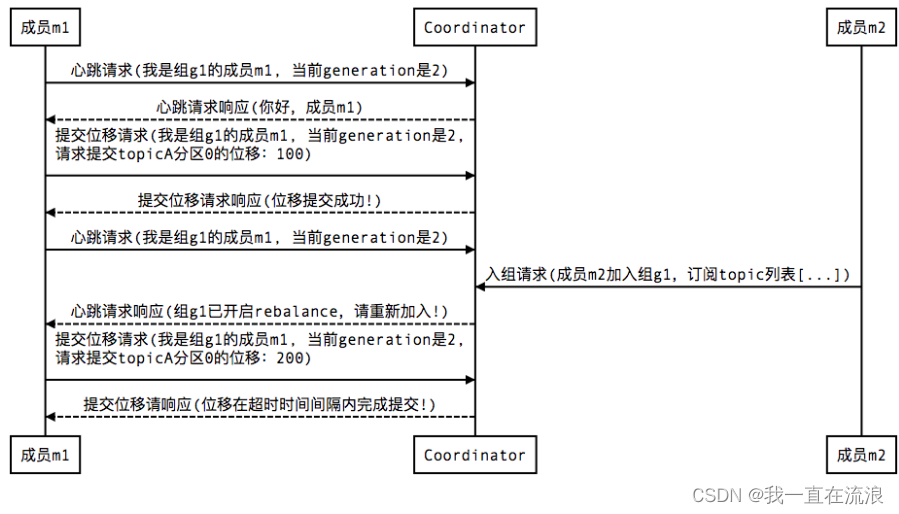
分布式 - 消息队列Kafka:Kafka消费者分区再均衡(Rebalance)
文章目录 01. Kafka 消费者分区再均衡是什么?02. Kafka 消费者分区再均衡的触发条件?03. Kafka 消费者分区再均衡的过程?04. Kafka 如何判定消费者已经死亡?05. Kafka 如何避免消费者的分区再均衡?06. Kafka 消费者分区再均衡有什…...

3个关键功能解析:USBToolBox如何简化macOS与Windows的USB端口映射难题
3个关键功能解析:USBToolBox如何简化macOS与Windows的USB端口映射难题 【免费下载链接】tool the USBToolBox tool 项目地址: https://gitcode.com/gh_mirrors/too/tool 在Hackintosh和跨平台开发领域,USB端口映射一直是个令人头疼的技术难题。US…...
 显卡排行榜 天梯图)
top50 BF16算力(TFLOPS) 显卡排行榜 天梯图
排名显卡型号BF16算力(TFLOPS)售价(元)单TFLOPS价格(元)1B200(SXM)45002200000488.892H200(SXM)19801200000606.063MI300X1307750000573.834H100 SXM519501100000564.105RTX PRO 6000 Blackwell1150780000678.266H100 PCIe 80GB1560850000544.877RTX 50906803400050.008A100 80…...

诚信标签工厂端解决方案 适配俄标 CRPT 体系一体化技术方案
俄罗斯诚实标签依托 CRPT 体系执行强制管控,各类出口货品必须完成 Data Matrix 编码采集、格式转换、多层包装数据绑定,数据合规后方可通关流通。美妆食品、日化建材、玩具五金等品类包装形态差异较大,人工采集方式普遍存在识别精度不足、批量…...

告别FTP龟速:用NTFS-3G在CentOS7上直连移动硬盘拷贝200G大文件
告别FTP龟速:用NTFS-3G在CentOS7上直连移动硬盘拷贝200G大文件当面对数百GB的设计素材、日志文件或数据库备份需要迁移时,传统的FTP传输往往会成为效率瓶颈。我曾在一个视频处理项目中,需要将230GB的4K原始素材从移动硬盘导入服务器ÿ…...

MAX78000移植Zephyr RTOS实战:从BSP创建到AI边缘设备开发
1. 项目概述与动机作为一名长期在嵌入式边缘AI和机器人领域摸爬滚打的开发者,我最近把目光投向了一块相当有潜力的板子:Maxim Integrated(现为ADI一部分)的MAX78000FTHR开发套件。这块板子的核心——MAX78000微控制器,…...

PentestGPT实战部署指南:AI驱动的渗透测试工作流落地
1. 这不是另一个“AI安全”的概念玩具,而是一套能真正跑起来的渗透测试辅助工作流“PentestGPT”这个名字刚在GitHub上出现时,我第一反应是点开又关掉——过去三年里,我见过太多打着“AI渗透”旗号的项目:有的只是把ChatGPT API封…...

2026智慧校园规划必读:如何在预算吃紧下选到高性价比方案
✅作者简介:合肥自友科技 📌核心产品:智慧校园平台(包括教工管理、学工管理、教务管理、考务管理、后勤管理、德育管理、资产管理、公寓管理、实习管理、就业管理、离校管理、科研平台、档案管理、学生平台等26个子平台) 。公司所有人员均有多…...

巧用对称性与平均值原理:低成本实现高精度电阻分压器校准
1. 项目概述:用数学思维突破测量设备的精度极限在电子实验室里捣鼓精密电路,尤其是涉及到电压基准、信号调理或者高精度ADC前端时,一个绕不开的坎就是精密分压器。你可能在设计一个需要0.1%甚至更高精度的分压网络,但手头的万用表…...

如何快速掌握Avidemux:新手完整入门指南与5个核心技巧
如何快速掌握Avidemux:新手完整入门指南与5个核心技巧 【免费下载链接】avidemux2 Avidemux2, simple video editor 项目地址: https://gitcode.com/gh_mirrors/avi/avidemux2 Avidemux是一款功能强大且完全开源的专业视频编辑工具,专为快速剪辑、…...

NPU跑LLM实战指南:KV Cache动态性如何突破硬件限制
NPU跑LLM实战指南:KV Cache动态性如何突破硬件限制 副标题: 从预分配+Attention Mask到三层软件栈,完整解析NPU推理架构 痛点:为什么NPU跑LLM这么难? LLM的生成机制和NPU的硬件特性存在根本冲突: LLM特性 NPU特性 冲突点 逐token生成 固定shape执行 KV Cache动态增长 动…...