macOS使用ffmpeg与QT进行音视频推拉流
1.先启动流服务器 ./mediamtx

2.开始推流: ffmpeg -re -stream_loop -1 -i /Users/hackerx/Desktop/test.mp4 -c copy -rtsp_transport tcp -f rtsp rtsp://127.0.0.1:8554/stream

3. 安装ffmpeg 4.4
brew install ffmpeg@4
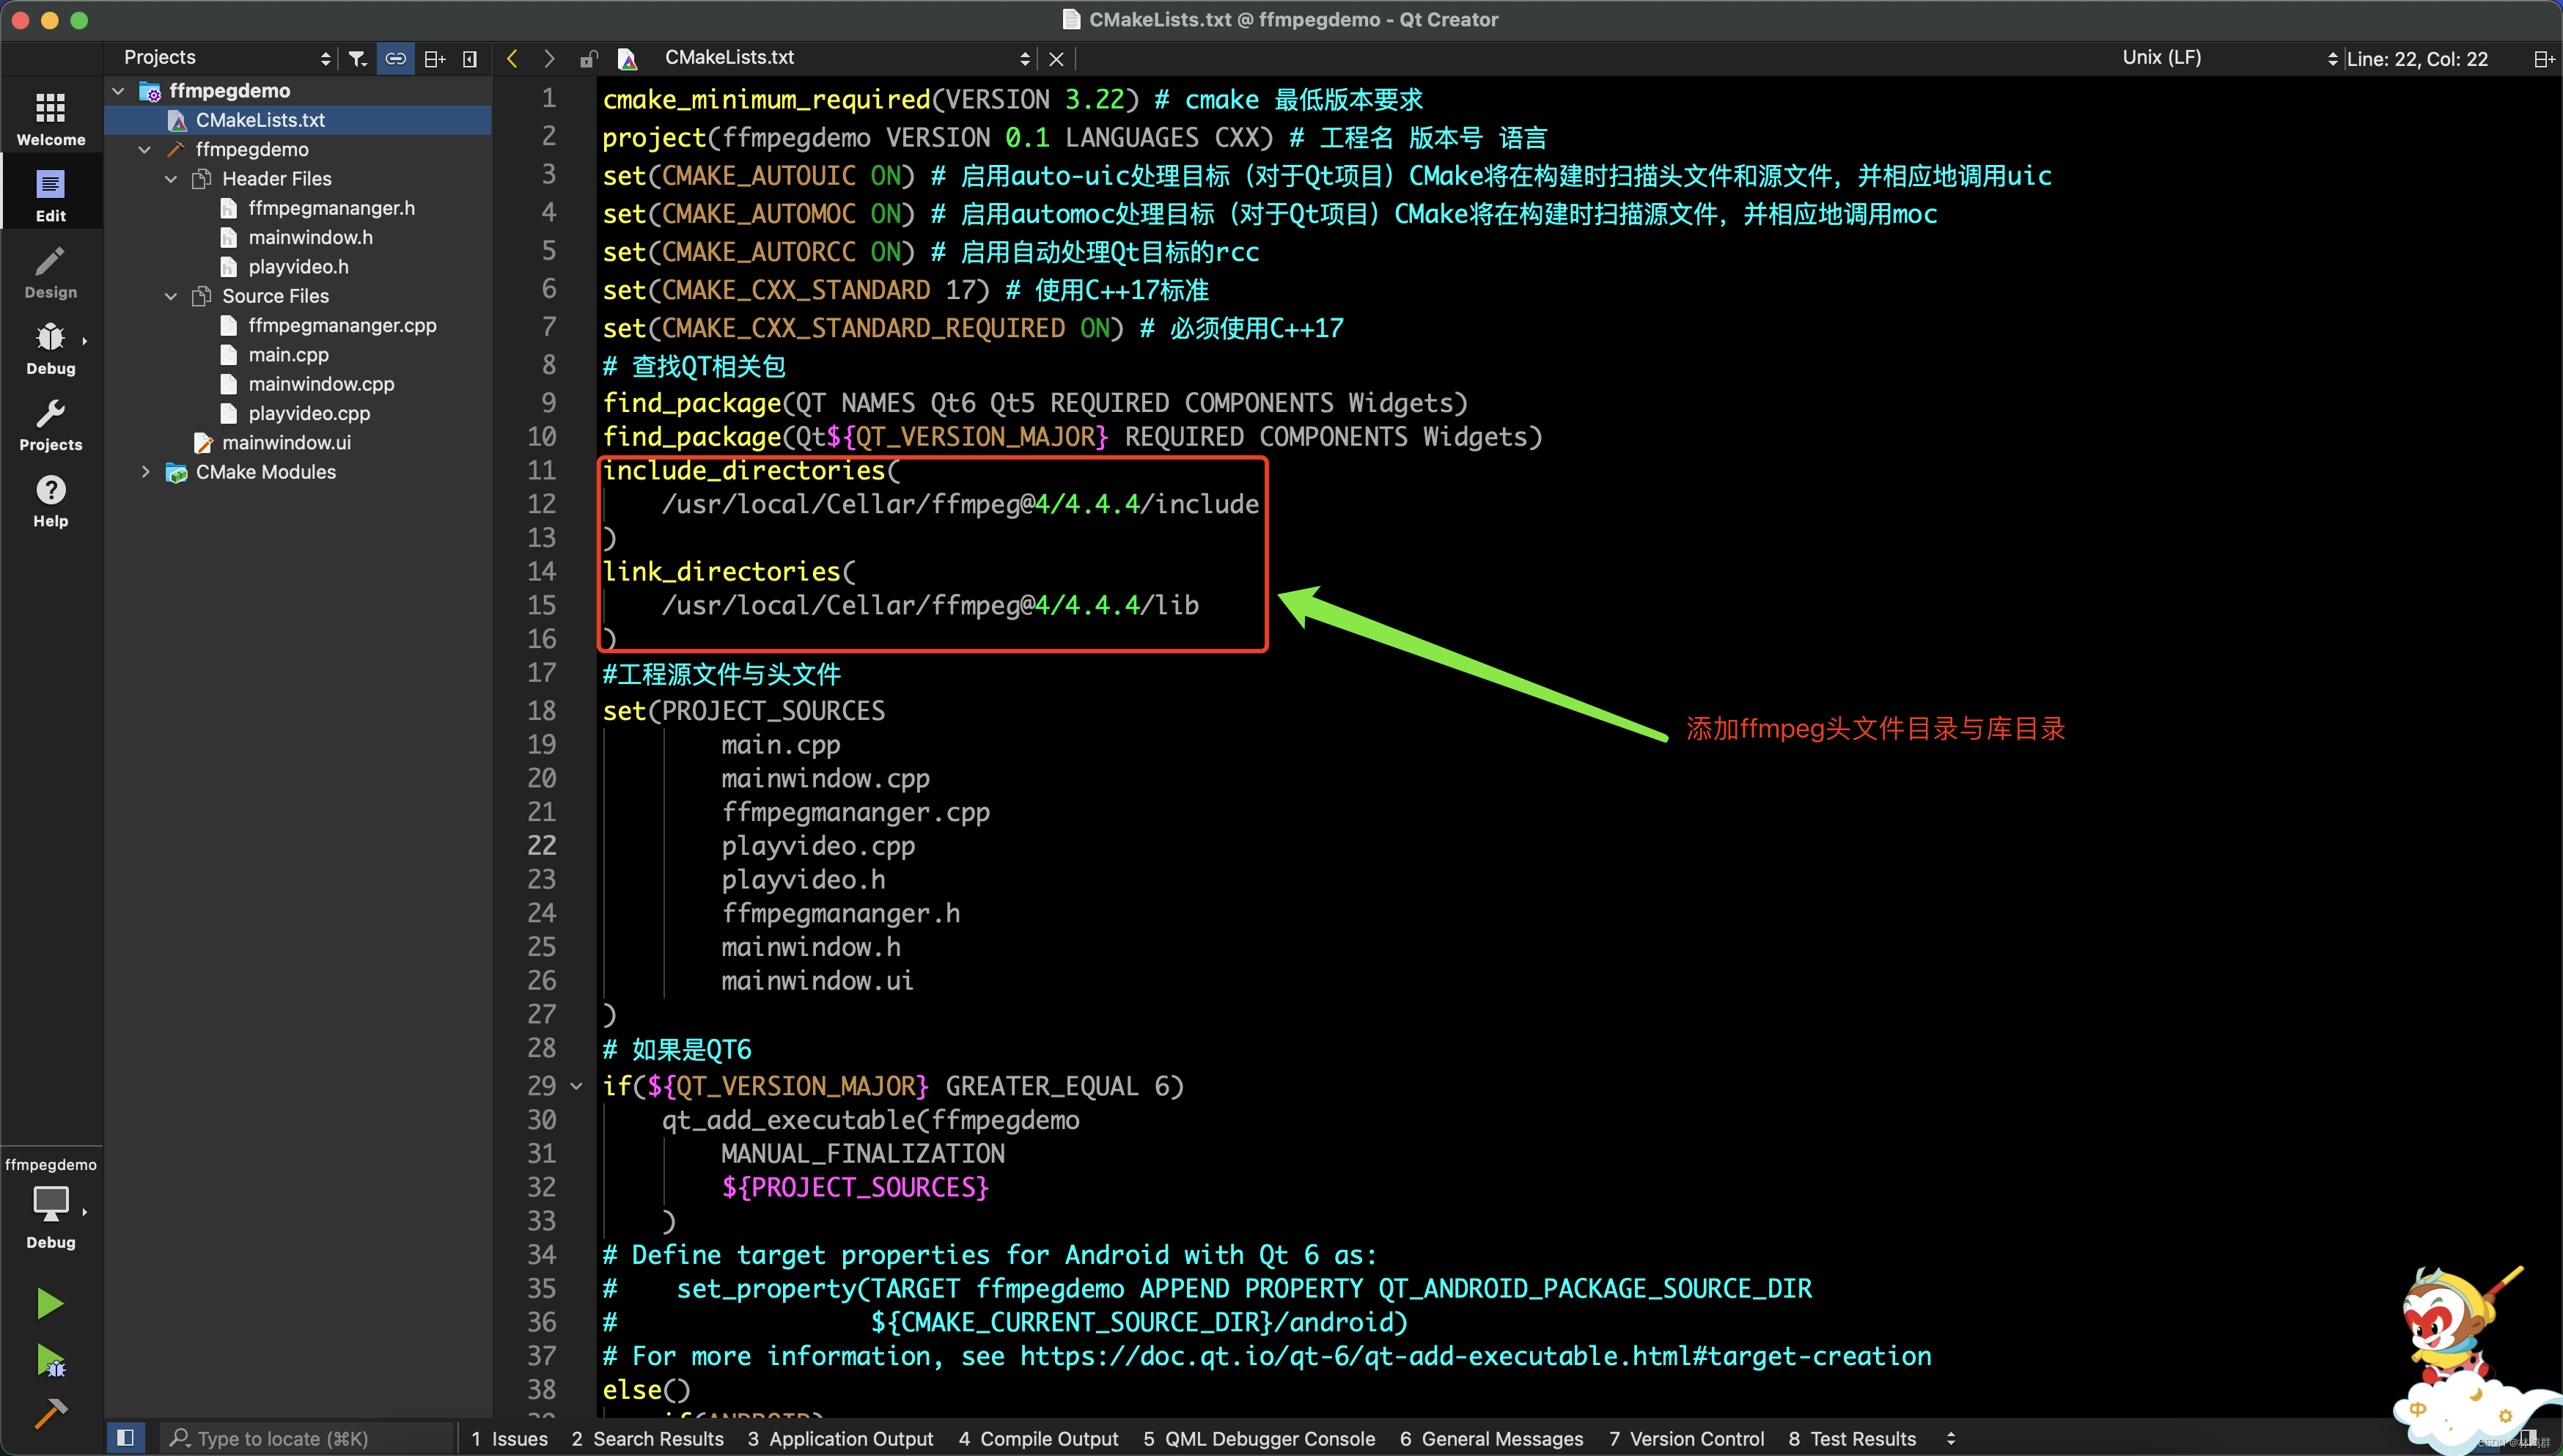
4.添加ffmpeg头文件目录与库目录
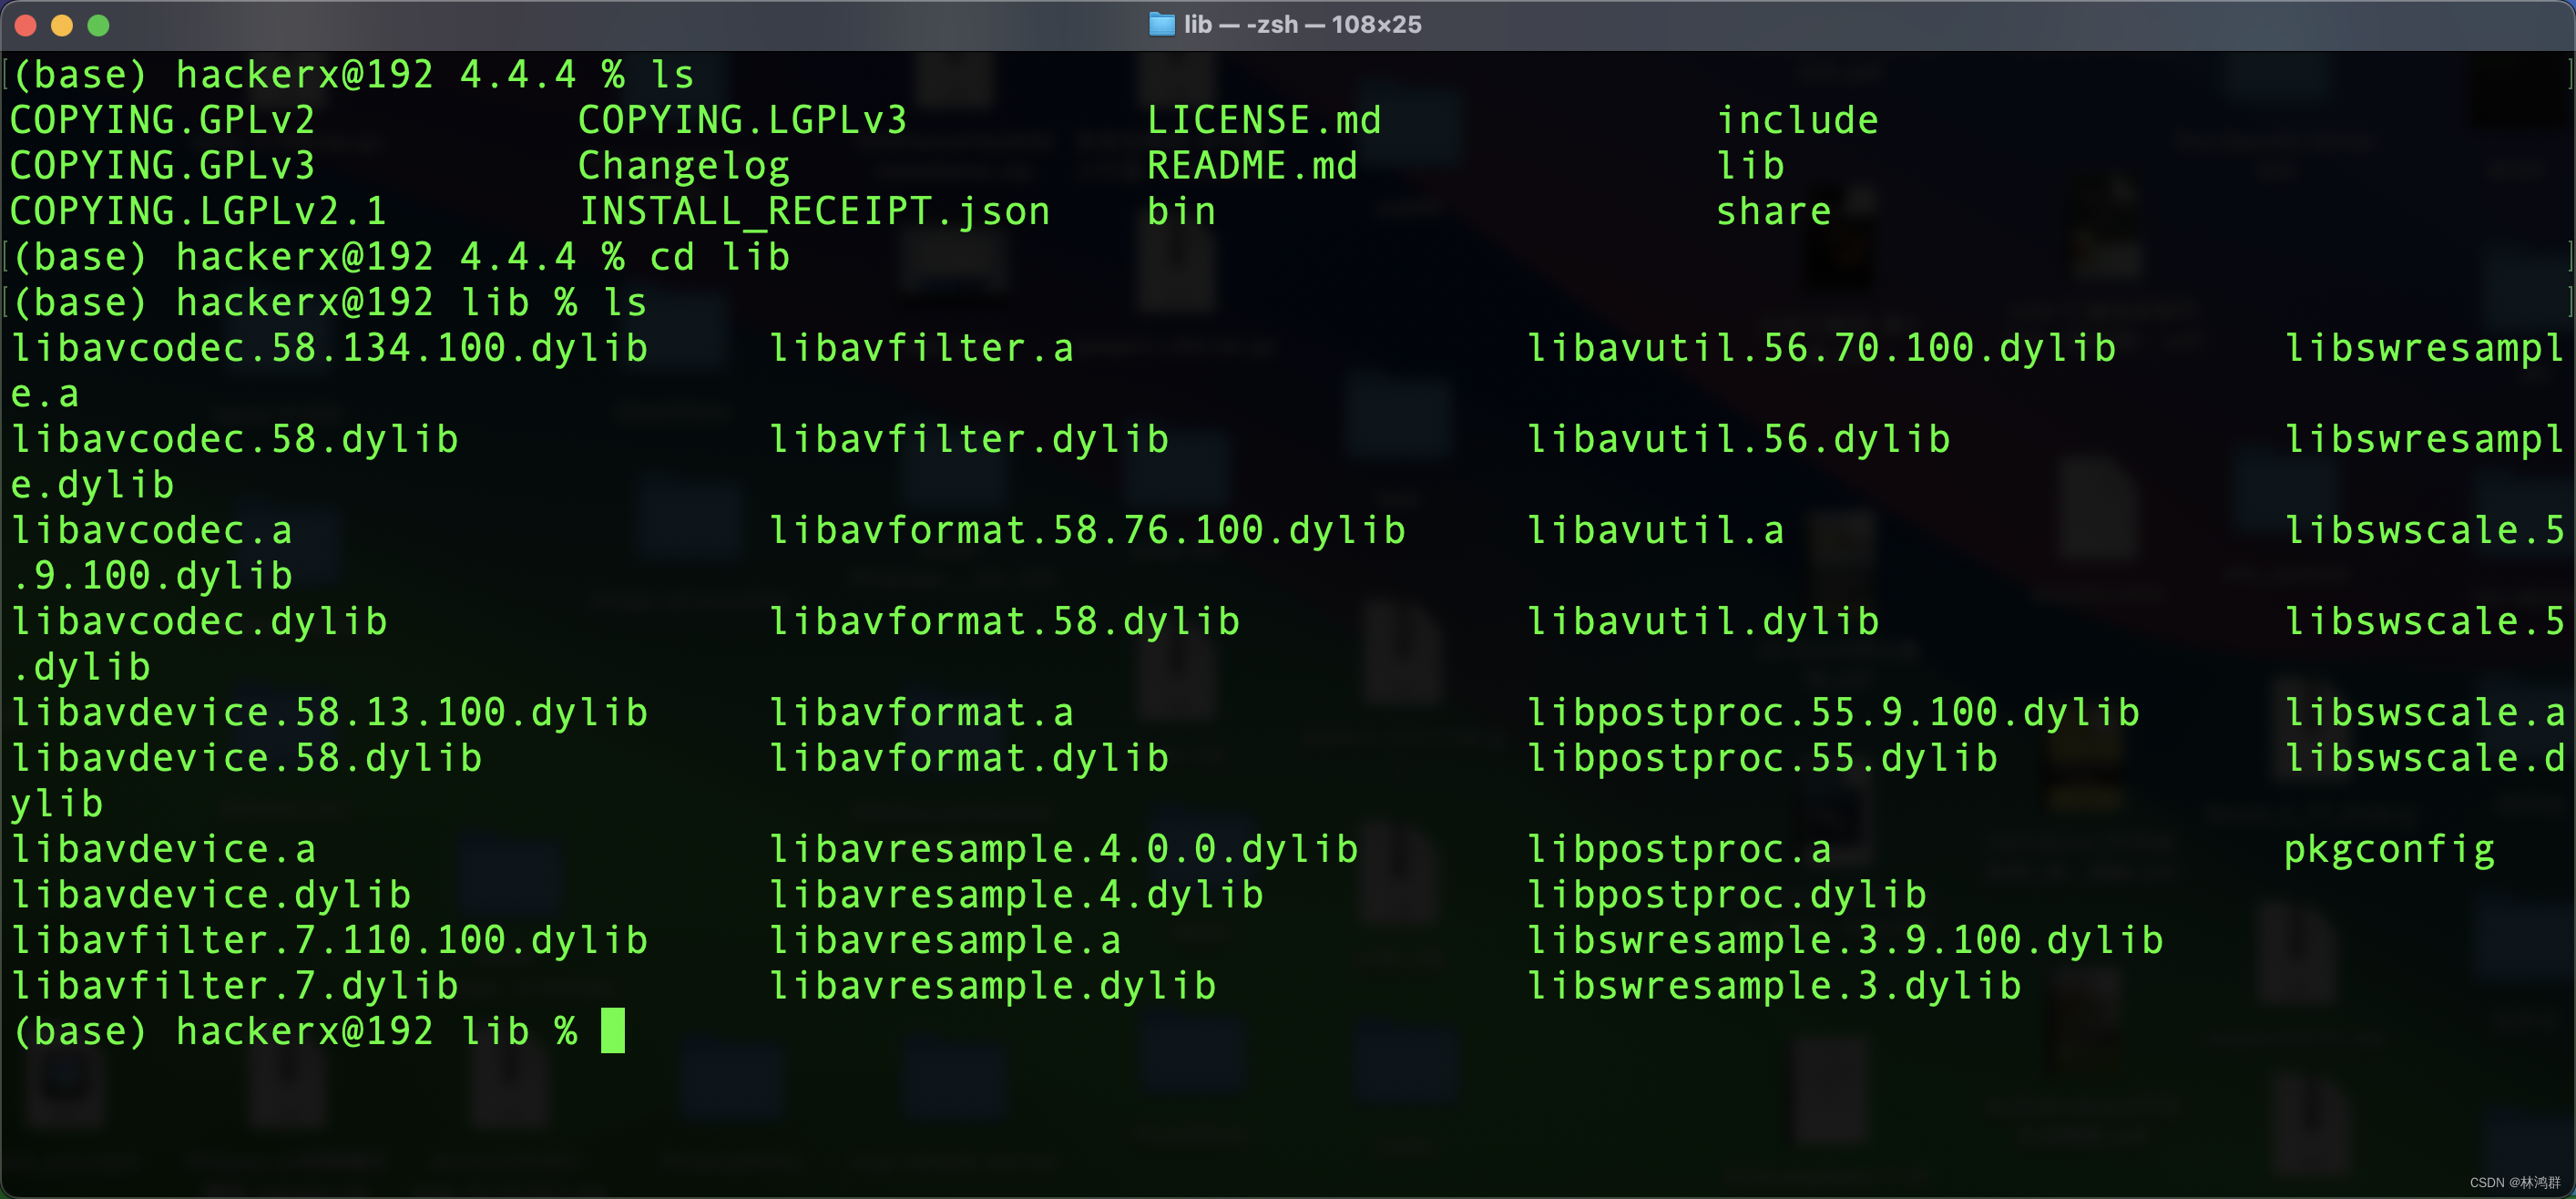
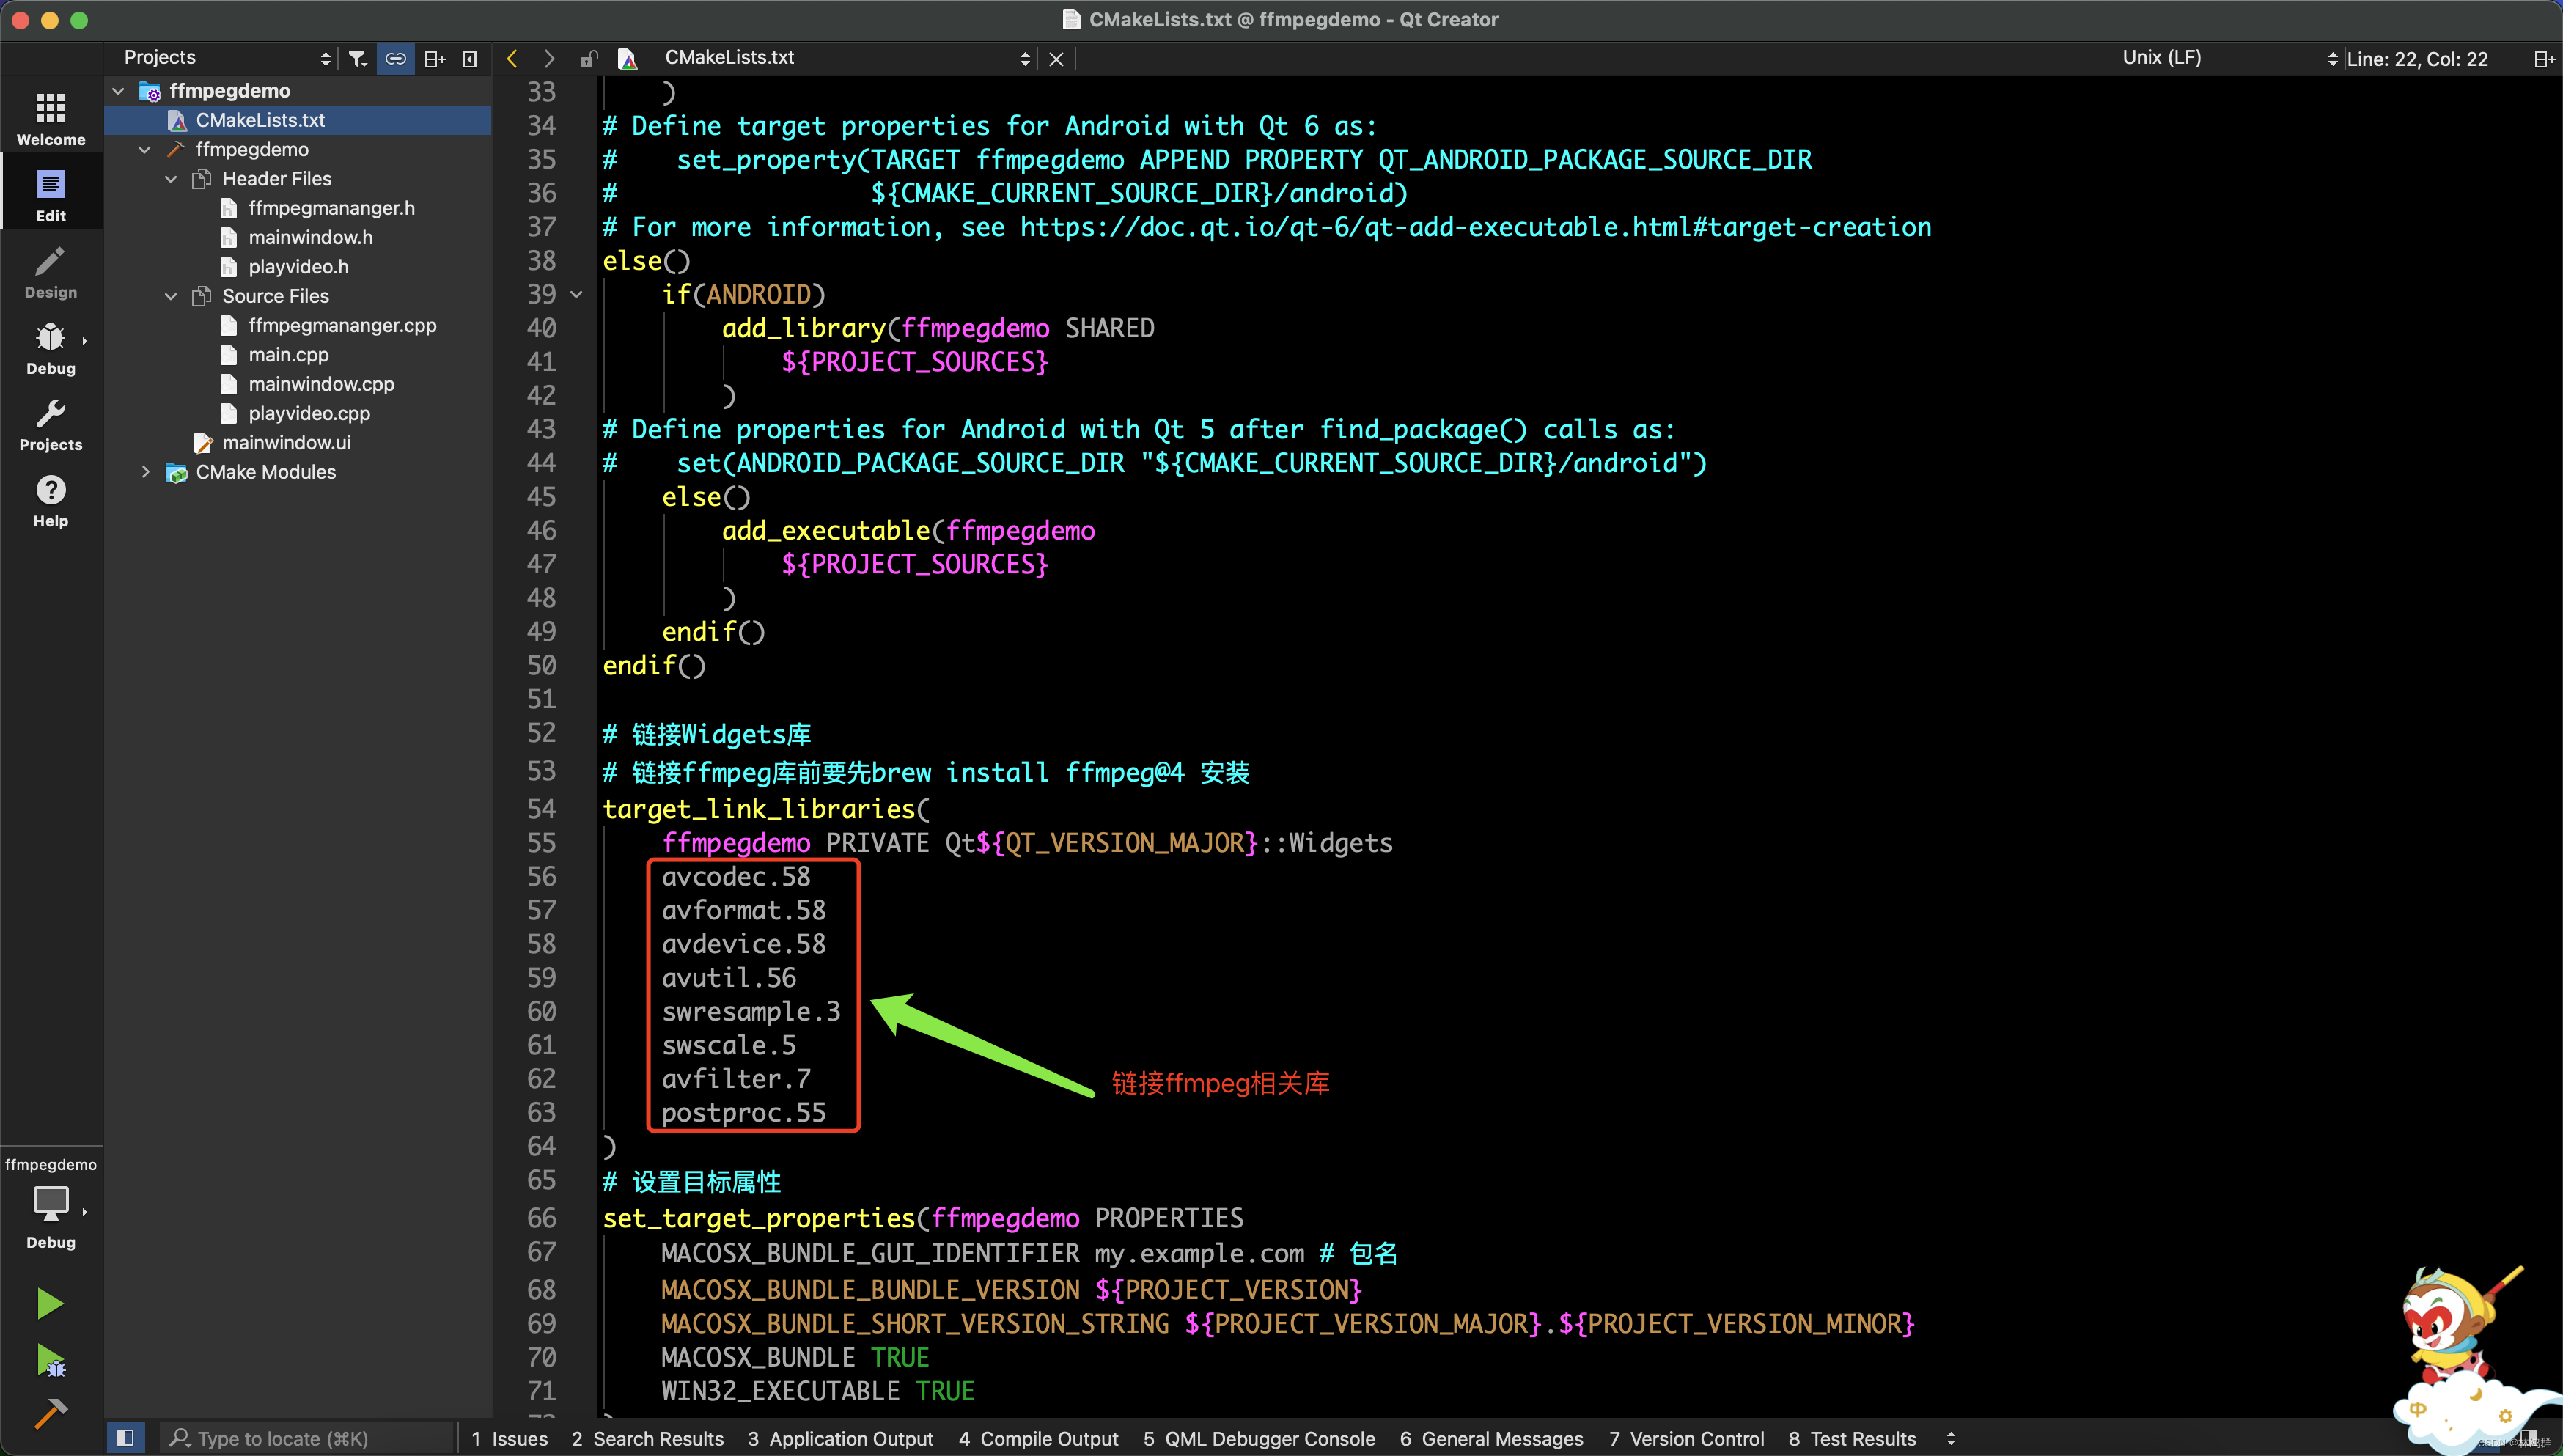
5.链接ffmpeg相关库
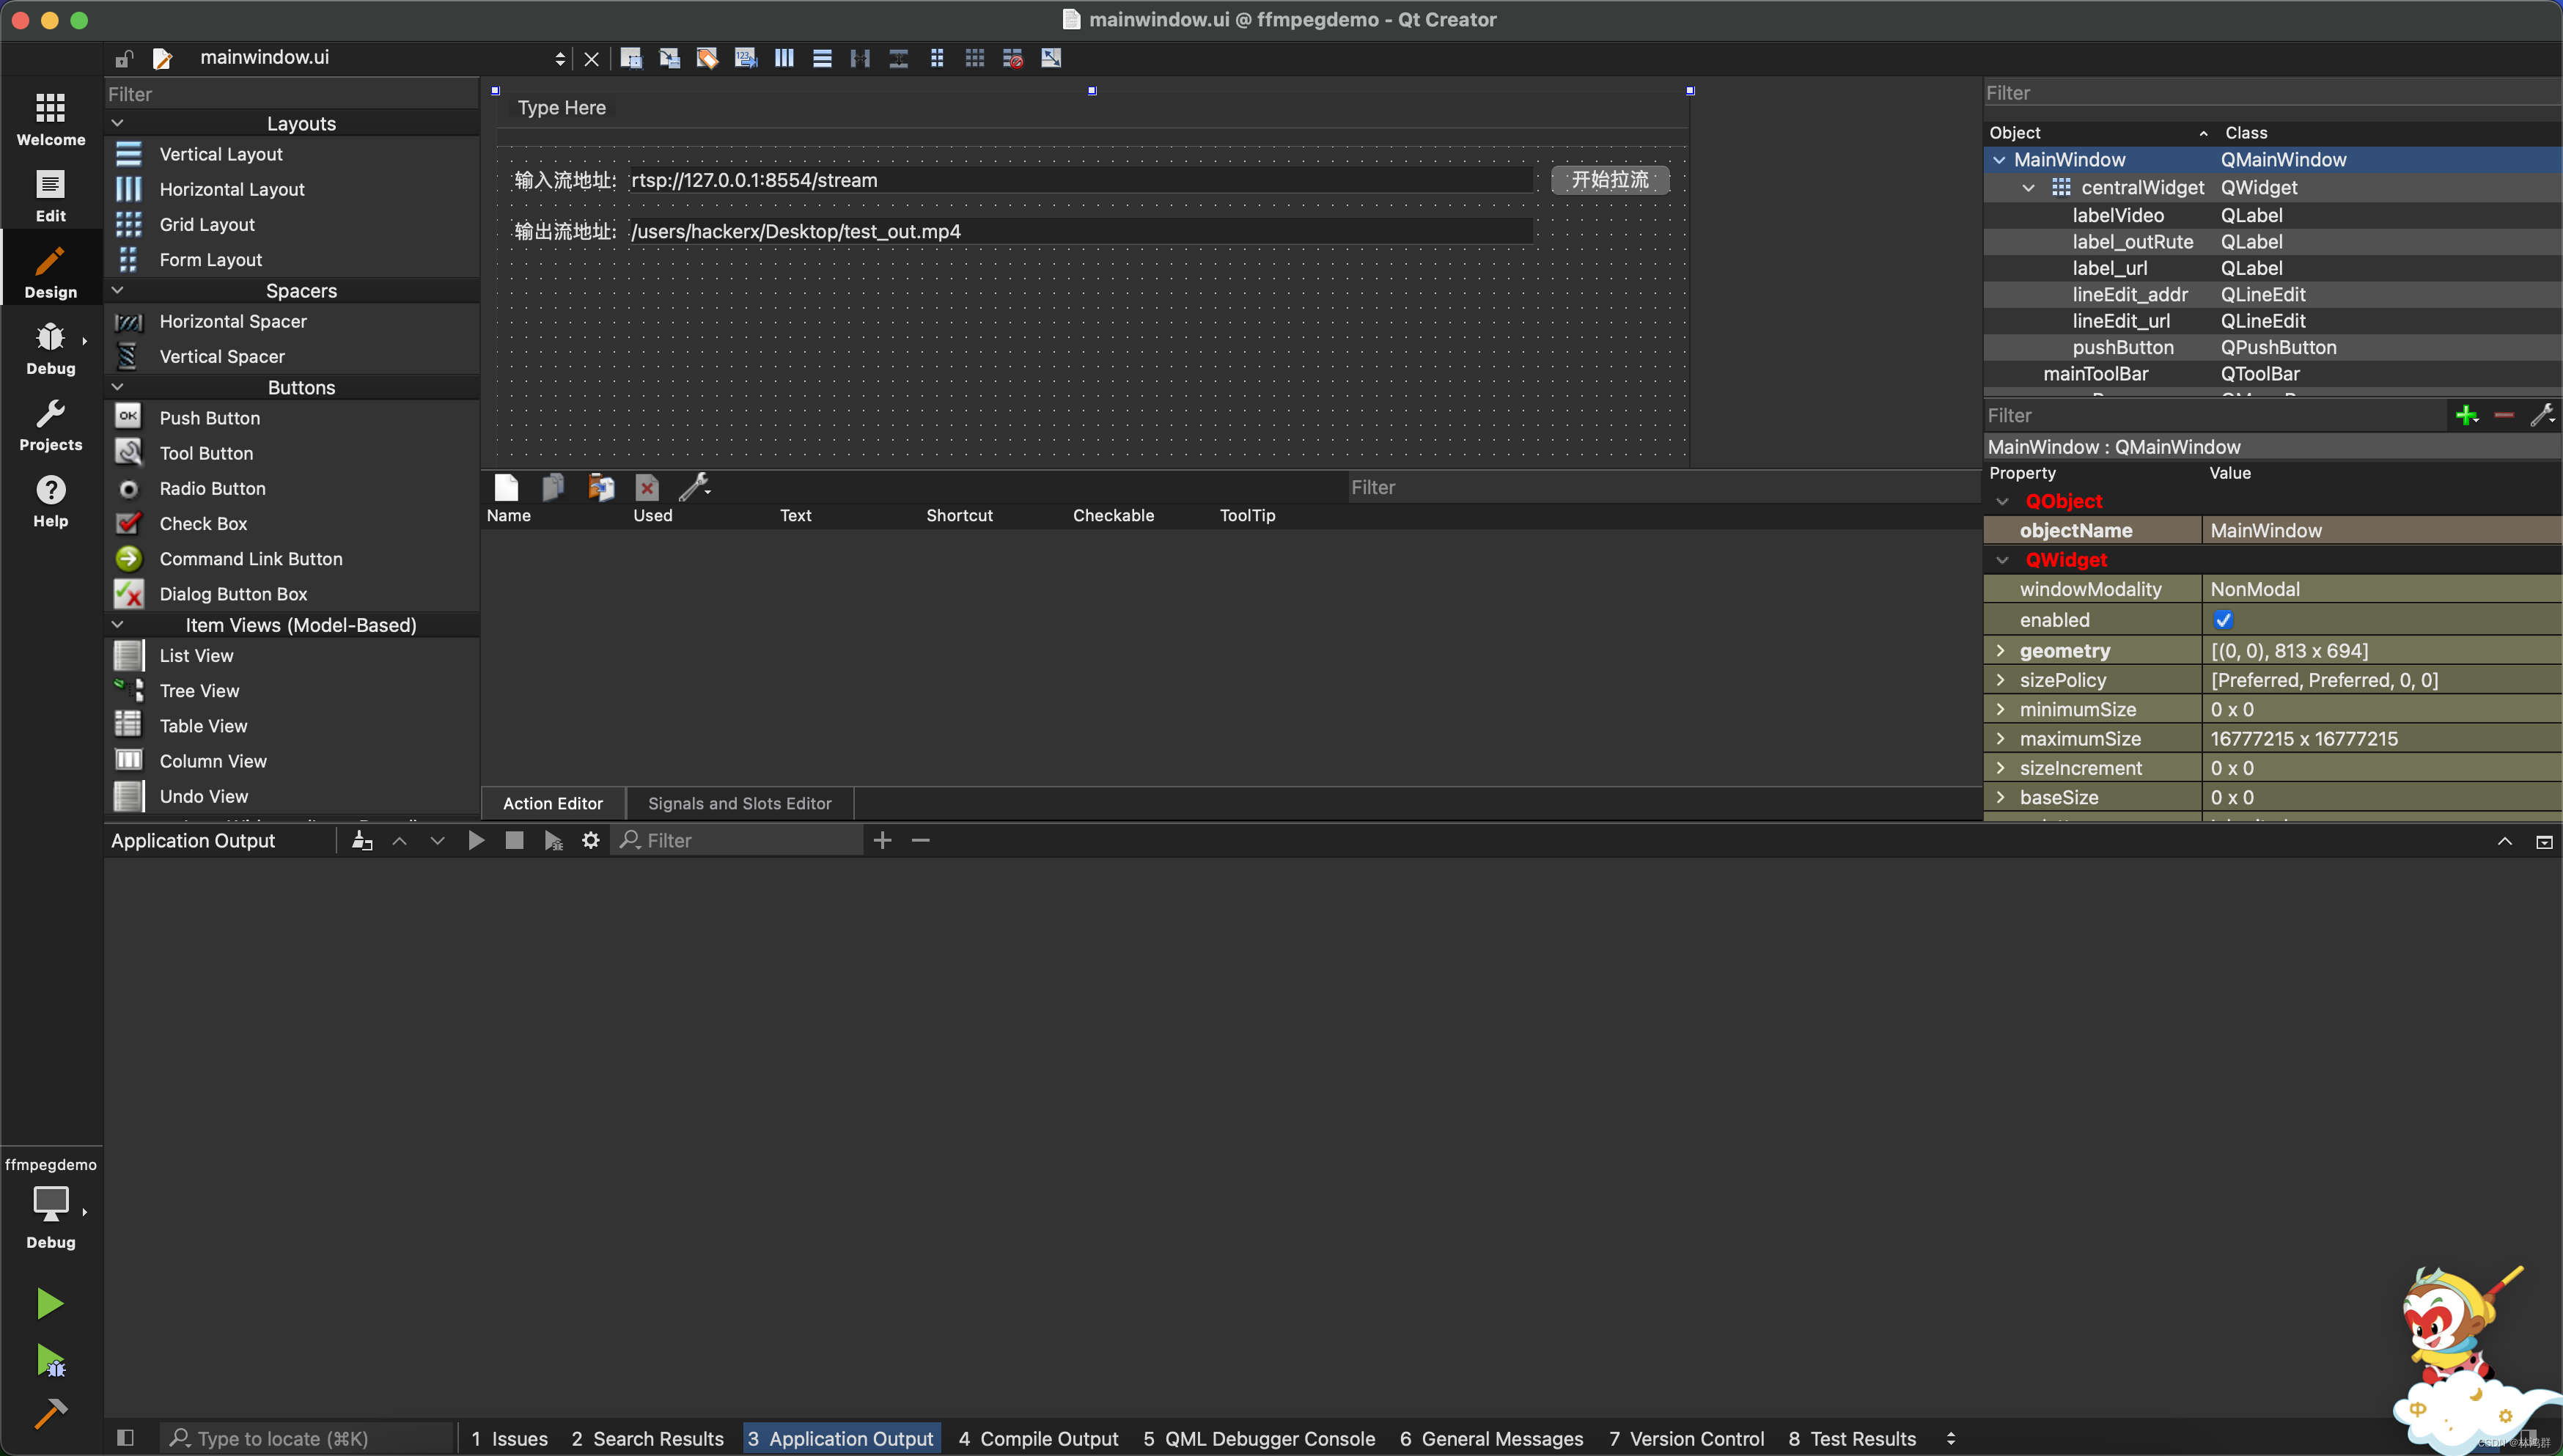
6.设计界面
7.拉流
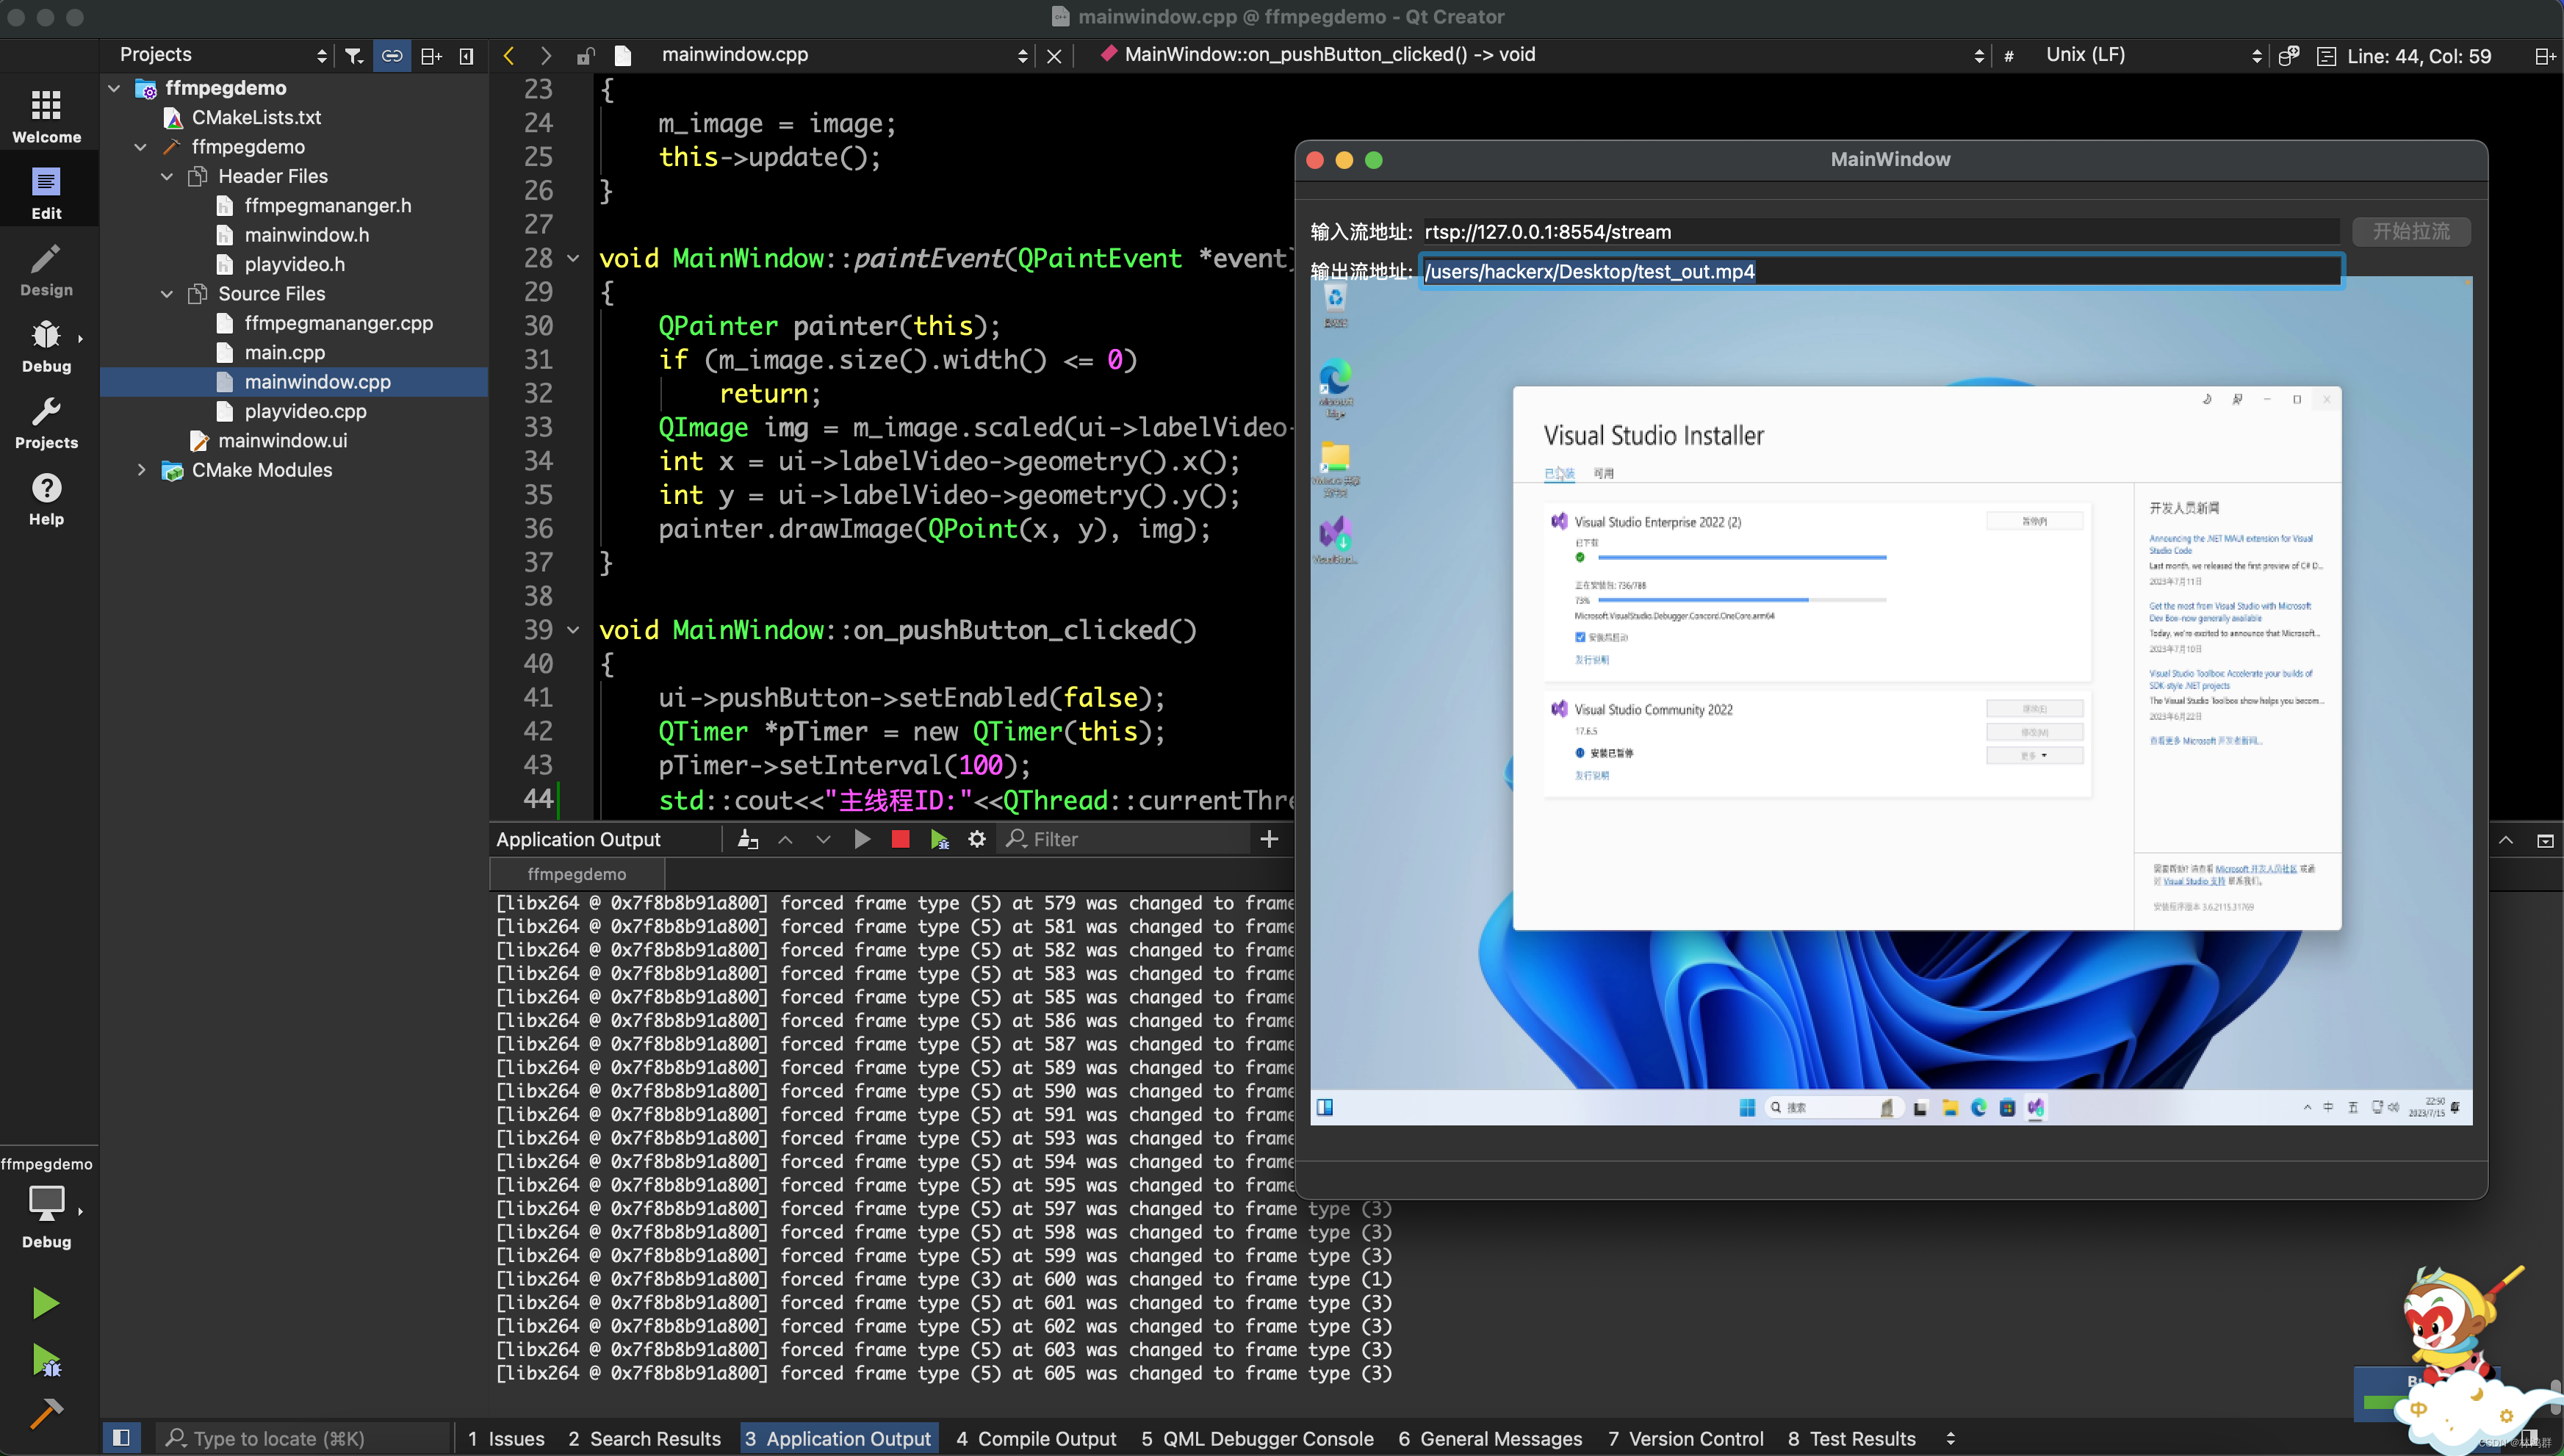
ffmpegmanager.cpp:
#include "ffmpegmananger.h"
#include <QThread>
//构造
ffmpegMananger::ffmpegMananger(QObject *parent) : QObject{parent}
{m_pInFmtCtx = nullptr;//输入流格式上下文m_pTsFmtCtx  = nullptr;//输出流格式上下文m_strInputStreamUrl = "";//输入流地址m_strOutputStreamPath = "";//输出流地址}//拆构
ffmpegMananger::~ffmpegMananger()
{avformat_free_context(m_pInFmtCtx);//释放输入流格式上下文avformat_free_context(m_pTsFmtCtx);//释放输出流格式上下文
}//取输入流地址
void ffmpegMananger::getRtspAddress(QString url)
{this->m_strInputStreamUrl = url;
}//取输出流地址
void ffmpegMananger::getOutputAddress(QString path)
{this->m_strOutputStreamPath = path;printf("输出流地址: %s\n",m_strOutputStreamPath.toStdString().c_str());
}void ffmpegMananger::setOutputCtx(AVCodecContext *encCtx, AVFormatContext **pTsFmtCtx,int &nVideoIdx_out)
{avformat_alloc_output_context2(pTsFmtCtx , nullptr, nullptr, m_strOutputStreamPath.toStdString().c_str());if (!pTsFmtCtx ) {printf("创建输出上下文失败: avformat_alloc_output_context2\n");return;}if (avio_open(&((*pTsFmtCtx)->pb), m_strOutputStreamPath.toStdString().c_str(), AVIO_FLAG_READ_WRITE) < 0){avformat_free_context(*pTsFmtCtx);printf("打开输出流失败: avio_open\n");return;}AVStream *out_stream = avformat_new_stream(*pTsFmtCtx, encCtx->codec);nVideoIdx_out = out_stream->index;avcodec_parameters_from_context(out_stream->codecpar, encCtx);printf("输出流信息:\n");av_dump_format(*pTsFmtCtx, 0, m_strOutputStreamPath.toStdString().c_str(), 1);printf("----------------------------\n");
}//拉流并播放
int ffmpegMananger::ffmepgInput()
{int nRet = 0;AVCodecContext *encCtx = nullptr;std::string temp = m_strInputStreamUrl.toStdString();const char *pUrl = temp.c_str();printf("输入流地址: %s\n",pUrl);//设置选项AVDictionary *dict = nullptr;av_dict_set(&dict,"rtsp_transport", "tcp", 0);av_dict_set(&dict,"stimeout","10000000",0);av_dict_set(&dict, "buffer_size", "1024000", 0);//打开输入流nRet = avformat_open_input(&m_pInFmtCtx,pUrl,nullptr,&dict);if( nRet < 0){printf("打开输入流失败\n");return nRet;}avformat_find_stream_info(m_pInFmtCtx, nullptr);printf("输入流信息:\n");av_dump_format(m_pInFmtCtx, 0, pUrl, 0);printf("---------------------------\n");//视频流索引int nVideo_indx = av_find_best_stream(m_pInFmtCtx,AVMEDIA_TYPE_VIDEO,-1,-1,nullptr,0);if(nVideo_indx < 0){avformat_free_context(m_pInFmtCtx);printf("查找视频流索引失败: av_find_best_stream\n");return -1;}//查找解码器auto pInCodec = avcodec_find_decoder(m_pInFmtCtx->streams[nVideo_indx]->codecpar->codec_id);if(nullptr == pInCodec){printf("查找解码器失败: avcodec_find_decoder fail.");return -1;}//解码器上下文AVCodecContext* pInCodecCtx = avcodec_alloc_context3(pInCodec);//设置解码器参数nRet = avcodec_parameters_to_context(pInCodecCtx, m_pInFmtCtx->streams[nVideo_indx]->codecpar);if(nRet < 0){avcodec_free_context(&pInCodecCtx);printf("设置解码器参数失败: avcodec_parameters_to_context");return -1;}//打开解码器if(avcodec_open2(pInCodecCtx, pInCodec, nullptr) < 0){avcodec_free_context(&pInCodecCtx);printf("打开解码器失败: avcodec_open2\n");return -1;}//输出视频分辨率printf("视频宽:%d\n", pInCodecCtx->width);printf("视频高:%d\n", pInCodecCtx->height);int frame_index = 0;//帧索引int got_picture = 0;//帧解码结果//输出输入流AVStream *in_stream =nullptr;AVStream *out_stream =nullptr;//分配内存AVFrame *pFrame= av_frame_alloc();AVFrame *pFrameRGB = av_frame_alloc();AVPacket *newpkt = av_packet_alloc();AVPacket *packet = av_packet_alloc();//初始化视频包av_init_packet(newpkt);av_init_packet(packet);//图像色彩空间转换、分辨率缩放、前后图像滤波处理SwsContext *m_SwsContext = sws_getContext(pInCodecCtx->width,pInCodecCtx->height,pInCodecCtx->pix_fmt,pInCodecCtx->width,pInCodecCtx->height,AV_PIX_FMT_RGB32,SWS_BICUBIC,nullptr, nullptr, nullptr);int bytes = av_image_get_buffer_size(AV_PIX_FMT_RGB32,pInCodecCtx->width,pInCodecCtx->height,4);uint8_t *m_OutBuffer = (uint8_t *)av_malloc(bytes * sizeof(uint8_t));//将分配的内存空间给pFrameRGB使用avpicture_fill((AVPicture *)pFrameRGB,m_OutBuffer,AV_PIX_FMT_RGB32,pInCodecCtx->width,pInCodecCtx->height);if(encCtx == nullptr){//打开编码器openEncoder(pInCodecCtx->width, pInCodecCtx->height,&encCtx);}//视频索引int videoindex_out = 0;//设置输出文件上下文setOutputCtx(encCtx,&m_pTsFmtCtx,videoindex_out);//写文件头if (avformat_write_header(m_pTsFmtCtx, nullptr) < 0){avformat_free_context(m_pTsFmtCtx);printf("写文件头失败\n");return -1;}printf("写文件头成功.\n");int count = 0;//已解码帧数量nRet = 0;//读取帧结果//从pInFmtCtx读H264数据到packet;while(av_read_frame(m_pInFmtCtx, packet) >= 0){if(packet->stream_index != nVideo_indx)//仅保留图像{continue;}//送packet中H264数据给解码器码器进行解码,解码好的YUV数据放在pInCodecCtx,if(avcodec_send_packet(pInCodecCtx, packet)<0){break;}//释放已解码帧引用av_packet_unref(packet);//把解码好的YUV数据放到pFrame中got_picture = avcodec_receive_frame(pInCodecCtx, pFrame);//解码好一帧数据if(0 == got_picture){//发送显示图像的信号// 对解码视频帧进行缩放、格式转换等操作sws_scale(m_SwsContext,(uint8_t const * const *)pFrame->data,pFrame->linesize,0,pInCodecCtx->height,pFrameRGB->data,pFrameRGB->linesize);// 转换到QImageQImage tmmImage((uchar *)m_OutBuffer, pInCodecCtx->width, pInCodecCtx->height, QImage::Format_RGB32);//复制图像QImage image = tmmImage.copy();//发送图像帧解码完成信息emit Sig_GetOneFrame(image);//设置解码器PTSsetDecoderPts(newpkt->stream_index,count, pFrame);count++;//已解码计数//送原始数据给编码器进行编码nRet = avcodec_send_frame(encCtx,pFrame);if(nRet < 0){continue;}//从编码器获取编号的数据while(nRet >= 0){//接收已编码包nRet = avcodec_receive_packet(encCtx,newpkt);if(nRet < 0){break;}//设置编码包PTSsetEncoderPts(nVideo_indx,frame_index,videoindex_out,newpkt);int _count = 1;printf("写%d包,大小:%5d,PTS:%lld\n", _count,newpkt->size, newpkt->pts);if (av_interleaved_write_frame(m_pTsFmtCtx, newpkt) < 0){printf("写帧失败: av_interleaved_write_frame\n");goto end;}_count++;av_packet_unref(newpkt);//释放已编码包}}}while(1)//从pInFmtCtx读H264数据到packet;{if(packet->stream_index != nVideo_indx)//仅保留图像{continue;}//送packet中H264数据给解码器码器进行解码,解码好的YUV数据放在pInCodecCtx,if(avcodec_send_packet(pInCodecCtx, packet)<0){continue;}//释放已解码包av_packet_unref(packet);//把解码好的YUV数据放到pFrame中got_picture = avcodec_receive_frame(pInCodecCtx, pFrame);//解码好一帧数据if(!got_picture){AVRational in_time_base1 = in_stream->time_base;in_stream = m_pInFmtCtx->streams[newpkt->stream_index];//PTSint64_t in_duration = (double)AV_TIME_BASE / av_q2d(in_stream->r_frame_rate);pFrame->pts = (double)(count*in_duration) / (double)(av_q2d(in_time_base1)*AV_TIME_BASE);count++;//送原始数据给编码器进行编码nRet = avcodec_send_frame(encCtx,pFrame);if(nRet < 0){break;}//从编码器获取编号的数据while(nRet >= 0){nRet = avcodec_receive_packet(encCtx,newpkt);if(nRet < 0){continue;}in_stream = m_pInFmtCtx->streams[newpkt->stream_index];out_stream = m_pTsFmtCtx->streams[videoindex_out];if (newpkt->stream_index == nVideo_indx){if (newpkt->pts == AV_NOPTS_VALUE){//写入PTSAVRational time_base1 = in_stream->time_base;int64_t calc_duration = (double)AV_TIME_BASE / av_q2d(in_stream->r_frame_rate);//设置包参数newpkt->pts = (double)(frame_index*calc_duration) / (double)(av_q2d(time_base1)*AV_TIME_BASE);newpkt->dts = newpkt->pts;newpkt->duration = (double)calc_duration / (double)(av_q2d(time_base1)*AV_TIME_BASE);frame_index++;}}//转换PTS/DTSnewpkt->pts = av_rescale_q_rnd(newpkt->pts, in_stream->time_base, out_stream->time_base, (AVRounding)(AV_ROUND_NEAR_INF | AV_ROUND_PASS_MINMAX));newpkt->dts = av_rescale_q_rnd(newpkt->dts, in_stream->time_base, out_stream->time_base, (AVRounding)(AV_ROUND_NEAR_INF | AV_ROUND_PASS_MINMAX));newpkt->duration = av_rescale_q(newpkt->duration, in_stream->time_base, out_stream->time_base);newpkt->pos = -1;newpkt->stream_index = videoindex_out;int count = 1;printf("写%d包,大小:%5dPTS:%lld\n", count,newpkt->size, newpkt->pts);if (av_interleaved_write_frame(m_pTsFmtCtx, newpkt) < 0){printf("写帧失败: av_interleaved_write_frame\n");goto end;}count++;av_packet_unref(newpkt);}}}//Write file trailerav_write_trailer(m_pTsFmtCtx);
end:av_frame_free(&pFrame);av_frame_free(&pFrameRGB);av_packet_unref(newpkt);av_packet_unref(packet);std::cout<<"拉流完成";return  0;
}void ffmpegMananger::setDecoderPts(int idx,int count,AVFrame *pFrame)
{AVStream* in_stream = m_pInFmtCtx->streams[idx];AVRational in_time_base1 = in_stream->time_base;//Duration between 2 frames (us)int64_t in_duration = (double)AV_TIME_BASE / av_q2d(in_stream->r_frame_rate);pFrame->pts = (double)(count*in_duration) / (double)(av_q2d(in_time_base1)*AV_TIME_BASE);
}void ffmpegMananger::setEncoderPts(int nVideo_indx,int frame_index,int videoindex_out,AVPacket *newpkt)
{AVStream*in_stream = m_pInFmtCtx->streams[newpkt->stream_index];AVStream*out_stream = m_pTsFmtCtx->streams[videoindex_out];if (newpkt->stream_index == nVideo_indx){//FIX:No PTS (Example: Raw H.264)//Simple Write PTSif (newpkt->pts == AV_NOPTS_VALUE){//Write PTSAVRational time_base1 = in_stream->time_base;//Duration between 2 frames (us)int64_t calc_duration = (double)AV_TIME_BASE / av_q2d(in_stream->r_frame_rate);//Parametersnewpkt->pts = (double)(frame_index*calc_duration) / (double)(av_q2d(time_base1)*AV_TIME_BASE);newpkt->dts = newpkt->pts;newpkt->duration = (double)calc_duration / (double)(av_q2d(time_base1)*AV_TIME_BASE);frame_index++;}}//Convert PTS/DTSnewpkt->pts = av_rescale_q_rnd(newpkt->pts, in_stream->time_base, out_stream->time_base, (AVRounding)(AV_ROUND_NEAR_INF | AV_ROUND_PASS_MINMAX));newpkt->dts = av_rescale_q_rnd(newpkt->dts, in_stream->time_base, out_stream->time_base, (AVRounding)(AV_ROUND_NEAR_INF | AV_ROUND_PASS_MINMAX));newpkt->duration = av_rescale_q(newpkt->duration, in_stream->time_base, out_stream->time_base);newpkt->pos = -1;newpkt->stream_index = videoindex_out;
}void ffmpegMananger::writeTail()
{//Write file trailerav_write_trailer(m_pTsFmtCtx);
}void ffmpegMananger::openEncoder(int width, int height, AVCodecContext** enc_ctx)
{//使用libx264编码器auto pCodec = avcodec_find_encoder_by_name("libx264");if(nullptr == pCodec){printf("avcodec_find_encoder_by_name fail.\n");return;}//获取编码器上下文*enc_ctx = avcodec_alloc_context3(pCodec);if(nullptr == enc_ctx){printf("avcodec_alloc_context3(pCodec) fail.\n");return;}//sps/pps(*enc_ctx)->profile = FF_PROFILE_H264_MAIN;(*enc_ctx)->level = 30;//表示level是5.0//分辨率(*enc_ctx)->width = width;(*enc_ctx)->height = height;//gop(*enc_ctx)->gop_size = 25;//i帧间隔(*enc_ctx)->keyint_min = 20;//设置最小自动插入i帧的间隔.OPTION//B帧(*enc_ctx)->max_b_frames = 0;//不要B帧(*enc_ctx)->has_b_frames = 0;////参考帧(*enc_ctx)->refs = 3;//OPTION//设置输入的yuv格式(*enc_ctx)->pix_fmt = AV_PIX_FMT_YUV420P;//设置码率(*enc_ctx)->bit_rate = 3000000;//设置帧率(*enc_ctx)->time_base = (AVRational){1,25};//帧与帧之间的间隔(*enc_ctx)->framerate = (AVRational){25,1};//帧率 25帧每秒if(avcodec_open2((*enc_ctx),pCodec,nullptr) < 0){printf("avcodec_open2 fail.\n");}return;
}
ffmpegmanager.h
#ifndef FFMPEGMANANGER_H
#define FFMPEGMANANGER_H
#pragma execution_character_set("utf-8")
//QT头
#include <QObject>
#include <QTimer>
#include <QImage>
//C标准头
#include <stdio.h>
#include <iostream>
//FFmpeg头
extern "C"
{#include "libswscale/swscale.h"#include "libavdevice/avdevice.h"#include "libavcodec/avcodec.h"#include "libavcodec/bsf.h"#include "libavformat/avformat.h"#include "libavutil/avutil.h"#include "libavutil/imgutils.h"#include "libavutil/log.h"#include "libavutil/time.h"#include <libswresample/swresample.h>}class ffmpegMananger : public QObject
{Q_OBJECT
public://构造explicit ffmpegMananger(QObject *parent = nullptr);//拆构~ffmpegMananger();//取输入流地址void getRtspAddress(QString url);//取输出流地址void getOutputAddress(QString path);//ffmpeg拉流播放int ffmepgInput();//打开解码器void openEncoder(int width, int height, AVCodecContext** enc_ctx);//设置输出上下文void setOutputCtx(AVCodecContext *encCtx, AVFormatContext **pTsFmtCtx,int &nVideoIdx_out);//写文件尾void writeTail();//设置解码的ptsvoid setDecoderPts(int idx,int count,AVFrame *pFrame);//设置编码的ptsvoid setEncoderPts(int nVideo_indx,int frame_index,int videoindex_out,AVPacket *newpkt);
signals://取一帧图像信号void Sig_GetOneFrame(QImage img);
private://输入流地址QString m_strInputStreamUrl;//输出流地址QString m_strOutputStreamPath;//输入流动格式上下文AVFormatContext *m_pInFmtCtx;//输出流动格式上下文AVFormatContext *m_pTsFmtCtx;bool m_ifRec;};#endif // FFMPEGMANANGER_H
相关文章:

macOS使用ffmpeg与QT进行音视频推拉流
1.先启动流服务器 ./mediamtx 2.开始推流: ffmpeg -re -stream_loop -1 -i /Users/hackerx/Desktop/test.mp4 -c copy -rtsp_transport tcp -f rtsp rtsp://127.0.0.1:8554/stream 3. 安装ffmpeg 4.4 brew install ffmpeg4 4.添加ffmpeg头文件目录与库目录 5.链接ffmpeg相关库…...

ARTS打卡:双指针的尝试
替换空格 <?php class Solution {/*** param String $s* return String*/function replaceSpace($s) {$arrstr_split($s); //转化成数组foreach($arr as &$item){if($item ){//执行替换操作$item%20;}}return implode(,$arr); //数组转化成字符串返回} } 反转链表…...

JavaWeb-DAO设计模式
目录 DAO设计模式 1.认识DAO 2.DAO各部分的详解 3.DAO设计模式流程 DAO设计模式 1.认识DAO DAO(Data Acess Object 数据库访问对象)的主要功能是操作数据库,所以DAO在标准开发架构中数据数据层,以下是标准开发的架构 客户层:目前使用B/…...

重温git和GitHub
1.初始化本地库:让git获取到这个目录的管理权 git init 查看文件夹的文件命令:ll 查看文件夹的隐藏的文件命令:ll -a 查看状态的命令:git status cat文件名:查看文件内容 工作区:当git status时,名字为红色则在工作区&…...
C# WPF 中 外部图标引入iconfont,无法正常显示问题 【小白记录】
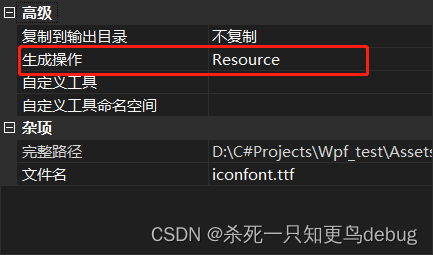
wpf iconfont 外部图标引入,无法正常显示问题。 1. 检查资源路径和引入格式是否正确2. 检查资源是否包含在程序集中 1. 检查资源路径和引入格式是否正确 正确的格式,注意字体文件 “xxxx.ttf” 应写为 “#xxxx” <TextBlock Text"…...

Hi-TRS:骨架点视频序列的层级式建模及层级式自监督学习
论文题目:Hierarchically Self-Supervised Transformer for Human Skeleton Representation Learning 论文下载地址:https://www.ecva.net/papers/eccv_2022/papers_ECCV/papers/136860181.pdf 代码地址:https://github.com/yuxiaochen1103…...

FPGA 之 xilinx DDS IP相位控制字及频率控制字浅析
浅析相位环在Xilinx DDS中的理解 本文仅为个人理解之用; 相关仿真结果如下:...

[鹏城杯 2022]简单包含
直接用php:// 有wtf 加脏数据绕过...

Required request parameter ‘XXX‘ for method parameter type XXX is not present问题
今日工作中遇到很奇葩的问题,用翻译软件翻译结果为 方法参数类型XXX所需的请求参数XXX不存在 也就是说前端没有给后端传值 后端的接收方式为 public Result demo(RequestParam("id") String id){}...

centOS 快速安装和配置 NVIDIA docker Container Toolkit
要在 CentOS 上正确安装和配置 NVIDIA Container Toolkit,您可以按照以下步骤进行操作,如果1和2都已经完成,可以直接进行第3步NVIDIA Container Toolkit安装配置。 1. 安装 NVIDIA GPU 驱动程序: 您可以从 NVIDIA 官方网站下载适…...
编程练习(2)
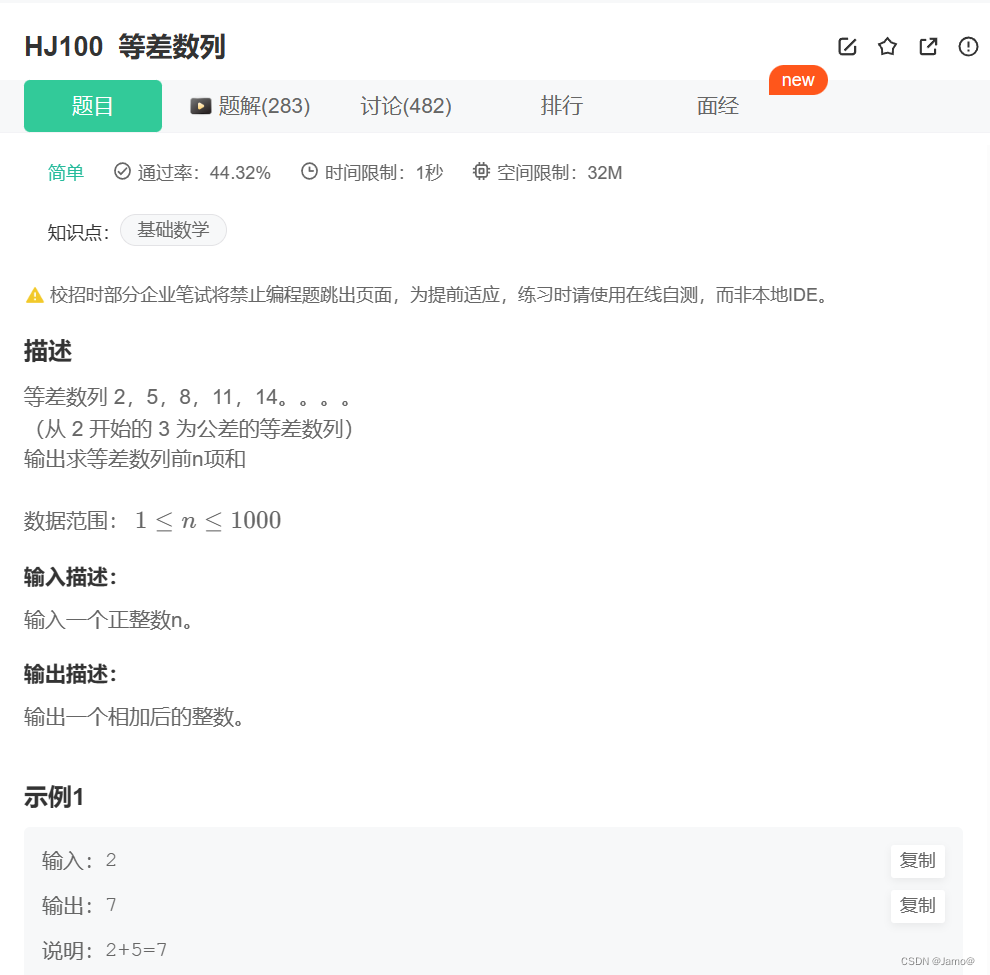
一.选择题 第一题: 考察转义字符和strlen函数求解字符串长度 进一步在VS中可以智能看出哪些字符是转义字符: 因此本体答案选择B 第二题: 本体较为简单,宏定义了三个数N,M,NUM,N值为2,M值为3,因此NUM值为8,…...

利用Figlet工具创建酷炫Linux Centos8服务器-登录欢迎界面-SHELL自动化编译安装代码
因为我们需要生成需要的特定字符,所以需要在当前服务器中安装Figlet,默认没有安装包的,其实如果我们也只要在一台环境中安装,然后需要什么字符只要复制到需要的服务器中,并不需要所有都安装。同样的,我们也可以利用此生成的字符用到脚本运行的开始起头部分,用ECHO分行标…...
Git Cherry-pick使用
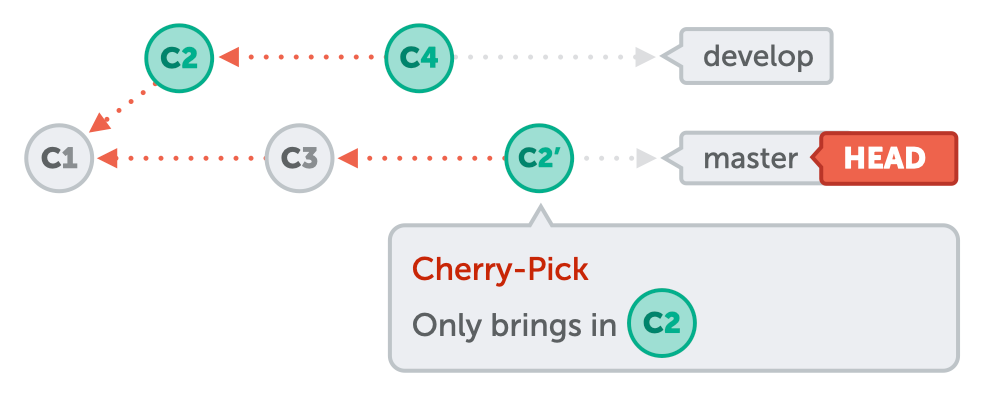
概述 无论项目大小,当你和一群程序员一起工作时,处理多个 Git 分支之间的变更都会变得很困难。有时,与其把整个 Git 分支合并到另一个分支,不如选择并移动几个特定的提交。这个过程被称为 "挑拣", 即 Cherry-pick。 本…...

红帽8.5 ansible 安装和部署 |(简单版)
什么是ansible Ansible是一款基于OpenSSH开源的自动化运维工具,可以用它来配置系统、部署软件和编排更高级的 IT 任务,并且使用具有极高的安全性,ansible是当前市面上主流的自动化运维工具之一 为什么使用ansible 比较直观的说,…...
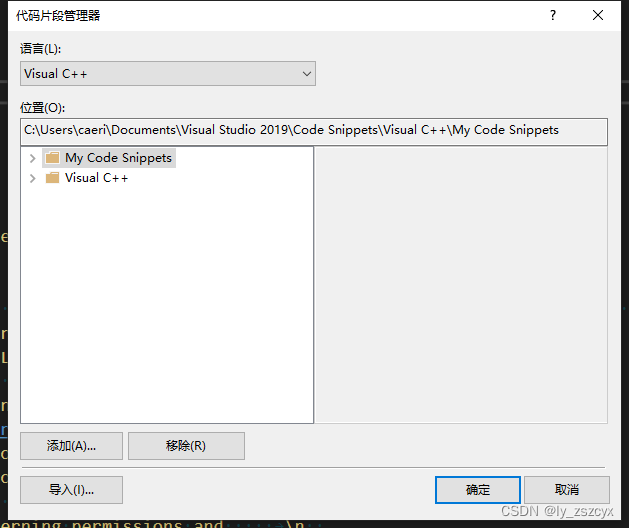
Visual Studio 2019 c++ 自定义注释 ----doxygen
可加入C 也可自定义。 <?xml version"1.0" encoding"utf-8"?> <CodeSnippets xmlns"http://schemas.microsoft.com/VisualStudio/2005/CodeSnippet"><CodeSnippet Format"1.0.0"><Header><Title>注释…...

面试题. 零矩阵
编写一种算法,若M N矩阵中某个元素为0,则将其所在的行与列清零。 示例 1: 输入: [[1,1,1],[1,0,1],[1,1,1] ] 输出: [[1,0,1],[0,0,0],[1,0,1] ] 示例 2: 输入: [[0,1,2,0],[3,4,5,2],[1,3…...

易语言下载器
静态网站整站下载器 https://bbs.125.la/forum.php?modviewthread&tid14791313&highlight%E4%B8%8B%E8%BD%BD%E5%99%A8 易语言 之音乐下载器 https://blog.51cto.com/u_15309652/3153642 (File Download Assistant)下载链接:https…...
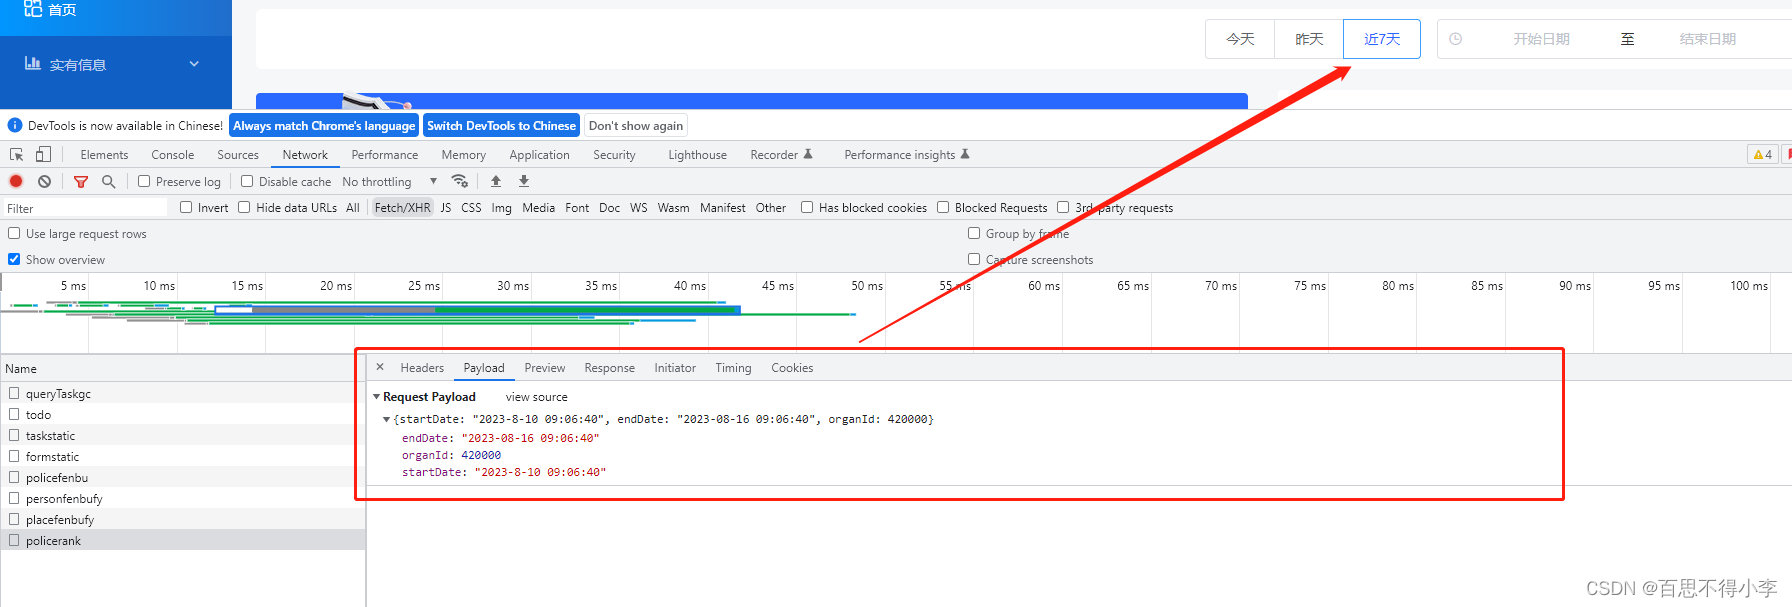
原生js获取今天、昨天、近7天的时间(年月日时分秒)
有的时候我们需要将今天,昨天,近7天的时间(年月日时分秒)作为参数传递给后端,如下图: 那怎么生成这些时间呢?如下代码里,在methods里的toDay方法、yesterDay方法、weekDay方法分别用于生成今天、昨天和近7天的时间: <template><div class="box"&…...
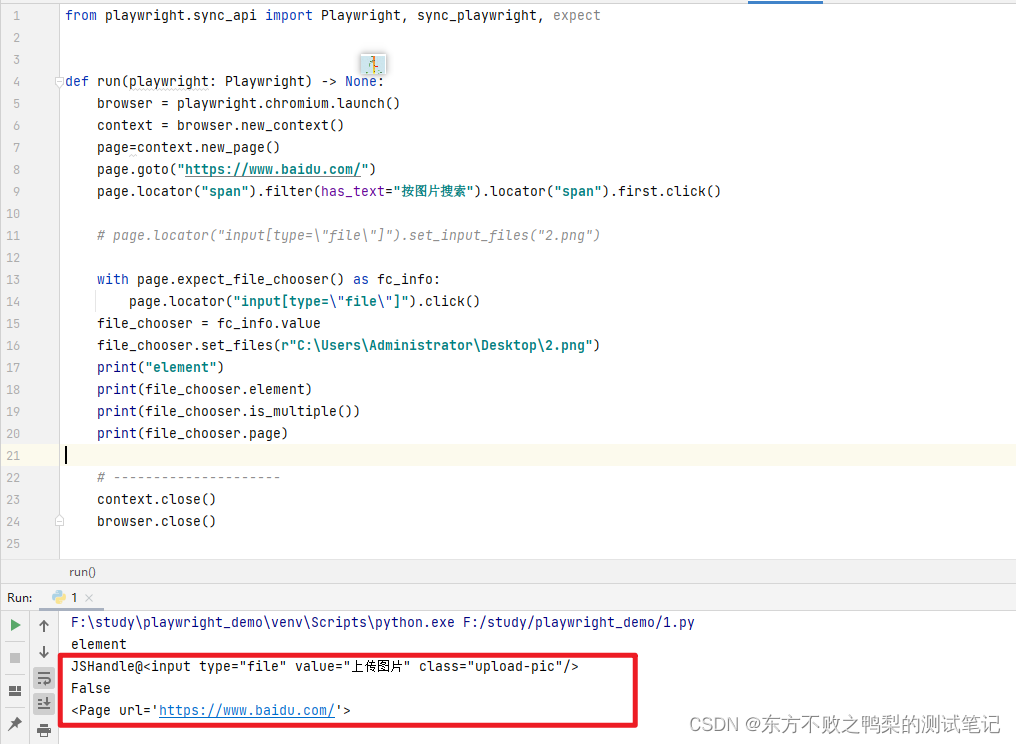
最强自动化测试框架Playwright(29)-文件选择对象
FileChooser对象通过page.on("filechoose")事件监听。 如下代码实现点击百度搜图按钮,上传文件进行搜索。 from playwright.sync_api import Playwright, sync_playwright, expectdef run(playwright: Playwright) -> None:browser playwright.chro…...

【烂尾】K8S部署
0x01 初见K8S 在地下城的迷宫深处,有一个神奇的存在,它就是Kubernetes!宛如一个勇敢的冒险者,它穿越着这个复杂的迷宫,带领着容器们战胜各种惊险的挑战。 Kubernetes就像是一位无所畏惧的剑士,手握着强大…...
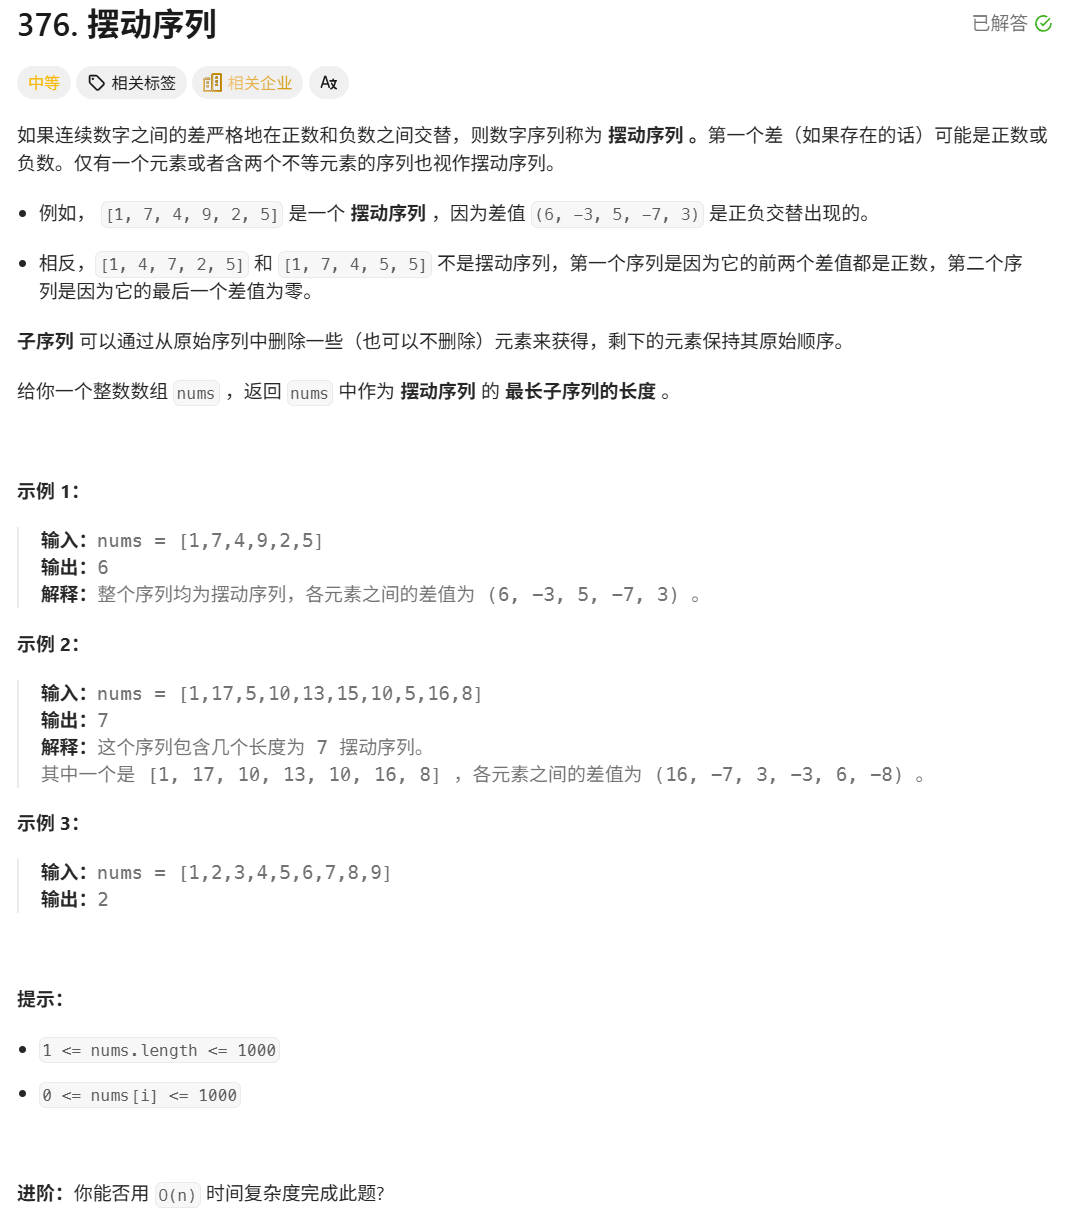
376. Wiggle Subsequence
376. Wiggle Subsequence 代码 class Solution { public:int wiggleMaxLength(vector<int>& nums) {int n nums.size();int res 1;int prediff 0;int curdiff 0;for(int i 0;i < n-1;i){curdiff nums[i1] - nums[i];if( (prediff > 0 && curdif…...
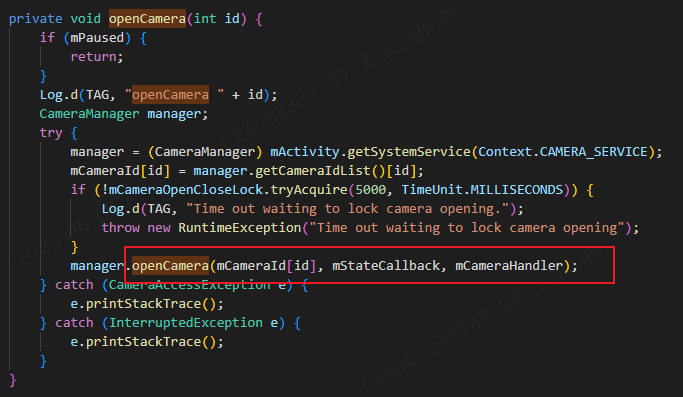
相机从app启动流程
一、流程框架图 二、具体流程分析 1、得到cameralist和对应的静态信息 目录如下: 重点代码分析: 启动相机前,先要通过getCameraIdList获取camera的个数以及id,然后可以通过getCameraCharacteristics获取对应id camera的capabilities(静态信息)进行一些openCamera前的…...
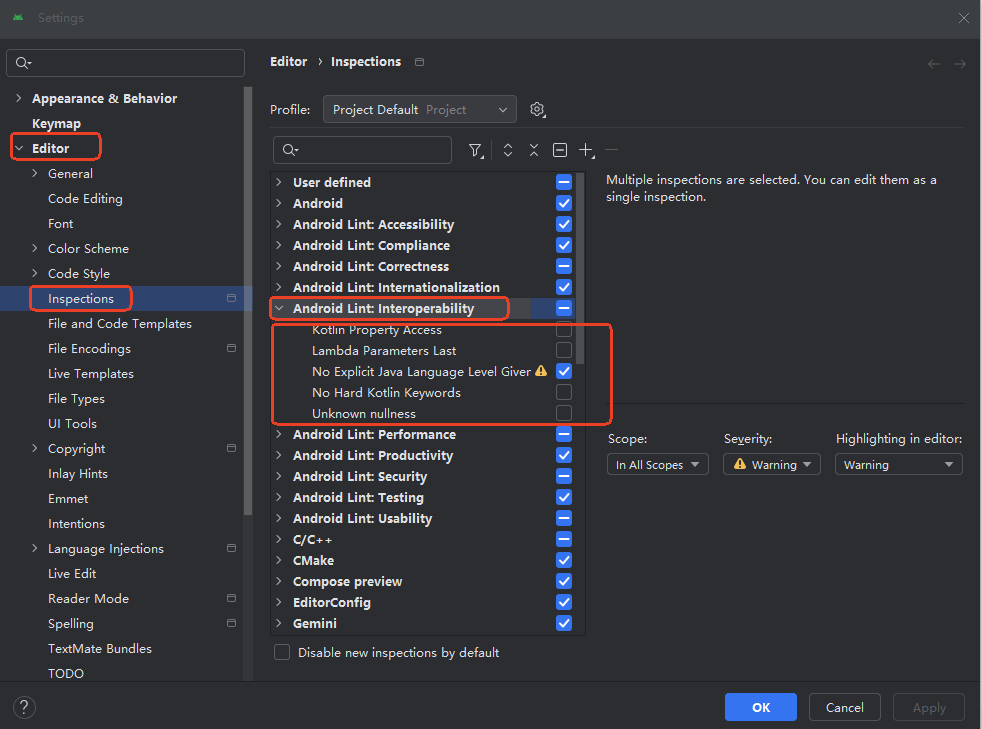
Android 之 kotlin 语言学习笔记三(Kotlin-Java 互操作)
参考官方文档:https://developer.android.google.cn/kotlin/interop?hlzh-cn 一、Java(供 Kotlin 使用) 1、不得使用硬关键字 不要使用 Kotlin 的任何硬关键字作为方法的名称 或字段。允许使用 Kotlin 的软关键字、修饰符关键字和特殊标识…...

安宝特方案丨船舶智造的“AR+AI+作业标准化管理解决方案”(装配)
船舶制造装配管理现状:装配工作依赖人工经验,装配工人凭借长期实践积累的操作技巧完成零部件组装。企业通常制定了装配作业指导书,但在实际执行中,工人对指导书的理解和遵循程度参差不齐。 船舶装配过程中的挑战与需求 挑战 (1…...
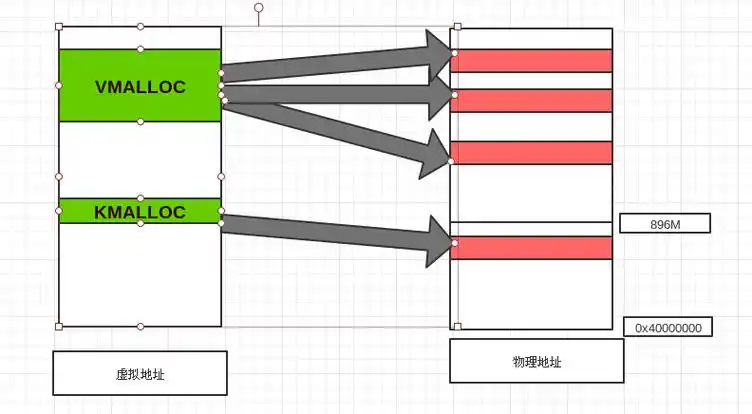
Linux 内存管理实战精讲:核心原理与面试常考点全解析
Linux 内存管理实战精讲:核心原理与面试常考点全解析 Linux 内核内存管理是系统设计中最复杂但也最核心的模块之一。它不仅支撑着虚拟内存机制、物理内存分配、进程隔离与资源复用,还直接决定系统运行的性能与稳定性。无论你是嵌入式开发者、内核调试工…...

Java求职者面试指南:计算机基础与源码原理深度解析
Java求职者面试指南:计算机基础与源码原理深度解析 第一轮提问:基础概念问题 1. 请解释什么是进程和线程的区别? 面试官:进程是程序的一次执行过程,是系统进行资源分配和调度的基本单位;而线程是进程中的…...

MySQL 部分重点知识篇
一、数据库对象 1. 主键 定义 :主键是用于唯一标识表中每一行记录的字段或字段组合。它具有唯一性和非空性特点。 作用 :确保数据的完整性,便于数据的查询和管理。 示例 :在学生信息表中,学号可以作为主键ÿ…...

Python竞赛环境搭建全攻略
Python环境搭建竞赛技术文章大纲 竞赛背景与意义 竞赛的目的与价值Python在竞赛中的应用场景环境搭建对竞赛效率的影响 竞赛环境需求分析 常见竞赛类型(算法、数据分析、机器学习等)不同竞赛对Python版本及库的要求硬件与操作系统的兼容性问题 Pyth…...

机器学习的数学基础:线性模型
线性模型 线性模型的基本形式为: f ( x ) ω T x b f\left(\boldsymbol{x}\right)\boldsymbol{\omega}^\text{T}\boldsymbol{x}b f(x)ωTxb 回归问题 利用最小二乘法,得到 ω \boldsymbol{\omega} ω和 b b b的参数估计$ \boldsymbol{\hat{\omega}}…...

大数据治理的常见方式
大数据治理的常见方式 大数据治理是确保数据质量、安全性和可用性的系统性方法,以下是几种常见的治理方式: 1. 数据质量管理 核心方法: 数据校验:建立数据校验规则(格式、范围、一致性等)数据清洗&…...
