Kubernetes+EFK构建日志分析平台
目录
Elasticsearch产品介绍
Fluentd 工作原理
Kibana产品介绍
一、环境准备
前三个主机都要操作
1、主机初始化配置
2、部署docker环境
2、部署kubernetes集群
2.1、组件介绍
2.2、配置阿里云yum源
2.3、安装kubelet kubeadm kubectl
2.4、配置init-config.yaml
2.5、安装master节点
2.6、安装node节点
2.7、安装flannel
3、部署企业镜像仓库
3.1、部署Harbor仓库
3.2、导入EFK镜像
4、部署EFK业务环境
4.1、准备组件Yaml文件
4.2、部署Elasticsearch
4.3、部署kibana
4.4、部署Fluentd
4.5、验证容器日志收集
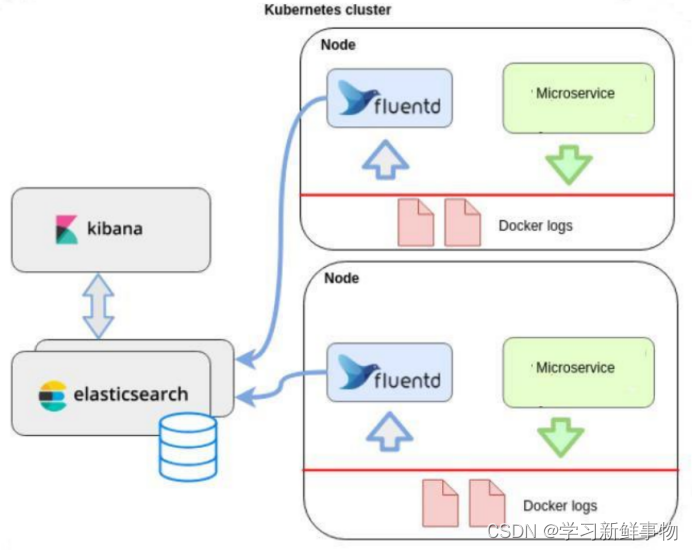
随着 Docker 容器及云原生相关技术的迅速发展,国内外厂商开始逐步向云原生方向转型。其中以 Kubernetes 为代表性的云原生技术凭借强大的功能成为各大厂商的第一选择。由于 Kubernetes 在容器编排领域的强势领先,使得越来越多的企业将业务迁至基于 Docker+Kubernetes 技术栈打造的容器管理平台,所以在 Kubernetes 集群环境下如何打造高效、可靠的业务日志收集系统也成为企业必须面临的问题。本章将主要介绍基于Elasticsearch、Fluentd 和 Kibana(EFK)技术栈实现完整 Kubernetes 集群日志收集解决方案。
Elasticsearch产品介绍
Elasticsearch 是一个 Restful 风格的、开源的分布式搜索引擎,具备搜索和数据分析功能,它的底层是开源库 Apache Lucene。Elasticsearch 具有如下特点。
- 一个分布式的实时文档存储,每个字段可以被索引与搜索;
- 一个分布式实时分析搜索引擎;
- 能支撑上百个服务节点的扩展,并支持 PB 级别的结构化或者非结构化数据。
Fluentd 工作原理
Fluentd 是一个日志的收集、处理、转发系统。通过丰富的插件,可以收集来自各种系统或应用的日志,转化为用户指定的格式后,转发到用户所指定的日志存储系统中。

Fluentd 通过一组给定的数据源抓取日志数据,处理后(转换成结构化的数据格式)将它们转发给其他服务,比如 Elasticsearch、对象存储等等。Fluentd 支持超过 300 个日志存储和分析服务,所以对日志存储和分析服务的支持是非常灵活的。Fluentd 采用了插件式的架构,具有高可扩展性及高可用性,同时还实现了高可靠的信息转发。其主要运行步骤如下所示:
(1)首先 Fluentd 从多个日志源获取数据。
(2)结构化并且标记这些数据。
(3)最后根据匹配的标签将数据发送到多个目标服务。
Kibana产品介绍
Kibana 是一个开源的可视化分析平台,用于和 Elasticsearch 一起工作。可以通过Kibana 搜索、查看、交互存放在 Elasticsearch 索引中的数据。也可以轻松地执行高级数据分析,并且以各种图表、表格和地图的形式可视化数据。Kibana 简单的、基于浏览器的界面便于对大量数据进行呈现,能够快速创建和共享动态仪表板,实时显示 Elasticsearch 查询的变化。
一、环境准备
| 操作系统 | IP地址 | 主机名 | 组件 |
| CentOS7.x | 192.168.50.54 | k8s-master | kubeadm、kubelet、kubectl、docker-ce |
| CentOS7.x | 192.168.50.51 | k8s-node01 | kubeadm、kubelet、kubectl、docker-ce、elasticsearch、fluentd |
| CentOS7.x | 192.168.50.50 | k8s-node02 | kubeadm、kubelet、kubectl、docker-ce、kibana、fluentd |
| CentOS7.x | 192.168.50.54 | harbor | docker-ce、docker-compose、harbor |
注意:所有主机配置推荐CPU:2C+ Memory:4G+、运行 Elasticsearch 的节点要有足够的内存(不低于 4GB)。若 Elasticsearch 容器退出,请检查宿主机中的/var/log/message 日志,观察是否因为系统 OOM 导致进程被杀掉。
项目拓扑
前三个主机都要操作
1、主机初始化配置
所有主机配置禁用防火墙和selinux
[root@localhost ~]# setenforce 0
[root@localhost ~]# iptables -F
[root@localhost ~]# systemctl stop firewalld
[root@localhost ~]# systemctl disable firewalld
Removed symlink /etc/systemd/system/multi-user.target.wants/firewalld.service.
Removed symlink /etc/systemd/system/dbus-org.fedoraproject.FirewallD1.service.
[root@localhost ~]# systemctl stop NetworkManager
[root@localhost ~]# systemctl disable NetworkManager
Removed symlink /etc/systemd/system/multi-user.target.wants/NetworkManager.service.
Removed symlink /etc/systemd/system/dbus-org.freedesktop.nm-dispatcher.service.
Removed symlink /etc/systemd/system/network-online.target.wants/NetworkManager-wait-online.service.
[root@localhost ~]# sed -i '/^SELINUX=/s/enforcing/disabled/' /etc/selinux/config
配置主机名并绑定hosts,不同主机名称不同
[root@localhost ~]# hostname k8s-master
[root@localhost ~]# bash
[root@k8s-master ~]# cat << EOF >> /etc/hosts
> 192.168.50.53 k8s-master
> 192.168.50.51 k8s-node01
> 192.168.50.50 k8s-node02
> EOF
主机配置初始化
[root@k8s-master ~]# yum -y install vim wget net-tools lrzsz
[root@k8s-master ~]# swapoff -a
[root@k8s-master ~]# sed -i '/swap/s/^/#/' /etc/fstab
[root@k8s-master ~]# cat << EOF >> /etc/sysctl.conf
> net.bridge.bridge-nf-call-ip6tables = 1
> net.bridge.bridge-nf-call-iptables = 1
> EOF
[root@k8s-master ~]# modprobe br_netfilter
[root@k8s-master ~]# sysctl -p
net.bridge.bridge-nf-call-ip6tables = 1
net.bridge.bridge-nf-call-iptables = 1
2、部署docker环境
三台主机上分别部署 Docker 环境,因为 Kubernetes 对容器的编排需要 Docker 的支持。
[root@k8s-master ~]# wget -O /etc/yum.repos.d/CentOS-Base.repo http://mirrors.aliyun.com/repo/Centos-7.repo
[root@k8s-master ~]# yum install -y yum-utils device-mapper-persistent-data lvm2[root@k8s-master ~]# yum-config-manager --add-repo https://mirrors.aliyun.com/docker-ce/linux/centos/docker-ce.repo
[root@k8s-master ~]# yum clean all && yum makecache fast
root@k8s-master ~]# yum -y install docker-ce
[root@k8s-master ~]# systemctl start docker
[root@k8s-master ~]# systemctl enable docker
Created symlink from /etc/systemd/system/multi-user.target.wants/docker.service to /usr/lib/systemd/system/docker.service.
镜像加速器(所有主机配置)
[root@k8s-master ~]# systemctl daemon-reload
[root@k8s-master ~]# systemctl restart docker
[root@k8s-master ~]# cat << END > /etc/docker/daemon.json
> {
> "registry-mirrors":[ "https://nyakyfun.mirror.aliyuncs.com" ]
> }
> END
[root@k8s-master ~]# systemctl daemon-reload
[root@k8s-master ~]# systemctl restart docker
2、部署kubernetes集群
2.1、组件介绍
三个节点都需要安装下面三个组件
- kubeadm:安装工具,使所有的组件都会以容器的方式运行
- kubectl:客户端连接K8S API工具
- kubelet:运行在node节点,用来启动容器的工具
2.2、配置阿里云yum源
使用 YUM 方式安装 Kubernetes时,推荐使用阿里的 YUM 源。
[root@k8s-master ~]# cat <<EOF > /etc/yum.repos.d/kubernetes.repo
> [kubernetes]
> name=Kubernetes
> baseurl=https://mirrors.aliyun.com/kubernetes/yum/repos/kubernetes-el7-x86_64/
> enabled=1
> gpgcheck=1
> repo_gpgcheck=1
> gpgkey=https://mirrors.aliyun.com/kubernetes/yum/doc/yum-key.gpg
> https://mirrors.aliyun.com/kubernetes/yum/doc/rpm-package-key.gpg
> EOF
2.3、安装kubelet kubeadm kubectl
所有主机配置
[root@k8s-master ~]# yum install -y kubelet-1.20.0 kubeadm-1.20.0 kubectl-1.20.0
[root@k8s-master ~]# systemctl enable kubelet
Created symlink from /etc/systemd/system/multi-user.target.wants/kubelet.service to /usr/lib/systemd/system/kubelet.service.
kubelet 刚安装完成后,通过 systemctl start kubelet 方式是无法启动的,需要加入节点或初始化为 master 后才可启动成功。
Kubeadm 提供了很多配置项,Kubeadm 配置在 Kubernetes 集群中是存储在ConfigMap 中的,也可将这些配置写入配置文件,方便管理复杂的配置项。Kubeadm 配内容是通过 kubeadm config 命令写入配置文件的。
在master节点安装,master 定于为192.168.50.53,通过如下指令创建默认的init-config.yaml文件:
2.4、配置init-config.yaml
[root@k8s-master ~]# kubeadm config print init-defaults > init-config.yaml
[root@k8s-master ~]# vim init-config.yaml
1 apiVersion: kubeadm.k8s.io/v1beta2
2 bootstrapTokens:
3 - groups:
4 - system:bootstrappers:kubeadm:default-node-token
5 token: abcdef.0123456789abcdef
6 ttl: 24h0m0s
7 usages:
8 - signing
9 - authentication
10 kind: InitConfiguration
11 localAPIEndpoint:
12 advertiseAddress: 192.168.50.53 //master节点IP地址
13 bindPort: 6443
14 nodeRegistration:
15 criSocket: /var/run/dockershim.sock
16 name: k8s-master
17 taints:
18 - effect: NoSchedule
19 key: node-role.kubernetes.io/master
20 ---
21 apiServer:
22 timeoutForControlPlane: 4m0s
23 apiVersion: kubeadm.k8s.io/v1beta2
24 certificatesDir: /etc/kubernetes/pki
25 clusterName: kubernetes
26 controllerManager: {}
27 dns:
28 type: CoreDNS
29 etcd:
30 local:
31 dataDir: /var/lib/etcd
32 imageRepository: registry.aliyuncs.com/google_containers //修改为国内地址
33 kind: ClusterConfiguration
34 kubernetesVersion: v1.20.0
35 networking:
36 dnsDomain: cluster.local
37 serviceSubnet: 10.96.0.0/12
38 podSubnet: 10.244.0.0/16 //新增加 Pod 网段
39 scheduler: {}
2.5、安装master节点
拉取所需镜像
[root@k8s-master ~]# kubeadm config images list --config init-config.yaml
registry.aliyuncs.com/google_containers/kube-apiserver:v1.20.0
registry.aliyuncs.com/google_containers/kube-controller-manager:v1.20.0
registry.aliyuncs.com/google_containers/kube-scheduler:v1.20.0
registry.aliyuncs.com/google_containers/kube-proxy:v1.20.0
registry.aliyuncs.com/google_containers/pause:3.2
registry.aliyuncs.com/google_containers/etcd:3.4.13-0
registry.aliyuncs.com/google_containers/coredns:1.7.0
[root@k8s-master ~]# kubeadm config images pull --config=init-config.yaml
[config/images] Pulled registry.aliyuncs.com/google_containers/kube-apiserver:v1.20.0
[config/images] Pulled registry.aliyuncs.com/google_containers/kube-controller-manager:v1.20.0
[config/images] Pulled registry.aliyuncs.com/google_containers/kube-scheduler:v1.20.0
[config/images] Pulled registry.aliyuncs.com/google_containers/kube-proxy:v1.20.0
[config/images] Pulled registry.aliyuncs.com/google_containers/pause:3.2
[config/images] Pulled registry.aliyuncs.com/google_containers/etcd:3.4.13-0
[config/images] Pulled registry.aliyuncs.com/google_containers/coredns:1.7.0
[root@k8s-master ~]# ls | while read line
> do
> docker load < $line
> done
archive/tar: invalid tar header
archive/tar: invalid tar header
[root@k8s-master ~]# kubeadm init --config=init-config.yaml 初始化安装K8S
[root@k8s-master ~]# kubeadm config images list --config init-config.yaml
registry.aliyuncs.com/google_containers/kube-apiserver:v1.20.0
registry.aliyuncs.com/google_containers/kube-controller-manager:v1.20.0
registry.aliyuncs.com/google_containers/kube-scheduler:v1.20.0
registry.aliyuncs.com/google_containers/kube-proxy:v1.20.0
registry.aliyuncs.com/google_containers/pause:3.2
registry.aliyuncs.com/google_containers/etcd:3.4.13-0
registry.aliyuncs.com/google_containers/coredns:1.7.0
[root@k8s-master ~]# kubeadm config images pull --config=init-config.yaml
[config/images] Pulled registry.aliyuncs.com/google_containers/kube-apiserver:v1.20.0
[config/images] Pulled registry.aliyuncs.com/google_containers/kube-controller-manager:v1.20.0
[config/images] Pulled registry.aliyuncs.com/google_containers/kube-scheduler:v1.20.0
[config/images] Pulled registry.aliyuncs.com/google_containers/kube-proxy:v1.20.0
[config/images] Pulled registry.aliyuncs.com/google_containers/pause:3.2
[config/images] Pulled registry.aliyuncs.com/google_containers/etcd:3.4.13-0
[config/images] Pulled registry.aliyuncs.com/google_containers/coredns:1.7.0
[root@k8s-master ~]# ls | while read line
> do
> docker load < $line
> done
archive/tar: invalid tar header
archive/tar: invalid tar header
[root@k8s-master ~]# kubeadm init --config=init-config.yaml
根据最下面提示操作
kubectl 默认会在执行的用户家目录下面的.kube 目录下寻找config 文件。这里是将在初始化时[kubeconfig]步骤生成的admin.conf 拷贝到.kube/config
Your Kubernetes control-plane has initialized successfully!
To start using your cluster, you need to run the following as a regular user:
mkdir -p $HOME/.kube
sudo cp -i /etc/kubernetes/admin.conf $HOME/.kube/config
sudo chown $(id -u):$(id -g) $HOME/.kube/config
Alternatively, if you are the root user, you can run:
export KUBECONFIG=/etc/kubernetes/admin.conf
You should now deploy a pod network to the cluster.
Run "kubectl apply -f [podnetwork].yaml" with one of the options listed at:
https://kubernetes.io/docs/concepts/cluster-administration/addons/
Then you can join any number of worker nodes by running the following on each as root:
kubeadm join 192.168.50.53:6443 --token abcdef.0123456789abcdef \
--discovery-token-ca-cert-hash sha256:1b3e2037ebc4179efc8b4b678fd5a7d50a7d1e3afa197364bf2792c45b72f29e
[root@k8s-master ~]# mkdir -p $HOME/.kube
[root@k8s-master ~]# sudo cp -i /etc/kubernetes/admin.conf $HOME/.kube/config
[root@k8s-master ~]# sudo chown $(id -u):$(id -g) $HOME/.kube/config
2.6、安装node节点
根据master安装时的提示信息
[root@k8s-node01 ~]# kubeadm join 192.168.50.53:6443 --token abcdef.0123456789abcdef \
> --discovery-token-ca-cert-hash sha256:1b3e2037ebc4179efc8b4b678fd5a7d50a7d1e3afa197364bf2792c45b72f29e
[preflight] Running pre-flight checks
[WARNING IsDockerSystemdCheck]: detected "cgroupfs" as the Docker cgroup driver. The recommended driver is "systemd". Please follow the guide at https://kubernetes.io/docs/setup/cri/
[WARNING SystemVerification]: this Docker version is not on the list of validated versions: 24.0.5. Latest validated version: 19.03
[preflight] Reading configuration from the cluster...
[preflight] FYI: You can look at this config file with 'kubectl -n kube-system get cm kubeadm-config -o yaml'
[kubelet-start] Writing kubelet configuration to file "/var/lib/kubelet/config.yaml"
[kubelet-start] Writing kubelet environment file with flags to file "/var/lib/kubelet/kubeadm-flags.env"
[kubelet-start] Starting the kubelet
[kubelet-start] Waiting for the kubelet to perform the TLS Bootstrap...
This node has joined the cluster:
* Certificate signing request was sent to apiserver and a response was received.
* The Kubelet was informed of the new secure connection details.
Run 'kubectl get nodes' on the control-plane to see this node join the cluster.
[root@k8s-node02 ~]# kubeadm join 192.168.50.53:6443 --token abcdef.0123456789abcdef \
> --discovery-token-ca-cert-hash sha256:1b3e2037ebc4179efc8b4b678fd5a7d50a7d1e3afa197364bf2792c45b72f29e
[preflight] Running pre-flight checks
[WARNING IsDockerSystemdCheck]: detected "cgroupfs" as the Docker cgroup driver. The recommended driver is "systemd". Please follow the guide at https://kubernetes.io/docs/setup/cri/
[WARNING SystemVerification]: this Docker version is not on the list of validated versions: 24.0.5. Latest validated version: 19.03
[preflight] Reading configuration from the cluster...
[preflight] FYI: You can look at this config file with 'kubectl -n kube-system get cm kubeadm-config -o yaml'
[kubelet-start] Writing kubelet configuration to file "/var/lib/kubelet/config.yaml"
[kubelet-start] Writing kubelet environment file with flags to file "/var/lib/kubelet/kubeadm-flags.env"
[kubelet-start] Starting the kubelet
[kubelet-start] Waiting for the kubelet to perform the TLS Bootstrap...
This node has joined the cluster:
* Certificate signing request was sent to apiserver and a response was received.
* The Kubelet was informed of the new secure connection details.
Run 'kubectl get nodes' on the control-plane to see this node join the cluster.
前面已经提到,在初始化 k8s-master 时并没有网络相关配置,所以无法跟 node 节点通信,因此状态都是“NotReady”。但是通过 kubeadm join 加入的 node 节点已经在k8s-master 上可以看到。
[root@k8s-master ~]# kubectl get nodes
NAME STATUS ROLES AGE VERSION
k8s-master NotReady control-plane,master 2m49s v1.20.0
k8s-node01 NotReady <none> 42s v1.20.0
k8s-node02 NotReady <none> 39s v1.20.0
2.7、安装flannel
Master 节点NotReady 的原因就是因为没有使用任何的网络插件,此时Node 和Master的连接还不正常。目前最流行的Kubernetes 网络插件有Flannel、Calico、Canal、Weave 这里选择使用flannel。
所有主机上传flannel_v0.12.0-amd64.tar
[root@k8s-master ~]# docker load < flannel_v0.12.0-amd64.tar
256a7af3acb1: Loading layer 5.844MB/5.844MB
d572e5d9d39b: Loading layer 10.37MB/10.37MB
57c10be5852f: Loading layer 2.249MB/2.249MB
7412f8eefb77: Loading layer 35.26MB/35.26MB
05116c9ff7bf: Loading layer 5.12kB/5.12kB
Loaded image: quay.io/coreos/flannel:v0.12.0-amd64
[root@k8s-master ~]# kubectl apply -f kube-flannel.yml
podsecuritypolicy.policy/psp.flannel.unprivileged created
Warning: rbac.authorization.k8s.io/v1beta1 ClusterRole is deprecated in v1.17+, unavailable in v1.22+; use rbac.authorization.k8s.io/v1 ClusterRole
clusterrole.rbac.authorization.k8s.io/flannel created
Warning: rbac.authorization.k8s.io/v1beta1 ClusterRoleBinding is deprecated in v1.17+, unavailable in v1.22+; use rbac.authorization.k8s.io/v1 ClusterRoleBinding
clusterrolebinding.rbac.authorization.k8s.io/flannel created
serviceaccount/flannel created
configmap/kube-flannel-cfg created
daemonset.apps/kube-flannel-ds-amd64 created
daemonset.apps/kube-flannel-ds-arm64 created
daemonset.apps/kube-flannel-ds-arm created
daemonset.apps/kube-flannel-ds-ppc64le created
daemonset.apps/kube-flannel-ds-s390x created
[root@k8s-master ~]# tar xf cni-plugins-linux-amd64-v0.8.6.tgz
[root@k8s-master ~]# cp flannel /opt/cni/bin/
[root@k8s-master ~]# kubectl get nodes
NAME STATUS ROLES AGE VERSION
k8s-master Ready control-plane,master 6m11s v1.20.0
k8s-node01 Ready <none> 4m4s v1.20.0
k8s-node02 Ready <none> 4m1s v1.20.0
[root@k8s-master ~]# kubectl get pods -n kube-system
NAME READY STATUS RESTARTS AGE
coredns-7f89b7bc75-8gh6f 1/1 Running 0 6m44s
coredns-7f89b7bc75-dtclj 1/1 Running 0 6m44s
etcd-k8s-master 1/1 Running 0 6m53s
kube-apiserver-k8s-master 1/1 Running 0 6m53s
kube-controller-manager-k8s-master 1/1 Running 0 6m53s
kube-flannel-ds-amd64-4tvdv 1/1 Running 0 2m53s
kube-flannel-ds-amd64-k54sk 1/1 Running 0 2m53s
kube-flannel-ds-amd64-tm7dp 1/1 Running 0 2m53s
kube-proxy-hf2p2 1/1 Running 0 6m44s
kube-proxy-pr5np 1/1 Running 0 4m55s
kube-proxy-zqrmf 1/1 Running 0 4m52s
kube-scheduler-k8s-master 1/1 Running 0 6m53s
已经是ready状态
3、部署企业镜像仓库
3.1、部署Harbor仓库
所有主机配置禁用防火墙和selinux
[root@localhost ~]# setenforce 0
[root@localhost ~]# iptables -F
[root@localhost ~]# systemctl stop firewalld
[root@localhost ~]# systemctl disable firewalld
Removed symlink /etc/systemd/system/multi-user.target.wants/firewalld.service.
Removed symlink /etc/systemd/system/dbus-org.fedoraproject.FirewallD1.service.
[root@localhost ~]# setenforce 0
[root@localhost ~]# iptables -F
[root@localhost ~]# systemctl stop firewalld
[root@localhost ~]# systemctl disable firewalld
[root@localhost ~]# systemctl stop NetworkManager
[root@localhost ~]# systemctl disable NetworkManager
Removed symlink /etc/systemd/system/multi-user.target.wants/NetworkManager.service.
Removed symlink /etc/systemd/system/dbus-org.freedesktop.nm-dispatcher.service.
Removed symlink /etc/systemd/system/network-online.target.wants/NetworkManager-wait-online.service.
[root@localhost ~]# sed -i '/^SELINUX=/s/enforcing/disabled/' /etc/selinux/config
配置主机名
[root@localhost ~]# hostname harbor
[root@localhost ~]# bash
部署docker环境
Harbor 仓库需要 Docker 容器支持,所以 Docker 环境是必不可少的。
[root@harbor ~]#wget -O /etc/yum.repos.d/CentOS-Base.repo http://mirrors.aliyun.com/repo/Centos-7.repo
[root@harbor ~]# yum install -y yum-utils device-mapper-persistent-data lvm2
使用 YUM 方式安装 Docker 时,推荐使用阿里的 YUM 源。
[root@harbor ~]# yum-config-manager --add-repo https://mirrors.aliyun.com/docker-ce/linux/centos/docker-ce.repo
[root@harbor ~]# yum clean all && yum makecache fast
[root@harbor ~]# yum -y install docker-ce
[root@harbor ~]# systemctl start docker
[root@harbor ~]# systemctl enable docker
镜像加速器(所有主机配置)
[root@k8s-master ~]# cat << END > /etc/docker/daemon.json
> {
> "registry-mirrors":[ "https://nyakyfun.mirror.aliyuncs.com" ]
> }
> END
[root@k8s-master ~]# systemctl daemon-reload
[root@k8s-master ~]# systemctl restart docker
部署docker-compose
[root@harbor ~]# mv docker-compose /usr/local/bin/
[root@harbor ~]# chmod +x /usr/local/bin/docker-compose
部署harbor
Harbor 私有仓库程序采用 docker-compose 方式部署,不同的功能和应用处于不同的容器,这样带来了很好的兼容性,可在众多支持 Docker 的系统上运行 Harbor。
[root@harbor ~]# tar xf harbor-offline-installer-v2.0.0.tgz -C /usr/local/
[root@harbor harbor]# vim /usr/local/harbor/harbor.yml
Harbor 的配置文件是/usr/local/harbor/harbor.yml 文件,默认的 hostname 要修改为
Harbor 虚拟机节点的 IP 地址。
# Configuration file of Harbor
# The IP address or hostname to access admin UI and registry service.
# DO NOT use localhost or 127.0.0.1, because Harbor needs to be accessed by external clients.
hostname: 192.168.50.54
# http related config
http:
# port for http, default is 80. If https enabled, this port will redirect to https port
port: 80
# https related config
#https:
# https port for harbor, default is 443
# port: 443
# The path of cert and key files for nginx
# certificate: /your/certificate/path
# private_key: /your/private/key/path
启动harbor
[root@harbor ~]# cd /usr/local/harbor/
只有harbor.yml.tmpl给他改名就行了
[root@harbor harbor]# mv harbor.yml.tmpl harbor.yml
[root@harbor harbor]# sh install.sh
[Step 0]: checking if docker is installed ...
Note: docker version: 24.0.5
[Step 1]: checking docker-compose is installed ...
Note: docker-compose version: 1.21.1
[Step 2]: loading Harbor images ...
Loaded image: goharbor/notary-signer-photon:v2.0.0
Loaded image: goharbor/clair-adapter-photon:v2.0.0
Loaded image: goharbor/chartmuseum-photon:v2.0.0
Loaded image: goharbor/harbor-log:v2.0.0
Loaded image: goharbor/harbor-registryctl:v2.0.0
Loaded image: goharbor/registry-photon:v2.0.0
Loaded image: goharbor/clair-photon:v2.0.0
Loaded image: goharbor/notary-server-photon:v2.0.0
Loaded image: goharbor/redis-photon:v2.0.0
Loaded image: goharbor/nginx-photon:v2.0.0
Loaded image: goharbor/harbor-core:v2.0.0
Loaded image: goharbor/harbor-db:v2.0.0
Loaded image: goharbor/harbor-jobservice:v2.0.0
Loaded image: goharbor/trivy-adapter-photon:v2.0.0
Loaded image: goharbor/prepare:v2.0.0
Loaded image: goharbor/harbor-portal:v2.0.0
[Step 3]: preparing environment ...
[Step 4]: preparing harbor configs ...
prepare base dir is set to /usr/local/harbor
WARNING:root:WARNING: HTTP protocol is insecure. Harbor will deprecate http protocol in the future. Please make sure to upgrade to https
Generated configuration file: /config/log/logrotate.conf
Generated configuration file: /config/log/rsyslog_docker.conf
Generated configuration file: /config/nginx/nginx.conf
Generated configuration file: /config/core/env
Generated configuration file: /config/core/app.conf
Generated configuration file: /config/registry/config.yml
Generated configuration file: /config/registryctl/env
Generated configuration file: /config/registryctl/config.yml
Generated configuration file: /config/db/env
Generated configuration file: /config/jobservice/env
Generated configuration file: /config/jobservice/config.yml
Generated and saved secret to file: /data/secret/keys/secretkey
Successfully called func: create_root_cert
Generated configuration file: /compose_location/docker-compose.yml
Clean up the input dir
[Step 5]: starting Harbor ...
Creating network "harbor_harbor" with the default driver
Creating harbor-log ... done
Creating registry ... done
Creating harbor-db ... done
Creating harbor-portal ... done
Creating redis ... done
Creating registryctl ... done
Creating harbor-core ... done
Creating nginx ... done
Creating harbor-jobservice ... done
✔ ----Harbor has been installed and started successfully.----
查看都是up
[root@harbor harbor]# docker-compose ps
Name Command State Ports
-------------------------------------------------------------------------------------------------------
harbor-core /harbor/entrypoint.sh Up (healthy)
harbor-db /docker-entrypoint.sh Up (healthy) 5432/tcp
harbor-jobservice /harbor/entrypoint.sh Up (healthy)
harbor-log /bin/sh -c /usr/local/bin/ ... Up (healthy) 127.0.0.1:1514->10514/tcp
harbor-portal nginx -g daemon off; Up (healthy) 8080/tcp
nginx nginx -g daemon off; Up (healthy) 0.0.0.0:80->8080/tcp,:::80->8080/tc
p
redis redis-server /etc/redis.conf Up (healthy) 6379/tcp
registry /home/harbor/entrypoint.sh Up (healthy) 5000/tcp
registryctl /home/harbor/start.sh Up (healthy)
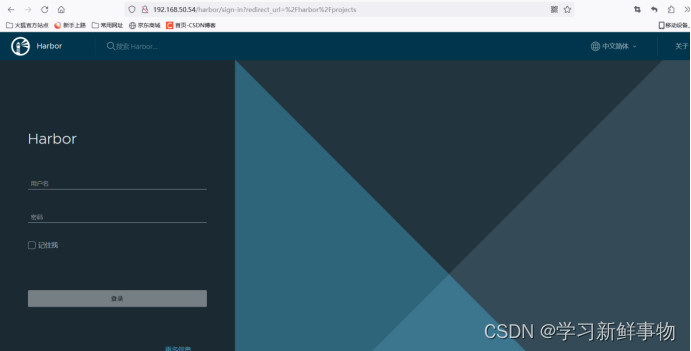
Harbor 启动完成后,浏览器访问 http://192.168.50.54,打开 Harbor Web 页面
用户名admin 密码Harbor12345


修改所有主机docker启动脚本
[root@k8s-master ~]# vim /usr/lib/systemd/system/docker.service
13 ExecStart=/usr/bin/dockerd -H fd:// --containerd=/run/containerd/containerd.sock --insecure-registr 192.168.50.54
重启服务
[root@k8s-master ~]# systemctl daemon-reload
[root@k8s-master ~]# systemctl restart docker
3.2、导入EFK镜像
[root@harbor ~]# docker login -u admin -p Harbor12345 http://192.168.50.54
WARNING! Using --password via the CLI is insecure. Use --password-stdin.
WARNING! Your password will be stored unencrypted in /root/.docker/config.json.
Configure a credential helper to remove this warning. See
https://docs.docker.com/engine/reference/commandline/login/#credentials-storeLogin Succeeded
[root@harbor ~]# docker load < elasticsearch-7.4.2.tar
[root@harbor ~]# docker load < fluentd-es.tar
[root@harbor ~]# docker load < kibana-7.4.2.tar
[root@harbor ~]# docker load < alpine-3.6.tar
[root@harbor ~]# docker tag b1179d 192.168.50.54/efk/elasticsearch:7.4.2
[root@harbor ~]# docker tag 636f3d 192.168.50.54/efk/fluentd-es-root:v2.5.2
[root@harbor ~]# docker tag 230d3d 192.168.50.54/efk/kibana:7.4.2
[root@harbor ~]# docker tag 43773d 192.168.50.54/efk/alpine:3.6[root@harbor ~]# docker push 192.168.50.54/efk/elasticsearch:7.4.2
[root@harbor ~]# docker push 192.168.50.54/efk/fluentd-es-root:v2.5.2
[root@harbor ~]# docker push 192.168.50.54/efk/kibana:7.4.2
[root@harbor ~]# docker push 192.168.50.54/efk/alpine:3.6访问存在

4、部署EFK业务环境
4.1、准备组件Yaml文件
[root@k8s-master ~]# mkdir /opt/efk
[root@k8s-master ~]# cd /opt/efk/[root@k8s-master efk]# grep "image:" elasticsearch.yaml
image: 192.168.50.54/efk/elasticsearch:7.4.2
image: 192.168.50.54/efk/alpine:3.6
image: 192.168.50.54/efk/alpine:3.6
[root@k8s-master efk]# grep -A1 "nodeSelector" elasticsearch.yaml
nodeSelector:
kubernetes.io/hostname: k8s-node01
[root@k8s-master efk]# vim kibana.yaml
[root@k8s-master efk]# grep "image:" kibana.yaml
image: 192.168.50.54/efk/kibana:7.4.2
[root@k8s-master efk]# grep -A1 "nodeSelector" kibana.yaml
nodeSelector:
kubernetes.io/hostname: k8s-node02
[root@k8s-master efk]# vim fluentd
[root@k8s-master efk]# vim fluentd.yaml
[root@k8s-master efk]# grep "image:" fluentd.yaml
image: 192.168.50.54/efk/fluentd-es-root:v2.5.2
[root@k8s-master efk]# vim test-pod.yaml
[root@k8s-master efk]# grep "image:" test-pod.yaml
image: 192.168.50.54/efk/alpine:3.6
4.2、部署Elasticsearch
创建命名空间
创建名为 logging 的命名空间,用于存放 EFK 相关的服务。在 k8s-master节点的/opt/efk 目录下。
[root@k8s-master efk]# kubectl create -f namespace.yaml
namespace/logging created
[root@k8s-master efk]# kubectl get namespaces | grep logging
logging Active 5s
创建 es 数据存储目录
Elasticsearch 服务通常可以简写为 es。到 k8s-node01 节点创建数据目录/esdata。
[root@k8s-node01 ~]# mkdir /esdata
部署 es 容器
进入 k8s-master节点的/opt/efk 目录,部署 es 容器,执行如下操作。
[root@k8s-master efk]# kubectl create -f elasticsearch.yaml
statefulset.apps/elasticsearch-logging created
service/elasticsearch created
[root@k8s-master efk]# kubectl -n logging get pods -o wide
NAME READY STATUS RESTARTS AGE IP NODE NOMINATED NODE READINESS GATES
elasticsearch-logging-0 0/1 PodInitializing 0 7s 10.244.2.4 k8s-node01 <none> <none>
等待片刻,即可查看到 es 的 Pod,已经部署到 k8s-node01 节点,状态变为 running。
[root@k8s-master efk]# kubectl -n logging get pods -o wide
NAME READY STATUS RESTARTS AGE IP NODE NOMINATED NODE READINESS GATES
elasticsearch-logging-0 0/1 PodInitializing 0 14s 10.244.2.4 k8s-node01 <none> <none>
[root@k8s-master efk]# kubectl -n logging get pods -o wide
NAME READY STATUS RESTARTS AGE IP NODE NOMINATED NODE READINESS GATES
elasticsearch-logging-0 1/1 Running 0 41s 10.244.2.4 k8s-node01 <none> <none>
[root@k8s-master efk]# kubectl -n logging get svc
NAME TYPE CLUSTER-IP EXTERNAL-IP PORT(S) AGE
elasticsearch ClusterIP 10.104.11.226 <none> 9200/TCP 69s
通过 curl 命令访问服务,验证 es 是否部署成功。
[root@k8s-master efk]# curl 10.104.11.226:9200
{
"name" : "elasticsearch-logging-0",
"cluster_name" : "docker-cluster",
"cluster_uuid" : "tJHah36AQ8u8uHcBWRg2uw",
"version" : {
"number" : "7.4.2",
"build_flavor" : "default",
"build_type" : "docker",
"build_hash" : "2f90bbf7b93631e52bafb59b3b049cb44ec25e96",
"build_date" : "2019-10-28T20:40:44.881551Z",
"build_snapshot" : false,
"lucene_version" : "8.2.0",
"minimum_wire_compatibility_version" : "6.8.0",
"minimum_index_compatibility_version" : "6.0.0-beta1"
},
"tagline" : "You Know, for Search"
}
4.3、部署kibana
进入 k8s-master 的/opt/efk 目录,执行如下命令。
[root@k8s-master efk]# kubectl create -f kibana.yaml
service/kibana created
deployment.apps/kibana created
查看 Pod 的状态。
[root@k8s-master efk]# kubectl -n logging get pods
NAME READY STATUS RESTARTS AGE
elasticsearch-logging-0 1/1 Running 0 109s
kibana-86cf8fb94c-9r6jt 0/1 ContainerCreating 0 6s
[root@k8s-master efk]# kubectl -n logging get pods
NAME READY STATUS RESTARTS AGE
elasticsearch-logging-0 1/1 Running 0 4m34s
kibana-86cf8fb94c-9r6jt 1/1 Running 0 2m51s
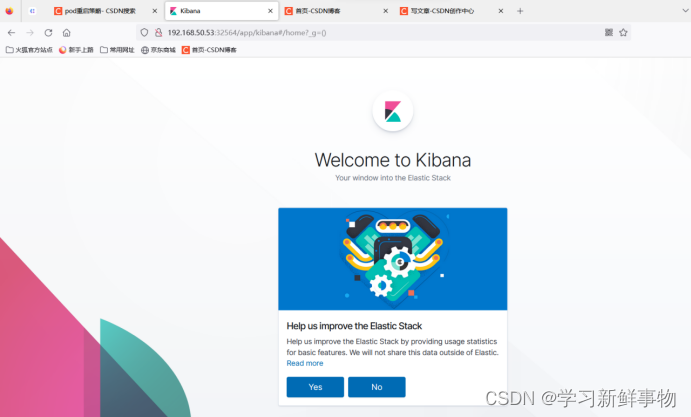
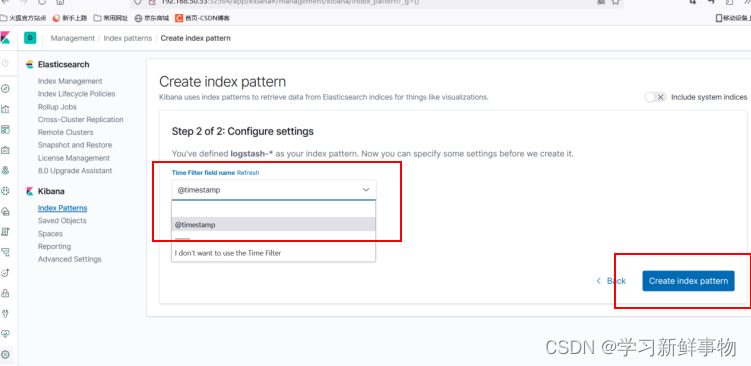
查看对应的 Service,得到 NodePort 值为 32564,此端口为随机端口,不同环境会不一致,请以实际结果为准。
[root@k8s-master efk]# kubectl -n logging get svc |grep kibana
kibana NodePort 10.111.216.111 <none> 5601:32564/TCP 3m16s
通过访问 192.168.50.53:32564 进入到 kibana 的访问界面,观察是否可以正常打开,其中 32564端口需要替换成实际的端口号。若能正常访问,说明 Kibana 连接 es 已经正常。
4.4、部署Fluentd
给集群节点打标签
为了自由控制需要采集集群中节点上业务容器的服务日志。因此,需要给 k8s-node01和 k8s-node02 节点打上 fluentd=true 的标签 label。
[root@k8s-master efk]# kubectl label node k8s-node01 fluentd=true
node/k8s-node01 labeled
[root@k8s-master efk]# kubectl label node k8s-node02 fluentd=true
node/k8s-node02 labeled
k8s-node01 和 k8s-node02 已经打上了 fluentd=true 的 label,那么 Fluentd 服务就会启动到这两个节点,也就意味着运行在这两个节点的 Pod 日志会被收集起来。
启动 Fluentd 服务
在 k8s-master节点的/opt/efk 目录,启动 Fluentd 服务
[root@k8s-master efk]# kubectl create -f fluentd-es-config-main.yaml
configmap/fluentd-es-config-main created
[root@k8s-master efk]# kubectl create -f fluentd-configmap.yaml
configmap/fluentd-config created
[root@k8s-master efk]# kubectl create -f fluentd.yaml
serviceaccount/fluentd-es created
clusterrole.rbac.authorization.k8s.io/fluentd-es created
clusterrolebinding.rbac.authorization.k8s.io/fluentd-es created
daemonset.apps/fluentd-es-v2.5.2 created
查看 Pod 是否已经在 k8s-node01 和 k8s-node02 节点启动成功。
NAME READY STATUS RESTARTS AGE
elasticsearch-logging-0 1/1 Running 0 9m2s
fluentd-es-v2.5.2-7qxjm 1/1 Running 0 17s
fluentd-es-v2.5.2-l7rtk 1/1 Running 0 17s
kibana-86cf8fb94c-9r6jt 1/1 Running 0 7m19s
4.5、验证容器日志收集
创建测试容器
进入 k8s-master的/opt/efk 目录,执行如下命令。
[root@k8s-master efk]# kubectl create -f test-pod.yaml
pod/counter created
[root@k8s-master efk]# kubectl get pods
NAME READY STATUS RESTARTS AGE
counter 1/1 Running 0 9s
4.6、配置 Kibana
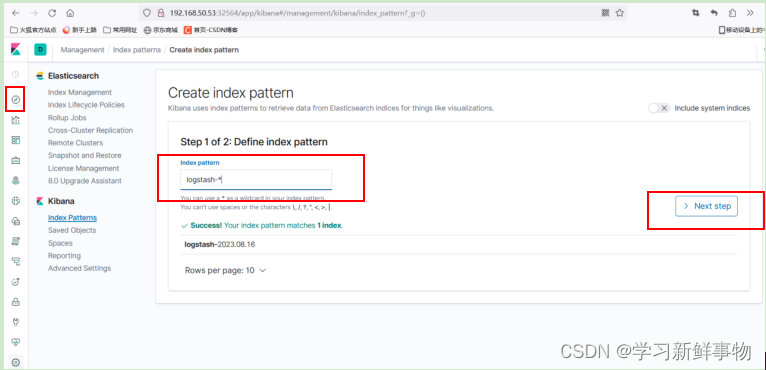
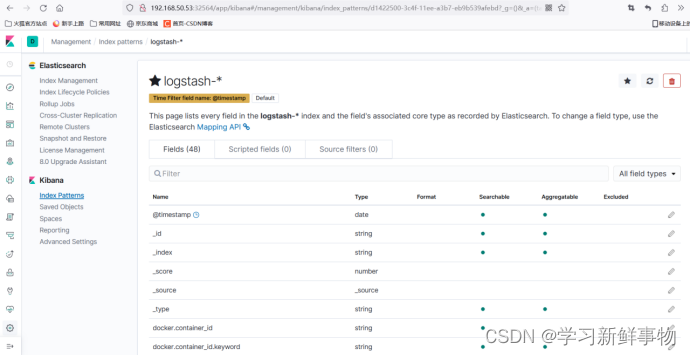
索引创建完成后,可以发现已经生成了多个索引域,稍等片刻再次点击左上角的
discover 图标,进入日志检索页面。
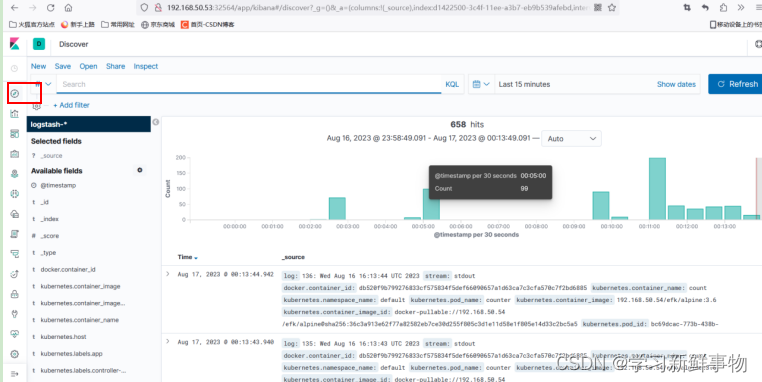
然后通过索引键去过滤,比如根据Kubernetes.host、Kubernetes.container_name、 kubernetes.container_image_id等去做过滤。
通过其他元数据也可以过滤日志数据,比如单击任何日志条目以查看其他元数据,如容
器名称、Kubernetes 节点、命名空间等。
到这里,在 Kubernetes 集群上已经成功部署了 EFK。
相关文章:
Kubernetes+EFK构建日志分析平台
目录 Elasticsearch产品介绍 Fluentd 工作原理 Kibana产品介绍 一、环境准备 前三个主机都要操作 1、主机初始化配置 2、部署docker环境 2、部署kubernetes集群 2.1、组件介绍 2.2、配置阿里云yum源 2.3、安装kubelet kubeadm kubectl 2.4、配置init-config.yaml …...
客服如何减轻工作压力?浅析客服压力管理方法
在现代商业领域中,客服是一项非常重要的工作,负责根据客户需求提供解决方案。客服工作不仅需要一定的专业知识和技能,还需要面对各种复杂、多变的情况,并拥有强大的应对压力的能力。客服从业人员的工作压力往往非常大,…...

知识储备--基础算法篇-二分搜索
1.前言 最近准备开始刷算法题了,搜了很多相关的帖子,下面三个很不错, 计算机视觉秋招准备过程看这个:计算机视觉算法工程师-秋招面经 - 知乎 (zhihu.com)https://zhuanlan.zhihu.com/p/399813916 复习深度学习相关…...

【MySQL系列】表内容的基本操作(增删查改)
「前言」文章内容大致是对MySQL表内容的基本操作,即增删查改。 「归属专栏」MySQL 「主页链接」个人主页 「笔者」枫叶先生(fy) 目录 一、MySQL表内容的增删查改1.1 Create1.1.1 单行数据全列插入1.1.2 多行数据指定列插入1.1.3 插入否则更新1.1.4 数据替换 1.2 Ret…...

docker搭建LNMP
docker安装 略 下载镜像 nginx:最新版php-fpm:根据自己需求而定mysql:根据自己需求定 以下是我搭建LNMP使用的镜像版本 rootVM-12-16-ubuntu:/docker/lnmp/php/etc# docker images REPOSITORY TAG IMAGE ID CREATED SIZE mysql 8.0…...

未出现过的最小正整数
给定一个长度为 n 的整数数组,请你找出未在数组中出现过的最小正整数。 样例 输入1:[-5, 3, 2, 3]输出1:1输入2:[1, 2, 3]输出2:4数据范围 1≤n≤105 , 数组中元素的取值范围 [−109,109]。 代码: c…...

易服客工作室:WordPress是什么?初学者的解释
目录 什么是WordPress? WordPress可以制作什么类型的网站? 谁制作了WordPress?它已经存在多久了? 谁使用 WordPress? 白宫网站 微软 滚石乐队 为什么要使用 WordPress? WordPress 是免费且…...
2019年9月全国计算机等级考试真题(C语言二级)
2019年9月全国计算机等级考试真题(C语言二级) 第1题 1、“商品”与“顾客”两个实体集之间的联系一般是 A. 一对一 B. 一对多 C. 多对一 D. 多对多 正确答案:D 第2题 定义学生选修课程的关系模式:SC(S#,…...

LLaMA模型泄露 Meta成最大受益者
一份被意外泄露的谷歌内部文件,将Meta的LLaMA大模型“非故意开源”事件再次推到大众面前。“泄密文件”的作者据悉是谷歌内部的一位研究员,他大胆指出,开源力量正在填平OpenAI与谷歌等大模型巨头们数年来筑起的护城河,而最大的受益…...
企业中商业智能BI,常见的工具和技术
商业智能(Business Intelligence,简称BI)数据可视化是通过使用图表、图形和其他可视化工具来呈现和解释商业数据的过程。它旨在帮助组织更好地理解和分析他们的数据,从而做出更明智的商业决策。 常见的商业智能数据可视化工具和技…...
item_password-获得淘口令真实url
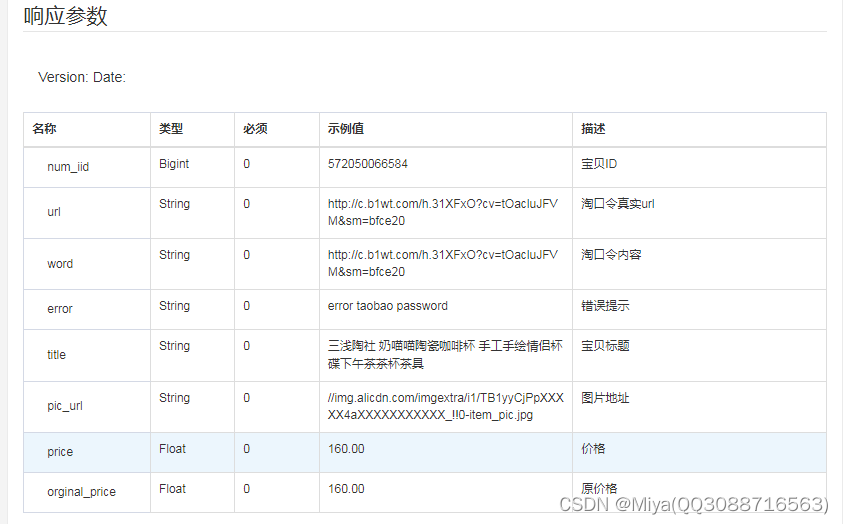
一、接口参数说明: item_password-获得淘口令真实url ,点击更多API调试,请移步注册API账号点击获取测试key和secret 公共参数 请求地址: https://api-gw.onebound.cn/taobao/item_password 名称类型必须描述keyString是调用key(…...
基于SOLIDWORKS配置功能建立塑料模具标准件库
在塑料模具的设计过程中,建立其三维模型对于后续进行CAE分析和CAM加工是非常重要的。除了型腔和型芯以外,塑料模具中的标准件很多,如推杆、导柱、导套、推板、限位钉等,这些对于不同的产品是需要反复调用的。目前,我国…...
1.物联网LWIP网络,TCP/IP协议簇
一。TCP/IP协议簇 1.应用层:FTP,HTTP,Telent,DNS,RIP 2.传输层:TCP,UDP 3.网络层:IPV4,IPV6,OSPF,EIGRP 4.数据链路层:Ethernet&#…...

拷贝公钥文件后,ssh 服务器仍提示输入密码
我们因为工作需要,可能在本地包含多个公私钥对,且每个公私钥对在生成时,指定的邮箱也不相同,所以我们在登录一些机器时,会指定不同的公钥文件,但是,有时候就算我们指定了正确的公钥文件…...

算法|Day45 动态规划13
LeetCode 300.最长递增子序列 题目链接:力扣(LeetCode)官网 - 全球极客挚爱的技术成长平台 题目描述:给你一个整数数组 nums ,找到其中最长严格递增子序列的长度。 子序列 是由数组派生而来的序列,删除&…...

基于随机森林的手写体数字识别,基于RF的手写体数字识别,基于RF的MNIST数据集分类识别
目录 背影 摘要 随机森林的基本定义 随机森林实现的步骤 基于随机森林的MNIST数据集分类识别 代码下载链接: 随机森林的手写体数字分类识别,随机森林的MNIST手写体数据集分类识别,卷积神经网络的手写体数字识别(代码完整,数据完整)资源-CSDN文库 https://download.csdn.n…...
vite初始化vue3项目(配置自动格式化工具与git提交规范工具)
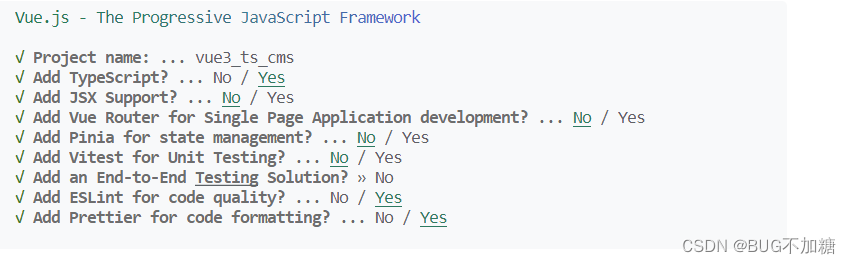
初始化项目 vite构建vue项目还是比较简单的,简单配置选择一下就行了 初始化命令 npm init vuelatest初始化最新版本vue项目 2. 基本选项含义 Add TypeScript 是否添加TSADD JSX是否支持JSXADD Vue Router是否添加Vue Router路由管理工具ADD Pinia 是否添加pinia…...

leetcode473. 火柴拼正方形(回溯算法-java)
火柴拼正方形 leetcode473 火柴拼正方形题目描述回溯算法 上期经典算法 leetcode473 火柴拼正方形 难度 - 中等 原题链接 - leetcode473 火柴拼正方形 题目描述 你将得到一个整数数组 matchsticks ,其中 matchsticks[i] 是第 i 个火柴棒的长度。你要用 所有的火柴棍…...

git-fatal: No url found for submodule path ‘packages/libary‘ in .gitmodules
文章目录 前言一、git submodule功能使用二、错误信息:三、解决方法:四、.gitmodules配置文件:总结 前言 最近在做vue项目,因为项目比较复杂,把功能拆分成很多子模块,我们使用Git的submodule功能。遇到错误…...

Android开发之性能优化:过渡绘制解决方案
1. 过渡绘制 屏幕上某一像素点在一帧中被重复绘制多次,就是过渡绘制。 下图中多个卡片跌在一起,但是只有第一个卡片是完全可见的。背后的卡片只有部分可见。但是Android系统在绘制时会将下层的卡片进行绘制,接着再将上层的卡片进行绘制。但其…...

JavaScript中隐藏类HiddenClasses对对象访问的加速
JavaScript引擎通过隐藏类机制优化对象属性访问,按固定顺序初始化属性可复用内存布局,乱序或动态增删会导致降级为慢字典模式,构造函数中预声明所有属性是保持性能的关键。JavaScript引擎(如V8)通过隐藏类(…...

如何高效评估ChatGLM3对话系统:全面测试用户体验与任务成功率的实用指南
如何高效评估ChatGLM3对话系统:全面测试用户体验与任务成功率的实用指南 【免费下载链接】ChatGLM3 ChatGLM3 series: Open Bilingual Chat LLMs | 开源双语对话语言模型 项目地址: https://gitcode.com/gh_mirrors/ch/ChatGLM3 ChatGLM3作为开源双语对话语言…...

面向软件测试从业者的多模态AI系统评估体系构建指南
随着人工智能技术的飞速演进,多模态AI系统正逐渐从实验室走向广泛的产业应用。这类系统能够同时处理和理解文本、图像、音频、视频等多种模态的信息,并实现跨模态的语义融合与推理。对于软件测试从业者而言,评估此类系统的复杂性远超传统单模…...

从零构建:深入理解自治系统与BGP协议的核心机制
1. 自治系统与BGP协议的前世今生 第一次听说"自治系统"这个词时,我脑海中浮现的是科幻电影里的智能机器人。实际上,它指的是互联网中由单一组织管理的网络区域。想象一下,每个自治系统就像城市里的一个独立社区,有自己的…...
)
NotebookLM知识沉淀全链路拆解(含12个真实踩坑案例与修复代码)
更多请点击: https://intelliparadigm.com 第一章:NotebookLM知识沉淀全链路概览 NotebookLM 是 Google 推出的基于用户自有文档构建可信 AI 助手的实验性工具,其核心价值在于将非结构化知识(PDF、TXT、网页等)转化为…...

从零构建:基于Air724UG的4G LTE物联网数据透传系统
1. 认识Air724UG模块:你的物联网数据搬运工 第一次拿到Air724UG这个巴掌大的4G模块时,我完全没想到它能成为我物联网项目的核心组件。这个来自合宙通信的Cat.1模块,最大的特点就是用2G的价格享受4G的体验。实测在市区环境下,它的上…...

C语言--day14
指针的常见操作 指针变量,有两方面的意思 一个指针指向的内容(数据值,一级) 指针变量本身存储的数据 (地址值) #include <stdio.h> int main() {int a 10;int b 0 ;int c 50;int *p NULL;int *q NULL;p &a; // 对指针变量本身进行修改…...

【51单片机一个按键切合初始流水灯按一下对半闪烁按一下显示时间】2023-10-16
缘由51单片机按键切换流水灯和时钟_嵌入式-CSDN问答 我想搞一个按键切换在初始状态流水灯按一下到双闪灯再按一下到时钟,可是之中如果用延时函数会导致CPU不能运行很多事情造成卡顿,利用中断的话定时检测的时间又不一样,我试着编译了代码但发…...

从丝杆到直线电机:半导体运动台驱动技术演进与选型指南
1. 半导体运动台驱动技术的核心挑战 在半导体制造领域,运动平台就像精密仪器的心脏,每一次跳动都关乎生产效率和产品质量。想象一下,光刻机要在指甲盖大小的芯片上绘制比头发丝还细的电路,这相当于让一台卡车在足球场上精准停到误…...

工程师如何驾驭参考设计:从复制到创新的实战指南
1. 参考设计的双刃剑:工程师的“爱恨情仇”在电子工程这个行当里混了十几年,我发现自己对“参考设计”的感情,就像对一位能力超群但性格有点别扭的同事。你离不开他,因为他总能帮你快速搞定最棘手的难题,让你在项目截止…...