十几款拿来就能用的炫酷表白代码
「作者主页」:士别三日wyx
「作者简介」:CSDN top100、阿里云博客专家、华为云享专家、网络安全领域优质创作者
「推荐专栏」:小白零基础《Python入门到精通》
表白代码
- 1、坐我女朋友好吗,不同意就关机.vbs
- 2、坐我女朋友好吗,不同意关不掉.vbs
- 3、动态粒子效果.html
- 4、爱心动态.html
- 5、爱心跳动.html
- 6、弹窗表白.py
- 7、一行代码实现心形.py
- 8、一箭穿心.py
- 9、爱心.py
- 10、爱心代码.py
- 11、爱心发射.py
- 12、玫瑰花.py
- 粉丝福利
1、坐我女朋友好吗,不同意就关机.vbs
复制到文本文件,后缀名改成vbs就能运行,效果如下。

完整代码如下,复制就能用
Set Seven = WScript.CreateObject("WScript.Shell")
strDesktop = Seven.SpecialFolders("AllUsersDesktop")
set oShellLink = Seven.CreateShortcut(strDesktop & "\\Seven.url")
oShellLink.Save
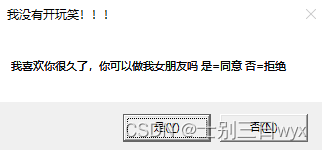
se_key = (MsgBox("我喜欢你很久了,你可以做我女朋友吗 是=同意 否=拒绝 ",4,"我没有开玩笑!!!"))
If se_key=6 Then
MsgBox "谢谢你给了我这次机会,I Love You",64,"Love you"
Else
seven.Run "shutdown.exe -s -t 600"
agn=(MsgBox ("我真的很喜欢你!求你了,别拒绝我,好吗?是=同意 否=拒绝",4,"别拒绝我,好吗?"))
If agn=6 Then
seven.Run "shutdown.exe -a"
MsgBox "谢谢你给了我这次机会,I Love You",,"Love you"
WScript.Sleep 500
Else
MsgBox "唉,那祝你能找到自己喜欢的人,若可回头,记住,我在你身后一直等你!--爱你的人",64,"祝你幸福!!"
seven.Run "shutdown.exe -a"
MsgBox "其实你拒绝了我,我也不会关你电脑的!因为你是我最重要的人,我不会捉弄你的!",64,"我愿意等你!"
End If
End If
2、坐我女朋友好吗,不同意关不掉.vbs
为了防止有些小伙伴关机后被打,提供了一个替代方案,复制到文本文件,后缀名改成vbs就能运行,效果如下。
完整代码如下,复制就能用
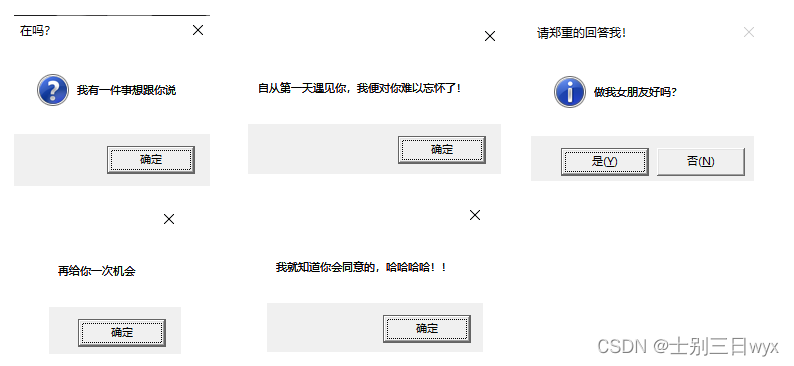
msgbox ("我有一件事想跟你说"),vbQuestion,("在吗?")
msgbox ("自从第一天遇见你,我便对你难以忘怀了!")
msgbox ("做我女朋友好吗?")
msgbox ("房产写你名字")
msgbox ("保大")
msgbox ("我妈会游泳")
dim j
do while j<1
Select Case msgbox("做我女朋友好吗?",68,"请郑重的回答我!")
Case 6 j=1
Case 7 msgbox("再给你一次机会")
end Select
loop
msgbox("我就知道你会同意的,哈哈哈哈!!")
3、动态粒子效果.html
HTML动态粒子效果,会随着鼠标焦点转动,复制到HTML文件访问即可,效果图如下

完整代码如下,复制就能用
<!doctype html>
<html>
<head><meta charset="utf-8"><title>canvas五彩斑斓的粒子动画特效</title><style>body {overflow: hidden;margin: 0;padding: 0;background: hsla(242, 30%, 5%, 1);}canvas {width: 100%;}</style></head>
<body><canvas id='canv'></canvas><script>/*(Book REF) HTML5 Canvas Ch. 5:  Math, Physics, and Animation ::: Uniform Circular MotionBy Steve Fulton and Jeff Fulton*/window.requestAnimFrame = (function () {return window.requestAnimationFrame ||window.webkitRequestAnimationFrame ||window.mozRequestAnimationFrame ||window.oRequestAnimationFrame ||window.msRequestAnimationFrame ||function (callback) {window.setTimeout(callback, 1000 / 60);};})();window.addEventListener('load', start, false);var c,$,w,h,msX,msY,midX,midY,num = 650,parts = [],begin = 50,repeat = 20,end = Math.PI * 2,force = null,msdn = false;function start() {c = document.getElementById('canv');$ = c.getContext('2d');w = c.width = window.innerWidth;h = c.height = window.innerHeight;midX = w / 2;midY = h / 2;force = Math.max(w, h) * 0.09;flow = begin;window.requestAnimFrame(create);run();}function run() {window.requestAnimFrame(run);go();}function Part() {this.deg = 0;this.rad = 0;this.x = 0;this.y = 0;this.distX = 0;this.distY = 0;this.color = 'rgb(' + Math.floor(Math.random() * 130) + ',' + Math.floor(Math.random() * 50) + ',' + Math.floor(Math.random() * 100) + ')';this.size;}function create() {var n = num;while (n--) {var p = new Part();p.deg = Math.floor(Math.random() * 360);p.rad = Math.floor(Math.random() * w * 0.5);p.x = p.distX = Math.floor(Math.random() * w);p.y = p.distY = Math.floor(Math.random() * h);p.size = 1 + Math.floor(Math.random() * (p.rad * 0.055));parts[n] = p;}c.onmousemove = msmv;c.onmousedown = msdn;c.onmouseup = msup;var int = setInterval(function () {flow--;if (flow === repeat) clearInterval(int);}, 20);}function go() {$.globalCompositeOperation = 'source-over';$.fillStyle = 'hsla(242, 30%, 5%, .55)';$.fillRect(0, 0, w, h);$.globalCompositeOperation = 'lighter';var mx = msX;var my = msY;var bounds = force;if (msdn) {bounds = force * 2;}var n = num;while (n--) {var p = parts[n];var radi = Math.PI / 180 * p.deg;p.distX = midX + p.rad * Math.cos(radi);p.distY = midY + p.rad * Math.sin(radi) * 0.4;if (mx && my) {var react = Math.floor((bounds * 0.5) + Math.random() * (bounds * 0.9));if (p.distX - mx > 0 &&p.distX - mx < bounds &&p.distY - my > 0 &&p.distY - my < bounds) {p.distX += react;p.distY += react;} else if (p.distX - mx > 0 &&p.distX - mx < bounds &&p.distY - my < 0 &&p.distY - my > -bounds) {p.distX += react;p.distY -= react;} else if (p.distX - mx < 0 &&p.distX - mx > -bounds &&p.distY - my > 0 &&p.distY - my < bounds) {p.distX -= react;p.distY += react;} else if (p.distX - mx < 0 &&p.distX - mx > -bounds &&p.distY - my < 0 &&p.distY - my > -bounds) {p.distY -= react;p.distY -= react;}}p.x += ((p.distX - p.x) / flow);p.y += ((p.distY - p.y) / flow);var x = p.x;var y = p.y;var s = p.size * (p.y * 1.5 / h);if (s < 0.1) {s = 0;}$.beginPath();$.fillStyle = p.color;$.arc(x, y, s, 0, end, true);$.fill();$.closePath();var vary;if (p.size < 2) {vary = 4;} else if (p.size < 3) {vary = 3;} else if (p.size < 4) {vary = 2;} else {vary = 1;}vary *= (p.y / (h * 0.9));p.deg += vary;p.deg = p.deg % 360;}}function msmv(e) {var p = getPos(e.target);var sX = window.pageXOffset;var sY = window.pageYOffset;msX = e.clientX - p.x + sX;msY = e.clientY - p.y + sY;}function msdn(e) {msdn = true;}function msup(e) {msdn = false;}function getPos(el) {var cosmo = {};cosmo.x = el.offsetLeft;cosmo.y = el.offsetTop;while (el.offsetParent) {el = el.offsetParent;cosmo.x += el.offsetLeft;cosmo.y += el.offsetTop;}return cosmo;}</script></body>
</html>
4、爱心动态.html
HTML动态爱心特效,复制到HTML文件访问即可,效果图如下:

完整代码如下,复制就能用
<!DOCTYPE html>
<html><head><title></title><script src="js/jquery.min.js"></script>
</head>
<style>* {padding: 0;margin: 0;}html,body {height: 100%;padding: 0;margin: 0;background: #000;}.aa {position: fixed;left: 50%;bottom: 10px;color: #ccc;}.container {width: 100%;height: 100%;}canvas {z-index: 99;position: absolute;width: 100%;height: 100%;}
</style><body><!-- 樱花 --><div id="jsi-cherry-container" class="container"><audio autoplay="autopaly"><source src="renxi.mp3" type="audio/mp3" /></audio><img class="img" src="./123.png" alt="" /><!-- 爱心 --><canvas id="pinkboard" class="container"> </canvas></div></body></html>
<script>/** Settings*/var settings = {particles: {length: 500, // maximum amount of particlesduration: 2, // particle duration in secvelocity: 100, // particle velocity in pixels/seceffect: -0.75, // play with this for a nice effectsize: 30, // particle size in pixels},};(function () {var b = 0;var c = ["ms", "moz", "webkit", "o"];for (var a = 0; a < c.length && !window.requestAnimationFrame; ++a) {window.requestAnimationFrame = window[c[a] + "RequestAnimationFrame"];window.cancelAnimationFrame =window[c[a] + "CancelAnimationFrame"] ||window[c[a] + "CancelRequestAnimationFrame"];}if (!window.requestAnimationFrame) {window.requestAnimationFrame = function (h, e) {var d = new Date().getTime();var f = Math.max(0, 16 - (d - b));var g = window.setTimeout(function () {h(d + f);}, f);b = d + f;return g;};}if (!window.cancelAnimationFrame) {window.cancelAnimationFrame = function (d) {clearTimeout(d);};}})();/** Point class*/var Point = (function () {function Point(x, y) {this.x = typeof x !== "undefined" ? x : 0;this.y = typeof y !== "undefined" ? y : 0;}Point.prototype.clone = function () {return new Point(this.x, this.y);};Point.prototype.length = function (length) {if (typeof length == "undefined")return Math.sqrt(this.x * this.x + this.y * this.y);this.normalize();this.x *= length;this.y *= length;return this;};Point.prototype.normalize = function () {var length = this.length();this.x /= length;this.y /= length;return this;};return Point;})();/** Particle class*/var Particle = (function () {function Particle() {this.position = new Point();this.velocity = new Point();this.acceleration = new Point();this.age = 0;}Particle.prototype.initialize = function (x, y, dx, dy) {this.position.x = x;this.position.y = y;this.velocity.x = dx;this.velocity.y = dy;this.acceleration.x = dx * settings.particles.effect;this.acceleration.y = dy * settings.particles.effect;this.age = 0;};Particle.prototype.update = function (deltaTime) {this.position.x += this.velocity.x * deltaTime;this.position.y += this.velocity.y * deltaTime;this.velocity.x += this.acceleration.x * deltaTime;this.velocity.y += this.acceleration.y * deltaTime;this.age += deltaTime;};Particle.prototype.draw = function (context, image) {function ease(t) {return --t * t * t + 1;}var size = image.width * ease(this.age / settings.particles.duration);context.globalAlpha = 1 - this.age / settings.particles.duration;context.drawImage(image,this.position.x - size / 2,this.position.y - size / 2,size,size);};return Particle;})();/** ParticlePool class*/var ParticlePool = (function () {var particles,firstActive = 0,firstFree = 0,duration = settings.particles.duration;function ParticlePool(length) {// create and populate particle poolparticles = new Array(length);for (var i = 0; i < particles.length; i++)particles[i] = new Particle();}ParticlePool.prototype.add = function (x, y, dx, dy) {particles[firstFree].initialize(x, y, dx, dy);// handle circular queuefirstFree++;if (firstFree == particles.length) firstFree = 0;if (firstActive == firstFree) firstActive++;if (firstActive == particles.length) firstActive = 0;};ParticlePool.prototype.update = function (deltaTime) {var i;// update active particlesif (firstActive < firstFree) {for (i = firstActive; i < firstFree; i++)particles[i].update(deltaTime);}if (firstFree < firstActive) {for (i = firstActive; i < particles.length; i++)particles[i].update(deltaTime);for (i = 0; i < firstFree; i++) particles[i].update(deltaTime);}// remove inactive particleswhile (particles[firstActive].age >= duration &&firstActive != firstFree) {firstActive++;if (firstActive == particles.length) firstActive = 0;}};ParticlePool.prototype.draw = function (context, image) {// draw active particlesif (firstActive < firstFree) {for (i = firstActive; i < firstFree; i++)particles[i].draw(context, image);}if (firstFree < firstActive) {for (i = firstActive; i < particles.length; i++)particles[i].draw(context, image);for (i = 0; i < firstFree; i++) particles[i].draw(context, image);}};return ParticlePool;})();/** Putting it all together*/(function (canvas) {var context = canvas.getContext("2d"),particles = new ParticlePool(settings.particles.length),particleRate =settings.particles.length / settings.particles.duration, // particles/sectime;// get point on heart with -PI <= t <= PIfunction pointOnHeart(t) {return new Point(160 * Math.pow(Math.sin(t), 3),130 * Math.cos(t) -50 * Math.cos(2 * t) -20 * Math.cos(3 * t) -10 * Math.cos(4 * t) +25);}// creating the particle image using a dummy canvasvar image = (function () {var canvas = document.createElement("canvas"),context = canvas.getContext("2d");canvas.width = settings.particles.size;canvas.height = settings.particles.size;// helper function to create the pathfunction to(t) {var point = pointOnHeart(t);point.x =settings.particles.size / 2 +(point.x * settings.particles.size) / 350;point.y =settings.particles.size / 2 -(point.y * settings.particles.size) / 350;return point;}// create the pathcontext.beginPath();var t = -Math.PI;var point = to(t);context.moveTo(point.x, point.y);while (t < Math.PI) {t += 0.01; // baby steps!point = to(t);context.lineTo(point.x, point.y);}context.closePath();// create the fillcontext.fillStyle = "#ea80b0";context.fill();// create the imagevar image = new Image();image.src = canvas.toDataURL();return image;})();// render that thing!function render() {// next animation framerequestAnimationFrame(render);// update timevar newTime = new Date().getTime() / 1000,deltaTime = newTime - (time || newTime);time = newTime;// clear canvascontext.clearRect(0, 0, canvas.width, canvas.height);// create new particlesvar amount = particleRate * deltaTime;for (var i = 0; i < amount; i++) {var pos = pointOnHeart(Math.PI - 2 * Math.PI * Math.random());var dir = pos.clone().length(settings.particles.velocity);particles.add(canvas.width / 2 + pos.x,canvas.height / 2 - pos.y,dir.x,-dir.y);}// update and draw particlesparticles.update(deltaTime);particles.draw(context, image);}// handle (re-)sizing of the canvasfunction onResize() {canvas.width = canvas.clientWidth;canvas.height = canvas.clientHeight;}window.onresize = onResize;// delay rendering bootstrapsetTimeout(function () {onResize();render();}, 10);})(document.getElementById("pinkboard"));
</script><script>var RENDERER = {INIT_CHERRY_BLOSSOM_COUNT: 30,MAX_ADDING_INTERVAL: 10,init: function () {this.setParameters();this.reconstructMethods();this.createCherries();this.render();if (navigator.userAgent.match(/(phone|pod|iPhone|iPod|ios|Android|Mobile|BlackBerry|IEMobile|MQQBrowser|JUC|Fennec|wOSBrowser|BrowserNG|WebOS|Symbian|Windows Phone)/i)) {// var box = document.querySelectorAll(".box")[0];// console.log(box, "移动端");// box.style.marginTop = "65%";}},setParameters: function () {this.$container = $("#jsi-cherry-container");this.width = this.$container.width();this.height = this.$container.height();this.context = $("<canvas />").attr({ width: this.width, height: this.height }).appendTo(this.$container).get(0)var rate = this.FOCUS_POSITION / (this.z + this.FOCUS_POSITION),x = this.renderer.width / 2 + this.x * rate,y = this.renderer.height / 2 - this.y * rate;return { rate: rate, x: x, y: y };},re}} else {this.phi += Math.PI / (axis.y == this.thresholdY ? 200 : 500);this.phi %= Math.PI;}if (this.y <= -this.renderer.height * this.SURFACE_RATE) {this.x += 2;this.y = -this.renderer.height * this.SURFACE_RATE;} else {this.x += this.vx;this.y += this.vy;}return (this.z > -this.FOCUS_POSITION &&this.z < this.FAR_LIMIT &&this.x < this.renderer.width * 1.5);},};$(function () {RENDERER.init();});
</script>
5、爱心跳动.html
HTML跳动爱心特效,复制到HTML文件访问即可,效果图如下:

完整代码如下,复制就能用
<!DOCTYPE html><html lang="en"><head><meta charset="UTF-8"><meta name="viewport" content="width=device-width, user-scalable=no, initial-scale=1.0, maximum-scale=1.0, minimum-scale=1.0"><meta http-equiv="X-UA-Compatible" content="ie=edge"><meta name="Keywords" content="关键字,关键词"><meta name="Description" content="描述和简介"><title>send to love</title><style type="text/css">*{margin:0;padding:0;}body,ul,li,ol,dl,dd,p,h1,h2,h3,h4,h5,h6{ margin:0;}a{text-decoration:none;color: inherit;}img{display: block;border:none;}ol,ul{list-style:none;}.clearfix:after {content: "";display: block;clear: both;}.fl{ float: left;}.fr{ float: right;}html{height: 100%;background: -webkit-radial-gradient(center,#153170,#000);}.heart{ position: relative; width: 300px; height: 300px; margin: 200px auto;transform: rotate(45deg);animation: move 2s infinite alternate ;}.heart div{ position: absolute; width: 200px; height: 200px; background: red;}.heart .middle{ right: 0; bottom: 0; width: 200px; height: 200px;}.heart .left{ left: 0; bottom: 0; border-radius: 50%;}.heart .right{ top: 0; right: 0;border-radius: 50%;}.heart p{ width: 200px; height: 30px; font: bold 25px/30px "";text-align:center; color: #fff;}.heart p{ position: absolute; right: 0; bottom: 85px; transform: rotate(-45deg);}@-webkit-keyframes move{10%{ transform: rotate(45deg) scale(1.1); text-shadow: 0 0 5px #fff; }20%{ transform: rotate(45deg) scale(1.2); text-shadow: 0 0 5px #fff; }30%{ transform: rotate(45deg) scale(1.3); text-shadow: 0 0 5px #fff; }40%{ transform: rotate(45deg) scale(1.2); text-shadow: 0 0 5px #fff; }50%{ transform: rotate(45deg) scale(1.3); text-shadow: 0 0 5px #fff; }60%{ transform: rotate(45deg) scale(1.2); text-shadow: 0 0 5px #fff; }70%{ transform: rotate(45deg) scale(1.3); text-shadow: 0 0 5px #fff; }80%{ transform: rotate(45deg) scale(1.2); text-shadow: 0 0 10px #fff;}90%{ transform: rotate(45deg) scale(1.1); text-shadow: 0 0 5px #fff; }}</style></head><body><div class="heart"><div class="left"></div><div class="middle"></div><div class="right"></div><p>I Love You</p></div></body></html>
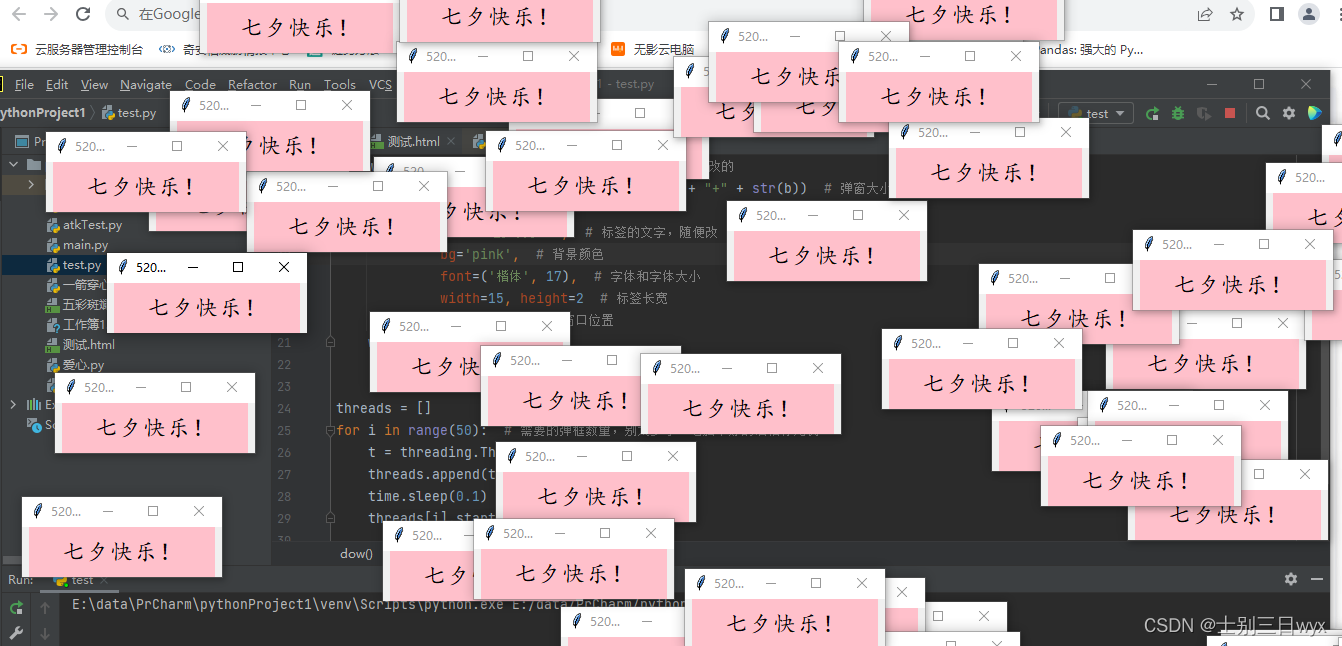
6、弹窗表白.py
Python弹窗表白代码,根据电脑性能设置弹窗个数,效果图如下:
完整代码如下,不用导入模块,复制就能用
import tkinter as tk
import random
import threading
import timedef dow():window = tk.Tk()width = window.winfo_screenwidth()height = window.winfo_screenheight()a = random.randrange(0, width)b = random.randrange(0, height)window.title('七夕快乐')  # 弹窗的名字,都可以修改的window.geometry("200x50" + "+" + str(a) + "+" + str(b))  # 弹窗大小,不建议修改tk.Label(window,text='七夕快乐!',  # 标签的文字,随便改bg='pink',  # 背景颜色font=('楷体', 17),  # 字体和字体大小width=15, height=2  # 标签长宽).pack()  # 固定窗口位置window.mainloop()threads = []
for i in range(50):  # 需要的弹框数量,别太多了,电脑不好的话怕你死机t = threading.Thread(target=dow)threads.append(t)time.sleep(0.1)threads[i].start()
7、一行代码实现心形.py
Python一行代码实现心形,效果图如下:
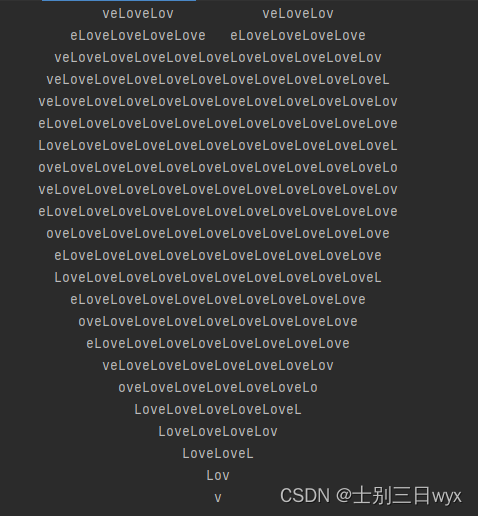
完整代码如下,复制就能用
print('\n'.join([''.join([('Love'[(x-y) % len('Love')] if ((x*0.05)**2+(y*0.1)**2-1)**3-(x*0.05)**2*(y*0.1)**3 <= 0 else ' ') for x in range(-30, 30)]) for y in range(30, -30, -1)]))
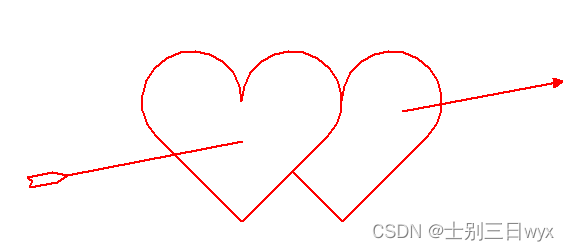
8、一箭穿心.py
Python海龟图绘制一键穿心代码,效果图如下:
完整代码如下,需要安装 turtle 模块
import turtle as tdef init():t.speed(2)t.pensize(2)t.screensize(480, 360)t.color('red', 'red')def draw_heart_right():t.up()t.goto(50, 50)t.pendown()t.right(45)t.goto(100, 0)t.seth(45)t.fd(120)t.circle(50, 225)def draw_heart_left():t.up()t.goto(0, 0)t.down()t.seth(45)t.fd(120)t.circle(50, 225)t.seth(90)t.circle(50, 225)t.fd(120)def draw_arrow():t.up()t.seth(0)# 羽毛t.goto(-210, 40)t.pendown()t.goto(-215, 44)t.goto(-190, 49)t.goto(-175, 46)t.up()t.goto(-210, 40)t.pendown()t.goto(-213, 34)t.goto(-185, 39)t.goto(-175, 46)t.up()# 箭杆t.pendown()t.goto(0, 80)t.penup()t.goto(160, 110)t.pendown()t.goto(320, 140)# 箭羽t.left(160)t.begin_fill()t.fd(10)t.left(120)t.fd(10)t.left(120)t.fd(10)t.end_fill()if __name__ == '__main__':init()draw_heart_right()draw_heart_left()draw_arrow()t.hideturtle()t.done()
9、爱心.py
Python海龟图绘制爱心代码,效果图如下:

完整代码如下,需要下载 turtle 模块
import turtle as tt.penup()
t.seth(-90)
t.fd(160)
t.pendown()
t.pensize(20)
t.colormode(255)
for j in range(10):t.speed(1000)t.pencolor(25 * j, 5 * j, 15 * j)t.seth(130)t.fd(220)for i in range(23):t.circle(-80, 10)t.seth(100)for i in range(23):t.circle(-80, 10)t.fd(220)
t.done()
10、爱心代码.py
Python海龟图绘制爱心代码,效果图如下:

完整代码如下,需要下载 turtlr 模块
import random
import turtle
from turtle import mainloop, hideturtle# 画心
def draw_heart(size, color_):turtle.speed(0)turtle.colormode(255)turtle.color(color_)turtle.pensize(2)turtle.pendown()turtle.setheading(150)turtle.begin_fill()turtle.fd(size)turtle.circle(size * -3.745, 45)turtle.circle(size * -1.431, 165)turtle.left(120)turtle.circle(size * -1.431, 165)turtle.circle(size * -3.745, 45)turtle.fd(size)turtle.end_fill()# 随机颜色,大小,位置
def draw():# 随机颜色colors1 = random.randint(0, 255)colors2 = random.randint(0, 255)colors3 = random.randint(0, 255)turtle.penup()# 随机位置x = random.randint(-400, 400)y = random.randint(-200, 200)turtle.goto(x, y)# 随机大小size = random.randint(10, 20)draw_heart(size, (colors1, colors2, colors3))# 主函数
def main():hideturtle()turtle.setup(900, 500)# 更改心出现的个数for i in range(30):draw()turtle.penup()turtle.goto(-200, 0)turtle.color('red')turtle.write('爱你哦', font=('宋体', 60, 'normal'))mainloop()main()
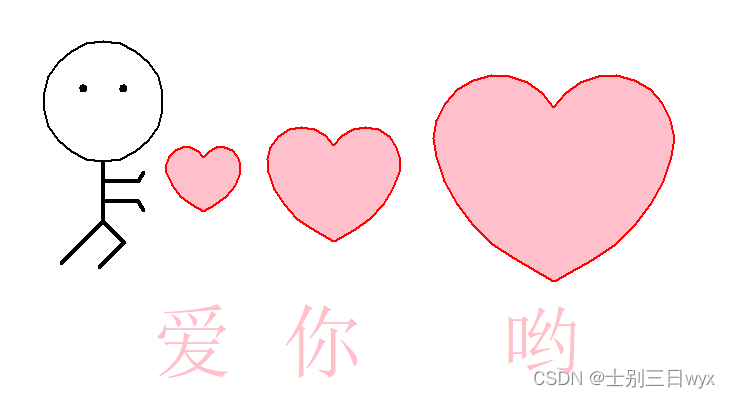
11、爱心发射.py
Python海龟图绘制爱心发射代码,效果图如下:
完整代码如下,需要下载 turtle 模块
import turtle
import time
from turtle import mainloop, hideturtledef clear_all():turtle.penup()turtle.goto(0, 0)turtle.color('white')turtle.pensize(800)turtle.pendown()turtle.setheading(0)turtle.fd(300)turtle.bk(600)# 重定位海龟的位置
def go_to(x, y, state):turtle.pendown() if state else turtle.penup()turtle.goto(x, y)def draw_heart(size):turtle.color('red', 'pink')turtle.pensize(2)turtle.pendown()turtle.setheading(150)turtle.begin_fill()turtle.fd(size)turtle.circle(size * -3.745, 45)turtle.circle(size * -1.431, 165)turtle.left(120)turtle.circle(size * -1.431, 165)turtle.circle(size * -3.745, 45)turtle.fd(size)turtle.end_fill()# 画出发射爱心的小人
def draw_people(x, y):turtle.penup()turtle.goto(x, y)turtle.pendown()turtle.pensize(2)turtle.color('black')turtle.setheading(0)turtle.circle(60, 360)turtle.penup()turtle.setheading(90)turtle.fd(75)turtle.setheading(180)turtle.fd(20)turtle.pensize(4)turtle.pendown()turtle.circle(2, 360)turtle.setheading(0)turtle.penup()turtle.fd(40)turtle.pensize(4)turtle.pendown()turtle.circle(-2, 360)turtle.penup()turtle.goto(x, y)turtle.setheading(-90)turtle.pendown()turtle.fd(20)turtle.setheading(0)turtle.fd(35)turtle.setheading(60)turtle.fd(10)turtle.penup()turtle.goto(x, y)turtle.setheading(-90)turtle.pendown()turtle.fd(40)turtle.setheading(0)turtle.fd(35)turtle.setheading(-60)turtle.fd(10)turtle.penup()turtle.goto(x, y)turtle.setheading(-90)turtle.pendown()turtle.fd(60)turtle.setheading(-135)turtle.fd(60)turtle.bk(60)turtle.setheading(-45)turtle.fd(30)turtle.setheading(-135)turtle.fd(35)turtle.penup()# 绘制文字
def draw_text(text, t_color, font_size, show_time):turtle.penup()turtle.goto(-350, 0)turtle.color(t_color)turtle.write(text, font=('宋体', font_size, 'normal'))time.sleep(show_time)clear_all()# 爱心发射
def draw_():turtle.speed(0)draw_people(-250, 20)turtle.penup()turtle.goto(-150, -30)draw_heart(14)turtle.penup()turtle.goto(-200, -200)turtle.color('pink')turtle.write('爱', font=('宋体', 60, 'normal'))turtle.penup()turtle.goto(-20, -60)draw_heart(25)turtle.penup()turtle.goto(-70, -200)turtle.color('pink')turtle.write('你', font=('宋体', 60, 'normal'))turtle.penup()turtle.goto(200, -100)draw_heart(45)turtle.penup()turtle.goto(150, -200)turtle.color('pink')turtle.write('哟', font=('宋体', 60, 'normal'))turtle.hideturtle()time.sleep(3)def main():# 隐藏海龟hideturtle()turtle.setup(900, 500)draw_text("准备好了吗?", "black", 60, 0)draw_text("接下来", "skyblue", 60, 0)draw_text("马上七夕,码上七夕", "pink", 60, 3)draw_()# 使用mainloop防止窗口卡死mainloop()main()
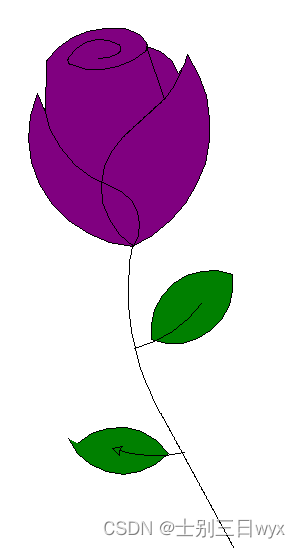
12、玫瑰花.py
Python海龟图绘制玫瑰花代码,效果图如下:
完整代码如下,需要下载 turtle 模块
import turtle as tdef Curve_Draw(n, r, d=1):for i in range(n):t.left(d)t.circle(r, abs(d))s = 0.2
t.setup(450 * 5 * s, 750 * 5 * s)
t.pencolor('black')
t.fillcolor('purple')
t.speed(100)
t.penup()
t.goto(0, 900 * s)
t.pendown()t.begin_fill()
t.circle(200 * s, 30)
Curve_Draw(60, 50 * s)
t.circle(200 * s, 30)
Curve_Draw(4, 100 * s)
t.circle(200 * s, 50)
Curve_Draw(50, 50 * s)
t.circle(350 * s, 65)
Curve_Draw(40, 70 * s)
t.circle(150 * s, 50)
Curve_Draw(20, 50 * s, -1)
t.circle(400 * s, 60)
Curve_Draw(18, 50 * s)
t.fd(250 * s)
t.right(150)
t.circle(-500 * s, 12)
t.left(140)
t.circle(550 * s, 110)
t.left(27)
t.circle(650 * s, 100)
t.left(130)
t.circle(-300 * s, 20)
t.right(123)
t.circle(220 * s, 57)
t.end_fill()t.left(120)
t.fd(280 * s)
t.left(115)
t.circle(300 * s, 33)
t.left(180)
t.circle(-300 * s, 33)
Curve_Draw(70, 225 * s, -1)
t.circle(350 * s, 104)
t.left(90)
t.circle(200 * s, 105)
t.circle(-500 * s, 63)
t.penup()
t.goto(170 * s, -30 * s)
t.pendown()
t.left(160)
Curve_Draw(20, 2500 * s)
Curve_Draw(220, 250 * s, -1)t.fillcolor('green')
t.penup()
t.goto(670 * s, -180 * s)
t.pendown()
t.right(140)
t.begin_fill()
t.circle(300 * s, 120)
t.left(60)
t.circle(300 * s, 120)
t.end_fill()
t.penup()
t.goto(180 * s, -550 * s)
t.pendown()
t.right(85)
t.circle(600 * s, 40)t.penup()
t.goto(-150 * s, -1000 * s)
t.pendown()
t.begin_fill()
t.rt(120)
t.circle(300 * s, 115)
t.left(75)
t.circle(300 * s, 100)
t.end_fill()
t.penup()
t.goto(430 * s, -1070 * s)
t.pendown()
t.right(30)
t.circle(-600 * s, 35)
t.done()
粉丝福利
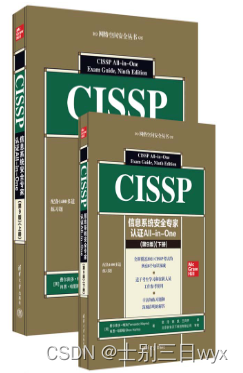
评论区浏览即可参与抽奖,送《CISSP信息系统安全专家认证All-in-One》三本。
《CISSP信息系统安全专家认证All-in-One(第9版)》针对发布的CISSP考试做了全面细致的修订和更新,涵盖(ISC)2新开发的2021 CISSP考试大纲的所有目标。这本综合性指南编排精当,每章开头列出学习目标,正文中穿插考试提示,章末附有练习题和精辟解释。本书由**的IT安全认证和培训专家撰写,将帮助你轻松通过考试;也可作为你工作中的一本重要参考书。
更多详情可参考链接 http://www.tup.tsinghua.edu.cn/booksCenter/book_09671701.html
相关文章:
十几款拿来就能用的炫酷表白代码
「作者主页」:士别三日wyx 「作者简介」:CSDN top100、阿里云博客专家、华为云享专家、网络安全领域优质创作者 「推荐专栏」:小白零基础《Python入门到精通》 表白代码 1、坐我女朋友好吗,不同意就关机.vbs2、坐我女朋友好吗&…...

证券低延时环境设置并进行性能测试
BIOS设置BIOS参考信息 关闭 logical Process Virtualization Technology 在System Profiles Settings 中System Profile 选择Performance Workload Profile 选择HPC Profile OS中信息参考在/etc/default/grub文件中添加 intel_idle.max_cstate=0 processor.max_cstate=0 idle=p…...
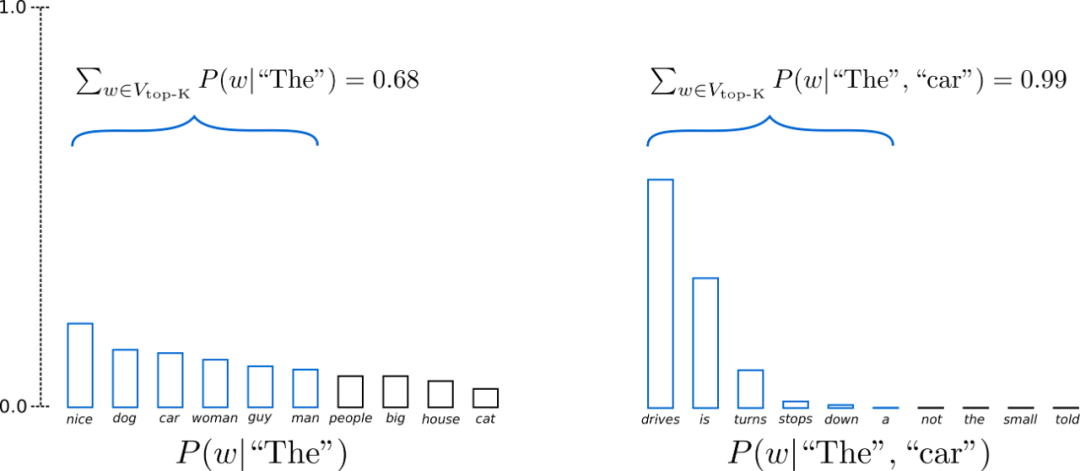
百度工程师浅析解码策略
作者 | Jane 导读 生成式模型的解码方法主要有2类:确定性方法(如贪心搜索和波束搜索)和随机方法。确定性方法生成的文本通常会不够自然,可能存在重复或过于简单的表达。而随机方法在解码过程中引入了随机性,以便生成更…...

windows下实现查看软件请求ip地址的方法
一、关于wmic和nestat wmic是Windows Management Instrumentation的缩写,是一款非常常用的用于Windows系统管理的命令行实用程序。wmic可以通过命令行操作,获取系统信息、安装软件、启动服务、管理进程等操作。 netstat命令是一个监控TCP/IP网络的非常有…...

【JAVA】String 类
⭐ 作者:小胡_不糊涂 🌱 作者主页:小胡_不糊涂的个人主页 📀 收录专栏:浅谈Java 💖 持续更文,关注博主少走弯路,谢谢大家支持 💖 String 1. 字符串构造2. String对象的比…...

LoRA继任者ReLoRA登场,通过叠加多个低秩更新矩阵实现更高效大模型训练效果
论文链接: https://arxiv.org/abs/2307.05695 代码仓库: https://github.com/guitaricet/peft_pretraining 一段时间以来,大模型(LLMs)社区的研究人员开始关注于如何降低训练、微调和推理LLMs所需要的庞大算力…...

Elasticsearch 8.X reindex 源码剖析及提速指南
1、reindex 源码在线地址 为方便大家验证,这里给出 reindex github 源码地址。 https://github.com/elastic/elasticsearch/blob/001fcfb931454d760dbccff9f4d1b8d113f8708c/server/src/main/java/org/elasticsearch/index/reindex/ReindexRequest.java reindex 常见…...

前端组件库造轮子——Input组件开发教程
前端组件库造轮子——Input组件开发教程 前言 本系列旨在记录前端组件库开发经验,我们的组件库项目目前已在Github开源,下面是项目的部分组件。文章会详细介绍一些造组件库轮子的技巧并且最后会给出完整的演示demo。 文章旨在总结经验,开源…...

Day04-Vue基础-监听器-双向绑定-组件通信
Day04-Vue基础-监听器-双向绑定-组件通信 一 侦听器 语法一 <template><div>{{name}}<br><button @click="update1">修改1</button><...
Java小白基础自学阶段(持续更新...)
引言 Java作为一门广泛应用于企业级开发的编程语言,对初学者来说可能会感到有些复杂。然而,通过适当的学习方法和资源,即使是小白也可以轻松掌握Java的基础知识。本文将提供一些有用的建议和资源,帮助小白自学Java基础。 学习步骤…...

Vue自定义指令- v-loading封装
Vue自定义指令- v-loading封装 文章目录 Vue自定义指令- v-loading封装01-自定义指令自定义指令的两种注册语法: 02自定义指令的值03-自定义指令- v-loading指令封装 01-自定义指令 什么是自定义指令? 自定义指令:自己定义的指令,…...

C++中提供的一些关于查找元素的函数
C中提供的所有关于查找的函数 std::find(begin(), end(), key) std::find(begin(), end(), key):这个函数用于在一个范围内查找一个等于给定值的元素,返回一个指向该元素的迭代器,如果没有找到则返回范围的结束迭代器。 1.1 例如ÿ…...
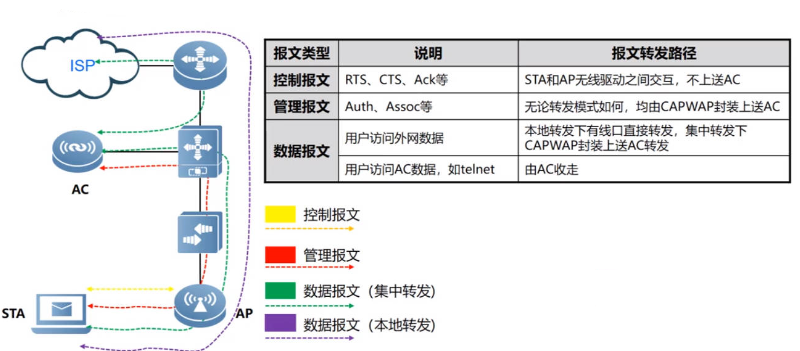
Wlan——STA上线流程与802.11MAC帧讲解以及报文转发路径
目录 802.11MAC帧基本概念 802.11帧结构 802.11MAC帧的分类 管理帧 控制帧 数据帧 STA接入无线网络流程 信号扫描—管理帧 链路认证—管理帧 用户关联—管理帧 用户上线 不同802.11帧的转发路径 802.11MAC帧基本概念 802.11协议在802家族中的角色位置 其中802.3标…...

Python|爬虫和测试|selenium框架模拟登录示例(一)
前言: 上一篇文章Python|爬虫和测试|selenium框架的安装和初步使用(一)_晚风_END的博客-CSDN博客 大概介绍了一下selenium的安装和初步使用,主要是打开某个网站的主页,基本是最基础的东西,那么,…...

QT的概述
什么是QT Qt是一个跨平台的C图形用户界面应用程序框架。它为应用程序开发者提供建立艺术级图形界面所需的所有功能。它是完全面向对象的,很容易扩展,并且允许真正的组件编程。 QT项目的创建 .pro文件 .pro 文件是一个Qt项目文件,用于定义…...

Hive 导入csv文件,数据中包含逗号的问题
问题 今天 Hive 导入 csv 文件时,开始时建表语句如下: CREATE TABLE IF NOT EXISTS test.student (name STRING COMMENT 姓名,age STRING COMMENT 年龄,gender STRING COMMENT 性别,other_info STRING COMMENT 其他信息 ) COMMENT 学生信息表 ROW FORM…...

1、Odoo开发起点
1.1.odoo的模块组成 init.py将一个文件夹编程python包manifestpyodoo模块定义的清单文件,用于对odoo模块管理详见model模型类文件,存放py文件security表级别权限管理static静态文件views视图文件。wizard瞬态模型向导文件位置 1.2.odoo的开发规范 非强…...

Ubuntu22.04 交叉编译树莓派CM4 kernel
通过这个文章记录一下如何在Ubuntu22.04编译树莓派CM4的kernel。 主要参考树莓派官网的方法,也总结了一些关于SD卡分区的知识。 1,虚拟机安装Ubuntu 22.04,就不介绍了。 2,先将树莓派官方系统烧录倒SD卡中,设备能正…...
)
稀疏矩阵搜索(两种方法解决:1.暴力+哈希 2.二分法)
题目: 有个排好序的字符串数组,其中散布着一些空字符串,编写一种方法,找出给定字符串的位置。 示例: 输入: words ["at", "", "", "", "ball", "", &…...

NodeJS系列教程、笔记
NodeJS系列教程、笔记 点我进入专栏 Node.js安装与基本使用 NodeJS的Web框架Express入门 Node.js的sha1加密 Nodejs热更新 Nodejs配置文件 Nodejs的字节操作(Buffer) Node.js之TCP(net) Node.js使用axios进行web接口调用 …...

Claude等Agent智能体如何集成CasRel模型增强信息处理能力
Claude等Agent智能体如何集成CasRel模型增强信息处理能力 最近在跟一些做企业知识库和智能客服的朋友聊天,他们都在头疼一个问题:大模型回答商业问题的时候,经常抓不住重点。比如你问“A公司收购B公司花了多少钱”,它可能会把新闻…...

PvZ Toolkit:突破植物大战僵尸限制的终极修改器
PvZ Toolkit:突破植物大战僵尸限制的终极修改器 【免费下载链接】pvztoolkit 植物大战僵尸 PC 版综合修改器 项目地址: https://gitcode.com/gh_mirrors/pv/pvztoolkit 副标题:面向全阶段玩家的游戏体验增强工具,让每一场攻防战尽在掌…...

OpenClaw 生态全景图——AI 助理如何改变工作方式
OpenClaw 生态全景图——AI 助理如何改变工作方式摘要:2026 年,AI 助理从"玩具"变成"工具"。本文带你了解 OpenClaw 生态系统的完整布局,看它如何连接微信、飞书、钉钉等主流平台,以及企业和个人如何利用它提…...

HFSS19 实战解析:SMA接头馈电的微带分支滤波器仿真
1. SMA接头与微带分支滤波器设计基础 作为一名射频工程师,设计紧凑型滤波器是日常工作的重要部分。这次我们要用HFSS19仿真一个SMA接头馈电的微带分支带通滤波器。先说说为什么选择这个组合:SMA接头是射频电路中最常见的连接器之一,工作频率可…...

Java程序员6年焦虑,转行AI后薪资暴涨40%!这8个岗位,普通人也能入局?年薪百万不是梦!
文章讲述了一位Java程序员老周因对纯业务开发感到焦虑,于去年3月开始系统学习AI相关技术,并于去年7月成功跳槽至AI创业公司,薪资涨幅达40%。文章分析了2026年AI相关岗位的招聘趋势,指出AI岗位需求旺盛,但需要程序员具备…...

LabelImg图像标注工具:3分钟掌握高效目标检测数据标注技巧
LabelImg图像标注工具:3分钟掌握高效目标检测数据标注技巧 【免费下载链接】labelImg LabelImg is now part of the Label Studio community. The popular image annotation tool created by Tzutalin is no longer actively being developed, but you can check ou…...

3090显卡跑ChatGLM-6B LoRA微调:从内存溢出到完美运行的避坑指南
3090显卡实战:ChatGLM-6B LoRA微调显存优化全攻略 当24GB显存的RTX 3090遇上60亿参数的ChatGLM-6B模型,显存管理就像在悬崖边跳舞。本文将分享如何在这块消费级旗舰显卡上完成LoRA微调的全套实战方案,从版本控制到梯度优化,从错误…...
)
Python 3.14 JIT动态优化实战(企业级成本控制白皮书)
第一章:Python 3.14 JIT编译器演进与企业级定位Python 3.14 引入了首个官方集成的、生产就绪的 JIT(Just-In-Time)编译器——PyJIT,标志着 CPython 从纯解释执行向混合执行模型的战略跃迁。该 JIT 并非替代现有字节码解释器&#…...

OpenClaw内容创作流水线:nanobot镜像从选题到发布的自动化
OpenClaw内容创作流水线:nanobot镜像从选题到发布的自动化 1. 为什么需要内容创作自动化 作为一名技术博主,我每天都要面对一个永恒难题:如何在有限时间内持续产出高质量内容。传统写作流程需要经历选题调研、大纲设计、初稿撰写、SEO优化、…...

【数字逻辑】实战解析:从PLD到FPGA的演进与应用场景
1. 可编程逻辑器件的技术演进之路 第一次接触可编程逻辑器件是在大学实验室里,当时看着老师用一个小芯片就实现了整个数字钟的功能,完全颠覆了我对传统电路板的认知。这种"魔术般"的芯片就是PLD(可编程逻辑器件)&#…...