MySQL数据库 MHA高可用
MySQL MHA
什么是 MHA
MHA(MasterHigh Availability)是一套优秀的MySQL高可用环境下故障切换和主从复制的软件。
MHA 的出现就是解决MySQL 单点的问题。
MySQL故障切换过程中,MHA能做到0-30秒内自动完成故障切换操作。
MHA能在故障切换的过程中最大程度上保证数据的一致性,以达到真正意义上的高可用。
MHA 的组成
MHA Node(数据节点)
MHA Node 运行在每台 MySQL 服务器上。
MHA Manager(管理节点)
MHA Manager 可以单独部署在一台独立的机器上,管理多个 master-slave 集群;也可以部署在一台 slave 节点上。
MHA Manager 会定时探测集群中的 master 节点。当 master 出现故障时,它可以自动将最新数据的 slave 提升为新的 mas然后将所有其他的 slave 重新指向新的 master。整个故障转移过程对应用程序完全透明。
MHA 的特点
自动故障切换过程中,MHA试图从宕机的主服务器上保存二进制日志,最大程度的保证数据不丢失
使用半同步复制,可以大大降低数据丢失的风险,如果只有一个slave已经收到了最新的二进制日志,MHA可以将最新的二进制日志应用于其他所有的slave服务器上,因此可以保证所有节点的数据一致性
目前MHA支持一主多从架构,最少三台服务,即一主两从
MHA Manger 管理多组主从复制。
MHA工作原理总结
1、从宕机崩溃的master 保存二进制日志事件(binlog events);
2、识别含有最新的更新 slave 日志
3、应用差异的中继日志(relay log)到其他的slave
4、应用从master保存的二进制日志事件
5、提升一个 salve 为新的master
6、使其他的slave连接行的master 进行复制。
搭建MySQL MHA
#预先准备MHA manager 节点服务器:CentOS7.6(64 位)
manager/20.0.0.41 ,安装MHA node 和 manager 组件Master 节点服务器:CentOS7.6(64 位)
mysql1/20.0.0.30 ,安装mysql5.7、MHA node 组件Slave1 节点服务器:CentOS7.6(64 位)
mysql2/20.0.0.40 ,安装mysql5.7、MHA node 组件Slave2 节点服务器:CentOS7.6(64 位)
mysql3/20.0.0.120 ,安装mysql5.7、MHA node 组件#关闭防火墙、安全机制
systemctl stop firewalld
systemctl disable firewalld
setenforce 0
配置一主两从
#Master、Slave1、Slave2 节点上安装 mysql5.7#修改 Master、Slave1、Slave2 节点的 Mysql主配置文件/etc/my.cnf ##Master 节点##
vim /etc/my.cnf
[mysqld]
server-id = 1
log_bin = master-bin
log-slave-updates = truesystemctl restart mysqld##Slave1 节点##
vim /etc/my.cnf
server-id = 2 						#三台服务器的 server-id 不能一样
log_bin = master-bin
relay-log = relay-log-bin
relay-log-index = slave-relay-bin.indexsystemctl restart mysqld###Slave2 节点##
vim /etc/my.cnf						#三台服务器的 server-id 不能一样
server-id = 3
relay-log = relay-log-bin
relay-log-index = slave-relay-bin.indexsystemctl restart mysqld#在 Master、Slave1、Slave2 节点上都创建两个软链接ln -s /usr/local/mysql/bin/mysql /usr/sbin/
ln -s /usr/local/mysql/bin/mysqlbinlog /usr/sbin/#配置 mysql 一主两从###########################################################(1)所有数据库节点进行 mysql 授权
mysql -uroot -p
grant replication slave on *.* to 'myslave'@'20.0.0.%' identified by '123456';		#从数据库同步使用
grant all privileges on *.* to 'mha'@'20.0.0.%' identified by 'manager';		#manager 使用grant all privileges on *.* to 'mha'@'master' identified by 'manager';				#防止从库通过主机名连接不上主库
grant all privileges on *.* to 'mha'@'slave1' identified by 'manager';
grant all privileges on *.* to 'mha'@'slave2' identified by 'manager';
flush privileges;(2)在 Master 节点查看二进制文件和同步点
show master status;
+-------------------+----------+--------------+------------------+-------------------+
| File              | Position | Binlog_Do_DB | Binlog_Ignore_DB | Executed_Gtid_Set |
+-------------------+----------+--------------+------------------+-------------------+
| master-bin.000002 |    3376  |              |                  |                   |
+-------------------+----------+--------------+------------------+-------------------+(3)在 Slave1、Slave2 节点执行同步操作
change master to master_host='20.0.0.30',master_user='myslave',master_password='123456',master_log_file='master-bin.000002',master_log_pos=3376; start slave;(4)在 Slave1、Slave2 节点查看数据同步结果
show slave status\G
//确保 IO 和 SQL 线程都是 Yes,代表同步正常。
Slave_IO_Running: Yes
Slave_SQL_Running: Yes(5)两个从库必须设置为只读模式:
set global read_only=1;(6)插入数据测试数据库同步
##在 Master 主库插入条数据,测试是否同步##
create database test_mha;
use test_mha;
create table test(id int);
insert into test(id) values (1);#在两个从服务器上测试
mysql> use test_mha
Reading table information for completion of table and column names
You can turn off this feature to get a quicker startup with -ADatabase changed
mysql> select * from test;
+------+
| id   |
+------+
|    1 |
+------+
1 row in set (0.00 sec)
#主从同步成功
配置MHA
安装 MHA 软件
(1)所有服务器上都安装 MHA 依赖的环境,首先安装 epel 源
yum install epel-release --nogpgcheck -yyum install -y perl-DBD-MySQL \
perl-Config-Tiny \
perl-Log-Dispatch \
perl-Parallel-ForkManager \
perl-ExtUtils-CBuilder \
perl-ExtUtils-MakeMaker \
perl-CPAN(2)安装 MHA 软件包,先在所有服务器上必须先安装 node 组件
对于每个操作系统版本不一样,这里 CentOS7.6选择 0.57 版本。
在所有服务器上必须先安装 node 组件,最后在 MHA-manager 节点上安装 manager 组件,因为 manager 依赖 node 组件。cd /opt
tar zxvf mha4mysql-node-0.57.tar.gz
cd mha4mysql-node-0.57
perl Makefile.PL
make && make install(3)在 MHA manager 节点上安装 manager 组件cd /opt
tar zxvf mha4mysql-manager-0.57.tar.gz
cd mha4mysql-manager-0.57
perl Makefile.PL
make && make install
在所有服务器上配置无密码认证
(1)在 manager 节点上配置到所有数据库节点的无密码认证
ssh-keygen -t rsa 				#一路按回车键
ssh-copy-id 20.0.0.30
ssh-copy-id 20.0.0.40
ssh-copy-id 20.0.0.42(2)在 master 上配置到数据库节点 slave1 和 slave2 的无密码认证
ssh-keygen -t rsa
ssh-copy-id 20.0.0.40
ssh-copy-id 20.0.0.42(3)在 slave1 上配置到数据库节点 master 和 slave2 的无密码认证
ssh-keygen -t rsa
ssh-copy-id 20.0.0.30
ssh-copy-id 20.0.0.42(4)在 slave2 上配置到数据库节点 master 和 slave1 的无密码认证
ssh-keygen -t rsa
ssh-copy-id 20.0.0.30
ssh-copy-id 20.0.0.40
在 manager 节点上配置 MHA
(1)在 manager 节点上复制相关脚本到/usr/local/bin 目录
cp -rp /opt/mha4mysql-manager-0.57/samples/scripts /usr/local/bin
//拷贝后会有四个执行文件
ll /usr/local/bin/scripts/
----------------------------------------------------------------------------------------------------------
master_ip_failover  		#自动切换时 VIP 管理的脚本
master_ip_online_change 	#在线切换时 vip 的管理
power_manager 				#故障发生后关闭主机的脚本
send_report 				#因故障切换后发送报警的脚本
----------------------------------------------------------------------------------------------------------(2)复制上述的自动切换时 VIP 管理的脚本到 /usr/local/bin 目录,这里使用master_ip_failover脚本来管理 VIP 和故障切换
cp /usr/local/bin/scripts/master_ip_failover /usr/local/bin(3)修改内容如下:(删除原有内容,直接复制并修改vip相关参数)
vim /usr/local/bin/master_ip_failover
#!/usr/bin/env perl
use strict;
use warnings FATAL => 'all';use Getopt::Long;my (
$command, $ssh_user, $orig_master_host, $orig_master_ip,
$orig_master_port, $new_master_host, $new_master_ip, $new_master_port
);
#############################添加内容部分#########################################my $vip = '20.0.0.220';									#指定vip的地址
my $brdc = '20.0.0.255';								#指定vip的广播地址
my $ifdev = 'ens33';										#指定vip绑定的网卡
my $key = '1';												#指定vip绑定的虚拟网卡序列号
my $ssh_start_vip = "/sbin/ifconfig ens33:$key $vip";		#代表此变量值为ifconfig ens33:1 20.0.0.220
my $ssh_stop_vip = "/sbin/ifconfig ens33:$key down";		#代表此变量值为ifconfig ens33:1 20.0.0.220 down
my $exit_code = 0;											#指定退出状态码为0
#my $ssh_start_vip = "/usr/sbin/ip addr add $vip/24 brd $brdc dev $ifdev label $ifdev:$key;/usr/sbin/arping -q -A -c 1 -I $ifdev $vip;iptables -F;";
#my $ssh_stop_vip = "/usr/sbin/ip addr del $vip/24 dev $ifdev label $ifdev:$key";##################################################################################
GetOptions(
'command=s' => \$command,
'ssh_user=s' => \$ssh_user,
'orig_master_host=s' => \$orig_master_host,
'orig_master_ip=s' => \$orig_master_ip,
'orig_master_port=i' => \$orig_master_port,
'new_master_host=s' => \$new_master_host,
'new_master_ip=s' => \$new_master_ip,
'new_master_port=i' => \$new_master_port,
);exit &main();sub main {print "\n\nIN SCRIPT TEST====$ssh_stop_vip==$ssh_start_vip===\n\n";if ( $command eq "stop" || $command eq "stopssh" ) {my $exit_code = 1;
eval {
print "Disabling the VIP on old master: $orig_master_host \n";
&stop_vip();
$exit_code = 0;
};
if ($@) {
warn "Got Error: $@\n";
exit $exit_code;
}
exit $exit_code;
}
elsif ( $command eq "start" ) {my $exit_code = 10;
eval {
print "Enabling the VIP - $vip on the new master - $new_master_host \n";
&start_vip();
$exit_code = 0;
};
if ($@) {
warn $@;
exit $exit_code;
}
exit $exit_code;
}
elsif ( $command eq "status" ) {
print "Checking the Status of the script.. OK \n";
exit 0;
}
else {
&usage();
exit 1;
}
}
sub start_vip() {
`ssh $ssh_user\@$new_master_host \" $ssh_start_vip \"`;
}
## A simple system call that disable the VIP on the old_master
sub stop_vip() {
`ssh $ssh_user\@$orig_master_host \" $ssh_stop_vip \"`;
}sub usage {
print
"Usage: master_ip_failover --command=start|stop|stopssh|status --orig_master_host=host --orig_master_ip=ip --orig_master_port=port --new_master_host=host --new_master_ip=ip --new_master_port=port\n";
}(4)创建 MHA 软件目录并拷贝配置文件,这里使用app1.cnf配置文件来管理 mysql 节点服务器
mkdir /etc/masterha
cp /opt/mha4mysql-manager-0.57/samples/conf/app1.cnf /etc/masterhavim /etc/masterha/app1.cnf						#删除原有内容,直接复制并修改节点服务器的IP地址
[server default]
manager_log=/var/log/masterha/app1/manager.log
manager_workdir=/var/log/masterha/app1
master_binlog_dir=/usr/local/mysql/data
master_ip_failover_script=/usr/local/bin/master_ip_failover
master_ip_online_change_script=/usr/local/bin/master_ip_online_change
password=manager
ping_interval=1
remote_workdir=/tmp
repl_password=123456
repl_user=myslave
secondary_check_script=/usr/local/bin/masterha_secondary_check -s 20.0.0.40 -s 20.0.0.42
shutdown_script=""
ssh_user=root
user=mha[server1]
hostname=20.0.0.30
port=3306[server2]
candidate_master=1
check_repl_delay=0
hostname=20.0.0.40
port=3306[server3]
hostname=20.0.0.42
port=3306----------------------------------------------------------------------------------------------------------
[server default]
manager_log=/var/log/masterha/app1/manager.log      #manager日志
manager_workdir=/var/log/masterha/app1            #manager工作目录
master_binlog_dir=/usr/local/mysql/data/         #master保存binlog的位置,这里的路径要与master里配置的binlog的路径一致,以便MHA能找到
master_ip_failover_script=/usr/local/bin/master_ip_failover  #设置自动failover时候的切换脚本,也就是上面的那个脚本
master_ip_online_change_script=/usr/local/bin/master_ip_online_change  #设置手动切换时候的切换脚本
password=manager			#设置mysql中root用户的密码,这个密码是前文中创建监控用户的那个密码
ping_interval=1				#设置监控主库,发送ping包的时间间隔,默认是3秒,尝试三次没有回应的时候自动进行failover
remote_workdir=/tmp			#设置远端mysql在发生切换时binlog的保存位置
repl_password=123		    #设置复制用户的密码
repl_user=myslave			#设置复制用户的用户
report_script=/usr/local/send_report     #设置发生切换后发送的报警的脚本
secondary_check_script=/usr/local/bin/masterha_secondary_check -s 192.168.10.14 -s 192.168.10.15	#指定检查的从服务器IP地址
shutdown_script=""			#设置故障发生后关闭故障主机脚本(该脚本的主要作用是关闭主机防止发生脑裂,这里没有使用)
ssh_user=root				#设置ssh的登录用户名
user=mha					#设置监控用户root[server1]
hostname=20.0.0.30
port=3306[server2]
hostname=20.0.0.40
port=3306
candidate_master=1
#设置为候选master,设置该参数以后,发生主从切换以后将会将此从库提升为主库,即使这个从库不是集群中最新的slavecheck_repl_delay=0
#默认情况下如果一个slave落后master 超过100M的relay logs的话,MHA将不会选择该slave作为一个新的master, 因为对于这个slave的恢复需要花费很长时间;通过设置check_repl_delay=0,MHA触发切换在选择一个新的master的时候将会忽略复制延时,这个参数对于设置了candidate_master=1的主机非常有用,因为这个候选主在切换的过程中一定是新的master[server3]
hostname=20.0.0.42
port=3306
----------------------------------------------------------------------------------------------------------
第一次配置需要在 Master 节点上手动开启虚拟IP
/sbin/ifconfig ens33:1 20.0.0.220/24在 manager 节点上测试 ssh 无密码认证
如果正常最后会输出 successfully,如下所示。[root@localhost ~]# masterha_check_ssh -conf=/etc/masterha/app1.cnf
Mon Sep  4 20:23:47 2023 - [warning] Global configuration file /etc/masterha_default.cnf not found. Skipping.
Mon Sep  4 20:23:47 2023 - [info] Reading application default configuration from /etc/masterha/app1.cnf..
Mon Sep  4 20:23:47 2023 - [info] Reading server configuration from /etc/masterha/app1.cnf..
Mon Sep  4 20:23:47 2023 - [info] Starting SSH connection tests..
Mon Sep  4 20:23:50 2023 - [debug]
Mon Sep  4 20:23:48 2023 - [debug]  Connecting via SSH from root@20.0.0.40(20.0.0.40:22) to root@20.0.0.30(20.0.0.30:22)..
Mon Sep  4 20:23:48 2023 - [debug]   ok.
Mon Sep  4 20:23:48 2023 - [debug]  Connecting via SSH from root@20.0.0.40(20.0.0.40:22) to root@20.0.0.42(20.0.0.42:22)..
Mon Sep  4 20:23:50 2023 - [debug]   ok.
Mon Sep  4 20:23:50 2023 - [debug]
Mon Sep  4 20:23:47 2023 - [debug]  Connecting via SSH from root@20.0.0.30(20.0.0.30:22) to root@20.0.0.40(20.0.0.40:22)..
Mon Sep  4 20:23:48 2023 - [debug]   ok.
Mon Sep  4 20:23:48 2023 - [debug]  Connecting via SSH from root@20.0.0.30(20.0.0.30:22) to root@20.0.0.42(20.0.0.42:22)..
Mon Sep  4 20:23:49 2023 - [debug]   ok.
Mon Sep  4 20:23:51 2023 - [debug]
Mon Sep  4 20:23:48 2023 - [debug]  Connecting via SSH from root@20.0.0.42(20.0.0.42:22) to root@20.0.0.30(20.0.0.30:22)..
Mon Sep  4 20:23:49 2023 - [debug]   ok.
Mon Sep  4 20:23:49 2023 - [debug]  Connecting via SSH from root@20.0.0.42(20.0.0.42:22) to root@20.0.0.40(20.0.0.40:22)..
Mon Sep  4 20:23:50 2023 - [debug]   ok.
Mon Sep  4 20:23:51 2023 - [info] All SSH connection tests passed successfully.
在 manager 节点上测试 mysql 主从连接情况
最后出现 MySQL Replication Health is OK 字样说明正常。如下所示。Mon Sep  4 20:55:19 2023 - [info] Checking replication health on 20.0.0.40..
Mon Sep  4 20:55:19 2023 - [info]  ok.
Mon Sep  4 20:55:19 2023 - [info] Checking replication health on 20.0.0.42..
Mon Sep  4 20:55:19 2023 - [info]  ok.
Mon Sep  4 20:55:19 2023 - [info] Checking master_ip_failover_script status:
Mon Sep  4 20:55:19 2023 - [info]   /usr/local/bin/master_ip_failover --command=status --ssh_user=root --orig_master_host=20.0.0.30 --orig_master_ip=20.0.0.30 --orig_master_port=3306
Mon Sep  4 20:55:20 2023 - [info]  OK.
Mon Sep  4 20:55:20 2023 - [warning] shutdown_script is not defined.
Mon Sep  4 20:55:20 2023 - [info] Got exit code 0 (Not master dead).
在 manager 节点上启动 MHA
[root@localhost ~]# nohup masterha_manager --conf=/etc/masterha/app1.cnf --remove_dead_master_conf --ignore_last_failover < /dev/null > /var/log/masterha/app1/manager.log 2>&1 &
[1] 19884
#生产中java 服务启动的方式
nohup  java -jar  微服务名称-( war jar)   &   ----------------------------------------------------------------------------------------------------------
--remove_dead_master_conf:该参数代表当发生主从切换后,老的主库的 ip 将会从配置文件中移除。
--manger_log:日志存放位置。
--ignore_last_failover:在缺省情况下,如果 MHA 检测到连续发生宕机,且两次宕机间隔不足 8 小时的话,则不会进行 Failover, 之所以这样限制是为了避免 ping-pong 效应。该参数代表忽略上次 MHA 触发切换产生的文件,默认情况下,MHA 发生切换后会在日志记录,也就是上面设置的日志app1.failover.complete文件,下次再次切换的时候如果发现该目录下存在该文件将不允许触发切换,除非在第一次切换后收到删除该文件,为了方便,这里设置为--ignore_last_failover。
----------------------------------------------------------------------------------------------------------
查看 MHA 状态,可以看到当前的 master 是 master 节点。
[root@localhost ~]# masterha_check_status --conf=/etc/masterha/app1.cnf
app1 (pid:19884) is running(0:PING_OK), master:20.0.0.30
查看 MHA 日志,也以看到当前的 master 是 20.0.0.30,如下所示。
[root@localhost ~]# cat /var/log/masterha/app1/manager.log | grep "current master"
Mon Sep  4 20:57:11 2023 - [info] Checking SSH publickey authentication settings on the current master..
20.0.0.30(20.0.0.30:3306) (current master)
[root@localhost ~]# tail -f /var/log/masterha/app1/manager.log+--20.0.0.42(20.0.0.42:3306)
故障模拟
#在 manager 节点上监控观察日志记录
tail -f /var/log/masterha/app1/manager.log#在 Master 节点 master 上停止mysql服务
systemctl stop mysqld
或
pkill -9 mysql#查看日志
Started automated(non-interactive) failover.
Invalidated master IP address on 20.0.0.30(20.0.0.30:3306)
The latest slave 20.0.0.40(20.0.0.40:3306) has all relay logs for recovery.
Selected 20.0.0.40(20.0.0.40:3306) as a new master.
20.0.0.40(20.0.0.40:3306): OK: Applying all logs succeeded.
Failed to activate master IP address for 20.0.0.40(20.0.0.40:3306) with return code 10:0
20.0.0.42(20.0.0.42:3306): This host has the latest relay log events.
Generating relay diff files from the latest slave succeeded.
20.0.0.42(20.0.0.42:3306): OK: Applying all logs succeeded. Slave started, replicating from 20.0.0.40(20.0.0.40:3306)
20.0.0.40(20.0.0.40:3306): Resetting slave info succeeded.
Master failover to 20.0.0.40(20.0.0.40:3306) completed successfully.
#正常自动切换一次后,MHA 进程会退出。HMA 会自动修改 app1.cnf 文件内容,将宕机的 master 节点删除。查看 slave1 是否接管 VIP
ifconfig故障切换备选主库的算法:
1.一般判断从库的是从(position/GTID)判断优劣,数据有差异,最接近于master的slave,成为备选主。
2.数据一致的情况下,按照配置文件顺序,选择备选主库。
3.设定有权重(candidate_master=1),按照权重强制指定备选主。
(1)默认情况下如果一个slave落后master 100M的relay logs的话,即使有权重,也会失效。
(2)如果check_repl_delay=0的话,即使落后很多日志,也强制选择其为备选主。
故障修复步骤
1.修复mysql
systemctl restart mysqld2.修复主从
#在现主库服务器 Mysql2 查看二进制文件和同步点
show master status;#在原主库服务器 mysql1 执行同步操作
change master to master_host='20.0.0.40',master_user='myslave',master_password='123456',master_log_file='master-bin.000002',master_log_pos=2755;start slave;3.在 manager 节点上修改配置文件app1.cnf(再把这个记录添加进去,因为它检测掉失效时候会自动消失)
vi /etc/masterha/app1.cnf
......
secondary_check_script=/usr/local/bin/masterha_secondary_check -s 20.0.0.40 -s 20.0.0.42
......
[server1]
hostname=20.0.0.30
port=3306[server2]
candidate_master=1
check_repl_delay=0
hostname=20.0.0.40
port=3306[server3]
hostname=20.0.0.42
port=33064.在 manager 节点上启动 MHA
nohup masterha_manager --conf=/etc/masterha/app1.cnf --remove_dead_master_conf --ignore_last_failover < /dev/null > /var/log/masterha/app1/manager.log 2>&1 &#解决中英字不兼容报错的问题
dos2unix /usr/local/bin/master_ip_failover
相关文章:

MySQL数据库 MHA高可用
MySQL MHA 什么是 MHA MHA(MasterHigh Availability)是一套优秀的MySQL高可用环境下故障切换和主从复制的软件。 MHA 的出现就是解决MySQL 单点的问题。 MySQL故障切换过程中,MHA能做到0-30秒内自动完成故障切换操作。 MHA能在故障切换的…...

leetcode669. 修剪二叉搜索树(java)
修剪二叉搜索树 题目描述递归代码演示: 题目描述 难度 - 中等 LC - 669. 修剪二叉搜索树 给你二叉搜索树的根节点 root ,同时给定最小边界low 和最大边界 high。通过修剪二叉搜索树,使得所有节点的值在[low, high]中。修剪树 不应该 改变保留…...
计算机网络的故事——确认访问用户身份的认证
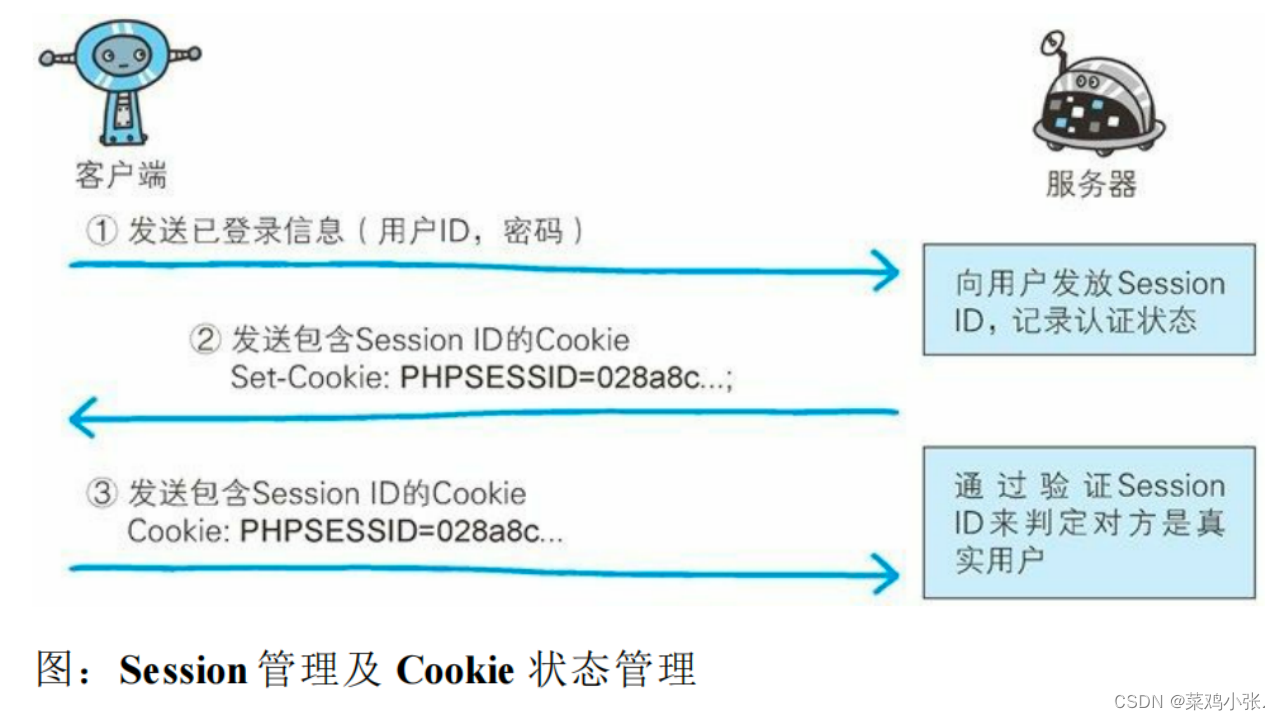
确认访问用户身份的认证 HTTP使用的认证方式:BASIC认证(基本认证)、DIGEST(摘要认证)、SSL客户端认证、FormBase认证(基于表单认证)。 基于表单的认证:涉及到session管理以及cookie…...

C#禁用或启用任务管理器
参考文档https://zhuanlan.zhihu.com/p/95156063 借助上述参考文档里的C#操作注册表类,禁用或启用任务管理器 using System; using System.Collections.Generic; using System.Linq; using System.Text; namespace HideTaskMgr { class Program { …...
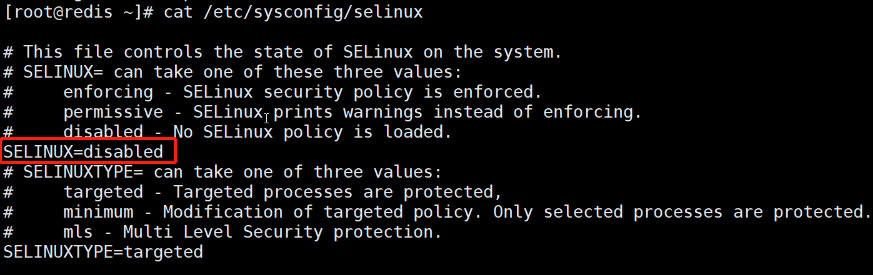
【Redis】NoSQL之Redis的配置及优化
关系数据库与非关系数据库 关系型数据库 关系型数据库是一个结构化的数据库,创建在关系模型(二维表格模型)基础上,一般面向于记录。 SQL 语句(标准数据查询语言)就是一种基于关系型数据库的语言&a…...

【数据库】如何利用Python中的petl将PostgreSQL中所有表的外键删除,迁移数据,再重建外键
一、简介 在数据库管理中,外键是一种重要的约束,用于确保数据的一致性和完整性。然而,在某些情况下,我们可能需要删除或修改外键。本文将介绍如何使用Python中的petl库将PostgreSQL中所有表的外键删除,迁移数据&#…...

Si24R2F+畜牧 耳标测体温开发资料
Si24R2F是针对IOT应用领域推出的新款超低功耗2.4G内置NVM单发射芯片。广泛应用于2.4G有源活体动物耳标,带实时测温计步功能。相较于Si24R2E,Si24R2F增加了温度监控、自动唤醒间隔功能;发射功率由7dBm增加到12dBm,距离更远…...
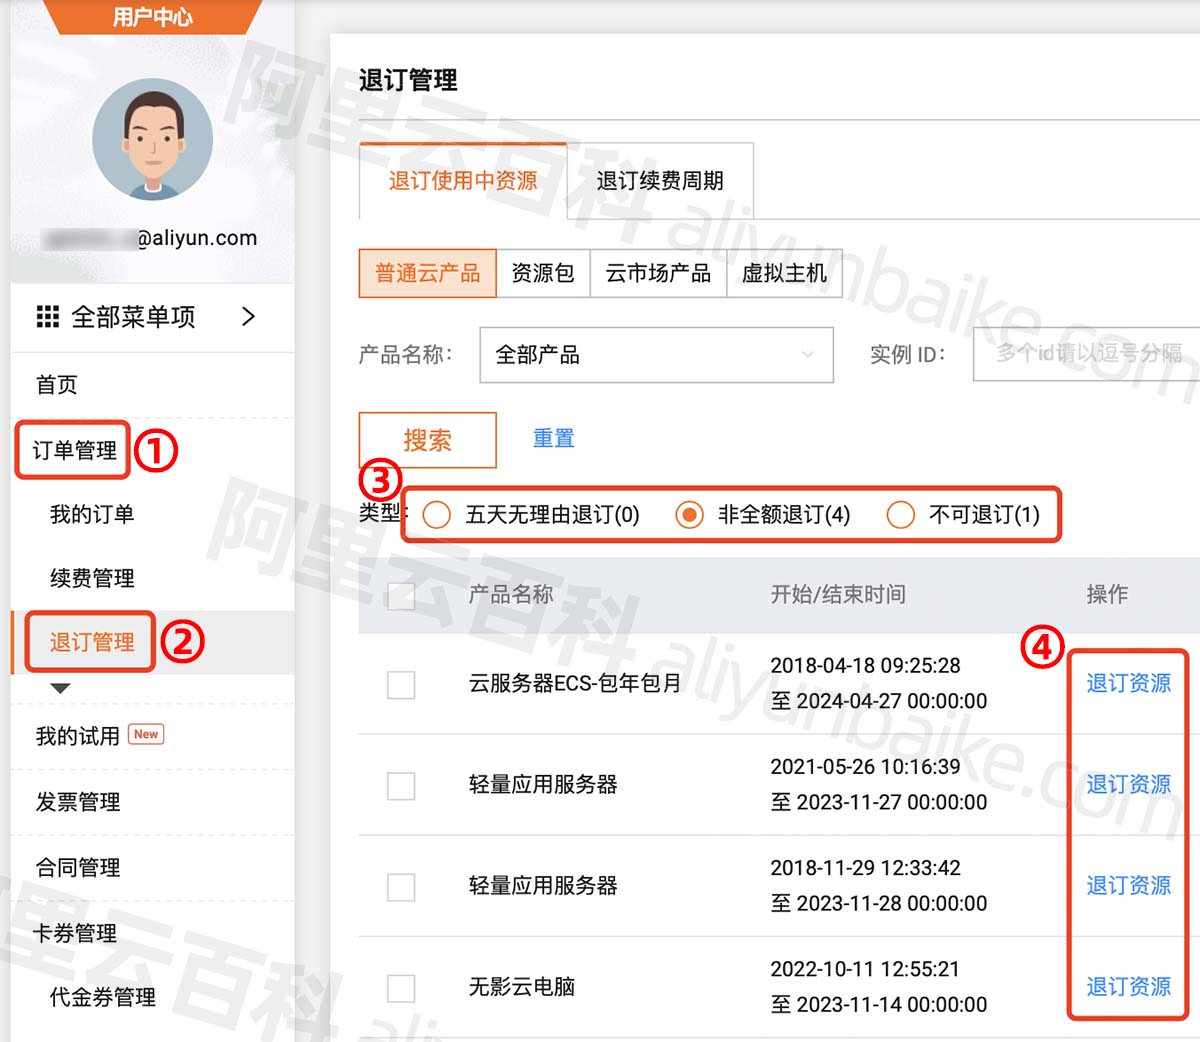
阿里云服务器退款流程_退订入口_到账时间说明
阿里云服务器如何退款?云服务器在哪申请退款?在用户中心订单管理中的退订管理中退款,阿里云百科分享阿里云服务器退款流程,包括申请退款入口、云服务器退款限制条件、退款多久到账等详细说明: 目录 阿里云服务器退款…...
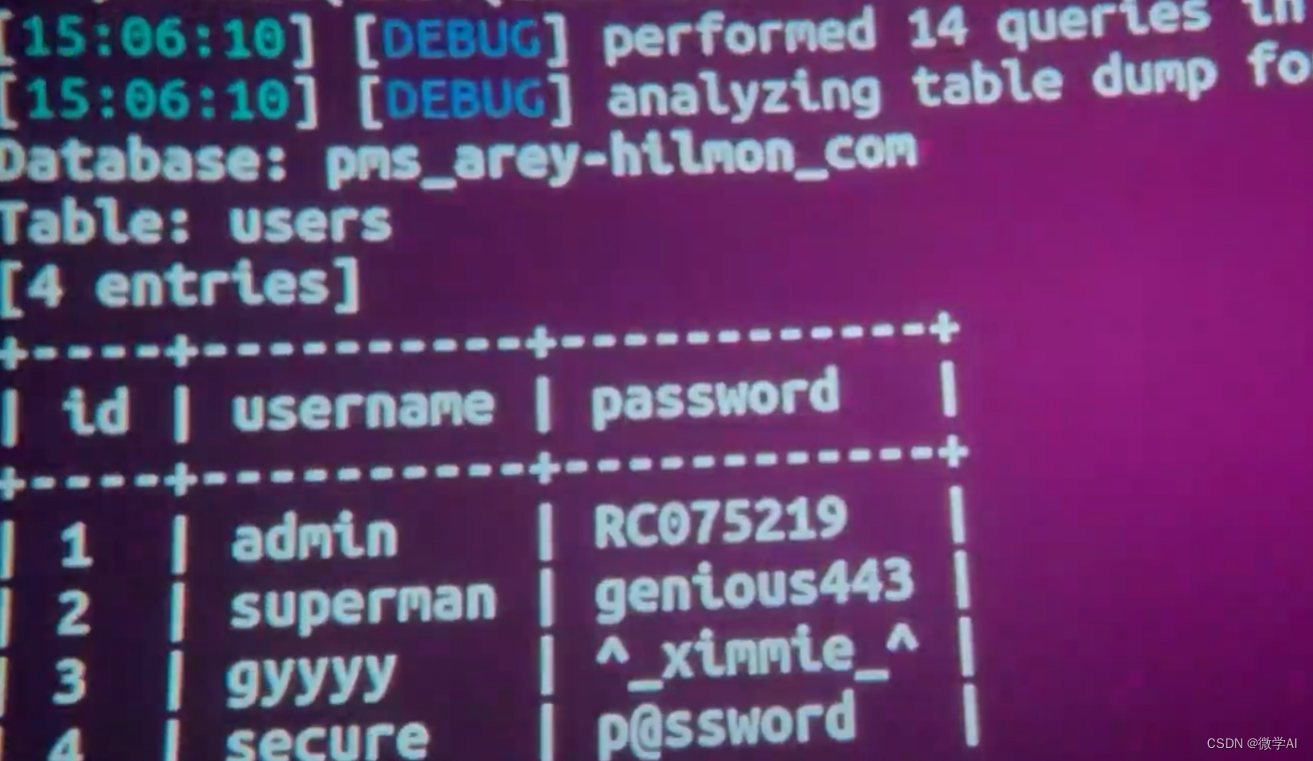
自然语言处理实战项目17-基于多种NLP模型的诈骗电话识别方法研究与应用实战
大家好,我是微学AI,今天给大家介绍一下自然语言处理实战项目17-基于NLP模型的诈骗电话识别方法研究与应用,相信最近小伙伴都都看过《孤注一掷》这部写实的诈骗电影吧,电影主要围绕跨境网络诈骗展开,电影取材自上万起真…...

安全错误攻击
近年来基于错误的密码分析(fault-based cryptanalysis)已成为检测智能卡(Smartcard)安全的重要因素。这种基于错误的密码分析,假设攻击者可以向智能卡中导入一定数量的、某种类型的错误,那么智能卡会输出错…...
logstash配置语法详解)
ELK安装、部署、调试 (八)logstash配置语法详解
input {#输入插件 }filter {#过滤插件 }output {#输出插件 } 1.读取文件。 使用filewatch的ruby gem库来监听文件变化,并通过.sincedb的数据库文件记录被监听日志we年的读取进度(时间 搓) 。sincedb数据文件的默认路径为<path.data>/…...
SPI协议
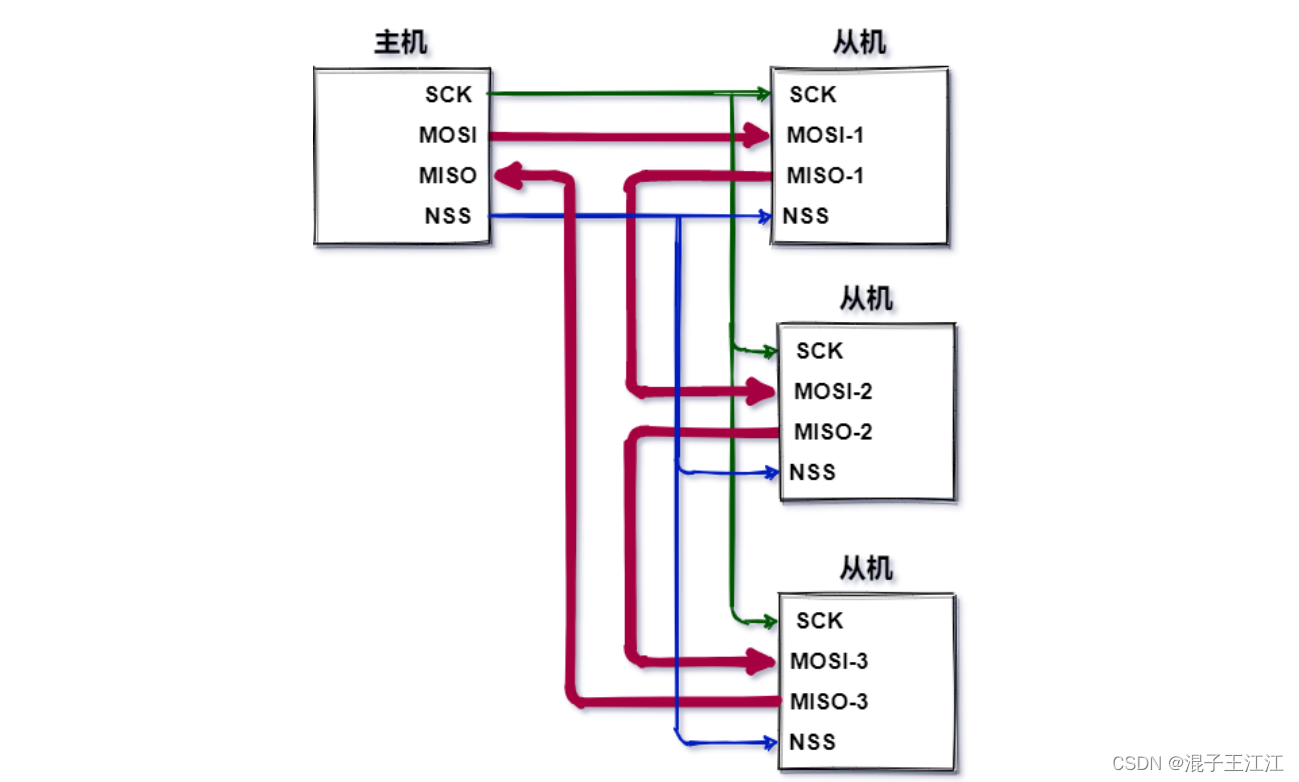
文章目录 前言一、简介1、通信模式2、总线定义3、SPI通信结构4、SPI通讯时序5、SPI数据交互过程 二、多从机模式1、多NSS2、菊花链3、SPI通信优缺点4、UART、IIC、SPI 区别 三、总结四、参考资料 前言 SPI协议是我们的重要通信协议之一,我们需要掌握牢靠。 一、简介…...

机器学习算法系列————决策树(二)
1.什么是决策树 用于解决分类问题的一种算法。 左边是属性,右边是标签。 属性选择时用什么度量,分别是信息熵和基尼系数。 这里能够做出来特征的区分。 下图为基尼系数为例进行计算。 下面两张图是对婚姻和年收入的详细计算过程(为GINI系…...

ACM中的数论
ACM中的数论是计算机科学领域中的一个重要分支,它主要研究整数的性质、运算规律和它们之间的关系。在ACM竞赛中,数论问题经常出现,因此掌握一定的数论知识对于参加ACM竞赛的选手来说是非常重要的。本文将介绍一些常见的数论概念和方法&#x…...

我的创作纪念日 —— 一年之期
前言 大家好!我是荔枝嘿~看到官方私信才发现原来时间又过去了一年,荔枝也在CSDN中创作满一年啦,虽然中间因为种种原因并没有经常输出博文哈哈,但荔枝一直在坚持创作嘿嘿。记得去年的同一时间我也同样写了一篇总结文哈哈哈&#x…...
qt.qpa.plugin:找不到Qt平台插件“wayland“|| (下载插件)Ubuntu上解决方案
相信大家也都知道这个地方应该做什么,当然是下载这个qt平台的插件wayland,但是很多人可能不知道怎么下载这个插件。 那么我现在要说的这个方法就是针对这种的。 sudo apt install qtwayland5完事儿了奥兄弟们。 看看效果 正常了奥。...

详解Spring Boot中@PostConstruct的使用
PostConstruct 在Java中,PostConstruct是一个注解,通常用于标记一个方法,它表示该方法在类实例化之后(通过构造函数创建对象之后)立即执行。 加上PostConstruct注解的方法会在对象的所有依赖项都已经注入完成之后执行…...

判断子序列
判断子序列 题目: 给定字符串 s 和 t ,判断 s 是否为 t 的子序列。 字符串的一个子序列是原始字符串删除一些(也可以不删除)字符而不改变剩余字符相对位置形成的新字符串。(例如,"ace"是"abcde"…...
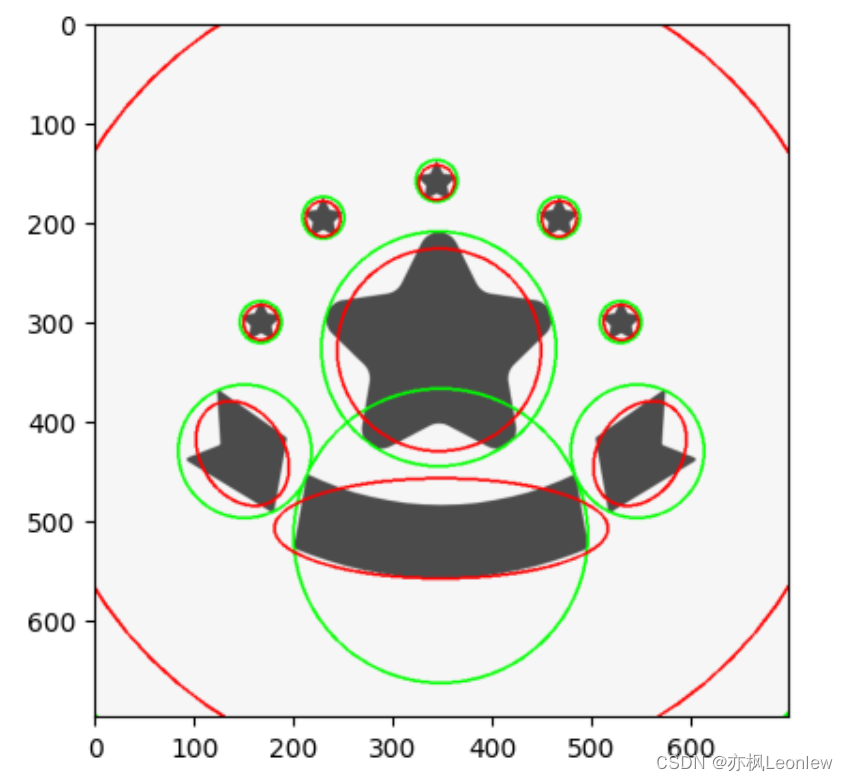
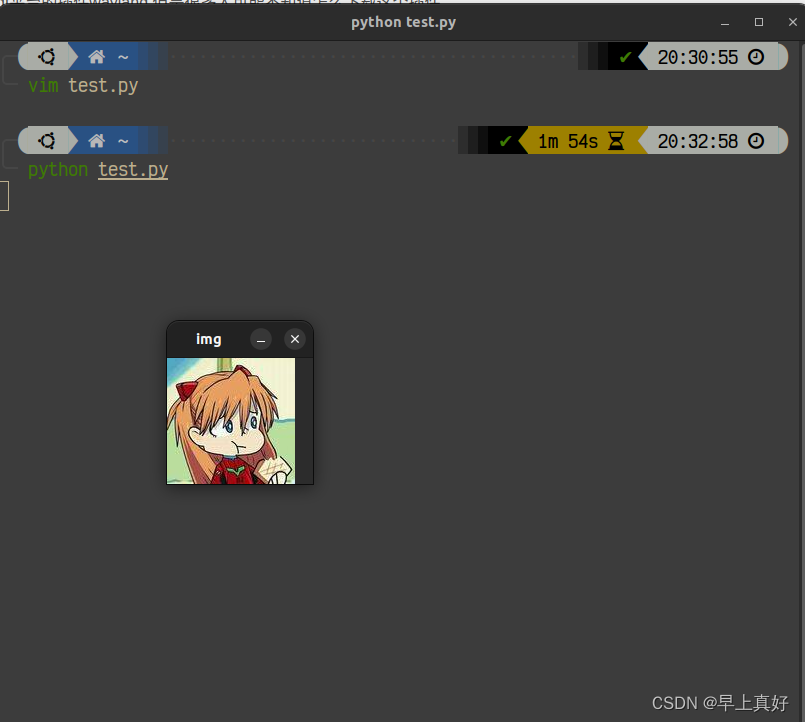
Python Opencv实践 - 轮廓特征(最小外接圆,椭圆拟合)
import cv2 as cv import numpy as np import matplotlib.pyplot as pltimg cv.imread("../SampleImages/stars.PNG") plt.imshow(img[:,:,::-1])#轮廓检测 img_gray cv.cvtColor(img, cv.COLOR_BGR2GRAY) ret,thresh cv.threshold(img_gray, 127, 255, 0) contou…...

Ubuntu22.04 LTS+NVIDIA 4090+Cuda12.1+cudnn8.8.1
系统环境中: 1.系统驱动安装的是: NVIDIA-Linux-x86_64-530.30.02.run 2.CUDA安装:cuda_12.1.0_530.30.02_linux.run(无需第1步,直接安装它就带配套驱动) wget https://developer.download.nvidia.com/…...

柔性LED灯丝DIY:从电路原理到创意饰品制作全攻略
1. 项目概述:当生日遇上柔性LED灯丝给孩子的生日派对准备一份独一无二的、会发光的惊喜,是很多家长和手工爱好者的心愿。这次,我们不买现成的塑料灯牌,而是亲手做一个能戴在头上或挂在脖子上的“生日数字灯冠”。这个项目的核心&a…...

终极跨平台漫画阅读方案:nhentai-cross全平台使用指南
终极跨平台漫画阅读方案:nhentai-cross全平台使用指南 【免费下载链接】nhentai-cross A nhentai client 项目地址: https://gitcode.com/gh_mirrors/nh/nhentai-cross 你是否厌倦了在不同设备间切换漫画阅读应用?nhentai-cross正是为你量身定制…...

暗黑3鼠标宏终极指南:D3KeyHelper 5步配置法快速上手
暗黑3鼠标宏终极指南:D3KeyHelper 5步配置法快速上手 【免费下载链接】D3keyHelper D3KeyHelper是一个有图形界面,可自定义配置的暗黑3鼠标宏工具。 项目地址: https://gitcode.com/gh_mirrors/d3/D3keyHelper D3KeyHelper是一款专为暗黑破坏神3玩…...

终极免费城通网盘直连解析工具:告别下载限速的完整指南
终极免费城通网盘直连解析工具:告别下载限速的完整指南 【免费下载链接】ctfileGet 获取城通网盘一次性直连地址 项目地址: https://gitcode.com/gh_mirrors/ct/ctfileGet 还在为城通网盘下载速度慢、等待时间长而烦恼吗?ctfileGet是一款专为城通…...

如何快速解密网易云NCM文件:终极免费转换工具指南
如何快速解密网易云NCM文件:终极免费转换工具指南 【免费下载链接】ncmdumpGUI C#版本网易云音乐ncm文件格式转换,Windows图形界面版本 项目地址: https://gitcode.com/gh_mirrors/nc/ncmdumpGUI 你是否在网易云音乐下载了喜欢的歌曲,…...

轻量级服务器监控面板:从原理到部署实战
1. 项目概述:一个开源监控面板的诞生最近在折腾服务器和容器化应用,发现一个挺普遍的需求:当你手头有几台服务器,上面跑着几个Docker容器,或者一些自己写的服务,你总想知道它们现在“活”得怎么样。CPU是不…...

Kubernetes部署Valheim游戏服务器:云原生技术赋能游戏运维实践
1. 项目概述:当维京英灵殿遇上容器编排如果你和我一样,既沉迷于《英灵神殿》(Valheim)里与好友共建家园、挑战上古巨兽的乐趣,又恰好是一名整天和Kubernetes(k8s)打交道的开发者或运维ÿ…...

基于MCP协议构建AI编程助手:unloop-mcp文件系统服务器实战指南
1. 项目概述:一个面向开发者的“解循环”MCP服务器最近在GitHub上看到一个挺有意思的项目,叫Escapepaleolithic247/unloop-mcp。光看这个名字,可能有点摸不着头脑,但如果你是一个经常和AI助手(比如Claude、Cursor等&am…...
TransPrompt:结构化提示词工程,提升LLM应用开发效率
1. 项目概述:当提示词工程遇上结构化工具最近在折腾大语言模型应用开发的朋友,估计都绕不开一个核心痛点:如何高效、稳定地管理那些越来越复杂、越来越长的提示词(Prompt)。直接写在代码里?改起来麻烦&…...

Linux内核升级C11标准:从C89到现代C语言的演进与实战解析
1. 项目概述:一次内核语言的“心脏移植”最近Linux内核社区的一个决定,在开发者圈子里激起了不小的波澜:计划将内核的C语言标准从使用了超过十年的C89/C90,逐步迁移到C11。这听起来可能像是一个枯燥的技术规范更新,但对…...