LNMP架构部署Discuz论坛系统
文章目录
- LNMP架构&部署Discuz论坛系统
- 部署LNMP架构
- 环境
- 前期准备
- 安装Nginx
- 安装mariadb
- 安装php
- 配置nginx
- 部署Discuz论坛系统
- 下载Discuz论坛系统代码包
- 部署Discuz论坛系统
- 配置虚拟主机
- 安装Discuz论坛
- 访问站点
- 尝试注册一个账号
LNMP架构&部署Discuz论坛系统
部署LNMP架构
环境
| 操作系统 | Nginx版本 | 数据库版本 | PHP版本 |
|---|---|---|---|
| centos-8 | nginx-1.22.1 | mariadb-10.3 | php-8.2.10 |
前期准备
//配置yum源(推荐使用阿里云源)和epel源
[root@wanf ~]# rm -rf /etc/yum.repos.d/*
[root@wanf ~]# curl -o /etc/yum.repos.d/CentOS-Base.repo https://mirrors.aliyun.com/repo/Centos-vault-8.5.2111.repo
[root@wanf ~]# sed -i -e '/mirrors.cloud.aliyuncs.com/d' -e '/mirrors.aliyuncs.com/d' /etc/yum.repos.d/CentOS-Base.repo
[root@wanf ~]# yum clean all
[root@wanf ~]# yum makecache
[root@wanf ~]# yum install -y https://mirrors.aliyun.com/epel/epel-release-latest-8.noarch.rpm
[root@wanf ~]# sed -i 's|^#baseurl=https://download.example/pub|baseurl=https://mirrors.aliyun.com|' /etc/yum.repos.d/epel*
[root@wanf ~]# sed -i 's|^metalink|#metalink|' /etc/yum.repos.d/epel*
[root@wanf ~]# yum makecache //永久关闭防火墙和selinux
[root@wanf ~]# systemctl disable --now firewalld.service
[root@wanf ~]# setenforce 0
[root@wanf ~]# sed -i 's/^SELINUX=enforcing/SELINUX=disabled/g' /etc/selinux/config
[root@wanf ~]# reboot//安装相关依赖
[root@wanf ~]# yum -y install libxml2-devel openssl openssl-devel bzip2 bzip2-devel libcurl libcurl-devel libicu-devel libjpeg libjpeg-devel libpng libpng-devel openldap-devel  pcre-devel freetype freetype-devel gmp gmp-devel libmcrypt libmcrypt-devel readline readline-devel libxslt libxslt-devel mhash mhash-devel php-mysqlnd sqlite-devel libzip libzip-devel gd-devel oniguruma make wget vim  --nobest[root@wanf ~]# yum -y install http://mirror.centos.org/centos/8-stream/PowerTools/x86_64/os/Packages/oniguruma-devel-6.8.2-2.el8.x86_64.rpm[root@wanf ~]# yum -y install gcc gcc-c++ --allowerasing
[root@wanf ~]# yum -y groups mark install 'Development Tools'
安装Nginx
//创建nginx系统用户
[root@wanf ~]# useradd -r -M -s /sbin/nologin nginx
[root@wanf ~]# id nginx
uid=995(nginx) gid=992(nginx) groups=992(nginx)//创建日志存放目录
[root@wanf ~]# mkdir -p /var/log/nginx
[root@wanf ~]# chown -R nginx.nginx /var/log/nginx//下载nginx软件包,并安装
[root@wanf ~]# wget http://nginx.org/download/nginx-1.22.1.tar.gz -P /usr/src///编译安装
[root@wanf ~]# cd /usr/src/
[root@wanf src]# ls
debug  kernels  nginx-1.22.1.tar.gz
[root@wanf src]# tar -xf nginx-1.22.1.tar.gz
[root@wanf src]# cd nginx-1.22.1/
[root@wanf nginx-1.22.1]# ./configure \
--prefix=/usr/local/nginx \
--user=nginx \
--group=nginx \
--with-debug \
--with-http_ssl_module \
--with-http_realip_module \
--with-http_image_filter_module \
--with-http_gunzip_module \
--with-http_gzip_static_module \
--with-http_stub_status_module \
--http-log-path=/var/log/nginx/access.log \
--error-log-path=/var/log/nginx/error.log
(配置过程省略)[root@wanf nginx-1.22.1]# make -j4 && make install
(编译安装过程省略)//nginx安装后配置
//配置环境变量
[root@wanf ~]# echo 'export PATH=/usr/local/nginx/sbin:$PATH' > /etc/profile.d/nginx.sh
[root@wanf ~]# source /etc/profile.d/nginx.sh//加入systemctl管理
[root@wanf ~]# vim /usr/lib/systemd/system/nginx.service
[root@wanf ~]# cat /usr/lib/systemd/system/nginx.service
[Unit]
Description=nginx server daemon
After=network.target[Service]
Type=forking
ExecStart=/usr/local/nginx/sbin/nginx
ExecStop=/usr/local/nginx/sbin/nginx -s stop
ExecReload=/usr/local/nginx/sbin/nginx -s reload[Install]
WantedBy=multi-user.target
[root@wanf ~]# systemctl daemon-reload  //启动并设置开机自启
[root@wanf ~]# systemctl enable --now nginx.service
[root@wanf ~]# ss -anlt
State   Recv-Q  Send-Q    Local Address:Port     Peer Address:Port  Process
LISTEN  0       511             0.0.0.0:80            0.0.0.0:*
LISTEN  0       128             0.0.0.0:22            0.0.0.0:*
LISTEN  0       128                [::]:22               [::]:*
[root@wanf ~]#
成功访问nginx主页

安装mariadb
//安装mariadb
[root@wanf ~]# yum -y install mariadb mariadb-server//启动mariadb并设置开机自启
[root@wanf ~]# systemctl enable --now mariadb.service //设置密码
[root@wanf ~]# mysql
MariaDB [(none)]> set password = password('12345678');   //根据需求设置密码
Query OK, 0 rows affected (0.001 sec)MariaDB [(none)]> quit
Bye
[root@wanf ~]#
安装php
//下载php软件包
[root@wanf ~]# wget https://www.php.net/distributions/php-8.2.10.tar.gz -P /usr/src///编译安装
[root@wanf ~]# cd /usr/src/
[root@wanf src]# tar -xf php-8.2.10.tar.gz
[root@wanf src]# cd php-8.2.10/
[root@wanf php-8.2.10]# ./configure --prefix=/usr/local/php8  \
--with-config-file-path=/etc \
--enable-fpm \
--disable-debug \
--disable-rpath \
--enable-shared \
--enable-soap \
--with-openssl \
--enable-bcmath \
--with-iconv \
--with-bz2 \
--enable-calendar \
--with-curl \
--enable-exif  \
--enable-ftp \
--enable-gd  \
--with-jpeg \
--with-zlib-dir \
--with-freetype \
--with-gettext \
--enable-mbstring \
--enable-pdo \
--with-mysqli=mysqlnd \
--with-pdo-mysql=mysqlnd \
--with-readline \
--enable-shmop \
--enable-simplexml \
--enable-sockets \
--with-zip \
--enable-mysqlnd-compression-support \
--with-pear \
--enable-pcntl \
--enable-posix
(配置过程省略)[root@wanf php-8.2.10]# make -j4 && make install
(编译安装过程省略)//安装后配置
[root@wanf php-8.2.10]# echo 'export PATH=/usr/local/php8/bin:$PATH' > /etc/profile.d/php8.sh
[root@wanf php-8.2.10]# source /etc/profile.d/php8.sh
[root@wanf php-8.2.10]# cp php.ini-production /etc/php.ini
cp: overwrite '/etc/php.ini'? y
[root@wanf php-8.2.10]# cp sapi/fpm/init.d.php-fpm /etc/init.d/php-fpm
[root@wanf php-8.2.10]# chmod +x /etc/rc.d/init.d/php-fpm
[root@wanf php-8.2.10]# cp /usr/local/php8/etc/php-fpm.conf.default /usr/local/php8/etc/php-fpm.conf
[root@wanf php-8.2.10]# cp /usr/local/php8/etc/php-fpm.d/www.conf.default /usr/local/php8/etc/php-fpm.d/www.conf[root@wanf php-8.2.10]# vim /usr/local/php8/etc/php-fpm.conf
[root@wanf php-8.2.10]# tail -4 /usr/local/php8/etc/php-fpm.conf
pm.max_children = 50
pm.start_servers = 5
pm.min_spare_servers = 2
pm.max_spare_servers = 8
[root@wanf php-8.2.10]# //加入systemctl管理
[root@wanf ~]# vim /usr/lib/systemd/system/php-fpm.service
[root@wanf ~]# cat /usr/lib/systemd/system/php-fpm.service
[Unit]
Description=php-fpm server daemon
After=network.targe[Service]
Type=forking
ExecStart=/etc/rc.d/init.d/php-fpm start
ExecStop=/etc/rc.d/init.d/php-fpm stop
ExecReload=/bin/kill -HUP \$MAINPID[Install]
WantedBy=multi-user.target
[root@wanf ~]# systemctl daemon-reload//启动并设置开机自启
[root@wanf ~]# systemctl enable --now php-fpm.service
配置nginx
//创建php测试页面
[root@wanf ~]# cd /usr/local/nginx/html/
[root@wanf html]# vim index.php
[root@wanf html]# cat index.php
<?phpphpinfo();
?>
[root@wanf html]# //修改nginx主配置文件
[root@wanf html]# vim /usr/local/nginx/conf/nginx.conf
......
server {listen       80;server_name  www.wanf.com;      //自己的域名
......location / {root   html;index  index.php index.html index.htm;    //加一个index.php}
......location ~ \.php$ {root           html;fastcgi_pass   127.0.0.1:9000;fastcgi_index  index.php;fastcgi_param  SCRIPT_FILENAME  /scripts$fastcgi_script_name;include        fastcgi.conf;    //改为fastcgi.conf;}
......//重启服务
[root@wanf html]# systemctl restart nginx.service
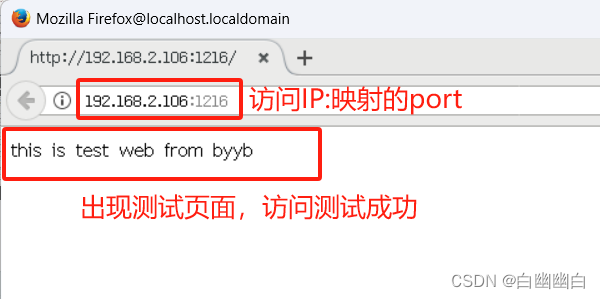
通过IP地址访问测试页面

部署完成
部署Discuz论坛系统
下载Discuz论坛系统代码包

Discuz论坛系统下载地址Discuz官网
//我提前下好了,然后传进主机中
[root@wanf ~]# ls
Discuz_X3.5_SC_UTF8_20231001.zip
部署Discuz论坛系统
//创建一个目录存放网站文件
[root@wanf ~]# mkdir /usr/local/nginx/html/Discuz//解压到刚刚创建的目录
[root@wanf ~]# yum -y install unzip
[root@wanf ~]# unzip Discuz_X3.5_SC_UTF8_20231001.zip -d /usr/local/nginx/html/Discuz/
[root@wanf ~]# cd /usr/local/nginx/html/
[root@wanf html]# ls
50x.html  Discuz  index.html  index.php
[root@wanf html]# cd Discuz/
[root@wanf Discuz]# ls
LICENSE  qqqun.png  readme  readme.html  upload  utility.html
[root@wanf Discuz]# cd upload/
[root@wanf upload]# ls
admin.php  connect.php      group.php   misc.php    source
api        crossdomain.xml  home.php    plugin.php  static
api.php    data             index.php   portal.php  template
archiver   favicon.ico      install     robots.txt  uc_client
config     forum.php        member.php  search.php  uc_server
[root@wanf upload]# //修改权限
[root@wanf ~]# cd /usr/local/nginx/html/Discuz/upload/
[root@wanf upload]# chown -R nginx config/
[root@wanf upload]# chown -R nginx data/
[root@wanf upload]# chown -R nginx uc_client/
[root@wanf upload]# chown -R nginx uc_server/
[root@wanf upload]# chmod -R 777 config/
[root@wanf upload]# chmod -R 777 data/
[root@wanf upload]# chmod -R 777 uc_client/
[root@wanf upload]# chmod -R 777 uc_server///创建数据库
[root@wanf ~]# mysql -uroot -p12345678 -e "create database Discuz;"
配置虚拟主机
//编辑nginx配置文件,创建一个虚拟主机,可以用域名访问
[root@wanf ~]# vim /usr/local/nginx/conf/nginx.conf
.......
server {listen       80;server_name  www.wanf1.com;     //自己的域名location / {root   html/Discuz/upload;           //改为网站目录index  index.php index.html index.htm;}error_page   500 502 503 504  /50x.html;location = /50x.html {root   html;}location ~ \.php$ {root           html/Discuz/upload;     //改为网站目录fastcgi_pass   127.0.0.1:9000;fastcgi_index  index.php;fastcgi_param  SCRIPT_FILENAME  /scripts$fastcgi_script_name;include        fastcgi.conf;}}
......//重启nginx服务和php-fpm
[root@wanf ~]# systemctl restart nginx.service
[root@wanf ~]# systemctl restart php-fpm.service
安装Discuz论坛
第一次安装需要在域名后面接/install才可以到安装界面


安装完毕
访问站点

尝试注册一个账号


相关文章:
LNMP架构部署Discuz论坛系统
文章目录 LNMP架构&部署Discuz论坛系统部署LNMP架构环境前期准备安装Nginx安装mariadb安装php配置nginx 部署Discuz论坛系统下载Discuz论坛系统代码包部署Discuz论坛系统配置虚拟主机安装Discuz论坛访问站点尝试注册一个账号 LNMP架构&部署Discuz论坛系统 部署LNMP架构…...

【vscode】本地配置和根据不同项目不同的vscode配置
目录 1. .vscode项目配置2. vscode本地配置 1. .vscode项目配置 {"typescript.tsdk": "node_modules/typescript/lib","prettier.enable": false,"god.tsconfig": "./tsconfig.json",// TODO: 文件默认配置"[css]&quo…...

状态空间方程的离散化
一、理论基础 1、系统离散化(传递函数和状态空间方程) 【离散系统】传递函数和状态空间方程离散化-CSDN博客 状态空间方程的离散化 - 知乎 (zhihu.com) 2、差分方程的建立与分析 【精选】数学建模之差分方程模型详解_左手の明天的博客-CSDN博客 【信…...
【Docker从入门到入土 3】Docker镜像的创建方法
Part3 一、Docker镜像1.1 镜像的概念1.2 镜像结构的分层 二、Docker镜像的创建2.1 基于现有镜像创建2.1.1 创建思路2.1.2 举个例子 2.2 基于本地模板创建2.3 基于Dockerfile 创建 三、Dockerfile 详解3.1 Dockerfile 操作指令3.1.1 常用的操作指令3.1.2 CMD和ENTRYPOINT的区别…...
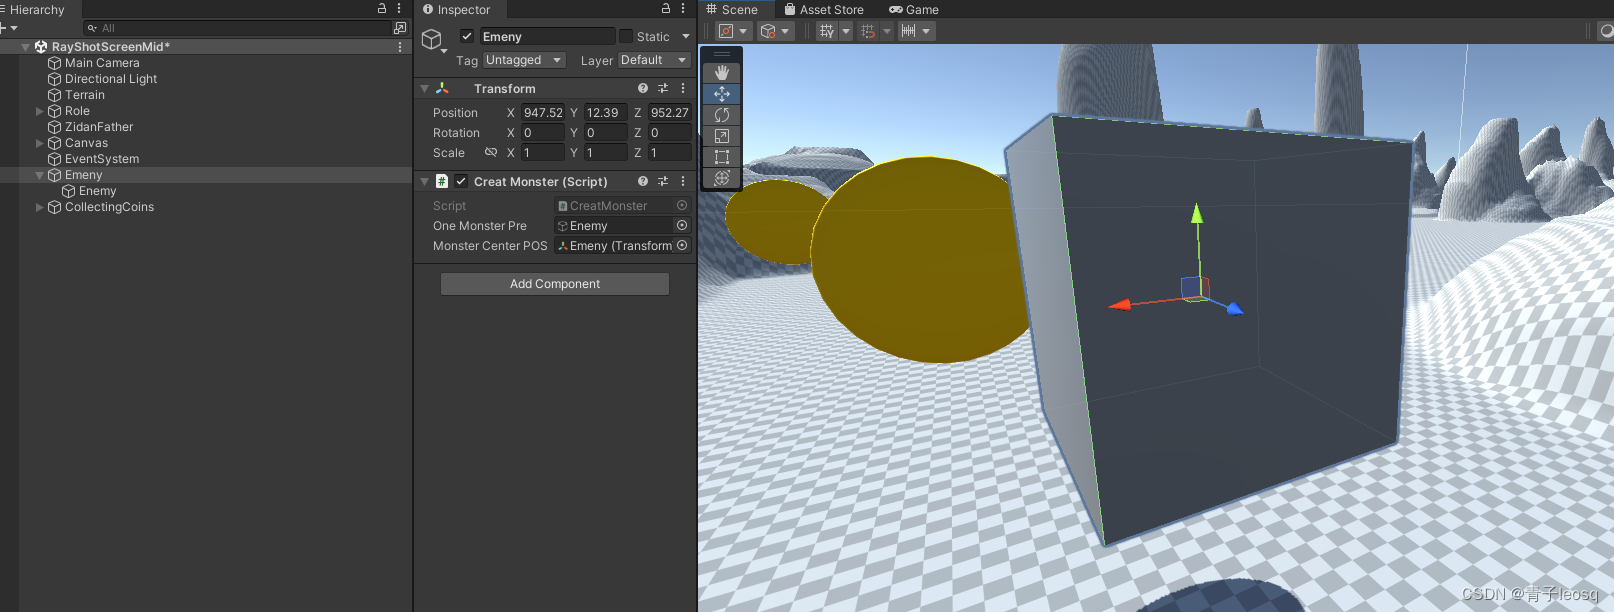
Unity实现方圆X范围随机生成怪物
using System.Collections; using System.Collections.Generic; using UnityEngine;public class CreatMonster : MonoBehaviour {// S这个脚本间隔一点时间生成怪物/*1.程序逻辑* 1. 设计一个计时器* 2.间隔一段时间3s执行一下 * */float SaveTime 0f;public GameObject …...

竞赛 深度学习乳腺癌分类
文章目录 1 前言2 前言3 数据集3.1 良性样本3.2 病变样本 4 开发环境5 代码实现5.1 实现流程5.2 部分代码实现5.2.1 导入库5.2.2 图像加载5.2.3 标记5.2.4 分组5.2.5 构建模型训练 6 分析指标6.1 精度,召回率和F1度量6.2 混淆矩阵 7 结果和结论8 最后 1 前言 &…...

基于斑马优化的BP神经网络(分类应用) - 附代码
基于斑马优化的BP神经网络(分类应用) - 附代码 文章目录 基于斑马优化的BP神经网络(分类应用) - 附代码1.鸢尾花iris数据介绍2.数据集整理3.斑马优化BP神经网络3.1 BP神经网络参数设置3.2 斑马算法应用 4.测试结果:5.M…...

LINUX | hexdump以16进制查看文件内容
LINUX | hexdump以16进制查看文件内容 时间:2023-10-20 文章目录 LINUX | hexdump以16进制查看文件内容1.参考2.示例1.以ASCII字符显示文件中字符2.以16进制和相应的ASCII字符显示文件里的字符3.只显示文件中前n个字符4.以偏移量开始格式输出 1.参考 1.Linux命令–h…...
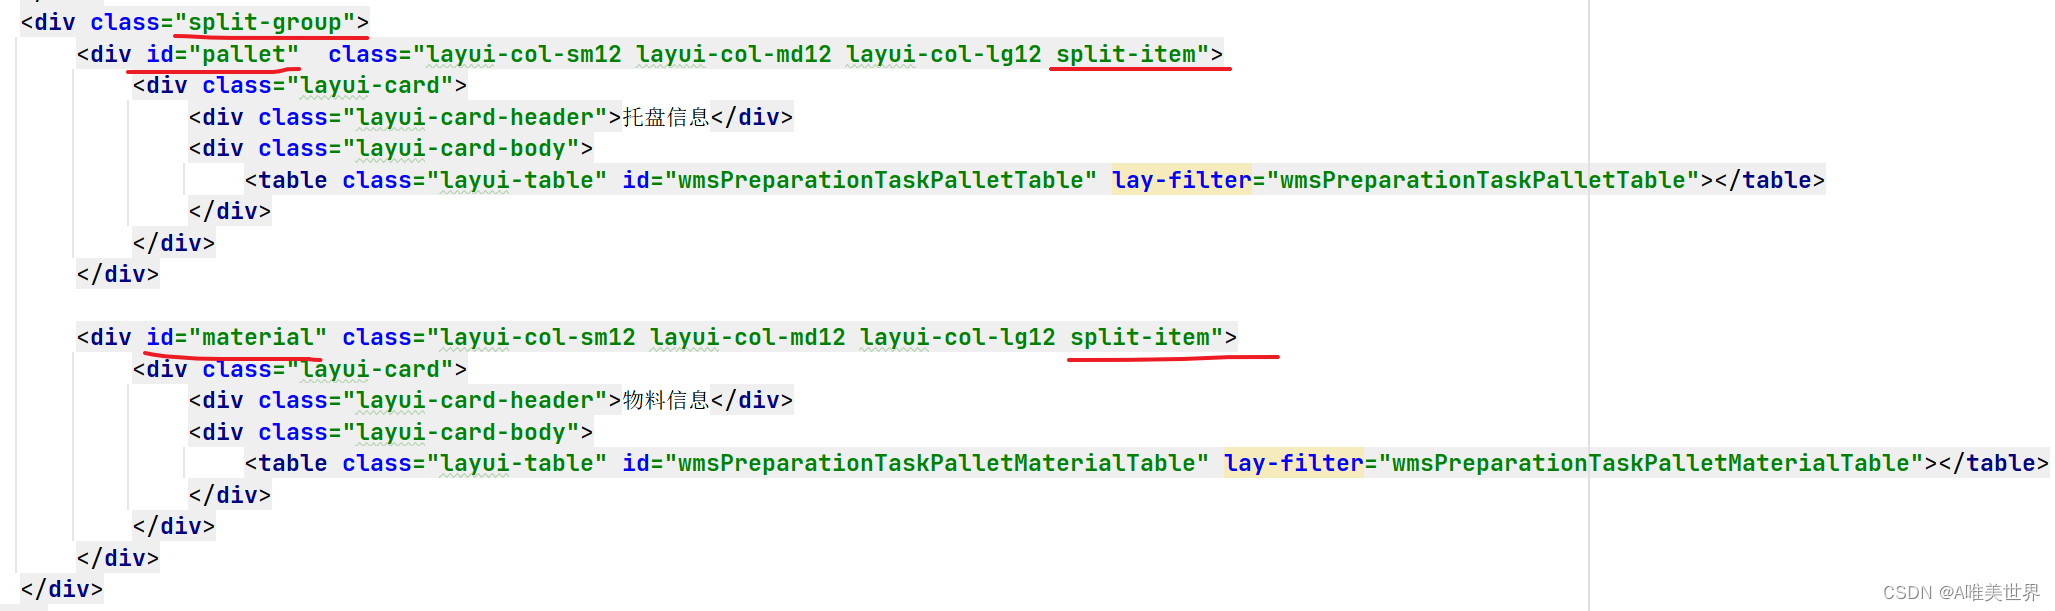
layui中页面切分
1.引入Split插件 2.切屏比例设置 pallet与material为标签的id 3.html内部标签上设置切分盒子 4参考网站 : 网站链接...
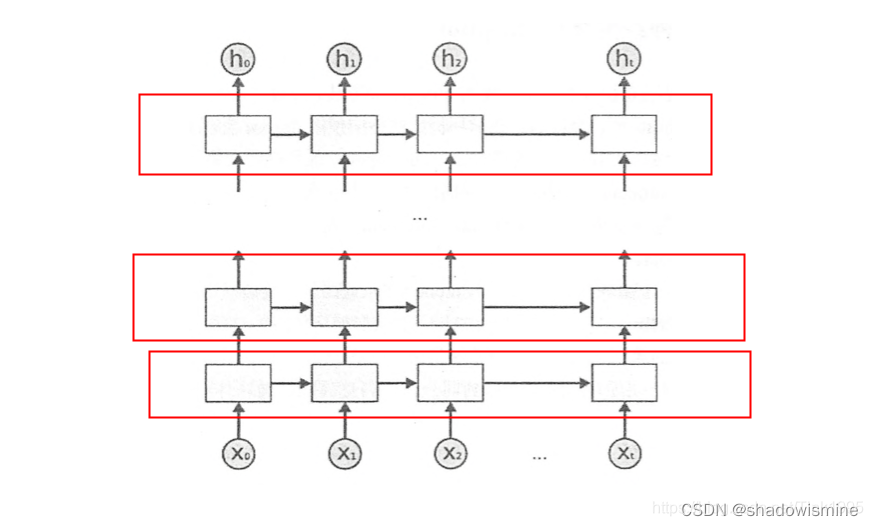
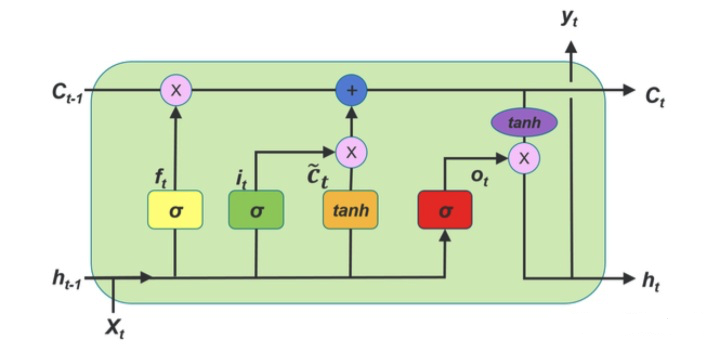
循环神经网络(Recurrent Neural Network)
1. 为什么需要循环神经网络 RNN 上图是一幅全连接神经网络图,我们可以看到输入层-隐藏层-输出层,他们每一层之间是相互独立地,(框框里面代表同一层),每一次输入生成一个节点,同一层中每个节点之间又相互独立的话&#…...

管理类联考——英语二——阅读篇——题材:经济
文章目录 2011 年,Text 2——题材:经济句意理解题-原词复现一般不选,但是要留意无中生有推断题-原词复现,注意是否“无中生有”“对象错误”“词意相反”推断题推断题主旨题-不了解阅读意思,很难做出选择 2011 年&…...

【Java】ListIterator
列表迭代器: ListIterator listIterator():List 集合特有的迭代器该迭代器继承了 Iterator 迭代器,所以,就可以直接使用 hasNext()和next()方法。特有功能: Object previous():获取上一个元素boolean hasPr…...

EV SSL数字证书贵吗
EVSSL证书通常适用于具有高需求的网站和企业,特别是涉及在线交易、金融服务、电子商务平台等需要建立用户信任的场景。大型企业、金融机构、电子商务平台等可以受益于使用EV证书来提升品牌形象和安全性。 申请EVSSL证书(Extended Validation SSL certifi…...

nginx安装详细步骤和使用说明
下载地址: https://download.csdn.net/download/jinhuding/88463932 详细说明和使用参考: 地址:http://www.gxcode.top/code 一 nginx安装步骤: 1.nginx安装与运行 官网 http://nginx.org/1.1安装gcc环境 # yum install gcc-c…...
11 Self-Attention相比较 RNN和LSTM的优缺点
博客配套视频链接: https://space.bilibili.com/383551518?spm_id_from=333.1007.0.0 b 站直接看 配套 github 链接:https://github.com/nickchen121/Pre-training-language-model 配套博客链接:https://www.cnblogs.com/nickchen121/p/15105048.html RNN 无法做长序列,当一…...
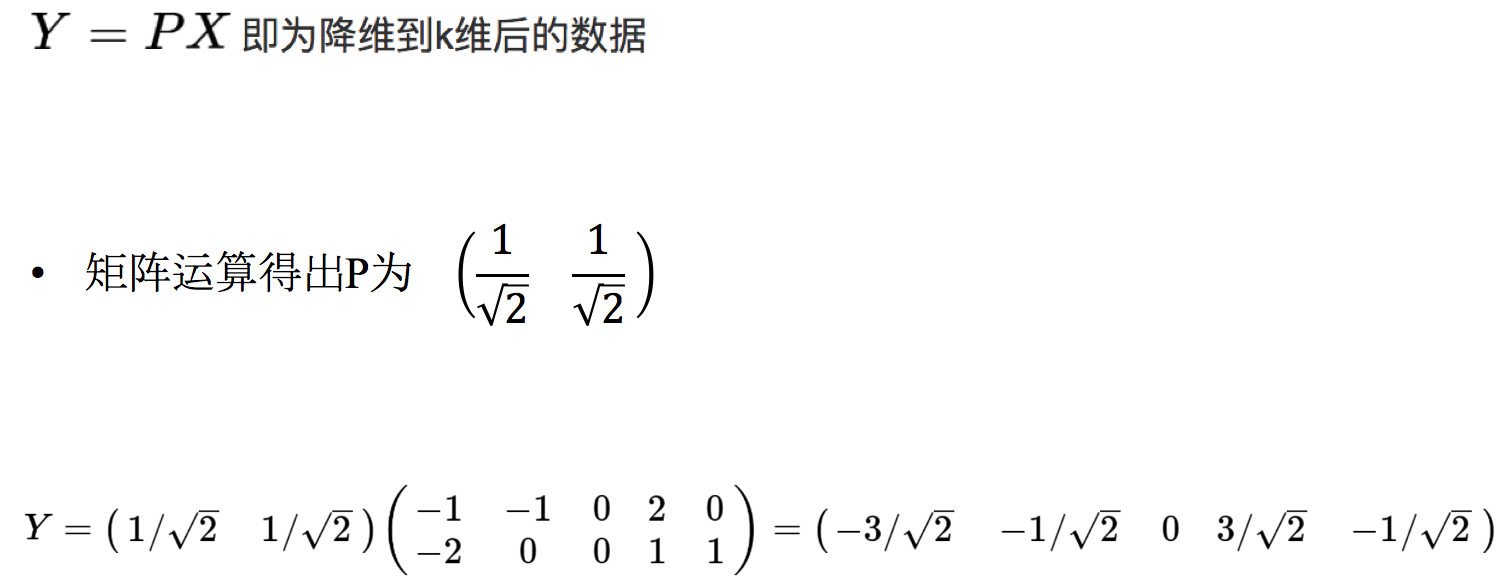
数据集-特征降维
1、降维 降维是指在某些限定条件下,降低随机变量(特征)个数,得到一组“不相关”主变量的过程 降低随机变量的个数 相关特征(correlated feature) 相对湿度与降雨量之间的相关等等 正是因为在进行训练的时候,我们都是使用特征进行学习。如果…...

【C语言】字符串+内存函数的介绍
🎈个人主页:.满船清梦压星河_-CSDN博客 🌂c/c领域新星创作者 🎉欢迎👍点赞✍评论❤️收藏 😛😛😛希望我的文章能对你有所帮助,有不足的地方还请各位看官多多指教…...

C#WPF资源字典应用实例
本文实例演示C#WPF资源字典应用 目录 一、资源字典 二、实例 1新建一个资源字典 2添加到资源文件App.xaml...

如何在国际腾讯云服务器上设置IP节点的密码?
跟着云计算技术的发展,越来越多的企业和个人开始运用云服务器来存储和处理数据。腾讯云服务器是一款非常受欢迎的云服务器产品,它提供了高效稳定的计算能力。在运用腾讯云服务器的过程中,咱们可能需求设置IP节点的暗码,以便维护咱…...

浅谈基于敏捷开发交付应对突发项目
软件项目开发的全过程是一个很大的范畴,从确定需求,到编码设计,到集成发布,到运维、运营、设计方方面面。在这个过程中,交付过程是非常关键的,因为它影响着软件的质量、稳定性和用户体验。 在当今竞争激烈的…...

论文图表不用手画!Paperxie AI 科研绘图:让学术可视化效率拉满
paperxie-免费查重复率aigc检测/开题报告/毕业论文/智能排版/文献综述/科研绘图https://www.paperxie.cn/drawinghttps://www.paperxie.cn/drawing 一、 科研人的 “画图焦虑”,终于有解了 做科研、写论文,最磨人的从来不是实验本身,而是画图…...
)
畜牧检测站综合监测系统设计与实现(有完整资料)
资料查找方式:特纳斯电子(电子校园网):搜索下面编号即可编号:T0542309M设计简介:本设计是基于单片机的畜牧检测站综合监测系统设计,主要实现以下功能:通过温湿度传感器检测温湿度 通…...
)
保姆级教程:手把手教你用PyTorch复现ICASSP 2023的EMA注意力模块(附完整代码)
从零实现ICASSP 2023多尺度注意力:EMA模块的工程实践指南 在计算机视觉领域,注意力机制已经成为提升模型性能的关键组件。ICASSP 2023提出的EMA(Efficient Multi-Scale Attention)模块通过创新的跨空间学习方式,在保持…...

3分钟快速上手:如何使用MIST实现高效显微图像拼接
3分钟快速上手:如何使用MIST实现高效显微图像拼接 【免费下载链接】MIST Microscopy Image Stitching Tool 项目地址: https://gitcode.com/gh_mirrors/mist3/MIST MIST(Microscopy Image Stitching Tool)是由美国国家标准与技术研究院…...

VMware虚拟机安装教程:Qwen3-TTS开发环境配置
VMware虚拟机安装教程:Qwen3-TTS开发环境配置 1. 环境准备与系统要求 在开始配置Qwen3-TTS开发环境之前,我们需要先确保硬件和软件环境满足基本要求。这个环节很重要,好的开始是成功的一半。 首先来看看硬件要求。建议使用至少8GB内存的电…...

ESP居然能当 DNS 服务器用?内含NCSI欺骗和DNS劫持实现肚
前言 Kubernetes 本身并不复杂,是我们把它搞复杂的。无论是刻意为之还是那种虽然出于好意却将优雅的原语堆砌成 鲁布戈德堡机械 的狂热。平台最初提供的 ReplicaSets、Services、ConfigMaps,这些基础组件简单直接,甚至显得有些枯燥。但后来我…...
)
STM32 Bootloader分区实战:12K空间如何优化配置(附Keil生成bin/hex命令)
STM32 Bootloader分区实战:12K空间优化配置与Keil生成技巧 在嵌入式开发领域,Bootloader设计往往是产品稳定性和可维护性的第一道门槛。面对有限的Flash资源,如何合理分配Bootloader与应用程序(APP)的空间,成为每个STM32开发者必…...

Bilibili-Evolved:重新定义你的B站浏览体验
Bilibili-Evolved:重新定义你的B站浏览体验 【免费下载链接】Bilibili-Evolved 强大的哔哩哔哩增强脚本 项目地址: https://gitcode.com/gh_mirrors/bi/Bilibili-Evolved 你是否曾想过,为什么每次打开B站都要面对千篇一律的界面?为什么…...

2026年4月如何搭建OpenClaw?阿里云9分钟喂饭级指南+大模型APIKey、Skill部署
2026年4月如何搭建OpenClaw?阿里云9分钟喂饭级指南大模型APIKey、Skill部署。OpenClaw是什么?OpenClaw能干什么?OpenClaw怎么部署使用?本文面向零基础用户,完整说明在轻量服务器与本地Windows11、macOS、Linux系统中部…...

2026年4月OpenClaw如何集成?云端4分钟保姆级方法+大模型APIKey、Skill集成
OpenClaw是什么?OpenClaw能干什么?OpenClaw怎么部署使用?本文面向零基础用户,完整说明在轻量服务器与本地Windows11、macOS、Linux系统中部署OpenClaw(Clawdbot)的流程,包含环境配置、服务启动、…...