Vue3的手脚架使用和组件父子间通信-插槽(Options API)学习笔记
Vue CLI安装和使用
- 全局安装最新vue3
npm install @vue/cli -g
- 升级Vue CLI:
如果是比较旧的版本,可以通过下面命令来升级
npm update @vue/cli -g
通过脚手架创建项目
vue create 01_product_demo
Vue3父子组件的通信
父传子
父组件
<template><div><div class="item" v-for="(item,index) in user_list" :key="index"><user-component :name="item.name" :age="item.age"></user-component></div></div>
</template><script>import UserComponent from './components/UserComponent'export default {components:{UserComponent},data(){return {user_list:[{name:'why',age:18},{name:'zhang',age:26},]}}}
</script><style scoped></style>
子组件 UserComponent.vue
<template><div><div>名字:{{ name }}</div><div>年龄:{{ age }}</div></div>
</template><script>export default {props:{name:{type:String,default:''},age:{type:Number,default:0},// 对象类型friend:{type:Object,default:()=>({name:"james"})},// 数组类型hobbies:{type:Array,default:()=>['篮球','rap','唱跳']}}}
</script><style scoped></style>
子传父
父组件
<template><div><div>{{ counter }}</div><JiaComponent @jia="jia"></JiaComponent> <JianComponent @jian="jian"></JianComponent> </div>
</template><script>import JiaComponent from './JiaComponent'import JianComponent from './JianComponent'export default {components:{JiaComponent,JianComponent},data(){return {counter:1}},methods:{jian:function(data){this.counter = this.counter - data;},jia:function(data){this.counter = this.counter + data;}}}
</script><style scoped></style>
**子组件1 JiaComponent.vue **
<template><div><div><button @click="jia(1)">+1</button><button @click="jia(5)">+5</button><button @click="jia(10)">+10</button></div></div>
</template><script>export default {emits:['jia'], // 使用的时候会有提醒// emits:{//   // 验证//   jia:function(data){//     if(data <= 5){//       return true//     }//     return false//   }// },methods:{jia(data){this.$emit('jia',data);}}}
</script><style scoped></style>
** 子组件2 JianComponent.vue **
<template><div><div><button @click="jian(1)">-1</button><button @click="jian(5)">-5</button><button @click="jian(10)">-10</button></div></div>
</template><script>export default {methods:{jian(data){this.$emit("jian",data);}}}
</script><style scoped></style>
插槽基本使用
父组件
<template><div><TitleComponents title="标题" desc="描述描述描述描述描述"></TitleComponents> <!-- 1.插入button --><TitleComponents title="标题" desc="描述描述描述描述描述"><button>按钮</button></TitleComponents><!-- 2.插入a链接 --><TitleComponents title="标题" desc="描述描述描述描述描述"><a href="https://www.baidu.com">百度一下</a></TitleComponents><!-- 3.插入image --><TitleComponents title="标题" desc="描述描述描述描述描述"><img src="https://gimg3.baidu.com/search/src=http%3A%2F%2Fpics6.baidu.com%2Ffeed%2F34fae6cd7b899e512cb62692d10fdf3ec9950db4.jpeg%40f_auto%3Ftoken%3D8ce9dbae74003846c318068640c41183&refer=http%3A%2F%2Fwww.baidu.com&app=2021&size=f360,240&n=0&g=0n&q=75&fmt=auto?sec=1698944400&t=e504855a1a7b815dfa76940bb9ac2a07" /></TitleComponents><!-- 4. 默认显示 --><TitleComponents title="标题" desc="描述描述描述描述描述"></TitleComponents> </div>
</template><script>
import TitleComponents from './TitleComponents.vue'export default {components:{TitleComponents}}
</script><style scoped></style>
子组件 TitleComponents.vue
<template><div><h1>{{ title }}</h1><div>{{ desc }}</div><slot><div>这里是默认内容</div></slot></div>
</template><script>export default {props:{title:{type:String,default:'默认标题'},desc:{type:String,default:''}}}
</script><style scoped></style>
插槽_具名插槽
父组件
<template><div><NavComponent><template v-slot:left><button>返回</button></template><template v-slot:center>首页</template><template v-slot:right><a href="#" >登录</a></template></NavComponent><NavComponent><template v-slot:[position]><button>返回</button></template></NavComponent><button @click="position = 'left'">左边</button><button @click="position = 'center'">中间</button><button @click="position = 'right'">右边</button></div>
</template><script>import NavComponent from './NavComponent.vue';export default {components:{NavComponent},data(){return {position:'left'}}}
</script><style scoped></style>
**子组件 NavComponent.vue **
<template><div><div style="display: flex;flex-direction: row;height: 100px;"><div class="left"> <slot name="left">左边</slot>   </div><div class="center">  <slot name="center">中间</slot> </div><div class="right"><slot name="right">右边</slot></div></div></div>
</template><script>export default {}
</script><style scoped>.left{width:30%;background-color: aqua;}.center{width: 40%;background-color: bisque;}.right{width: 30%;background-color: blueviolet;}
</style>
组件插槽_作用域插槽
父组件
<template><div><NavComponet :nav_list="nav_list"><template v-slot:default="porps_val">{{ porps_val.item }}---{{ porps_val.abc }}</template></NavComponet><!--  --><hr><NavComponet :nav_list="nav_list"><template #default="porps_val"><a href="#">{{ porps_val.item }}---{{ porps_val.abc }}</a></template></NavComponet></div>
</template><script>import NavComponet from './NavComponet.vue'export default {components:{NavComponet},data(){return {nav_list:[{id:1,title:'标题1'},{id:1,title:'标题2'},{id:1,title:'标题3'},]}}}
</script><style scoped></style>
子组件 NavComponet.vue
<template><div><div class="nav"><div v-for="(item,index) in nav_list" :key="index" class="nav_item"><div>{{ item.title }}</div><slot :item="item.title" abc="cba"><div>{{ item.title }}</div></slot></div></div></div>
</template><script>export default {props:{nav_list:{type:Array,default:()=>{return [{id:1,title:'衣服'},{id:1,title:'食物'},{id:1,title:'玩具'},];}}},data(){return {}}}
</script><style scoped>.nav{display: flex;flex-direction: row;}.nav_item{flex:1;}
</style>
Provide和Inject
App.vue
<template><div class="app"><home-component></home-component><h2>app:{{ message }}</h2><button @click="message = 'hello world'">改变message</button></div>
</template><script>import { computed  } from 'vue'import HomeComponent from './HomeComponent.vue'export default {components:{HomeComponent},data(){return {message:"Hello App"}},provide(){return {name:"why",age:18,message:computed(()=>{return this.message}) }}}
</script><style scoped></style>
**子组件 HomeBanner.vue **
<template><div><h2>HomeBanner:{{ name }} - {{ age }} - {{ message }}</h2></div>
</template><script>export default {inject:["name","age","message"]}
</script><style scoped></style>
孙组件 HomeComponent.vue
<template><div><home-banner></home-banner></div>
</template><script>import HomeBanner from './HomeBanner.vue';export default {components:{HomeBanner},data(){return {}}}
</script><style scoped></style>
事件总线的使用
App.vue
<template><div class="app"><!-- 安装状态管理库 npm install hy-event-store --><!-- Mitt事件状态(略) --><HomeCon></HomeCon>  <h2>{{ message }}</h2><button @click="show_cate_gory = !show_cate_gory">是否显示cate_gory</button><cate-gory v-if="show_cate_gory"></cate-gory></div>
</template><script>import eventBus from './utils/event.bus';import HomeCon from './HomeCon.vue'import CateGory from './CateGory.vue'export default {components:{HomeCon,CateGory},data(){return {message:'hello vue',show_cate_gory:true}},created(){// 事件监听eventBus.on("whyEvent",(name,age,height)=>{console.log("whyEvent事件在app中的监听",name,age,height)this.message = `name:${name},age:${age},height:${height}`})}}
</script><style scoped></style>
** 子组件 CateGory.vue**
<template><div><h2>Category</h2></div>
</template><script>import eventBus from './utils/event.bus.js'export default {methods:{whyEventHandler(){console.log("whyEvent在category中监听")}},created(){eventBus.on("whyEvent",this.whyEventHandler)},unmounted(){console.log("category umounted")eventBus.off("whyEvent",this.whyEventHandler)}}
</script><style scoped></style>
**子组件 HomeBanner.vue **
<template><div><button @click="bannerBtnClick">banner按钮</button></div>
</template><script>import eventBus  from './utils/event.bus';export default {methods:{bannerBtnClick(){console.log("bannerBtnClick")eventBus.emit("whyEvent","why",18,1.88)}}}
</script><style scoped></style>
** 子组件 HomeCon.vue**
<template><div><home-banner></home-banner></div>
</template><script>import HomeBanner from './HomeBanner.vue';export default {components:{HomeBanner},data(){return {}}}
</script><style scoped></style>
事件总线 event.bus.js
import { HYEventBus } from "hy-event-store"const eventBus = new HYEventBus()export default eventBus
生命周期函数演练
App.vue
<template><div><h2>{{ message }}---{{ counter }}</h2><button @click="message = 'hello world'" >修改message</button><button @click="counter++">+1</button><button @click="showHome = !showHome">隐藏home</button><home-com v-if="showHome"></home-com></div>
</template><script>import HomeCom from "./HomeCom.vue"export default {components:{HomeCom},data(){return {message:'hello vue',counter:1,showHome:true}},// 1.组件创建之前beforeCreate(){console.log("beforeCreate")},// 2.组件被创建完成created(){console.log("组件被创建完成:created")console.log("1.发送网络请求,请求数据")console.log("2.监听eventbus事件")console.log("3.监听watch数据")},// 3. 组件template准备被挂在beforeMount(){console.log("beforeMount")},// 4.组件template被挂载,虚拟dom=》真实dommounted(){console.log("mounted")console.log("1.获取DOM")console.log("2.使用DOM")},// 5.数据发生改变// 5.1 准备更新DOMbeforeUpdate(){console.log("beforeUpdate")},// 5.2 更新DOMupdated(){console.log("updated")},// 6.卸载Vnode-》DOM原生// 6.1 卸载之前beforeUnmount(){console.log("beforeUnmount")},// 6.2 DOM元素被卸载完成unmounted(){console.log("unmounted")}}
</script><style scoped></style>
子组件 HomeCom.vue
<template><div>Home</div>
</template><script>export default {unmounted(){console.log("unmounted home")},beforeUnmount(){console.log("beforeUnmout home")}}
</script><style scoped></style>
ref获取元素组件
App.vue
<template><div><h2 ref="title" class="title" :style="{color:titleColor}">{{ message }}</h2><button ref="btn" @click="changeTitle">修改title</button><BannerCom ref="banner"></BannerCom><BannerCom ref="banner"></BannerCom><BannerCom ref="banner"></BannerCom><BannerCom ref="banner"></BannerCom><BannerCom ref="banner"></BannerCom></div>
</template><script>import BannerCom from './BannerCom.vue';export default {components:{BannerCom},data(){return {message:"hello world",titleColor:"red"}},methods:{changeTitle(){// 1.不要主动去获取DOM,并且修改DOM内容this.message = "你好啊,世界"this.titleColor = "blue"// 2.获取h2/button元素console.log(this.$refs.title)console.log(this.$refs.btn)// 3.获取banner组件:组件实例console.log(this.$refs.banner)// 3.1在父组件中可以主动的调用子组件的方法this.$refs.banner.bannerClick()// 3.2 获取banner组件实例,获取banner中的元素console.log(this.$refs.banner.$el)// 3.3 如果banner template是多个根,拿到的是一个node节点console.log(this.$refs.banner.$el.nextElementSibling)// 第二个node节点console.log(this.$refs.banner.$el.previousElementSibling)// 4.组件实例了解console.log(this.$parent); // 父组件console.log(this.$root); //根组件}}}
</script><style scoped></style>
**子组件 BannerCom.vue **
<template><div class="banner">Banner</div><div class="banner2"></div>
</template><script>export default {methods:{bannerClick(){console.log('bannerClick')}}}
</script><style scoped></style>
内置组件的使用
App.vue
<template><div><button v-for="(item,index) in tab_arr" :style="default_tab == item ? 'color:red;' : ''" :key="index" @click="show_tab(item)">{{ item }}</button><!-- 第一中方法 --><!-- <div v-if="default_tab=='home'"><HomeCom></HomeCom></div><div v-if="default_tab=='about'"><AboutCom></AboutCom></div><div v-if="default_tab=='category'"><CategoryCom></CategoryCom></div> --><!-- 第二种方式 --><component name="kb" age="20" @homebtn="homebtn" :is="default_tab"></component></div>
</template><script>import HomeCom from './views/HomeCom.vue'import AboutCom from './views/AboutCom.vue'import CategoryCom from './views/CategoryCom.vue'export default {components:{HomeCom,AboutCom,CategoryCom},data(){return {tab_arr:['HomeCom','AboutCom','CategoryCom'],default_tab:'HomeCom'}},methods:{show_tab(item){this.default_tab = item},homebtn(eve){console.log('homebtn',eve)}}}
</script><style scoped></style>
** 子组件 AboutCom.vue**
<template><div>about组件</div>
</template><script>export default {}
</script><style scoped></style>
子组件 CategoryCom.vue
<template><div>category组件</div>
</template><script>export default {}
</script><style scoped></style>
子组件 HomeCom.vue
<template><div>home组件{{ name }} --- {{ age }}<button @click="homebtn">homebtn</button></div>
</template><script>export default {data(){return {}},props:{name:{type:String,default:'why'},age:{type:String,default:'18'}},emits:['homebtn'],methods:{homebtn(){this.$emit('homebtn','home')}}}
</script><style scoped></style>
Keep-Alive的使用-分包
App.vue
<template><div><button v-for="(item,index) in tab_arr" :style="default_tab == item ? 'color:red;' : ''" :key="index" @click="show_tab(item)">{{ item }}</button><!-- 第一中方法 --><!-- <div v-if="default_tab=='home'"><HomeCom></HomeCom></div><div v-if="default_tab=='about'"><AboutCom></AboutCom></div><div v-if="default_tab=='category'"><CategoryCom></CategoryCom></div> --><!-- 第二种方式 --><KeepAlive include="HomeCom,AboutCom"><component :is="default_tab"></component></KeepAlive></div>
</template><script>
import { defineAsyncComponent } from 'vue'import HomeCom from './views/HomeCom.vue'import AboutCom from './views/AboutCom.vue'
//  import CategoryCom from './views/CategoryCom.vue'const AsyncCategory = defineAsyncComponent(()=>import("./views/CategoryCom.vue"))export default {components:{HomeCom,AboutCom,CategoryCom:AsyncCategory},data(){return {tab_arr:['HomeCom','AboutCom','CategoryCom'],default_tab:'HomeCom'}},methods:{show_tab(item){this.default_tab = item},homebtn(eve){console.log('homebtn',eve)}}}
</script><style scoped></style>
子组件 AboutCom.vue
<template><div>about组件</div>
</template><script>export default {name:"AboutCom",created(){console.log('about created')},unmounted(){console.log('about unmounted')},}
</script><style scoped></style>
**子组件 CategoryCom.vue **
<template><div>category组件</div>
</template><script>export default {created(){console.log('category created')},unmounted(){console.log('category unmounted')},}
</script><style scoped></style>
子组件 HomeCom.vue
<template><div>home组件<div>计数:{{ counter }}</div><button @click="jia">加1</button></div>
</template><script>export default {name:"HomeCom",data(){return {counter:0}},created(){console.log('home created')},unmounted(){console.log('home unmounted')},// 对于保持keep-alive组件,监听有没有进行切换// keep-alive组件进入活跃状态activated(){console.log('home activated')},deactivated(){console.log('home deactivated')},  methods:{jia:function(){this.counter++;}}}
</script><style scoped></style>
组件的v-model
App.vue
<template><div class="app"><!-- 1.input v-model --><!-- <input type="text" v-model="message"> --><!-- <input type="text" :value="message" @input="message = $event.target.value"> --><!-- <CounterCom :modelValue="appCounter" @update:modelValue="appCounter = $event"></CounterCom> --><!-- <CounterCom v-model="appCounter"></CounterCom> --><CounterCom2 v-model:counter="appCounter" v-model:why="why"></CounterCom2></div>
</template><script>import CounterCom2 from './CounterCom2.vue'export default {components:{CounterCom2},data(){return {message:'hello',appCounter:"100",why:'coderwhy'}}}
</script><style scoped></style>
**子组件 CounterCom.vue **
<template><div>counter<div>modelValue:{{ modelValue }}</div><button @click="changeCounter">修改counter</button></div>
</template><script>export default {props:{modelValue:{type:String,default:''}},emits:["update:modelValue"],methods:{changeCounter(){this.$emit("update:modelValue",'999999')}}}
</script><style scoped></style>
子组件 CounterCom2.vue
<template><div><div>counter:{{ counter }}</div><button @click="changeCounter">修改counter</button><div>why:{{ why }}</div><button @click="changeWhy">修改why的值</button></div>
</template><script>export default {props:{counter:{type:String,default:''},why:{type:String,default:''}},emits:["update:counter","update:why"],methods:{changeCounter(){ this.$emit("update:counter",'999999')},changeWhy(){this.$emit("update:why",'kobi')}}}
</script><style scoped></style>
组件的混入Mixin
message-mixin.js
export default {data(){return {message:"Hello World"}},created(){console.log("message:",this.message)}
}
**App.vue **
<template><div><HomeCon></HomeCon><AboutCon></AboutCon><CatetoryCon></CatetoryCon></div>
</template><script>import HomeCon from './views/HomeCon.vue'import AboutCon from './views/AboutCon.vue'import CatetoryCon from './views/CatetoryCon.vue'export default {components:{HomeCon,AboutCon,CatetoryCon}}
</script><style scoped></style>
子组件 AboutCon.vue
<template><div><h2>AboutCon组件</h2></div>
</template><script>
import messageMixin from  '../mixins/message-mixin'export default {mixins:[messageMixin]}
</script><style scoped></style>
子组件 CatetoryCon.vue
<template><div><h2>CatetoryCon组件</h2></div>
</template><script>
import messageMixin from  '../mixins/message-mixin'export default {mixins:[messageMixin]}
</script><style scoped></style>
子组件 HomeCon.vue
<template><div><h2>HomeCon组件</h2></div>
</template><script>
import messageMixin from  '../mixins/message-mixin'export default {mixins:[messageMixin]}
</script><style scoped></style>
感谢观看,我们下次再见
相关文章:
学习笔记)
Vue3的手脚架使用和组件父子间通信-插槽(Options API)学习笔记
Vue CLI安装和使用 全局安装最新vue3 npm install vue/cli -g升级Vue CLI: 如果是比较旧的版本,可以通过下面命令来升级 npm update vue/cli -g通过脚手架创建项目 vue create 01_product_demoVue3父子组件的通信 父传子 父组件 <template>…...

第九章软件管理
云计算第九章软件管理 概述 1RPM包 RPM Package Manager 由Red Hat公司提出被众多Linux发现版所采用 也称二进制无需编译可以直接使用 无法设定个人设置开关功能 软件包示例 认识ROM包 2源码包 source code 需要经过GCC,C编辑环境编译才能运行 可以设定个人设置&…...
Web渗透编程语言基础
Web渗透初学者JavaScript专栏汇总-CSDN博客 Web渗透Java初学者文章汇总-CSDN博客 一 Web渗透PHP语言基础 PHP 教程 | 菜鸟教程 (runoob.com) 一 PHP 语言的介绍 PHP是一种开源的服务器端脚本语言,它被广泛用于Web开发领域。PHP可以与HTML结合使用,创建动态网页。 PHP的特…...

Vue-router 路由的基本使用
Vue-router是一个Vue的插件库,专门用于实现SPA应用,也就是整个应用是一个完整的页面,点击页面上的导航不会跳转和刷新页面。 一、安装Vue-router npm i vue-router // Vue3安装4版本 npm i vue-router3 // Vue2安装3版本 二、引入…...
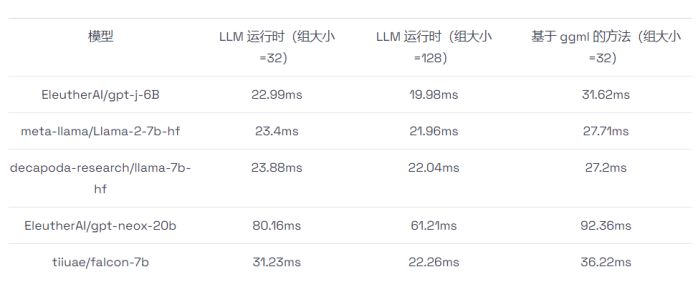
如何在CPU上进行高效大语言模型推理
大语言模型(LLMs)已经在广泛的任务中展示出了令人瞩目的表现和巨大的发展潜力。然而,由于这些模型的参数量异常庞大,使得它们的部署变得相当具有挑战性,这不仅需要有足够大的内存空间,还需要有高速的内存传…...
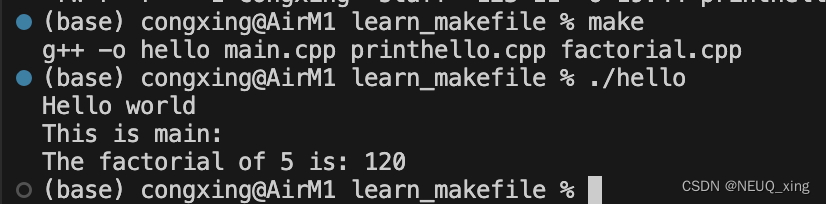
简简单单入门Makefile
笔记来源:于仕琪教授:Makefile 20分钟入门,简简单单,展示如何使用Makefile管理和编译C代码 操作环境 MacosVscode 前提准备 新建文件夹 mkdir learn_makefile新建三个cpp文件和一个头文件 // mian.cpp #include <iostrea…...
New Maven Project
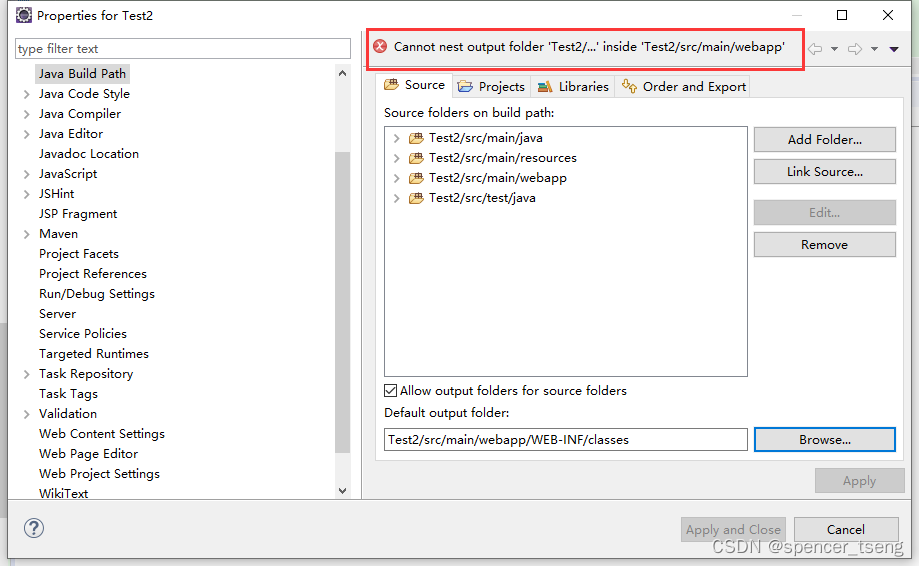
下面两个目录丢失了: src/main/java(missing) src/test/java(missing) 换个JRE就可以跑出来了 变更目录...
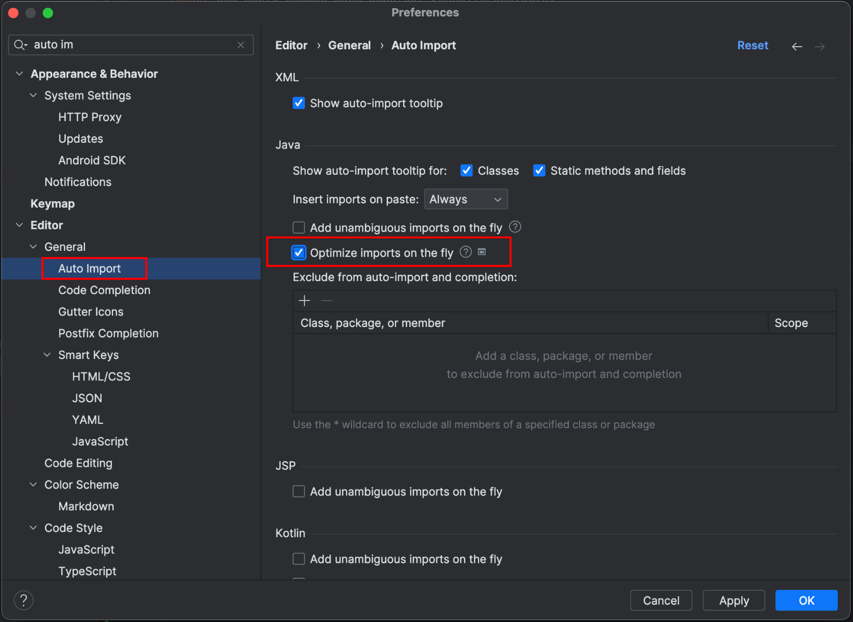
IDEA中如何移除未使用的import
👨🏻💻 热爱摄影的程序员 👨🏻🎨 喜欢编码的设计师 🧕🏻 擅长设计的剪辑师 🧑🏻🏫 一位高冷无情的编码爱好者 大家好,我是全栈工…...
)
第18章_MySQL8新特性之CTE(公用表表达式)
文章目录 新特性:公用表表达式(cte)普通公用表表达式递归公用表表达式小 结 新特性:公用表表达式(cte) 公用表表达式(或通用表表达式)简称为CTE(Common Table Expressions)。CTE是一个命名的临时结果集&am…...

MySQL的备份恢复
数据备份的重要性 1.生产环境中,数据的安全至关重要 任何数据的丢失都会导致非常严重的后果。 2.数据为什么会丢失 :程序操作,运算错误,磁盘故障,不可预期的事件(地震,海啸)&#x…...
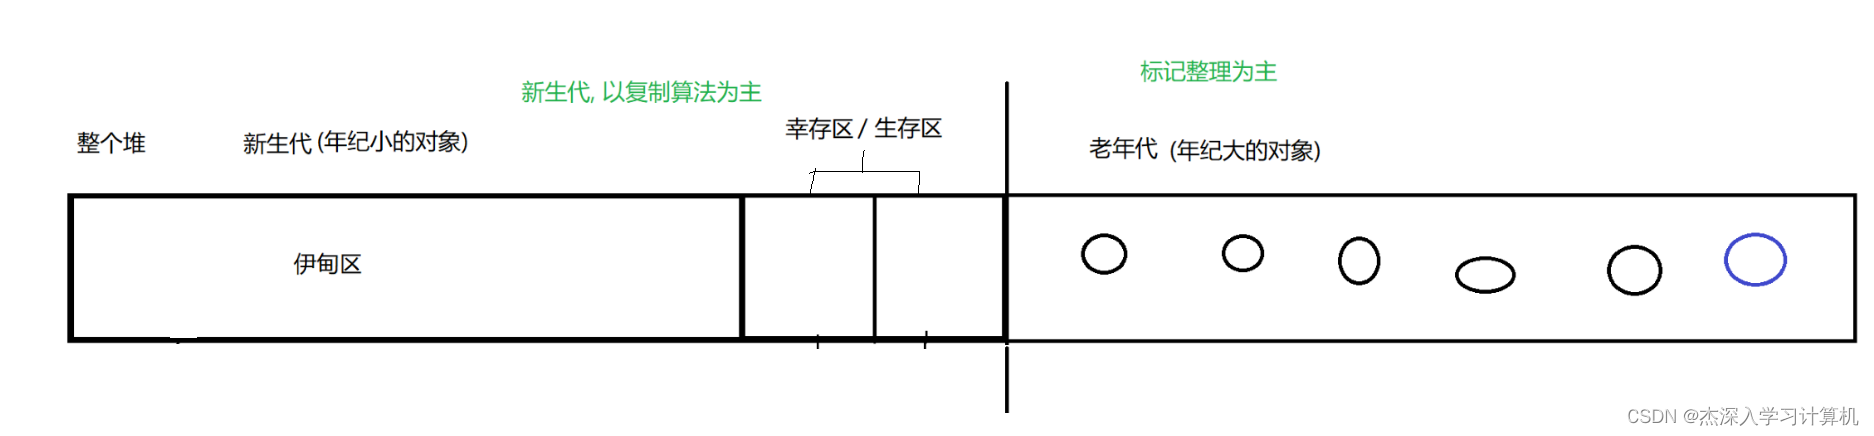
【JavaEE】JVM 剖析
JVM 1. JVM 的内存划分2. JVM 类加载机制2.1 类加载的大致流程2.2 双亲委派模型2.3 类加载的时机 3. 垃圾回收机制3.1 为什么会存在垃圾回收机制?3.2 垃圾回收, 到底实在做什么?3.3 垃圾回收的两步骤第一步: 判断对象是否是"垃圾"第二步: 如何回收垃圾 1. JVM 的内…...
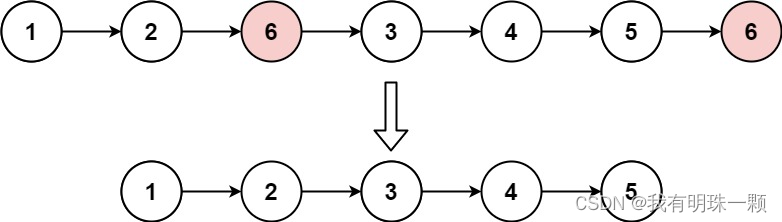
算法题:203. 移除链表元素(递归法、设置虚拟头节点法等3种方法)Java实现创建链表与解析链表
1、算法思路 讲一下设置虚拟头节点的那个方法,设置一个新节点指向原来链表的头节点,这样我们就可以通过判断链表的当前节点的后继节点值是不是目标删除值,来判断是否删除这个后继节点了。如果不设置虚拟头节点,则需要将头节点和后…...

ubuntu18.04 多版本opencv配置记录
多版本OpenCV过程记录 环境 ubuntu18.04 python2.7 python3.6 python3.9 opencv 3.2 OpenCV 4.4.0安装 Ubuntu18.04 安装 Opencv4.4.0 及 Contrib (亲测有效) 暂时不清楚Contrib的作用,所以没安装,只安装最基础的 下载opencv4.4.0并解压 opencv下载…...

Spring Security—OAuth 2.0 资源服务器的多租户
一、同时支持JWT和Opaque Token 在某些情况下,你可能需要访问两种令牌。例如,你可能支持一个以上的租户,其中一个租户发出JWT,另一个发出 opaque token。 如果这个决定必须在请求时做出,那么你可以使用 Authenticati…...

VB.NET—窗体引起的乌龙事件
目录 前言: 过程: 总结: 升华: 前言: 分享一个VB.NET遇到的一个问题,开始一直没有解决,这个问题阻碍了很长时间,成功的变成我路上的绊脚石,千方百计的想要绕过去,但事与愿违怎么也绕不过去,因为运行不了…...

批量新增报错PSQLException: PreparedStatement can have at most 65,535 parameters.
报错信息: org.postgresql.util.PSQLException: PreparedStatement can have at most 65,535 parameters. Please consider using arrays, or splitting the query in several ones, or using COPY. Given query has 661,068 parameters ; SQL []; PreparedStatemen…...

数仓分层能减少重复计算,为啥能减少?如何减少?这篇文章包懂!
很多时候,看一些数据领域的文章,说到为什么做数据仓库、数据仓库要分层,我们经常会看到一些结论:因为有ABCD…等等理由,比如降低开发成本、减少重复计算等等好处 然后,多数人就记住了ABCD。但是࿰…...

【Linux】基础IO之文件操作(文件fd)——针对被打开的文件
系列文章目录 文章目录 系列文章目录前言浅谈文件的共识 一、 回忆c语言对文件操作的接口1.fopen接口和cwd路径2.fwrite接口和"w","a"方法3.fprintf接口和三个默认打开的输入输出流(文件) 二、过渡到系统,认识…...

什么是超算数据中心
超算数据中心是基于超级计算机或者是大规模的计算集群的数据中心,它具备高性能、高可靠性、高可用性和高扩展性这些特点,能够提供大规模计算、存储和网络服务的功能,在人工智能、科学计算、数据分析等等领域应用比较广泛。 超算数据中心有以下…...
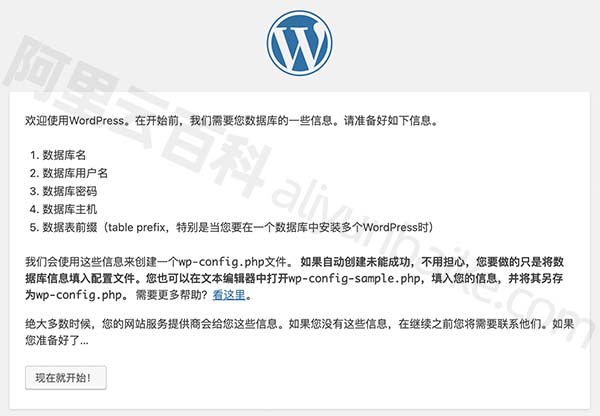
阿里云服务器省钱购买和使用方法(图文详解)
阿里云服务器使用教程包括云服务器购买、云服务器配置选择、云服务器开通端口号、搭建网站所需Web环境、安装网站程序、域名解析到云服务器公网IP地址,最后网站上线全流程,新手站长xinshouzhanzhang.com分享阿里云服务器详细使用教程: 一&am…...

tools.simonwillison.net图像处理工具集:从裁剪到优化的完整指南
tools.simonwillison.net图像处理工具集:从裁剪到优化的完整指南 【免费下载链接】tools Assorted useful tools, almost entirely generated using LLMs 项目地址: https://gitcode.com/gh_mirrors/tools23/tools tools.simonwillison.net图像处理工具集是一…...

DMA-330地址空间限制与扩展方案解析
1. DMA-330地址空间限制解析DMA-330作为Arm CoreLink系列中的直接内存访问控制器,其物理寻址能力直接由AxADDR信号宽度决定。这个32位地址总线宽度意味着它原生仅支持4GB(2^32字节)的物理地址空间访问。在实际嵌入式系统设计中,这…...

D3KeyHelper:暗黑3玩家的智能按键助手,告别重复操作疲劳
D3KeyHelper:暗黑3玩家的智能按键助手,告别重复操作疲劳 【免费下载链接】D3keyHelper D3KeyHelper是一个有图形界面,可自定义配置的暗黑3鼠标宏工具。 项目地址: https://gitcode.com/gh_mirrors/d3/D3keyHelper 你是否曾在《暗黑破坏…...

物联网与云技术赋能咖啡后处理:CeriTech 的实时监控系统实践
1. 项目概述:用物联网与云技术重塑咖啡后处理在印尼的咖啡农场里,传统的发酵与干燥过程很大程度上依赖“感觉”和“经验”。一位有经验的农人可能会用手触摸、用鼻子闻,或者根据天气和日照时间来估算发酵是否完成、干燥是否均匀。这种方法固然…...

飞书远程控机:OpenClaw配置全攻略
本文详细介绍如何通过 OpenClaw 工具对接飞书开放平台,配置智能机器人实现 Windows 电脑的远程控制。主要内容涵盖文件管理和程序启动等核心功能的实现方法,并提供完整的配置指南与常见问题解决方案。 一、使用前提说明 1. 系统要求 仅适用于 Windows…...

基于双T振荡器的正弦波LED调光电路设计与实践
1. 项目概述:用双T振荡器实现正弦波LED调光最近在捣鼓一些氛围灯项目,总感觉用单片机PWM做的呼吸灯效果有点“硬”,那种线性的明暗变化看久了难免审美疲劳。于是翻出以前模拟电路的老本行,琢磨着能不能用纯硬件的方式,…...

孤舟笔记 互联网常用框架篇三 Dubbo是如何动态感知服务下线的?注册中心和服务端双保险
文章目录先说结论机制一:注册中心通知机制二:心跳检测机制三:连接事件感知机制四:定时拉取四种机制的协作回答技巧与点评加分回答面试官点评个人网站微服务环境下,服务实例随时可能上下线——重启、扩容、宕机……调用…...

举一个具体例子说明为什么索引不是越多越好,举具体字段
文章目录1. 核心舞台:笔记表 (t_note) 结构设计🚨 错误的操作:2. 结合具体字段,拆解三大翻车现场现场一:给 view_count(浏览量)加索引 —— 导致写放大,拖垮数据库现场二:…...

Web渗透测试能力成长地图:从工具使用到漏洞认知跃迁
1. 这不是工具清单,而是一张Web渗透测试的“能力成长地图”你刚点开这篇文章,大概率正站在两个路口之间:一边是网上铺天盖地的“十大免费扫描器推荐”,点进去全是截图下载链接一句“一键扫漏洞”,结果装完跑两下&#…...

从安装到排错:手把手解决Linux服务器上Nacos启动失败的十大常见问题
从安装到排错:手把手解决Linux服务器上Nacos启动失败的十大常见问题当你在Linux服务器上部署Nacos时,是否遇到过启动失败却无从下手的困境?作为阿里巴巴开源的服务发现和配置管理平台,Nacos在微服务架构中扮演着重要角色。然而&am…...