部署系列六基于nndeploy的深度学习 图像降噪unet部署
文章目录
- 1.直接在源代码demo中修改
- 2. 如何修改呢?
- 3. 修改 graph
- 4. 总结
https://github.com/DeployAI/nndeploy
https://nndeploy-zh.readthedocs.io/zh/latest/introduction/index.html
通过以上2个官方链接对nndeploy基本的使用方法应该有所了解了。
下面就是利用nndeploy跑一个图像降噪的unet类型网络。
为了方便,直接修改源码然后重新编译了一个demo。大家理解就好,可以自己整理完善,创建新的demo, 因为我这里没有创建新的deno,而是直接修改 yolov5的相关代码。
1.直接在源代码demo中修改
源代码如果你想运行yolo5是一个目标检测模型,可以通过下面的命令:
onnxruntime:115ms
./install/lib/demo_nndeploy_detect --name NNDEPLOY_YOLOV5 --inference_type kInferenceTypeOnnxRuntime --device_type kDeviceTypeCodeX86:0 --model_type kModelTypeOnnx --is_path --model_value …/…/yolov5s.onnx --input_type kInputTypeImage --input_path …/…/sample.jpg --output_path …/…/sample_output.jpg
openvino:57ms
./install/lib/demo_nndeploy_detect --name NNDEPLOY_YOLOV5 --inference_type kInferenceTypeOpenVino --device_type kDeviceTypeCodeX86:0 --model_type kModelTypeOnnx --is_path --model_value …/…/yolov5s.onnx --input_type kInputTypeImage --input_path …/…/sample.jpg --output_path …/…/sample_output.jpg
mnn:78ms
./install/lib/demo_nndeploy_detect --name NNDEPLOY_YOLOV5 --inference_type kInferenceTypeMnn --device_type kDeviceTypeCodeX86:0 --model_type kModelTypeMnn --is_path --model_value …/…/yolov5s.mnn --input_type kInputTypeImage --input_path …/…/sample.jpg --output_path …/…/sample_output.jpg
tensorrt: 17ms
./install/lib/demo_nndeploy_detect --name NNDEPLOY_YOLOV5 --inference_type kInferenceTypeTensorRt --device_type kDeviceTypeCodeCuda:0 --model_type kModelTypeOnnx --is_path --model_value …/…/yolov5s.onnx --input_type kInputTypeImage --input_path …/…/sample.jpg --output_path …/…/sample_output.jpg
然后我直接修改源码然后编译后通过下面的命令 可以运行 unet denoise model
tensorrt
./install/lib/demo_nndeploy_detect --name NNDEPLOY_YOLOV5 --inference_type kInferenceTypeTensorRt --device_type kDeviceTypeCodeCuda:0 --model_type kModelTypeOnnx --is_path --model_value /home/tony/nndeploy/mymodel/scripts/unet8.opt.onnx --input_type kInputTypeImage --input_path …/…/1007_01_06_40_000101.png --output_path …/…/sample_output.jpg
onnxruntime
./install/lib/demo_nndeploy_detect --name NNDEPLOY_YOLOV5 --inference_type kInferenceTypeOnnxRuntime --device_type kDeviceTypeCodeX86:0 --model_type kModelTypeOnnx --is_path --model_value /home/tony/nndeploy/mymodel/scripts/unet8.opt.onnx --input_type kInputTypeImage --input_path …/…/1007_01_06_40_000101.png --output_path …/…/sample_output.jpg
openvino:
./install/lib/demo_nndeploy_detect --name NNDEPLOY_YOLOV5 --inference_type kInferenceTypeOpenVino --device_type kDeviceTypeCodeX86:0 --model_type kModelTypeOnnx --is_path --model_value /home/tony/nndeploy/mymodel/scripts/unet8.opt.onnx --input_type kInputTypeImage --input_path …/…/1007_01_06_40_000101.png --output_path …/…/sample_output.jpg
MNN:
./install/lib/demo_nndeploy_detect --name NNDEPLOY_YOLOV5 --inference_type kInferenceTypeMnn --device_type kDeviceTypeCodeX86:0 --model_type kModelTypeMnn --is_path --model_value /home/tony/nndeploy/mymodel/scripts/unet8.opt.mnn --input_type kInputTypeImage --input_path …/…/1007_01_06_40_000101.png --output_path …/…/sample_output.jpg
TNN:
./install/lib/demo_nndeploy_detect --name NNDEPLOY_YOLOV5 --inference_type kInferenceTypeTnn --device_type kDeviceTypeCodeX86:0 --model_type kModelTypeTnn --is_path --model_value /home/tony/nndeploy/mymodel/scripts/unet8.sim.tnnproto,/home/tony/nndeploy/mymodel/scripts/unet8.sim.tnnmodel --input_type kInputTypeImage --input_path …/…/1007_01_06_40_000101.png --output_path …/…/sample_output.jpg
2. 如何修改呢?
首先明白我的模型,输入输出都是 c,h,w, 0-1, float32
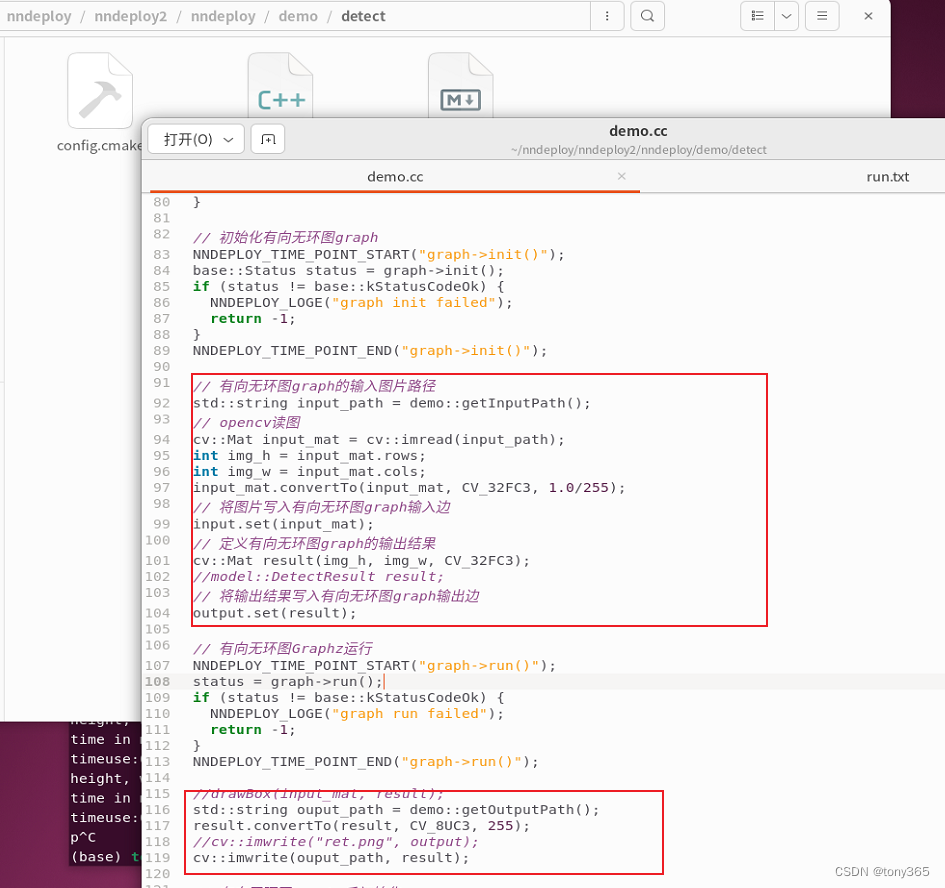
首先修改demo.cc:
设置了graph的 input和output :都是 h, w, c , 0-1, float32
输入是 h,w,c float32
输出也是h,w,c float32
一个完整的graph包括:
- 前处理需要完成 从 h,w,c foat32 -> c, h, w float32
2.然后infer跑model;:输入输出都是 c,h,w, 0-1, float32
3.那么后处理需要完成 从 c, h, w,float32 -> h, w, c, float32
其实使用一个框架,要获取到 模型输入和输出的指针,然后可以用opencv进行前后预处理,很多框架都有自己的前后处理(我不太喜欢用,感觉不清晰有学习成本)
完整代码:
#include "flag.h"
#include "nndeploy/base/glic_stl_include.h"
#include "nndeploy/base/time_profiler.h"
#include "nndeploy/dag/node.h"
#include "nndeploy/device/device.h"
#include "nndeploy/model/detect/yolo/yolo.h"using namespace nndeploy;cv::Mat drawBox(cv::Mat &cv_mat, model::DetectResult &result) {// float w_ratio = float(cv_mat.cols) / float(640);// float h_ratio = float(cv_mat.rows) / float(640);float w_ratio = float(cv_mat.cols);float h_ratio = float(cv_mat.rows);const int CNUM = 80;cv::RNG rng(0xFFFFFFFF);cv::Scalar_<int> randColor[CNUM];for (int i = 0; i < CNUM; i++)rng.fill(randColor[i], cv::RNG::UNIFORM, 0, 256);int i = -1;for (auto bbox : result.bboxs_) {std::array<float, 4> box;box[0] = bbox.bbox_[0];  // 640.0;box[2] = bbox.bbox_[2];  // 640.0;box[1] = bbox.bbox_[1];  // 640.0;box[3] = bbox.bbox_[3];  // 640.0;box[0] *= w_ratio;box[2] *= w_ratio;box[1] *= h_ratio;box[3] *= h_ratio;int width = box[2] - box[0];int height = box[3] - box[1];int id = bbox.label_id_;NNDEPLOY_LOGE("box[0]:%f, box[1]:%f, width :%d, height :%d\n", box[0],box[1], width, height);cv::Point p = cv::Point(box[0], box[1]);cv::Rect rect = cv::Rect(box[0], box[1], width, height);cv::rectangle(cv_mat, rect, randColor[id]);std::string text = " ID:" + std::to_string(id);cv::putText(cv_mat, text, p, cv::FONT_HERSHEY_PLAIN, 1, randColor[id]);}return cv_mat;
}//
int main(int argc, char *argv[]) {gflags::ParseCommandLineNonHelpFlags(&argc, &argv, true);if (demo::FLAGS_usage) {demo::showUsage();return -1;}// 检测模型的有向无环图graph名称,例如:// NNDEPLOY_YOLOV5/NNDEPLOY_YOLOV6/NNDEPLOY_YOLOV8std::string name = demo::getName();// 推理后端类型,例如:// kInferenceTypeOpenVino / kInferenceTypeTensorRt / kInferenceTypeOnnxRuntimebase::InferenceType inference_type = demo::getInferenceType();// 推理设备类型,例如:// kDeviceTypeCodeX86:0/kDeviceTypeCodeCuda:0/...base::DeviceType device_type = demo::getDeviceType();// 模型类型,例如:// kModelTypeOnnx/kModelTypeMnn/...base::ModelType model_type = demo::getModelType();// 模型是否是路径bool is_path = demo::isPath();// 模型路径或者模型字符串std::vector<std::string> model_value = demo::getModelValue();// 有向无环图graph的输入边packertdag::Edge input("detect_in");// 有向无环图graph的输出边packertdag::Edge output("detect_out");// 创建检测模型有向无环图graphdag::Graph *graph =dag::createGraph(name, inference_type, device_type, &input, &output,model_type, is_path, model_value);if (graph == nullptr) {NNDEPLOY_LOGE("graph is nullptr");return -1;}// 初始化有向无环图graphNNDEPLOY_TIME_POINT_START("graph->init()");base::Status status = graph->init();if (status != base::kStatusCodeOk) {NNDEPLOY_LOGE("graph init failed");return -1;}NNDEPLOY_TIME_POINT_END("graph->init()");// 有向无环图graph的输入图片路径std::string input_path = demo::getInputPath();// opencv读图cv::Mat input_mat = cv::imread(input_path);int img_h = input_mat.rows;int img_w = input_mat.cols;input_mat.convertTo(input_mat, CV_32FC3, 1.0/255);// 将图片写入有向无环图graph输入边input.set(input_mat);// 定义有向无环图graph的输出结果cv::Mat result(img_h, img_w, CV_32FC3);//model::DetectResult result;// 将输出结果写入有向无环图graph输出边output.set(result);// 有向无环图Graphz运行NNDEPLOY_TIME_POINT_START("graph->run()");status = graph->run();if (status != base::kStatusCodeOk) {NNDEPLOY_LOGE("graph run failed");return -1;}NNDEPLOY_TIME_POINT_END("graph->run()");//drawBox(input_mat, result);std::string ouput_path = demo::getOutputPath();result.convertTo(result, CV_8UC3, 255);//cv::imwrite("ret.png", output);cv::imwrite(ouput_path, result);// 有向无环图graphz反初始化NNDEPLOY_TIME_POINT_START("graph->deinit()");status = graph->deinit();if (status != base::kStatusCodeOk) {NNDEPLOY_LOGE("graph deinit failed");return -1;}NNDEPLOY_TIME_POINT_END("graph->deinit()");NNDEPLOY_TIME_PROFILER_PRINT("detetct time profiler");// 有向无环图graphz销毁delete graph;NNDEPLOY_LOGE("hello world!\n");return 0;
}
3. 修改 graph
一个完整的graph包括:
- 前处理需要完成 从 h,w,c foat32 -> c, h, w float32
2.然后infer跑model;:输入输出都是 c,h,w, 0-1, float32
3.那么后处理需要完成 从 c, h, w,float32 -> h, w, c, float32
dag::Graph* createYoloV5Graph(const std::string& name,
base::InferenceType inference_type,
base::DeviceType device_type, dag::Edge* input,
dag::Edge* output, base::ModelType model_type,
bool is_path,
std::vectorstd::string model_value)
中修改前后处理函数即可。
前处理,infer , 后处理是一个 graph , 也就是demo中完整的图。
demo中的input和output是 完整的图的输入输出。
然后前处理,infer, 后处理 内部也有自己的input和output,不要搞混淆了。
比如模型infer输入,输出都是c,h,w, float32的结果,
后处理 input是 c,h,w float32 的数据,output转换为 h,w,c float32的数据(对应上面的cv::Mat result(img_h, img_w, CV_32FC3);)
那么我们修改 后处理函数为
base::Status YoloPostProcess::runV5V6() {// data, img_data 就是输入和输出的指针,将图像从c,h,w转为h,w,c device::Tensor* tensor = inputs_[0]->getTensor();float* data = (float*)tensor->getPtr();int batch = tensor->getBatch();int channel = tensor->getChannel();int height = tensor->getHeight();int width = tensor->getWidth();
NNDEPLOY_LOGE("batch:%d, channel:%d, height:%d, width:%d. (%f,%f,%f))\n", batch,  channel, height, width, data[0], data[1], data[2]);
cv::Mat* dst = outputs_[0]->getCvMat();
NNDEPLOY_LOGE("mat  channel:%d, height:%d, width:%d.\n", dst->channels(),   dst->rows, dst->cols);auto* img_data = (float*)dst->data;for (int h = 0; h < height; h++){for (int w = 0; w < width; w++){for (int c = 0; c < 3; c++){int in_index = h * width * 3 + w * 3 + c;int out_index = c * width * height + h * width + w;// if (w < 10)//   if(h < 10)//     printf("%.2f,", data[out_index]);img_data[in_index] = data[out_index];}}// if(h < 10)//   printf("\n");}return base::kStatusCodeOk;
}
前处理也是同样的道理。
4. 总结
前后处理都完成后,进重新编译,得到的./install/lib/demo_nndeploy_detect 就是处理 UNET类型的输入输出了, 不能处理目标检测网络了,目标检测的输入是 uint8 image, 输出的是一系列目标框,对应的前后处理都是不同的。
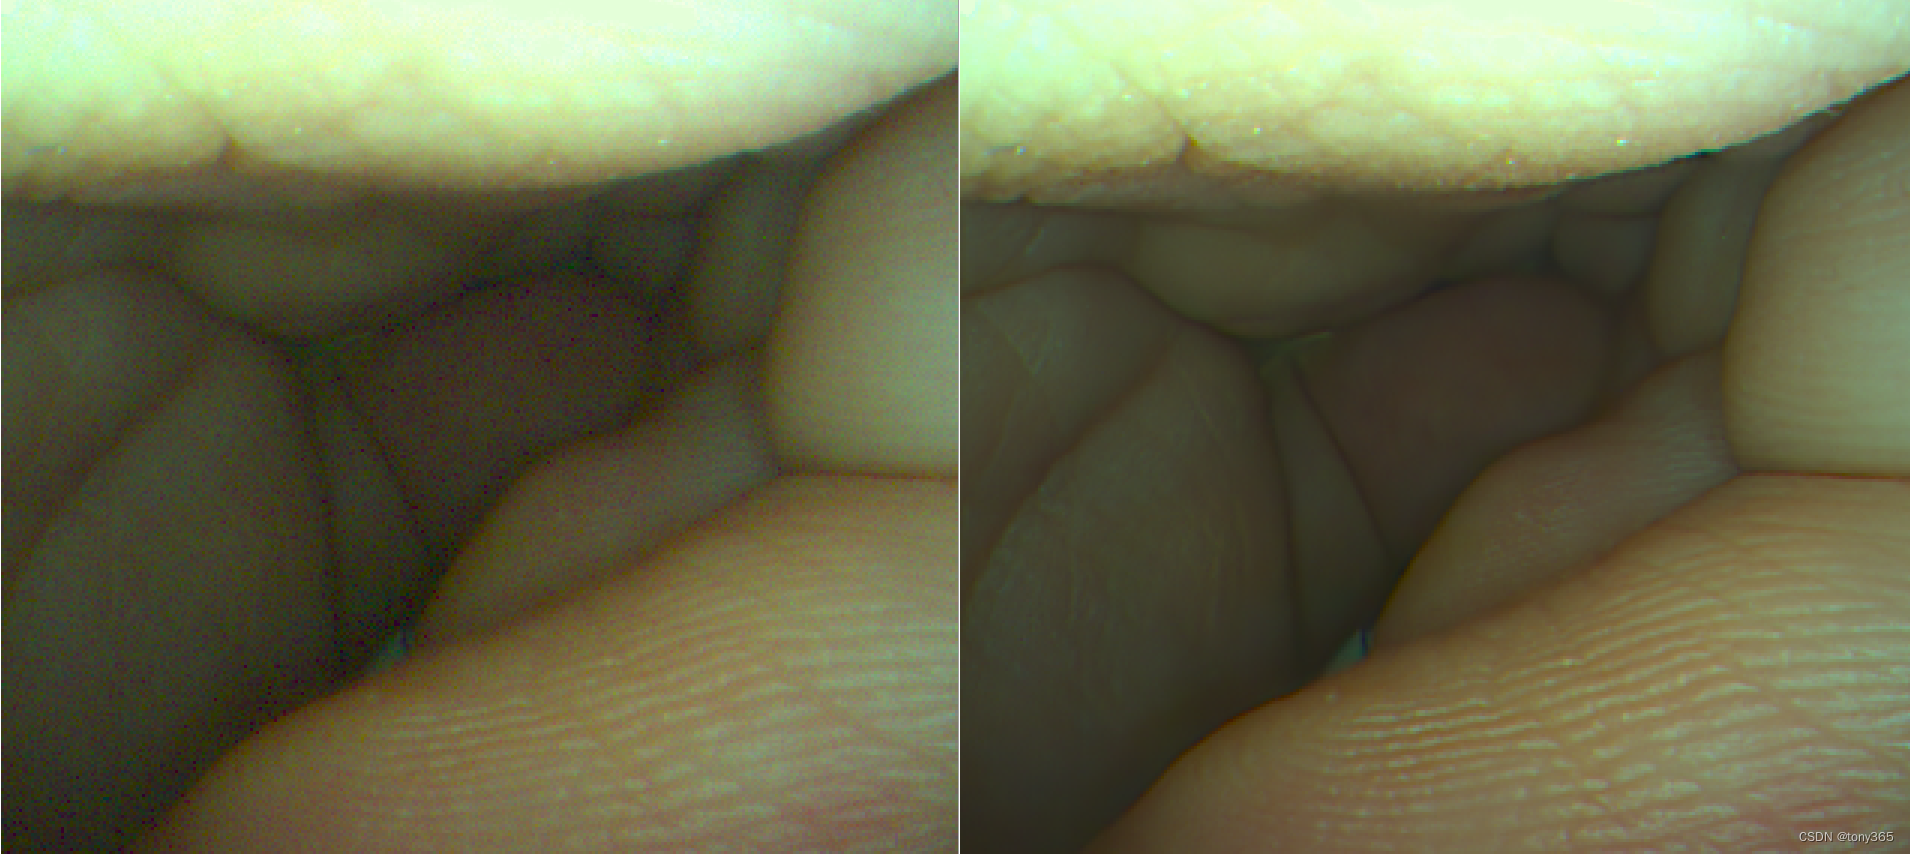
1080P的图像, 在我训练的降噪model(未量化)上 基于openvino在 amd的Ryzen Embedded上可以跑到30-60ms。
降噪前后对比:降噪最重要是不损失细节且可以提升清晰度。


相关文章:
部署系列六基于nndeploy的深度学习 图像降噪unet部署
文章目录 1.直接在源代码demo中修改2. 如何修改呢?3. 修改 graph4. 总结 https://github.com/DeployAI/nndeploy https://nndeploy-zh.readthedocs.io/zh/latest/introduction/index.html 通过以上2个官方链接对nndeploy基本的使用方法应该有所了解了。 下面就是利用…...

使用 ClickHouse 做日志分析
原作:Monika Singh & Pradeep Chhetri 这是我们在 Monitorama 2022 上发表的演讲的改编稿。您可以在此处找到包含演讲者笔记的幻灯片和此处的视频。 当 Cloudflare 的请求抛出错误时,信息会记录在我们的 requests_error 管道中。错误日志用于帮助解…...
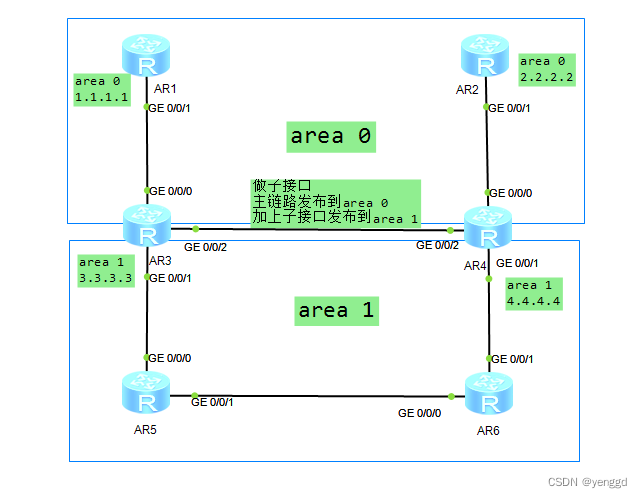
华为ospf路由协议防环和次优路径中一些难点问题分析
第一种情况是ar3的/0/0/2口和ar4的0/0/2口发布在区域1时,当ar1连接ar2的线断了以后,骨干区域就断了,1.1.1.1到2.2.2.2就断了,ping不通了。但ar5和ar6可以ping通2.2.2.2和1.1.1.1,ar3和ar4不可以ping通2.2.2.2和1.1.1.1…...
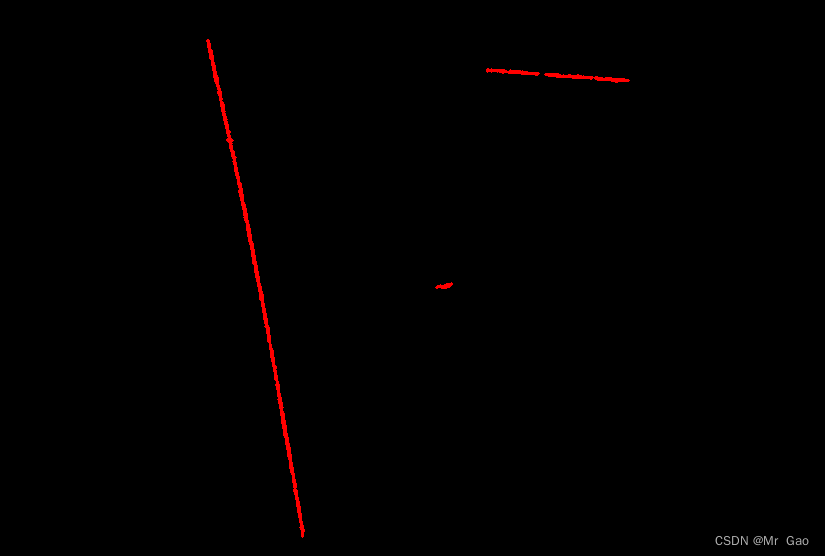
python-opencv划痕检测-续
python-opencv划痕检测-续 这次划痕检测,是上一次划痕检测的续集。 处理的图像如下: 这次划痕检测,我们经过如下几步: 第一步:读取灰度图像 第二步:进行均值滤波 第三步:进行图像差分 第四步࿱…...
c++[string实现、反思]
我的码云 我的string码云 分析总结 1.项目结构 所有的类和函数需要在namespace中实现,要和string高度对应 private:char* _str;//字符串size_t _size;//有效长度size_t _capacity;//总空间,包括\0const static size_t npos-1;2.定义变量 <1> 所…...
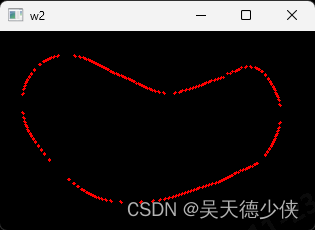
c++版本opencv计算灰度图像的轮廓点
代码 #include<iostream> #include<opencv.hpp>int main() {std::string imgPath("D:\\prostate_run\\result_US_20230804_141531\\mask\\us\\104.bmp");cv::Mat imgGray cv::imread(imgPath, 0);cv::Mat kernel cv::getStructuringElement(cv::MORPH…...

【05】ES6:函数的扩展
一、函数参数的默认值 ES6 允许为函数的参数设置默认值,即直接写在参数定义的后面。 1、基本用法 默认值的生效条件 不传参数,或者明确的传递 undefined 作为参数,只有这两种情况下,默认值才会生效。 注意:null 就…...
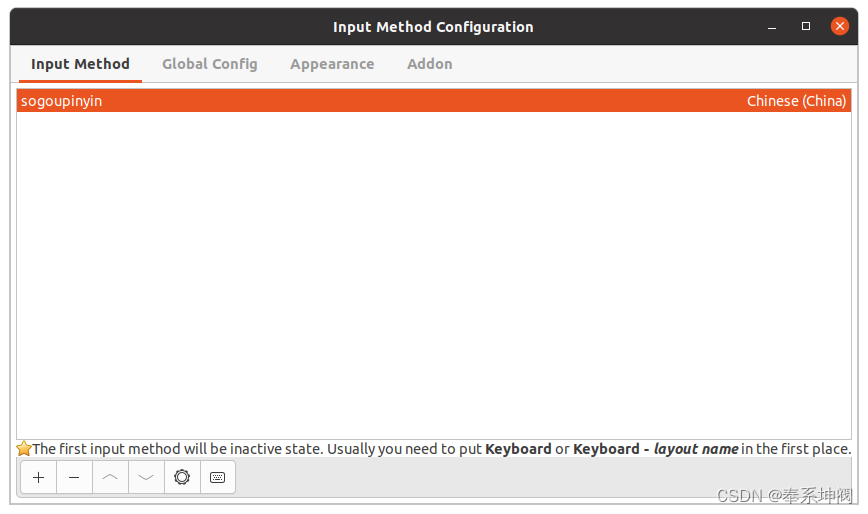
Ubuntu20.04安装搜狗输入法
1、安装包下载 搜狗输入法linux-首页搜狗输入法for linux—支持全拼、简拼、模糊音、云输入、皮肤、中英混输https://shurufa.sogou.com/linux点击立即下载,根据自己的硬件选择deb安装包。 2、输入法安装 当第一步完成以后,页面会自动跳转至搜狗的安装…...

linux的基础命令
文章目录 linux的基础命令一、linux的目录结构(一)Linux路径的描述方式 二、Linux命令入门(一)Linux命令基础格式 三、ls命令(一)HOME目录和工作目录(二)ls命令的参数1.ls命令的-a选…...

linux查询某个进程使用的内存量
linux查询某个进程使用的内存量 查进程用的内存,查看进程占用的内存量,centos查询内存使用 查某个进程id使用的内存量 ps -p 24450 -o rss | awk {print int($1/1024)"MB"} 该命令的含义是: ps -p 24450: 查找进程ID为24450的进…...

list的总结
目录 1.什么是list 1.1list 的优势和劣势 优势: 劣势: 2.构造函数 2.1 default (1) 2.2 fill (2) 2.3 range (3) 2.4 copy (4) 3.list iterator的使用 3.1. begin() 3.2. end() 3.3迭代器遍历 4. list容量函数 4.1. empty() 4.2. siz…...
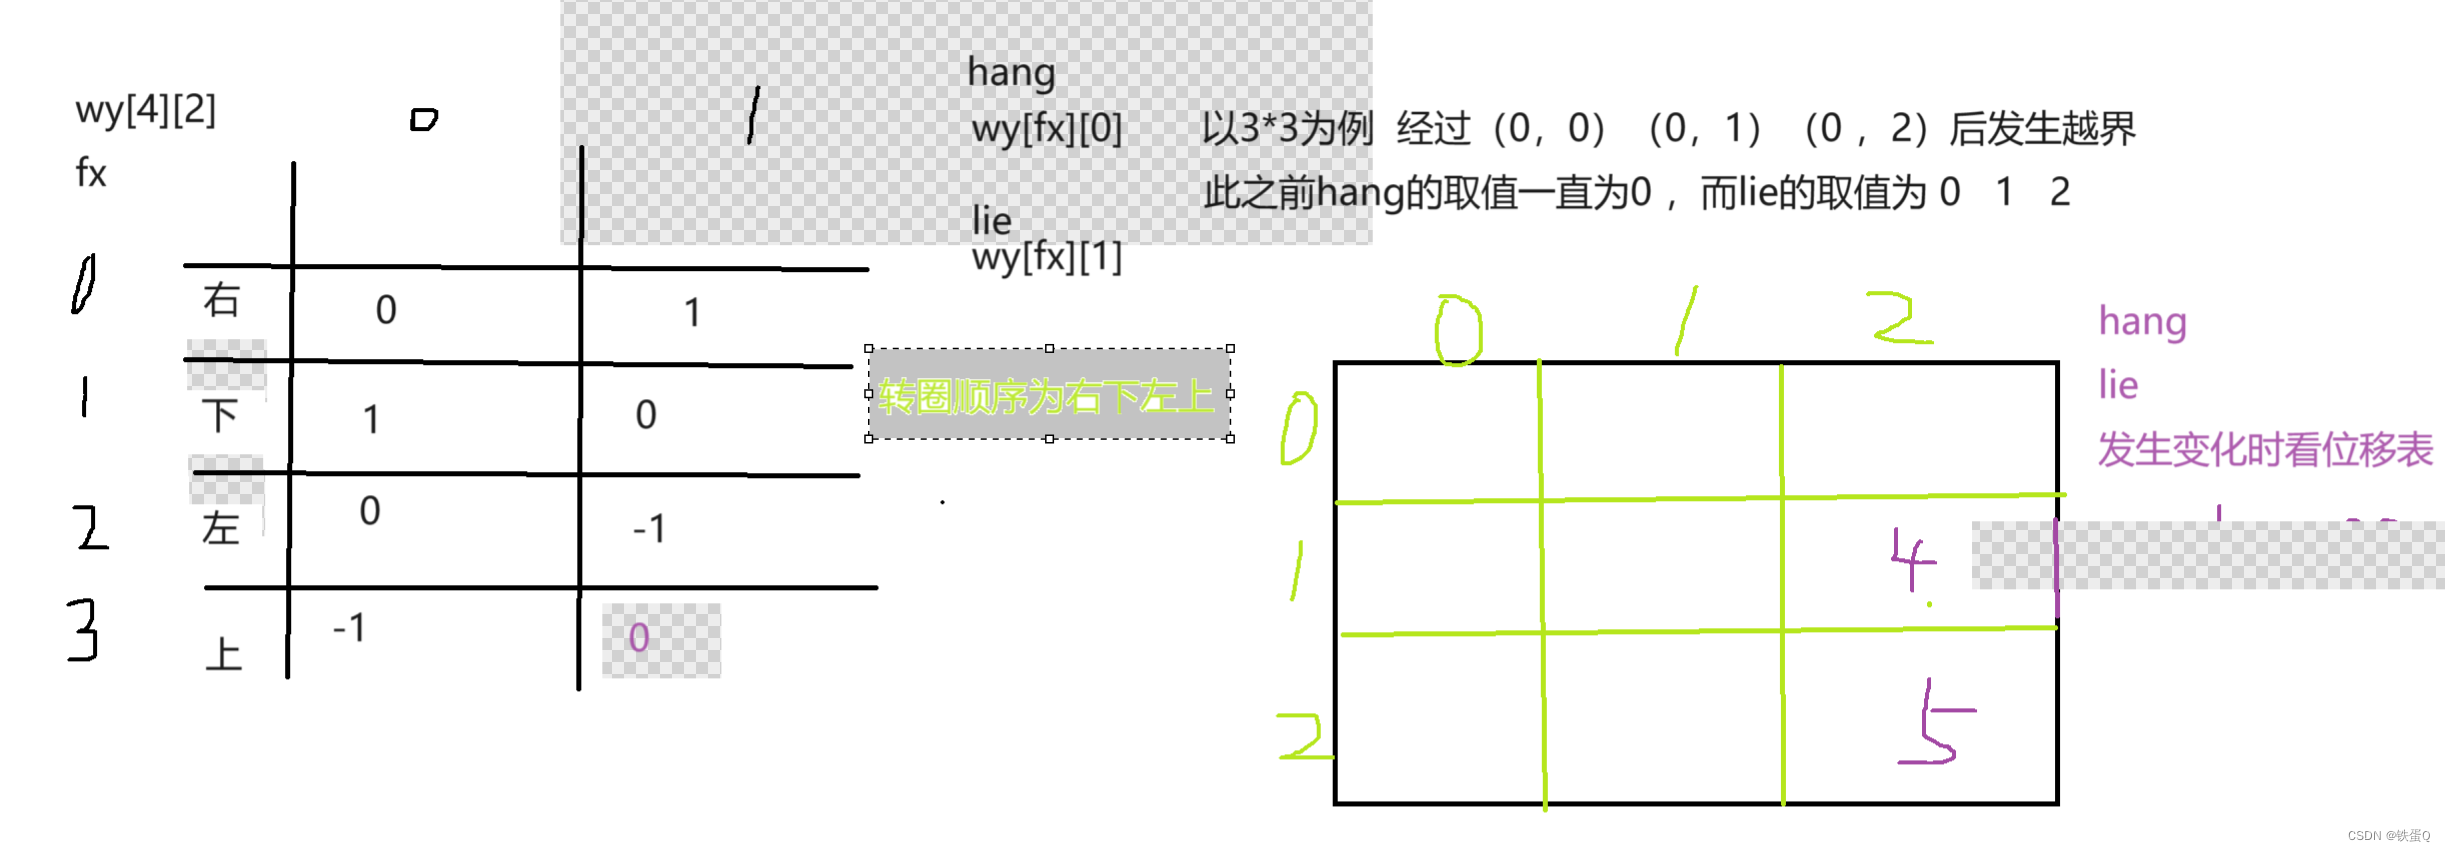
c语言数字转圈
数字转圈 题干输入整数 N(1≤N≤9),输出如下 N 阶方阵。 若输入5显示如下方阵: * 1** 2** 3** 4** 5* *16**17**18**19** 6* *15**24**25**20** 7* *14**23**22**21** 8* *13**12**11**10** 9*输入样例3输出样例* 1*…...
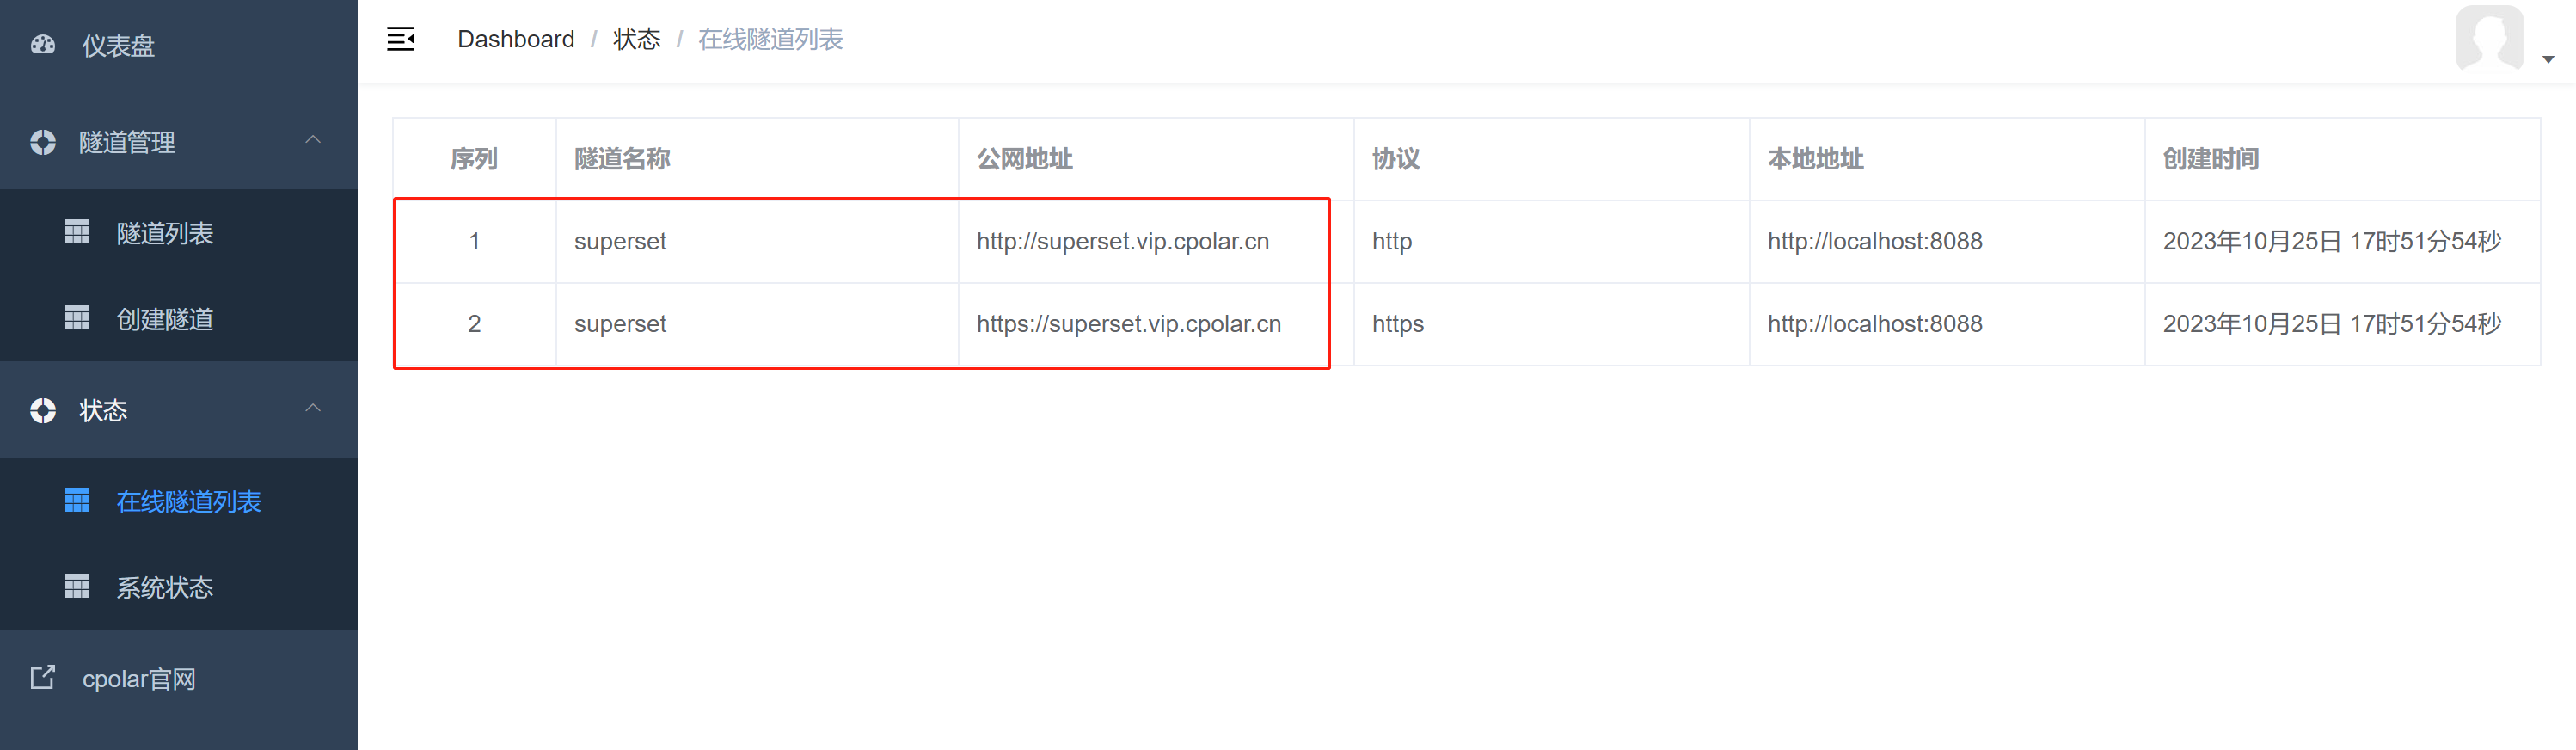
Apache Superset数据分析平台如何实现公网实时远程访问数据【内网穿透】
文章目录 前言1. 使用Docker部署Apache Superset1.1 第一步安装docker 、docker compose1.2 克隆superset代码到本地并使用docker compose启动 2. 安装cpolar内网穿透,实现公网访问3. 设置固定连接公网地址 前言 Superset是一款由中国知名科技公司开源的“现代化的…...
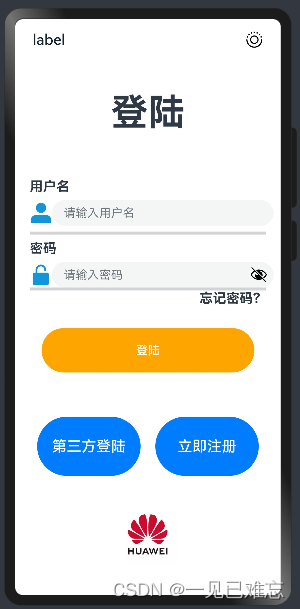
HarmonyOS应用开发实战—登录页面【ArkTS】
文章目录 本页面实战效果预览图一.HarmonyOS应用开发1.1HarmonyOS 详解1.2 ArkTS详解二.HarmonyOS应用开发实战—登录页面【ArkTS】2.1 ArkTS页面源码2.2 代码解析2.3 心得本页面实战效果预览图 一.HarmonyOS应用开发 1.1HarmonyOS 详解 HarmonyOS(鸿蒙操作系统)是华为公司…...

@RequestMapping
目录 作用: 位置: 属性 1.value 2.method 3.params 4.header 作用: 该注解是一个用来处理请求地址映射的注解。 位置: 可用于映射一个请求或一个方法,可以用在类或方法上。 用于方法上,表示在类的…...

操作系统 应用题 例题+参考答案(考研真题)
1.(考研真题)一个多道批处理系统中仅有P1和P2两个作业,P2比P1晚5ms到达,它们的计算和I/O操作顺序如下。 P1:计算60ms,I/O 80ms,计算20ms。 P2:计算120ms,I/O 40ms&…...

免费获取GPT-4的五种工具
不可否认,由OpenAI带来的GPT-4已是全球最受欢迎的、功能最强大的大语言模型(LLM)之一。大多数人都需要使用ChatGPT Plus的订阅服务去访问GPT-4。为此,他们通常需要每月支付20美元。那么问题来了,如果您不想每月有这笔支…...

XTU OJ 1146 矩阵乘法学习笔记
原题 题目描述 给你两个矩阵A(n*k),B(k*m),请求A*B。 输入 第一行是一个整数K,表示样例的个数。 每个样例包含两个矩阵A和B。 每个矩阵的第一行是两个整数n,m,(1≤n,m≤10)表示矩阵的行和列 以后的n行,每行m个整数,每个整数的绝对值不超过…...
基于官方YOLOv4开发构建目标检测模型超详细实战教程【以自建缺陷检测数据集为例】
本文是关于基于YOLOv4开发构建目标检测模型的超详细实战教程,超详细实战教程相关的博文在前文有相应的系列,感兴趣的话可以自行移步阅读即可:《基于yolov7开发实践实例分割模型超详细教程》 《YOLOv7基于自己的数据集从零构建模型完整训练、…...

1、Docker概述与安装
相关资源网站: ● docker官网:http://www.docker.com ● Docker Hub仓库官网: https://hub.docker.com/ 注意,如果只是想看Docker的安装,可以直接往下拉跳转到Docker架构与安装章节下的Docker具体安装步骤,一步步带你安…...

2025届学术党必备的降重复率助手推荐
Ai论文网站排名(开题报告、文献综述、降aigc率、降重综合对比) TOP1. 千笔AI TOP2. aipasspaper TOP3. 清北论文 TOP4. 豆包 TOP5. kimi TOP6. deepseek 要降低AIGC率,需从文本特征着手进行。首先,把高频AI词汇,…...

嵌入式开发板固件管理进阶:手把手教你用Python脚本替代UBin工具合成bin文件
嵌入式开发板固件管理进阶:用Python脚本实现bin文件智能合成 在嵌入式开发中,频繁烧录uboot、kernel和rootfs等固件是每个开发者都会遇到的日常操作。传统方法要么需要逐个文件烧录,要么依赖现成的图形化工具如UBin,这两种方式都存…...

VR消防安全学习机,数字化消防培训新选择
在城市建设不断加快、公共空间日益复杂的背景下,消防安全教育的重要性愈发凸显。传统的消防宣传多以展板、手册、讲座为主,信息传递单一,参与感不足,难以让体验者真正理解火灾风险与应急处置要点。VR消防安全学习机正是在这样的需…...

手把手教你为GD32F103移植FreeRTOS:从SysTick时基配置到任务调度实战
GD32F103实战:从SysTick到FreeRTOS任务调度的完整移植指南 1. 嵌入式实时操作系统的核心:SysTick时基 在嵌入式开发领域,时间管理是一切的基础。GD32F103作为一款基于Cortex-M3内核的微控制器,其内置的SysTick定时器为实时操作系统…...

从‘掩膜膨胀’到特征重建:深入浅出图解Partial Convolutions如何‘脑补’图像缺失部分
从‘掩膜膨胀’到特征重建:深入浅出图解Partial Convolutions如何‘脑补’图像缺失部分 想象一下,你正在修复一张老照片——照片的角落被撕掉了一块,或者某个区域因为年代久远而模糊不清。传统的方法可能需要你手动绘制缺失的部分,…...
)
从编码原理到实战:彻底搞懂QT中文乱码,让你的应用告别“火星文”(UTF-8/GBK转换详解)
从编码原理到实战:彻底搞懂QT中文乱码,让你的应用告别“火星文”(UTF-8/GBK转换详解) 在QT开发中,中文乱码问题就像一位不请自来的“老朋友”,总会在你最意想不到的时候出现。无论是控件显示、文件读写还是…...
)
C++26反射让constexpr容器成为现实?揭秘编译期JSON Schema校验器的7层元编程架构(含完整Doxygen生成的反射依赖图)
更多请点击: https://intelliparadigm.com 第一章:C26反射核心机制与constexpr容器的范式突破 C26 将首次在标准中引入原生、零开销的编译期反射(std::reflect)设施,配合全面 constexpr 化的容器(如 std::…...
)
Unity里也能直接放PPT?用Aspose.Slides插件实现PPT加载与分页展示(附打包报错解决方案)
Unity3D中高效集成PPT展示功能的工程实践 在教育培训、产品演示和虚拟现实项目中,经常需要将现有的PPT内容无缝嵌入到Unity应用中。传统方案往往要求开发者重新制作所有幻灯片内容为Unity支持的格式,耗时耗力且难以维护更新。本文将介绍一种基于Aspose.S…...

别再死记硬背了!用‘火车过站’比喻,5分钟搞懂EtherCAT核心原理
工业通信的极速列车:用火车站模型透视EtherCAT的实时奥秘 想象一下清晨高峰期的地铁系统——列车以精确到秒的间隔发车,每节车厢载着特定乘客在不同站点快速上下车,整个系统保持着惊人的同步性。这正是EtherCAT总线在工业自动化领域的真实写照…...

ROFL-Player终极指南:快速解析英雄联盟回放文件的最佳工具
ROFL-Player终极指南:快速解析英雄联盟回放文件的最佳工具 【免费下载链接】ROFL-Player (No longer supported) One stop shop utility for viewing League of Legends replays! 项目地址: https://gitcode.com/gh_mirrors/ro/ROFL-Player 你是否厌倦了等待…...