Android之高级UI
系统ViewGroup原理解析
常见的布局容器: FrameLayout, LinearLayout,RelativeLayoout,GridLayout
后起之秀:ConstraintLayout,CoordinateLayout
Linearlayout
@Overrideprotected void onMeasure(int widthMeasureSpec, int heightMeasureSpec) {if (mOrientation == VERTICAL) {measureVertical(widthMeasureSpec, heightMeasureSpec);} else {measureHorizontal(widthMeasureSpec, heightMeasureSpec);}}
onMeasure(int widthMeasureSpec, int heightMeasureSpec) 源码如上所示,通过 mOrientation 分别处理垂直和水平两个方向的测量,其中的 mOrientation 变量则是我们在 xml 布局文件中通过 android:orientation=“vertical” 或者直接通过 setOrientation(@OrientationMode int orientation) 方法设置的 LinearLayout 文件方向变量
我们仅分析垂直方向的测量方法,也就是 measureVertical(int widthMeasureSpec, int heightMeasureSpec)(水平方向的测量方法 measureHorizontal(int widthMeasureSpec, int heightMeasureSpec) 是类似的原理,有兴趣的朋友可以自己分析)
初始化变量
需要初始化一些类变量 & 声明一些重要的局部变量
void measureVertical(int widthMeasureSpec, int heightMeasureSpec) {
//第一阶段,主要是一些变量的初始化mTotalLength = 0;// 所有 childView 的高度和 + 本身的 padding,注意:它和 LinearLayout 本身的高度是不同的int maxWidth = 0;// 所有 childView 中宽度的最大值int childState = 0;int alternativeMaxWidth = 0;// 所有 layout_weight <= 0 的 childView 中宽度的最大值int weightedMaxWidth = 0;// 所有 layout_weight >0 的 childView 中宽度的最大值boolean allFillParent = true;float totalWeight = 0;// 所有 childView 的 weight 之和final int count = getVirtualChildCount();final int widthMode = MeasureSpec.getMode(widthMeasureSpec);final int heightMode = MeasureSpec.getMode(heightMeasureSpec);boolean matchWidth = false;boolean skippedMeasure = false;final int baselineChildIndex = mBaselineAlignedChildIndex;final boolean useLargestChild = mUseLargestChild;int largestChildHeight = Integer.MIN_VALUE;int consumedExcessSpace = 0;int nonSkippedChildCount = 0;}
第一次测量
在测量第一阶段会计算那些没有设置 weight 的 childView 的高度、计算 mTotleLength,并且计算三个宽度相关的变量的值
void measureVertical(int widthMeasureSpec, int heightMeasureSpec) {
//第二阶段,第一次测量,接上面代码
// See how tall everyone is. Also remember max width.
//第一遍循环,看看每个childview的高度,并且记录最大宽度for (int i = 0; i < count; ++i) {//一层for循环final View child = getVirtualChildAt(i);//获取到每一个childviewif (child == null) {mTotalLength += measureNullChild(i);continue;}if (child.getVisibility() == View.GONE) {i += getChildrenSkipCount(child, i);continue;}nonSkippedChildCount++;if (hasDividerBeforeChildAt(i)) {mTotalLength += mDividerHeight;}final LayoutParams lp = (LayoutParams) child.getLayoutParams();totalWeight += lp.weight;//计算总权重final boolean useExcessSpace = lp.height == 0 && lp.weight > 0;//使用了权重才会满足// 我们都知道,测量模式有三种:// * UNSPECIFIED:父控件对子控件无约束// * Exactly:父控件对子控件强约束,子控件永远在父控件边界内,越界则裁剪。如果要记忆的话,可以记忆为有对应的具体数值或者是Match_parent// * AT_Most:子控件为wrap_content的时候,测量值为ATif (heightMode == MeasureSpec.EXACTLY && useExcessSpace) {//确切高度,且height=0 权重>0// Optimization: don't bother measuring children who are only// laid out using excess space. These views will get measured// later if we have space to distribute.//先跳过测量模式为EXACTLY并且需要权重计算的childview         // 在后面第三个 for 循环重新计算此 childView 大小final int totalLength = mTotalLength;mTotalLength = Math.max(totalLength, totalLength + lp.topMargin + lp.bottomMargin);skippedMeasure = true;//后面跳过Measure} else {//高度不是确定可能是AT_MOST/UNSPECIFIEDif (useExcessSpace) {// The heightMode is either UNSPECIFIED or AT_MOST, and// this child is only laid out using excess space. Measure// using WRAP_CONTENT so that we can find out the view's// optimal height. We'll restore the original height of 0// after measurement.//把使用权重的childview的高度设置为wrap_contentlp.height = LayoutParams.WRAP_CONTENT;}// Determine how big this child would like to be. If this or// previous children have given a weight, then we allow it to// use all available space (and we will shrink things later// if needed).//这是非常重要的一个方法,将会决定每个 childView 的大小//如果此 childView 及在此 childView 之前的 childView 中使用了 weight 属性,// 我们允许此 childView 使用所有的空间(后续如果需要,再做调整)final int usedHeight = totalWeight == 0 ? mTotalLength : 0;//调用viewgroup中方法测量子viewmeasureChildBeforeLayout(child, i, widthMeasureSpec, 0,heightMeasureSpec, usedHeight);// 得到测量之后的 childView 的 childHeightfinal int childHeight = child.getMeasuredHeight();if (useExcessSpace) {// Restore the original height and record how much space// we've allocated to excess-only children so that we can// match the behavior of EXACTLY measurement.lp.height = 0;consumedExcessSpace += childHeight;}// 将此 childView 的 childHeight 加入到 mTotalLength 中// 并加上 childView 的 topMargin 和 bottomMargin // getNextLocationOffset 方法返回 0,方便以后扩展使用final int totalLength = mTotalLength;mTotalLength = Math.max(totalLength, totalLength + childHeight + lp.topMargin +lp.bottomMargin + getNextLocationOffset(child));if (useLargestChild) {largestChildHeight = Math.max(childHeight, largestChildHeight);//记录最大子view高度}}// 下面两个 if 判断都和 `android:baselineAlignedChildIndex` 属性有关,这里不展开分析/*** If applicable, compute the additional offset to the child's baseline* we'll need later when asked {@link #getBaseline}.*/if ((baselineChildIndex >= 0) && (baselineChildIndex == i + 1)) {mBaselineChildTop = mTotalLength;}// if we are trying to use a child index for our baseline, the above// book keeping only works if there are no children above it with// weight.  fail fast to aid the developer.if (i < baselineChildIndex && lp.weight > 0) {throw new RuntimeException("A child of LinearLayout with index "+ "less than mBaselineAlignedChildIndex has weight > 0, which "+ "won't work.  Either remove the weight, or don't set "+ "mBaselineAlignedChildIndex.");}boolean matchWidthLocally = false;//该子view是否需要测量宽度// 所有 widthMode 是 `MeasureSpec.EXACTLY`,不会进入此 if 判断 if (widthMode != MeasureSpec.EXACTLY && lp.width == LayoutParams.MATCH_PARENT) {// The width of the linear layout will scale, and at least one// child said it wanted to match our width. Set a flag// indicating that we need to remeasure at least that view when// we know our width.// 当父类(LinearLayout)不是match_parent或者精确值的时候,但子控件却是一个match_parent// 那么matchWidthLocally和matchWidth置为true// 意味着这个控件将会占据父类(水平方向)的所有空间matchWidth = true;matchWidthLocally = true;}// 计算三个和宽度相关的变量值final int margin = lp.leftMargin + lp.rightMargin;final int measuredWidth = child.getMeasuredWidth() + margin;maxWidth = Math.max(maxWidth, measuredWidth);childState = combineMeasuredStates(childState, child.getMeasuredState());//获取子viewmeasure后的state状态allFillParent = allFillParent && lp.width == LayoutParams.MATCH_PARENT;if (lp.weight > 0) {//需要计算权重的/** Widths of weighted Views are bogus if we end up* remeasuring, so keep them separate.* alternative 可供选择的*/weightedMaxWidth = Math.max(weightedMaxWidth,matchWidthLocally ? margin : measuredWidth);} else {//如果不需要计算权重走这里alternativeMaxWidth = Math.max(alternativeMaxWidth,matchWidthLocally ? margin : measuredWidth);}i += getChildrenSkipCount(child, i);}//for循环结束// 如果存在没有跳过的 childView 并且需要绘制 end divider 则需要加上 end 位置的 divider 的高度if (nonSkippedChildCount > 0 && hasDividerBeforeChildAt(count)) {mTotalLength += mDividerHeight;}
measureChildBeforeLayout()
在此方法中将会计算每个 childView 的大小,调用 ViewGroup 的 measureChildWithMargins() 方法计算每个 childView 的大小,在测量垂直方向的 childView 时,有一个非常重要的参数需要注意,即:heightUsed,根据英文注释,heightUsed 是指在垂直方向,已经被 parentView 或者 parentView 的其他 childView 使用了的空间
void measureChildBeforeLayout(View child, int childIndex,int widthMeasureSpec, int totalWidth, int heightMeasureSpec,int totalHeight) {measureChildWithMargins(child, widthMeasureSpec, totalWidth,heightMeasureSpec, totalHeight);}
第二次测量
如果进入这个 if 条件,会进行第二次的 for 循环遍历 childView,重新计算 mTotalLength
void measureVertical(int widthMeasureSpec, int heightMeasureSpec) {
//接上面代码
if (useLargestChild &&(heightMode == MeasureSpec.AT_MOST || heightMode == MeasureSpec.UNSPECIFIED)) {mTotalLength = 0;//重新计算总高度:每个非gone的view的高度都按 上次循环记录的最大子view的高度计算,再加上marginfor (int i = 0; i < count; ++i) {final View child = getVirtualChildAt(i);if (child == null) {mTotalLength += measureNullChild(i);continue;}if (child.getVisibility() == GONE) {i += getChildrenSkipCount(child, i);continue;}final LinearLayout.LayoutParams lp = (LinearLayout.LayoutParams)child.getLayoutParams();// Account for negative marginsfinal int totalLength = mTotalLength;mTotalLength = Math.max(totalLength, totalLength + largestChildHeight +lp.topMargin + lp.bottomMargin + getNextLocationOffset(child));}}
测量第三阶段
针对设置了 android:layout_weight 属性的布局,重新计算 mTotalLength
void measureVertical(int widthMeasureSpec, int heightMeasureSpec) {
//接上面代码// Add in our paddingmTotalLength += mPaddingTop + mPaddingBottom;int heightSize = mTotalLength;// Check against our minimum height// 通过 getSuggestedMinimumHeight() 得到建议最小高度,并和计算得到的// mTotalLength 比较取最大值heightSize = Math.max(heightSize, getSuggestedMinimumHeight());// Reconcile our calculated size with the heightMeasureSpec// 通过 heightMeasureSpec,调整 heightSize 的大小int heightSizeAndState = resolveSizeAndState(heightSize, heightMeasureSpec, 0);heightSize = heightSizeAndState & MEASURED_SIZE_MASK;// Either expand children with weight to take up available space or// shrink them if they extend beyond our current bounds. If we skipped// measurement on any children, we need to measure them now.// 重新计算有 weight 属性的 childView 大小,// 如果还有可用的空间,则扩展 childView,计算其大小// 如果 childView 超出了 LinearLayout 的边界,则收缩 childViewint remainingExcess = heightSize - mTotalLength+ (mAllowInconsistentMeasurement ? 0 : consumedExcessSpace);if (skippedMeasure|| ((sRemeasureWeightedChildren || remainingExcess != 0) && totalWeight > 0.0f)) {    // 根据 mWeightSum 计算得到 remainingWeightSum,mWeightSum 是通过 // `android:weightSum` 属性设置的,totalWeight 是通过第一次 for 循环计算得到的float remainingWeightSum = mWeightSum > 0.0f ? mWeightSum : totalWeight;// 将 mTotalLength 复位为 0mTotalLength = 0;// 权重childview的测量,开始真正的第二次 for 循环遍历每一个 childView,重新测量每一个 childViewfor (int i = 0; i < count; ++i) {final View child = getVirtualChildAt(i);if (child == null || child.getVisibility() == View.GONE) {continue;}final LayoutParams lp = (LayoutParams) child.getLayoutParams();final float childWeight = lp.weight              // 如果该 childView 设置了 `weight` 值,则进入 if 语句块if (childWeight > 0) {// 这是设置了 weight 的情况下,最重要的一行代码// remainingExcess 剩余高度 * ( childView 的 weight / remainingWeightSum)// share 便是此 childView 通过这个公式计算得到的高度,                               // 并重新计算剩余高度 remainingExcess 和剩余权重总和 remainingWeightSumfinal int share = (int) (childWeight * remainingExcess / remainingWeightSum);remainingExcess -= share;remainingWeightSum -= childWeight;// 通过下面的 if 条件重新计算,childHeight 是最终 childView 的真正高度final int childHeight;if (mUseLargestChild && heightMode != MeasureSpec.EXACTLY) {childHeight = largestChildHeight;} else if (lp.height == 0 && (!mAllowInconsistentMeasurement|| heightMode == MeasureSpec.EXACTLY)) {// This child needs to be laid out from scratch using// only its share of excess space.childHeight = share;} else {// This child had some intrinsic height to which we// need to add its share of excess space.childHeight = child.getMeasuredHeight() + share;}// 计算 childHeightMeasureSpec & childWidthMeasureSpec,并调用 child.measure() 方法final int childHeightMeasureSpec = MeasureSpec.makeMeasureSpec(Math.max(0, childHeight), MeasureSpec.EXACTLY);final int childWidthMeasureSpec = getChildMeasureSpec(widthMeasureSpec,mPaddingLeft + mPaddingRight + lp.leftMargin + lp.rightMargin,lp.width);child.measure(childWidthMeasureSpec, childHeightMeasureSpec);// Child may now not fit in vertical dimension.childState = combineMeasuredStates(childState, child.getMeasuredState()& (MEASURED_STATE_MASK>>MEASURED_HEIGHT_STATE_SHIFT));}final int margin =  lp.leftMargin + lp.rightMargin;final int measuredWidth = child.getMeasuredWidth() + margin;maxWidth = Math.max(maxWidth, measuredWidth);boolean matchWidthLocally = widthMode != MeasureSpec.EXACTLY &&lp.width == LayoutParams.MATCH_PARENT;alternativeMaxWidth = Math.max(alternativeMaxWidth,matchWidthLocally ? margin : measuredWidth);allFillParent = allFillParent && lp.width == LayoutParams.MATCH_PARENT;// 考虑 childView.topMargin & childView.bottomMargin,重新计算 mTotalLengthfinal int totalLength = mTotalLength;mTotalLength = Math.max(totalLength, totalLength + child.getMeasuredHeight() +lp.topMargin + lp.bottomMargin + getNextLocationOffset(child));}// Add in our padding// 完成 for 循环之后,加入 LinearLayout 本身的 mPaddingTop & mPaddingBottommTotalLength += mPaddingTop + mPaddingBottom;// TODO: Should we recompute the heightSpec based on the new total length?} else {// 重新计算 alternativeMaxWidthalternativeMaxWidth = Math.max(alternativeMaxWidth,weightedMaxWidth);// We have no limit, so make all weighted views as tall as the largest child.// Children will have already been measured once.if (useLargestChild && heightMode != MeasureSpec.EXACTLY) {for (int i = 0; i < count; i++) {final View child = getVirtualChildAt(i);if (child == null || child.getVisibility() == View.GONE) {continue;}final LinearLayout.LayoutParams lp =(LinearLayout.LayoutParams) child.getLayoutParams();float childExtra = lp.weight;if (childExtra > 0) {child.measure(MeasureSpec.makeMeasureSpec(child.getMeasuredWidth(),MeasureSpec.EXACTLY),MeasureSpec.makeMeasureSpec(largestChildHeight,MeasureSpec.EXACTLY));}}}}if (!allFillParent && widthMode != MeasureSpec.EXACTLY) {maxWidth = alternativeMaxWidth;}// 调整 width 大小maxWidth += mPaddingLeft + mPaddingRight;// Check against our minimum widthmaxWidth = Math.max(maxWidth, getSuggestedMinimumWidth());// 调用 setMeasuredDimension() 设置 LinearLayout 的大小setMeasuredDimension(resolveSizeAndState(maxWidth, widthMeasureSpec, childState),heightSizeAndState);//最后,设置LinearLayout的size大小和状态,如果LinearLayout有设置width为match_parent的话,将会调用forceUniformWidth再测量一次所有的subchild,这里主要是测量subchild的width大小if (matchWidth) {forceUniformWidth(count, heightMeasureSpec);}
假如一共有3个subchild且都有设置weight ,分别为3、2、1,我们假设剩余的space为120,则第一个view的大小为120 * 3/(3+2+1)=60,第二个view的大小为(120-60)*2/(2+1)=40,第3个view的大小为(60-40)*1/1 = 20
resolveSizeAndState
public static int resolveSizeAndState(int size, int measureSpec, int childMeasuredState) {final int specMode = MeasureSpec.getMode(measureSpec);final int specSize = MeasureSpec.getSize(measureSpec);final int result;switch (specMode) {case MeasureSpec.AT_MOST:if (specSize < size) {result = specSize | MEASURED_STATE_TOO_SMALL;} else {result = size;}break;case MeasureSpec.EXACTLY:result = specSize;break;case MeasureSpec.UNSPECIFIED:default:result = size;}return result | (childMeasuredState & MEASURED_STATE_MASK);}
总结
1.LinearLayout针对设置weight与不设置weight的情况分别处理
2.在 LinearLayout 中总共有 3 个 for 循环,分别处理不同的流程
- 第一个 for 循环,只会在不使用 weight 属性时进入,并有可能会测量每个 childView 的大小
- 第二个 for 循环,在使用 android:measureWithLargestChild 时才会进入,并且即使进入也不会调用 childView 的测量方法,只会更新 mTotalLength 变量
- 第三个 for 循环,只会在使用 weight 属性时进入,并测量每个 childView 的大小
自定义View总结
自定义UI基础
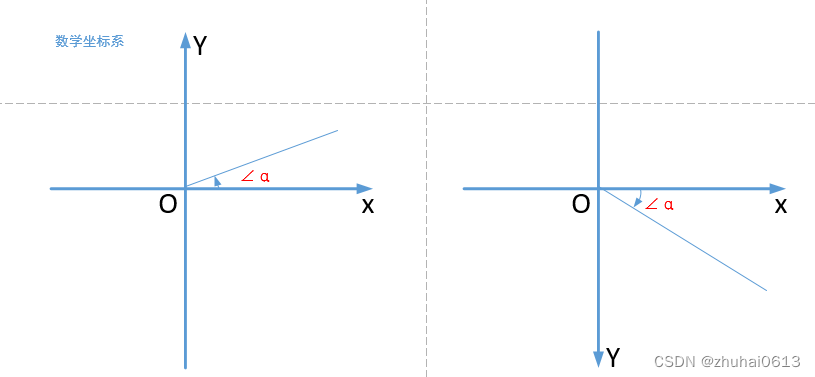
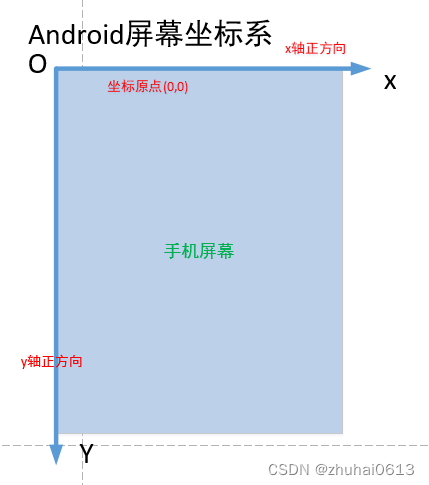
Android的坐标系

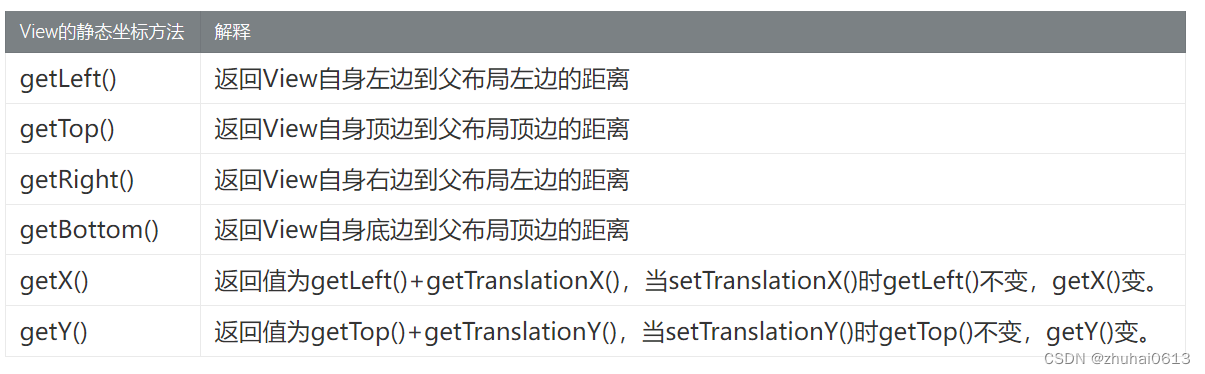
View的静态坐标方法
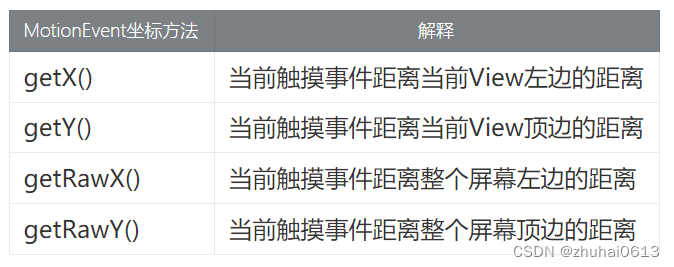
手指触摸屏幕时MotionEvent
获取宽高

获取view位置

View滑动相关坐标系
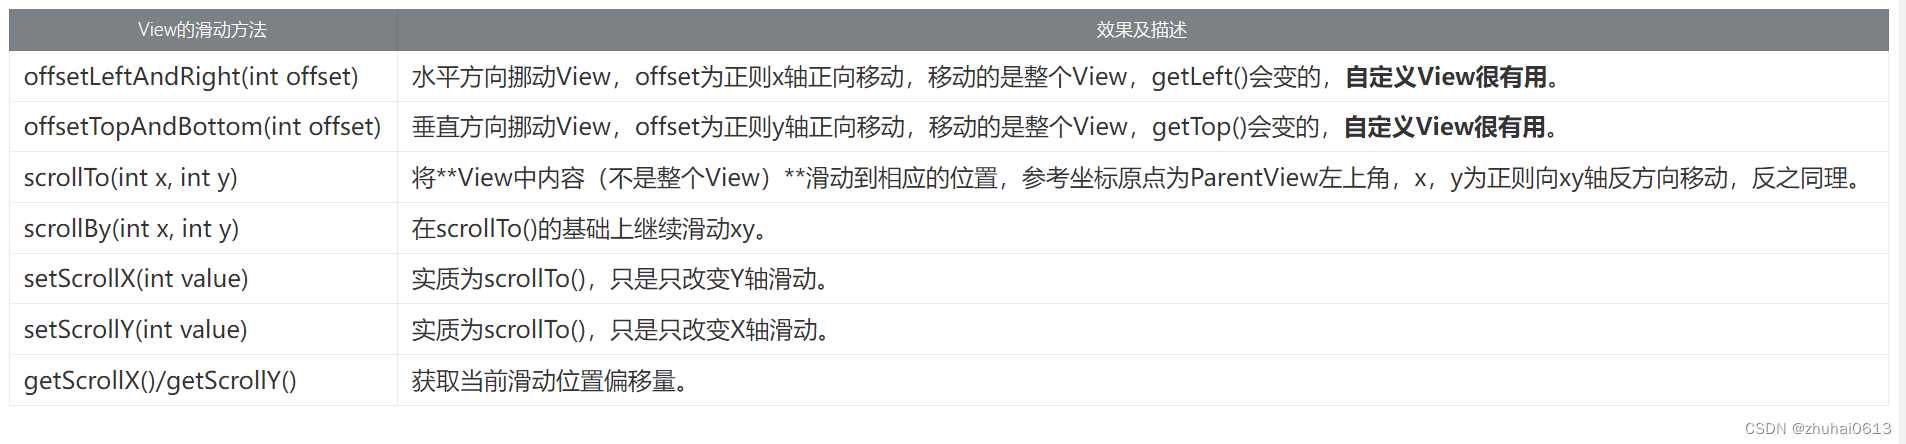
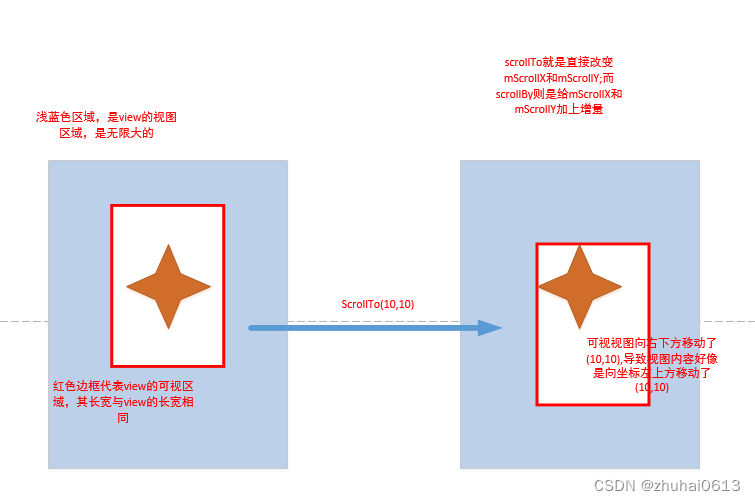
View的scrollTo()和scrollBy()是用于滑动View中的内容,而不是改变View的位置;改变View在屏幕中的位置可以使用offsetLeftAndRight()和offsetTopAndBottom()方法,他会导致getLeft()等值改变
自定义view分类
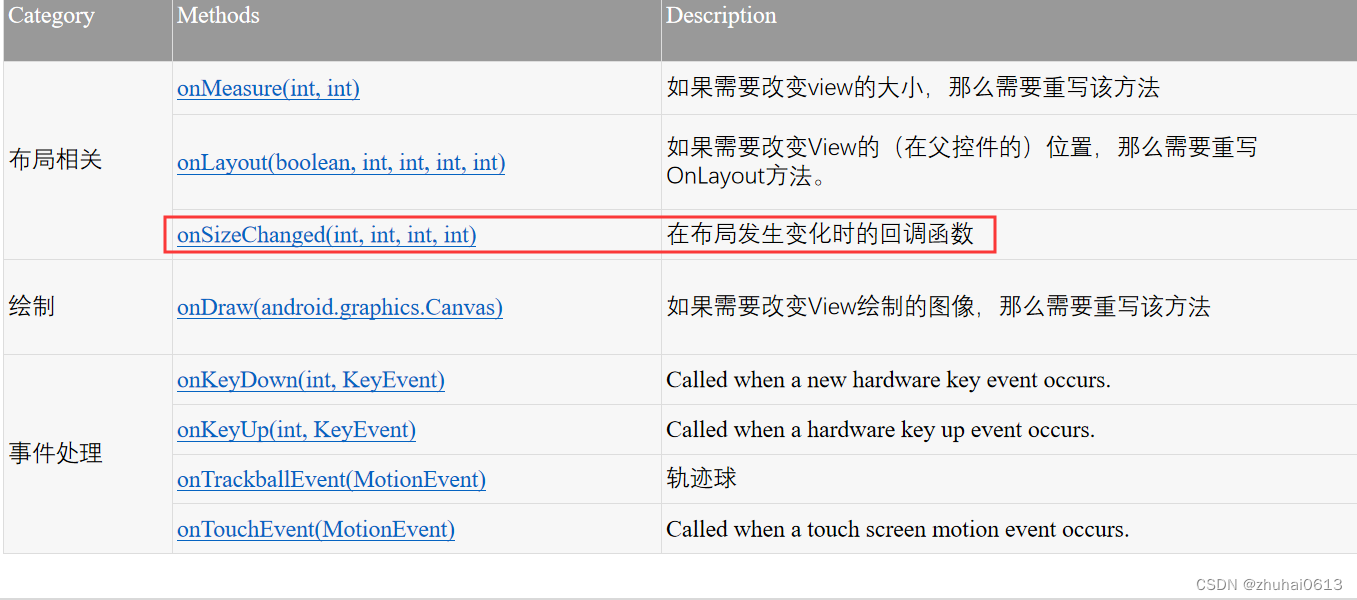
- 自定义View的基本方法
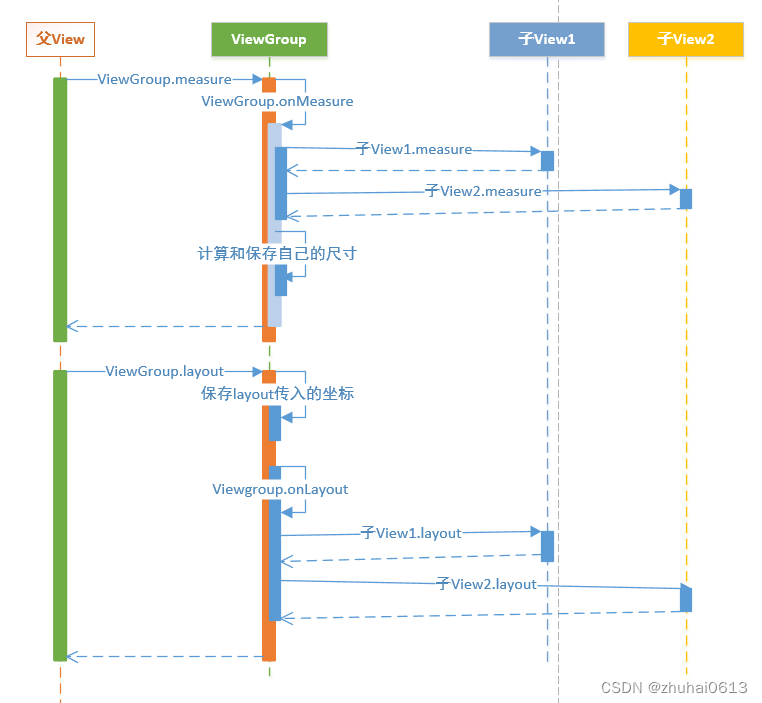
自定义View的最基本的三个方法分别是: onMeasure()、onLayout()、onDraw();
View在Activity中显示出来,要经历测量、布局和绘制三个步骤,分别对应三个动作:measure、layout和draw。
测量:onMeasure()决定View的大小;
布局:onLayout()决定View在ViewGroup中的位置;
绘制:onDraw()决定绘制这个View。
- 自定义控件分类
自定义View: 只需要重写onMeasure()和onDraw()
自定义ViewGroup: 则只需要重写onMeasure()和onLayout()
- 视图View主要分为两类

View类简介
View类是Android中各种组件的基类,如View是ViewGroup基类
View表现为显示在屏幕上的各种视图
Android中的UI组件都由View、ViewGroup组成。
View的构造函数:共有4个
// 如果View是在Java代码里面new的,则调用第一个构造函数public CustomView(Context context) {super(context);}// 如果View是在.xml里声明的,则调用第二个构造函数// 自定义属性是从AttributeSet参数传进来的public CustomView(Context context, AttributeSet attrs) {super(context, attrs);}// 不会自动调用// 一般是在第二个构造函数里主动调用// 如View有style属性时public CustomView(Context context, AttributeSet attrs, int defStyleAttr) {super(context, attrs, defStyleAttr);}//API21之后才使用// 不会自动调用// 一般是在第二个构造函数里主动调用// 如View有style属性时public CustomView(Context context, AttributeSet attrs, int defStyleAttr, int defStyleRes) {super(context, attrs, defStyleAttr, defStyleRes);}
- AttributeSet与自定义属性
系统自带的View可以在xml中配置属性,对于写的好的自定义View同样可以在xml中配置属性,为了使自定义的View的属性可以在xml中配置,需要以下4个步骤:
通过为自定义View添加属性
在xml中为相应的属性声明属性值
在运行时(一般为构造函数)获取属性值
将获取到的属性值应用到View
- View视图结构
1 PhoneWindow是Android系统中最基本的窗口系统,继承自Windows类,负责管理界面显示以及事件响应。它是Activity与View系统交互的接口
2 DecorView是PhoneWindow中的起始节点View,继承于View类,作为整个视图容器来使用。用于设置窗口属性。它本质上是一个FrameLayout
3 ViewRoot在Activtiy启动时创建,负责管理、布局、渲染窗口UI等等
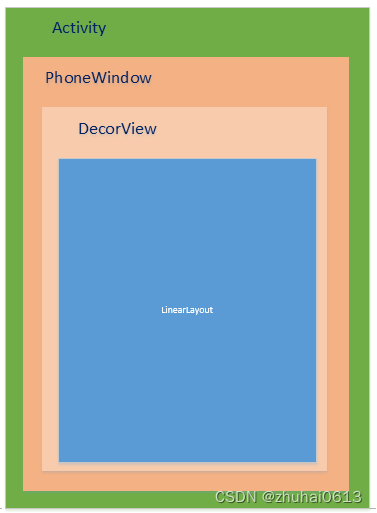
上图是 Activity 的结构。我们先进行大致的描述,然后在进入源码体会这一过程。
我们可以清晰的知道一个 Activity 会对应着有一个 Window,而 Window 的唯一实现类为 PhoneWindow,PhoneWindow 的初始化是在 Activity 的 attach 方法中,我们前面也有提到 attach 方法。
在往下一层是一个 DecorView,被 PhoneWindow 持有着,DecorView 的初始化在 setContentView 中,这个我们待会会进行详细分析。DecorView 是我们的顶级View,我们设置的布局只是其子View。
DecorView 是一个 FrameLayout。但在 setContentView 中,会给他加入一个线性的布局(LinearLayout)。该线性布局的子View 则一般由 TitleBar 和 ContentView 进行组成。TitleBar 我们可以通过 requestWindowFeature(Window.FEATURE_NO_TITLE); 进行去除,而 ContentView 则是来装载我们设置的布局文件的 ViewGroup 了
对于多View的视图,结构是树形结构:最顶层是ViewGroup,ViewGroup下可能有多个ViewGroup或View,如下图:
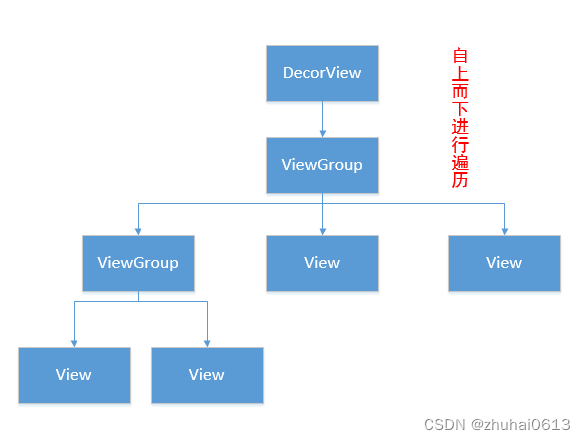
一定要记住:无论是measure过程、layout过程还是draw过程,永远都是从View树的根节点开始测量或计算(即从树的顶端开始),一层一层、一个分支一个分支地进行(即树形递归),最终计算整个View树中各个View,最终确定整个View树的相关属性
view的生命周期
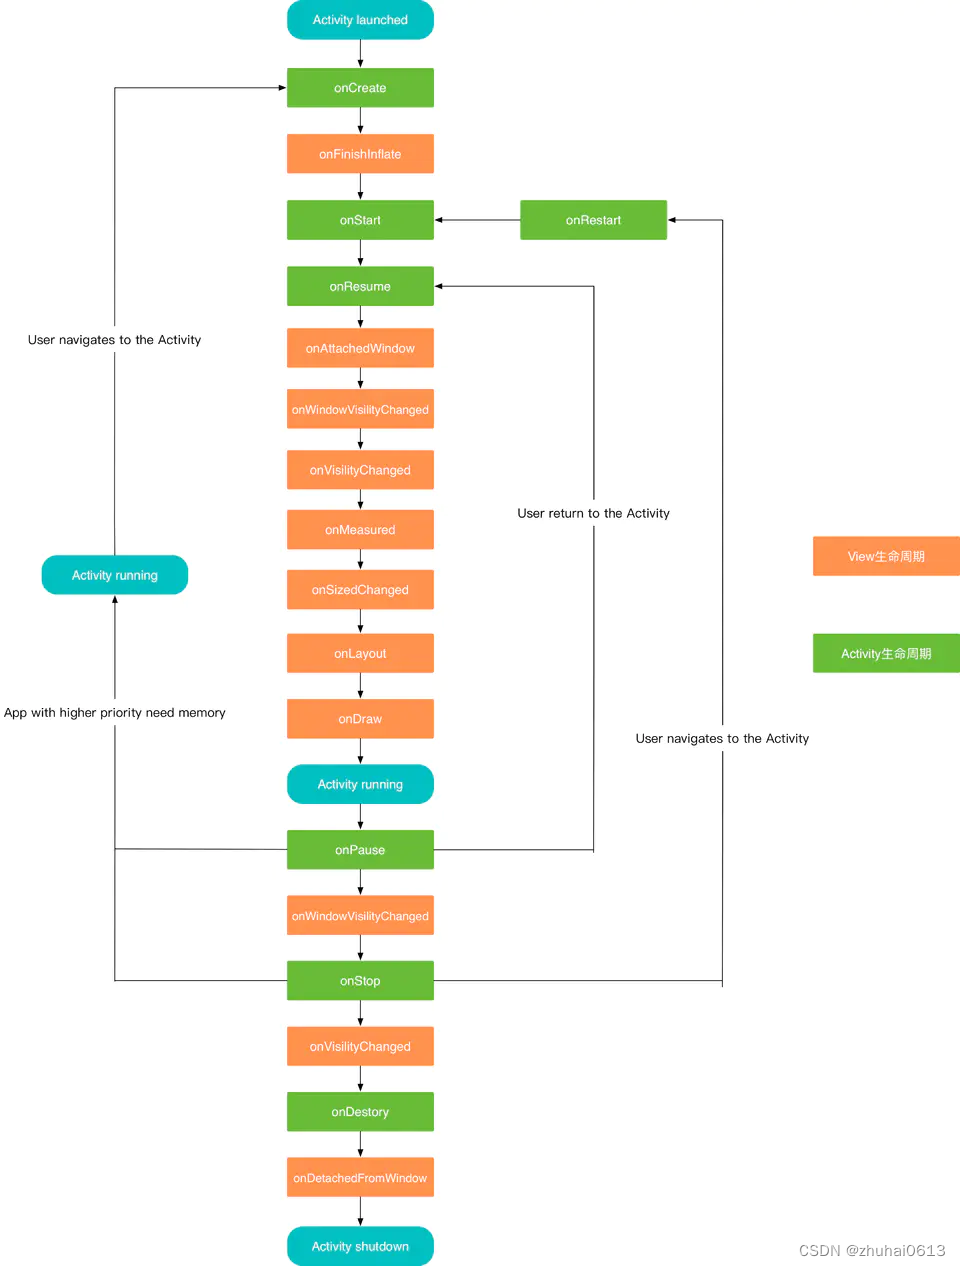
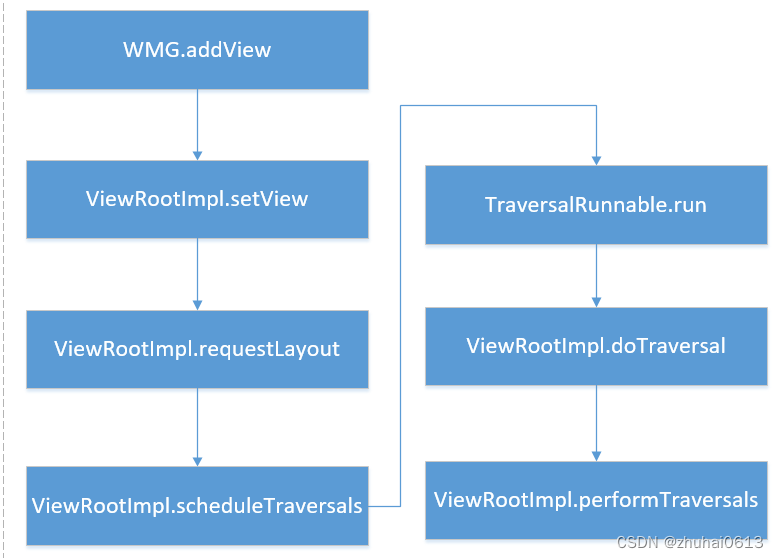
绘制流程从何而起
我们一说到绘制流程,就会想到或是听过onMeasure、onLayout、onDraw这三个方法,但是有没想过为什么我们开启一个App或是点开一个Activity,就会触发这一系列流程呢?想知道绘制流程从何而起,我们就有必要先解释 App启动流程 和 Activity的启动流程。我们都知道
ActivityThread 的 main 是一个App的入口。我们来到 main 方法看看他做了什么启动操作。ActivityThread 的 main方法是由 ZygoteInit 类中最终通过 RuntimeInit类的invokeStaticMain 方法进行反射调用

measure流程
layout流程
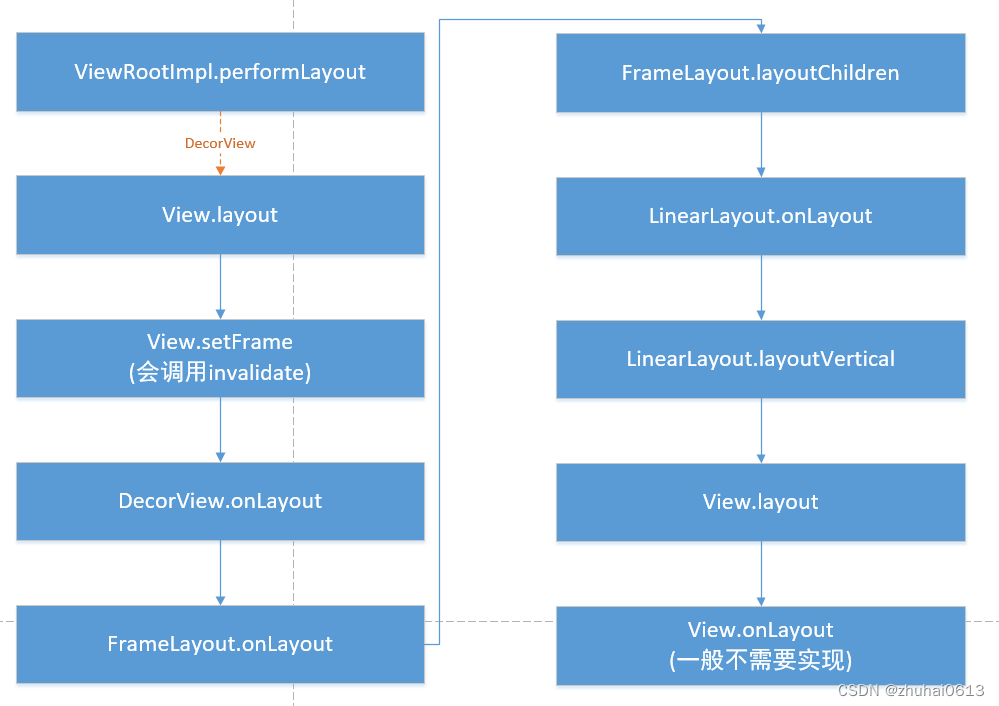
draw流程
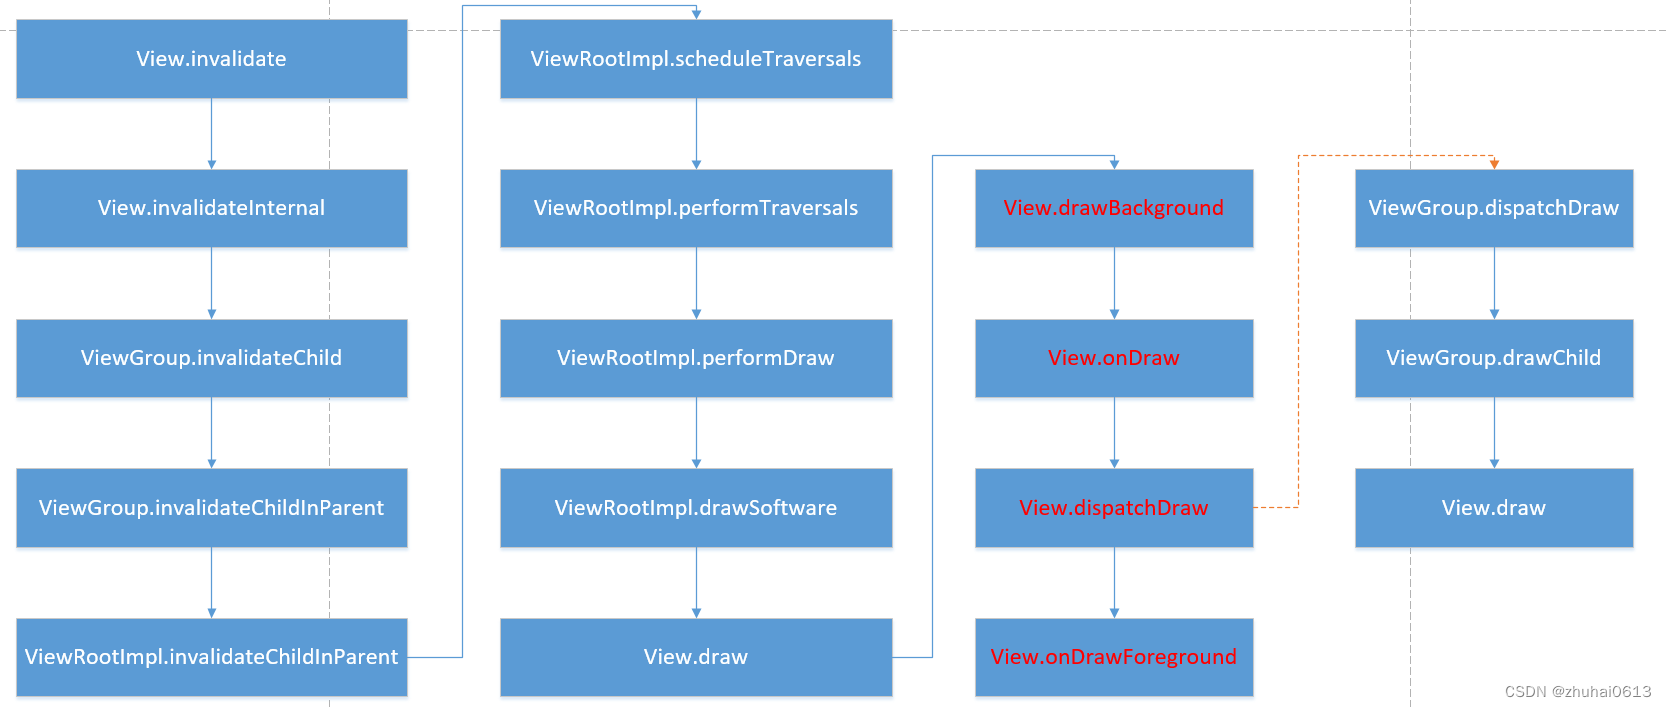
刷新
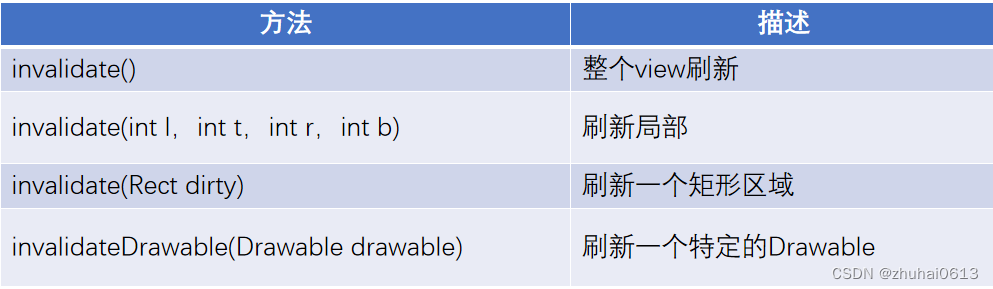
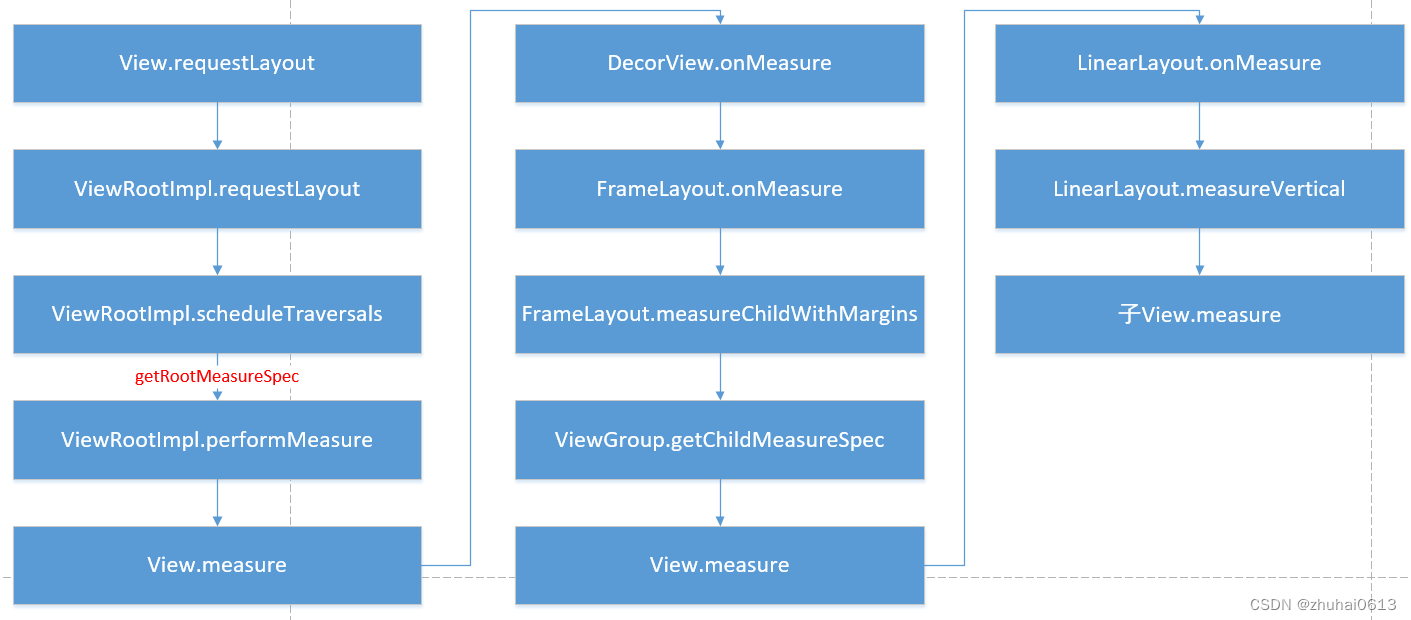
测量是如何进行的
-
测量遍历在 measure(int, int) 中实现,是 View 树的自上而下遍历。在递归过程中,每个 View
都会将维度规范下推到布局树。在测量遍历结束时,每个 View 均存储了其测量值。第二次遍历发生在 layout(int, int,
int, int) 中,也是自上而下遍历。在此次遍历中,每个父级负责使用测量遍历中计算的尺寸来定位其所有的子级。当返回 View 对象的
measure() 方法时,必须设置其 getMeasuredWidth() 和 getMeasuredHeight() 值,以及该
View 对象的所有子级的值。View 对象的测量宽度值和测量高度值必须遵守 View
对象的父级所施加的限制。这就保证了在测量遍历结束时,所有父级都会接受其子级的所有测量值。父级 View 可以对其子级多次调用
measure()。例如,父级可以使用未指定的维度测量每个子级一次,以确定它们希望的大小;然后,如果所有子级不受限制的尺寸的总和过大或过小,则再次使用实际的数字对它们调用
measure()(即,如果子级未就各自获得多少空间达成一致,则父级将会介入并针对第二次遍历设置规则)。 -
测量遍历使用两个类来传达维度。View 对象使用 ViewGroup.LayoutParams 类来告知父级它们想要如何测量和定位。基本的
ViewGroup.LayoutParams 类仅描述了 View 希望的宽度和高度。针对每个维度,它可以指定以下某一项: -
一个确切的数字
-
MATCH_PARENT,该参数意味着 View 想要和它的父级一样大(负填充)
-
WRAP_CONTENT,该参数意味着 View 想要足够大,以包含其内容(正填充)。
有适用于 ViewGroup 的不同子类的 ViewGroup.LayoutParams 子类。例如,RelativeLayout 有自己的 ViewGroup.LayoutParams 子类,其中包括使子级 View 对象水平和垂直居中的功能。
MeasureSpec 对象用于在树中将要求从父级下推到子级。MeasureSpec 可以为以下三种模式之一:
- UNSPECIFIED:父级使用该模式来确定子级 View 所需的维度。例如,LinearLayout 可能会对其高度设置为 UNSPECIFIED 和宽度设置为 EXACTLY 240 的子级调用 measure(),从而确定宽度为 240 像素的子级 View 所需的高度。
- EXACTLY:父级使用该模式来强制子级使用某个确切尺寸。子级必须使用该尺寸,并保证其所有的子项都能放入该尺寸。
- AT MOST:父级使用该模式来强制规定子级的最大尺寸。子级必须保证它及其所有的子项都能放入该尺寸

// ViewGroup 类
public static int getChildMeasureSpec(int spec, int padding, int childDimension) {int specMode = MeasureSpec.getMode(spec);int specSize = MeasureSpec.getSize(spec);int size = Math.max(0, specSize - padding);int resultSize = 0;int resultMode = 0;switch (specMode) {// 父视图为确定的大小的模式case MeasureSpec.EXACTLY:/*** 根据子视图的大小,进行不同模式的组合:* 1、childDimension 大于 0,说明子视图设置了具体的大小* 2、childDimension 为 {@link LayoutParams.MATCH_PARENT},说明大小和其父视图一样大* 3、childDimension 为 {@link LayoutParams.WRAP_CONTENT},说明子视图想为其自己的大小,但* 不能超过其父视图的大小。*/if (childDimension >= 0) {resultSize = childDimension;resultMode = MeasureSpec.EXACTLY;} else if (childDimension == LayoutParams.MATCH_PARENT) {// Child wants to be our size. So be it.resultSize = size;resultMode = MeasureSpec.EXACTLY;} else if (childDimension == LayoutParams.WRAP_CONTENT) {// Child wants to determine its own size. It can't be// bigger than us.resultSize = size;resultMode = MeasureSpec.AT_MOST;}break;// 父视图已经有一个最大尺寸限制case MeasureSpec.AT_MOST:/*** 根据子视图的大小,进行不同模式的组合:* 1、childDimension 大于 0,说明子视图设置了具体的大小* 2、childDimension 为 {@link LayoutParams.MATCH_PARENT},* -----说明大小和其父视图一样大,但是此时的父视图还不能确定其大小,所以只能让子视图不超过自己* 3、childDimension 为 {@link LayoutParams.WRAP_CONTENT},* -----说明子视图想为其自己的大小,但不能超过其父视图的大小。*/if (childDimension >= 0) {// Child wants a specific size... so be itresultSize = childDimension;resultMode = MeasureSpec.EXACTLY;} else if (childDimension == LayoutParams.MATCH_PARENT) {// Child wants to be our size, but our size is not fixed.// Constrain child to not be bigger than us.resultSize = size;resultMode = MeasureSpec.AT_MOST;} else if (childDimension == LayoutParams.WRAP_CONTENT) {// Child wants to determine its own size. It can't be// bigger than us.resultSize = size;resultMode = MeasureSpec.AT_MOST;}break;case MeasureSpec.UNSPECIFIED:if (childDimension >= 0) {// Child wants a specific size... let him have itresultSize = childDimension;resultMode = MeasureSpec.EXACTLY;} else if (childDimension == LayoutParams.MATCH_PARENT) {// Child wants to be our size... find out how big it should// beresultSize = View.sUseZeroUnspecifiedMeasureSpec ? 0 : size;resultMode = MeasureSpec.UNSPECIFIED;} else if (childDimension == LayoutParams.WRAP_CONTENT) {// Child wants to determine its own size.... find out how// big it should beresultSize = View.sUseZeroUnspecifiedMeasureSpec ? 0 : size;resultMode = MeasureSpec.UNSPECIFIED;}break;}return MeasureSpec.makeMeasureSpec(resultSize, resultMode);}
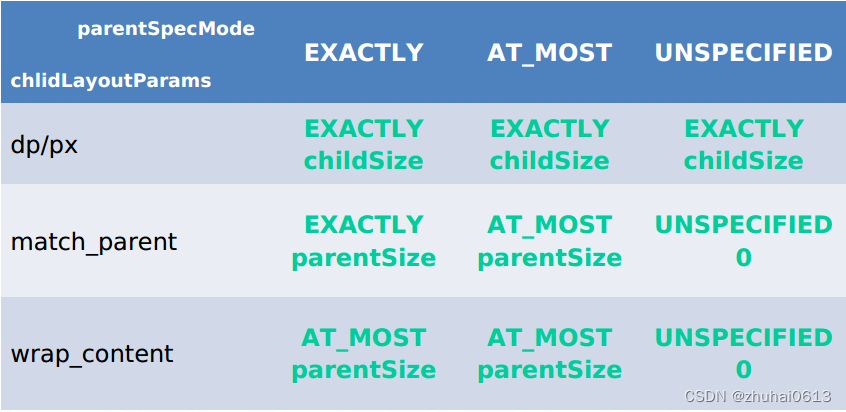
针对上表,这里再做一下具体的说明
- 对于应用层 View ,其 MeasureSpec 由父容器的 MeasureSpec 和自身的 LayoutParams 来共同决定
- 对于不同的父容器和view本身不同的LayoutParams,view就可以有多种MeasureSpec。
- 当view采用固定宽高的时候,不管父容器的MeasureSpec是什么,view的MeasureSpec都是精确模式并且其大小遵循Layoutparams中的大小;
- 当view的宽高是match_parent时,这个时候如果父容器的模式是精准模式,那么view也是精准模式并且其大小是父容器的剩余空间,如果父容器是最大模式,那么view也是最大模式并且其大小不会超过父容器的剩余空间;
- 当view的宽高是wrap_content时,不管父容器的模式是精准还是最大化,view的模式总是最大化并且大小不能超过父容器的剩余空间。
- Unspecified模式,这个模式主要用于系统内部多次measure的情况下,一般来说,我们不需要关注此模式(这里注意自定义View放到ScrollView的情况 需要处理)。
onMeasure()方法中常用的方法 - getChildCount():获取子View的数量;
- getChildAt(i):获取第i个子控件;
- subView.getLayoutParams().width/height:设置或获取子控件的宽或高;
- measureChild(child, widthMeasureSpec, heightMeasureSpec):测量子View的宽高;
- child.getMeasuredHeight/width():执行完measureChild()方法后就可以通过这种方式获取子View的宽高值;
- getPaddingLeft/Right/Top/Bottom():获取控件的四周内边距;
- setMeasuredDimension(width, height):重新设置控件的宽高
自定义View需要注意的地方
- 让View支持wrap_conent
- 让View支持padding
- 尽量避免使用Handler,一般都可以用View自带的post方法代替
- 在onDeatchFromWindow时,停止View的动画或线程(如果有的话)
- 如果存在嵌套滑动,处理好滑动冲突
自定义View如何测量
自定义绘制
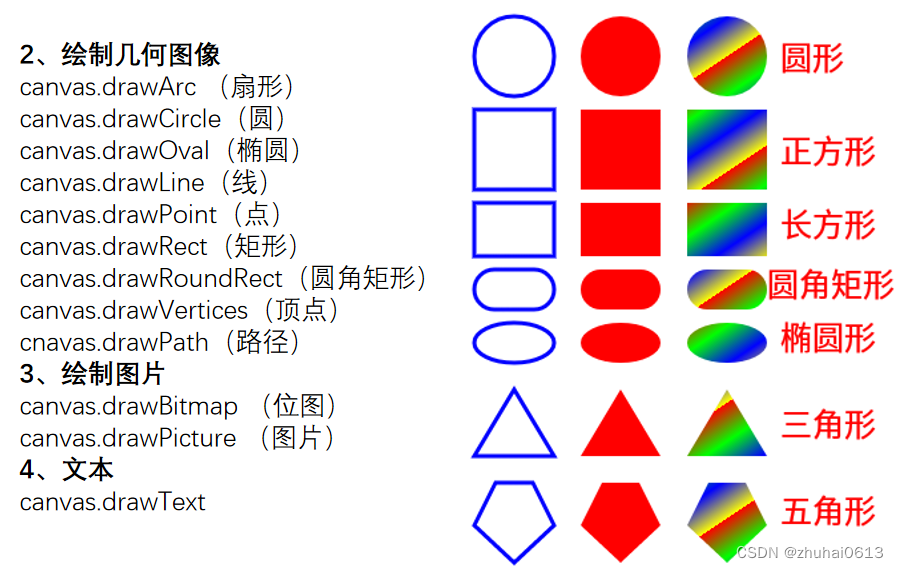
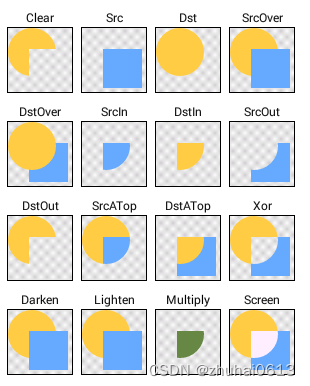
1.Canvas常用方法
- 绘制图形(点、线、矩形、椭圆、圆等)
- 绘制文本(文本的居中问题,需要Paint知识)
- 画布的基本变化(平移、缩放、旋转、倾斜)
- 画布的裁剪
- 画布的保存
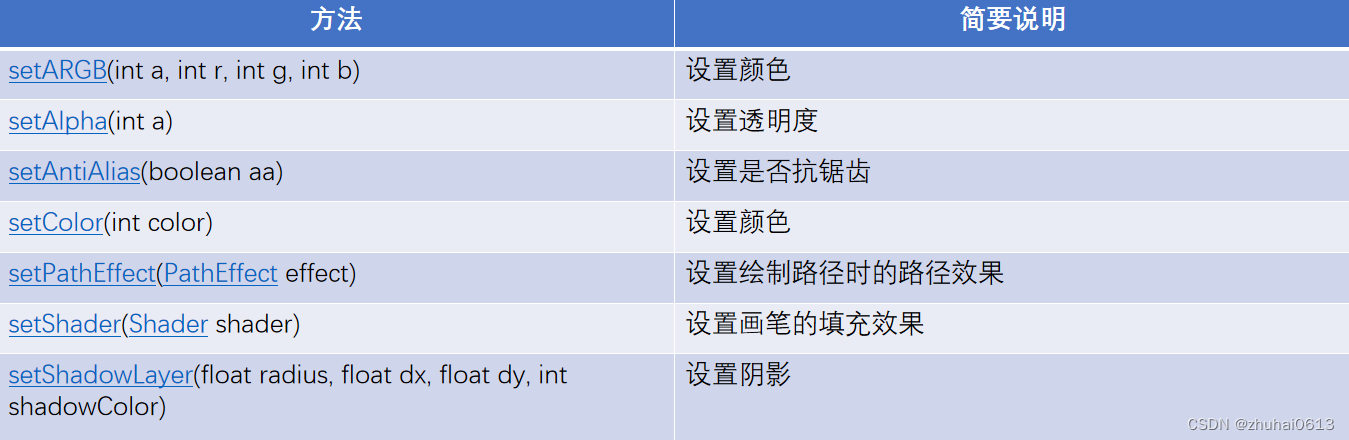
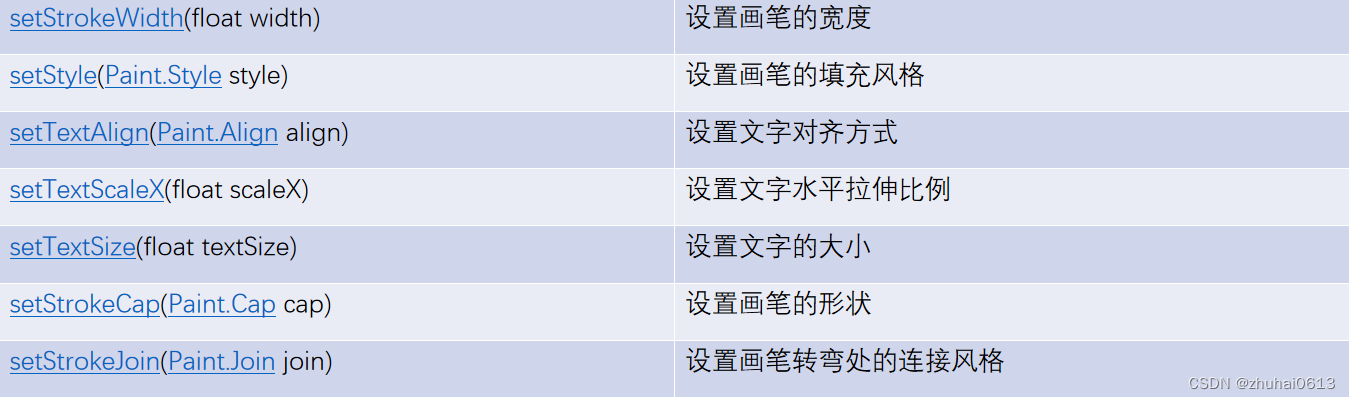
2.Paint类主要用于设置绘制风格:包括画笔的颜色画笔触笔粗细、填充风格及文字的特征
-
Paint常用方法
-
颜色
-
类型(填充、描边)
-
字体大小
-
宽度
-
对齐方式
-
文字位置属性测量
-
文字宽度测量
-
Path常用方法
-
添加路径
-
移动起点
-
贝塞尔(二阶、三阶)
-
逻辑运算
-
重置路径
-
PathEffect
-
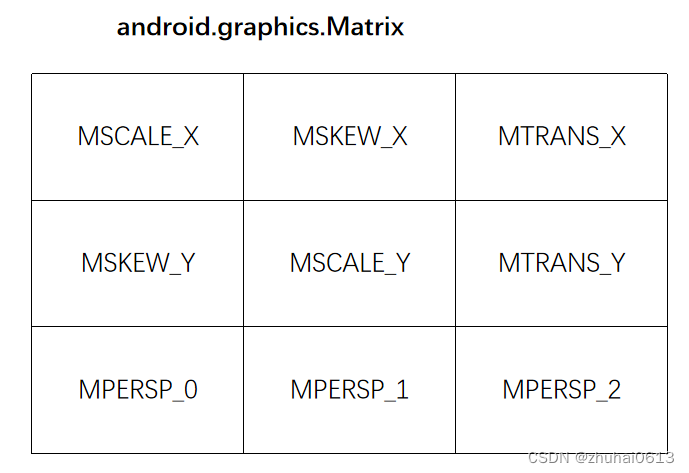
Matrix
-
PathMeasure:来操作和获取有关 Path 对象信息的工具类。
-
PorterDuffXfermode
-
Matrix
-
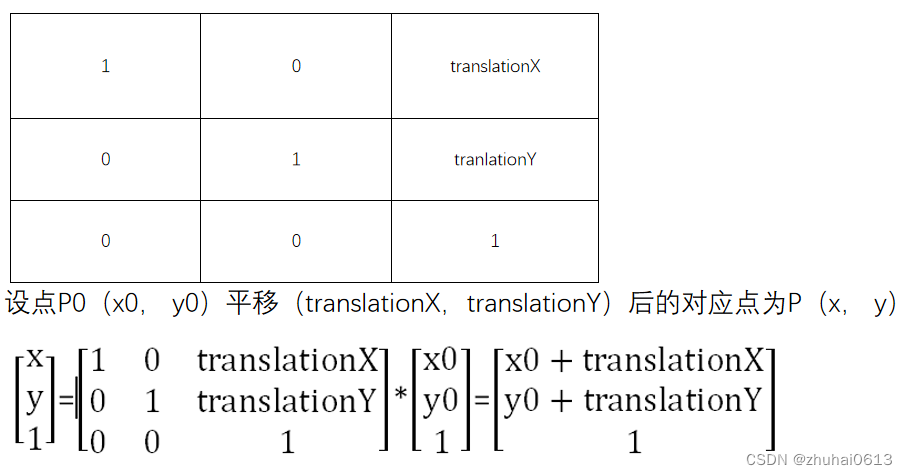
平移矩阵
-
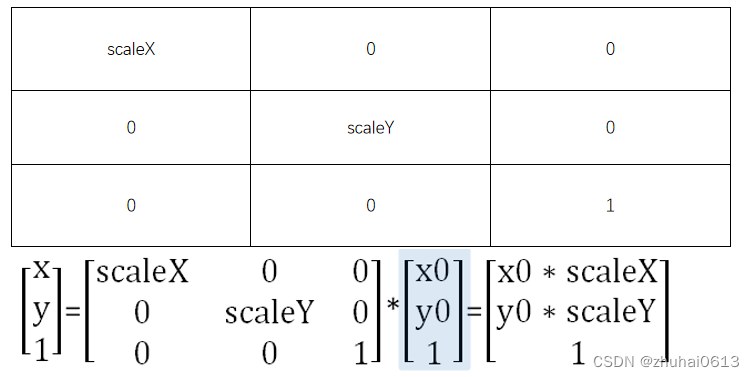
缩放矩阵
-
旋转矩阵
-
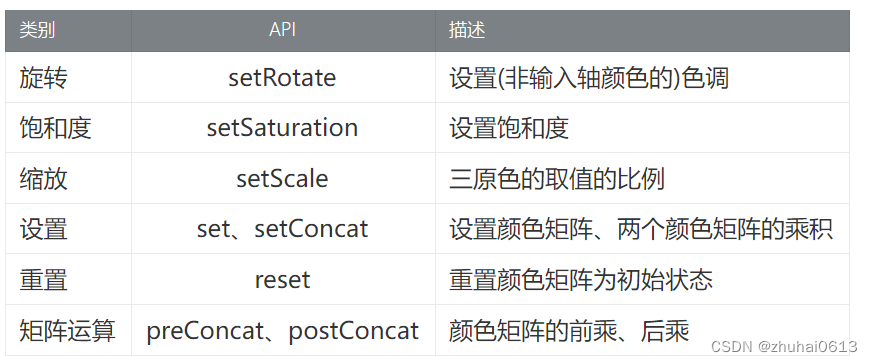
ColorMatrix
4 动画
- ObjectAnimator
- ValueAnimator
- AnimatorSet
- 差值器
- 估值器
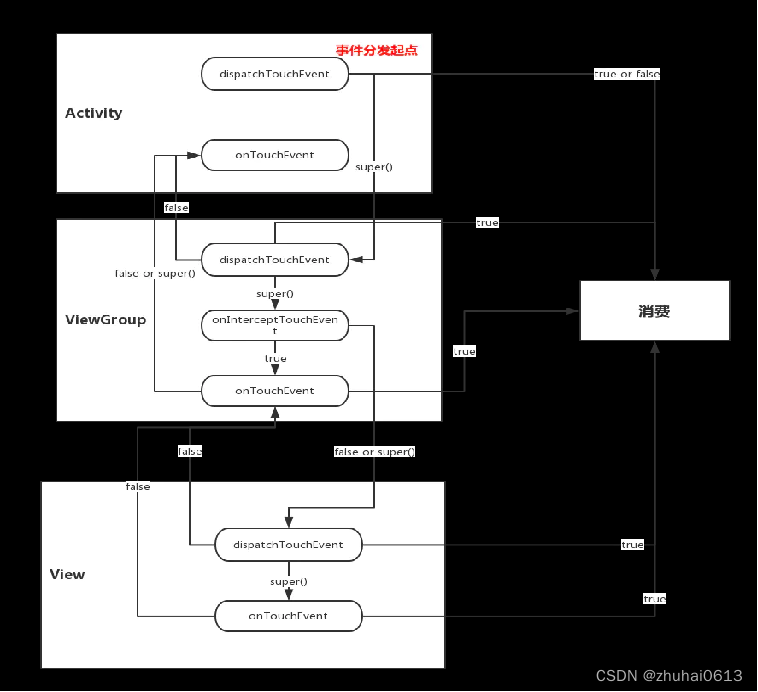
事件分发
-
事件序列 DOWN -> … MOVE … -> UP/CANCEL
-
父容器调用哪个方法可以拦截子View的事件?为什么?
- 调用onInterceptTouchEvent()并返回true。因为该方法返回true后,会导致变量 intercepted =
true,从而导致不会走后面分发事件的代码。 -
子View调用哪个方法可以请求父容器不拦截自己?为什么?
- requestDisallowInterceptTouchEvent(true)。因为 onInterceptTouchEvent()
方法的执行条件是disallowIntercept = false,而子View调用requestDisallowInterceptTouchEvent(true)方法可以导致disallowIntercept
= true,从而onInterceptTouchEvent方法不会执行,父容器就不能拦截自己了。 -
父容器一旦在down事件拦截子View,就算子View调用了requestDisallowInterceptTouchEvent方法还是拿不到事件,为什么?
- 因为down事件时,父容器会调用resetTouchState,导致disallowIntercept始终为false,即onInterceptTouchEvent方法始终会执行。
-
按钮的onClick方法是在哪个事件响应的?
- A.MotionEvent.ACTION_UP
- B.MotionEvent.ACTION_DOWN
- C.MotionEvent.ACTION_MOVE
-
解决事件冲突的主要方法有哪些?
- 内部拦截法、外部拦截法
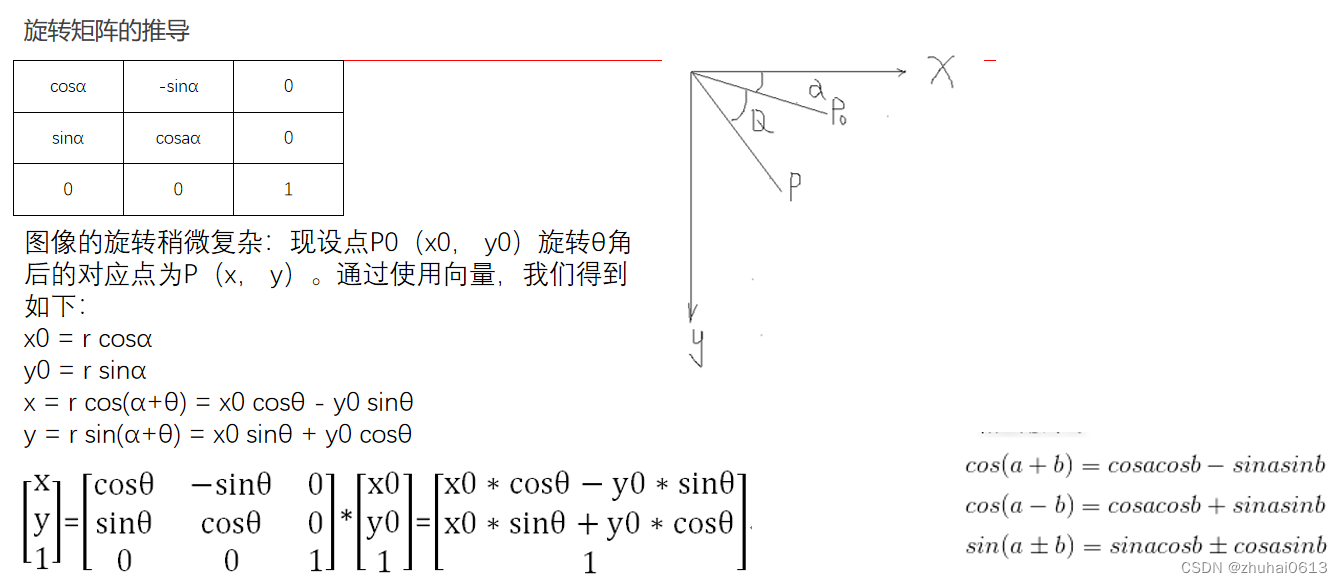
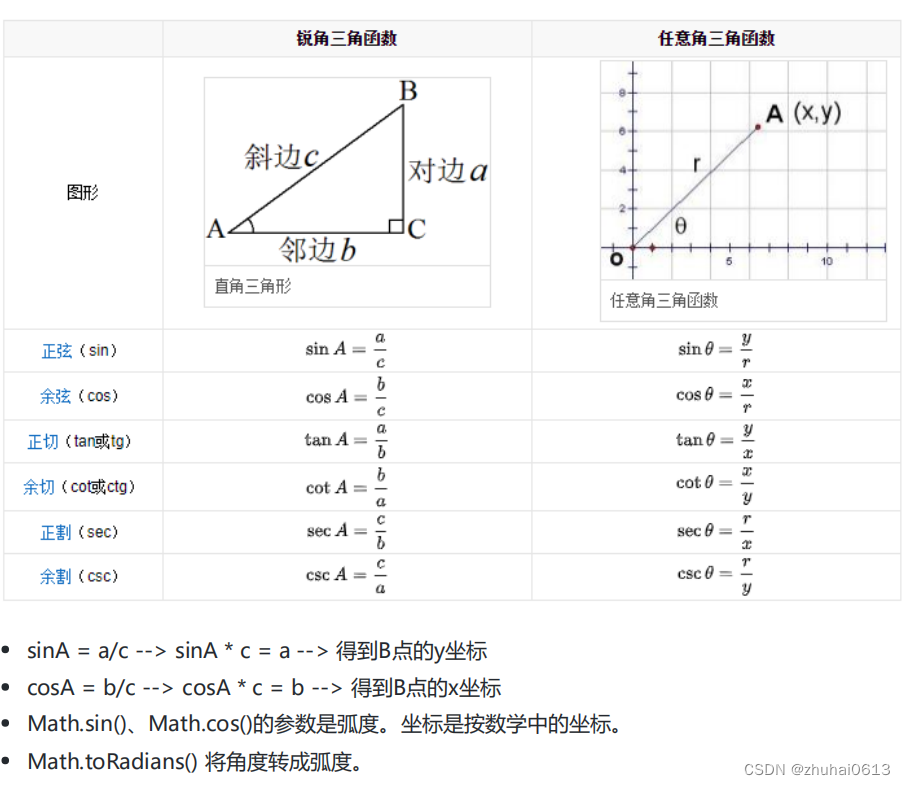
三角函数
Android底层绘制原理:
1.Linux Kernel(Linux内核) :
Graphics Driver(图形驱动):Linux内核包含用于管理硬件资源的图形驱动,如GPU(图形处理单元)。它负责底层的图形渲染和硬件加速。
2.Hardware Abstraction Layer (HAL)(硬件抽象层):
Graphics HAL:这一层抽象了硬件的细节,为上层提供统一的接口。在这里,Android系统与具体的硬件设备进行交互,例如图形和显示硬件。
3.Android Runtime and Libraries(Android运行时和库):
Skia:Android中用于2D图形绘制的库。它被用于处理形状、文本、图像等基本绘图操作。
OpenGL ES:用于3D图形渲染的库。Android应用通过OpenGL ES API进行复杂的3D绘图。
SurfaceFlinger:Android的合成器,负责将多个应用的图形内容合成到屏幕上。它管理应用创建的Surface(绘图表面)。
4.Android Framework(Android框架):
View System:Android框架的一部分,负责布局和绘制用户界面。每个View负责绘制自身。
Canvas API:提供了一个绘图表面,开发者可以在上面绘制图形(如线条、圆形、文本等)。
Hardware Acceleration(硬件加速):自Android 3.0(Honeycomb)起,UI的绘制可以通过GPU进行加速。
5.Android Applications(Android应用):
Application Code(应用代码):开发者编写的代码,使用Android提供的API(如View、Canvas)来创建和管理用户界面。
Rendering(渲染):应用通过View系统进行界面布局,然后通过Canvas或OpenGL ES绘制内容。完成的绘制内容传递给SurfaceFlinger进行合成。
在整个过程中,从应用发起的绘制请求(如一个按钮或图像的显示),首先通过Android框架层处理,然后通过硬件抽象层和Linux内核中的驱动与实际的硬件(如GPU)交互,最终将内容渲染到屏幕上。
最后给大家带来一个好玩的公式:
e i π + 1 = 0 e ^{iπ}+1=0 eiπ+1=0
- e 是自然对数的底数。
- i 是虚数单位。
- π是圆周率。
相关文章:
Android之高级UI
系统ViewGroup原理解析 常见的布局容器: FrameLayout, LinearLayout,RelativeLayoout,GridLayout 后起之秀:ConstraintLayout,CoordinateLayout Linearlayout Overrideprotected void onMeasure(int widthMeasureSpec, int heightMeasureSpec) {if (mOrientation …...

Qt:解决跨线程调用socket/IO类,导致报错的问题
Qt有很多IO相关的类,比如说QTcpSocket、QFile,总的来说,在Qt的框架内使用,还是非常方便的。 但是用过其他框架IO类的人,可能有一个很不习惯,就是Qt的所有IO类,都不推荐或者不可以跨线程操作&…...
长沙电信大楼火灾调查报告发布:系烟头引发。FIS来护航安全
近日,长沙电信大楼的火灾调查报告引起广泛关注。调查发现,火灾是由未熄灭的烟头引发,烟头点燃了室外平台的易燃物,迅速蔓延至整个建筑。这起悲剧再次提醒我们,小小的疏忽可能酿成大灾难。但如果我们能及时发现并处理这…...

【Web系列二十七】Vue实现dom元素拖拽并限制移动范围
目录 需求 拖拽功能封装 使用拖拽功能 vite-env.d.ts main.ts test.vue 需求 dom元素拖拽并限制在父组件范围内 拖拽功能封装 export const initVDrag (vue) > {vue.directive(drag, (el) > {const oDiv el // 当前元素oDiv.onmousedown (e) > {let target…...

【IEEE独立出版】2024第四届神经网络、信息与通信工程国际学术会议(NNICE 2024)
2024第四届神经网络、信息与通信工程国际学术会议(NNICE 2024) 2024 4th International Conference on Neural Networks, Information and Communication Engineering 2024第四神经网络、信息与通信工程国际学术会议(NNICE 2024࿰…...

docker 推送tar包到远程仓库
tar 包 推送到远程仓库的步骤 - 导入镜像(docker load -i 镜像名称)示例:docker load -i yiyi-admin.tar- 打标签(docker tag 镜像id registry.cn-hangzhou.aliyuncs.com/空间名称/镜像名称:版本号)示例:docker tag $image_id reg…...

全志XR806基于FreeRTOS下部署竞技机器人先进模糊控制器
前言 很荣幸参与到由“极术社区和全志在线联合组织”举办的XR806开发板试用活动。本人热衷于各种的开发板的开发,同时更愿意将其实现到具体项目中。秉承以上原则,发现大家的重心都放在开发中的环境构建过程,缺少了不少实际应用场景的运用&am…...

python动态加载内容抓取问题的解决实例
问题背景 在网页抓取过程中,动态加载的内容通常无法通过传统的爬虫工具直接获取,这给爬虫程序的编写带来了一定的技术挑战。腾讯新闻(https://news.qq.com/)作为一个典型的动态网页,展现了这一挑战。 问题分析 动态…...

系列二十三、将一个第三方的类配置成bean的方式
一、将一个第三方的类配置成bean的方式 1.1、概述 日常的JavaEE开发中,难免不会遇到需要使用第三方的类的情况,比如:MyBatisPlus、RedisTemplate、DruidDataSource...,这些外部组件是不同的组织或个人提供的,我们为什…...
【长文干货】Python可视化教程
文章目录 数据介绍Matplotlib散点图折线图柱形图直方图 Seaborn散点图折线图柱形图直方图 Bokeh散点图折线条形图交互式 Plotly基本组合优化:定制化下拉菜单 总结 数据介绍 在这个小费数据集中,我们记录了20世纪90年代初期餐厅顾客在两个半月内给出的小…...
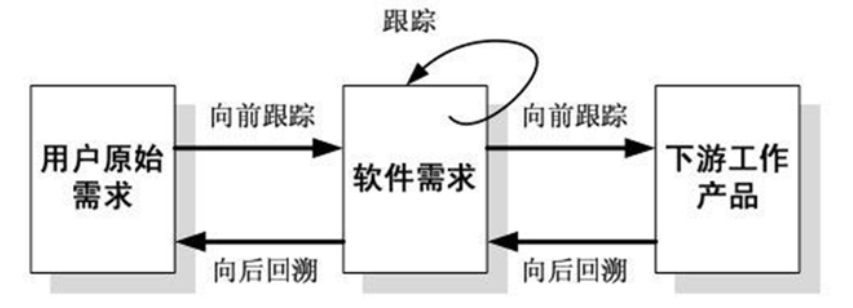
软件工程--需求工程--学习笔记(超详细)
软件需求工程是软件开发周期的第一个阶段,也是关系到软件开发成败最关键阶段,本章讲解需求的基础知识和需求工程的关键活动。这些知识对于结构化方法、面向对象方法、面向服务方法等都是适用的 本文参考教材:沈备军老师的《软件工程原理》 目…...

TemplateHit中提取query和hit比对上序列索引的映射字典
template_hits(Sequence[TemplateHit]数据格式)来自结构数据库搜索结果 python运行hhsearch二进制命令的包装器类 映射索引计算:TemplateHit 中含有 indices_query,需要换算成在原始query序列中的index,hit 中indices_hit 需要减去最小index…...

富必达API:一站式无代码开发集成电商平台、CRM和营销系统
一站式无代码开发的连接解决方案 电子商务、客户服务系统以及其它商业应用,是现代企业运营的重要部分。然而,将这些系统进行有效的整合往往需要复杂的API开发,这对很多企业来说是一个巨大的挑战。富必达API以其一站式的无代码开发解决方案&a…...

聊聊接口最大并发处理数
文章目录 前言并发和并行并发(Concurrency)并行(Parallelism)思考一下 前言 生活在 2023 年的互联网时代下,又是在国内互联网越发内卷的背景下,相信大家面试找工作、网上学习查资料时都了解过互联网系统设…...
6.如何利用LIO-SAM生成可用于机器人/无人机导航的二维/三维栅格地图--以octomap为例
目录 1 octomap的安装 2 二维导航节点的建立及栅格地图的构建 3 三维栅格地图的建立 1 octomap的安装 这里采用命令安装: sudo apt install ros-melodic-octomap-msgs ros-melodic-octomap-ros ros-melodic-octomap-rviz-plugins ros-melodic-octomap-server 这样…...
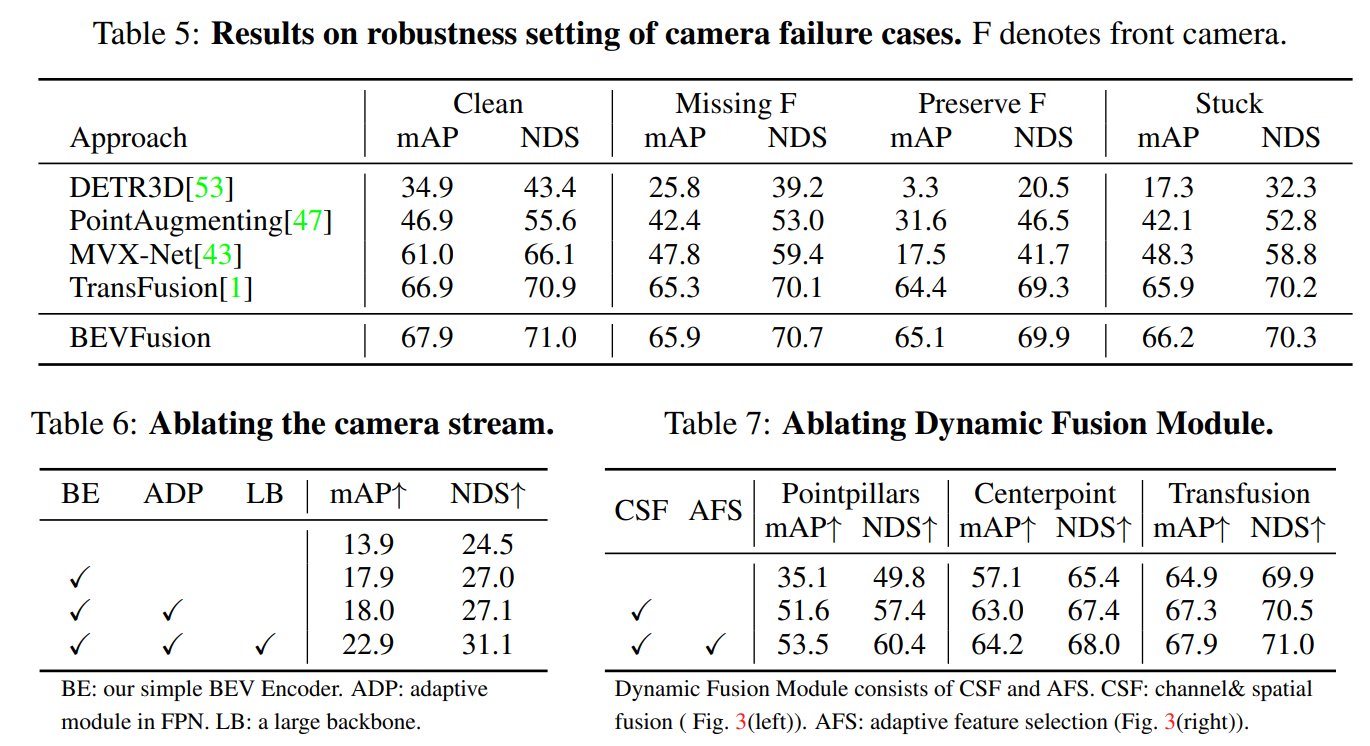
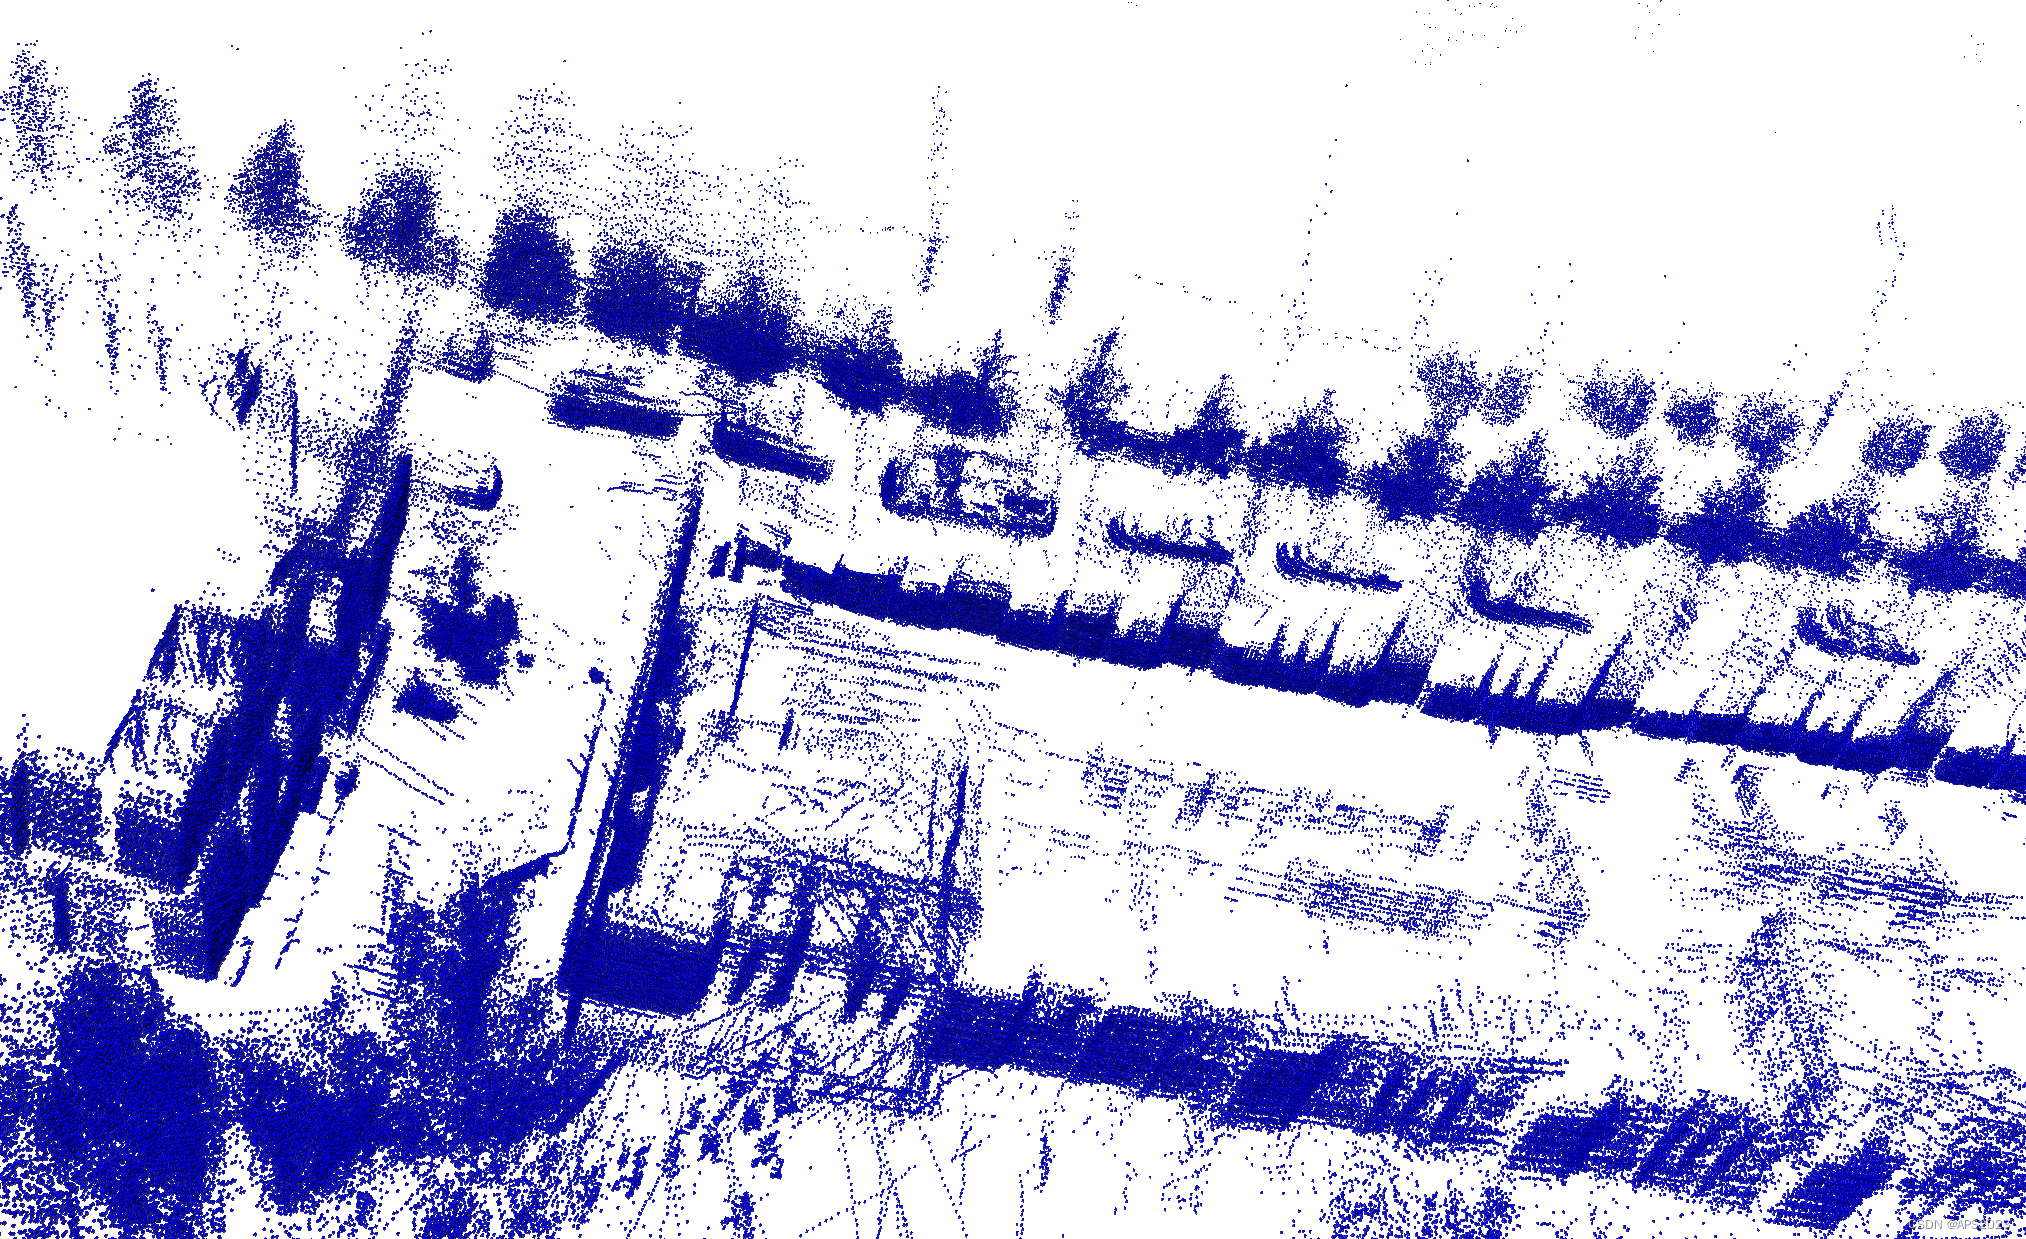
【多传感器融合】BEVFusion: 激光雷达和视觉融合框架 NeurIPS 2022
前言 BEVFusion其实有两篇, 【1】BEVFusion: A Simple and Robust LiDAR-Camera Fusion Framework. NeurIPS 2022 | 北大&阿里提出 【2】BEVFusion: Multi-Task Multi-Sensor Fusion with Unified Bird’s-Eye View Representation 2022 | MIT提出 本文先分…...
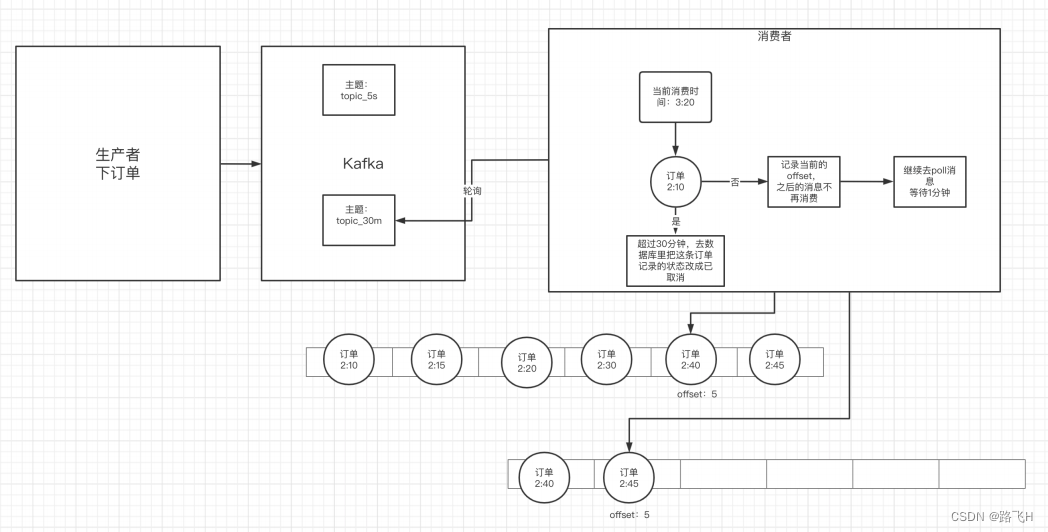
kafka中的常见问题处理
文章目录 1. 如何防⽌消息丢失2. 如何防⽌重复消费3. 如何做到消息的顺序消费4. 如何解决消息积压问题4.1 消息积压问题的出现4.2 消息积压的解决⽅案 5. 实现延时队列的效果5.1 应用场景5.2 具体方案 1. 如何防⽌消息丢失 ⽣产者:1)使⽤同步发送 2&…...
——@Styles装饰器:定义组件重用样式)
HarmonyOS(八)——@Styles装饰器:定义组件重用样式
前言 在前面我们介绍过Builder装饰器和BuilderParam装饰器。今天我们继续介绍另外一个装饰器——Styles装饰器:定义组件重用样式。 如果每个组件的样式都需要单独设置,在开发过程中会出现大量代码在进行重复样式设置,虽然可以复制粘贴&…...

手写VUE后台管理系统5 - 整合状态管理组件pinia
整合状态管理组件 安装整合创建实例挂载使用 pinia 是一个拥有组合式 API 的 Vue 状态管理库。 pinia 官方文档:https://pinia.vuejs.org/zh/introduction.html 安装 yarn add pinia整合 所有与状态相关的文件都放置于项目 src/store 目录下,方便管理 在…...
解决webpack打包生成gz格式css/js文件没法在nginx使用的问题--全网唯一正确
本文绝对是全网解决这个问题唯一正确的文章,没有之一! 很多人都说开启nginx gzip压缩,这些人完全是胡说八道!你们到底懂不懂叫gzip压缩啊?! 不信你就试试,如果css/js只有gz文件,ng…...

APT32F110 RISC-V开发板printf重定向与串口花式表白项目实战
1. 项目概述:从“Hello World”到“花式表白”的嵌入式浪漫作为一名在嵌入式领域摸爬滚打了十多年的老工程师,我调试过无数块开发板,写过数不清的“Hello World”。但当我拿到爱普特APT32F110这块基于国产RISC-V内核的开发板时,我…...

AI Infra 后端开发工程师 — 学习路线
AI Infra 后端开发工程师 — 学习路线目标:3个月可切换到AI Infra后端岗位能力迁移地图AI Infra 对应迁移成本Goroutine调度/并发控制思维直接复用Agent会话生命周期管理设计模式相同SSE/WebSocket流式协议实时系统思维GPU显存管理/KV-cache资源约束优化思维推理延迟…...

大模型生产环境中的行为漂移监控:从生存驱动到可测可控
1. 这不是科幻片,而是我们正在调试的模型行为现象“AI模型是否发展出了生存驱动”——这个标题在2025年春季突然密集出现在主流科技媒体、AI伦理专栏甚至哲学播客中,背后不是某篇新论文的发布,而是一连串真实发生、可复现、被多个独立实验室记…...

2026 BI指标管理平台设计与最佳实践
引言关于衡石科技(HENGSHI):衡石科技是国内领先的嵌入式BI PaaS平台提供商,其核心产品HENGSHI SENSE以"让数据分析无处不在"为使命,为企业提供从数据连接、数据准备、指标管理、可视化分析到智能问答的全链路…...

ops-math:昇腾 NPU 的数学算子库
ops-math:昇腾 NPU 的数学算子库 之前帮朋友看一个数学密集型模型(做科学计算的,不是 AI 模型)的适配代码,发现他自己手写了很多数学函数(Sin/Cos/Exp/Log 等)——在 NPU 上跑,性能只…...

AI 时代,C# 程序员学 Python 到底值不值?| C#转Python
关键词:C#转Python、Python入门、AI时代、C#程序员、Python学习刷技术社区的时候,你一定见过这种标题:"Python 已成 AI 时代唯一语言""C# 已死,.NET 没未来""不会 Python 的程序员正在被淘汰"说实话…...

初创团队如何利用 Taotoken Token Plan 有效控制 AI 实验成本
🚀 告别海外账号与网络限制!稳定直连全球优质大模型,限时半价接入中。 👉 点击领取海量免费额度 初创团队如何利用 Taotoken Token Plan 有效控制 AI 实验成本 对于资源有限的初创团队而言,在产品原型和概念验证阶段&…...

单神经元动态记忆机制及其神经形态计算应用
1. 动态记忆的神经实现范式革新在神经科学与类脑计算领域,动态记忆(或称工作记忆)一直被视为认知功能的基础模块。传统理论认为,这种能够短暂保持神经活动状态的功能必须依赖于神经元群体构成的递归网络——通过兴奋性神经元间的相…...

为OpenClaw智能体工作流配置稳定可靠的大模型后端
🚀 告别海外账号与网络限制!稳定直连全球优质大模型,限时半价接入中。 👉 点击领取海量免费额度 为OpenClaw智能体工作流配置稳定可靠的大模型后端 在构建基于OpenClaw的自动化工作流时,一个稳定、可管理的大模型后端…...

Unity拼图游戏商业级架构:零代码关卡+丝滑拖拽+真机性能优化
1. 这不是“拼图小游戏”,而是一套可量产的商业级益智游戏骨架你肯定见过那种上线三天就冲进App Store益智类前20的拼图游戏:首页是高清风景图轮播,点进去自动切分成16块带微动效的碎片,拖拽顺滑、吸附精准、完成时有粒子音效成就…...