blender scripting 编写
blender scripting 编写
- 一、查看ui按钮对应的代码
- 二、查看或修改对象名称
- 三、案例:渲染多张图片并导出对应的相机参数
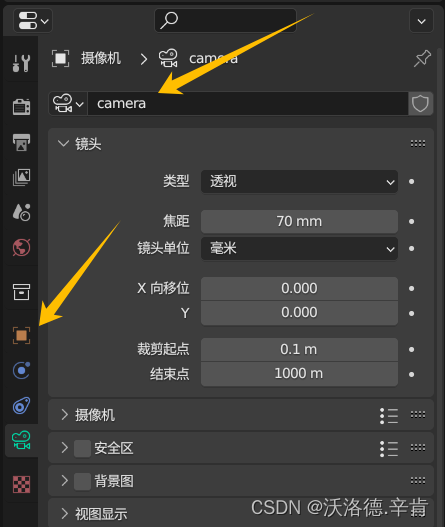
一、查看ui按钮对应的代码

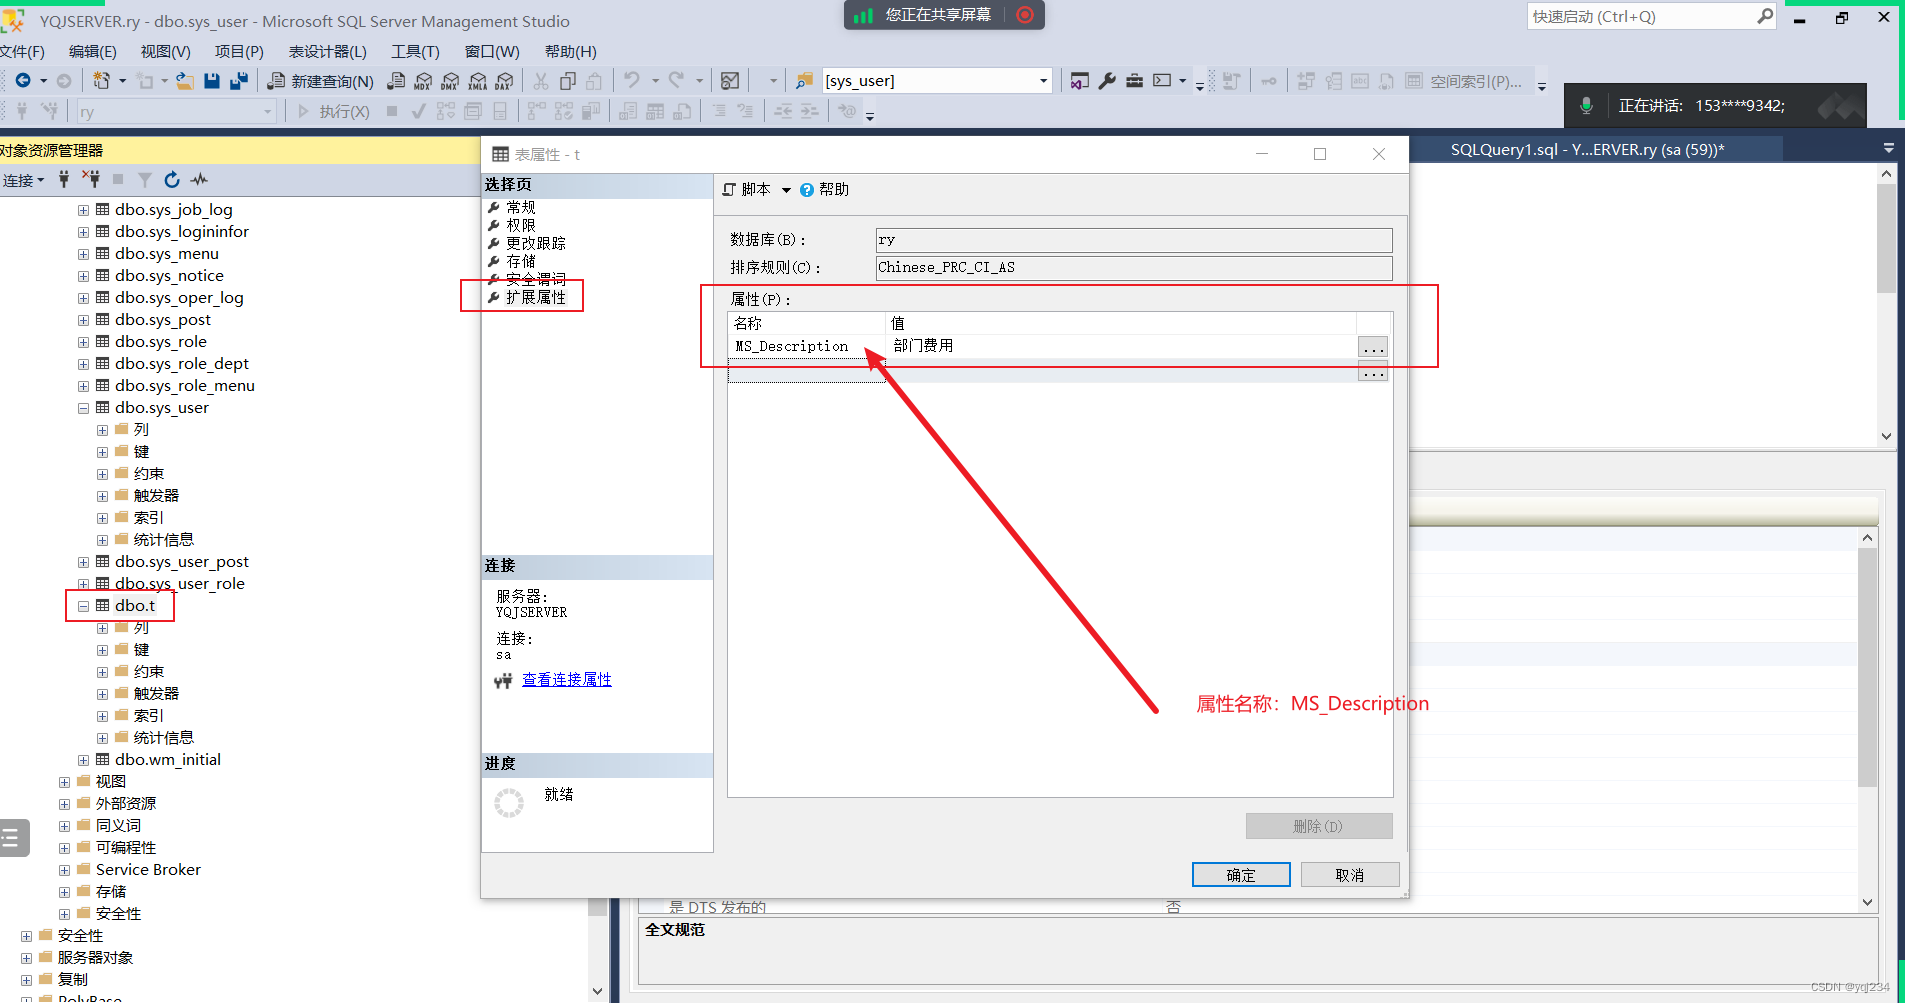
二、查看或修改对象名称
三、案例:渲染多张图片并导出对应的相机参数
注:通过ui交互都设置好,如果ui能渲染,该代码就能运行成功。
import bpy
import math
import os
from mathutils import Vector, Matrix
from math import radians
import bmesh
import datetime
import time
import numpy as np
import os
#from os import pathscenenumber='baseline_scene6_clean'#basefolder=os.path.join(os.path.expanduser('~'), 'Documents', 'Zantis', scenenumber)
scene = bpy.data.scenes["Scene"]
#scene.camera.rotation_mode='YZX'
def length():leg=0.00p1=[0.0,0.0]temp=0ob = bpy.context.object # active objectfor p in ob.data.splines.active.bezier_points:p2=p1p1=[p.co.x,p.co.y]if(temp==0):temp=1continuedistance = math.sqrt( ((p1[0]-p2[0])**2)+((p1[1]-p2[1])**2) )leg=leg+distancereturn legitem=0
multiply=40
camera = bpy.data.objects['Camera']
target=bpy.data.objects['mesh.001']
my_obj=[]#my_obj.append("019")
#my_obj.append("021")
#my_obj.append("029")
#my_obj.append("030")
#my_obj.append("031")
#my_obj.append("032")
#my_obj.append("033")
#my_obj.append("034")
my_obj.append("040")
#my_obj.append("042")t1 = time.time()#import bpy#for ob in bpy.context.selected_editable_objects:#  ob.active_material_index = 0#   for i in range(len(ob.material_slots)):
#        bpy.ops.object.material_slot_remove({'object': ob})for item in my_obj:#break# basefolder=os.path.join(os.path.expanduser('~'), 'Desktop', 'Urban_Enviroment_Texturing','Mesh_Texturing_Pipeline', 'Scenes', '005', 'images')basefolder = os.path.join('E:\\', 'chromeDownload', 'mvs_test', 'scenes', '006', 'images')t2 = time.time()for ob in bpy.context.selected_objects:ob.select_set(False)curv='Curve.'+itempath = bpy.data.objects[curv]camera.select_set(True)path.select_set(True)# bpy.context.view_layer.objects.active = path # parent# bpy.ops.object.parent_set(type='FOLLOW') # follow path# camera.location=path.matrix_world @ bpy.context.object.data.splines.active.bezier_points[0].co# target.location=path.matrix_world @ bpy.context.object.data.splines.active.bezier_points[1].co# direc=target.location-camera.locationframes=(int)(length()*multiply)	# bpy.data.scenes["Scene"].frame_end=frames# bpy.context.object.data.path_duration=framesframe_is=0frames=frames+1print(frames)count=0for frame_is in range(scene.frame_start, scene.frame_end + 1):# for frame_is in range(frames - 3):t3 = time.time()scene.frame_current=frame_is#print(scene.frame_currents
#        s=str(scene.objects['Camera'].matrix_world[0][3])+"_"+str(scene.objects['Camera'].matrix_world[1][3])+"_"+str(scene.objects['Camera'].matrix_world[2][3])+"_"
#        s=s+str(direc[0])+"_"+str(direc[1])+"_"+str(direc[2])+".jpg"s = str(scene.frame_current).zfill(5)+".jpg"image_filepath=os.path.join(basefolder,s)#print(s)bpy.data.scenes['Scene'].render.filepath = image_filepath
#        bpy.ops.render.render(write_still=True)elapsedTime = time.time() - t3print("Frame time passed {hours:d}:{minutes:d}:{seconds:d}".format(hours=int((elapsedTime / 60 ** 2) % (60 ** 2)), minutes=int((elapsedTime / 60) % (60)),seconds=int(elapsedTime % 60)))#        print('path to create: ', os.path.join(os.path.expanduser('~'), 'Desktop', 'Data','Depth_data',scenenumber+'_'+item))if not os.path.exists(os.path.join(os.path.expanduser('~'), basefolder)):os.mkdir(os.path.join(os.path.expanduser('~'), basefolder))if not os.path.exists(os.path.join(os.path.expanduser('~'), basefolder, 'RTm/')):os.mkdir(os.path.join(os.path.expanduser('~'), basefolder, 'RTm/'))# Set up rendering of depth map:bpy.context.scene.use_nodes = Truetree = bpy.context.scene.node_treelinks = tree.links# clear default nodesfor n in tree.nodes:tree.nodes.remove(n)# create input render layer noderl = tree.nodes.new('CompositorNodeRLayers')RGB2BW = tree.nodes.new(type="CompositorNodeRGBToBW")links.new(rl.outputs[0], RGB2BW.inputs[0])map = tree.nodes.new(type="CompositorNodeMapValue")# Size is chosen kind of arbitrarily, try out until you're satisfied with resulting depth map.map.size = [0.05]map.use_min = Truemap.min = [0]map.use_max = Truemap.max = [1]links.new(rl.outputs[2], map.inputs[0])mix_multi = tree.nodes.new(type="CompositorNodeMixRGB")# Size is chosen kind of arbitrarily, try out until you're satisfied with resulting depth map.mix_multi.blend_type = 'MULTIPLY'mix_multi.inputs[2].default_value[0] = 0.5mix_multi.inputs[2].default_value[1] = 0.5mix_multi.inputs[2].default_value[2] = 0.5
#        mix_multi.inputs[2].default = [0.5 , 0.5, 0.5, 1.0]links.new(rl.outputs[3], mix_multi.inputs[1])mix_multi2 = tree.nodes.new(type="CompositorNodeMixRGB")# Size is chosen kind of arbitrarily, try out until you're satisfied with resulting depth map.mix_multi2.blend_type = 'ADD'mix_multi2.inputs[2].default_value[0] = 0.5mix_multi2.inputs[2].default_value[1] = 0.5mix_multi2.inputs[2].default_value[2] = 0.5links.new(mix_multi.outputs[0], mix_multi2.inputs[1])invert = tree.nodes.new(type="CompositorNodeInvert")links.new(map.outputs[0], invert.inputs[1])# The viewer can come in handy for inspecting the results in the GUIdepthViewer = tree.nodes.new(type="CompositorNodeViewer")links.new(invert.outputs[0], depthViewer.inputs[0])# Use alpha from input.links.new(rl.outputs[1], depthViewer.inputs[1])# Normal map# The viewer can come in handy for inspecting the results in the GUIdepthViewer2 = tree.nodes.new(type="CompositorNodeViewer")links.new(rl.outputs[1], depthViewer2.inputs[1])links.new(mix_multi2.outputs[0], depthViewer2.inputs[0])#        fileOutput = tree.nodes.new(type="CompositorNodeOutputFile")
#        fileOutput.base_path = os.path.join(os.path.expanduser('~'), 'Desktop', 'Data','Depth_data',scenenumber+'_'+item, 'depth')
##        fileOutput.file_slots[0].path = str(scene.frame_current).zfill(5)
#        links.new(invert.outputs[0], fileOutput.inputs[0])
#
#        fileOutput2 = tree.nodes.new(type="CompositorNodeOutputFile")
#        fileOutput2.base_path = os.path.join(os.path.expanduser('~'), 'Desktop', 'Data','Depth_data',scenenumber+'_'+item,'normal')
##        fileOutput2.file_slots[0].path = str(scene.frame_current).zfill(5)
#        links.new(mix_multi2.outputs[0], fileOutput2.inputs[0])
#
#        fileOutput3 = tree.nodes.new(type="CompositorNodeOutputFile")
#        fileOutput3.base_path = os.path.join(os.path.expanduser('~'), 'Desktop', 'Data','Depth_data',scenenumber+'_'+item,'panoramas_BW')
##        fileOutput3.file_slots[0].path = str(scene.frame_current).zfill(5)
#        links.new(RGB2BW.outputs[0], fileOutput3.inputs[0])bpy.ops.render.render(write_still=True)location, rotation = scene.objects['Camera'].matrix_world.decompose()[0:2]R_world2bcam = rotation.to_matrix().transposed()T_world2bcam = -1*R_world2bcam @ locationCamera_RT_matrix =  Matrix((R_world2bcam[0][:] + (T_world2bcam[0],),R_world2bcam[1][:] + (T_world2bcam[1],),R_world2bcam[2][:] + (T_world2bcam[2],),[0,0,0,1],))np.savetxt(os.path.join(os.path.expanduser('~'), basefolder, 'RTm')+'/'+str(frame_is).zfill(6)+"_RTm.txt",np.array(Camera_RT_matrix))# breakscene.frame_current=0path.select_set(False)bpy.ops.object.parent_clear(type='CLEAR')# camera.select_set(False)
elapsedTime = time.time() - t1
print("Total time passed {hours:d}:{minutes:d}:{seconds:d}".format(hours=int((elapsedTime / 60 ** 2) % (60 ** 2)), minutes=int((elapsedTime / 60) % (60)),seconds=int(elapsedTime % 60)))
print("Finished")
相关文章:
blender scripting 编写
blender scripting 编写 一、查看ui按钮对应的代码二、查看或修改对象名称三、案例:渲染多张图片并导出对应的相机参数 一、查看ui按钮对应的代码 二、查看或修改对象名称 三、案例:渲染多张图片并导出对应的相机参数 注:通过ui交互都设置好…...
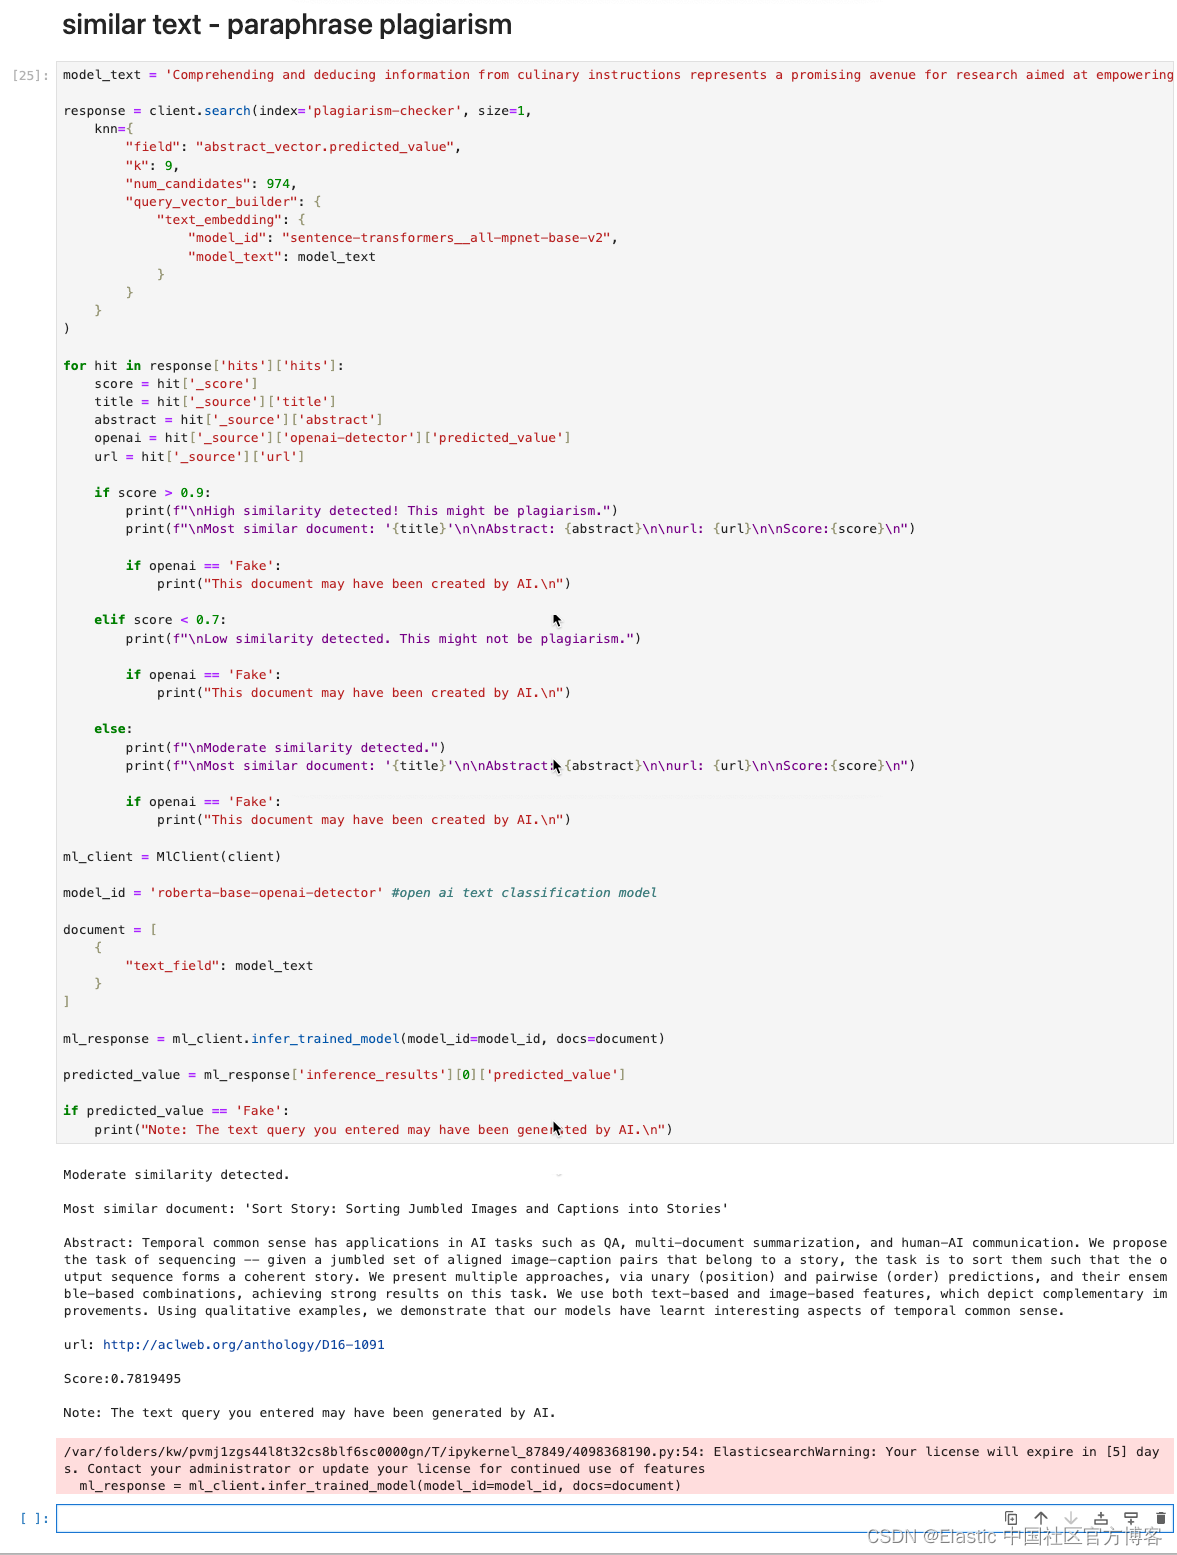
使用 Elasticsearch 检测抄袭 (二)
我在在之前的文章 “使用 Elasticsearch 检测抄袭 (一)” 介绍了如何检文章抄袭。这个在许多的实际使用中非常有意义。我在 CSDN 上的文章也经常被人引用或者抄袭。有的人甚至也不用指明出处。这对文章的作者来说是很不公平的。文章介绍的内容针对很多的…...

WPF DataGrid
文章目录 SelectionModeHeaderVisibilityBorderBrush SelectionMode DataGrid 控件的 SelectionMode 属性定义了用户可以如何选择 DataGrid 中的行。它是一个枚举类型的属性,有以下几个选项: Single(默认值):只能选择…...
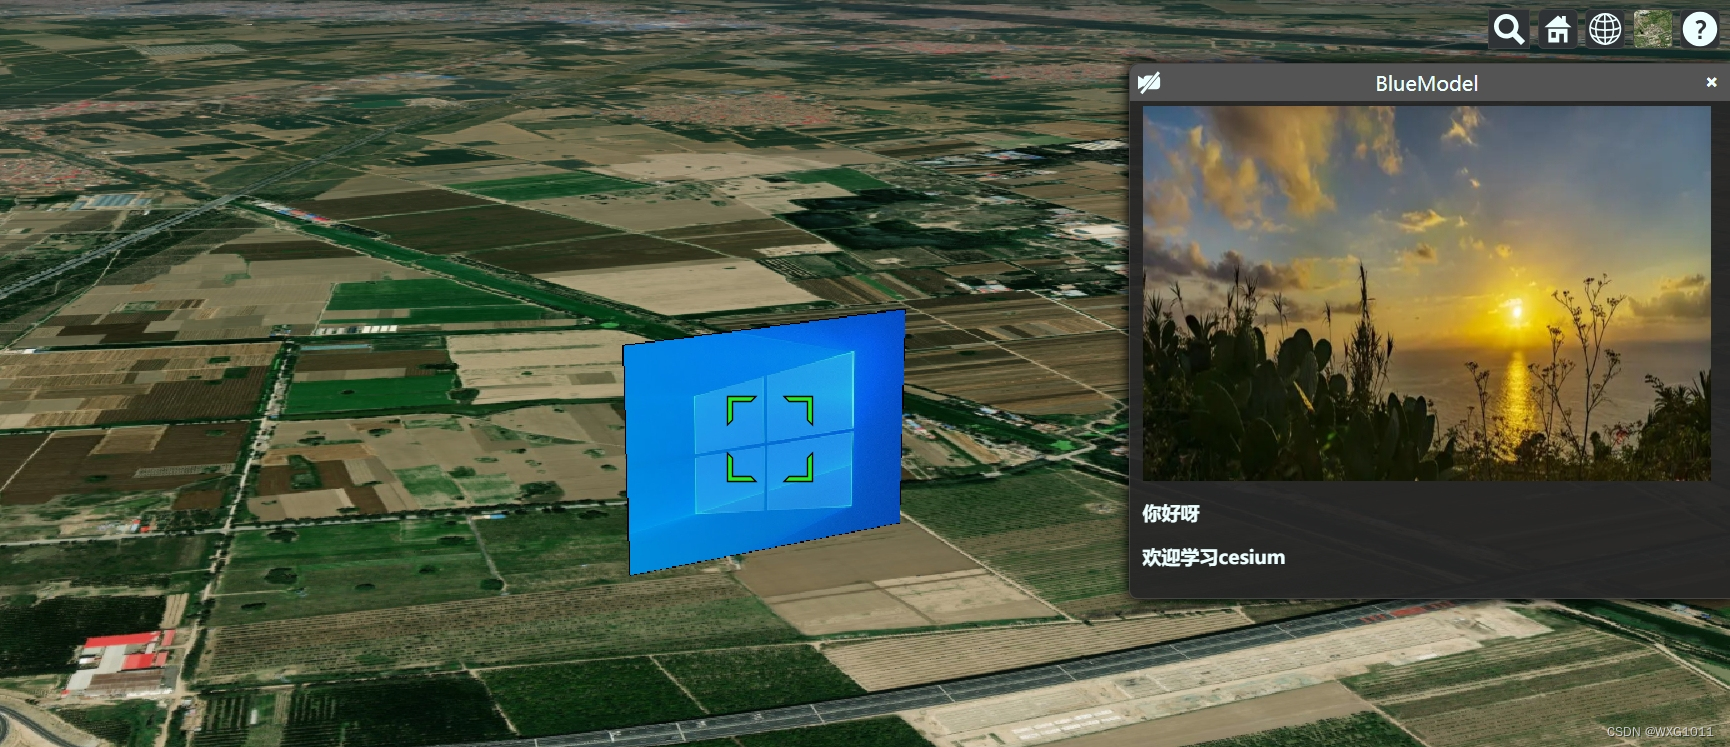
【cesium-5】鼠标交互与数据查询
scene.pick返回的是包含给定窗口位置基元的对象 scene.drillpack返回的是给定窗口位置所有对象的列表 Globe.pick返回的是给光线和地形的交点 Cesium.ScreenSpaceEventType.MIDDLE_CLICK 鼠标中间点击事件 Cesium.ScreenSpaceEventType.MOUSE_MOVE 鼠标移入事件 Cesium.ScreenS…...

Xcode 编译速度慢是什么原因?如何提高编译速度?
作为一个开发者,我们都希望能够高效地开发应用程序,而编译速度是影响开发效率的重要因素之一。然而,有时候我们会发现在使用 Xcode 进行开发时,译速度非常慢,这给我们带来了不少困扰。那么,为什么 Xcode 的…...

Best Arm Identification in Batched Multi-armed Bandit Problems
Q: 这篇论文试图解决什么问题? A: 这篇论文试图解决在批量多臂老虎机问题中进行最佳臂识别(BAI)的挑战,其中必须成批地对臂进行抽样,因为代理等待反馈的时间有限。这种场景出现在许多现实世界的应用中,例如…...

Unity编辑器紫色
紫色原因是因为编辑器内跑了其他平台的shader兼容性导致的,需要动态的去修改shader,主要用到Unity的api : Shader.Find(shaderName); 具体的工具代码如下: using System.Collections; using System.Collections.Generic; using UnityEngine…...
冒泡排序(C语言)
void BubbleSort(int arr[], int len) {int i, j, temp;for (i 0; i < len; i){for (j len - 1; j > i; j--){if (arr[j] > arr[j 1]){temp arr[j];arr[j] arr[j 1];arr[j 1] temp;}}} } 优化: 设置标志位flag,如果发生了交换flag设置…...

Unity中Shader观察空间推导(在Shader中实现)
文章目录 前言一、观察空间矩阵推导1、求观察空间基向量2、求观察空间的基向量在世界空间中的矩阵 的 逆矩阵2、求平移变换矩阵3、相乘得出 观察空间转化矩阵4、得到顶点的世界空间坐标,然后转化到观察空间5、把观察空间坐标转化为齐次裁剪坐标输出到屏幕 二、最终效…...

Hive04_DDL操作
Hive DDL操作 1 DDL 数据定义 1.1 创建数据库 CREATE DATABASE [IF NOT EXISTS] database_name [COMMENT database_comment] [LOCATION hdfs_path] [WITH DBPROPERTIES (property_nameproperty_value, ...)];[IF NOT EXISTS] :判断是否存在 [COMMENT database_c…...

odoo17核心概念view4——view.js
这是view系列的第四篇文章,专门介绍View组件。 作为一个Component,它总共包含js、css、xml三个标准文件,当然最重要的是view.js 首先在setup函数中对传入的参数props做了各种校验,然后扩展了subenv useSubEnv({keepLast: new Kee…...

Centos7 openSSL
阅读时长:10分钟 本文内容: 在阿里云Centos7上部署python3.10.6项目时遇到openSSL协议不支持,导致无法下载第三方包 本文目的: 通过手动编译,升级openssl版本centos7 重编译 python3.10.6github下载缓慢解决镜像源记录…...

Web 安全之文件下载漏洞详解
目录 引言 文件下载漏洞原理 文件下载漏洞的危害 文件下载漏洞类型 文件下载漏洞的利用方法 文件下载漏洞示例 文件下载漏洞的防护措施 漏洞检测与测试 小结 引言 在数字化时代,文件下载是网络应用程序的重要的功能之一,用户可以通过这一功能获…...
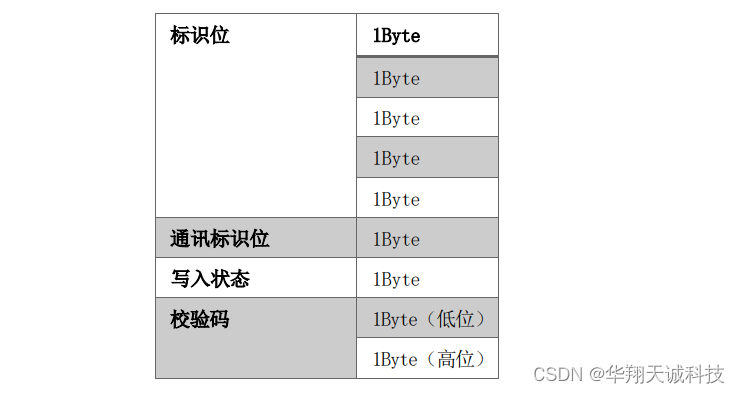
搬运机器人RFID传感器CNS-RFID-01|1S的RS485(MODBUS|HS协议)通讯连接方法
搬运机器人RFID传感器CNS-RFID-01|1S支持RS485通信,可支持RS485(MODBUS RTU)协议、RS485-HS协议,广泛应用于物流仓储,立库 AGV|无人叉车|搬送机器人等领域,常用定位、驻车等,本篇重点介绍CNS-RF…...

使用ZMQ.proxy实现ZMQ PUB消息转发
MQ.proxy 是 ZeroMQ 库中的一个功能,用于创建一个简单的代理服务器。它可以将消息从一个套接字传递到另一个套接字,实现消息的转发和路由。 要使用 ZMQ.proxy,需要按照以下步骤进行操作: 创建两个 ZMQ.Socket 对象:一个…...
若依SQL Server开发使用教程
1. sys_menu表中的将菜单ID修改为自动ID,解决不能增加菜单的问题,操作流程如下: 解决方案如下 菜单栏->工具->选项 点击设计器,去掉阻止保存要求更新创建表的更改选项,点确认既可以保存了 2 自动生成代码找不表的解决方案…...

Mysql5.7服务器选项、系统变量和状态变量参考
官网地址:MySQL :: MySQL 5.7 Reference Manual :: 5.1.3 Server Option, System Variable, and Status Variable Reference 欢迎关注留言,我是收集整理小能手,工具翻译,仅供参考,笔芯笔芯. MySQL 5.7 参考手册 / ..…...

【Qt-Qss-Style】
Qt编程指南 ■ Qss■ Style■ setStyleSheet ■ style.qss■ border■ 去除弹框背景圆角■ QProgressBar样式表 ■ Qss Qt 支持很多种常见 符号 “>”代表直属子部件,说明两个控件之间是父子关系。 “#”代表后面的字段是前面控件类型的名称,当然也可…...

基于yolov8,制作停车位计数器(附源码)
大家好,YOLO(You Only Look Once) 是由Joseph Redmon和Ali开发的一种对象检测和图像分割模型。 YOLO的第一个版本于2015年发布,由于其高速度和准确性,瞬间得到了广大AI爱好者的喜爱。 Ultralytics YOLOv8则是一款前沿、最先进(SOTA)的模型&a…...
)
C++设计模式:单例模式(饿汉式、懒汉式)
单例模式是什么? 单例模式是一种创建型的软件设计模式。通过单例模式的设计,使得创建的类在当前进程中只有唯一一个实例,并提供一个全局性的访问点,这样可以规避因频繁创建对象而导致的内存飙升情况。 单例模式有三个要点 私有化…...
)
别再手动敲命令了!用Kuboard-Spray v1.2.4图形化搞定K8s集群(附CentOS 7.9避坑实录)
图形化利器Kuboard-Spray v1.2.4:三分钟搭建生产级K8s集群的避坑指南 当你在凌晨三点盯着满屏的kubeadm init报错信息时,是否想过Kubernetes集群部署还能更简单?去年我们团队在客户现场部署一套生产环境时,传统命令行方式让我们在…...

为什么mob成为远程团队编程的首选工具?深度解析
为什么mob成为远程团队编程的首选工具?深度解析 【免费下载链接】mob Tool for smooth git handover. 项目地址: https://gitcode.com/gh_mirrors/mo/mob 在当今远程协作成为常态的时代,高效的团队编程工具变得至关重要。mob作为一款专为平滑Git交…...
)
Zabbix 7.0 在 Ubuntu 上启用中文界面语言(zh_CN)
Zabbix 7.0 配置中文选项(zh_CN) 适用于 Zabbix 7.0 系统默认情况下语言文件不包含中文的情况。环境说明 Zabbix 版本:7.0.15(LTS)问题现象 Language 下拉框中 Chinese (zh_CN) 是灰色不可选;原因是系统未安…...

突发!Karpathy 加入 Anthropic,重回一线搞研发
①就在刚刚不久,前 OpenAI 创始团队成员 Andrej Karpathy 发推宣布加入 Anthropic。我已加入 Anthropic。我认为未来几年大语言模型(LLM)领域的前沿发展将极具塑造性。我非常兴奋能加入这里的团队,重新投入研发工作。我对教育事业…...

如何用SMUDebugTool完全掌控AMD Ryzen处理器性能
如何用SMUDebugTool完全掌控AMD Ryzen处理器性能 【免费下载链接】SMUDebugTool A dedicated tool to help write/read various parameters of Ryzen-based systems, such as manual overclock, SMU, PCI, CPUID, MSR and Power Table. 项目地址: https://gitcode.com/gh_mir…...

三个00后给母校捐了“20亿”,全网炸了——结果这20亿可能就值几百块?
整件事最魔幻的地方在于:你第一眼看到“20亿”,脑子里自动补上的单位是“人民币”。然后一算账,发现可能连捐的那个展示牌都不如。这事到底是怎么回事?前几天,郑州西亚斯学院搞了一场挺隆重的捐赠仪式。三个00后校友—…...

终极AMD Ryzen调试指南:5个场景掌握SMUDebugTool硬件调优
终极AMD Ryzen调试指南:5个场景掌握SMUDebugTool硬件调优 【免费下载链接】SMUDebugTool A dedicated tool to help write/read various parameters of Ryzen-based systems, such as manual overclock, SMU, PCI, CPUID, MSR and Power Table. 项目地址: https:/…...

销售易NeoAgent 2.0深度解析:从“业务语义本体“到“智能体矩阵“的技术架构
一、行业背景:CRM的AI进化分水岭2026年,企业面临获客成本飙升、销售周期拉长、客户需求日益挑剔的多重挑战。传统CRM依赖人工录入且缺乏智能分析能力,往往沦为滞后的记录工具。市场正在寻找能够主动思考、预判和执行的下一代CRM架构。销售易基…...
)
Sora 2原生导入Blender 4.2:3步实现动态提示词驱动骨骼绑定与物理模拟(附实测FBX+USDZ双通道转换参数表)
更多请点击: https://kaifayun.com 第一章:Sora 2与Blender整合的底层架构演进 Sora 2并非公开发布的独立产品,而是OpenAI内部代号体系中用于指代多模态时空建模能力迭代的实验性技术路径;其与Blender的整合并非官方API对接&…...

电动汽车高压系统狭窄空间高精度电流电压测量方案解析
1. 项目概述:当高压测量遇上“螺蛳壳里做道场”在电动汽车的研发测试领域,尤其是实车道路测试阶段,有一个场景让很多工程师头疼不已:如何在发动机舱、底盘或电池包附近那些错综复杂、空间逼仄的线束通道里,精准地测量高…...