python tcp socket中实现SSL/TLS认证
SSL/TLS介绍
官话说SSL是安全套接层(secure sockets layer),TLS是SSL的继任者,叫传输层安全(transport layer security)。

说白点,就是在明文的上层和TCP层之间加上一层加密,这样就保证上层信息传输的安全。如HTTP协议是明文传输,加上SSL层之后,就有了雅称HTTPS。它存在的唯一目的就是保证上层通讯安全的一套机制。
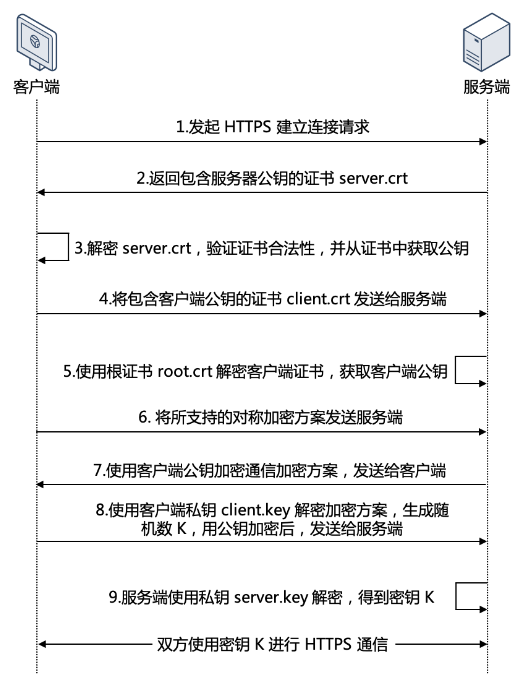
传统的 TLS 握手过程:

单向认证和双向认证
SSL认证分为单向认证和双向认证,是在安全通信中使用的两种不同的身份验证方式,它们之间的主要区别在于身份验证的方向和安全性。
- 单向认证(One-Way Authentication):
-

-
客户端认证服务器:- 无需客户端拥有客户端证书,只需服务端拥有服务器证书。
- 例如:浏览器通常会内置一组根证书,这些根证书由浏览器厂商或操作系统供应商预先安装在浏览器中。这组内置的根证书是被广泛信任的证书颁发机构(Certificate Authorities,CAs)签发的根证书,用于验证网站和服务的数字证书的可信性。
- 当您访问一个使用HTTPS协议的网站时,您的浏览器会使用其内置的根证书来验证该网站的数字证书是否由受信任的CA签发。如果验证通过,浏览器将显示一个锁定图标或其他安全标志,表示连接是安全的。如果验证未通过,浏览器通常会发出警告,提醒您可能存在安全风险。
- 因此,根证书在浏览器中起到了关键的作用,它们构成了安全通信的基础。浏览器定期更新其内置的根证书,以反映新的CA或吊销的证书,以确保持续的安全性和可信性。
-
适用场景:单向认证适用于大多数Web浏览和服务器通信场景,一般情况下,在打开页面的时候没有提示数据加密插件的,属于单向认证,即浏览器只持有公钥。
-
-
双向认证(Two-Way Authentication):
-
服务器验证客户端和客户端验证服务器:双向认证中,服务器验证客户端的身份,同时客户端也验证服务器的身份。这意味着客户端和服务器都需要提供有效的证书以进行相互验证。 -
更高的安全性:双向认证提供更高的安全性,因为它确保了通信的两端都是合法的,并且双方都可以互相验证。 -
适用场景:双向认证通常在需要更高级别的安全性的场景中使用,例如金融交易、医疗保健、政府通信等,其中双方都需要互相验证以确保身份。类似于支付宝、银行的U顿支付之类的,会要求用户安装插件或驱动,属于双向验证。
-
总之,单向认证用于服务器验证客户端的情况,而双向认证要求双方都进行身份验证,提供更高级别的安全性。选择哪种认证方式取决于您的应用程序的特定需求和安全性要求。
生成自签名证书文件
数字证书一般由数字证书认证机构签发,证书包含了:
- 公钥。
- 证书拥有者身份信息。
- 数字证书认证机构(发行者)信息。
- 发行者对这份文件的数字签名及使用的算法。
- 有效期。
生成 CA 根证书、服务器证书和客户端证书的步骤如下:
步骤 1:创建 CA 根密钥和证书
首先,您需要生成一个 CA 根密钥(私钥)和一个 CA 根证书。以下是一些基本的步骤:
- 创建 CA 根密钥 (
ca-key.pem)。这是用于签署服务器和客户端证书请求的私钥。请确保保护好这个私钥文件,因为它是证书链的根。
openssl genpkey -algorithm RSA -out ca-key.pem
- 使用 CA 根密钥创建自签名的 CA 根证书 (
ca-cert.pem)。
openssl req -new -x509 -key ca-key.pem -out ca-cert.pem -days 3650
在此过程中,您需要提供一些 CA 根证书的信息,如组织、单位、常用名等。
步骤 2:创建服务器证书请求和证书
接下来,您需要为服务器创建证书请求并签署服务器证书。
- 创建服务器密钥 (
server-key.pem)。
openssl genpkey -algorithm RSA -out server-key.pem- 使用服务器密钥创建证书请求 (
server-csr.pem)。在这一步中,您需要提供服务器的信息,如主机名(通常是服务器的域名)。
openssl req -new -key server-key.pem -out server-csr.pem(py3.8) root@localhost:/opt/lianhaifeng/test2# openssl req -new -key server-key.pem -out server-csr.pem
You are about to be asked to enter information that will be incorporated
into your certificate request.
What you are about to enter is what is called a Distinguished Name or a DN.
There are quite a few fields but you can leave some blank
For some fields there will be a default value,
If you enter '.', the field will be left blank.
-----
Country Name (2 letter code) [AU]:CN
State or Province Name (full name) [Some-State]:fujian
Locality Name (eg, city) []:xiamen
Organization Name (eg, company) [Internet Widgits Pty Ltd]:
Organizational Unit Name (eg, section) []:
Common Name (e.g. server FQDN or YOUR name) []:
Email Address []:Please enter the following 'extra' attributes
to be sent with your certificate request
A challenge password []:
An optional company name []:
- 使用 CA 根证书和私钥签署服务器证书请求,生成服务器证书 (
server-cert.pem)。
openssl x509 -req -in server-csr.pem -CA ca-cert.pem -CAkey ca-key.pem -out server-cert.pem -CAcreateserial -days 3650
(py3.8) root@localhost:/opt/lianhaifeng/test2# openssl x509 -req -in server-csr.pem -CA ca-cert.pem -CAkey ca-key.pem -out server-cert.pem -CAcreateserial -days 3650
Signature ok
subject=C = CN, ST = fujian, L = xiamen, O = Internet Widgits Pty Ltd
Getting CA Private Key
- 验证生成的服务器证书,如果验证成功,它将不会输出任何错误消息。
openssl verify -CAfile ca-cert.pem client-cert.pem  # 验证证书链完整性
openssl x509 -text -noout -in server-cert.pem  # 验证证书属性
(py3.8) root@localhost:/opt/lianhaifeng/test2# openssl verify -CAfile ca-cert.pem server-cert.pem
server-cert.pem: OK
步骤 3:创建客户端证书请求和证书(可选)
如果您需要客户端证书以进行双向认证,则可以执行以下步骤:
- 创建客户端密钥 (
client-key.pem)。
openssl genpkey -algorithm RSA -out client-key.pem(py3.8) root@localhost:/opt/lianhaifeng/test2# openssl genpkey -algorithm RSA -out client-key.pem
....................................................................................................................................................................+++++
........+++++
- 使用客户端密钥创建证书请求 (
client-csr.pem)。
openssl req -new -key client-key.pem -out client-csr.pem(py3.8) root@localhost:/opt/lianhaifeng/test2# openssl req -new -key client-key.pem -out client-csr.pem
You are about to be asked to enter information that will be incorporated
into your certificate request.
What you are about to enter is what is called a Distinguished Name or a DN.
There are quite a few fields but you can leave some blank
For some fields there will be a default value,
If you enter '.', the field will be left blank.
-----
Country Name (2 letter code) [AU]:CN
State or Province Name (full name) [Some-State]:fujian
Locality Name (eg, city) []:qz
Organization Name (eg, company) [Internet Widgits Pty Ltd]:
Organizational Unit Name (eg, section) []:
Common Name (e.g. server FQDN or YOUR name) []:
Email Address []:Please enter the following 'extra' attributes
to be sent with your certificate request
A challenge password []:
An optional company name []:- 使用 CA 根证书和私钥签署客户端证书请求,生成客户端证书 (
client-cert.pem)。
openssl x509 -req -in client-csr.pem -CA ca-cert.pem -CAkey ca-key.pem -out client-cert.pem -CAcreateserial -days 3650注意: 在实际生产环境中,需要更多的安全性和细化控制。此示例仅提供了基本步骤和示例命令,具体的配置可能因您的环境和需求而有所不同。同时,请确保适当地保护和存储您的密钥和证书文件。
- 验证生成的服务器证书,如果验证成功,它将不会输出任何错误消息。
openssl verify -CAfile ca-cert.pem client-cert.pem  # 验证证书链完整性
openssl x509 -text -noout -in server-cert.pem  # 验证证书属性
python实现SSL单向认证
通过上面的介绍,我们已经了解了单向认证的一般概念及流程。
下面是一个简单的Python示例代码,演示了如何在客户端认证服务端证书:
ssl_server.py
import socket
import ssl
import threadingclass server_ssl:def build_listen(self):# CA_FILE = "ca-cert.pem"KEY_FILE = "server-key.pem"CERT_FILE = "server-cert.pem"context = ssl.create_default_context(ssl.Purpose.CLIENT_AUTH)context.load_cert_chain(certfile=CERT_FILE, keyfile=KEY_FILE)  # 加载服务端证书和私钥# context.load_verify_locations(CA_FILE)  # 加载根证书context.verify_mode = ssl.CERT_NONE  # 不需要客户端提供证书# 监听端口with socket.socket(socket.AF_INET, socket.SOCK_STREAM, 0) as sock:# 将socket打包成SSL socketwith context.wrap_socket(sock, server_side=True) as ssock:ssock.bind(('127.0.0.1', 10036))ssock.listen(5)print("Server is listening for connections...")while True:# 接收客户端连接client_socket, addr = ssock.accept()print(f"Accepted connection from {addr}")# 创建新线程来处理客户端请求client_thread = threading.Thread(target=self.handle_client, args=(client_socket, addr))client_thread.start()def handle_client(self, client_socket, addr):try:while True:# 接收客户端信息msg = client_socket.recv(1024).decode("utf-8")if not msg:break  # 客户端断开连接print(f"Received message from client {addr}: {msg}")# 向客户端发送信息response = f"Received: {msg}".encode("utf-8")client_socket.send(response)except Exception as e:print(f"Error: {str(e)}")finally:client_socket.close()print("Connection closed")if __name__ == "__main__":server = server_ssl()server.build_listen()
运行server端代码:
(py3.8) root@localhost:/opt/lianhaifeng# python ssl_server.py
Server is listening for connections...
Accepted connection from ('127.0.0.1', 49814)
Received message from client ('127.0.0.1', 49814): hello
Received message from client ('127.0.0.1', 49814): world
ssl_client.py
import socket
import sslclass client_ssl:def send_hello(self):CA_FILE = "ca-cert.pem"# CLIENT_KEY_FILE = "client-key.pem"# CLIENT_CERT_FILE = "client-cert.pem"# 创建SSL上下文对象context = ssl.SSLContext(ssl.PROTOCOL_TLS)context.check_hostname = False# context.load_cert_chain(certfile=CLIENT_CERT_FILE, keyfile=CLIENT_KEY_FILE)  # 服务器不需要认证客户端证书,故不需要context.load_verify_locations(CA_FILE)   # 使用根证书认证服务端证书context.verify_mode = ssl.CERT_REQUIRED# 与服务端建立socket连接with socket.socket() as sock:# 将socket打包成SSL socketwith context.wrap_socket(sock, server_side=False) as ssock:ssock.connect(('127.0.0.1', 10036))while True:# 输入要发送的消息msg = input("Enter a message to send (or 'quit' to exit): ")if msg.lower() == 'quit':break# 向服务端发送消息ssock.send(msg.encode("utf-8"))# 接收并打印服务端返回的消息response = ssock.recv(1024).decode("utf-8")print(f"Received message from the server: {response}")if __name__ == "__main__":client = client_ssl()client.send_hello()
运行客户端代码:
(py3.8) root@localhost:/opt/lianhaifeng# python ssl_client.py
Enter a message to send (or 'quit' to exit): hello
Received message from the server: Received: hello
Enter a message to send (or 'quit' to exit): world
Received message from the server: Received: world
Enter a message to send (or 'quit' to exit):
python实现SSL双向认证
下面是一个简单的Python示例代码,演示了如何在服务器和客户端之间进行双向认证:
服务器端代码 server.py:
import socket
import ssl
import threadingclass server_ssl:def build_listen(self):CA_FILE = "ca-cert.pem"KEY_FILE = "server-key.pem"CERT_FILE = "server-cert.pem"context = ssl.create_default_context(ssl.Purpose.CLIENT_AUTH)context.load_cert_chain(certfile=CERT_FILE, keyfile=KEY_FILE)context.load_verify_locations(CA_FILE)context.verify_mode = ssl.CERT_REQUIRED  # 如果服务器不验证客户端证书:ssl.CERT_NONE context.check_hostname = False# 监听端口with socket.socket(socket.AF_INET, socket.SOCK_STREAM, 0) as sock:# 将socket打包成SSL socketwith context.wrap_socket(sock, server_side=True) as ssock:ssock.bind(('127.0.0.1', 10028))ssock.listen(5)print("Server is listening for connections...")while True:# 接收客户端连接client_socket, addr = ssock.accept()print(f"Accepted connection from {addr}")# 创建新线程来处理客户端请求client_thread = threading.Thread(target=self.handle_client, args=(client_socket, addr))client_thread.start()def handle_client(self, client_socket, addr):try:while True:# 接收客户端信息msg = client_socket.recv(1024).decode("utf-8")if not msg:break  # 客户端断开连接print(f"Received message from client {addr}: {msg}")# 向客户端发送信息response = f"Received: {msg}".encode("utf-8")client_socket.send(response)except Exception as e:print(f"Error: {str(e)}")finally:client_socket.close()print("Connection closed")if __name__ == "__main__":server = server_ssl()server.build_listen()
(py3.8) root@localhost:/opt/lianhaifeng/test2# python server.py
Server is listening for connections...
Accepted connection from ('127.0.0.1', 55364)
Received message from client ('127.0.0.1', 55364): hello
Received message from client ('127.0.0.1', 55364): haige1
Accepted connection from ('127.0.0.1', 55366)
Received message from client ('127.0.0.1', 55366): hello
Received message from client ('127.0.0.1', 55366): haige2
客户端代码 client.py:
import socket
import sslclass client_ssl:def send_hello(self):CA_FILE = "ca-cert.pem"SERVER_CERT_FILE = "server-cert.pem"  # 服务器证书文件路径CLIENT_KEY_FILE = "client-key.pem"CLIENT_CERT_FILE = "client-cert.pem"# 创建SSL上下文对象context = ssl.SSLContext(ssl.PROTOCOL_TLS)context.check_hostname = Falsecontext.load_cert_chain(certfile=CLIENT_CERT_FILE, keyfile=CLIENT_KEY_FILE)context.load_verify_locations(CA_FILE)context.verify_mode = ssl.CERT_REQUIREDcontext.load_verify_locations(cafile=CA_FILE)  # 设置根证书# 与服务端建立socket连接with socket.socket() as sock:# 将socket打包成SSL socketwith context.wrap_socket(sock, server_side=False) as ssock:ssock.connect(('127.0.0.1', 10026))while True:# 输入要发送的消息msg = input("Enter a message to send (or 'quit' to exit): ")if msg.lower() == 'quit':break# 向服务端发送消息ssock.send(msg.encode("utf-8"))# 接收并打印服务端返回的消息response = ssock.recv(1024).decode("utf-8")print(f"Received message from the server: {response}")if __name__ == "__main__":client = client_ssl()client.send_hello()
客户端1
(py3.8) root@localhost:/opt/lianhaifeng/test2# python client.py
Enter a message to send (or 'quit' to exit): hello
Received message from the server: Received: hello
Enter a message to send (or 'quit' to exit): haige1
Received message from the server: Received: haige1
Enter a message to send (or 'quit' to exit):
客户端2
(py3.8) root@localhost:/opt/lianhaifeng/test2# python client.py
Enter a message to send (or 'quit' to exit): hello
Received message from the server: Received: hello
Enter a message to send (or 'quit' to exit): haige2
Received message from the server: Received: haige2
Enter a message to send (or 'quit' to exit):
若是服务端要求验证客户端证书,但是客户端没有携带证书,则会引发一个常见的网络错误:
ConnectionResetError: [Errno 104] Connection reset by peer,此时在服务器端也会有详细信息:ssl.SSLError: [SSL: PEER_DID_NOT_RETURN_A_CERTIFICATE] peer did not return a certificate (_ssl.c:1131)
如果本篇文章对你所有帮助,欢迎转发、点赞、收藏、在看,非常感谢。
参考
https://www.jianshu.com/p/ffcf1b765d76
https://blog.csdn.net/wuliganggang/article/details/78428866
https://blog.csdn.net/zhangtaoym/article/details/55259889
https://cloud.tencent.com/document/product/214/54254
相关文章:
python tcp socket中实现SSL/TLS认证
SSL/TLS介绍 官话说SSL是安全套接层(secure sockets layer),TLS是SSL的继任者,叫传输层安全(transport layer security)。 说白点,就是在明文的上层和TCP层之间加上一层加密,这样就保证上层信息传输的安全。如HTTP协议是明文传输…...
SQL-修改表操作
🎉欢迎您来到我的MySQL基础复习专栏 ☆* o(≧▽≦)o *☆哈喽~我是小小恶斯法克🍹 ✨博客主页:小小恶斯法克的博客 🎈该系列文章专栏:重拾MySQL 🍹文章作者技术和水平很有限,如果文中出现错误&am…...

【Node.js学习 day3——http模块】
创建HTTP服务端 //1.导入http模块 const http require(http);//2.创建服务对象 const server http.createServer((request, response) > {response.end(Hello HTTP Server);//设置响应体 });//3.监听端口,启动服务 server.listen(9000,()>{console.log(服务…...

初探UAF漏洞(3)
构造exp #include <iostream> #include <Windows.h>typedef void(*FunctionPointer) ();typedef struct _FAKE_USE_AFTER_FREE {FunctionPointer countinter;char bufffer[0x54]; }FAKE_USE_AFTER_FREE, * PUSE_AFTER_FREE;void ShellCode() {_asm{noppushadmov e…...
)
C++学习笔记(二十一)
一、set/multiset容器 1. set基本概念 简介:所有元素都会在插入时自动被排序 本质:set/multiset属于关联式容器,底层结构是用二叉树实现的 set和multiset的区别:set不允许容器中有重复的元素,multiset允许容器中有…...

Java版企业电子招投标系统源代码,支持二次开发,采用Spring cloud技术
在数字化时代,采购管理也正经历着前所未有的变革。全过程数字化采购管理成为了企业追求高效、透明和规范的关键。该系统通过Spring Cloud、Spring Boot2、Mybatis等先进技术,打造了从供应商管理到采购招投标、采购合同、采购执行的全过程数字化管理。通过…...
01、Kafka ------ 下载、安装 ZooKeeper 和 Kafka
目录 Kafka是什么?安装 ZooKeeper下载安装启动 zookeeper 服务器端启动 zookeeper 的命令行客户端工具 安装 Kafka下载安装启动 Kafka 服务器 Kafka是什么? RabbitMQ的性能比ActiveMQ的性能有显著提升。 Kafka的性能比RabbitMQ的性能又有显著提升。 K…...

Spark: 检查数据倾斜的方法以及解决方法总结
1. 使用Spark UI Spark UI提供了一个可视化的方式来监控和调试Spark作业。你可以通过检查各个Stage的任务执行时间和数据大小来判断是否存在数据倾斜。 任务执行时间: 如果某个Stage中的大部分任务很快完成,但有少数任务执行时间非常长,这可能是数据倾…...

基于JavaWeb+BS架构+SpringBoot+Vue“共享书角”图书借还管理系统系统的设计和实现
基于JavaWebBS架构SpringBootVue“共享书角”图书借还管理系统系统的设计和实现 文末获取源码Lun文目录前言主要技术系统设计功能截图订阅经典源码专栏Java项目精品实战案例《500套》 源码获取 文末获取源码 Lun文目录 第1章 概 述 5 1.1 开发背景及研究意义 5 1.2 国内外研究…...

论文阅读:TinyGPT-V 论文阅读及源码梳理对应
!!!目前只是初稿,静待周末更新 引言 TinyGPT-V来自论文:TinyGPT-V: Efficient Multimodal Large Language Model via Small Backbones,是一篇基于较小LLM作为backbone的多模态工作。相关工作已经开源&…...

XCTF:MISCall[WriteUP]
使用file命令,查看该文件类型 file d02f31b893164d56b7a8e5edb47d9be5 文件类型:bzip2 使用bzip2命令可对该文件进行解压 bzip2 -d d02f31b893164d56b7a8e5edb47d9be5 生成了一个后缀为.out的文件 再次使用file命令,查看该文件类型 file…...

【MIdjourney】图像角度关键词
本篇仅是我个人在使用过程中的一些经验之谈,不代表一定是对的,如有任何问题欢迎在评论区指正,如有补充也欢迎在评论区留言。 1.侧面视角(from side) 侧面视角观察或拍摄的主体通常以其侧面的特征为主要焦点,以便更好地展示其轮廓…...

使用 Jamf Pro 和 Okta 工作流程实现自动化苹果设备管理
Jamf的销售工程师Vincent Bonnin与Okta的产品经理Emily Wendell一起介绍了JNUC 2021的操作方法会议。它们涵盖了Okta工作流程(Okta Workflow),并在其中集成了Jamf Pro,构建了一些工作流程,并提供了几个用例。 Okta 工作…...
C++)
根能抵达的节点(二分法、DFS)C++
给定一棵由 N个节点构成的带边权树。节点编号从 0到 N−1,其中 0 号点为根节点。最初,从根节点可以抵达所有节点(包括自己)。如果我们将所有边权小于 X 的边全部删掉,那么从根节点可以抵达的节点数目就可能发生改变。 …...
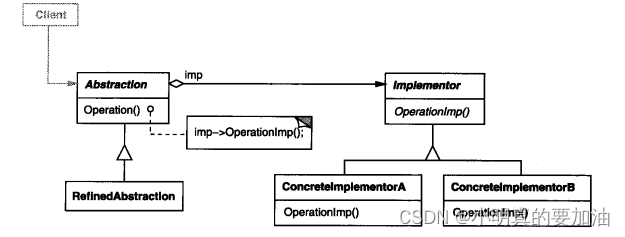
一天一个设计模式---桥接模式
概念 桥接器模式是一种结构型设计模式,旨在将抽象部分与实现部分分离,使它们可以独立变化而不相互影响。桥接器模式通过创建一个桥接接口,连接抽象和实现,从而使两者可以独立演化。 具体内容 桥接器模式通常包括以下几个要素&a…...
OpenHarmony4.0Release系统应用常见问题FAQ
前言 自OpenHarmony4.0Release发布之后,许多小伙伴使用了配套的系统应用源码以及IDE作为基线开发,也遇到了各种各样的问题,这篇文档主要收录了比较常见的一些问题解答。 FAQ 系统应用源码在哪 目前OpenHarmony系统应用分为3种模式&#x…...
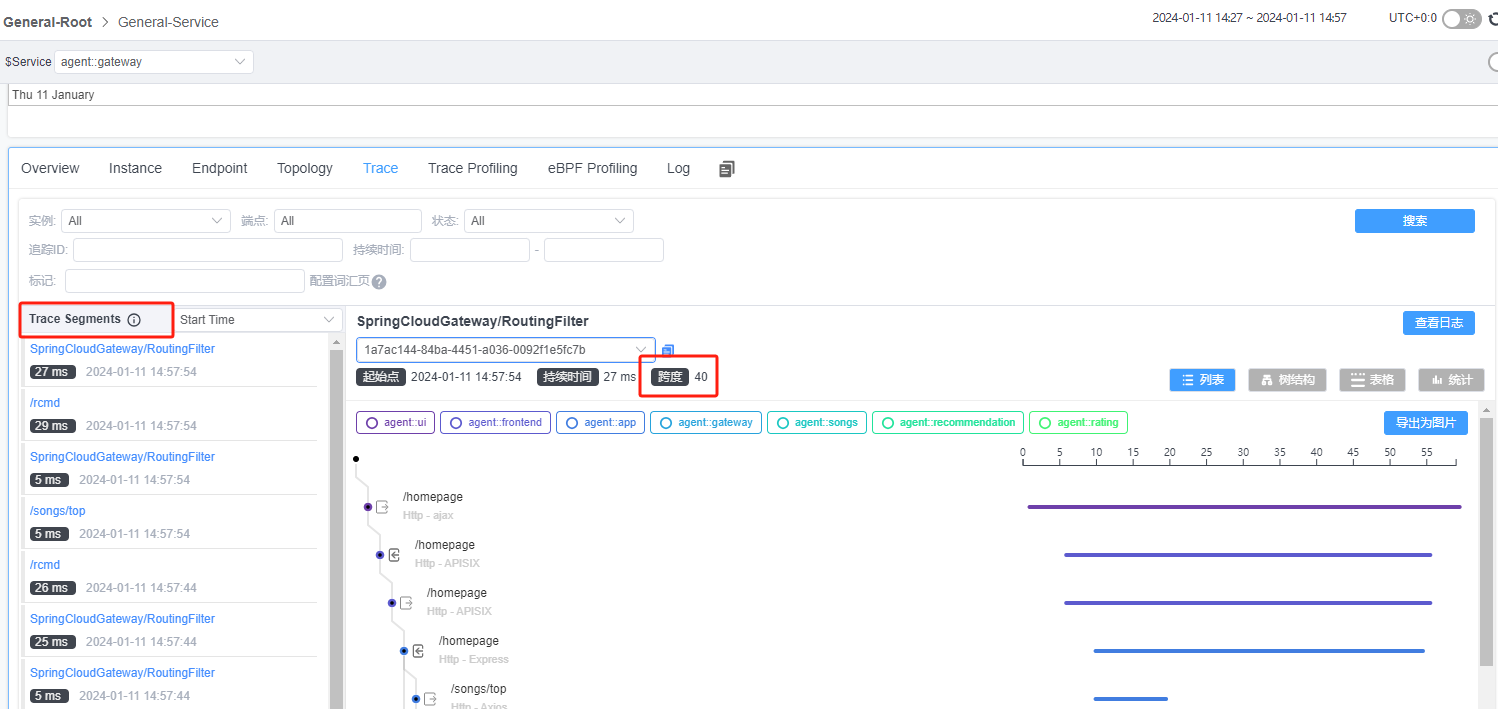
Skywalking UI页面中操作的各种实用功能汇总
刚刚接触skywalking不久,在这里总结一下在UI页面中操作的各种实用功能,随着使用的不断深入,我也会对文章进行持续补充。 本文skywalking 的ui入口是官方demo ,版本是10.0.0-SNAPSHOT-593bd05 http://demo.skywalking.apache.org…...

springboot摄影跟拍预定管理系统源码和论文
首先,论文一开始便是清楚的论述了系统的研究内容。其次,剖析系统需求分析,弄明白“做什么”,分析包括业务分析和业务流程的分析以及用例分析,更进一步明确系统的需求。然后在明白了系统的需求基础上需要进一步地设计系统,主要包罗软件架构模式、整体功能模块、数据库设计。本项…...
【python】python新年烟花代码【附源码】
欢迎来到英杰社区https://bbs.csdn.net/topics/617804998 新年的钟声即将敲响,为了庆祝这个喜庆的时刻,我们可以用 Python 编写一个炫彩夺目的烟花盛典。本文将详细介绍如何使用 Pygame 库创建一个令人惊叹的烟花效果。 一、效果图: 二…...
书生·浦语大模型实战营-学习笔记1
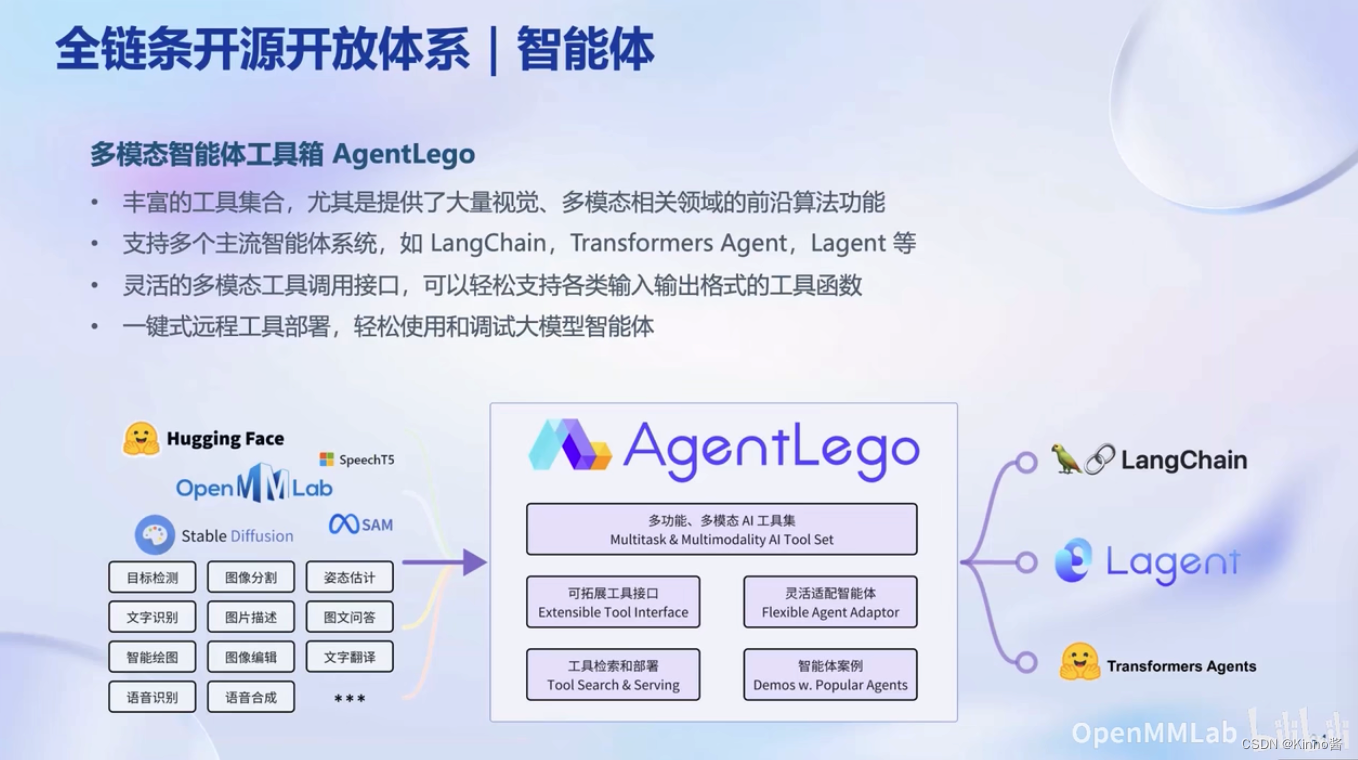
目录 书生浦语大模型全链路开源体系数据集预训练微调评测部署多智能体 视频地址: (1)书生浦语大模型全链路开源体系 开源工具github: https://github.com/InternLM/InternLM 书生浦语大模型全链路开源体系 这次视频中介绍了由上海人工智能实验室OpenMMLa…...

HttpOnly Cookie 深度解析
一、什么是 HttpOnly Cookie HttpOnly 是一个可以附加在 Set-Cookie 响应头上的标志位(flag)。当一个 Cookie 被标记为 HttpOnly 后,客户端脚本(如 JavaScript)将无法通过 document.cookie 等 API 访问该 Cookie&…...

微软DebugMCP:可视化调试MCP协议,解决AI与工具通信黑盒问题
1. 项目概述:当你的AI助手开始“自言自语”,你需要一个调试器 最近在折腾AI应用开发的朋友,估计没少跟各种“智能体”打交道。无论是基于OpenAI的GPTs,还是那些能联网、能调用工具的自定义助手,它们背后的核心通信协议…...
)
新手也能看懂的TCAD入门:用Sentaurus和Silvaco分别跑一个NPN三极管(附完整代码)
TCAD新手实战指南:从零开始仿真NPN三极管 1. 初识TCAD:半导体仿真的利器 在微电子领域,TCAD(Technology Computer-Aided Design)工具如同设计师的"数字实验室",让我们能在计算机上模拟半导体器件…...

从myplaces.shp到专题地图:手把手教你用QGIS C++ API实现点要素分级渲染
从myplaces.shp到专题地图:QGIS C API实现点要素分级渲染实战指南 当我们需要在桌面GIS应用中直观展示气象站降雨量、城市人口密度或商业网点销售额等连续型空间数据时,分级色彩渲染是最有效的可视化手段之一。本文将深入探讨如何利用QGIS强大的C API&am…...

从零构建现代化Web控制面板:安全架构与实时监控实践
1. 项目概述:一个为开发者设计的现代化控制面板最近在GitHub上看到一个挺有意思的项目,叫clawpanel,作者是kweephyo-pmt。光看名字,你可能会联想到“爪子”和“面板”,感觉像是个带点攻击性或工具属性的管理界面。实际…...

δ - mem:提升大型语言模型内存效率,得分最高可达 1.31 倍!
快速通道可了解 arXiv 成为独立非营利组织的情况,也能直达康奈尔大学官网。同时,还能通过链接进行捐赠,支持 arXiv 的发展。搜索与导航提供了多种搜索途径,可在所有字段(标题、作者、摘要等)进行搜索。还有…...

框架式幕墙与单元式幕墙的价格差异
框架式幕墙与单元式幕墙的价格差异 框架式幕墙与单元式幕墙由于结构及安装方式的不同,在价格方面存着很大的差异。主要表现在以下几个方面: 铝型材的用量: 框架式幕墙铝型材用量一般在7—9 kg/平方米左右。 单元式幕墙铝型材用量一般在13—15kg/平方米左右。 两者每平方…...

芯片老化座的工作温度范围?
在芯片测试领域,老化座(Burn-in Socket)是保障半导体器件长期可靠性的关键设备。它不仅要在极端温度下稳定工作,还要确保测试数据的精准度。今天,我们以HMILU(深圳市鸿怡电子有限公司)为例&…...

Emacs AI编程助手:ai-code-interface.el深度集成指南
1. 项目概述:一个为Emacs注入AI灵魂的代码接口如果你是一位Emacs的深度用户,同时又对AI辅助编程抱有极大的热情,那么你很可能已经厌倦了在浏览器、终端和编辑器之间反复横跳的割裂体验。tninja/ai-code-interface.el这个项目,正是…...
:提取未文档化emotion_intensity参数,实现新闻播报级庄严语调控制)
【独家首发】ElevenLabs乌尔都语语音SDK逆向分析(v2.4.1):提取未文档化emotion_intensity参数,实现新闻播报级庄严语调控制
更多请点击: https://intelliparadigm.com 第一章:ElevenLabs乌尔都语语音SDK逆向分析全景概览 ElevenLabs 官方未公开乌尔都语(ur-PK)的独立语音 SDK,但其 Web API 实际支持该语言的 TTS 合成。通过对官方 JS SDK&am…...