【Spring6】IoC容器之基于XML管理Bean
3、容器:IoC
IoC 是 Inversion of Control 的简写,译为“控制反转”,它不是一门技术,而是一种设计思想,是一个重要的面向对象编程法则,能够指导我们如何设计出松耦合、更优良的程序。
Spring 通过 IoC 容器来管理所有 Java 对象的实例化和初始化,控制对象与对象之间的依赖关系。我们将由 IoC 容器管理的 Java 对象称为 Spring Bean,它与使用关键字 new 创建的 Java 对象没有任何区别。
IoC 容器是 Spring 框架中最重要的核心组件之一,它贯穿了 Spring 从诞生到成长的整个过程。
3.1、IoC容器
3.1.1、控制反转(IoC)
-
控制反转是一种思想。
-
控制反转是为了降低程序耦合度,提高程序扩展力。
-
控制反转,反转的是什么?
-
- 将对象的创建权利交出去,交给第三方容器负责。
- 将对象和对象之间关系的维护权交出去,交给第三方容器负责。
-
控制反转这种思想如何实现呢?
-
- DI(Dependency Injection):依赖注入
3.1.2、依赖注入
DI(Dependency Injection):依赖注入,依赖注入实现了控制反转的思想。
依赖注入:
- 指Spring创建对象的过程中,将对象依赖属性通过配置进行注入
依赖注入常见的实现方式包括两种:
- 第一种:set注入
- 第二种:构造注入
所以结论是:IOC 就是一种控制反转的思想, 而 DI 是对IoC的一种具体实现。
Bean管理说的是:Bean对象的创建,以及Bean对象中属性的赋值(或者叫做Bean对象之间关系的维护)。
3.1.3、IoC容器在Spring的实现
Spring 的 IoC 容器就是 IoC思想的一个落地的产品实现。IoC容器中管理的组件也叫做 bean。在创建 bean 之前,首先需要创建IoC 容器。Spring 提供了IoC 容器的两种实现方式:
①BeanFactory
这是 IoC 容器的基本实现,是 Spring 内部使用的接口。面向 Spring 本身,不提供给开发人员使用。
②ApplicationContext
BeanFactory 的子接口,提供了更多高级特性。面向 Spring 的使用者,几乎所有场合都使用 ApplicationContext 而不是底层的 BeanFactory。
③ApplicationContext的主要实现类
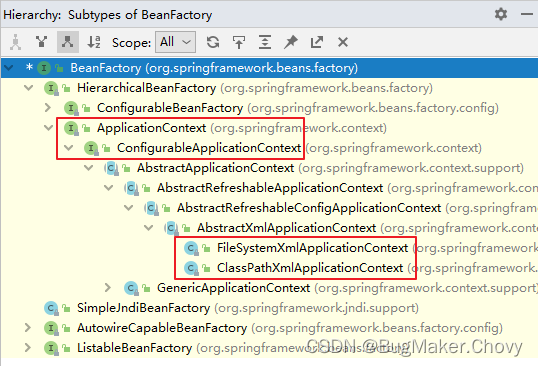
| 类型名 | 简介 |
|---|---|
| ClassPathXmlApplicationContext | 通过读取类路径下的 XML 格式的配置文件创建 IOC 容器对象 |
| FileSystemXmlApplicationContext | 通过文件系统路径读取 XML 格式的配置文件创建 IOC 容器对象 |
| ConfigurableApplicationContext | ApplicationContext 的子接口,包含一些扩展方法 refresh() 和 close() ,让 ApplicationContext 具有启动、关闭和刷新上下文的能力。 |
| WebApplicationContext | 专门为 Web 应用准备,基于 Web 环境创建 IOC 容器对象,并将对象引入存入 ServletContext 域中。 |
3.2、基于XML管理Bean
3.2.1、搭建子模块spring6-ioc-xml
①搭建模块
搭建方式如:spring-first
②引入配置文件
引入spring-first模块配置文件:beans.xml、log4j2.xml
③添加依赖
<dependencies><!--spring context依赖--><!--当你引入Spring Context依赖之后,表示将Spring的基础依赖引入了--><dependency><groupId>org.springframework</groupId><artifactId>spring-context</artifactId><version>6.0.3</version></dependency><!--junit5测试--><dependency><groupId>org.junit.jupiter</groupId><artifactId>junit-jupiter-api</artifactId><version>5.3.1</version></dependency><!--log4j2的依赖--><dependency><groupId>org.apache.logging.log4j</groupId><artifactId>log4j-core</artifactId><version>2.19.0</version></dependency><dependency><groupId>org.apache.logging.log4j</groupId><artifactId>log4j-slf4j2-impl</artifactId><version>2.19.0</version></dependency>
</dependencies>
④引入java类
引入spring-first模块java及test目录下实体类
package com.atguigu.spring6.bean;public class HelloWorld {public HelloWorld() {System.out.println("无参数构造方法执行");}public void sayHello(){System.out.println("helloworld");}
}
package com.atguigu.spring6.bean;import org.junit.jupiter.api.Test;
import org.slf4j.Logger;
import org.slf4j.LoggerFactory;
import org.springframework.context.ApplicationContext;
import org.springframework.context.support.ClassPathXmlApplicationContext;public class HelloWorldTest {private Logger logger = LoggerFactory.getLogger(HelloWorldTest.class);@Testpublic void testHelloWorld(){}
}
3.2.2、实验一:获取bean
配置bean
<?xml version="1.0" encoding="UTF-8"?>
<beans xmlns="http://www.springframework.org/schema/beans"xmlns:xsi="http://www.w3.org/2001/XMLSchema-instance"xsi:schemaLocation="http://www.springframework.org/schema/beans http://www.springframework.org/schema/beans/spring-beans.xsd"><!--配置HelloWorld所对应的bean,即将HelloWorld的对象交给Spring的IOC容器管理通过bean标签配置IOC容器所管理的bean属性:id:设置bean的唯一标识class:设置bean所对应类型的全类名--><bean id="helloWorld" class="com.atguigu.spring6.bean.HelloWorld"></bean></beans>
①方式一:根据id获取
由于 id 属性指定了 bean 的唯一标识,所以根据 bean 标签的 id 属性可以精确获取到一个组件对象。
@Test
public void testHelloWorld(){ApplicationContext ac = new ClassPathXmlApplicationContext("beans.xml");HelloWorld helloworld = (HelloWorld) ac.getBean("helloWorld");helloworld.sayHello();
}
②方式二:根据类型获取
@Test
public void testHelloWorld1(){ApplicationContext ac = new ClassPathXmlApplicationContext("beans.xml");HelloWorld bean = ac.getBean(HelloWorld.class);bean.sayHello();
}
③方式三:根据id和类型
@Test
public void testHelloWorld2(){ApplicationContext ac = new ClassPathXmlApplicationContext("beans.xml");HelloWorld bean = ac.getBean("helloworld", HelloWorld.class);bean.sayHello();
}
④注意的地方
当根据类型获取bean时,要求IOC容器中指定类型的bean有且只能有一个
当IOC容器中一共配置了两个:
<bean id="helloworldOne" class="com.atguigu.spring6.bean.HelloWorld"></bean>
<bean id="helloworldTwo" class="com.atguigu.spring6.bean.HelloWorld"></bean>
根据类型获取时会抛出异常:
org.springframework.beans.factory.NoUniqueBeanDefinitionException: No qualifying bean of type ‘com.atguigu.spring6.bean.HelloWorld’ available: expected single matching bean but found 2: helloworldOne,helloworldTwo
此时只能根据id或者id加类型获取
⑤扩展知识
如果组件类实现了接口,根据接口类型可以获取 bean 吗?
可以,前提是bean唯一
如果一个接口有多个实现类,这些实现类都配置了 bean,根据接口类型可以获取 bean 吗?
不行,因为bean不唯一
结论
根据类型来获取bean时,在满足bean唯一性的前提下,其实只是看:『对象 instanceof 指定的类型』的返回结果,只要返回的是true就可以认定为和类型匹配,能够获取到。
java中,instanceof运算符用于判断前面的对象是否是后面的类,或其子类、实现类的实例。如果是返回true,否则返回false。也就是说:用instanceof关键字做判断时, instanceof 操作符的左右操作必须有继承或实现关系
3.2.3、实验二:依赖注入之setter注入
①创建学生类Student
package com.atguigu.spring6.bean;public class Student {private Integer id;private String name;private Integer age;private String sex;public Student() {}public Integer getId() {return id;}public void setId(Integer id) {this.id = id;}public String getName() {return name;}public void setName(String name) {this.name = name;}public Integer getAge() {return age;}public void setAge(Integer age) {this.age = age;}public String getSex() {return sex;}public void setSex(String sex) {this.sex = sex;}@Overridepublic String toString() {return "Student{" +"id=" + id +", name='" + name + '\'' +", age=" + age +", sex='" + sex + '\'' +'}';}}
②配置bean时为属性赋值
spring-di.xml
<bean id="studentOne" class="com.atguigu.spring6.bean.Student"><!-- property标签:通过组件类的setXxx()方法给组件对象设置属性 --><!-- name属性:指定属性名(这个属性名是getXxx()、setXxx()方法定义的,和成员变量无关) --><!-- value属性:指定属性值 --><property name="id" value="1001"></property><property name="name" value="张三"></property><property name="age" value="23"></property><property name="sex" value="男"></property>
</bean>
③测试
@Test
public void testDIBySet(){ApplicationContext ac = new ClassPathXmlApplicationContext("spring-di.xml");Student studentOne = ac.getBean("studentOne", Student.class);System.out.println(studentOne);
}
3.2.4、实验三:依赖注入之构造器注入
①在Student类中添加有参构造
public Student(Integer id, String name, Integer age, String sex) {this.id = id;this.name = name;this.age = age;this.sex = sex;
}
②配置bean
spring-di.xml
<bean id="studentTwo" class="com.atguigu.spring6.bean.Student"><constructor-arg value="1002"></constructor-arg><constructor-arg value="李四"></constructor-arg><constructor-arg value="33"></constructor-arg><constructor-arg value="女"></constructor-arg>
</bean>
注意:
constructor-arg标签还有两个属性可以进一步描述构造器参数:
- index属性:指定参数所在位置的索引(从0开始)
- name属性:指定参数名
③测试
@Test
public void testDIByConstructor(){ApplicationContext ac = new ClassPathXmlApplicationContext("spring-di.xml");Student studentOne = ac.getBean("studentTwo", Student.class);System.out.println(studentOne);
}
通过构造器注入时只会执行有参构造器
3.2.5、实验四:特殊值处理
①字面量赋值
什么是字面量?
int a = 10;
声明一个变量a,初始化为10,此时a就不代表字母a了,而是作为一个变量的名字。当我们引用a的时候,我们实际上拿到的值是10。
而如果a是带引号的:‘a’,那么它现在不是一个变量,它就是代表a这个字母本身,这就是字面量。所以字面量没有引申含义,就是我们看到的这个数据本身。
<!-- 使用value属性给bean的属性赋值时,Spring会把value属性的值看做字面量 -->
<property name="name" value="张三"/>
②null值
<property name="name"><null />
</property>
注意:
<property name="name" value="null"></property>以上写法,为name所赋的值是字符串null
③xml实体
<!-- 小于号在XML文档中用来定义标签的开始,不能随便使用 -->
<!-- 解决方案一:使用XML实体来代替 -->
<property name="expression" value="a < b"/>
④CDATA节
<property name="expression"><!-- 解决方案二:使用CDATA节 --><!-- CDATA中的C代表Character,是文本、字符的含义,CDATA就表示纯文本数据 --><!-- XML解析器看到CDATA节就知道这里是纯文本,就不会当作XML标签或属性来解析 --><!-- 所以CDATA节中写什么符号都随意 --><value><![CDATA[a < b]]></value>
</property>
3.2.6、实验五:为对象类型属性赋值
①创建班级类Clazz
package com.atguigu.spring6.beanpublic class Clazz {private Integer clazzId;private String clazzName;public Integer getClazzId() {return clazzId;}public void setClazzId(Integer clazzId) {this.clazzId = clazzId;}public String getClazzName() {return clazzName;}public void setClazzName(String clazzName) {this.clazzName = clazzName;}@Overridepublic String toString() {return "Clazz{" +"clazzId=" + clazzId +", clazzName='" + clazzName + '\'' +'}';}public Clazz() {}public Clazz(Integer clazzId, String clazzName) {this.clazzId = clazzId;this.clazzName = clazzName;}
}
②修改Student类
在Student类中添加以下代码:
private Clazz clazz;public Clazz getClazz() {return clazz;
}public void setClazz(Clazz clazz) {this.clazz = clazz;
}
方式一:引用外部bean
配置Clazz类型的bean:
<bean id="clazzOne" class="com.atguigu.spring6.bean.Clazz"><property name="clazzId" value="1111"></property><property name="clazzName" value="财源滚滚班"></property>
</bean>
为Student中的clazz属性赋值:
<bean id="studentFour" class="com.atguigu.spring6.bean.Student"><property name="id" value="1004"></property><property name="name" value="赵六"></property><property name="age" value="26"></property><property name="sex" value="女"></property><!-- ref属性:引用IOC容器中某个bean的id,将所对应的bean为属性赋值 --><property name="clazz" ref="clazzOne"></property>
</bean>
错误演示:
<bean id="studentFour" class="com.atguigu.spring6.bean.Student"><property name="id" value="1004"></property><property name="name" value="赵六"></property><property name="age" value="26"></property><property name="sex" value="女"></property><property name="clazz" value="clazzOne"></property>
</bean>
如果错把ref属性写成了value属性,会抛出异常: Caused by: java.lang.IllegalStateException: Cannot convert value of type ‘java.lang.String’ to required type ‘com.atguigu.spring6.bean.Clazz’ for property ‘clazz’: no matching editors or conversion strategy found
意思是不能把String类型转换成我们要的Clazz类型,说明我们使用value属性时,Spring只把这个属性看做一个普通的字符串,不会认为这是一个bean的id,更不会根据它去找到bean来赋值
方式二:内部bean
<bean id="studentFour" class="com.atguigu.spring6.bean.Student"><property name="id" value="1004"></property><property name="name" value="赵六"></property><property name="age" value="26"></property><property name="sex" value="女"></property><property name="clazz"><!-- 在一个bean中再声明一个bean就是内部bean --><!-- 内部bean只能用于给属性赋值,不能在外部通过IOC容器获取,因此可以省略id属性 --><bean id="clazzInner" class="com.atguigu.spring6.bean.Clazz"><property name="clazzId" value="2222"></property><property name="clazzName" value="远大前程班"></property></bean></property>
</bean>
方式三:级联属性赋值
<bean id="studentFour" class="com.atguigu.spring6.bean.Student"><property name="id" value="1004"></property><property name="name" value="赵六"></property><property name="age" value="26"></property><property name="sex" value="女"></property><property name="clazz" ref="clazzOne"></property><property name="clazz.clazzId" value="3333"></property><property name="clazz.clazzName" value="最强王者班"></property>
</bean>
3.2.7、实验六:为数组类型属性赋值
①修改Student类
在Student类中添加以下代码:
private String[] hobbies;public String[] getHobbies() {return hobbies;
}public void setHobbies(String[] hobbies) {this.hobbies = hobbies;
}
②配置bean
<bean id="studentFour" class="com.atguigu.spring.bean6.Student"><property name="id" value="1004"></property><property name="name" value="赵六"></property><property name="age" value="26"></property><property name="sex" value="女"></property><!-- ref属性:引用IOC容器中某个bean的id,将所对应的bean为属性赋值 --><property name="clazz" ref="clazzOne"></property><property name="hobbies"><array><value>抽烟</value><value>喝酒</value><value>烫头</value></array></property>
</bean>
3.2.8、实验七:为集合类型属性赋值
①为List集合类型属性赋值
在Clazz类中添加以下代码:
private List<Student> students;public List<Student> getStudents() {return students;
}public void setStudents(List<Student> students) {this.students = students;
}
配置bean:
<bean id="clazzTwo" class="com.atguigu.spring6.bean.Clazz"><property name="clazzId" value="4444"></property><property name="clazzName" value="Javaee0222"></property><property name="students"><list><ref bean="studentOne"></ref><ref bean="studentTwo"></ref><ref bean="studentThree"></ref></list></property>
</bean>
若为Set集合类型属性赋值,只需要将其中的list标签改为set标签即可
②为Map集合类型属性赋值
创建教师类Teacher:
package com.atguigu.spring6.bean;
public class Teacher {private Integer teacherId;private String teacherName;public Integer getTeacherId() {return teacherId;}public void setTeacherId(Integer teacherId) {this.teacherId = teacherId;}public String getTeacherName() {return teacherName;}public void setTeacherName(String teacherName) {this.teacherName = teacherName;}public Teacher(Integer teacherId, String teacherName) {this.teacherId = teacherId;this.teacherName = teacherName;}public Teacher() {}@Overridepublic String toString() {return "Teacher{" +"teacherId=" + teacherId +", teacherName='" + teacherName + '\'' +'}';}
}
在Student类中添加以下代码:
private Map<String, Teacher> teacherMap;public Map<String, Teacher> getTeacherMap() {return teacherMap;
}public void setTeacherMap(Map<String, Teacher> teacherMap) {this.teacherMap = teacherMap;
}
配置bean:
<bean id="teacherOne" class="com.atguigu.spring6.bean.Teacher"><property name="teacherId" value="10010"></property><property name="teacherName" value="大宝"></property>
</bean><bean id="teacherTwo" class="com.atguigu.spring6.bean.Teacher"><property name="teacherId" value="10086"></property><property name="teacherName" value="二宝"></property>
</bean><bean id="studentFour" class="com.atguigu.spring6.bean.Student"><property name="id" value="1004"></property><property name="name" value="赵六"></property><property name="age" value="26"></property><property name="sex" value="女"></property><!-- ref属性:引用IOC容器中某个bean的id,将所对应的bean为属性赋值 --><property name="clazz" ref="clazzOne"></property><property name="hobbies"><array><value>抽烟</value><value>喝酒</value><value>烫头</value></array></property><property name="teacherMap"><map><entry><key><value>10010</value></key><ref bean="teacherOne"></ref></entry><entry><key><value>10086</value></key><ref bean="teacherTwo"></ref></entry></map></property>
</bean>
③引用集合类型的bean
<!--list集合类型的bean-->
<util:list id="students"><ref bean="studentOne"></ref><ref bean="studentTwo"></ref><ref bean="studentThree"></ref>
</util:list>
<!--map集合类型的bean-->
<util:map id="teacherMap"><entry><key><value>10010</value></key><ref bean="teacherOne"></ref></entry><entry><key><value>10086</value></key><ref bean="teacherTwo"></ref></entry>
</util:map>
<bean id="clazzTwo" class="com.atguigu.spring6.bean.Clazz"><property name="clazzId" value="4444"></property><property name="clazzName" value="Javaee0222"></property><property name="students" ref="students"></property>
</bean>
<bean id="studentFour" class="com.atguigu.spring6.bean.Student"><property name="id" value="1004"></property><property name="name" value="赵六"></property><property name="age" value="26"></property><property name="sex" value="女"></property><!-- ref属性:引用IOC容器中某个bean的id,将所对应的bean为属性赋值 --><property name="clazz" ref="clazzOne"></property><property name="hobbies"><array><value>抽烟</value><value>喝酒</value><value>烫头</value></array></property><property name="teacherMap" ref="teacherMap"></property>
</bean>
使用util:list、util:map标签必须引入相应的命名空间
<?xml version="1.0" encoding="UTF-8"?>
<beans xmlns="http://www.springframework.org/schema/beans"xmlns:xsi="http://www.w3.org/2001/XMLSchema-instance"xmlns:util="http://www.springframework.org/schema/util"xsi:schemaLocation="http://www.springframework.org/schema/utilhttp://www.springframework.org/schema/util/spring-util.xsdhttp://www.springframework.org/schema/beanshttp://www.springframework.org/schema/beans/spring-beans.xsd">
3.2.9、实验八:p命名空间
引入p命名空间
<?xml version="1.0" encoding="UTF-8"?>
<beans xmlns="http://www.springframework.org/schema/beans"xmlns:xsi="http://www.w3.org/2001/XMLSchema-instance"xmlns:util="http://www.springframework.org/schema/util"xmlns:p="http://www.springframework.org/schema/p"xsi:schemaLocation="http://www.springframework.org/schema/utilhttp://www.springframework.org/schema/util/spring-util.xsdhttp://www.springframework.org/schema/beanshttp://www.springframework.org/schema/beans/spring-beans.xsd">
引入p命名空间后,可以通过以下方式为bean的各个属性赋值
<bean id="studentSix" class="com.atguigu.spring6.bean.Student"p:id="1006" p:name="小明" p:clazz-ref="clazzOne" p:teacherMap-ref="teacherMap"></bean>
3.2.10、实验九:引入外部属性文件
①加入依赖
 <!-- MySQL驱动 -->
<dependency><groupId>mysql</groupId><artifactId>mysql-connector-java</artifactId><version>8.0.30</version>
</dependency><!-- 数据源 -->
<dependency><groupId>com.alibaba</groupId><artifactId>druid</artifactId><version>1.2.15</version>
</dependency>
②创建外部属性文件
[外链图片转存失败,源站可能有防盗链机制,建议将图片保存下来直接上传(img-BQVUwjNN-1677994650279)(images/spring6/img010.png)]
jdbc.user=root
jdbc.password=atguigu
jdbc.url=jdbc:mysql://localhost:3306/ssm?serverTimezone=UTC
jdbc.driver=com.mysql.cj.jdbc.Driver
③引入属性文件
引入context 名称空间
<?xml version="1.0" encoding="UTF-8"?>
<beans xmlns="http://www.springframework.org/schema/beans"xmlns:xsi="http://www.w3.org/2001/XMLSchema-instance"xmlns:context="http://www.springframework.org/schema/context"xsi:schemaLocation="http://www.springframework.org/schema/beanshttp://www.springframework.org/schema/beans/spring-beans.xsdhttp://www.springframework.org/schema/contexthttp://www.springframework.org/schema/context/spring-context.xsd"></beans>
<!-- 引入外部属性文件 -->
<context:property-placeholder location="classpath:jdbc.properties"/>
注意:在使用 context:property-placeholder 元素加载外包配置文件功能前,首先需要在 XML 配置的一级标签 中添加 context 相关的约束。
④配置bean
<bean id="druidDataSource" class="com.alibaba.druid.pool.DruidDataSource"><property name="url" value="${jdbc.url}"/><property name="driverClassName" value="${jdbc.driver}"/><property name="username" value="${jdbc.user}"/><property name="password" value="${jdbc.password}"/>
</bean>
⑤测试
@Test
public void testDataSource() throws SQLException {ApplicationContext ac = new ClassPathXmlApplicationContext("spring-datasource.xml");DataSource dataSource = ac.getBean(DataSource.class);Connection connection = dataSource.getConnection();System.out.println(connection);
}
3.2.11、实验十:bean的作用域
①概念
在Spring中可以通过配置bean标签的scope属性来指定bean的作用域范围,各取值含义参加下表:
| 取值 | 含义 | 创建对象的时机 |
|---|---|---|
| singleton(默认) | 在IOC容器中,这个bean的对象始终为单实例 | IOC容器初始化时 |
| prototype | 这个bean在IOC容器中有多个实例 | 获取bean时 |
如果是在WebApplicationContext环境下还会有另外几个作用域(但不常用):
| 取值 | 含义 |
|---|---|
| request | 在一个请求范围内有效 |
| session | 在一个会话范围内有效 |
②创建类User
package com.atguigu.spring6.bean;
public class User {private Integer id;private String username;private String password;private Integer age;public User() {}public User(Integer id, String username, String password, Integer age) {this.id = id;this.username = username;this.password = password;this.age = age;}public Integer getId() {return id;}public void setId(Integer id) {this.id = id;}public String getUsername() {return username;}public void setUsername(String username) {this.username = username;}public String getPassword() {return password;}public void setPassword(String password) {this.password = password;}public Integer getAge() {return age;}public void setAge(Integer age) {this.age = age;}@Overridepublic String toString() {return "User{" +"id=" + id +", username='" + username + '\'' +", password='" + password + '\'' +", age=" + age +'}';}
}
③配置bean
<!-- scope属性:取值singleton(默认值),bean在IOC容器中只有一个实例,IOC容器初始化时创建对象 -->
<!-- scope属性:取值prototype,bean在IOC容器中可以有多个实例,getBean()时创建对象 -->
<bean class="com.atguigu.spring6.bean.User" scope="prototype"></bean>
④测试
@Test
public void testBeanScope(){ApplicationContext ac = new ClassPathXmlApplicationContext("spring-scope.xml");User user1 = ac.getBean(User.class);User user2 = ac.getBean(User.class);System.out.println(user1==user2);
}
通过测试可以看出,scope="prototype"得到的两个bean不是同一个bean
3.2.12、实验十一:bean生命周期
①具体的生命周期过程
-
bean对象创建(调用无参构造器)
-
给bean对象设置属性
-
bean的前置处理器(初始化之前)
-
bean对象初始化(需在配置bean时指定初始化方法)
-
bean的后置处理器(初始化之后)
-
bean对象就绪可以使用
-
bean对象销毁(需在配置bean时指定销毁方法)
-
IOC容器关闭
②修改类User
public class User {private Integer id;private String username;private String password;private Integer age;public User() {System.out.println("生命周期:1、创建对象");}public User(Integer id, String username, String password, Integer age) {this.id = id;this.username = username;this.password = password;this.age = age;}public Integer getId() {return id;}public void setId(Integer id) {System.out.println("生命周期:2、依赖注入");this.id = id;}public String getUsername() {return username;}public void setUsername(String username) {this.username = username;}public String getPassword() {return password;}public void setPassword(String password) {this.password = password;}public Integer getAge() {return age;}public void setAge(Integer age) {this.age = age;}public void initMethod(){System.out.println("生命周期:3、初始化");}public void destroyMethod(){System.out.println("生命周期:5、销毁");}@Overridepublic String toString() {return "User{" +"id=" + id +", username='" + username + '\'' +", password='" + password + '\'' +", age=" + age +'}';}
}
注意其中的initMethod()和destroyMethod(),可以通过配置bean指定为初始化和销毁的方法
③配置bean
<!-- 使用init-method属性指定初始化方法 -->
<!-- 使用destroy-method属性指定销毁方法 -->
<bean class="com.atguigu.spring6.bean.User" scope="prototype" init-method="initMethod" destroy-method="destroyMethod"><property name="id" value="1001"></property><property name="username" value="admin"></property><property name="password" value="123456"></property><property name="age" value="23"></property>
</bean>
④测试
@Test
public void testLife(){ClassPathXmlApplicationContext ac = new ClassPathXmlApplicationContext("spring-lifecycle.xml");User bean = ac.getBean(User.class);System.out.println("生命周期:4、通过IOC容器获取bean并使用");ac.close();
}
⑤bean的后置处理器
bean的后置处理器会在生命周期的初始化前后添加额外的操作,需要实现BeanPostProcessor接口,且配置到IOC容器中,需要注意的是,bean后置处理器不是单独针对某一个bean生效,而是针对IOC容器中所有bean都会执行
创建bean的后置处理器:
package com.atguigu.spring6.process;import org.springframework.beans.BeansException;
import org.springframework.beans.factory.config.BeanPostProcessor;public class MyBeanProcessor implements BeanPostProcessor {@Overridepublic Object postProcessBeforeInitialization(Object bean, String beanName) throws BeansException {System.out.println("☆☆☆" + beanName + " = " + bean);return bean;}@Overridepublic Object postProcessAfterInitialization(Object bean, String beanName) throws BeansException {System.out.println("★★★" + beanName + " = " + bean);return bean;}
}
在IOC容器中配置后置处理器:
<!-- bean的后置处理器要放入IOC容器才能生效 -->
<bean id="myBeanProcessor" class="com.atguigu.spring6.process.MyBeanProcessor"/>
<bean id="user" class="com.chovy.spring6.iocxml.life.User" init-method="initMethod" destroy-method="destroyMethod"><!--        <property name="name" value="Chovy"/>--><constructor-arg name="name" value="Chovy"/>
</bean>
注意此处如果是这样子写,就只会执行有参构造器,不会执行无参构造器
3.2.13、实验十二:FactoryBean
①简介
FactoryBean是Spring提供的一种整合第三方框架的常用机制。和普通的bean不同,配置一个FactoryBean类型的bean,在获取bean的时候得到的并不是class属性中配置的这个类的对象,而是getObject()方法的返回值。通过这种机制,Spring可以帮我们把复杂组件创建的详细过程和繁琐细节都屏蔽起来,只把最简洁的使用界面展示给我们。
将来我们整合Mybatis时,Spring就是通过FactoryBean机制来帮我们创建SqlSessionFactory对象的。
/** Copyright 2002-2020 the original author or authors.** Licensed under the Apache License, Version 2.0 (the "License");* you may not use this file except in compliance with the License.* You may obtain a copy of the License at**      https://www.apache.org/licenses/LICENSE-2.0** Unless required by applicable law or agreed to in writing, software* distributed under the License is distributed on an "AS IS" BASIS,* WITHOUT WARRANTIES OR CONDITIONS OF ANY KIND, either express or implied.* See the License for the specific language governing permissions and* limitations under the License.*/
package org.springframework.beans.factory;import org.springframework.lang.Nullable;/*** Interface to be implemented by objects used within a {@link BeanFactory} which* are themselves factories for individual objects. If a bean implements this* interface, it is used as a factory for an object to expose, not directly as a* bean instance that will be exposed itself.** <p><b>NB: A bean that implements this interface cannot be used as a normal bean.</b>* A FactoryBean is defined in a bean style, but the object exposed for bean* references ({@link #getObject()}) is always the object that it creates.** <p>FactoryBeans can support singletons and prototypes, and can either create* objects lazily on demand or eagerly on startup. The {@link SmartFactoryBean}* interface allows for exposing more fine-grained behavioral metadata.** <p>This interface is heavily used within the framework itself, for example for* the AOP {@link org.springframework.aop.framework.ProxyFactoryBean} or the* {@link org.springframework.jndi.JndiObjectFactoryBean}. It can be used for* custom components as well; however, this is only common for infrastructure code.** <p><b>{@code FactoryBean} is a programmatic contract. Implementations are not* supposed to rely on annotation-driven injection or other reflective facilities.</b>* {@link #getObjectType()} {@link #getObject()} invocations may arrive early in the* bootstrap process, even ahead of any post-processor setup. If you need access to* other beans, implement {@link BeanFactoryAware} and obtain them programmatically.** <p><b>The container is only responsible for managing the lifecycle of the FactoryBean* instance, not the lifecycle of the objects created by the FactoryBean.</b> Therefore,* a destroy method on an exposed bean object (such as {@link java.io.Closeable#close()}* will <i>not</i> be called automatically. Instead, a FactoryBean should implement* {@link DisposableBean} and delegate any such close call to the underlying object.** <p>Finally, FactoryBean objects participate in the containing BeanFactory's* synchronization of bean creation. There is usually no need for internal* synchronization other than for purposes of lazy initialization within the* FactoryBean itself (or the like).** @author Rod Johnson* @author Juergen Hoeller* @since 08.03.2003* @param <T> the bean type* @see org.springframework.beans.factory.BeanFactory* @see org.springframework.aop.framework.ProxyFactoryBean* @see org.springframework.jndi.JndiObjectFactoryBean*/
public interface FactoryBean<T> {/*** The name of an attribute that can be* {@link org.springframework.core.AttributeAccessor#setAttribute set} on a* {@link org.springframework.beans.factory.config.BeanDefinition} so that* factory beans can signal their object type when it can't be deduced from* the factory bean class.* @since 5.2*/String OBJECT_TYPE_ATTRIBUTE = "factoryBeanObjectType";/*** Return an instance (possibly shared or independent) of the object* managed by this factory.* <p>As with a {@link BeanFactory}, this allows support for both the* Singleton and Prototype design pattern.* <p>If this FactoryBean is not fully initialized yet at the time of* the call (for example because it is involved in a circular reference),* throw a corresponding {@link FactoryBeanNotInitializedException}.* <p>As of Spring 2.0, FactoryBeans are allowed to return {@code null}* objects. The factory will consider this as normal value to be used; it* will not throw a FactoryBeanNotInitializedException in this case anymore.* FactoryBean implementations are encouraged to throw* FactoryBeanNotInitializedException themselves now, as appropriate.* @return an instance of the bean (can be {@code null})* @throws Exception in case of creation errors* @see FactoryBeanNotInitializedException*/@NullableT getObject() throws Exception;/*** Return the type of object that this FactoryBean creates,* or {@code null} if not known in advance.* <p>This allows one to check for specific types of beans without* instantiating objects, for example on autowiring.* <p>In the case of implementations that are creating a singleton object,* this method should try to avoid singleton creation as far as possible;* it should rather estimate the type in advance.* For prototypes, returning a meaningful type here is advisable too.* <p>This method can be called <i>before</i> this FactoryBean has* been fully initialized. It must not rely on state created during* initialization; of course, it can still use such state if available.* <p><b>NOTE:</b> Autowiring will simply ignore FactoryBeans that return* {@code null} here. Therefore it is highly recommended to implement* this method properly, using the current state of the FactoryBean.* @return the type of object that this FactoryBean creates,* or {@code null} if not known at the time of the call* @see ListableBeanFactory#getBeansOfType*/@NullableClass<?> getObjectType();/*** Is the object managed by this factory a singleton? That is,* will {@link #getObject()} always return the same object* (a reference that can be cached)?* <p><b>NOTE:</b> If a FactoryBean indicates to hold a singleton object,* the object returned from {@code getObject()} might get cached* by the owning BeanFactory. Hence, do not return {@code true}* unless the FactoryBean always exposes the same reference.* <p>The singleton status of the FactoryBean itself will generally* be provided by the owning BeanFactory; usually, it has to be* defined as singleton there.* <p><b>NOTE:</b> This method returning {@code false} does not* necessarily indicate that returned objects are independent instances.* An implementation of the extended {@link SmartFactoryBean} interface* may explicitly indicate independent instances through its* {@link SmartFactoryBean#isPrototype()} method. Plain {@link FactoryBean}* implementations which do not implement this extended interface are* simply assumed to always return independent instances if the* {@code isSingleton()} implementation returns {@code false}.* <p>The default implementation returns {@code true}, since a* {@code FactoryBean} typically manages a singleton instance.* @return whether the exposed object is a singleton* @see #getObject()* @see SmartFactoryBean#isPrototype()*/default boolean isSingleton() {return true;}
}
②创建类UserFactoryBean
package com.atguigu.spring6.bean;
public class UserFactoryBean implements FactoryBean<User> {@Overridepublic User getObject() throws Exception {return new User();}@Overridepublic Class<?> getObjectType() {return User.class;}
}
③配置bean
<bean id="user" class="com.atguigu.spring6.bean.UserFactoryBean"></bean>
④测试
@Test
public void testUserFactoryBean(){//获取IOC容器ApplicationContext ac = new ClassPathXmlApplicationContext("spring-factorybean.xml");User user = (User) ac.getBean("user");System.out.println(user);
}
3.2.14、实验十三:基于xml自动装配
自动装配:
根据指定的策略,在IOC容器中匹配某一个bean,自动为指定的bean中所依赖的类类型或接口类型属性赋值
①场景模拟
创建类UserController
package com.atguigu.spring6.autowire.controller
public class UserController {private UserService userService;public void setUserService(UserService userService) {this.userService = userService;}public void saveUser(){userService.saveUser();}}
创建接口UserService
package com.atguigu.spring6.autowire.service
public interface UserService {void saveUser();}
创建类UserServiceImpl实现接口UserService
package com.atguigu.spring6.autowire.service.impl
public class UserServiceImpl implements UserService {private UserDao userDao;public void setUserDao(UserDao userDao) {this.userDao = userDao;}@Overridepublic void saveUser() {userDao.saveUser();}}
创建接口UserDao
package com.atguigu.spring6.autowire.dao
public interface UserDao {void saveUser();}
创建类UserDaoImpl实现接口UserDao
package com.atguigu.spring6.autowire.dao.impl
public class UserDaoImpl implements UserDao {@Overridepublic void saveUser() {System.out.println("保存成功");}}
②配置bean
使用bean标签的autowire属性设置自动装配效果
自动装配方式:byType
byType:根据类型匹配IOC容器中的某个兼容类型的bean,为属性自动赋值
若在IOC中,没有任何一个兼容类型的bean能够为属性赋值,则该属性不装配,即值为默认值null
若在IOC中,有多个兼容类型的bean能够为属性赋值,则抛出异常NoUniqueBeanDefinitionException
<bean id="userController" class="com.atguigu.spring6.autowire.controller.UserController" autowire="byType"></bean><bean id="userService" class="com.atguigu.spring6.autowire.service.impl.UserServiceImpl" autowire="byType"></bean><bean id="userDao" class="com.atguigu.spring6.autowire.dao.impl.UserDaoImpl"></bean>
自动装配方式:byName
byName:将自动装配的属性的属性名,作为bean的id在IOC容器中匹配相对应的bean进行赋值
<bean id="userController" class="com.atguigu.spring6.autowire.controller.UserController" autowire="byName"></bean><bean id="userService" class="com.atguigu.spring6.autowire.service.impl.UserServiceImpl" autowire="byName"></bean><bean id="userDao" class="com.atguigu.spring6.autowire.dao.impl.UserDaoImpl"></bean>
③测试
@Test
public void testAutoWireByXML(){ApplicationContext ac = new ClassPathXmlApplicationContext("autowire-xml.xml");UserController userController = ac.getBean(UserController.class);userController.saveUser();
}
本文章参考B站 尚硅谷Spring零基础视频教程,2023版spring6入门到精通,仅供个人学习使用,部分内容为本人自己见解,与尚硅谷无关。
相关文章:
【Spring6】IoC容器之基于XML管理Bean
3、容器:IoC IoC 是 Inversion of Control 的简写,译为“控制反转”,它不是一门技术,而是一种设计思想,是一个重要的面向对象编程法则,能够指导我们如何设计出松耦合、更优良的程序。 Spring 通过 IoC 容…...
Warshall算法求传递闭包及Python编程的实现
弗洛伊德算法-Floyd(Floyd-Warshall)-求多源最短路径,求传递闭包 Floyd算法又称为插点法,是一种利用动态规划的思想寻找给定的加权图中多源点之间最短路径的算法, 与Dijkstra算法类似。该算法名称以创始人之一、1978年图灵奖获得者、斯坦福大…...

AcWing第 93 场周赛
4867. 整除数 给定两个整数 n,k,请你找到大于 n 且能被 k 整除的最小整数 x。 输入格式 共一行,包含两个整数 n,k。 输出格式 输出大于 n 且能被 k 整除的最小整数 x。 数据范围 前 4 个测试点满足 1≤n,k≤100。 所有测试点满足 1≤n,k≤109。 …...

计及需求响应的粒子群算法求解风能、光伏、柴油机、储能容量优化配置(Matlab代码实现)
👨🎓个人主页:研学社的博客💥💥💞💞欢迎来到本博客❤️❤️💥💥🏆博主优势:🌞🌞🌞博客内容尽量做到思维缜密…...
利用Nginx给RStudio-Server配置https
前篇文档,我这边写了安装RStudio-Server的方法。默认是http的访问方式,现在我们需要将其改成https的访问方式。 1、给服务器安装Nginx:参照之前的安装Nginx的方法。 2、创建/usr/local/nginx/ssl目录: mkdir /usr/local/nginx/ss…...

YOLOv7实验记录
这篇博客主要记录博主在做YOLOv7模型训练与测试过程中遇到的一些问题。 首先我们需要明确YOLO模型权重文件与模型文件的使用 其实在github的readme中已经告诉我们使用方法,但我相信有很多像博主一样眼高手低的人可能会犯类似的错误。 训练 首先是训练时的设置&…...

用Python获取史瓦西时空中克氏符的分量
文章目录三维球面坐标史瓦西时空三维球面坐标 Einsteinpy中提供了克氏符模型,可通过ChristoffelSymbols获取。简单起见,先以最直观的三维球面为例,来用Einsteinpy查看其克氏符的表达形式。 三维球面的度规张量可表示为 g001g11r2g22r2sin…...
QML编码约定
QML中的国际化: QML使用以下函数来将字符串标记为可翻译的 qsTr()qsTranslate()qsTrld()QT_TR_NOOP()QT_TRANSLATE_NOOP()QT_TRID_NOOP最常用的还是qsTr() string qsTr(string sourceText, string disambiguation&…...
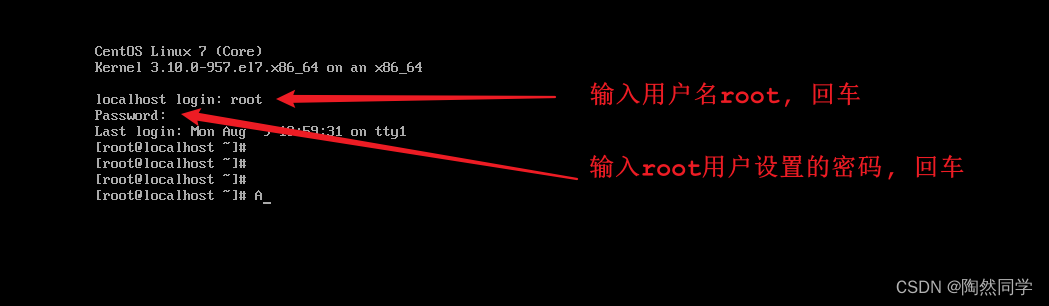
【Linux】安装Linux操作系统具体步骤
1). 选择创建新的虚拟机 2). 选择"典型"配置 3). 选择"稍后安装操作系统(S)" 4). 选择"Linux"操作系统,"CentOS7 64位"版本 5). 设置虚拟机的名称及系统文件存放路径 6). 设置磁盘容量 7). 自定义硬件信息 8). 启动上述创建的新虚拟机…...
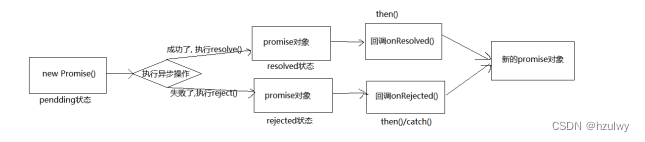
前端ES6异步编程技术——Promise使用
Promise是什么 官方的定义是:Promise是ES6新推出的用于进行异步编程的解决方案,旧方案是单纯使用回调函数来解决的。对于开发人员来说,我们把promise当作一个普通的对象即可,使用它可以用来封装一个异步操作并可以获取其成功/失败…...
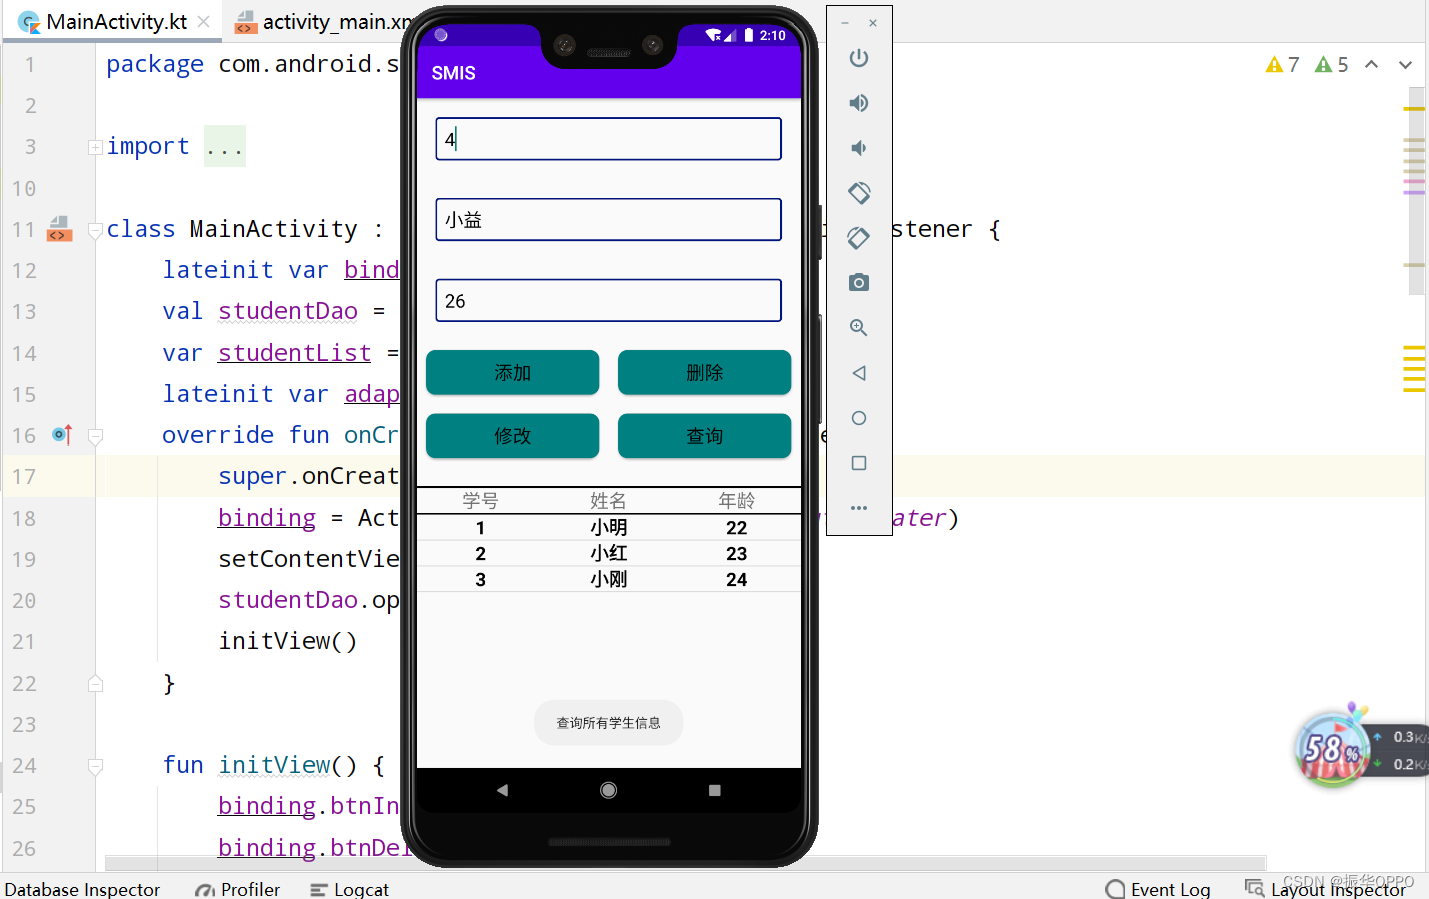
Kotlin实现简单的学生信息管理系统
文章目录一、实验内容二、实验步骤1、页面布局2、数据库3、登录活动4、增删改查三、运行演示四、实验总结五、源码下载一、实验内容 根据Android数据存储的内容,综合应用SharedPreferences和SQLite数据库实现一个用户信息管理系统,强化对SharedPreferen…...

413. 等差数列划分
413. 等差数列划分 如果一个数列 至少有三个元素 ,并且任意两个相邻元素之差相同,则称该数列为等差数列。 例如,[1,3,5,7,9]、[7,7,7,7] 和 [3,-1,-5,-9] 都是等差数列。 给你一个整数数组 nums ,返回数组 nums 中所有为等差数…...
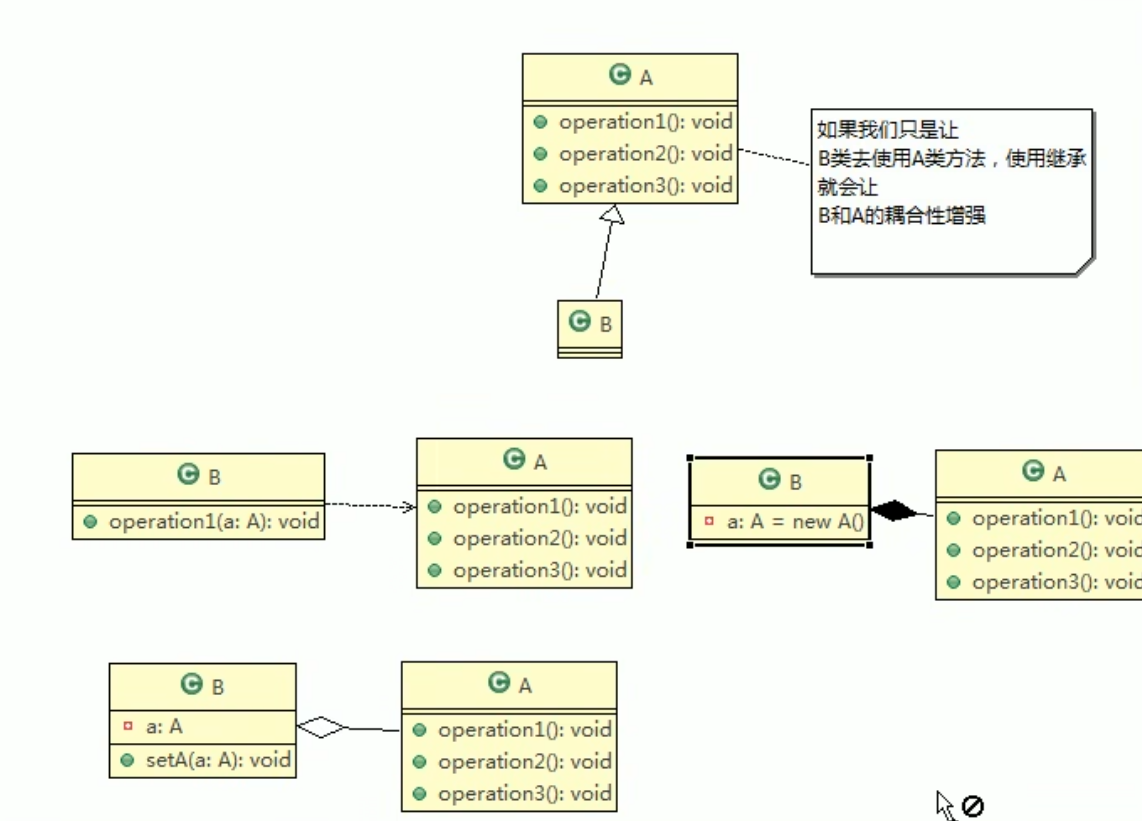
设计模式七大原则
一、设计模式概念 1.1 软件设计模式的产生背景 "设计模式"最初并不是出现在软件设计中,而是被用于建筑领域的设计中。 1977年美国著名建筑大师、加利福尼亚大学伯克利分校环境结构中心主任克里斯托夫亚历山大(Christopher Alexander&#x…...

【Mybatis系列】Mybatis常见的分页方法以及源码理解
Mybatis-Plus的selectPage 引入依赖 <dependency><groupId>com.baomidou</groupId><artifactId>mybatis-plus-boot-starter</artifactId><version>3.5.1</version></dependency>添加分页插件 Configuration public class My…...
Java面向对象:多态特性的学习
本文介绍了Java面向对象多态特性, 多态的介绍. 多态的实现条件–1.发生继承.2.发生重写(重写与重载的区别)3.向上转型与向下转型.4.静态绑定和动态绑定5. 实现多态 举例总结多态的优缺点 避免在构造方法内调用被重写的方法… Java面向对象:多态特性的学习一.什么是多态?二.多态…...
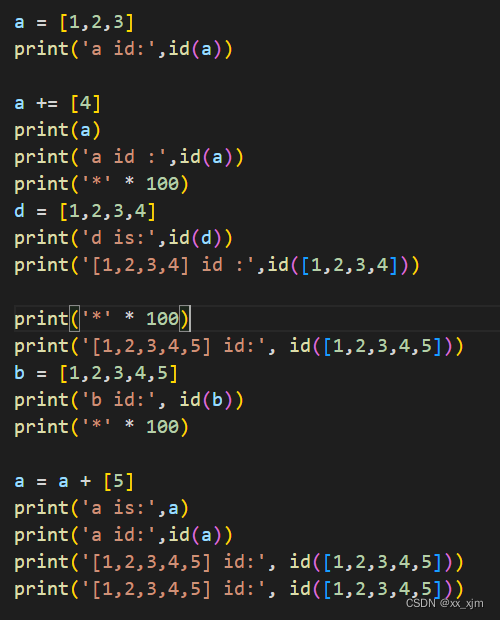
id函数 / 可变类型变量 / 不可变类型变量 / +=操作
前言 再说正文之前,需要大家先了解一下对象,指针和引用的含义,不懂得同学可以参考我上一篇博客“(12条消息) 引用是否有地址的讨论的_xx_xjm的博客-CSDN博客” 正文 一:python中一切皆对象 “python中一切皆对象”这句话我相信…...
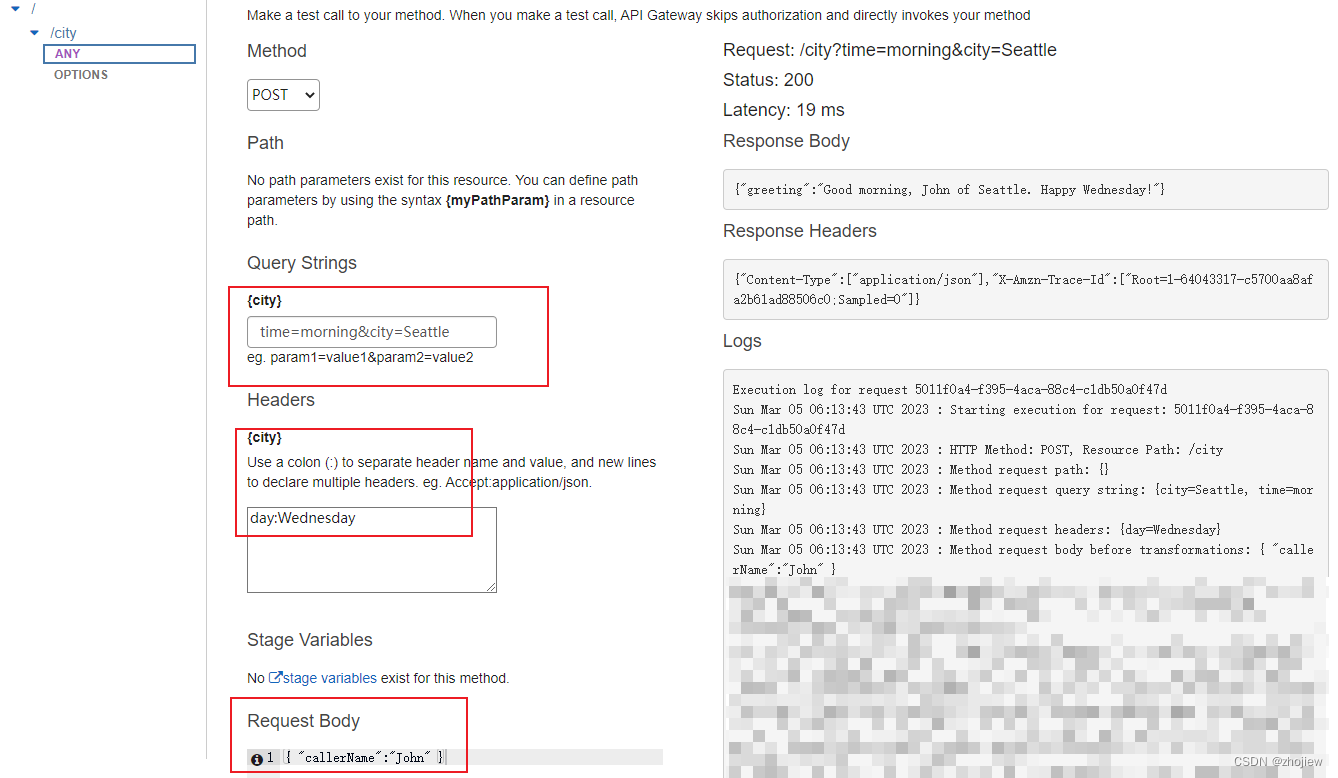
aws apigateway 使用apigateway集成lambda
参考资料 代理集成,https://docs.aws.amazon.com/zh_cn/apigateway/latest/developerguide/api-gateway-create-api-as-simple-proxy-for-lambda.html非代理集成,https://docs.aws.amazon.com/zh_cn/apigateway/latest/developerguide/getting-started-…...

Linux SPI 驱动实验
目录 一、Linux 下 SPI 驱动框架简介 1、SPI 主机驱动 2、SPI 设备驱动 SPI 设备数据收发处理流程 3、SPI 设备和驱动匹配过程 二、添加SPI 设备信息 1、添加 ICM20608 所使用的 IO 2、 在 ecspi3 节点追加 icm20608 子节点 三、编写 ICM20608 驱动 1、修改makefile…...
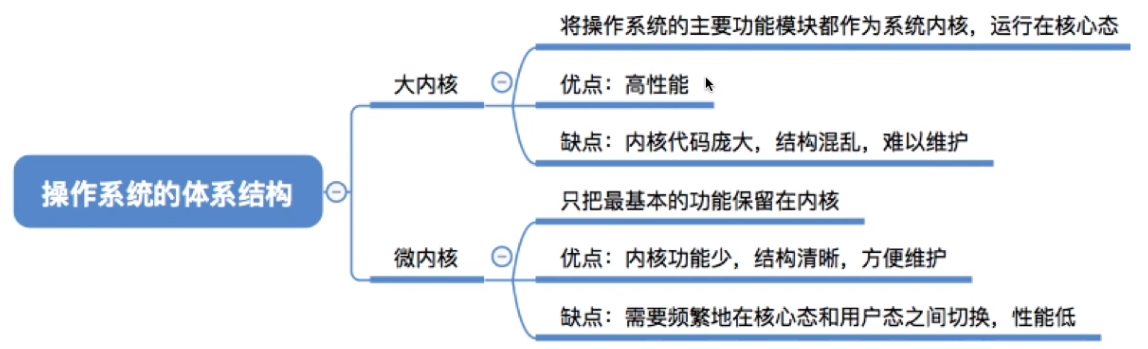
[1.4]计算机系统概述——操作系统的体系结构
第一章 计算机系统概述 操作系统的体系结构 大内核/单内核/宏内核微内核 通过之前的学习,我们知道计算机系统的层次结构是这样的。 但是操作系统的内部其实还可以再进一步地划分。 一部分是内核的功能,一部分是非内核的功能。 操作系统最核心的功能&…...
FPGA的GigE Vision IP相机图像采集方案设计,转换为千兆UDP,支持10G MAC
1 概述 GigE Vision是一个比较复杂的协议,要在FPGA中完全实现具有较大的难度。如果FPGA作为接收端希望实现GigE Vision相机的配置和图像采集功能,则只需要实现其中小部分功能即可。本文对原有GigE Vision协议的结构进行了裁剪,仅保留设备搜索…...

N_m3u8DL-CLI-SimpleG:解决M3U8流媒体下载难题的开源解决方案
N_m3u8DL-CLI-SimpleG:解决M3U8流媒体下载难题的开源解决方案 【免费下载链接】N_m3u8DL-CLI-SimpleG N_m3u8DL-CLIs simple GUI 项目地址: https://gitcode.com/gh_mirrors/nm3/N_m3u8DL-CLI-SimpleG M3U8流媒体格式已成为在线视频传输的主流标准࿰…...
)
GraphSAGE实战:用PyTorch Geometric实现工业级节点分类(含邻居采样优化技巧)
GraphSAGE工业级实战:PyTorch Geometric实现与亿级节点优化指南 当电商平台的日活用户突破千万量级时,传统的用户行为预测模型开始显露出明显的局限性。静态的特征工程无法捕捉用户间复杂的交互关系,而基于全图计算的GNN方法又难以应对实时更…...
5步打造Windows桌面美学:TranslucentTB任务栏透明化完全指南
5步打造Windows桌面美学:TranslucentTB任务栏透明化完全指南 【免费下载链接】TranslucentTB A lightweight utility that makes the Windows taskbar translucent/transparent. 项目地址: https://gitcode.com/gh_mirrors/tr/TranslucentTB 厌倦了Windows系…...

深入浅出Livepatch:从kprobe到ftrace的Linux热补丁实现原理
深入浅出Livepatch:从kprobe到ftrace的Linux热补丁实现原理 当你的生产环境服务器正在处理每秒数万次请求时,突然发现一个关键内核漏洞需要立即修复,传统方式要求重启系统——这无异于在高速公路上急刹车。Livepatch技术应运而生,…...

VISA 标准深度剖析:寄存器基控制规范与函数接口研究
VISA 标准深度剖析:寄存器基控制规范与函数接口研究 VISA(Virtual Instrument Software Architecture)是仪器控制领域的标准 API,它为不同总线(GPIB、USB、LAN、PXI 等)提供了统一的编程接口。本文将 VISA 函数按功能分为 8 大类,并逐一解析其作用、核心函数及使用场景…...

Gated DeltaNet 线性注意力:揭秘大模型算力魔咒的破局之道!
文章深入探讨了线性注意力机制在大模型中的重要性,特别是Gated DeltaNet如何通过改变运算顺序,将Transformer的注意力计算复杂度从平方级降低到线性级,从而打破算力瓶颈。文中对比了阿里Qwen、Kimi Linear等模型的线性架构应用,以…...

毕业设计实战:基于SSM+JSP的家纺用品销售管理系统设计与实现全攻略
毕业设计实战:基于SSMJSP的家纺用品销售管理系统设计与实现全攻略 在开发“家纺用品销售管理系统”这套毕设时,我曾因“订单管理与商家库存脱节”踩过一个关键坑。初期设计时,我将“用户下单”和“商家库存扣减”视为两个独立操作,…...

Qt网络编程实战:基于QTcpSocket构建带进度反馈的可靠文件传输系统
1. 为什么需要带进度反馈的文件传输系统 在开发桌面应用时,文件传输是个绕不开的刚需功能。特别是传输大文件时,用户最怕的就是看着界面发呆——不知道传输进行到哪一步了,也不知道还要等多久。我做过一个医疗影像传输系统,医生们…...

从单张图片到动态世界:Depth-Anything-3如何重塑3D视觉的通用法则
1. 当单张图片学会"思考"深度 第一次看到Depth-Anything-3(DA3)处理一张普通照片时,我盯着屏幕足足愣了三分钟。它就像给二维世界突然装上了Z轴——原本平淡无奇的街景照片,在DA3的解构下,近处的咖啡杯轮廓清…...

如何用Wi-Fi信号实现非接触检测:ESP-CSI完整指南
如何用Wi-Fi信号实现非接触检测:ESP-CSI完整指南 【免费下载链接】esp-csi Applications based on Wi-Fi CSI (Channel state information), such as indoor positioning, human detection 项目地址: https://gitcode.com/GitHub_Trending/es/esp-csi 想要让…...