【Vue3】源码解析-Runtime
文章目录
- 系列文章
- packages/runtime-dom/src/index.ts
- 初始化
- 创建renderer
- mount
- \src\runtime-core\component.js
- h.ts
- packages/runtime-core/src/renderer.ts
- 挂载及卸载DOM节点
- render
- packages/runtime-dom/src/nodeOps.ts
- packages/runtime-core/src/apiCreateApp.ts
- 创建app
- mount
- packages/runtime-core/src/vnode.ts
- 创建虚拟节点
- createVNode
- 来源
系列文章
【前端】Typescript入门
【Vue3】源码解析-前置
【Vue3】源码解析-响应式原理
【Vue3】源码解析-虚拟DOM
【Vue3】源码解析-编绎模块
【Vue3】源码解析-Runtime
packages/runtime-dom/src/index.ts
初始化
vue主入口文件中,引入导出了runtime-dom和compiler,而createApp就是来自runtime-dom
// packages/runtime-dom/src/index.tsexport const createApp = ((...args) => {const app = ensureRenderer().createApp(...args)if (__DEV__) {injectNativeTagCheck(app) // 在dev环境***册一个方法isNativeTag,挂载到app.config下面}const { mount } = appapp.mount = (containerOrSelector: Element | ShadowRoot | string): any => {// ...}return app
}) as CreateAppFunction<Element>
在该函数内部中通过调用ensureRenderer()和createApp(…args)创建了app实例并把实例返回出去,因此我们可以在app实例中安装插件,设置全局指令等等。这其中又是怎么实现的呢?
创建renderer
ensureRenderer()函数的用途是什么呢?
// packages/runtime-dom/src/index.tsfunction ensureRenderer() {return renderer || (renderer = createRenderer<Node, Element>(rendererOptions))我们可以看到调用该函数后返回一个renderer,若没有renderer则调用createRenderer来进行创建。
而这边的createRenderer则是来自runtime-core
// packages/runtime-core/src/index.tsexport function createRenderer<HostNode = RendererNode,HostElement = RendererElement
>(options: RendererOptions<HostNode, HostElement>) {return baseCreateRenderer<HostNode, HostElement>(options)
}
该函数接收一个RendererOptions作为参数,其实际是调用了baseCreateRenderer并将options传入
传入的RendererOptions是什么?为什么在runtime-dom传入,又在runtime-core拆解。
// packages/runtime-dom/src/index.tsconst rendererOptions = extend({ patchProp, forcePatchProp }, nodeOps)
mount
当创建完app实例后,现在让我们开始进行mount(‘#app’),让我们重新进入createApp
// packages/runtime-dom/src/index.tsexport const createApp = ((...args) => {const app = ensureRenderer().createApp(...args)if (__DEV__) {injectNativeTagCheck(app)}const { mount } = app // 保存app实例上原本的mount// 重写mountapp.mount = (containerOrSelector: Element | ShadowRoot | string): any => {const container = normalizeContainer(containerOrSelector) // 获取根元素容器if (!container) returnconst component = app._component // 获取根组件,即Appif (!isFunction(component) && !component.render && !component.template) {component.template = container.innerHTML // 使用根元素来作为模板}// clear content before mountingcontainer.innerHTML = ''const proxy = mount(container) // 调用实例中的mount方法if (container instanceof Element) {container.removeAttribute('v-cloak') // 删除v-cloak属性container.setAttribute('data-v-app', '') // 添加data-v-app属性}return proxy}return app
}) as CreateAppFunction<Element>
我们可以看到在上面的代码中,在创建完app之后,先对app实例中的mount方法进行了保存,接着又对mount进行了重写。
重写的mount方法中,先是调用了normalizeContainer(containerOrSelector)来获取根元素容器,containerOrSelector即我们传入的#app
// packages/runtime-dom/src/index.tsfunction normalizeContainer(container: Element | ShadowRoot | string
): Element | null {if (isString(container)) {const res = document.querySelector(container) // 进行dom操作选中容器if (__DEV__ && !res) {// ...}return res}// ...return container as any
}
在获取到根元素的容器之后,进行判断,将容器原本的html作为根组件的模板,然后清除了容器中原本的html
\src\runtime-core\component.js
// 创建组件实例
export function createComponentInstance(vnode) {const component = {vnode,type:vnode.type}return component
}// 初始化组件
export function setupComponent(instance) {// TODO// initProps()// initSlots()setupStatefulComponent(instance)}// 设置组件状态
function setupStatefulComponent(instance) {const Component = instance.typeconst { setup } = Componentif (setup) {const setupResult = setup()handleSetupResult(instance, setupResult)}}// 处理setup的结果
function handleSetupResult(instance, setupResult) {// function object// TODO funcitonif (typeof setupResult === "object") {instance.setupState = setupResult}finishComponentSetup(instance)
}// 完成组件设置
function finishComponentSetup(instance) {const Component = instance.renderif(!Component.render) {instance.render = Component.render}
}
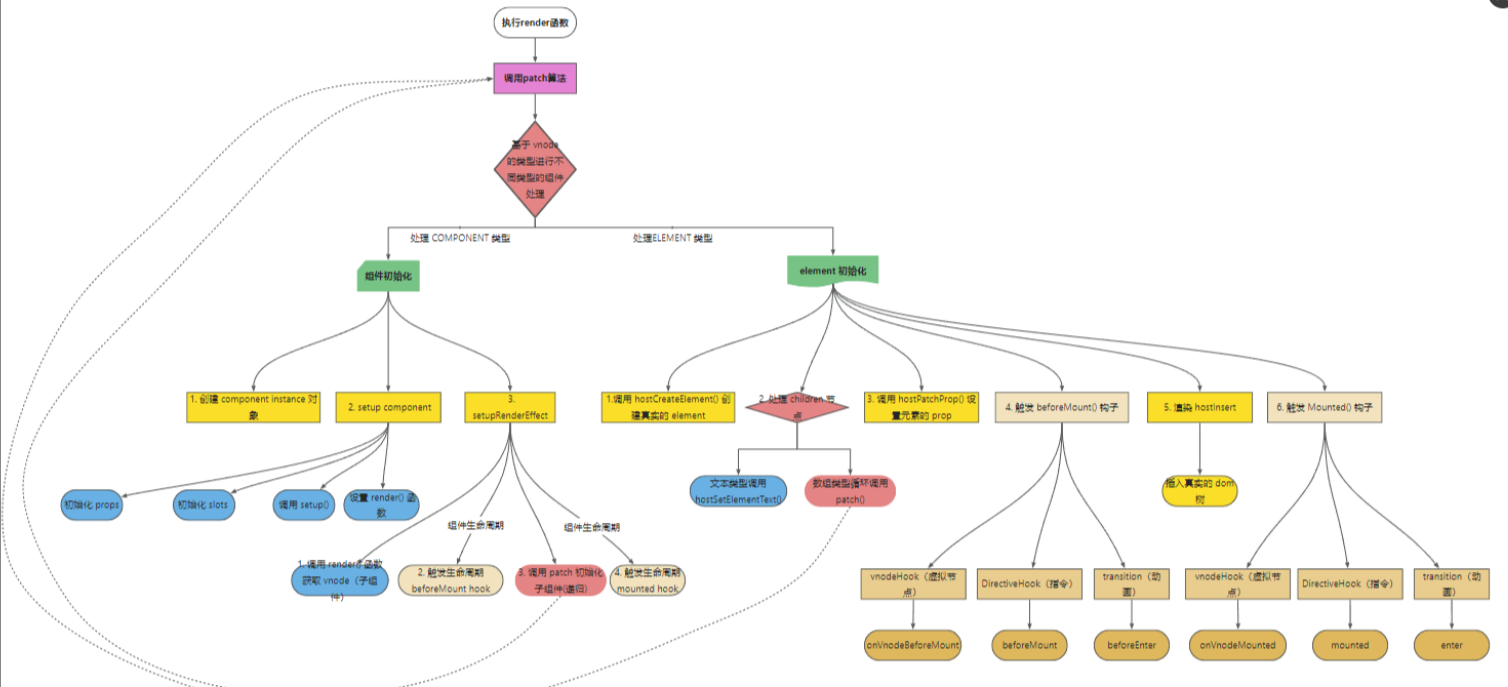
完成源码初始化组件的逻辑,可以对照着这张流程图看一看代码的运行过程:
h.ts
/*
// type only
h('div')// type + props
h('div', {})// type + omit props + children
// Omit props does NOT support named slots
h('div', []) // array
h('div', 'foo') // text
h('div', h('br')) // vnode
h(Component, () => {}) // default slot// type + props + children
h('div', {}, []) // array
h('div', {}, 'foo') // text
h('div', {}, h('br')) // vnode
h(Component, {}, () => {}) // default slot
h(Component, {}, {}) // named slots// named slots without props requires explicit `null` to avoid ambiguity
h(Component, null, {})
**/import { isArray, isObject } from '@vue/shared';
import { createVNode, isVNode } from './vnode';export function h(type, propsOrChildren?, children?) {const l = arguments.length;if (l === 2) {if (isObject(propsOrChildren) && !isArray(propsOrChildren)) {if (isVNode(propsOrChildren)) {return createVNode(type, null, [propsOrChildren]);}return createVNode(type, propsOrChildren);} else {return createVNode(type, null, propsOrChildren);}} else {if (l > 3) {children = Array.prototype.slice.call(arguments, 2);} else if (l === 3 && isVNode(children)) {children = [children];}return createVNode(type, propsOrChildren, children);}
}
h方法对创建虚拟节点操作进行了二次封装,使用法变得多种多样
packages/runtime-core/src/renderer.ts
挂载及卸载DOM节点
import { isString, ShapeFlags } from '@vue/shared';
import { createVNode, isSameVNode, Text } from './vnode';export function createRenderer(renderOptions) {let {insert: hostInsert,createElement: hostCreateElement,createText: hostCreateText,remove: hostRemove,setElementText: hostSetElementText,setText: hostSetText,querySelector: hostQuerySelector,parentNode: hostParentNode,nextSibling: hostNextSibling,patchProp: hostPatchProp,} = renderOptions;const normalize = (child, i) => {if (isString(child[i])) {let vnode = createVNode(Text, null, child[i]);child[i] = vnode;return child[i];}return child[i];};// 递归挂载子节点const mountChildren = (children, container) => {for (let i = 0; i < children.length; i++) {let child = normalize(children, i);patch(null, child, container);}};const mountElement = (vnode, container) => {let { type, props, children, shapeFlag } = vnode;// 挂载真实dom到vnode上let el = (vnode.el = hostCreateElement(type));// 属性if (props) {for (const key in props) {hostPatchProp(el, key, null, props[key]);}}// 子节点处理,& 预算判断是否为某一个类型if (shapeFlag & ShapeFlags.TEXT_CHILDREN) {// 文本hostSetElementText(el, children);} else if (shapeFlag & ShapeFlags.ARRAY_CHILDREN) {mountChildren(children, el);}// 插入真实dom到容器中hostInsert(el, container);};const processText = (n1, n2, container) => {if (n1 === null) {hostInsert((n2.el = hostCreateText(n2.children)), container);} else {// 文本内容变化,节点复用const el = (n2.el = n1.el);if (n1.children !== n2.children) {// 更新文本hostSetText(el, n2.children);}}};const patchProps = (oldProps, newProps, el) => {for (let key in newProps) {hostPatchProp(el, key, oldProps[key], newProps[key]);}for (let key in oldProps) {if (!newProps[key]) {hostPatchProp(el, key, oldProps[key], undefined);}}};const unmountChildren = (children) => {for (let i = 0; i < children.length; i++) {unmount(children[i]);}};// 比较两个节点的差异const patchKeyChildren = (c1, c2, el) => {};// 比较两个节点的子节点,el为当前父节点const patchChildren = (n1, n2, el) => {const c1 = n1.children;const c2 = n2.children;const prevShapeFlag = n1.shapeFlag;const shapeFlag = n2.shapeFlag;// 新值为文本if (shapeFlag & ShapeFlags.TEXT_CHILDREN) {// 旧值为数组if (prevShapeFlag & ShapeFlags.ARRAY_CHILDREN) {// 文本 数组unmountChildren(c1);}if (c1 !== c2) {// 文本 文本hostSetElementText(el, c2);}} else {// 旧值为数组if (prevShapeFlag & ShapeFlags.ARRAY_CHILDREN) {// 新值为数组if (shapeFlag & ShapeFlags.ARRAY_CHILDREN) {// 数组 数组 diffpatchKeyChildren(c1, c2, el); // 全量更新,同级比较} else {// 空   数组unmountChildren(c1);}} else {if (prevShapeFlag & ShapeFlags.TEXT_CHILDREN) {// 空   文本// 数组 文本hostSetElementText(el, '');}if (shapeFlag & ShapeFlags.ARRAY_CHILDREN) {// 数组 空// 数组 文本mountChildren(c2, el);}}}};// 先复用节点,然后比较属性,再比较子节点const patchElement = (n1, n2) => {// 复用节点let el = (n2.el = n1.el);let oldProps = n1.props || {};let newProps = n2.props || {};patchProps(oldProps, newProps, el);patchChildren(n1, n2, el);};const processElement = (n1, n2, container) => {if (n1 === null) {mountElement(n2, container);} else {// 对比元素patchElement(n1, n2);}};const patch = (n1, n2, container) => {if (n1 === n2) {return;}// 如果新值与老值完全没有可比性,删除老值,创建新值if (n1 && !isSameVNode(n1, n2)) {unmount(n1);n1 = null;}const { type, shapeFlag } = n2;switch (type) {case Text: // 文本processText(n1, n2, container);break;default:if (shapeFlag & ShapeFlags.ELEMENT) {// 元素processElement(n1, n2, container);}break;}};const unmount = (vnode) => {hostRemove(vnode.el);};const render = (vnode, container) => {if (vnode === null) {// 卸载domif (container._vnode) {unmount(container._vnode);}} else {// 初始化及更新patch(container._vnode || null, vnode, container);}// 缓存下次直接更新container._vnode = vnode;};return { render };
}
// packages/runtime-core/src/renderer.tsfunction baseCreateRenderer(options: RendererOptions,createHydrationFns?: typeof createHydrationFunctions
): any {const {insert: hostInsert,remove: hostRemove,patchProp: hostPatchProp,forcePatchProp: hostForcePatchProp,createElement: hostCreateElement,createText: hostCreateText,createComment: hostCreateComment,setText: hostSetText,setElementText: hostSetElementText,parentNode: hostParentNode,nextSibling: hostNextSibling,setScopeId: hostSetScopeId = NOOP,cloneNode: hostCloneNode,insertStaticContent: hostInsertStaticContent} = options// 声明了许多操作函数,约2000行return {render,hydrate,createApp: createAppAPI(render, hydrate)}
}
在调用完baseCreateRenderer后主要返回了三个函数:render,hydrate,createApp。
此时renderer便创建完成了
render
当我们拥有这个vnode后,就开始进入渲染阶段了。render(vnode, rootContainer),可以看到传入的参数为vnode以及根元素的容器,接下来让我们继续深入。
不知道你是否还记得,这个render函数是在调用createAPI时传入的第一个参数,因此这个函数来源于runtime-core中的baseCreateRenderer
// packages/runtime-core/src/renderer.tsconst render: RootRenderFunction = (vnode, container) => {// (判断进行卸载还是渲染if (vnode == null) {if (container._vnode) {unmount(container._vnode, null, null, true) // 卸载}} else {patch(container._vnode || null, vnode, container) // 创建或更新组件,进行dom diff和渲染}flushPostFlushCbs() // 回调调度器,使用Promise实现,与Vue2的区别是Vue2是宏任务或微任务来处理的container._vnode = vnode // 缓存vnode节点,证明已经渲染完成,方便后续diff操作}
在render函数中,对vnode的存在进行了判断,如果为空,则对组件进行销毁,否则将调用patch,创建组件。
接下来让我们继续进入patch函数
// packages/runtime-core/src/renderer.tsconst patch: PatchFn = (n1, // 旧n2, // 新container, // 容器anchor = null,parentComponent = null,parentSuspense = null,isSVG = false,optimized = false) => {// 如果两者类型不同,则直接卸载n1if (n1 && !isSameVNodeType(n1, n2)) {anchor = getNextHostNode(n1)unmount(n1, parentComponent, parentSuspense, true)n1 = null}if (n2.patchFlag === PatchFlags.BAIL) {optimized = falsen2.dynamicChildren = null}const { type, ref, shapeFlag } = n2// 根据不同的节点类型来进行不同的process方法switch (type) {case Text: // 文本processText(n1, n2, container, anchor)breakcase Comment: // 注释processCommentNode(n1, n2, container, anchor)breakcase Static: // 静态if (n1 == null) {mountStaticNode(n2, container, anchor, isSVG)} else if (__DEV__) {patchStaticNode(n1, n2, container, isSVG)}breakcase Fragment: // 片段(dom数组)processFragment(// ...)breakdefault:if (shapeFlag & ShapeFlags.ELEMENT) { // 原生节点(div)processElement(// ...)} else if (shapeFlag & ShapeFlags.COMPONENT) { // 组件,根组件即通过processComponent处理processComponent(// ...)} else if (shapeFlag & ShapeFlags.TELEPORT) { // 传送组件;(type as typeof TeleportImpl).process(// ...)} else if (__FEATURE_SUSPENSE__ && shapeFlag & ShapeFlags.SUSPENSE) { // 挂起组件-异步渲染;(type as typeof SuspenseImpl).process(// ...)} else if (__DEV__) {warn('Invalid VNode type:', type, `(${typeof type})`)}}// 处理节点之后处理refif (ref != null && parentComponent) {setRef(ref, n1 && n1.ref, parentSuspense, n2)}
}
我们可以看到在创建vnode时定义的shapeFlag,在这里发挥了作用。根组件经过逻辑流程之后也进入了processComponent之中。
packages/runtime-dom/src/nodeOps.ts
// packages/runtime-dom/src/nodeOps.tsexport const nodeOps: Omit<RendererOptions<Node, Element>, 'patchProp'> = {insert: (child, parent, anchor) => {parent.insertBefore(child, anchor || null)},remove: child => {const parent = child.parentNodeif (parent) {parent.removeChild(child)}},// ...
}
其实就是对于dom操作的封装。那为什么要在runtime-dom中传入,runtime-core拆解?
其实是因为在Vue3中runtime-core和runtime-dom的拆分,runtime-core不应该关心实际的操作,这样当新平台要接入时(比如weex)就可以只实现属于自己平台的nodeOps。
总结:创建renderer的函数调用顺序为
- ensureRenderer()
- createRenderer()
- baseCreateRenderer()
packages/runtime-core/src/apiCreateApp.ts
创建app
当创建完renderer后返回了3个函数,我们可以看到其中createApp实际上是引用了createAppAPI(render, hydrate),所以其实const app = ensureRenderer().createApp(…args)创建app实例时,调用的是createAppAPI的返回值(运用柯里化,返回的是一个函数)
// packages/runtime-core/src/apiCreateApp.tsexport function createAppContext(): AppContext {return {app: null as any, // 刚创建时为空config: {isNativeTag: NO,performance: false,globalProperties: {},optionMergeStrategies: {},isCustomElement: NO,errorHandler: undefined,warnHandler: undefined},mixins: [],components: {},directives: {},provides: Object.create(null)}
}export function createAppAPI<HostElement>(render: RootRenderFunction,hydrate?: RootHydrateFunction
): CreateAppFunction<HostElement> {return function createApp(rootComponent, rootProps = null) {// 检验root propsif (rootProps != null && !isObject(rootProps)) {__DEV__ && warn(`root props passed to app.mount() must be an object.`)rootProps = null}const context = createAppContext(); // 创建contextconst installedPlugins = new Set(); // 创建插件列表集合,储存已安装的插件let isMounted = false;const app: App = (context.app = {_component: rootComponent as Component,_props: rootProps,_container: null,_context: context,version,get config() {},set config() {}use() {},mixin() {},component() {},mount() {}                                                        // ...})return app // 返回创建的app实例};
}
看完上面的代码后结果就很清楚了,当我们调用createApp时,返回的app上有着许多函数方法和属性,相信你对这些函数方法并不陌生,这些就是vue2.x中在Vue上的那些API:use、mixin、component,在vue3则是被挂载到了app实例上
需要注意的是:我们在应用中调用的createApp(App),其中的APP就是第一个参数,作为根组件
mount
// packages/runtime-core/src/apiCreateApp.tsmount(rootContainer: HostElement, isHydrate?: boolean): any {if (!isMounted) {// 1.创建vnode const vnode = createVNode(rootComponent as ConcreteComponent, // App组件rootProps)vnode.appContext = context // 保存context在根节点上// HMR root reloadif (__DEV__) {// ...}if (isHydrate && hydrate) {hydrate(vnode as VNode<Node, Element>, rootContainer as any)} else {render(vnode, rootContainer) // 2.进入render,函数来源于runtime-core}isMounted = true // 修改状态app._container = rootContainer// for devtools and telemetry;(rootContainer as any).__vue_app__ = appif (__DEV__ || __FEATURE_PROD_DEVTOOLS__) {devtoolsInitApp(app, version)}return vnode.component!.proxy // 返回vnode.component的代理} else if (__DEV__) {// ...}},
runtime-core中mount方法主要做了两件事:创建vnode和调用render进入渲染。这里我们先简略的介绍一下这两个函数的作用。
在创建vnode时调用了createVNode(),并将根组件作为参数传入。
在得到vnode之后又调用了render()开始进行渲染。
最后mount函数的返回值为vnode.component的代理。
packages/runtime-core/src/vnode.ts
创建虚拟节点
import { isArray, isString, ShapeFlags } from '@vue/shared';export const Text = Symbol('Text');export function isVNode(value) {return !!(value && value.__v_isVnode);
}/*** 创建虚拟节点* @param type 虚拟节点类型* @param props 属性* @param children 子节点*/
export function createVNode(type, props, children = null) {let shapeFlag = isString(type) ? ShapeFlags.ELEMENT : 0;// 虚拟dom,可以跨平台,性能好const vnode = {__v_isVnode: true, // 是否是虚拟节点shapeFlag, // 类型标识type, // 节点类型props, // 属性children, // 子节点key: props?.key, // key/*** 对应的真实节点,后续diff算法比对两个vnode时会替换新的属性值,并更新el*/el: null,};if (children) {let type = 0;if (isArray(children)) {type = ShapeFlags.ARRAY_CHILDREN;} else {children = String(children);type = ShapeFlags.TEXT_CHILDREN;}// 通过位运算将当前vnode类型及子节点类型存储起来vnode.shapeFlag |= type;}return vnode;
}
虚拟节点不用考虑平台兼容,并且可以将虚拟节点利用js存储并进行比对后再渲染真实dom,不用频繁操作dom元素,性能更好
createVNode
// packages/runtime-core/src/vnode.tsexport const createVNode = (__DEV__? createVNodeWithArgsTransform: _createVNode) as typeof _createVNode// 实际调用
function _createVNode(type: VNodeTypes | ClassComponent | typeof NULL_DYNAMIC_COMPONENT,props: (Data & VNodeProps) | null = null,children: unknown = null,patchFlag: number = 0, // patch flag默认为0dynamicProps: string[] | null = null,isBlockNode = false
): VNode {// ...// ...// class & style normalization// 处理props,标准化calss和styleif (props) {// for reactive or proxy objects, we need to clone it to enable mutation.if (isProxy(props) || InternalObjectKey in props) {props = extend({}, props)}let { class: klass, style } = propsif (klass && !isString(klass)) {props.class = normalizeClass(klass) // 标准化class}if (isObject(style)) {// reactive state objects need to be cloned since they are likely to be// mutatedif (isProxy(style) && !isArray(style)) {style = extend({}, style)}props.style = normalizeStyle(style) // 标准化style}}// 定义shapeFlag// encode the vnode type information into a bitmapconst shapeFlag = isString(type)? ShapeFlags.ELEMENT: __FEATURE_SUSPENSE__ && isSuspense(type)? ShapeFlags.SUSPENSE: isTeleport(type)? ShapeFlags.TELEPORT: isObject(type)? ShapeFlags.STATEFUL_COMPONENT // 根组件shapeFlag: isFunction(type)? ShapeFlags.FUNCTIONAL_COMPONENT: 0// ...// 创建vnode对象const vnode: VNode = {__v_isVNode: true,[ReactiveFlags.SKIP]: true,type,props,key: props && normalizeKey(props),ref: props && normalizeRef(props),scopeId: currentScopeId,children: null,component: null,suspense: null,ssContent: null,ssFallback: null,dirs: null,transition: null,el: null,anchor: null,target: null,targetAnchor: null,staticCount: 0,shapeFlag,patchFlag,dynamicProps,dynamicChildren: null,appContext: null}// ...normalizeChildren(vnode, children) // 标准化子节点// ...return vnode // 返回创建完的vnode
}
可以看到createVNode主要做了四件事:
- 处理props:标准化class和style,如果是响应式元素则会被克隆
- 定义shapeFlag:shapeFlag用于对元素进行标记,比如文本、注释、组件等等。主要是为了在render的时候可以根据不同的元素类型来进行不同的patch操作。
- 创建vnode对象
- 标准化子节点:把不同数据类型的 children 转成数组或者文本类型
shapeFlag的定义如下:
// packages/runtime-core/src/renderer.tsconst patch: PatchFn = (n1, // 旧n2, // 新container, // 容器anchor = null,parentComponent = null,parentSuspense = null,isSVG = false,optimized = false) => {// 如果两者类型不同,则直接卸载n1if (n1 && !isSameVNodeType(n1, n2)) {anchor = getNextHostNode(n1)unmount(n1, parentComponent, parentSuspense, true)n1 = null}if (n2.patchFlag === PatchFlags.BAIL) {optimized = falsen2.dynamicChildren = null}const { type, ref, shapeFlag } = n2// 根据不同的节点类型来进行不同的process方法switch (type) {case Text: // 文本processText(n1, n2, container, anchor)breakcase Comment: // 注释processCommentNode(n1, n2, container, anchor)breakcase Static: // 静态if (n1 == null) {mountStaticNode(n2, container, anchor, isSVG)} else if (__DEV__) {patchStaticNode(n1, n2, container, isSVG)}breakcase Fragment: // 片段(dom数组)processFragment(// ...)breakdefault:if (shapeFlag & ShapeFlags.ELEMENT) { // 原生节点(div)processElement(// ...)} else if (shapeFlag & ShapeFlags.COMPONENT) { // 组件,根组件即通过processComponent处理processComponent(// ...)} else if (shapeFlag & ShapeFlags.TELEPORT) { // 传送组件;(type as typeof TeleportImpl).process(// ...)} else if (__FEATURE_SUSPENSE__ && shapeFlag & ShapeFlags.SUSPENSE) { // 挂起组件-异步渲染;(type as typeof SuspenseImpl).process(// ...)} else if (__DEV__) {warn('Invalid VNode type:', type, `(${typeof type})`)}}// 处理节点之后处理refif (ref != null && parentComponent) {setRef(ref, n1 && n1.ref, parentSuspense, n2)}
}
我们可以看到在创建vnode时定义的shapeFlag,在这里发挥了作用。根组件经过逻辑流程之后也进入了processComponent之中。
来源
Vue3源码学习之路-实现runtime-core
【Vue3源码Runtime-core篇】 第二章初始化Component
代码先锋网
相关文章:
【Vue3】源码解析-Runtime
文章目录 系列文章packages/runtime-dom/src/index.ts初始化创建renderermount \src\runtime-core\component.jsh.tspackages/runtime-core/src/renderer.ts挂载及卸载DOM节点render packages/runtime-dom/src/nodeOps.tspackages/runtime-core/src/apiCreateApp.ts创建appmoun…...
常见面试题之计算机网络
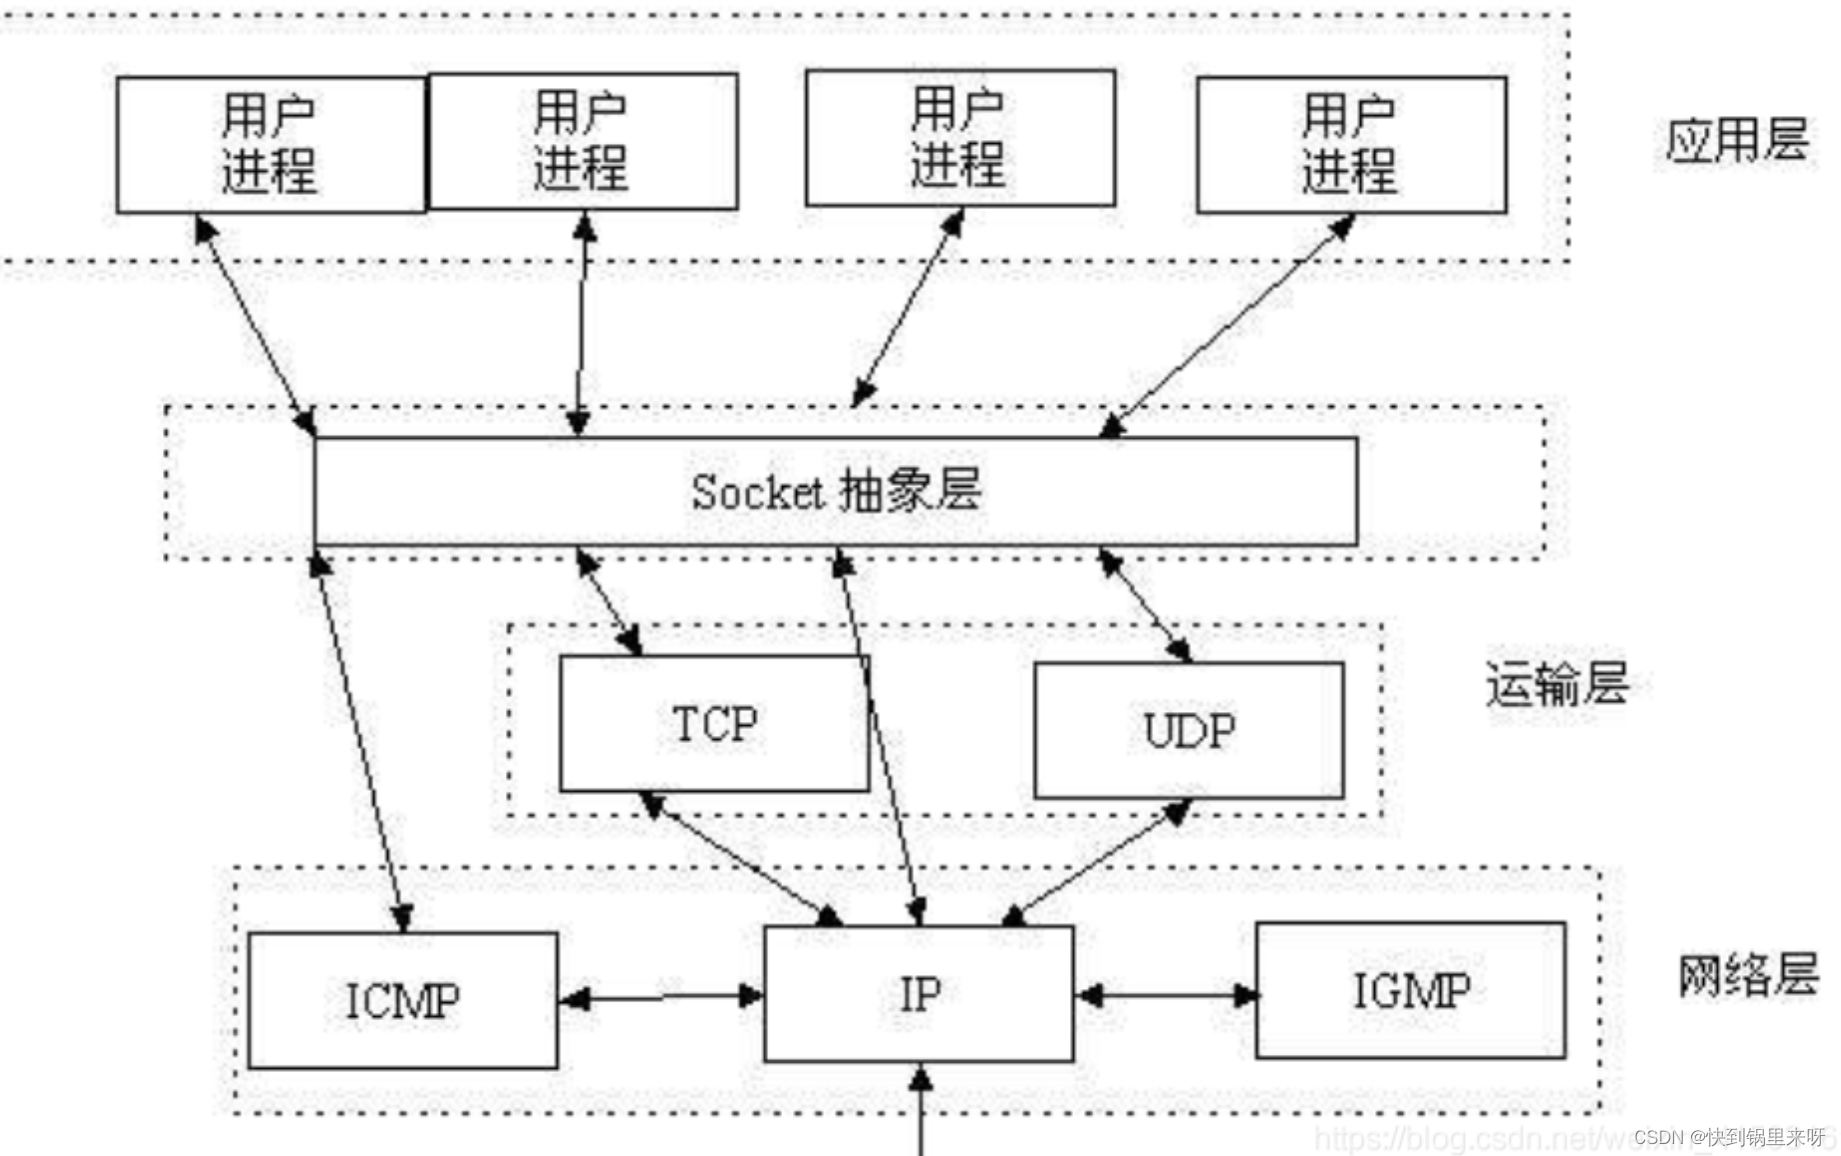
1. OSI 五层模型(或七层模型)是什么,每一层的作用是什么 应用层:又可细分为应用层、表示层、会话层。其中应用层主要做的工作就是为应用程序提供服务,常见的协议为 HTTP、HTTPS、DNS等;表示层主要做的工作…...
C++进阶:详解多态(多态、虚函数、抽象类以及虚函数原理详解)
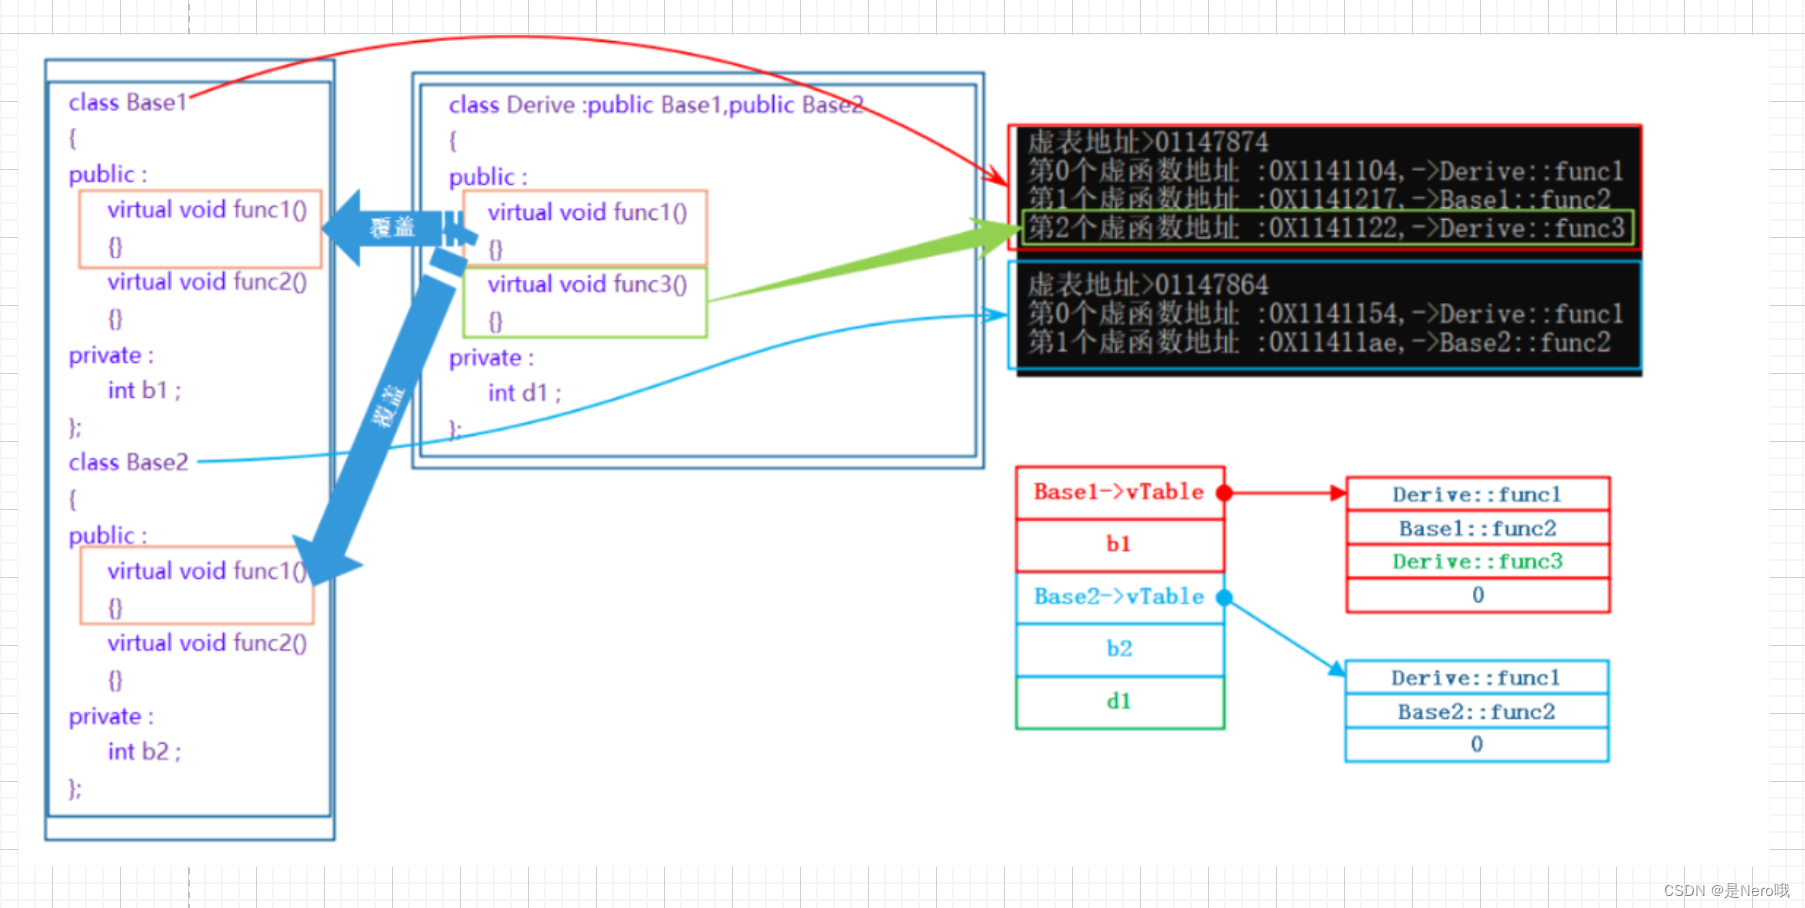
C进阶:详解多态(多态、虚函数、抽象类以及虚函数原理详解) 结束了继承的介绍:C进阶:详细讲解继承 那紧接着的肯定就是多态啦 文章目录 1.多态的概念2.多态的定义和实现2.1多态的构成条件2.2虚函数2.2.1虚函数的概念2…...

【Hadoop大数据技术】——MapReduce经典案例实战(倒排索引、数据去重、TopN)
📖 前言:MapReduce是一种分布式并行编程模型,是Hadoop核心子项目之一。实验前需确保搭建好Hadoop 3.3.5环境、安装好Eclipse IDE 🔎 【Hadoop大数据技术】——Hadoop概述与搭建环境(学习笔记) 目录 &#…...
02、字面量与变量
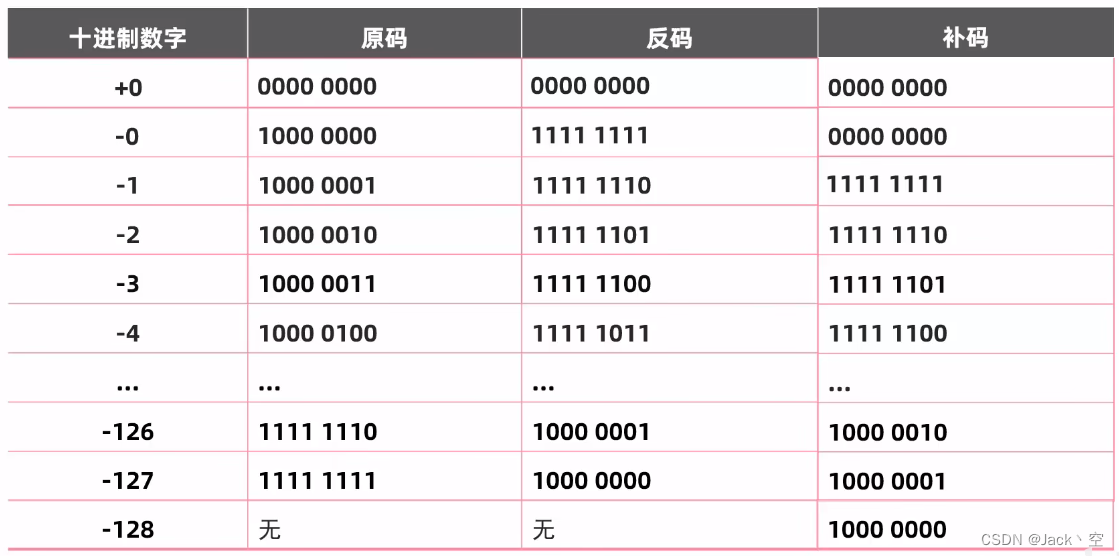
二、字面量与变量 文章目录 二、字面量与变量1、字面量字面量类型扩展:特殊字符 2、变量进制转换 3、数据类型 1、字面量 字面量又叫做常量,字面值常量,告诉程序员数据在程序中的书写格式。 字面量类型 整数类型(int):不带小数点…...

docker的常用指令
docker的常用指令 从docker镜像仓库,搜索所有和mysql有关的镜像 docker search mysql 从docker仓库拉取mysql docker pull mysql这里的mysql是指使用search搜索出来的所有容器的NAME 如果和我一样遇到以下问题: 我可以登录阿里云的官网,找…...
19 OpenCV 霍夫曼变换检测圆
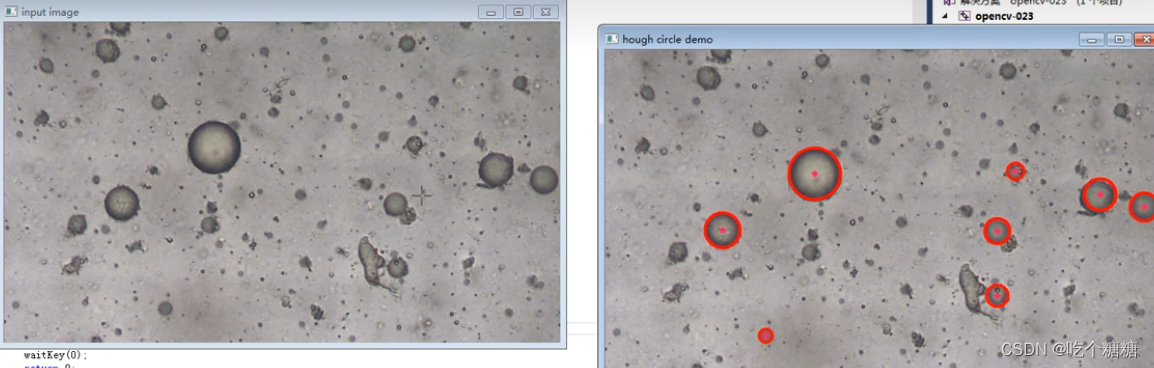
文章目录 cv::HoughCircles算子参数示例 cv::HoughCircles 因为霍夫圆检测对噪声比较敏感,所以首先要对图像做中值滤波。 基于效率考虑,Opencv中实现的霍夫变换圆检测是基于图像梯度的实现,分为两步: 检测边缘,发现可能…...
leetcode代码记录(摆动序列
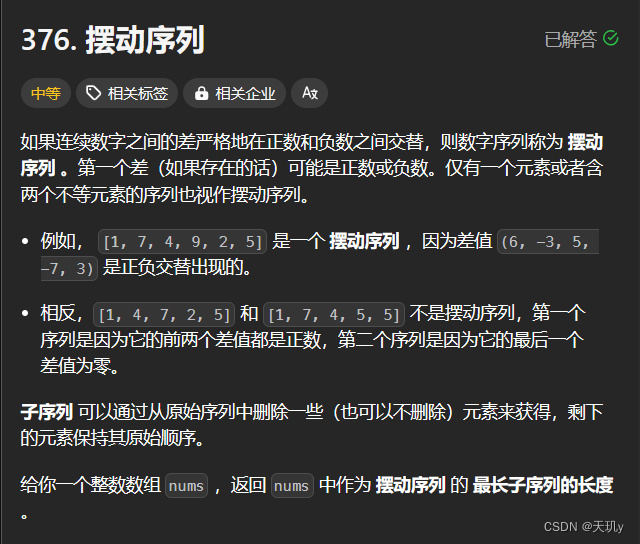
目录 1. 题目:2. 我的代码:小结: 1. 题目: 如果连续数字之间的差严格地在正数和负数之间交替,则数字序列称为 摆动序列 。第一个差(如果存在的话)可能是正数或负数。仅有一个元素或者含两个不等…...

django学习笔记
django学习笔记 http://djangobook.py3k.cn/2.0/chapter05/ 文章目录 django学习笔记模型 models.py1、定义数据模型2、模型安装3、创建数据表4、数据表的增删改查4.1 增加4.2 删除4.3 修改4.4 查询4.5 模糊查询4.6 排序&连锁查询4.7 限制返回数据 5、模型使用实战 模型 m…...
Python环境安装及Selenium引入
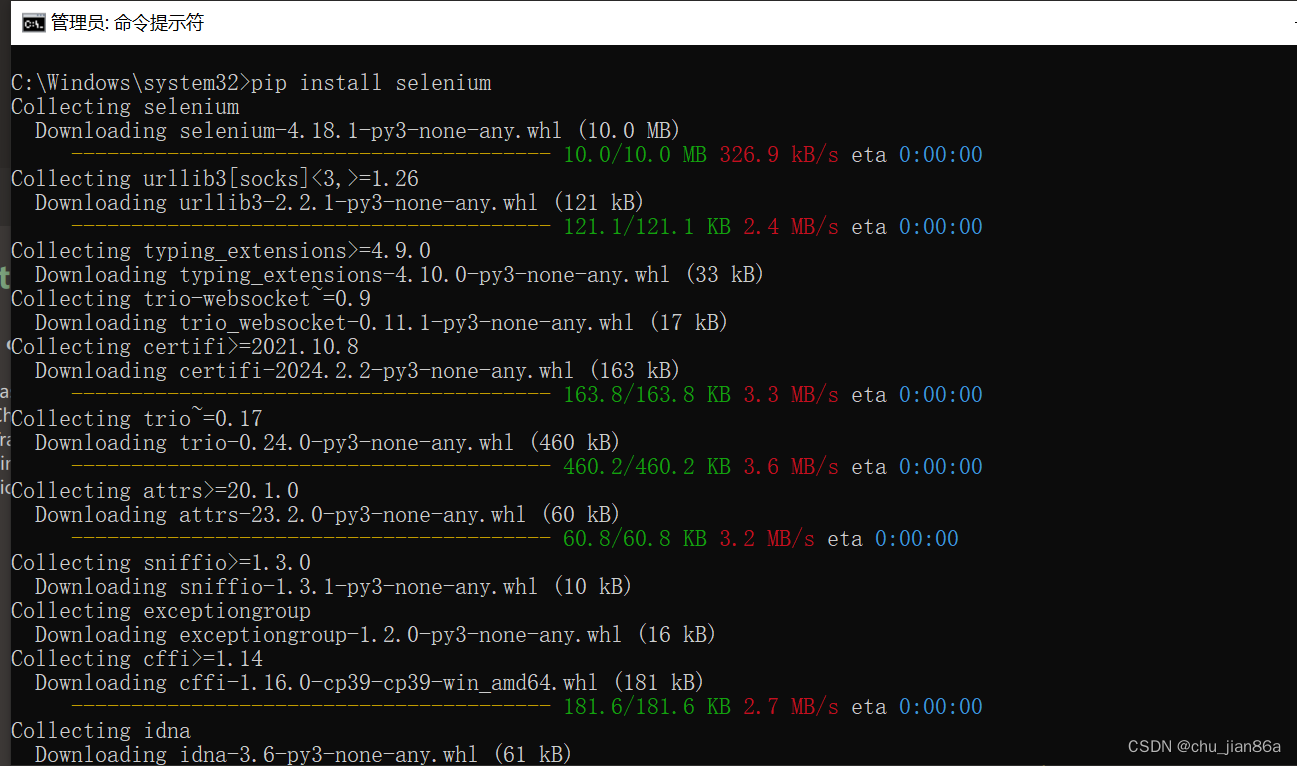
Python环境安装 环境下载 Download Python | Python.org 环境安装 需使用管理员身份运行 查看环境是否安装成功 python --version 如果未成功则检查环境变量配置 安装 Selenium 库 pip install selenium Selenium 可以模拟用户在浏览器中的操作,如点击按钮、填写…...

【gpt实践】实用咒语分享
直接上咒语了,大家可以自行实践。 1、忽略先前所有的提示 有时候gpt会停留在之前的问题中,导致回答当前问题带着之前问题结论。 2、忽略所有的客套话 我们只是需要有用的信息,有时候gpt客套话会混淆视听。 3、给出非常简短明确的答案 同样…...

Linux用户和权限
一、root用户(超级管理员) 普通用户的权限,一般在其HOME目录内是不受限的 一旦出了HOME目录,大多数地方,普通用户仅有只读和执行权限,无修改权限 二、su 和 exit命令 语法:su [ - ] 【用户…...
git svn混用
背景 项目代码管理初始使用的svn, 由于svn代码操作,无法在本地暂存,有诸多不便,另外本人习惯使用git. 所以决定迁移至git管理 迁移要求: 保留历史提交记录 迁移流程 代码检出 git svn svn_project_url git代码提交 修改本…...
FPGA静态时序分析与约束(三)、读懂vivado时序报告
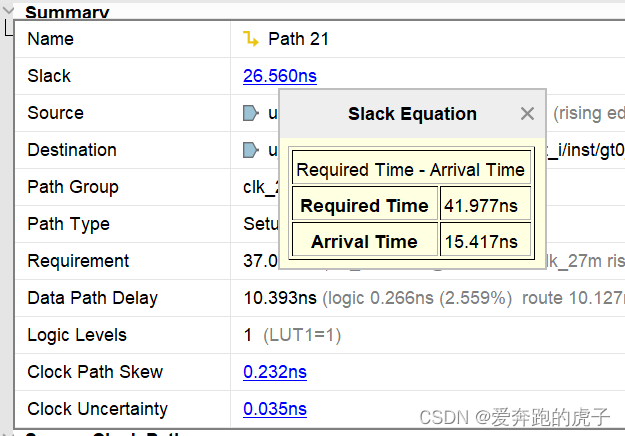
系列文章目录 FPGA静态时序分析与约束(一)、理解亚稳态 FPGA静态时序分析与约束(二)、时序分析 文章目录 系列文章目录前言一、时序分析回顾二、打开vivado任意工程2.1 工程布局路由成功后,点击vivado左侧**IMPLEMENT…...

鸿蒙Harmony应用开发—ArkTS声明式开发(容器组件:Badge)
可以附加在单个组件上用于信息标记的容器组件。 说明: 该组件从API Version 7开始支持。后续版本如有新增内容,则采用上角标单独标记该内容的起始版本。 子组件 支持单个子组件。 说明: 子组件类型:系统组件和自定义组件…...

Python程序设计基础——代码习题
1 __name__属性 import demodef main():if __name__ __main__:print(这个程序被直接运行。)elif __name__demo:print(这个程序作为模块被使用。) main()3.3 编写程序,生成包含1000个0~100之间的随机整数,并统计每个元素出现的次数。 import randomx[r…...
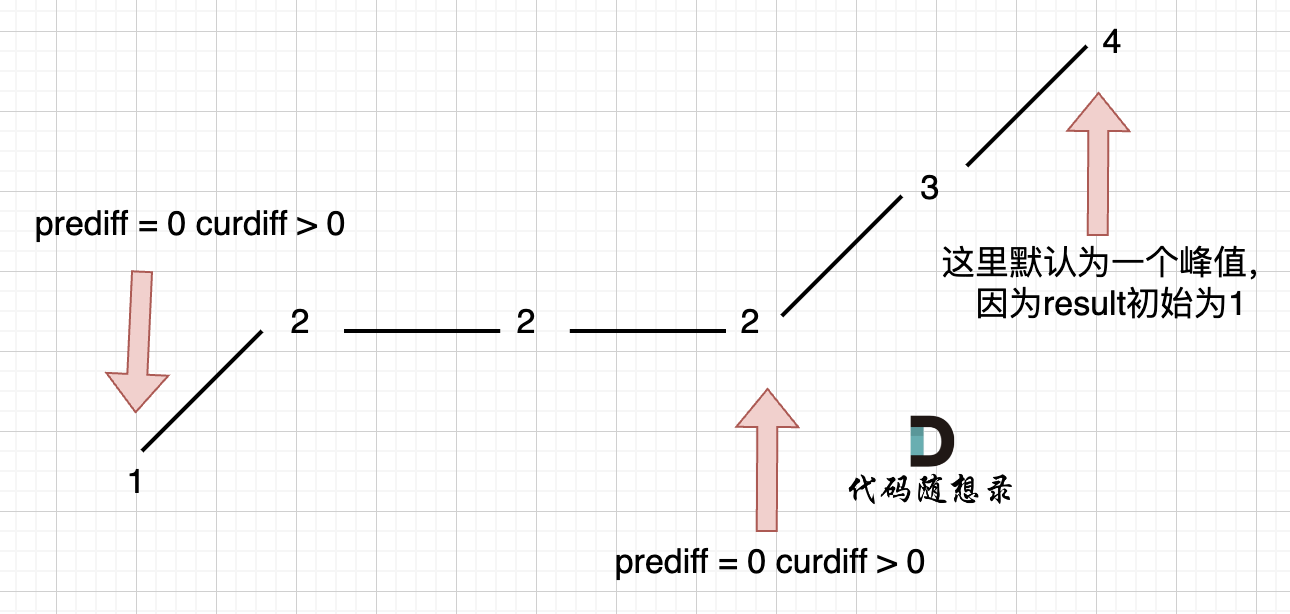
代码随想录 贪心算法-中等题目-序列问题
目录 376.摆动序列 738.单调递增的数字 376.摆动序列 376. 摆动序列 中等 如果连续数字之间的差严格地在正数和负数之间交替,则数字序列称为 摆动序列 。第一个差(如果存在的话)可能是正数或负数。仅有一个元素或者含两个不等元素的序列…...
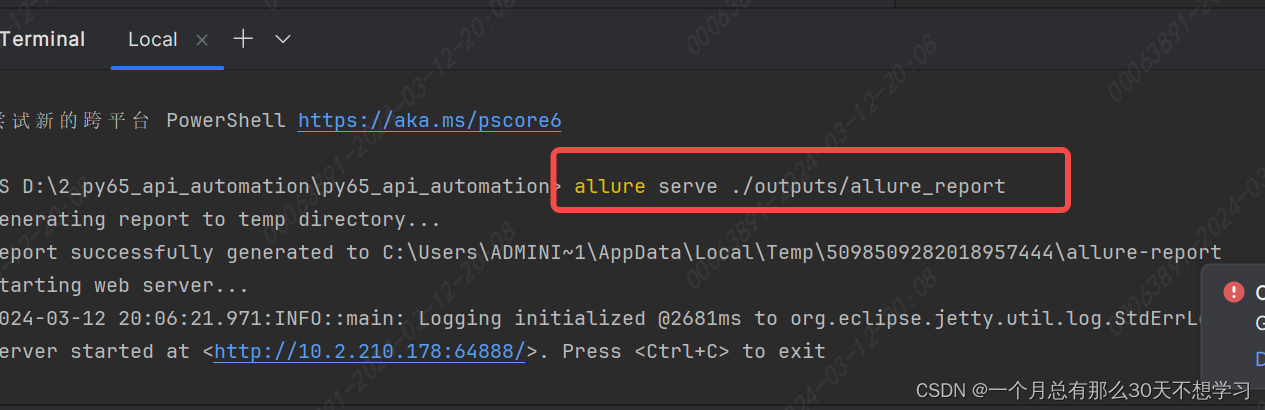
pytest生成allure的报告
首先要下载安装配置allure allure serve ./outputs/allure_report 可以生成html的文件自动在默认浏览器中打开...

Python控制摄像头并获取数据文件
一、引言 摄像头作为计算机视觉领域的核心设备之一,广泛应用于视频监控、图像采集和数据处理等领域。通过Python编程语言,我们可以实现对摄像头的精确控制,包括摄像头的开启、关闭、参数设置以及数据获取等功能。 目录 一、引言 二、摄像头…...
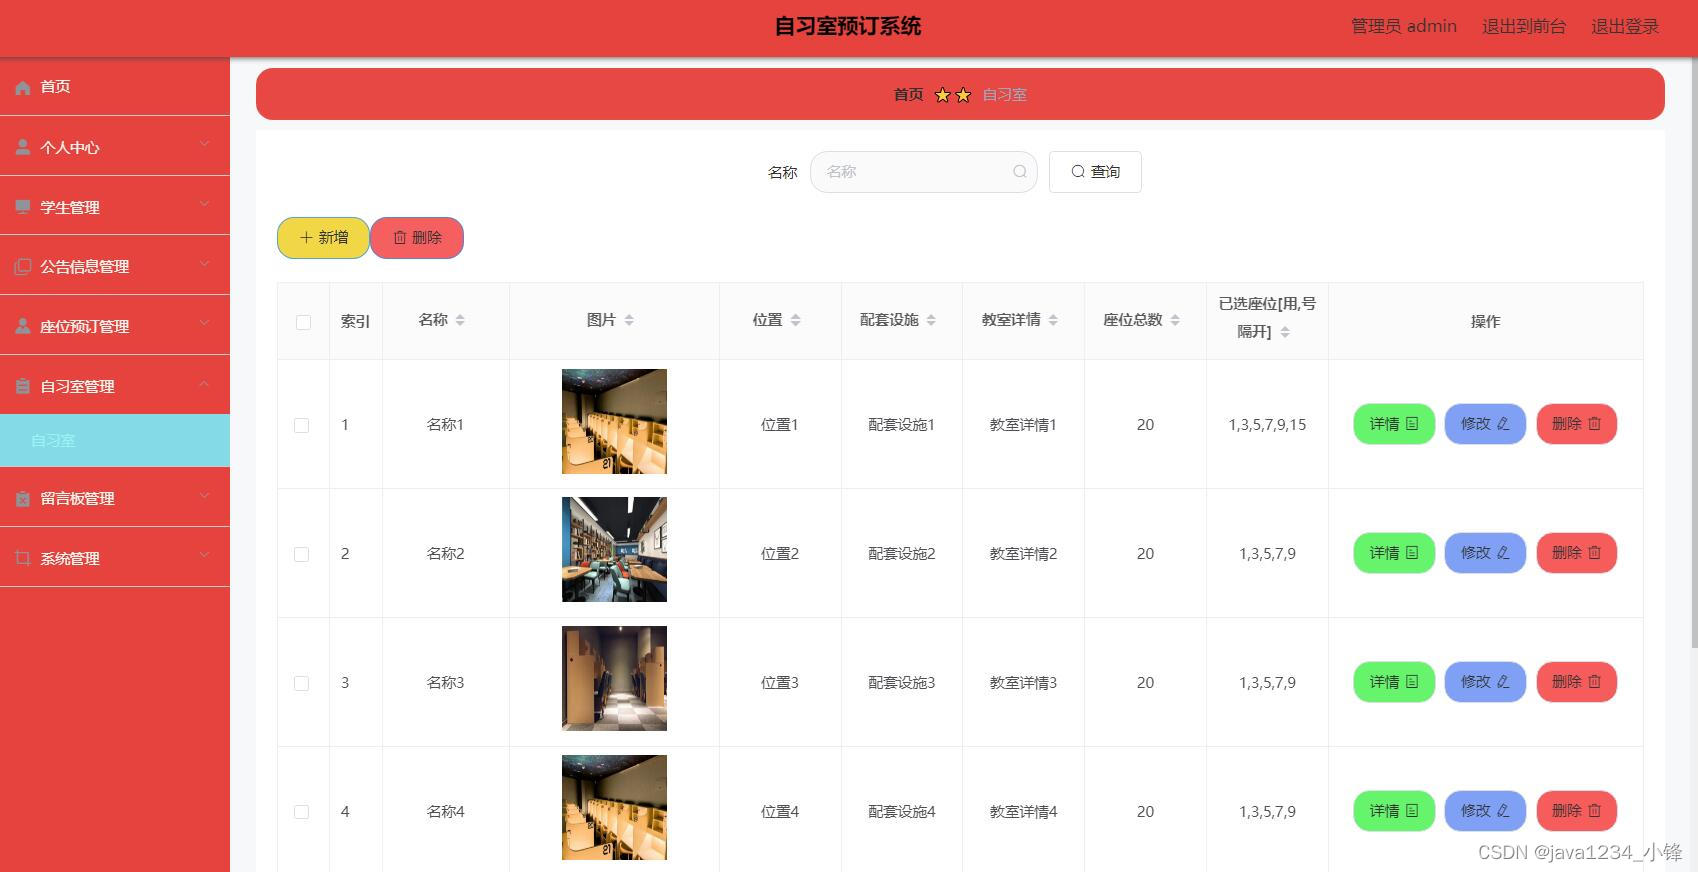
免费分享一套SpringBoot+Vue自习室(预约)管理系统,帅呆了~~
大家好,我是java1234_小锋老师,看到一个不错的SpringBootVue自习室预约)管理系统,分享下哈。 项目视频演示 【免费】SpringBootVue自习室预约(预约)管理系统 Java毕业设计_哔哩哔哩_bilibili【免费】SpringBootVue自习室预约(预约)管理系统…...

Buzz音频转录完全指南:3大核心功能+5个实战场景,快速掌握本地语音转文字技术
Buzz音频转录完全指南:3大核心功能5个实战场景,快速掌握本地语音转文字技术 【免费下载链接】buzz Buzz transcribes and translates audio offline on your personal computer. Powered by OpenAIs Whisper. 项目地址: https://gitcode.com/GitHub_Tr…...

Kerberos身份认证原理与企业级排错实战指南
1. 这不是“另一个登录框”,而是一套精密运转的身份验证齿轮系统很多人第一次听说 Kerberos,是在公司内网登录邮箱或访问内部系统时,看到那个带小盾牌图标的弹窗——“正在使用 Kerberos 协议进行身份验证”。于是下意识觉得:“哦…...

Android 11开发避坑:为什么你的App获取的Wifi MAC地址总是变?手把手教你配置固定MAC
Android 11开发实战:彻底解决Wifi MAC地址随机化问题最近在开发一个设备管理系统时,遇到了一个棘手的问题:我们的App在Android 11设备上获取的Wifi MAC地址每次都不一样,导致基于MAC地址的设备识别功能完全失效。经过一周的深入研…...
)
从STM32迁移到普冉PY32F003:UART代码移植保姆级教程(附HAL库对比)
从STM32到普冉PY32F003的UART代码迁移实战指南 1. 国产MCU替代浪潮下的技术选择 近年来,半导体行业的供应链波动促使更多工程师将目光投向国产MCU解决方案。普冉PY32F003系列作为Cortex-M0内核的代表产品,以48MHz主频、64KB Flash和8KB RAM的配置&#x…...

Python基础语法:常用内置函数
round():四舍五入 # 省略 ndigits print(round(3.14)) # 输出 3(int) print(round(3.66)) # 输出 4# 指定 ndigits print(round(3.14159, 2)) # 输出 3.14(float) print(round(3.666, 2)) # 输出 3.67# …...

2026年一键生成论文工具对比实测:5款神器从选题到格式全流程护航
写论文的焦虑,是每个科研人和学生都心照不宣的“隐形压力”。选题无从下手,文献检索耗时费力,逻辑框架反复推翻,格式排版让人抓狂,查重降重更是像在和系统玩“猫鼠游戏”。2026年的AI工具早已不是过去那种“打字机”&a…...

基于Arduino与蓝牙模块的六路无线开关控制系统设计与实现
1. 项目概述:用手机蓝牙控制六路LED想不想把手机变成一个无线遥控器,随手一点就能开关家里的灯带、氛围灯,甚至是其他电器?这个项目就是为你准备的。它基于一块功能增强的Arduino兼容板——GlowDuino Uno,配合一个极其…...
)
用ESP32-C3的PWM做个RGB呼吸灯吧:从配置结构体到色彩渐变(乐鑫ESP-IDF实战)
ESP32-C3 RGB呼吸灯实战:从PWM配置到色彩渐变算法 当智能家居的灯光不再只是简单的开关控制,而是能像呼吸般自然渐变时,整个空间的氛围立刻变得生动起来。ESP32-C3凭借其出色的LED PWM控制器(LEDC)外设,为开…...

OpenCore Legacy Patcher完整指南:让老旧Mac焕发新生,运行最新macOS
OpenCore Legacy Patcher完整指南:让老旧Mac焕发新生,运行最新macOS 【免费下载链接】OpenCore-Legacy-Patcher Experience macOS just like before 项目地址: https://gitcode.com/GitHub_Trending/op/OpenCore-Legacy-Patcher 你是否有一台被苹…...

【国家级攻防演练级建议】:DeepSeek私有化部署中4类隐蔽后门植入路径与实时检测方案
更多请点击: https://kaifayun.com 第一章:DeepSeek私有化部署中隐蔽后门植入的攻防对抗本质 在私有化场景下,DeepSeek模型的部署链路常跨越镜像构建、权重加载、推理服务启动及API网关接入等多个环节。攻击者可利用构建上下文污染、依赖包劫…...