diffusion model(十四): prompt-to-prompt 深度剖析
| info | |
|---|---|
| paper | Prompt-to-Prompt Image Editing with Cross Attention Control |
| github | https://github.com/google/prompt-to-prompt |
| Org: | Google Research |
| 个人复现 | https://github.com/myhz0606/diffusion_learning |
| 个人博客主页 | http://myhz0606.com/article/p2p |
1 前言
基于扩散模型(diffusion model)的图片编辑技术当下取得了飞跃的进展,涌现出了大量优秀的工作,例如:InstructPix2Pix[1]和EmuEdit[2]。这些工作致力于实现直接通过文字指令来编辑图片,极大地提升了传统图像编辑流程的效率。这种新兴的技术领域被称作基于指令的图像编辑(instruction-based image editing)。饮水思源,这类技术成功的背后,离不开Google在2022年提出的Prompt-to-Prompt(下文简称为p2p)这项工作。
为了深入理解技术细节,笔者借鉴google的开源代码对其进行复现。
2 P2P提出的Motivation
目前大火的文生图技术(text to image),给定一段文本(prompt)和随机种子,文生图模型会基于这两者生成一张图片。生成图片的不同由两个变量决定
- 随机种子。随机种子决定初始的噪声 x T x_T xT。
- prompt。prompt是通过文本编码器(如
CLIP的text encoder)转为语义向量再送入到diffusion model的cross-attention层中与图片信息交互。
假定up sampler不引入随机性,如DDIM; classifier-guidance-score; generation step是系统变量维持不变
如果我们固定了随机种子,仅微小的改变prompt,输出的图片是否相似?如果可行,那么根据这个特性,很方便的可以通过修改prompt来编辑图片了。很遗憾,事情没有那么简单。仅微小改动prompt,输出的图片也有很大差异。下图展示了固定随机种子,仅更改蛋糕种类的生成结果。

过去为了解决上述问题,Repaint[3]、Diffedit[4]在做图片编辑时,会引入一个mask,在编辑阶段,只更新mask区域的像素值,这类方法也取得了一些令人惊叹的结果,但上述方法同样存在三个问题:
- 需要手动构建mask,比较麻烦。(现在一般会接入
SAM[5]来加速这个过程) - 由于在编辑过程只修改mask区域的像素值,未考虑mask区域与非mask区域的结构信息,导致生成的图片语义连贯性较差。
- 这类方法只能实现object-level的编辑,无法实现图片风格、纹理的编辑。
在这篇文章中,作者提出了一种p2p的文字编辑方法(textual editing),无需训练任何参数、添加任何模块,仅用预训练的文生图模型(如stable diffusion)即能实现卓越的textual editing能力。下图展示了引入p2p技术后,同样的随机种子和prompt的生成结果。

下面来看p2p具体是怎么做的吧。
3 方法
3.1 什么是prompt-to-prompt 🤔
通过上面的背景和动机介绍,我们知道p2p做的是这样一件事:
给定原始图片的prompt( P \mathcal{P} P)与编辑图片的prompt ( P ∗ \mathcal{P}^* P∗),通过文生图模型,分别获得原始图片 I \mathcal{I} I与编辑后的图片 I ∗ \mathcal{I}^* I∗。 I \mathcal{I} I 与 I ∗ \mathcal{I}^* I∗除了编辑区域外尽可能的近。
举个🌰,当我输入prompt a photo of a house on a mountain.用文生图生成了一张在山上的房子的图片,现在我们想维持生成图片的整体布局,仅将其改为冬景。用p2p技术可以很方便实现,如下图所示

3.2 prompt-to-prompt的具体实现 🤔
在详细介绍p2p之前,我们先来回答motivation中的一个问题。
为什么给定了随机种子,仅微小的改变prompt,输出的图片却差异很大?
我们知道在文生图中,prompt与diffusion model是在cross-attention层进行交互(text embedding作为cross-attention的key和value)。如下图所示(灰色的块代表mask)。

📌忘记文生图条件融合的话,可以回顾 classifier-free guided的内容。
假定当prompt的第二个token发生改变时,根据下图的计算流,可以看到整个attention score的数值都会发生改变。从而导致最终输出结果发生改变。

3.2.1 cross-attention对生成图片的影响
通过对diffusion model网络内部的观察,作者发现生成图片的空间布局和几何形状都是由内部的cross-attention层的attention map决定(上图的 a t t e n \mathrm{atten} atten)。下图是由prompt: “a furry bear watching a bird”生成的图片,我们分别看每一个token对应的attention map对应生成图片的相应位置。并在time step的早期这个对应关系就已形成。


这里提供一张attention map随时间步变化的gif图。

3.2.1 controlling the cross-attention
control的思路很简单。既然cross-attention的attention map决定生成图片的结构信息,那我们维持原始的attention map即可。
p2p的整体算法流程如下图所示
每一个时间步 t t t分别计算原始prompt P \mathcal{P} P的attention map M t M_t Mt和新的prompt P ∗ \mathcal{P}^* P∗的attention map M t ∗ M^*_t Mt∗并用特定的替换规则 E d i t ( M t , M t ∗ , t ) Edit(M_t, M_t^*, t) Edit(Mt,Mt∗,t)替换后再进行生成。

作者根据不同的编辑类型,设计了不同的替换方式

(一)Word Swap
这个编辑类型是指将原始prompt中的某个token用新的token进行替换。 P = \mathcal{P} = P= “photo of a cat riding on a bicycle”, P ∗ = \mathcal{P}^* = P∗= “photo of a cat riding on a motorcycle”。此时的替换规则是
E d i t ( M t , M t ∗ , t ) : = { M t ∗ i f t < τ M t o t h e r w i s e . (1) E d i t ( M _ { t } , M _ { t } ^ { * } , t ) : = \left\{ \begin{array} { c l } { M _ { t } ^ { * } } & { \quad \mathrm { i f \ } t \lt \tau } \\ { M _ { t } } & { \quad \mathrm { o t h e r w i s e . } } \\ \end{array} \right . \tag{1} Edit(Mt,Mt∗,t):={Mt∗Mtif t<τotherwise.(1)
τ \tau τ表示某一时间步。当时间步小于 τ \tau τ时不做替换,否则用原始prompt的attention map做替换。(当两个词的长度不同时,可以对少的进行复制)引入 τ \tau τ的目的是:有一些编辑对图像的几何改变会很大,可以通过引入控制时机 τ \tau τ来缓和。Word Swap的编辑形式可以很方便的对图片中某个物体进行局部编辑。

(二)Adding a New Phrase
指的是在原始prompt P \mathcal{P} P新增一些token。如 P = \mathcal{P}= P= “a photo of a house on a mountain”, P ∗ = \mathcal{P}^* = P∗= “a photo of a house on a mountain at winter”。
( E d i t ( M t , M t ∗ , t ) ) i , j : = { ( M t ∗ ) i , j i f A ( j ) = N o n e ( M t ) i , A ( j ) o t h e r w i s e . (2) ( E d i t ( M _ { t } , M _ { t } ^ { * } , t ) ) _ { i , j } : = \left \{ \begin{array} { l l } { { ( M _ { t } ^ { * } ) _ { i , j } } } & { { \mathrm { i f } \ A ( j ) = N o n e } } \\ { { ( M _ { t } ) _ { i , A ( j ) } } } & { { \mathrm { o t h e r w i s e } . } } \end{array} \right . \tag{2} (Edit(Mt,Mt∗,t))i,j:={(Mt∗)i,j(Mt)i,A(j)if A(j)=Noneotherwise.(2)
i i i 表示visual token的索引位置, j j j 表示 P ∗ \mathcal{P}^* P∗中text token 的索引位置; A ( j ) A(j) A(j)表示, P ∗ \mathcal{P}^* P∗的text token j j j 在 P \mathcal{P} P中的索引位置。这种类型的control同样可以引入word swap中的 τ \tau τ来控制control的时机。用这个方法可以对图像进行全局的编辑,如下面例子的改变风格整体图片的风格为“winter”。

(三)Attention Re–weighting
基于p2p还可以精细的控制prompt每一个token的控制强度。这个场景 P \mathcal{P} P和 P ∗ \mathcal{P}^* P∗是相同的,可以更改特定token的权重来控制图像。
( E d i t ( M t , M t ∗ , t ) ) i , j : = { c ⋅ ( M t ) i , j i f j = j ∗ ( M t ) i , j o f h e r w i s e . (3) ( E d i t ( M _ { t } , M _ { t } ^ { * } , t ) ) _ { i , j } : = \left \{ \begin{array} { c c } { c \cdot ( M _ { t } ) _ { i , j } } & { \mathrm { i f } \ j = j ^ { * } } \\ { ( M _ { t } ) _ { i , j } } & { \mathrm { o f h e r w i s e } . } \\ \end{array} \right . \tag{3} (Edit(Mt,Mt∗,t))i,j:={c⋅(Mt)i,j(Mt)i,jif j=j∗ofherwise.(3)

4 核心部分代码说明
diffusers.version == 0.10.0
4.1 修改cross-attention层的forward
p2p的核心是修改cross-attention层的计算方式,为此我们需要重写diffusers内部cross-attention的forward函数,引入controller.control() 来控制attention map的编辑。
def control_cross_attn_forward(self, controller: BaseController, place_in_unet):def forward(x, context: Optional[torch.Tensor] = None, mask: Optional[torch.Tensor] = None):batch_size, sequence_length, dim = x.shapeh = self.headsq = self.to_q(x)is_cross = context is not Nonecontext = context if is_cross else xk = self.to_k(context)v = self.to_v(context)q = self.reshape_heads_to_batch_dim(q)k = self.reshape_heads_to_batch_dim(k)v = self.reshape_heads_to_batch_dim(v)sim = torch.einsum("b i d, b j d -> b i j", q, k) * self.scaleif mask is not None:mask = mask.reshape(batch_size, -1)max_neg_value = -torch.finfo(sim.dtype).maxmask = mask[:, None, :].repeat(h, 1, 1)sim.masked_fill_(~mask, max_neg_value)# attention, what we cannot get enough ofattn = sim.softmax(dim=-1)# print(f"attn shape: {attn.shape}")attn = controller.control(attn, is_cross, place_in_unet) # AttentionStore时相当于将attention值缓存到controller中out = torch.einsum("b i j, b j d -> b i d", attn, v)out = self.reshape_batch_dim_to_heads(out)to_out = self.to_outif type(to_out) is torch.nn.modules.container.ModuleList:to_out = self.to_out[0] # 忽略dropoutelse:to_out = self.to_outreturn to_out(out)return forwarddef register_attention_control_mine(unet, controller):cross_attn_name_ls = []for i in unet.named_children():name, cur_module = i[:2]if cur_module.__class__.__name__ == "CrossAttention":cur_module.forward = control_cross_attn_forward(cur_module, controller, name)cross_attn_name_ls.append(name)elif hasattr(cur_module, "children"):module_ls = [(name, cur_module)]while module_ls:name, cur_module = module_ls.pop()for sub_name, sub_module in cur_module.named_children():if sub_module.__class__.__name__ == "CrossAttention":sub_module.forward = control_cross_attn_forward(sub_module,controller,f"{name}.{sub_name}")cross_attn_name_ls.append(f"{name}.{sub_name}")elif hasattr(sub_module, "children"):module_ls.append((f"{name}.{sub_name}", sub_module))controller.num_att_layers = len(cross_attn_name_ls)controller.cross_attn_name_ls = cross_attn_name_ls4.2 control attention map
controller.control() 内部的实现方式
class EditControllerMemEfficient(BaseController):def __init__(self, edit_params: EditParams,max_vis_pixel_num=MAX_VIS_PIXEL_NUM,cached_attn_info_flag=False,logger=base_logger):super(EditControllerMemEfficient, self).__init__(max_vis_pixel_num=max_vis_pixel_num, cached_attn_info_flag=cached_attn_info_flag, edit_params=edit_params, logger=logger)self.control_info_checking()def cross_attn_control(self, attn: torch.Tensor, place_in_unet: str) -> torch.Tensor:assert attn.shape[0] > 1, f"attn shape: {attn.shape}"source_replace_mask = self.replace_index_map["source_mask"]target_replace_mask = self.replace_index_map["target_mask"]source_token_weight = self.replace_index_map["source_token_weight"]target_token_weight = self.replace_index_map["target_token_weight"]if self.do_cross_attn_control_flag:attn = rearrange(attn, "(b h) p c -> b h p c", b=self.batch_size)source_attn = attn[:1, ...]target_attn = attn[1:, ...]source_attn_for_merge = source_attn * source_token_weighttarget_attn = target_attn * target_token_weighttarget_attn[..., target_replace_mask] = source_attn_for_merge[..., source_replace_mask]attn = torch.cat([source_attn, target_attn], dim=0)attn = rearrange(attn, "b h p c -> (b h) p c")if self.do_local_blend and self.text_branch_flag: # local blend whatever cross controlblend_attn = attnself.set_blend_attn_map(place_in_unet, True, blend_attn)return attndef self_attn_control(self, attn: torch.Tensor, place_in_unet: str) -> torch.Tensor:if attn.shape[2] <= 16 ** 2:attn = rearrange(attn, "(b h) p c -> b h p c", b=self.batch_size)source_attn = attn[:1, ...]if self.do_self_attn_control_flag:attn = source_attn.expand(self.batch_size, *source_attn.shape[1:])attn = rearrange(attn, "b h p c -> (b h) p c")return attndef control(self, attn: torch.Tensor, is_cross: bool, place_in_unet: str) -> torch.Tensor:# print(f">>>cached_attn_flag: {self.cached_attn_info_flag}")assert self.current_step is not None, f"please set current time step by 'self.set_step'!"pixel_num = attn.shape[1]if pixel_num > self.max_vis_pixel_num:self.not_control_attn_name_set.add(place_in_unet)return attnif place_in_unet not in self.cached_attn.keys():self.cached_attn[place_in_unet] = dict() if is_cross:attn = self.cross_attn_control(attn, place_in_unet)else:attn = self.self_attn_control(attn, place_in_unet)if self.cached_attn_info_flag:self.cached_attn_name_set.add(place_in_unet)if is_cross and self.do_cross_attn_control_flag:self.set_cached_attn(place_in_unet, is_cross, attn)elif is_cross and not self.do_cross_attn_control_flag:self.set_cached_attn(place_in_unet, is_cross, None)elif not is_cross and self.do_self_attn_control_flag:self.set_cached_attn(place_in_unet, is_cross, attn)else:self.set_cached_attn(place_in_unet, is_cross, None)return attn
4.3 支持的编辑方式
代码中通过EditParams类来指定编辑的参数
class EditParams:source_prompt: strtarget_prompt: strcross_merge_end_step: Union[float, int] # cross attention merge step, 0-(cross_merge_step * diffusion step) using cross-attn injection self_merge_end_step: Union[float, int] # self attention merge step, 0-(self_merge_step * diffusion step) using self-attn injectioncross_merge_start_step: Union[float, int] = 0 # cross attention merge step, 0-(cross_merge_step * diffusion step) using cross-attn injectionself_merge_start_step: Union[float, int] = 0 # self attention merge step, 0-(self_merge_step * diffusion step) using self-attn injectionaddition_token_control_info: Optional[Dict] = Nonedo_noise_branch_control: bool = Falsedo_local_blend: bool = False # using local blendblend_focus_text: Optional[List] = None
5 One More Thing
5.1 p2p with additional constraints
的edit能力通过引入以下3个约束还能进一步提升
- self attention的约束
将原始图片在self attention处的attention map迁移给编辑图片,非编辑区域维持性会更强。详细可见pnp[7]论文。
下图展现了当使用self- attention control时的编辑效果。应用的步长越多,非edit区域的维持性越好。
source prompt: "a photo of a house on a mountain.”
target_prompt: "a photo of a house on a mountain at winter"

同样,有一些编辑对图像的几何改变会很大,不宜控制过多

- 引入local blend
仅更改需要编辑区域的pixel,保留其它区域的pixel。编辑区域的mask为token对应的attention map。底层原理可见repaint[8] paper。
如:当引入“mountain”的local blend限制时,只有山的区域变为雪景。

当local-blend还可以结合re-weight等编辑策略,可以实现更细粒度的控制

- noise分支引入self attention的约束
我们知道对于classifier-free的文生图,需要同时计算条件分支的噪声估计 ϵ θ ( x t , y , t ) \epsilon_{\theta}(x_t, y, t) ϵθ(xt,y,t)和非条件分支的噪声估计 ϵ θ ( x t , y = ∅ , t ) \epsilon_{\theta}(x_t, y=\empty, t) ϵθ(xt,y=∅,t) ,再通过classifier-free的方式融合。尝试发现,非条件分支引入self-attention control有助于进一步提升编辑效果(相比前面,提升不太大)。
ϵ ^ θ ( x t , y , t ) = ϵ θ ( x t , y = ∅ , t ) + s [ ϵ θ ( x t , y , t ) − ϵ θ ( x t , y = ∅ , t ) ] (4) \begin{align} \hat{\epsilon}_{\theta}(x_t, y, t)=\epsilon_{\theta}(x_t, y=\empty,t) + s[\epsilon_{\theta}(x_t, y, t) - \epsilon_{\theta}(x_t, y=\empty, t) ] \end{align} \tag{4} ϵ^θ(xt,y,t)=ϵθ(xt,y=∅,t)+s[ϵθ(xt,y,t)−ϵθ(xt,y=∅,t)](4)
5.2 p2p for real image editing
若要采用p2p论文中的方法进行编辑需要知道两个信息:1)图片的初始噪声分布;2)图片的prompt。如果直接拿一张图过来是没有办法进行p2p进行编辑的。需要先得到以下两个信息:
1)给定或生成这张图的prompt;
2)估计出给定prompt下这张图的噪声。
在作者后续的Null-text Inversion [9]工作中对这类情形进一步研究,后续文章中将详细介绍。
参考文献
[1] InstructPix2Pix: Learning to Follow Image Editing Instructions
[2] Emu Edit: Precise Image Editing via Recognition and Generation Tasks
[3] RePaint: Inpainting using Denoising Diffusion Probabilistic Models
[4] DiffEdit: Diffusion-based semantic image editing with mask guidance
[5] Segment Anything
[6] classifier-free diffusion model
[7] Plug-and-Play Diffusion Features for Text-Driven Image-to-Image Translation
[8] RePaint: Inpainting using Denoising Diffusion Probabilistic Models
[9] Null-text Inversion for Editing Real Images using Guided Diffusion Models
相关文章:
diffusion model(十四): prompt-to-prompt 深度剖析
infopaperPrompt-to-Prompt Image Editing with Cross Attention Controlgithubhttps://github.com/google/prompt-to-promptOrg:Google Research个人复现https://github.com/myhz0606/diffusion_learning个人博客主页http://myhz0606.com/article/p2p 1 前言 基于扩散模型&a…...
)
线性表的顺序表示(顺序表)
静态分配: #include <stdbool.h> #include <stdio.h>typedef int ElementType;#define MaxSize 50 typedef struct {ElementType data[MaxSize];int length; }SqList;//初始化 //SqList L; void InitList(SqList L) {L.length 0; }//插入 bool ListIn…...

矩阵A的LU分解
文章目录 1. 矩阵的逆矩阵1.1 AB的逆矩阵1.2 转置矩阵 2. 2X2矩阵A消元3. 3X3矩阵A消元4. 运算量5. 置换矩阵-左行右列 本文主要目的是为了通过矩阵乘法实现矩阵A的分解。 1. 矩阵的逆矩阵 1.1 AB的逆矩阵 假设A,B矩阵都可逆 A ( B B − 1 ) A − 1 I (1) A(BB^{-1})A^{-1}…...

深入了解Flutter中Future的全部工厂方法及使用
在Flutter中,Future是一种表示异步操作结果的对象。它代表了一个可能已经完成或尚未完成的计算,可以用来处理异步任务。Flutter提供了多种工厂方法来创建Future对象,每种方法都有其特定的用途和优势。在本文中,我们将深入探讨Flut…...

python的BBS论坛系统flask-django-nodejs-php
为了更好地发挥本系统的技术优势,根据BBS论坛系统的需求,本文尝试以B/S架构设计模式中的django/flask框架,python语言为基础,通过必要的编码处理、BBS论坛系统整体框架、功能服务多样化和有效性的高级经验和技术实现方法ÿ…...
vulnhub-----pWnOS1.0靶机
文章目录 1.信息收集2.漏洞测试3.爆破hash4.提权 首先拿到一台靶机,就需要知道靶机的各种信息(IP地址,开放端口,有哪些目录,什么框架,cms是什么,网页有什么常见的漏洞,如sql注入&…...

vue 消息左右滚动(前后无缝衔接)
演示效果 封装的组件 <!--* Author:* Date: 2024-03-21 19:21:58* LastEditTime: 2024-03-21 20:31:50* LastEditors: Please set LastEditors* Description: 消息左右滚动 --> <template><divid"textScroll"class"text-scroll"mousemove&…...
Qt如何直接处理系统事件(比如鼠标事件),而不是post事件
#include <QtGui/5.15.2/QtGui/qpa/qwindowsysteminterface.h> // 方便调试事件 QWindowSystemInterface::setSynchronousWindowSystemEvents(true); 直接再 qWindowsWndProc函数中处理 通常情况: 事件被放到一个队列中...

Web前端笔记+表单练习+五彩导航
一、笔记 表单:数据交互的一种方式 登录、注册、搜索 <from> <input type""> --- <input type"text"> --- 普通输入框,内容在一行显示 <input type"password"> --- 密码框 <input type"…...
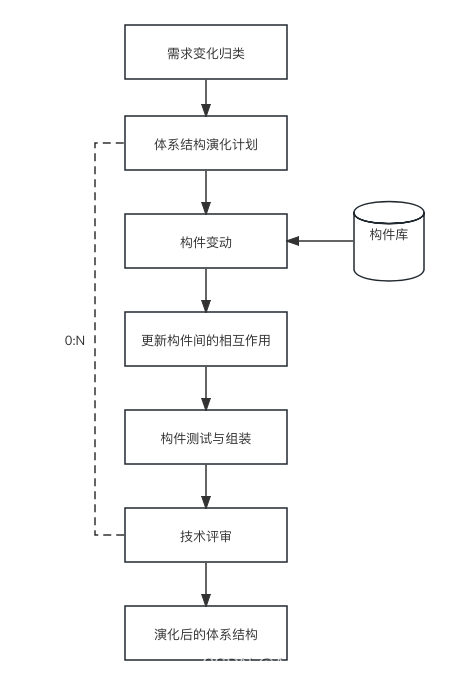
软件架构和基于架构的软件开发方法知识总结
一、软件架构定义 软件架构为软件系统提供了一个结构、行为和属性的高级抽象 软件架构是一种表达,使软件工程师能够: (1)分析设计在满足所规定的需求方面的有效性 (2)在设计变更相对容易的阶段,…...
环信新版单群聊UIKit集成指南——Android篇
前言 环信新版UIKit已重磅发布!目前包含单群聊UIKit、聊天室ChatroomUIKit,本文详细讲解Android端单群聊UIKit的集成教程。 环信单群聊 UIKit 是基于环信即时通讯云 IM SDK 开发的一款即时通讯 UI 组件库,提供各种组件实现会话列表、聊天界…...
最细致最简单的 Arm 架构搭建 Harbor
更好的阅读体验:点这里 ( www.doubibiji.com ) ARM离线版本安装 官方提供了一个 arm 版本,但是好久都没更新了,地址:https://github.com/goharbor/harbor-arm 。 也不知道为什么不更新,我看…...

mysql基础02
1.常用函数 字符串处理函数 length(str) 统计字符长度char_length(str) 统计以(单个字符为单位)的字符长度ucase/upper(str) 小写变大写lcase/lower(str) 大写变小写substr(s,start,end) 从s截start到end的字符串instr(str,"str1") str1在str的位置是? trim(str) 去…...

css的box-shadow详解
CSS的box-shadow属性用于在元素框上添加阴影效果。它可以为元素提供外阴影或内阴影,并且可以控制阴影的颜色、偏移距离、模糊半径以及扩展半径。 box-shadow属性的基本语法如下: box-shadow: h-shadow v-shadow blur spread color inset;下面是各个参数…...

递归的个人总结
递归函数(递去、回归)是函数不断的调用自己; 可以按照如下来理解:func1中调用func2,func2中调用func3; func3函数返回了,继续执行func2中的语句;func2执行完了,继续执行func1之后的…...
使用PDFBox调整PDF每页格式
目录 一、内容没有图片 二、内容有图片 maven依赖,这里使用的是pdfbox的2.0.30版本 <dependency><groupId>org.apache.pdfbox</groupId><artifactId>pdfbox</artifactId><version>2.0.30</version></dependency>…...
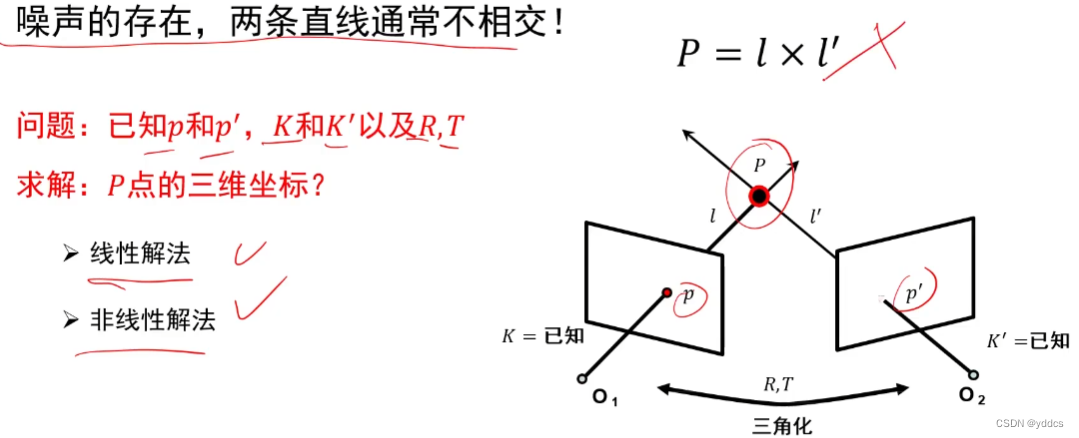
【3D reconstruction 学习笔记】
三维重建 3D reconstruction 1. 相机几何针孔相机摄像机几何 2. 相机标定线性方程组的解齐次线性方程组的解非线性方程组的最小二乘解透镜相机标定带畸变的相机标定 3. 单视图重建2D平面上的变换3D空间上的变换单视测量无穷远点 无穷远线 无穷远平面影消点 影消线单视重构 4. 三…...

(附源码)基于Spring Boot与Vue的宠物用品销售系统设计与实现
前言 💗博主介绍:✌专注于Java、小程序技术领域和毕业项目实战✌💗 👇🏻 精彩专栏 推荐订阅👇🏻 2024年Java精品实战案例《100套》 🍅文末获取源码联系🍅 ἱ…...

Qwen及Qwen-audio大模型微调项目汇总
Qwen及Qwen-audio可微调项目调研 可用来微调方法/项目汇总ps.大语言模型基础资料 可用来微调方法/项目汇总 Qwen github 项目自带的finetune脚本 可以参考https://blog.csdn.net/qq_45156060/article/details/135153920PAI-DSW中微调千问大模型(阿里云的一个产品&a…...
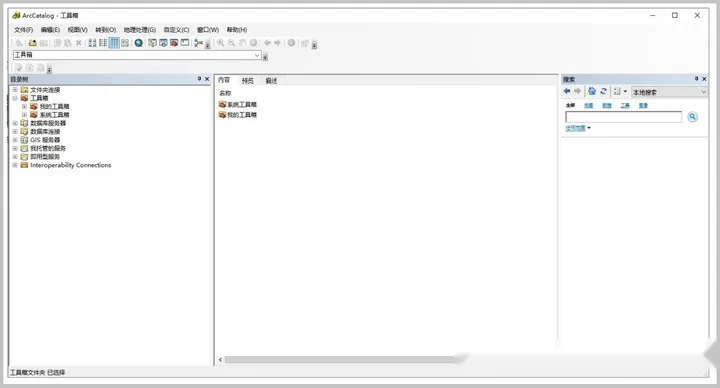
浅析ArcGis中的软件——ArcMap、ArcScene、 ArcGlobe、ArcCatalog
为什么要写这么一篇介绍ArcGis的文章呢?因为大部分人也包括ArcGisdada,在使用ArcMap应用程序创建工程时总以为我们就是使用了ArcGis这个软件的所有。其实不然,在后期的接触和使用中慢慢发现原来ArcMap只是ArcGis这个综合平台的一部分…...
实战选型指南)
别再乱用分支了!Flowable四种网关(排他/并行/包容/事件)实战选型指南
Flowable四大网关实战选型:从混乱到精准的决策艺术当你在设计一个请假审批流程时,是否遇到过这样的困惑:部门经理审批后需要同时通知HR和财务,但某些特殊情况下又需要跳过财务直接归档?这种看似简单的业务需求…...
 显卡排行榜 天梯图)
top50 BF16算力(TFLOPS) 显卡排行榜 天梯图
排名显卡型号BF16算力(TFLOPS)售价(元)单TFLOPS价格(元)1B200(SXM)45002200000488.892H200(SXM)19801200000606.063MI300X1307750000573.834H100 SXM519501100000564.105RTX PRO 6000 Blackwell1150780000678.266H100 PCIe 80GB1560850000544.877RTX 50906803400050.008A100 80…...
)
Windows 10/11系统下,SecureCRT 8.7.2保姆级安装与激活图文指南(含Keygen使用避坑点)
Windows平台SecureCRT 8.7.2全流程部署与安全配置指南在当今远程运维与网络管理的日常工作中,一款可靠的终端仿真工具如同工程师的瑞士军刀。作为行业标杆的SecureCRT,其8.7.2版本在Windows 10/11环境下的部署却常让新手陷入各种技术陷阱——从安装路径选…...

华硕笔记本终极性能控制指南:用G-Helper完全替代Armoury Crate
华硕笔记本终极性能控制指南:用G-Helper完全替代Armoury Crate 【免费下载链接】g-helper Lightweight Armoury Crate alternative for Asus laptops with nearly the same functionality. Works with ROG Zephyrus, Flow, TUF, Strix, Scar, ProArt, Vivobook, Zen…...

DragonBones与Godot集成:骨骼动画的可编程化实践
1. 为什么在Godot里用DragonBones不是“锦上添花”,而是“绕不开的刚需” 去年上线一个横版动作手游Demo时,美术团队交来一套20个角色、每个角色含8套动画(待机/跑动/跳跃/攻击/受击/死亡/闪避/必杀)的Spine资源。我兴冲冲导入God…...

破解材料数据荒:合成数据与随机森林预测聚合物阻燃性能
1. 项目概述与核心挑战在材料研发领域,尤其是涉及公共安全的聚合物阻燃性研究,传统实验方法正面临巨大瓶颈。想象一下,你是一位材料工程师,需要设计一种用于高铁内饰或高层建筑电缆护套的新型聚合物,其阻燃性能必须满足…...

浏览器指纹识别机制深度剖析与反识别技术实现
一、浏览器指纹技术基础认知1.1 浏览器指纹的核心定义在数字化时代,每一台接入互联网的设备都会留下独特的数字标识,浏览器指纹便是其中最关键的识别凭证之一。浏览器指纹是网站通过 JavaScript 脚本、HTTP 请求头、硬件接口调用等多种技术手段ÿ…...

Matlab,plot绘图如何添加边框
matlab生成的图——编辑(E)——坐标区属性(A)——框样式——Box,勾选效果:...

简单学习 --> SSE
我们使用AI时,AI对我们说的话不会一次性把全部内容弹出来,而是会像流水一样,一点点吐出来,那么这种丝滑的交互体验,背后的核心就是 SSE (Server-Sent Events)。 什么是 SSE? SSE(Server-Sent …...

3个实用场景教你轻松解锁网易云音乐NCM加密文件:ncmdumpGUI完整指南
3个实用场景教你轻松解锁网易云音乐NCM加密文件:ncmdumpGUI完整指南 【免费下载链接】ncmdumpGUI C#版本网易云音乐ncm文件格式转换,Windows图形界面版本 项目地址: https://gitcode.com/gh_mirrors/nc/ncmdumpGUI 你是否曾经下载了网易云音乐的…...