arm 解决Rk1126 画框颜色变色问题(RGB转NV12)
在Rv1126上直接对Nv12图像进行绘制时,颜色是灰色。故将Nv12转BGR后绘制图像,绘制完成后转成Nv12,BGR的图像颜色是正常的,但是NV12的图像颜色未画全,如图: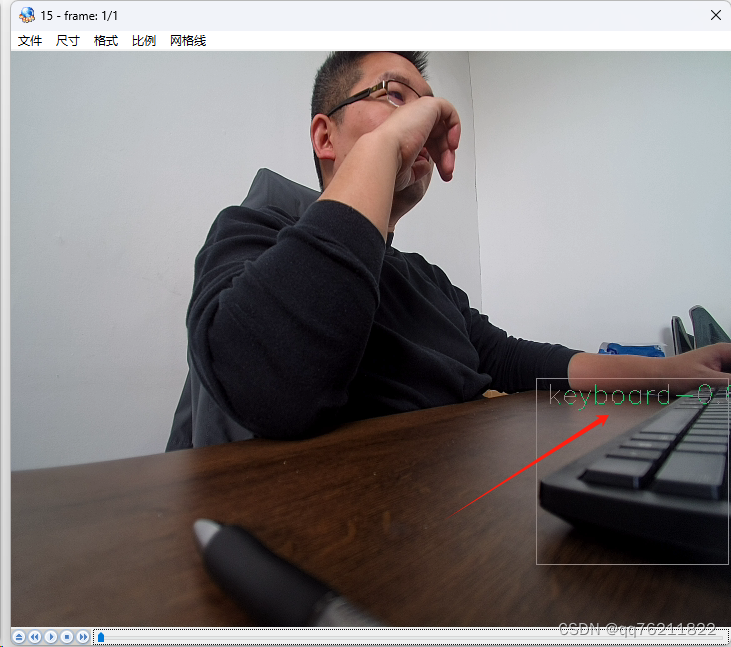
1.排查发现是RGB转NV12的函数出现问题,故百度找到一个可用的网址:RGB转换为NV12的代码_rgb转nv12-CSDN博客
//https://software.intel.com/en-us/node/503873
//YCbCr Color Model:
//    The YCbCr color space is used for component digital video and was developed as part of the ITU-R BT.601 Recommendation. YCbCr is a scaled and offset version of the YUV color space.
//    The Intel IPP functions use the following basic equations [Jack01] to convert between R'G'B' in the range 0-255 and Y'Cb'Cr' (this notation means that all components are derived from gamma-corrected R'G'B'):
//    Y' = 0.257*R' + 0.504*G' + 0.098*B' + 16
//    Cb' = -0.148*R' - 0.291*G' + 0.439*B' + 128
//    Cr' = 0.439*R' - 0.368*G' - 0.071*B' + 128//Y' = 0.257*R' + 0.504*G' + 0.098*B' + 16
static float Rgb2Y(float r0, float g0, float b0)
{float y0 = 0.257f*r0 + 0.504f*g0 + 0.098f*b0 + 16.0f;return y0;
}//U equals Cb'
//Cb' = -0.148*R' - 0.291*G' + 0.439*B' + 128
static float Rgb2U(float r0, float g0, float b0)
{float u0 = -0.148f*r0 - 0.291f*g0 + 0.439f*b0 + 128.0f;return u0;
}//V equals Cr'
//Cr' = 0.439*R' - 0.368*G' - 0.071*B' + 128
static float Rgb2V(float r0, float g0, float b0)
{float v0 = 0.439f*r0 - 0.368f*g0 - 0.071f*b0 + 128.0f;return v0;
}//Convert two rows from RGB to two Y rows, and one row of interleaved U,V.
//I0 and I1 points two sequential source rows.
//I0 -> rgbrgbrgbrgbrgbrgb...
//I1 -> rgbrgbrgbrgbrgbrgb...
//Y0 and Y1 points two sequential destination rows of Y plane.
//Y0 -> yyyyyy
//Y1 -> yyyyyy
//UV0 points destination rows of interleaved UV plane.
//UV0 -> uvuvuv
static void Rgb2NV12TwoRows(const unsigned char I0[],const unsigned char I1[],int step,const int image_width,unsigned char Y0[],unsigned char Y1[],unsigned char UV0[])
{int x;  //Column index//Process 4 source pixels per iteration (2 pixels of row I0 and 2 pixels of row I1).for (x = 0; x < image_width; x += 2){//Load R,G,B elements from first row (and convert to float).float r00 = (float)I0[x*step + 0];float g00 = (float)I0[x*step + 1];float b00 = (float)I0[x*step + 2];//Load next R,G,B elements from first row (and convert to float).float r01 = (float)I0[x*step + step+0];float g01 = (float)I0[x*step + step+1];float b01 = (float)I0[x*step + step+2];//Load R,G,B elements from second row (and convert to float).float r10 = (float)I1[x*step + 0];float g10 = (float)I1[x*step + 1];float b10 = (float)I1[x*step + 2];//Load next R,G,B elements from second row (and convert to float).float r11 = (float)I1[x*step + step+0];float g11 = (float)I1[x*step + step+1];float b11 = (float)I1[x*step + step+2];//Calculate 4 Y elements.float y00 = Rgb2Y(r00, g00, b00);float y01 = Rgb2Y(r01, g01, b01);float y10 = Rgb2Y(r10, g10, b10);float y11 = Rgb2Y(r11, g11, b11);//Calculate 4 U elements.float u00 = Rgb2U(r00, g00, b00);float u01 = Rgb2U(r01, g01, b01);float u10 = Rgb2U(r10, g10, b10);float u11 = Rgb2U(r11, g11, b11);//Calculate 4 V elements.float v00 = Rgb2V(r00, g00, b00);float v01 = Rgb2V(r01, g01, b01);float v10 = Rgb2V(r10, g10, b10);float v11 = Rgb2V(r11, g11, b11);//Calculate destination U element: average of 2x2 "original" U elements.float u0 = (u00 + u01 + u10 + u11)*0.25f;//Calculate destination V element: average of 2x2 "original" V elements.float v0 = (v00 + v01 + v10 + v11)*0.25f;//Store 4 Y elements (two in first row and two in second row).Y0[x + 0]    = (unsigned char)(y00 + 0.5f);Y0[x + 1]    = (unsigned char)(y01 + 0.5f);Y1[x + 0]    = (unsigned char)(y10 + 0.5f);Y1[x + 1]    = (unsigned char)(y11 + 0.5f);//Store destination U element.UV0[x + 0]    = (unsigned char)(u0 + 0.5f);//Store destination V element (next to stored U element).UV0[x + 1]    = (unsigned char)(v0 + 0.5f);}
}//Convert image I from pixel ordered RGB to NV12 format.
//I - Input image in pixel ordered RGB format
//image_width - Number of columns of I
//image_height - Number of rows of I
//J - Destination "image" in NV12 format.//I is pixel ordered RGB color format (size in bytes is image_width*image_height*3):
//RGBRGBRGBRGBRGBRGB
//RGBRGBRGBRGBRGBRGB
//RGBRGBRGBRGBRGBRGB
//RGBRGBRGBRGBRGBRGB
//
//J is in NV12 format (size in bytes is image_width*image_height*3/2):
//YYYYYY
//YYYYYY
//UVUVUV
//Each element of destination U is average of 2x2 "original" U elements
//Each element of destination V is average of 2x2 "original" V elements
//
//Limitations:
//1. image_width must be a multiple of 2.
//2. image_height must be a multiple of 2.
//3. I and J must be two separate arrays (in place computation is not supported).
void Rgb2NV12(const unsigned char I[], int step,const int image_width, const int image_height,unsigned char J[])
{//In NV12 format, UV plane starts below Y plane.unsigned char *UV = &J[image_width*image_height];//I0 and I1 points two sequential source rows.const unsigned char *I0;  //I0 -> rgbrgbrgbrgbrgbrgb...const unsigned char *I1;  //I1 -> rgbrgbrgbrgbrgbrgb...//Y0 and Y1 points two sequential destination rows of Y plane.unsigned char *Y0;    //Y0 -> yyyyyyunsigned char *Y1;    //Y1 -> yyyyyy//UV0 points destination rows of interleaved UV plane.unsigned char *UV0; //UV0 -> uvuvuvint y;  //Row index//In each iteration: process two rows of Y plane, and one row of interleaved UV plane.for (y = 0; y < image_height; y += 2){I0 = &I[y*image_width*step];        //Input row width is image_width*3 bytes (each pixel is R,G,B).I1 = &I[(y+1)*image_width*step];Y0 = &J[y*image_width];            //Output Y row width is image_width bytes (one Y element per pixel).Y1 = &J[(y+1)*image_width];UV0 = &UV[(y/2)*image_width];    //Output UV row - width is same as Y row width.//Process two source rows into: Two Y destination row, and one destination interleaved U,V row.Rgb2NV12TwoRows(I0,I1,step,image_width,Y0,Y1,UV0);}
}
调用:
cv::Mat m_stJpg_640x384 = cv::imread("D:\\ImageToNv12\\111.jpg");if (!m_stJpg_640x384.empty()) {cv::cvtColor(m_stJpg_640x384, m_stJpg_640x384, COLOR_BGR2RGB);unsigned char* pData = new unsigned char[1920 * 1080 * 3];Rgb2NV12(m_stJpg_640x384.data, 3/*RGB为3,RGBA为4*/, m_stJpg_640x384.cols, m_stJpg_640x384.rows, pData);WriteFile("m.yuv", "wb+", pData, m_stJpg_640x384.cols * m_stJpg_640x384.rows * 3 / 2);delete[] pData;}相关文章:
arm 解决Rk1126 画框颜色变色问题(RGB转NV12)
在Rv1126上直接对Nv12图像进行绘制时,颜色是灰色。故将Nv12转BGR后绘制图像,绘制完成后转成Nv12,BGR的图像颜色是正常的,但是NV12的图像颜色未画全,如图: 1.排查发现是RGB转NV12的函数出现问题,…...

113 链接集10--ctrl+左键单击多选
1.ctrl左键单击多选,单击单选 精简代码 <div class"model-list"><divmousedown.prevent"handleClick(item, $event)"class"model-list-item"v-for"item in modelList":key"item.id":class"{ model…...
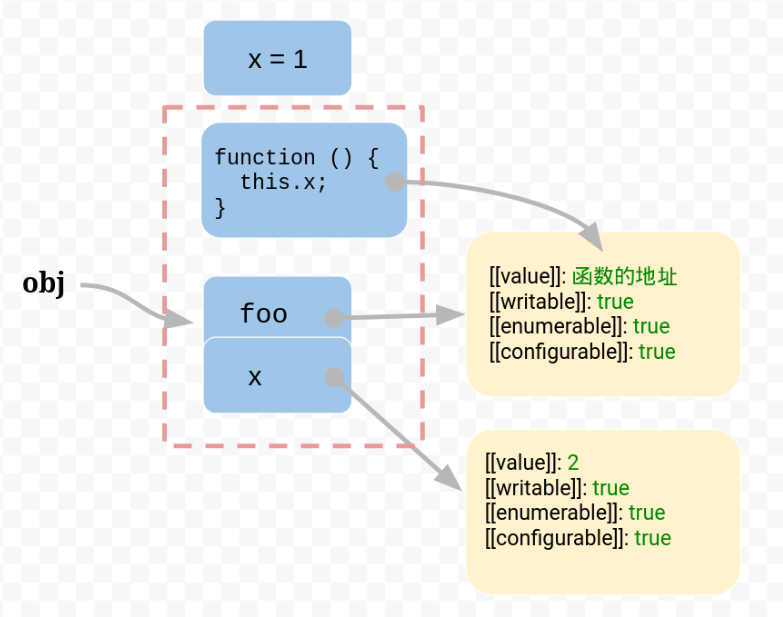
详解JavaScript中this指向
this 原理 this 是一个指针型变量,它指向当前函数的运行环境。 1.内存的数据结构 var obj { foo: 5 };2.函数 var obj { foo: function () {} };引擎会将函数单独保存在内存中,然后再将函数的地址赋值给foo属性的value属性。 由于函数是一个单独的…...

c语言之在函数中传递指针
c语言中定义一个函数,如果说是形参一个数组,这个数组在编译后会变成一个指针变量 比如下面的代码例子 #include<stdio.h> void ff(char a[]) {a[1]r;a[4]r;printf("%d\n",a); }int main() {char a[]"peogeam";ff(a);printf(…...
)
vue2 插槽(默认插槽 slot 、具名插槽 v-slot 、作用域插槽 slot-scope -- 插槽传值 )
插槽:用于在子组件的指定位置插入指定内容,类似在电梯里挂的若干广告显示屏,可以给指定的位置传入指定的广告 单插槽(匿名/默认插槽) 父组件中( 此时的 ) <Child><template><p…...
单机转 RAC:19C 单机 到 19C RAC)
(第79天)单机转 RAC:19C 单机 到 19C RAC
前言 单机转 RAC 分为两种: 同版本迁移:可以使用 RMAN 或者 ADG 方式升级迁移:建议使用数据泵 或者 XTTS 方式升级迁移使用数据泵的方式与 (第72天)数据泵升级:11GR2 到 19C 步骤基本一致,这里不作演示,只演示使用 ADG 来进行同版本迁移。 升级前准备 本次测试尽量按…...

Spring Cloud微服务Actuator和Vue
目录 前言一、引入Actuator依赖二、暴露Actuator端点1. 配置文件2. 监控端点 三、自定义健康检查自定义健康检查类 四、vue前端代码五、监控器的优势六、监控指标的可视化1. Grafana2. Prometheus 七、安全性考虑安全配置示例 八、总结 前言 随着微服务架构的流行,…...
Iterator对象功能学习
package config;import java.util.Iterator; import java.util.Properties; import java.util.Set;/*** 这个类演示了如何使用Properties类来存储和访问键值对。* Properties类继承自Hashtable,因此它可以用来存储键值对数据,且支持同步。*/ public clas…...

Linux的一些基本指令
目录 前言: 1.以指令的形式登录 2.ls指令 语法: 功能: 常用选项: 3.pwd指令 4.cd指令 4.1 绝对路径与相对路径 4.2 cd .与cd ..(注意cd后先空格,然后两个点是连一起的࿰…...

【tips】Git使用指南
文章目录 一、Git介绍1. 什么是Git2.Git对比SVN3.Git安装 二.Git常用命令1. git config2. 初始化本地库3. 工作区、暂存区和版本库4. git add5. git commit6. git reset 与 git revertgit resetgit revert 三. Git 分支1.初识分支2.创建分支3.切换分支4.合并分支5.删除分支 四.…...

【字节序】
字节序 高字节(低字节)高地址(低地址)大端模式(小端模式) 高字节(低字节) 一个16位(双字节)的数据,比如0xAABB,那么高位字节就是0xAA,低位是0xBB …...
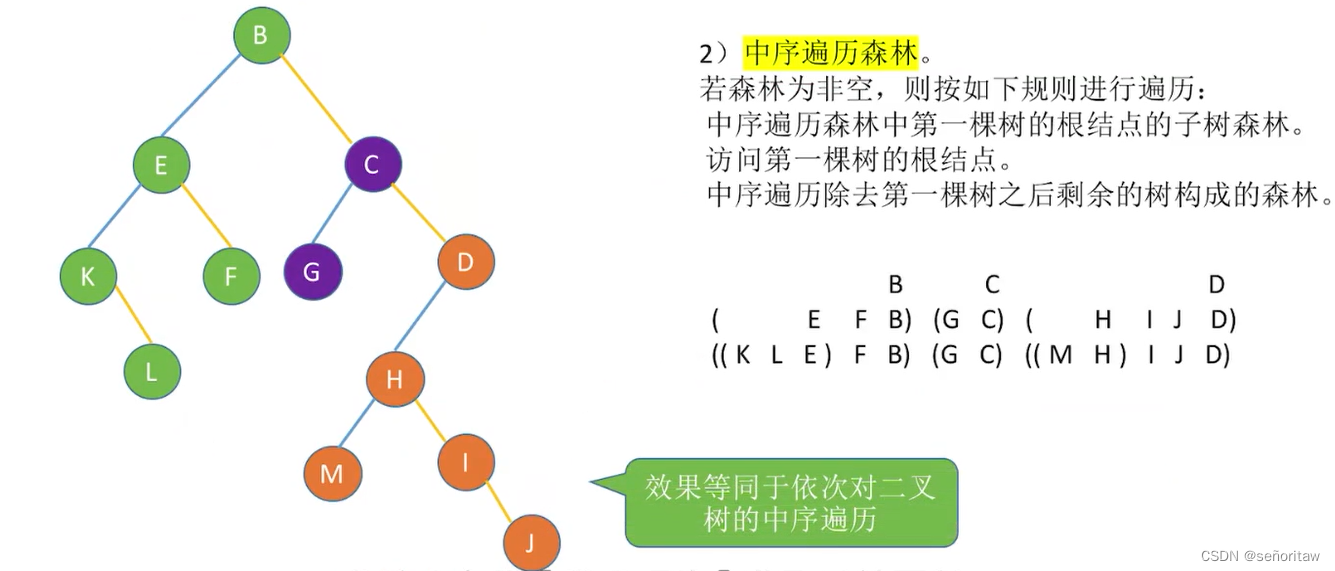
数据结构(五)——树森林
5.4 树和森林 5.4.1 树的存储结构 树的存储1:双亲表示法 用数组顺序存储各结点,每个结点中保存数据元素、指向双亲结点(父结点)的“指针” #define MAX_TREE_SIZE 100// 树的结点 typedef struct{ElemType data;int parent; }PTNode;// 树的类型 type…...
vscode配置c/c++调试环境
本文记录win平台使用vscode远程连接ubuntu server服务器下,如何配置c/c调试环境。 过程 1. 服务器配置编译环境 这里的前置条件是vscode已经能够连接到服务器,第一步安装编译构建套件(gcc、g、make、链接器等)和调试器…...

食品输送带的材质
食品输送带的材质:确保安全与卫生的关键选择 在食品生产和加工过程中,食品输送带扮演着至关重要的角色。它负责将原材料、半成品和成品在各个环节之间进行有效传输,确保生产流程的顺畅进行。然而,在食品行业中,输送带…...

普通用户权限运行Docker
普通用户权限运行Docker 安装Docker Docker的安装比较简单,在Docker官网已经给出了具体的方案,可以直接使用apt安装 # Add Dockers official GPG key: sudo apt-get update sudo apt-get install ca-certificates curl sudo install -m 0755 -d /etc/…...

7.Java并发编程—掌握线程池的标准创建方式和优雅关闭技巧,提升任务调度效率
文章目录 线程池的标准创建方式线程池参数1.核心线程(corePoolSize)2.最大线程数(maximumPoolSize)3.阻塞队列(BlockingQueue) 向线程提交任务的两种方式1.execute()1.1.案例-execute()向线程池提交任务 2.submit()2.1.submit(Callable<T> task)2.2.案例-submit()向线程池…...

从边缘设备丰富你的 Elasticsearch 文档
作者:David Pilato 我们在之前的文章中已经了解了如何丰富 Elasticsearch 本身和 Logstash 中的数据。 但如果我们可以从边缘设备中做到这一点呢? 这将减少 Elasticsearch 要做的工作。 让我们看看如何从具有代理处理器的 Elastic 代理中执行此操作。 E…...

day29|leetcode|C++|491. 非递减子序列|46. 全排列|47. 全排列 II
Leetcode 491. 非递减子序列 链接:491. 非递减子序列 thought: 设 stack 中最后一个值的位置为 last。如果 stack 为空,则 last -1。 设当前正在处理的位置为 pos。如果在 nums 的子区间 [last1, pos) 中,存在和 nums[pos] 相同的值&…...

[Java、Android面试]_12_java访问修饰符、抽象类和接口
文章目录 1. java访问修饰符2. 抽象类和接口2.1 抽象类2.2 接口2.3 抽象类和接口的区别 本人今年参加了很多面试,也有幸拿到了一些大厂的offer,整理了众多面试资料,后续还会分享众多面试资料。 整理成了面试系列,由于时间有限&…...
Linux:Prometheus的源码包安装及操作(2)
环境介绍 三台centos 7系统,运行内存都2G 1.prometheus监控服务器:192.168.6.1 主机名:pm 2.grafana展示服务器:192.168.6.2 主机名:gr 3.被监控服务器:192.168.6.3 …...
 —— STM32的SPI外设)
STM32单片机学习(28) —— STM32的SPI外设
文章目录概述SPI通信的移位机制(以bit为单位)SPI外设框图第一部分:数据通路SPI通信的数据帧格式SPI外设移位机制(以字节为单位)第二部分:主机时钟生成器SPI通信时钟频率与传输速率第三部分:主从…...

艾尔登法环帧率解锁终极指南:告别卡顿,畅享丝滑游戏体验
艾尔登法环帧率解锁终极指南:告别卡顿,畅享丝滑游戏体验 【免费下载链接】EldenRingFpsUnlockAndMore A small utility to remove frame rate limit, change FOV, add widescreen support and more for Elden Ring 项目地址: https://gitcode.com/gh_m…...

如何从零构建智能FOC轮腿机器人:完整开源硬件系统终极指南
如何从零构建智能FOC轮腿机器人:完整开源硬件系统终极指南 【免费下载链接】foc-wheel-legged-robot Open source materials for a novel structured legged robot, including mechanical design, electronic design, algorithm simulation, and software developme…...

基于Arduino的智能蓝调节拍器:DIY音乐练习伴侣
1. 项目概述:一个能“演奏”蓝调的低成本节拍器玩乐器的人,对节拍器这东西又爱又恨。它像一位严厉的监工,用单调的“嘀嗒”声强迫你跟上节奏。但你想过没有,这个监工其实可以很有趣?几年前,我在练习蓝调吉他…...

AI IDE 革命:程序员正在被重新定义
很多开发者第一次使用 Cursor 的 CtrlK 或 Composer(高级多文件编辑模式)时,都会有一种强烈的、甚至让人有些脊背发凉的冲击感。 因为: 它已经不再是那个我们熟悉的、只能在原地等待光标落下的: “代码自动补全插件&am…...

TorchDynamo与TorchInductor:PyTorch编译器生态的完整解析
TorchDynamo与TorchInductor:PyTorch编译器生态的完整解析 【免费下载链接】torchdynamo A Python-level JIT compiler designed to make unmodified PyTorch programs faster. 项目地址: https://gitcode.com/gh_mirrors/to/torchdynamo TorchDynamo 是一个…...

3分钟告别英文恐惧:Android Studio中文界面轻松切换指南
3分钟告别英文恐惧:Android Studio中文界面轻松切换指南 【免费下载链接】AndroidStudioChineseLanguagePack AndroidStudio中文插件(官方修改版本) 项目地址: https://gitcode.com/gh_mirrors/an/AndroidStudioChineseLanguagePack 你是否曾经因…...

Unity塔防底层架构:ScriptableObject驱动的数据契约设计
1. 这不是“又一个塔防模板”,而是塔防开发的底层操作系统我第一次在Asset Store点开Tower Defense Toolkit 4(TDTK-4)的预览图时,下意识划走了——界面太“干净”了,没有炫酷的粒子特效演示,没有满屏飞舞的…...

如何快速定制Office界面:终极开源工具使用指南
如何快速定制Office界面:终极开源工具使用指南 【免费下载链接】office-ribbonx-editor An overhauled fork of the original Custom UI Editor for Microsoft Office, built with WPF 项目地址: https://gitcode.com/gh_mirrors/of/office-ribbonx-editor O…...
)
从数据到模型:手把手教你预处理MPIIFaceGaze和EyeDiap数据集(Python实战)
从数据到模型:手把手教你预处理MPIIFaceGaze和EyeDiap数据集(Python实战)当你第一次打开MPIIFaceGaze或EyeDiap数据集的压缩包时,那种面对杂乱文件夹和神秘.mat文件的迷茫感,我太熟悉了。作为计算机视觉工程师…...