uniapp蓝牙打印图片
前言
这是个蓝牙打印图片的功能,业务是打印界面固定的demo范围,这里通过html2canvas插件生成的图片base64,然后图片base64绘制到canvas中去后,获取canvas中的像素信息,然后对像素信息进行一个灰度值处理,灰度值处理后再进行黑白值的处理,然后再根据蓝牙机需要通过图片的宽高比例进行一个二维数组的生成等等,一番数据处理后,将数据转换为buffer格式 ,因为蓝牙一次只能发20字节所以采用递归方式发送。
采用贴纸打印的话,需要使用黑标指令发送固定数据给蓝牙一次,打印机会蜂鸣,目的是打印内容完后,自动切换下一个纸准备,不会仍旧在当前纸打印。
这里用的是南方鸿志科技的58mm热敏打印机,
总结:打印的view视图范围中有文字有图片,其中图片是base64格式是正常运行的,如果是本地图片会发现html2canvas在app端无法处理。
- 搜索连接蓝牙界面
- 蓝牙打印界面
- 引用组件界面
搜索连接蓝牙界面
<template><view class="content"><button type="default" @click="bluetoothInit">搜寻蓝牙设备</button><button @click="goPrint">跳转打印界面</button><uni-search-bar  :focus="true" v-model="searchValue"  @input="input"@cancel="cancel" @clear="clear"></uni-search-bar><view class="list"><view class="item" v-for="(item,index) in bluetoothList" :key="index"><text class="name">{{item.name}}----{{item.deviceId}}</text><view class="btns" @click="connect(item)">点击连接</view></view></view></view>
</template><script>export default {data() {return {bluetoothList: [], //蓝牙列表searchValue:""}},onshow() {},created() {},methods: {input(e){console.log(e);let bluetoothList=uni.getStorageSync('bluetoothList');this.bluetoothList=bluetoothList.filter(element=>{return element.name.includes(e)})console.log(this.bluetoothList);},cancel(){this.bluetoothList=uni.getStorageSync('bluetoothList');},clear(){this.bluetoothList=uni.getStorageSync('bluetoothList');},goPrint(){uni.navigateTo({url:'/pages/Print/Print'})},//点击连接设备connect(device) {uni.showModal({title: device.name,content: '确定连接此设备?',success: (res => {if (res.confirm) {uni.setStorageSync("DeviceID", device.deviceId) //把已经连接的蓝牙设备信息放入缓存this.DeviceID = device.deviceIdlet DeviceID = device.deviceId //这里是拿到的uuidthis.StopBluetoothDevicesDiscovery() //当找到匹配的蓝牙后就关掉蓝牙搜寻,因为蓝牙搜寻很耗性能console.log("匹配到的蓝牙this.DeviceID:", this.DeviceID)this.CreateBLEConnection(DeviceID) //创建蓝牙连接,连接低功耗蓝牙设备	uni.showLoading({title: '正在尝试连接蓝牙...'}); 	console.log('用户点击确定');} else if (res.cancel) {console.log('用户点击取消');}})});},//蓝牙初始化bluetoothInit() {this.searchValue='';this.bluetoothList = [];uni.openBluetoothAdapter({success: (res) => {console.log('第一步初始化蓝牙成功:' + res.errMsg);// 初始化完毕开始搜索this.StartBluetoothDeviceDiscovery()},fail: (res) => {console.log('初始化蓝牙失败: ' + JSON.stringify(res));if (res.errCode == 10001) {uni.showToast({title: '蓝牙未打开',duration: 2000,})} else {uni.showToast({title: res.errMsg,duration: 2000,})}}});},/*** 第二步 在页面显示的时候判断是都已经初始化完成蓝牙适配器若成功,则开始查找设备*/StartBluetoothDeviceDiscovery() {uni.startBluetoothDevicesDiscovery({// services: ['0000FFE0'],success: res => {console.log('第二步 开始搜寻附近的蓝牙外围设备:startBluetoothDevicesDiscovery success', res)this.OnBluetoothDeviceFound();},fail: res => {uni.showToast({icon: "none",title: "查找设备失败!",duration: 3000})}});},/*** 第三步  发现外围设备*/OnBluetoothDeviceFound() {console.log("监听寻找新设备");uni.showLoading({title: '搜寻设备中...'});uni.onBluetoothDeviceFound(res => {console.log("第三步 监听寻找到新设备的事件:", JSON.stringify(res))console.log("第三步 监听寻找到新设备列表:", res.devices)let bluetoothList = [...res.devices, ...this.bluetoothList];this.bluetoothList=bluetoothList;uni.setStorageSync('bluetoothList', bluetoothList);console.log(bluetoothList);// 		res.devices.forEach(device => { //这一步就是去筛选找到的蓝牙中,有没有你匹配的名称// 			console.log("这一步就是去筛选找到的蓝牙中,有没有你匹配的名称:", JSON.stringify(device))// 			if (device.name == 'Qsprinter') { //匹配蓝牙名称// 				uni.setStorageSync("DeviceID", device.deviceId) //把已经连接的蓝牙设备信息放入缓存// 				this.DeviceID = device.deviceId// 				let DeviceID = device.deviceId //这里是拿到的uuid// 				this.StopBluetoothDevicesDiscovery() //当找到匹配的蓝牙后就关掉蓝牙搜寻,因为蓝牙搜寻很耗性能// 				console.log("匹配到的蓝牙this.DeviceID:", this.DeviceID)// 				this.CreateBLEConnection(DeviceID) //创建蓝牙连接,连接低功耗蓝牙设备// 			}// 		})setTimeout(() => {this.StopBluetoothDevicesDiscovery()}, 10000)});},/*** 第四步 停止搜索蓝牙设备*/StopBluetoothDevicesDiscovery() {uni.stopBluetoothDevicesDiscovery({success: res => {console.log("第四步 找到匹配的蓝牙后就关掉蓝牙搜寻:", JSON.stringify(res))},fail: res => {console.log('第四步 停止搜索蓝牙设备失败,错误码:' + res.errCode);},complete() {uni.hideLoading();}});},// 第五步 创建蓝牙连接,连接低功耗蓝牙设备CreateBLEConnection(DeviceID, index) {let doc = thisuni.createBLEConnection({ //创建蓝牙连接,连接低功耗蓝牙设备deviceId: DeviceID, //传入刚刚获取的uuidsuccess(res) {console.log("第五步 创建蓝牙连接成功:", JSON.stringify(res))doc.GetBLEDeviceServices(DeviceID) //获取蓝牙设备所有服务(service)。},fail(res) {console.log(res)}})},//第六步 获取蓝牙设备所有服务(service)。GetBLEDeviceServices(DeviceID, index) {let doc = thissetTimeout(function() { //这里为什么要用setTimeout呢,等等下面会解释uni.getBLEDeviceServices({ //获取蓝牙设备所有服务deviceId: DeviceID,success(res) { //为什么要用延时,因为不用延时就拿不到所有的服务,在上一步,连接低功耗蓝牙//设备的时候,需要一个600-1000毫秒的时间后,再去获取设备所有服务,不给延时就会一直返回错误码10004console.log("第六步 获取蓝牙设备所有服务:", JSON.stringify(res))uni.setStorageSync("ServiceUUID", res.services[2].uuid) //把已经连接的蓝牙设备信息放入缓存uni.setStorageSync("ServiceUUIDNew", res.services[2].uuid) //把已经连接的蓝牙设备信息放入缓存let ServiceUUIDNew = res.services[2].uuidthis.ServiceUUID = res.services[2].uuidconsole.log("this.ServiceUUID:", this.ServiceUUID);doc.GetBLEDeviceCharacteristics(DeviceID) //获取蓝牙设备某个服务中所有特征值},fail(res) {console.log(JSON.stringify(res))}})}, 1000)},// 第七步 获取蓝牙特征值GetBLEDeviceCharacteristics(DeviceID) {console.log("第七步 获取蓝牙特征值DeviceID:", DeviceID, "serviceId:", uni.getStorageSync('ServiceUUIDNew'));setTimeout(() => {let that = this;uni.getBLEDeviceCharacteristics({ //获取蓝牙设备某个服务中所有特征值deviceId: DeviceID,serviceId: uni.getStorageSync('ServiceUUIDNew'), //这个serviceId可以在上一步获取中拿到,也可以在//蓝牙文档中(硬件的蓝牙文档)拿到,我这里是通过文档直接赋值上去的,一般有两个,一个是收的uuid,一个是发的uuid,我们这边是发success(res) {console.log("第七步 获取蓝牙设备某个服务中所有特征值成功:", JSON.stringify(res))uni.showToast({title: '设备蓝牙已连接',duration: 2000});// uni.hideLoading();// #ifdef APP-IOSuni.setStorageSync("CharacteristicId", res.characteristics[0].uuid) //把某个服务中所有特征值信息放入缓存that.characteristicId = res.characteristics[0].uuidconsole.log(res);// #endif// #ifdef APP-ANDROIDuni.setStorageSync("CharacteristicId", res.characteristics[1].uuid) //把某个服务中所有特征值信息放入缓存that.characteristicId = res.characteristics[1].uuid// #endif// that.WriteBLECharacteristicValue()},fail(res) {console.log("获取蓝牙设备某个服务中所有特征值失败:", JSON.stringify(res))}})}, 2000)},}}
</script><style>.container {display: flex;flex-direction: column;align-items: center;}.row {display: flex;}.cell {width: 10px;height: 10px;margin-top: 2rpx;color: #000;/* 这里可以根据灰度值设置背景色 */}.list {margin-top: 10rpx;}.list .item {width: 97%;height: 100rpx;margin-top: 10rpx;display: flex;justify-content: space-between;align-items: center;border-bottom: 1rpx solid #ccc;}.btns {white-space: nowrap;}
</style>
蓝牙打印界面
<template><view><PrintCode ref='PrintCode' :imgUrl="imgUrl" codeType="code" :info="info"></PrintCode><button type="default" @click="btn">选中图片打印</button><button type="default" @click="btn2">黑标打印</button></view>
</template><script>export default {data() {return {imgUrl:"data:image/png;base64,iVBORw0KGgoAAAANSUhEUgAAAGQAAABkAQAAAABYmaj5AAAAtElEQVR4nJWTwYkDQRADa43/tRk4/7CcgSYC3cOfgwMfml/DCKmlFoA2FODB7/dtwlYCtR1wD64bXxGue8A9Ad7e5950PgFenHhPOGyNcdzvAgTgbHxtW2vbZtEZkJC68aVRsbLwJZiIyeILDSmCdcshmBA3Xz5Ak7jhwLSUZNTZFsm4H0IsMOXQtqaxzPtRVMYcqqTWue/AOde/P/9Mx5v6vta+9wC59r5/znvC8el7Rl9+AN59eFd5eY5PAAAAAElFTkSuQmCC",resultArray:[],info:{name:"xxxxxxxxxxxxxxxxxx",model:"1111111111112123123132312",amount:"12312312313212312123",start_use_date:'2024-2-3'}}},methods: {btn(){this.$refs.PrintCode.open()},btn2(){let value=[31, 27, 31, 128, 4, 5, 6, 68];uni.writeBLECharacteristicValue({deviceId: uni.getStorageSync('DeviceID'),// 这里的 serviceId 需要在 getBLEDeviceServices 接口中获取serviceId: uni.getStorageSync('ServiceUUIDNew'),// 这里的 characteristicId 需要在 getBLEDeviceCharacteristics 接口中获取characteristicId: uni.getStorageSync('CharacteristicId'),// 这里的value是ArrayBuffer类型value: value,success: function(res) {console.log(res);//写入成功后继续递归调用发送剩下的数据// that.sendMsg(newData)},fail: function(err) {console.log(err)},complete: function() {}})},},onShow() {uni.onBLEConnectionStateChange(function (res) {// 该方法回调中可以用于处理连接意外断开等异常情况console.log(`device ${res.deviceId} state has changed, connected: ${res.connected}`)})}}
</script>
引用组件界面
<template><view><uni-popup ref="popup" type="center"><view class="BigBox" v-if="codeType=='bar'"><image :src="imgUrl" mode="" class="barImg"></image></view><view class="BigBox2" v-else id="pagePoster"><view class="lf"><view class="">名称:{{setLength(info.name)}}</view><view class="">型号:{{setLength(info.model)}}</view><view class="">数量:{{setLength(info.amount)}}</view><view class="">投用时间:{{setLength(info.start_use_date)}}</view></view><view class="rg"><image :src="imgUrl" mode=""></image></view></view><view class="btnBox"><view class="print" v-if="codeType=='bar'" @click="printBtn">打印</view><view class="print" v-else @click="canvasImage.generateImage">打印</view><view class="close" @click="close">取消</view></view><canvas canvas-id="myCanvas" id="myCanvas" :style="{width:imgWidth,height:imgHeight}"></canvas></uni-popup></view>
</template><script>export default {name: "PrintCode",props: {imgUrl: {default: ""},codeType: {default: 'bar'},info: {type: Object}},data() {return {imgWidth: "",imgHeight: ""};},mounted() {uni.openBluetoothAdapter({success: (res) => {console.log('第一步初始化蓝牙成功:' + res.errMsg);uni.showToast({title: '蓝牙已初始化',duration: 1000});},fail: (res) => {console.log('初始化蓝牙失败: ' + JSON.stringify(res));if (res.errCode == 10001) {uni.showToast({title: '蓝牙未打开',duration: 2000,})} else {uni.showToast({title: res.errMsg,duration: 2000,})}}});},methods: {//canvas无法显示省略号,给文字添加省略号,setLength(e) {console.log(e);let text = e;if (e?.length > 8) {text = e.substring(0, 8) + '...';}return text},open() {this.$refs.popup.open('center')},close() {this.$refs.popup.close()},//二维码打印receiveSendData(val) {const ctx = uni.createCanvasContext('myCanvas', this);// 获取图片信息成功后绘制到 Canvas 上ctx.drawImage(val, 0, 0, 350, 176);// 获取绘制完成的图片数据ctx.draw(false, () => {this.imgWidth = 350 + 'px';this.imgHeight = 176 + 'px';// 将 Canvas 中的图片数据转换为灰度图像uni.canvasGetImageData({canvasId: 'myCanvas',x: 0,y: 0,width: 350,height: 176,success: (res) => {console.log(res);const imageData = res.data;console.log(imageData);this.chuli(imageData)},fail: (error) => {console.error('获取图片数据失败', error);}});});},//条码打印printBtn() {// const dcRichAlert = uni.requireNativePlugin('Yunjinginc-Print')//  dcRichAlert.printBitmap1(0,this.imgUrl,true)},//处理像素为打印机发送数据chuli(imageData) {let imgWidth = 350;let imgHeight = 176;// 将彩色图片转换为灰度图片for (let i = 0; i < imageData.length; i += 4) {const r = imageData[i];const g = imageData[i + 1];const b = imageData[i + 2];// 根据灰度公式将 RGB 值转换为灰度值const grayscale = 0.299 * r + 0.587 * g + 0.114 *b;// 将灰度值赋给 RGBimageData[i] = grayscale; // RedimageData[i + 1] = grayscale; // GreenimageData[i + 2] = grayscale; // Blue}console.log(imageData);let blackWhiteData = this.convertToBlackWhite(imageData); // 转换成黑白像素点数据console.log(blackWhiteData);this.grayscaleArray = [];// 将一维数组转换为二维数组for (let i = 0; i < imgWidth; i++) {// 每一行的起始索引let startIndex = i * imgWidth;// 每一行的灰度值数据let row = blackWhiteData.slice(startIndex,startIndex + imgWidth);// 将当前行添加到二维数组中this.grayscaleArray.push(row);}let originalArray = this.grayscaleArray;console.log(this.grayscaleArray);let resultArray = this.complementArr(this.grayscaleArray, imgWidth, imgHeight);//求二维数组进行24行处理时除数与余数const quotient = resultArray.length / 24; // 求次数let list = []// 对前24*n行进行处理for (let i = 0; i < quotient; i++) {const startIndex = i * 24;const endIndex = (i + 1) * 24;const rowsToProcess = originalArray.slice(startIndex, endIndex);console.log(rowsToProcess);console.log(startIndex, endIndex);list.push(this.processRows(rowsToProcess))}console.log(list);// 二维转一维let list2 = list.flat()console.log(list2);this.resultArray = list2;// 创建一个 Uint8Array 视图对象,将数组数据复制到该视图中const typedArray = new Uint8Array(this.resultArray);// 获取 typedArray 的 buffer 属性,即得到对应的 ArrayBufferconst buffer = typedArray.buffer;this.sendMsg(buffer)},//发送数据给蓝牙sendMsg(buffer) {var newData = buffer.slice(20)var writeBuffer = buffer.slice(0, 20)console.log(writeBuffer.length);if (writeBuffer.byteLength < 20) {console.log("Invalid data length. Data will not be sent.");//纸打印完了之后进行切刀,(标签纸)uni.writeBLECharacteristicValue({deviceId: uni.getStorageSync('DeviceID'),// 这里的 serviceId 需要在 getBLEDeviceServices 接口中获取serviceId: uni.getStorageSync('ServiceUUIDNew'),// 这里的 characteristicId 需要在 getBLEDeviceCharacteristics 接口中获取characteristicId: uni.getStorageSync('CharacteristicId'),// 这里的value是ArrayBuffer类型value: [27, 35, 35, 67, 84, 71, 72, 48],success: function(res) {console.log(res);},})return; // 数据无效,不发送}let that = this;console.log(uni.getStorageSync('DeviceID'));uni.writeBLECharacteristicValue({deviceId: uni.getStorageSync('DeviceID'),// 这里的 serviceId 需要在 getBLEDeviceServices 接口中获取serviceId: uni.getStorageSync('ServiceUUIDNew'),// 这里的 characteristicId 需要在 getBLEDeviceCharacteristics 接口中获取characteristicId: uni.getStorageSync('CharacteristicId'),// 这里的value是ArrayBuffer类型value: writeBuffer,writeType: 'write',success: function(res) {//写入成功后继续递归调用发送剩下的数据that.sendMsg(newData)},fail: function(err) {console.log(err)},complete: function() {}})},//补充数组complementArr(originalArray, width, height) {let originalArrayData = originalArraylet replenish = 24 - height % 24for (let i = 0; i < replenish; i++) {let arr = []for (let j = 0; j < width; j++) {arr.push(0)}originalArrayData.push(arr)}return originalArrayData},//处理数据processRows(rows) {const columnValues = [];for (let col = 0; col < rows[0].length; col++) {const values = [];for (let row = 0; row < rows.length; row++) {values.push(rows[row][col]);}// 将每列的值拆分为三份const partitionSize = Math.ceil(values.length / 3);const partitions = [];for (let i = 0; i < values.length; i += partitionSize) {partitions.push(values.slice(i, i + partitionSize));}// 将每份的值拼接成一个字符串,并转换为10进制数for (let i = 0; i < partitions.length; i++) {const binaryString = partitions[i].join('');const decimalValue = parseInt(binaryString, 2);columnValues.push(decimalValue);}}//计算 n1,n2const n2 = Math.floor((this.grayscaleArray[0]).length / 256) < 1 ? 0 : Math.floor((this.grayscaleArray[0]).length / 256); // 求除数const n1 = this.grayscaleArray[0].length % 256; // 求余数console.log(n2, n1);columnValues.unshift(27, 42, 33, n1, n2)columnValues.push(10)console.log(columnValues);return columnValues},// 根据阈值将灰度值转换为黑白像素值convertToBlackWhite(grayscaleData) {let blackWhiteData = [];for (let i = 0; i < grayscaleData.length; i += 4) {let pixel = grayscaleData[i];let bwPixel = pixel > 128 ? 0 : 1;blackWhiteData.push(bwPixel);}return blackWhiteData;},}}
</script>
<script lang="renderjs" module="canvasImage">import html2canvas from 'html2canvas'export default {data() {return {}},methods: {// 生成图片需要调用的方法generateImage(e, ownerVm) {setTimeout(() => {const dom = document.getElementById('pagePoster') // 需要生成图片内容的 dom 节点console.log(dom.clientWidth, dom.clientHeight);html2canvas(dom, {width: dom.clientWidth, //dom 原始宽度height: dom.clientHeight,scrollY: 0, // html2canvas默认绘制视图内的页面,需要把scrollY,scrollX设置为0scrollX: 0,useCORS: true //支持跨域// , // 设置生成图片的像素比例,默认是1,如果生成的图片模糊的话可以开启该配置项}).then((canvas) => {// 创建新的 Canvasvar newCanvas = document.createElement("canvas");var newContext = newCanvas.getContext("2d");// 设置新 Canvas 的宽度和高度var width = 350; // 设置新 Canvas 的宽度var height = 176; // 设置新 Canvas 的高度newCanvas.width = width;newCanvas.height = height;console.log(newCanvas.height);// 将 HTML2Canvas 生成的内容绘制到新 Canvas 中newContext.drawImage(canvas, 0, 0, width, height);// 将新 Canvas 转换为 base64 图像var base64 = newCanvas.toDataURL("image/png");console.log(base64);// 发送数据到 逻辑层ownerVm.callMethod('receiveSendData', base64)}).catch(err => {})}, 300)},}}
</script><style scoped lang="scss">.BigBox {width: 630rpx;height: auto;background: #FFFFFF;border-radius: 20rpx 20rpx 20rpx 20rpx;display: flex;justify-content: center;align-items: center;}.barImg {width: 566rpx;height: 300rpx;}.BigBox2 {width: 630rpx;height: auto;background: #FFFFFF;border-radius: 20rpx 20rpx 20rpx 20rpx;display: flex;justify-content: space-between;padding: 32rpx 25rpx;box-sizing: border-box;margin: 0 auto;.lf {width: 362rpx;view {width: 100%;white-space: nowrap;/* 禁止换行 */overflow: hidden;/* 溢出内容隐藏 */text-overflow: ellipsis;/* 显示省略号 */font-family: PingFang SC, PingFang SC;font-weight: 500;font-size: 40rpx;color: #000000;margin-top: 15rpx;font-weight: 700;}view:first-child {margin-top: 0;}}.rg {display: flex;justify-content: center;align-items: center;image {width: 204rpx;height: 204rpx;}}}.qrImg {}.print,.close {width: 48%;height: 88rpx;line-height: 88rpx;text-align: center;border-radius: 10rpx 10rpx 10rpx 10rpx;border: 2rpx solid #FFFFFF;font-family: PingFang SC, PingFang SC;font-weight: 500;font-size: 30rpx;color: #FFFFFF;margin-top: 160rpx;}.btnBox {width: 630rpx;display: flex;justify-content: space-between;margin: 0 auto;}#myCanvas {width: 350px;height: 176px;opacity: 0;}
</style>
相关文章:

uniapp蓝牙打印图片
前言 这是个蓝牙打印图片的功能,业务是打印界面固定的demo范围,这里通过html2canvas插件生成的图片base64,然后图片base64绘制到canvas中去后,获取canvas中的像素信息,然后对像素信息进行一个灰度值处理,灰…...

Ajax用法总结(包括原生Ajax、Jquery、Axois)
HTTP知识 HTTP(hypertext transport protocol)协议『超文本传输协议』,协议详细规定了浏览器和万维网服务器之间互相通信的规则。 请求报文 请求行: GET、POST /s?ieutf-8...(url的一长串参数) HTTP/1.1 请求头…...

LeetCode 题解:112. 路径总和,递归,JavaScript,详细注释
原题链接: 112. 路径总和 解题思路: 如果求根节点到叶子节点的路径上的节点值之和,假设共有3个节点,那么写成计算式是val1 val2 val3 sum那么将计算式转换就可以得到val3 sum - val1 - val2也就是说,问题可以从…...
Spring Boot的自动配置是如何工作的)
Spring (15)Spring Boot的自动配置是如何工作的
Spring Boot的自动配置是通过条件注解(如ConditionalOnClass,ConditionalOnBean等)和EnableAutoConfiguration注解来实现的。这一机制主要是为了简化配置过程,让开发者在满足特定条件时自动配置Spring应用。接下来,我们…...

【机器学习】—机器学习和NLP预训练模型探索之旅
目录 一.预训练模型的基本概念 1.BERT模型 2 .GPT模型 二、预训练模型的应用 1.文本分类 使用BERT进行文本分类 2. 问答系统 使用BERT进行问答 三、预训练模型的优化 1.模型压缩 1.1 剪枝 权重剪枝 2.模型量化 2.1 定点量化 使用PyTorch进行定点量化 3. 知识蒸馏…...
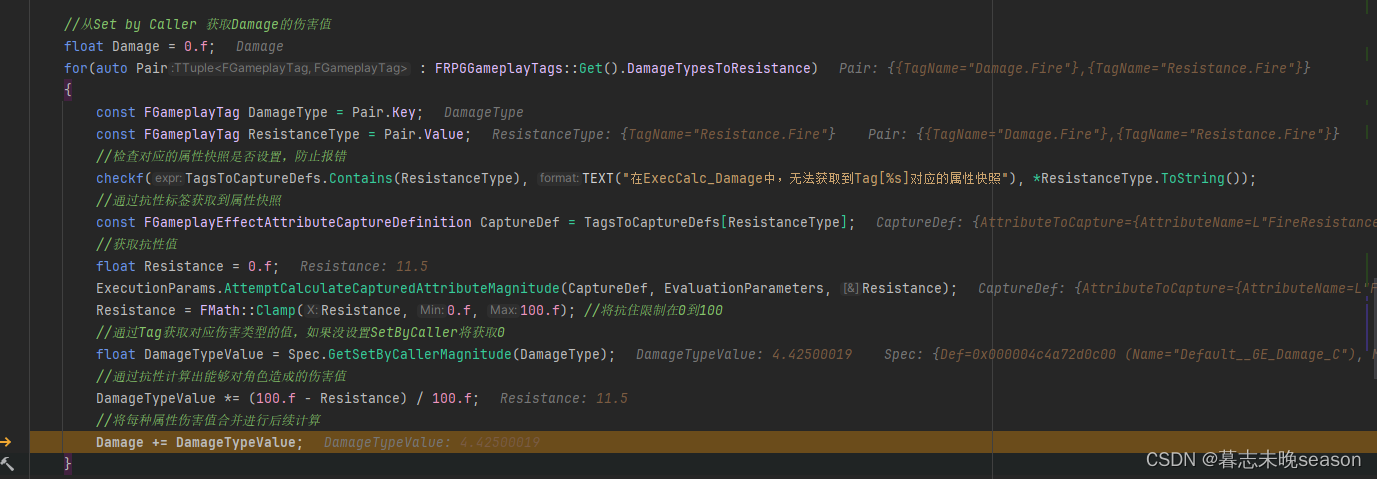
54. UE5 RPG 增加伤害类型
在正常的RPG游戏中,都存在一个类别就是属性伤害,比如,在一个游戏里面有一个火属性的技能,它造成的伤害就是火属性类型的,并且它还有可能有附加伤害,比如给予目标一个灼烧效果,每秒造成多少的火属…...

llama3 微调教程之 llama factory 的 安装部署与模型微调过程,模型量化和gguf转换。
本文记录了从环境部署到微调模型、效果测试的全过程,以及遇到几个常见问题的解决办法,亲测可用(The installed version of bitsandbytes was compiled without GPU support. NotImplementedError: Architecture ‘LlamaForCausalLM’ not sup…...

C++三剑客之std::any(二) : 源码剖析
目录 1.引言 2.std::any的存储分析 3._Any_big_RTTI与_Any_small_RTTI 4.std::any的构造函数 4.1.从std::any构造 4.2.可变参数模板构造函数 4.3.赋值构造与emplace函数 5.reset函数 6._Cast函数 7.make_any模版函数 8.std::any_cast函数 9.总结 1.引言 C三剑客之s…...
)
【C语言】8.C语言操作符详解(2)
文章目录 6.单⽬操作符7.逗号表达式8.下标访问[]、函数调⽤()8.1 [ ] 下标引⽤操作符8.2 函数调⽤操作符 9.结构成员访问操作符9.1 结构体9.1.1 结构的声明9.1.2 结构体变量的定义和初始化 9.2 结构成员访问操作符9.2.1 结构体成员的直接访问9.2.2 结构体成员的间接访问 6.单⽬…...

vivado 物理约束KEEP_HIERARCHY
KEEP_HIERARCHY Applied To Cells Constraint Values • TRUE • FALSE • YES • NO UCF Example INST u1 KEEP_HIERARCHY TRUE; XDC Example set_property DONT_TOUCH true [get_cells u1] IOB Applied To Cells Constraint Values IOB_XnYn UCF Examp…...

Linux 三十六章
🐶博主主页:ᰔᩚ. 一怀明月ꦿ ❤️🔥专栏系列:线性代数,C初学者入门训练,题解C,C的使用文章,「初学」C,linux 🔥座右铭:“不要…...

ntsd用法+安装包
ntsd是一个强大的进程终止软件,除了少数系统进程之外一律杀掉 用法 1.ntsd -c q -p 进程的pid 2.ntsd -c q -pn 进程名 记得解压到System32里面 当然,资源管理器的进程是可以杀的所以也可以让电脑黑屏 同样可以让电脑黑屏的还有taskkill /f /im 进程…...

Nacos 微服务管理
Nacos 本教程将为您提供Nacos的基本介绍,并带您完成Nacos的安装、服务注册与发现、配置管理等功能。在这个过程中,您将学到如何使用Nacos进行微服务管理。下方是官方文档: Nacos官方文档 1. Nacos 简介 Nacos(Naming and Confi…...
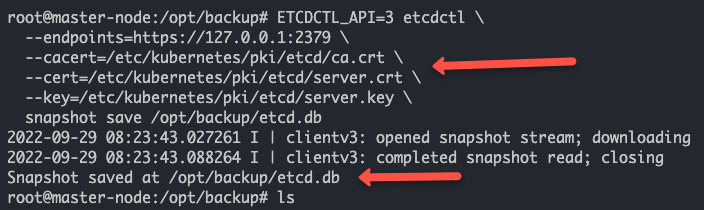
Kubernetes集群上的Etcd备份和恢复
在本教程中,您将学习如何在Kubernetes集群上使用etcd快照进行etcd备份和恢复。 在Kubernetes架构中,etcd是集群的重要组成部分。所有集群对象及其状态都存储在etcd中。为了更好地理解Kubernetes,有几点关于etcd的信息是您需要了解的。 它是…...
)
创建型模式 (Python版)
单例模式 懒汉式 class SingleTon:# 类属性_obj None # 用来存储对象# 创造对象def __new__(cls, *args, **kwargs):# 如果对象不存在,就创造一个对象if cls._obj is None:cls._obj super().__new__(cls, *args, *kwargs)# 返回对象return cls._objif __name__…...

【收录 Hello 算法】9.4 小结
目录 9.4 小结 1. 重点回顾 2. Q & A 9.4 小结 1. 重点回顾 图由顶点和边组成,可以表示为一组顶点和一组边构成的集合。相较于线性关系(链表)和分治关系(树),网络关系(图&am…...

MYSQL数据库基础语法
目录 友情提醒第一章:数据库简述1)数据库简述2)常见的数据库软件3)MySQL数据库安装和连接4)SQL语句分类①DDL(Data Definition)②DML(Data Manipulation)③DQL࿰…...
)
R实验 参数检验(二)
实验目的:掌握正态分布和二项分布中,功效与样本容量之间的关系;学会利用R软件完成一个正态总体方差和两个正态总体方差比的区间估计和检验。 实验内容: (习题5.28)一种药物可治疗眼内高压,目的…...

【Linux】进程信号及相关函数/系统调用的简单认识与使用
文章目录 前言一、相关函数/系统调用1. signal2. kill3. abort (库函数)4. raise (库函数)5. alarm 前言 现实生活中, 存在着诸多信号, 比如红绿灯, 上下课铃声…我们在接收到信号时, 就会做出相应的动作. 对于进程也是如此的, 进程也会收到来自 OS 发出的信号, 根据信号的不同…...
什么是Spring Boot)
Spring (14)什么是Spring Boot
Spring Boot是一个开源的Java基础框架,旨在简化Spring应用的创建和开发过程。Spring Boot通过提供一套默认配置(convention over configuration),自动配置和启动器(starters)来减少开发者的开发工作量和配置…...

3分钟实现GitHub界面汉化:浏览器插件让GitHub说中文
3分钟实现GitHub界面汉化:浏览器插件让GitHub说中文 【免费下载链接】github-chinese GitHub 汉化插件,GitHub 中文化界面。 (GitHub Translation To Chinese) 项目地址: https://gitcode.com/gh_mirrors/gi/github-chinese 你是否曾因GitHub的英…...

Unity IL2CPP运行时调试:Frida-il2cpp-bridge实战指南
1. 这不是“教你怎么黑游戏”,而是Unity开发者该懂的底层透视镜你有没有在调试一个Unity项目时,突然发现某个C#方法的行为和预期完全不符,但断点打进去却卡在IL2CPP生成的汇编里,连变量名都看不到了?或者你在做性能优化…...
)
KAN网络实战:5分钟看懂如何用它‘可视化’发现物理定律(以安德森定域化为例)
KAN网络:用可视化方法发现物理定律的AI协作者 在科学研究的前沿,物理学家们常常需要从海量数据中识别出隐藏的规律和模式。传统的人工智能方法虽然能够提供预测结果,却往往难以解释其内部机制,这让科学家们难以信任和验证这些&quo…...
)
Win11系统下,Java开发环境配置保姆级教程(JDK 8u201安装+环境变量避坑指南)
Win11系统Java开发环境配置全攻略:从零开始避坑指南 刚接触Java编程的新手们,面对陌生的开发环境配置往往感到无从下手。特别是对于非计算机专业背景的学习者来说,那些晦涩的术语和复杂的系统设置就像一堵高墙,让人望而生畏。本文…...

别再手动画图了!用Mermaid+Markdown在VSCode里5分钟搞定UML设计文档
用文本驱动设计:现代开发者的UML高效实践指南 在技术文档中清晰表达系统设计是每个开发者的必修课。传统UML工具往往需要频繁切换鼠标键盘,拖拽调整元素位置,保存后再手动插入文档——这种工作流不仅低效,更让设计文档与代码库脱节…...
)
从单机到团队协作:手把手教你用SVN在Windows上搭建个人小型项目版本库(含汉化与日常使用图解)
从单机到团队协作:Windows环境下SVN轻量化部署与实战指南 在个人开发和小型团队协作中,版本控制是保证代码安全和团队高效协作的基石。对于Windows平台的开发者而言,SVN(Subversion)以其简单可靠的特点,成为…...

macOS用户必看:vscode-icons安装与使用完整手册
macOS用户必看:vscode-icons安装与使用完整手册 【免费下载链接】vscode-icons Custom Visual Studio Code Icons 项目地址: https://gitcode.com/gh_mirrors/vsc/vscode-icons 想要为你的Visual Studio Code换上个性化图标吗?vscode-icons项目提…...

3步搞定歌词管理难题:LDDC歌词下载工具的完整实战指南
3步搞定歌词管理难题:LDDC歌词下载工具的完整实战指南 【免费下载链接】LDDC 简单易用的精准歌词(逐字歌词/卡拉OK歌词)下载匹配工具|A simple and user-friendly tool for downloading and matching precise lyrics (word-by-word lyrics/Karaoke lyrics) 项目地…...

合同系统功能详解:相对方管理
上一期,我们讲解了合同系统的业务功用。本期开始,我们将逐一对合同系统的核心功能进行拆解,结合实际业务场景展开详细讲解。今天,我们重点介绍合同系统中的相对方管理功能。 在实际业务落地过程中,不同企业的经营业态…...

Python数据流式处理:Streaming深度解析与实战
Python数据流式处理:Streaming深度解析与实战 引言 在Python开发中,数据流式处理是处理大数据和实时数据的关键技术。作为一名从Rust转向Python的后端开发者,我深刻体会到流式处理在处理海量数据时的优势。Python提供了多种流式处理工具&…...