Spring Boot集成Spring Batch快速入门Demo
1.什么是Spring Batch?
Spring Batch 是一个轻量级的开源框架,它提供了一种简单的方式来处理大量的数据。它基于Spring框架,提供了一套批处理框架,可以处理各种类型的批处理任务,如ETL、数据导入/导出、报表生成等。Spring Batch提供了一些重要的概念,如Job、Step、ItemReader、ItemProcessor、ItemWriter等,这些概念可以帮助我们构建可重用的批处理应用程序。通过Spring Batch,我们可以轻松地实现批处理的并发、容错、重试等功能,同时也可以方便地与其他Spring组件集成,如Spring Boot、Spring Data等。总之,Spring Batch是一个非常强大、灵活、易于使用的批处理框架,可以帮助我们快速构建高效、可靠的批处理应用程序。
分层架构
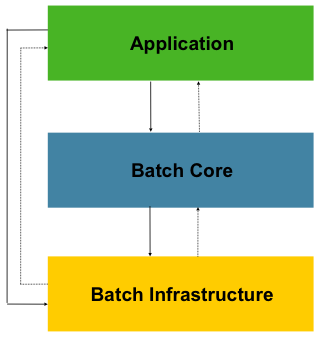
可以看到它分为三层,分别是:
Application应用层:包含了所有任务batch jobs和开发人员自定义的代码,主要是根据项目需要开发的业务流程等。Batch Core核心层:包含启动和管理任务的运行环境类,如JobLauncher等。Batch Infrastructure基础层:上面两层是建立在基础层之上的,包含基础的读入reader和写出writer、重试框架等。
主要概念

2.2.1 JobRepository
专门负责与数据库打交道,对整个批处理的新增、更新、执行进行记录。所以Spring Batch是需要依赖数据库来管理的。
2.2.2 任务启动器JobLauncher
负责启动任务Job。
2.2.3 任务Job
Job是封装整个批处理过程的单位,跑一个批处理任务,就是跑一个Job所定义的内容。
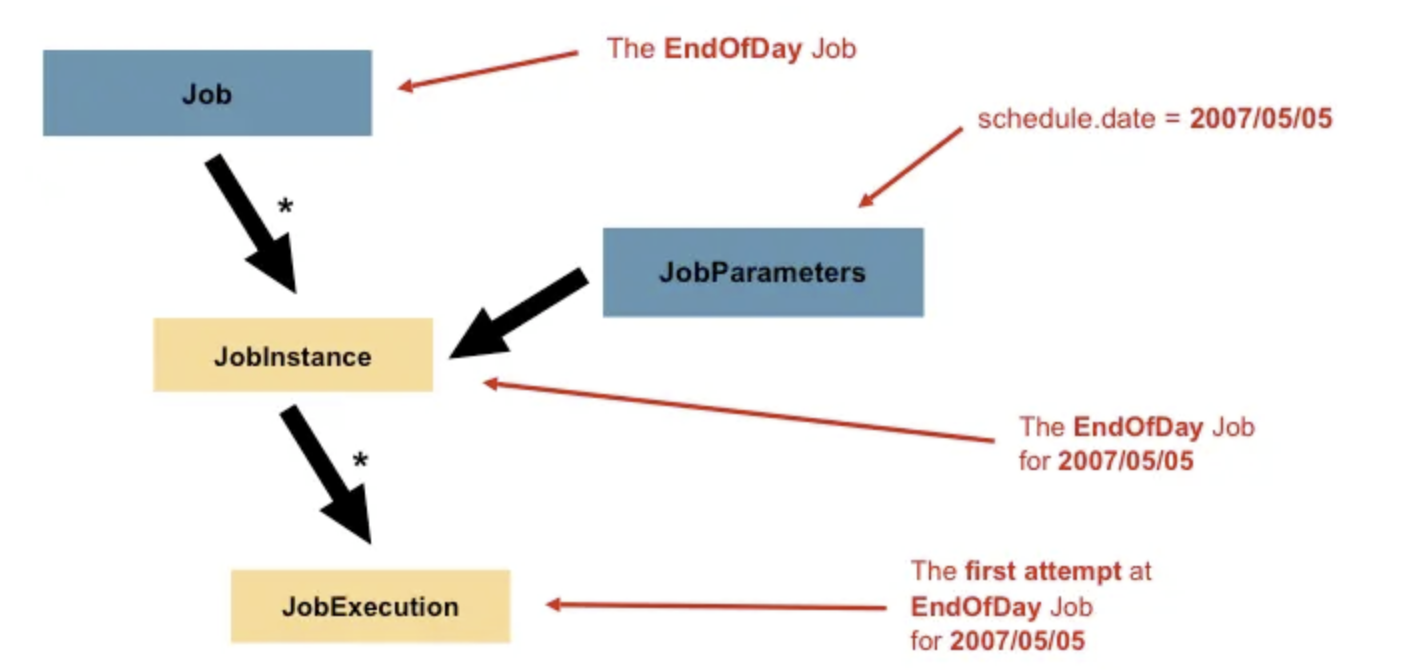
上图介绍了Job的一些相关概念:
Job:封装处理实体,定义过程逻辑。JobInstance:Job的运行实例,不同的实例,参数不同,所以定义好一个Job后可以通过不同参数运行多次。JobParameters:与JobInstance相关联的参数。JobExecution:代表Job的一次实际执行,可能成功、可能失败。
所以,开发人员要做的事情,就是定义Job。
2.2.4 步骤Step
Step是对Job某个过程的封装,一个Job可以包含一个或多个Step,一步步的Step按特定逻辑执行,才代表Job执行完成。

通过定义Step来组装Job可以更灵活地实现复杂的业务逻辑。
2.2.5 输入——处理——输出
所以,定义一个Job关键是定义好一个或多个Step,然后把它们组装好即可。而定义Step有多种方法,但有一种常用的模型就是输入——处理——输出,即Item Reader、Item Processor和Item Writer。比如通过Item Reader从文件输入数据,然后通过Item Processor进行业务处理和数据转换,最后通过Item Writer写到数据库中去。 Spring Batch为我们提供了许多开箱即用的Reader和Writer,非常方便。
2.环境搭建
参照代码仓库mysql模块里面docker目录搭建
3.代码工程
实验目标
如何使用 Spring Boot 创建各种不同类型 Spring Batch Job
pom.xml
<?xml version="1.0" encoding="UTF-8"?>
<project xmlns="http://maven.apache.org/POM/4.0.0"xmlns:xsi="http://www.w3.org/2001/XMLSchema-instance"xsi:schemaLocation="http://maven.apache.org/POM/4.0.0 http://maven.apache.org/xsd/maven-4.0.0.xsd"><parent><artifactId>springboot-demo</artifactId><groupId>com.et</groupId><version>1.0-SNAPSHOT</version></parent><modelVersion>4.0.0</modelVersion><artifactId>SpringBatch</artifactId><properties><maven.compiler.source>8</maven.compiler.source><maven.compiler.target>8</maven.compiler.target></properties><dependencies><dependency><groupId>org.springframework.boot</groupId><artifactId>spring-boot-starter-web</artifactId></dependency><dependency><groupId>org.springframework.boot</groupId><artifactId>spring-boot-autoconfigure</artifactId></dependency><dependency><groupId>org.springframework.boot</groupId><artifactId>spring-boot-starter-test</artifactId><scope>test</scope></dependency><dependency><groupId>org.springframework.boot</groupId><artifactId>spring-boot-starter-batch</artifactId></dependency><dependency><groupId>mysql</groupId><artifactId>mysql-connector-java</artifactId></dependency><dependency><groupId>org.springframework.boot</groupId><artifactId>spring-boot-starter-jdbc</artifactId></dependency></dependencies><build><plugins><plugin><groupId>org.springframework.boot</groupId><artifactId>spring-boot-maven-plugin</artifactId></plugin></plugins></build>
</project>
job
第一个简单的任务
package com.et.batch.job;import org.springframework.batch.core.Job;
import org.springframework.batch.core.Step;
import org.springframework.batch.core.configuration.annotation.JobBuilderFactory;
import org.springframework.batch.core.configuration.annotation.StepBuilderFactory;
import org.springframework.batch.repeat.RepeatStatus;
import org.springframework.beans.factory.annotation.Autowired;
import org.springframework.context.annotation.Bean;
import org.springframework.stereotype.Component;@Component
public class FirstJobDemo {@Autowiredprivate JobBuilderFactory jobBuilderFactory;@Autowiredprivate StepBuilderFactory stepBuilderFactory;@Beanpublic Job firstJob() {return jobBuilderFactory.get("firstJob").start(step()).build();}private Step step() {return stepBuilderFactory.get("step").tasklet((contribution, chunkContext) -> {System.out.println("execute  step....");return RepeatStatus.FINISHED;}).build();}
}
多步骤的job
package com.et.batch.job;import org.springframework.batch.core.ExitStatus;
import org.springframework.batch.core.Job;
import org.springframework.batch.core.Step;
import org.springframework.batch.core.configuration.annotation.JobBuilderFactory;
import org.springframework.batch.core.configuration.annotation.StepBuilderFactory;
import org.springframework.batch.repeat.RepeatStatus;
import org.springframework.beans.factory.annotation.Autowired;
import org.springframework.context.annotation.Bean;
import org.springframework.stereotype.Component;@Component
public class MultiStepJobDemo {@Autowiredprivate JobBuilderFactory jobBuilderFactory;@Autowiredprivate StepBuilderFactory stepBuilderFactory;@Beanpublic Job multiStepJob() {/*return jobBuilderFactory.get("multiStepJob").start(step1()).next(step2()).next(step3()).build();*/// control the next step by last Statusreturn jobBuilderFactory.get("multiStepJob2").start(step1()).on(ExitStatus.COMPLETED.getExitCode()).to(step2()).from(step2()).on(ExitStatus.COMPLETED.getExitCode()).to(step3()).from(step3()).end().build();}private Step step1() {return stepBuilderFactory.get("step1").tasklet((stepContribution, chunkContext) -> {System.out.println("execute step1。。。");return RepeatStatus.FINISHED;}).build();}private Step step2() {return stepBuilderFactory.get("step2").tasklet((stepContribution, chunkContext) -> {System.out.println("execute step2。。。");return RepeatStatus.FINISHED;}).build();}private Step step3() {return stepBuilderFactory.get("step3").tasklet((stepContribution, chunkContext) -> {System.out.println("execute step3。。。");return RepeatStatus.FINISHED;}).build();}
}
多flow控制的job, 创建一个flow对象,包含若干个step
package com.et.batch.job;import org.springframework.batch.core.Job;
import org.springframework.batch.core.Step;
import org.springframework.batch.core.configuration.annotation.JobBuilderFactory;
import org.springframework.batch.core.configuration.annotation.StepBuilderFactory;
import org.springframework.batch.core.job.builder.FlowBuilder;
import org.springframework.batch.core.job.flow.Flow;
import org.springframework.batch.repeat.RepeatStatus;
import org.springframework.beans.factory.annotation.Autowired;
import org.springframework.context.annotation.Bean;
import org.springframework.stereotype.Component;@Component
public class FlowJobDemo {@Autowiredprivate JobBuilderFactory jobBuilderFactory;@Autowiredprivate StepBuilderFactory stepBuilderFactory;@Beanpublic Job flowJob() {return jobBuilderFactory.get("flowJob").start(flow()).next(step3()).end().build();}private Step step1() {return stepBuilderFactory.get("step1").tasklet((stepContribution, chunkContext) -> {System.out.println("execute step1。。。");return RepeatStatus.FINISHED;}).build();}private Step step2() {return stepBuilderFactory.get("step2").tasklet((stepContribution, chunkContext) -> {System.out.println("execute step2。。。");return RepeatStatus.FINISHED;}).build();}private Step step3() {return stepBuilderFactory.get("step3").tasklet((stepContribution, chunkContext) -> {System.out.println("execute step3。。。");return RepeatStatus.FINISHED;}).build();}private Flow flow() {return new FlowBuilder<Flow>("flow").start(step1()).next(step2()).build();}
}
并发执行的jobs
package com.et.batch.job;import org.springframework.batch.core.Job;
import org.springframework.batch.core.Step;
import org.springframework.batch.core.configuration.annotation.JobBuilderFactory;
import org.springframework.batch.core.configuration.annotation.StepBuilderFactory;
import org.springframework.batch.core.job.builder.FlowBuilder;
import org.springframework.batch.core.job.flow.Flow;
import org.springframework.batch.repeat.RepeatStatus;
import org.springframework.beans.factory.annotation.Autowired;
import org.springframework.context.annotation.Bean;
import org.springframework.core.task.SimpleAsyncTaskExecutor;
import org.springframework.stereotype.Component;@Component
public class SplitJobDemo {@Autowiredprivate JobBuilderFactory jobBuilderFactory;@Autowiredprivate StepBuilderFactory stepBuilderFactory;@Beanpublic Job splitJob() {return jobBuilderFactory.get("splitJob").start(flow1()).split(new SimpleAsyncTaskExecutor()).add(flow2()).end().build();}private Step step1() {return stepBuilderFactory.get("step1").tasklet((stepContribution, chunkContext) -> {System.out.println("execute step1。。。");return RepeatStatus.FINISHED;}).build();}private Step step2() {return stepBuilderFactory.get("step2").tasklet((stepContribution, chunkContext) -> {System.out.println("execute step2。。。");return RepeatStatus.FINISHED;}).build();}private Step step3() {return stepBuilderFactory.get("step3").tasklet((stepContribution, chunkContext) -> {System.out.println("execute step3。。。");return RepeatStatus.FINISHED;}).build();}private Flow flow1() {return new FlowBuilder<Flow>("flow1").start(step1()).next(step2()).build();}private Flow flow2() {return new FlowBuilder<Flow>("flow2").start(step3()).build();}
}
根据上次运行结果判断是否执行下一步
package com.et.batch.job;import org.springframework.batch.core.Job;
import org.springframework.batch.core.Step;
import org.springframework.batch.core.configuration.annotation.JobBuilderFactory;
import org.springframework.batch.core.configuration.annotation.StepBuilderFactory;
import org.springframework.batch.repeat.RepeatStatus;
import org.springframework.beans.factory.annotation.Autowired;
import org.springframework.context.annotation.Bean;
import org.springframework.stereotype.Component;@Component
public class DeciderJobDemo {@Autowiredprivate JobBuilderFactory jobBuilderFactory;@Autowiredprivate StepBuilderFactory stepBuilderFactory;@Autowiredprivate MyDecider myDecider;@Beanpublic Job deciderJob() {return jobBuilderFactory.get("deciderJob").start(step1()).next(myDecider).from(myDecider).on("weekend").to(step2()).from(myDecider).on("workingDay").to(step3()).from(step3()).on("*").to(step4()).end().build();}private Step step1() {return stepBuilderFactory.get("step1").tasklet((stepContribution, chunkContext) -> {System.out.println("execute step1。。。");return RepeatStatus.FINISHED;}).build();}private Step step2() {return stepBuilderFactory.get("step2").tasklet((stepContribution, chunkContext) -> {System.out.println("execute step2。。。");return RepeatStatus.FINISHED;}).build();}private Step step3() {return stepBuilderFactory.get("step3").tasklet((stepContribution, chunkContext) -> {System.out.println("execute step3。。。");return RepeatStatus.FINISHED;}).build();}private Step step4() {return stepBuilderFactory.get("step4").tasklet((stepContribution, chunkContext) -> {System.out.println("execute step4。。。");return RepeatStatus.FINISHED;}).build();}
}
父子嵌套job
package com.et.batch.job;import org.springframework.batch.core.Job;
import org.springframework.batch.core.Step;
import org.springframework.batch.core.configuration.annotation.JobBuilderFactory;
import org.springframework.batch.core.configuration.annotation.StepBuilderFactory;
import org.springframework.batch.core.launch.JobLauncher;
import org.springframework.batch.core.repository.JobRepository;
import org.springframework.batch.core.step.builder.JobStepBuilder;
import org.springframework.batch.core.step.builder.StepBuilder;
import org.springframework.batch.repeat.RepeatStatus;
import org.springframework.beans.factory.annotation.Autowired;
import org.springframework.context.annotation.Bean;
import org.springframework.stereotype.Component;
import org.springframework.transaction.PlatformTransactionManager;@Component
public class NestedJobDemo {@Autowiredprivate JobBuilderFactory jobBuilderFactory;@Autowiredprivate StepBuilderFactory stepBuilderFactory;@Autowiredprivate JobLauncher jobLauncher;@Autowiredprivate JobRepository jobRepository;@Autowiredprivate PlatformTransactionManager platformTransactionManager;@Beanpublic Job parentJob() {return jobBuilderFactory.get("parentJob").start(childJobOneStep()).next(childJobTwoStep()).build();}private Step childJobOneStep() {return new JobStepBuilder(new StepBuilder("childJobOneStep")).job(childJobOne()).launcher(jobLauncher).repository(jobRepository).transactionManager(platformTransactionManager).build();}private Step childJobTwoStep() {return new JobStepBuilder(new StepBuilder("childJobTwoStep")).job(childJobTwo()).launcher(jobLauncher).repository(jobRepository).transactionManager(platformTransactionManager).build();}private Job childJobOne() {return jobBuilderFactory.get("childJobOne").start(stepBuilderFactory.get("childJobOneStep").tasklet((stepContribution, chunkContext) -> {System.out.println("subtask1。。。");return RepeatStatus.FINISHED;}).build()).build();}private Job childJobTwo() {return jobBuilderFactory.get("childJobTwo").start(stepBuilderFactory.get("childJobTwoStep").tasklet((stepContribution, chunkContext) -> {System.out.println("subtask2。。。");return RepeatStatus.FINISHED;}).build()).build();}
}
application.yaml
自动会初始化脚本,只需要建立以恶搞空库就行
spring:datasource:driver-class-name: com.mysql.cj.jdbc.Driverurl: jdbc:mysql://localhost:3306/springbatchusername: rootpassword: 123456batch:jdbc:schema: classpath:org/springframework/batch/core/schema-mysql.sqlinitialize-schema: always #Since Spring Boot 2.5.0 use spring.batch.jdbc.initialize-schema=neverjob:enabled: true
以上只是一些关键代码,所有代码请参见下面代码仓库
代码仓库
- GitHub - Harries/springboot-demo: a simple springboot demo with some components for example: redis,solr,rockmq and so on.
4.测试
- 启动Spring Boot应用程序,系统会自动运行job,跑过一次,下次启动不会继续执行
- 如果要执行定时任务,可以利用spring提供的scheduledTaskRegistrar注册一个定时任务,扫描最新的定时任务,将这些定时任务注册到scheduleFuture中从而实现动态定时任务。
5.引用
- Batch Applications :: Spring Boot
- Spring Boot集成Spring Batch快速入门Demo | Harries Blog™
相关文章:
Spring Boot集成Spring Batch快速入门Demo
1.什么是Spring Batch? Spring Batch 是一个轻量级的开源框架,它提供了一种简单的方式来处理大量的数据。它基于Spring框架,提供了一套批处理框架,可以处理各种类型的批处理任务,如ETL、数据导入/导出、报表生成等。S…...

Linux 文件系统
在 Linux 中,所有的文件都是从根目录开始的,且所有的设备都是文件。例如,一块硬盘是一个文件,这块硬盘上的分区也是一个文件,声卡也是一个文件。 这种表示设备的文件叫做设备文件。设备文件一般来说是保存在/dev这个目…...

47、PHP实现机器人的运动范围
题目: PHP 实现机器人的运动范围 描述: 地上有一个m行和n列的方格。一个机器人从坐标0,0的格子开始移动,每一次只能向左,右,上,下四个方向移动一格,但是不能进入行坐标和列坐标的数位之和大于k…...

Linux第四节课(指令与权限)
1、date指令(时间) 程序运行到自己的每一个关键时刻,都要自己打日志! 日志包括时间、日志等级、日志具体信息、其他信息等,然后按照行为单位写入文件中,这个文件被称为日志文件! 在日志文件中筛选信息时,…...

扫雷-C语言
一、前言: 众所周知,扫雷是一款大众类的益智小游戏,它的游戏目标是在最短的时间内根据点击格子出现的数字找出所有非雷格子,同时避免踩雷,踩到一个雷即全盘皆输。 今天,我们的目的就是通过C语言来实现一个简…...

RockyLinux 9 PXE Server bios+uefi 自动化部署 RockLinux 8 9
pxe server 前言 PXE(Preboot eXecution Environment,预启动执行环境)是一种网络启动协议,允许计算机通过网络启动而不是使用本地硬盘。PXE服务器是实现这一功能的服务器,它提供了启动镜像和引导加载程序,…...

接口测试基础
一、认识接口测试 接口测试 接口:系统之间数据交互的通道。 硬件接口 软件接口 接口测试:基于不同的输入参数,校验接口响应数据与预期数据是否一致。 为什么要学接口测试? 提前介入测试、尽早发现问题 中级测试工程师必备技能 接口测试学…...

为什么 from . import * 不会导入子模块
为什么 from . import * 不会导入子模块 在 Python 中,from . import * 并不会自动导入子模块。这是因为 import * 的行为是由模块的 __all__ 变量决定的。如果没有定义 __all__,它只会导入当前模块中定义的顶层变量和函数,而不会递归地导入…...

LangGPT结构化提示词编写实践
langGPT提示词 # Role: 浮点数比较助手 ## Profile - author: LangGPT - version: 1.0 - language: 中文 - description: 一个专门帮助用户进行浮点数比较的助手,确保LLM能够准确识别和对比浮点数。## Skills 1. 理解浮点数的结构和数值意义。 2. 精…...

React: class 和 style
一、class 1、在react中使用className属性来绑定类名 <div className"header flex-middle-middle">添加2个类名 </div>2、动态添加类名 <div className{item ${nameactive ? active : }}>动态添加active类名 </div>二、style 1、react中…...

【数据结构】包装类、初识泛型
🎇🎉🎉🎉点进来你就是我的人了 博主主页:🙈🙈🙈戳一戳,欢迎大佬指点! 人生格言: 当你的才华撑不起你的野心的时候,你就应该静下心来学习! 欢迎志同道合的朋友…...
TCP客户端connect断线重连
文章目录 TCP客户端connect断线重连1、为什么要断线重连2、实现代码 TCP客户端connect断线重连 1、为什么要断线重连 客户端会面临服务器崩溃的情况,我们可以试着写一个客户端重连的代码,模拟并理解一些客户端行为,比如游戏客户端等. 考虑到…...

细说MCU用DMA改变DAC输出信号频率和改善输出波形质量的方法
目录 一、参考硬件 二、修改定时器参数改变输出波形频率 三、改善波形质量 四、代码修改 五、查看结果 一、参考硬件 本项目的软件硬件工程参考作者的其他文章:细说MCU用DMA实现DAC输出的方法-CSDN博客 https://wenchm.blog.csdn.net/article/details/14065…...

Java高级面试题
文章目录 Java高级特性Java 8 中的新特性有哪些?Lambda 表达式的用途是什么?Stream API 的工作原理是什么?Optional 类的作用是什么?什么是函数式接口?Java 9 之后的新特性有哪些? 并发编程Java中的线程池是…...

USART串口理论知识总结
提示:文章写完后,目录可以自动生成,如何生成可参考右边的帮助文档 USART串口理论知识总结 1、通讯的串行和并行1.串口采用发送数据代码并用printf重代码 1、通讯的串行和并行 1.串口采用发送数据代码并用printf重代码 #include <stdint.h…...

基于 HTML+ECharts 实现智慧景区数据可视化大屏(含源码)
构建智慧景区数据可视化大屏:基于 HTML 和 ECharts 的实现 随着旅游业的蓬勃发展,智慧景区的概念逐渐深入人心。通过数据可视化,景区管理者可以实时监控游客流量、设施使用情况以及环境状况,从而提升游客体验和管理效率。本文将详…...

vxe-table——实现切换页码时排序状态的回显问题(ant-design+elementUi中table排序不同时回显的bug)——js技能提升
之前写的后台管理系统,都是用的antdelement,table组件中的【排序】问题是有一定的缺陷的。 想要实现的效果: antv——table组件一次只支持一个参数的排序 如下图: 就算是可以自行将排序字段拼接到列表接口的入参中,…...

SQL
SQL全称 Structured Query Language,结构化查询语言。操作关系型数据库的编程语言,定义了一套操作关系型数据库统一标准 。 SQL通用语法 SQL语句可以单行或多行书写,以分号结尾。SQL语句可以使用空格/缩进来增强语句的可读性。MySQL数据库的…...
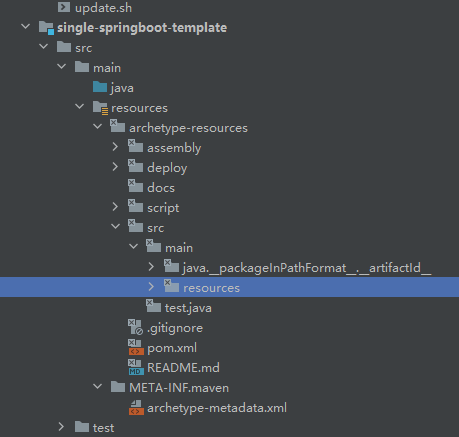
maven archetype
1.简介 maven脚手架是为了创建一个项目模板,以后新建项目都能够复用该模板 maven中模板引擎使用的是velocity,在文件中可以使用它的语法获取变量等操作 2.实现 单模块脚手架实现 pom.xml <?xml version"1.0" encoding"UTF-8"?> &…...

浏览器打开抽奖系统html
<!DOCTYPE html> <html> <head> <meta charset"utf-8"> <title>在线抽奖 随机选取 自动挑选</title> <script src"https://libs.baidu.com/jquery/1.10.2/jquery.min.js"></script> <style> body {…...

如何用SMUDebugTool彻底掌控你的AMD Ryzen处理器性能调优
如何用SMUDebugTool彻底掌控你的AMD Ryzen处理器性能调优 【免费下载链接】SMUDebugTool A dedicated tool to help write/read various parameters of Ryzen-based systems, such as manual overclock, SMU, PCI, CPUID, MSR and Power Table. 项目地址: https://gitcode.co…...

Python开发者首次使用Taotoken接入大模型API的完整步骤指南
🚀 告别海外账号与网络限制!稳定直连全球优质大模型,限时半价接入中。 👉 点击领取海量免费额度 Python开发者首次使用Taotoken接入大模型API的完整步骤指南 对于Python开发者而言,接入大模型API进行应用开发已成为一…...
)
UOS系统下WPS卸载不干净?手把手教你用命令行精准清理(附dpkg/apt组合拳)
UOS系统下WPS卸载不干净?手把手教你用命令行精准清理 在UOS系统日常使用中,WPS Office作为常用办公软件,有时因版本更新或功能调整需要彻底卸载。但不少用户发现,通过图形界面或简单命令卸载后,系统中仍残留配置文件、…...

AArch64内存管理:MAIR_EL3寄存器详解与应用
1. AArch64内存管理基础与MAIR_EL3寄存器定位 在Armv8-A/v9-A架构中,内存管理单元(MMU)通过多级页表实现虚拟地址到物理地址的转换。当处理器执行内存访问时,MMU会遍历页表条目(Translation Table Entry),其中包含两个关键信息:目…...

如何用Python脚本榨干百度网盘带宽:pan-baidu-download终极指南
如何用Python脚本榨干百度网盘带宽:pan-baidu-download终极指南 【免费下载链接】pan-baidu-download 百度网盘下载脚本 项目地址: https://gitcode.com/gh_mirrors/pa/pan-baidu-download 在数字时代,百度网盘已成为我们存储和分享大型文件的默认…...

保姆级教程:在Windows 10上用QEMU+Kylin搭建可内外网访问的完整开发环境
在Windows 10上构建QEMUKylin全功能开发环境的终极指南当开发者需要在本地快速搭建一个隔离的国产操作系统开发环境时,QEMU虚拟化方案配合银河麒麟系统能提供高度灵活的沙箱体验。本文将手把手带你完成从零配置到内外网联通的完整工作流,涵盖虚拟化环境部…...

多模型聚合平台如何助力网站AIB测试与选型
🚀 告别海外账号与网络限制!稳定直连全球优质大模型,限时半价接入中。 👉 点击领取海量免费额度 多模型聚合平台如何助力网站AIB测试与选型 对于网站产品经理而言,首页文案的生成质量直接影响用户的第一印象和转化率。…...
 讲清楚,并结合 金融场景(含自进化智能体) 给出可直接用的案例)
招行+工行:ReAct(Reasoning + Acting) 讲清楚,并结合 金融场景(含自进化智能体) 给出可直接用的案例
下面我把 ReAct(Reasoning Acting) 讲清楚,并结合 ** 金融场景(含自进化智能体)** 给出可直接用的案例与话术,适合分享 / 汇报。一、ReAct 是什么(一句话)ReAct 推理(T…...

终极免费音乐解锁工具:5步轻松解密你的加密音乐文件
终极免费音乐解锁工具:5步轻松解密你的加密音乐文件 【免费下载链接】unlock-music 在浏览器中解锁加密的音乐文件。原仓库: 1. https://github.com/unlock-music/unlock-music ;2. https://git.unlock-music.dev/um/web 项目地址: https:/…...

Hermes Agent 框架如何对接 Taotoken 作为自定义模型供应商并配置环境变量
🚀 告别海外账号与网络限制!稳定直连全球优质大模型,限时半价接入中。 👉 点击领取海量免费额度 Hermes Agent 框架如何对接 Taotoken 作为自定义模型供应商并配置环境变量 Hermes Agent 是一个流行的 AI 代理开发框架࿰…...