全网超详细haproxy七层代理
一:负载均衡
1、概念
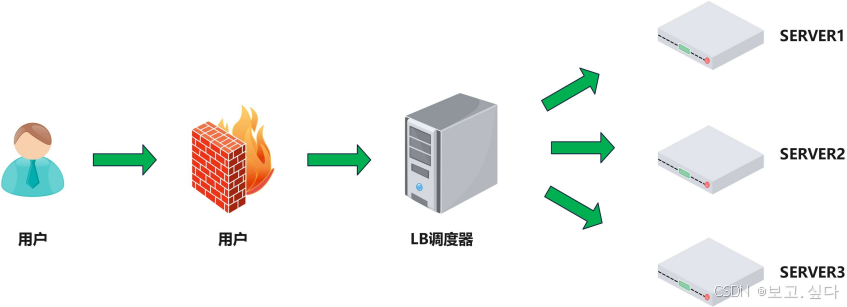
2、作用
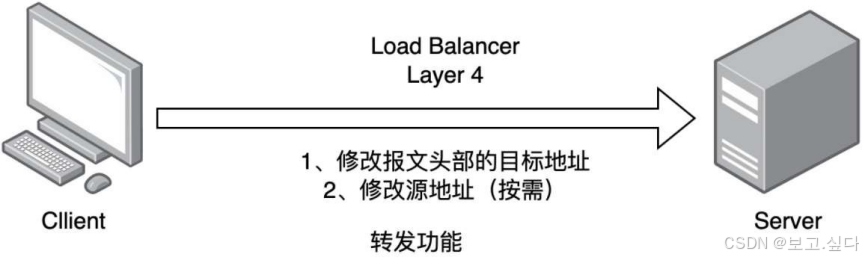
3、四层负载均衡
- lvs:重量级四层负载均衡器。
- Nginx:轻量级四层负载均衡器,可缓存。(nginx四层是通过upstream模块)
- Haproxy:模拟四层转发
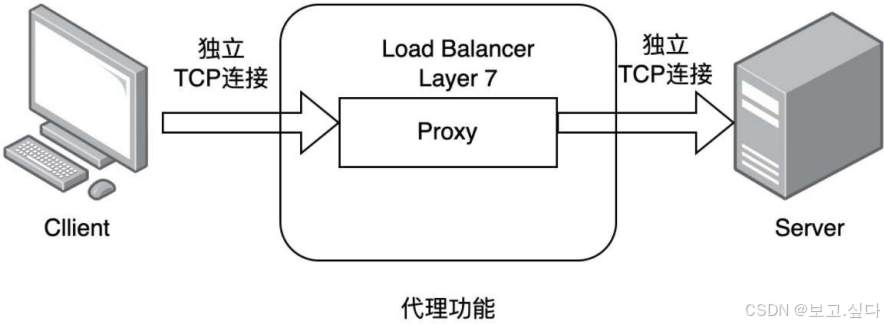
4、七层负载均衡
- Nginx:基于http协议(nginx七层是通过proxy_pass)
- Haproxy:七层代理,会话保持、标记、路径转移等。
5、 四层和七层的区别
四层的负载均衡,就是通过发布三层的 IP 地址( VIP ),然后加四层的端口号,来决定哪些流量需要做负载均衡,对需要处理的流量进行NAT 处理,转发至后台服务器,并记录下这个 TCP 或者 UDP 的流量是由哪台服务器处理的,后续这个连接的所有流量都同样转发到同一台服务器处理
七层的负载均衡,就是在四层的基础上(没有四层是绝对不可能有七层的),再考虑应用层的特征,比如同一个Web 服务器的负载均衡,除了根据 VIP 加 80 端口辨别是否需要处理的流量,还可根据七层的URL、浏览器类别、语言来决定是否要进行负载均衡。
二、haproxy基本部署和全局匹配
- 进程及安全配置相关的参数
- 性能调整相关参数
- Debug参数
- defaults:为frontend, backend, listen提供默认配置
- frontend:前端,相当于nginx中的server {}
- backend:后端,相当于nginx中的upstream {}
- listen:同时拥有前端和后端配置,配置简单,生产推荐使用
1:server配置
[root@webserver ~]# vmset.sh eth0 172.25.254.10 webserver.hyl.oeg
[root@webserver ~]# systemctlstop firewalld.service
[root@webserver ~]# yum install nginx -y
[root@webserver ~]# echo webserver - 172.25.254.10 > /usr/share/nginx/html/index.html
[root@webserver ~]# systemctl restart nginx.service
[root@webserver2 ~]# vmset.sh eth0 172.25.254.20 webserver2.hyl.oeg
[root@webserver2 ~]# systemctlstop firewalld.service
[root@webserver2 ~]# yum install nginx -y
[root@webserver2 ~]# echo webserver2 - 172.25.254.20 > /usr/share/nginx/html/index.html
[root@webserver2 ~]# systemctl restart nginx.service
2:haproxy配置
ip基本配置
[root@haproxy ~]# vmset.sh eth0 172.25.254.100 haproxy.hyl.org
[root@haproxy ~]# systemctl stop firewalld.service
测试
[root@haproxy ~]# curl 172.25.254.10
webserver - 172.25.254.10
[root@haproxy ~]# curl 172.25.254.20
webserver2 - 172.25.254.20
安装haproxy
[root@haproxy ~]# dnf install haproxy -y 安装haproxy
[root@haproxy ~]# rpm -qc haproxy 查看文件
/etc/haproxy/haproxy.cfg
/etc/logrotate.d/haproxy
/etc/sysconfig/haproxy[root@haproxy ~]# vim /etc/haproxy/haproxy.cfg 修改配置文件
frontend webcluster
bind *:80
mode http
use_backend webcluster-host
backend webcluster-host
balance roundrobin
server web1 172.25.254.10:80
server web2 172.25.254.20:80
[root@haproxy ~]# systemctl restart haproxy.service 重启haproxy服务
测试
[root@haproxy ~]# curl 172.25.254.100
webserver - 172.25.254.10
[root@haproxy ~]# curl 172.25.254.100
webserver2 - 172.25.254.20
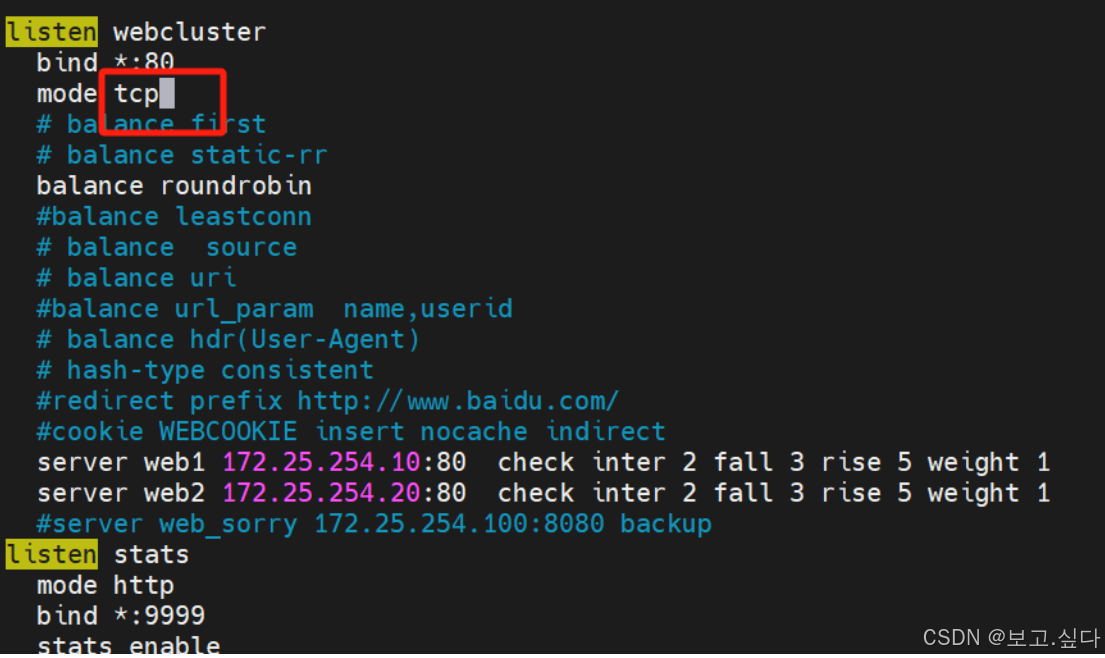
listen块
[root@haproxy ~]# vim /etc/haproxy/haproxy.cfg
listen webcluster
bind *:80
mode http
balance roundrobin
server webl 172.25.254.10:80
server web2 172.25.254.20:80
[root@haproxy ~]# systemctl restart haproxy.service测试
[root@haproxy ~]# curl 172.25.254.100
webserver - 172.25.254.10
[root@haproxy ~]# curl 172.25.254.100
webserver2 - 172.25.254.20
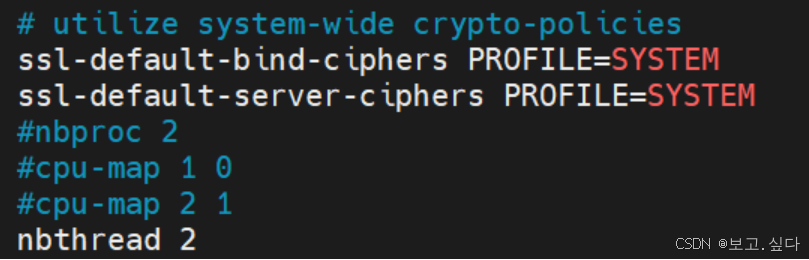
3:多进程和线程
1):查看多线程信息
[root@haproxy ~]# pstree -p | grep haproxy
|-haproxy(33040)---haproxy(33043)-+-{haproxy}(33044)
| |-{haproxy}(33045)
| `-{haproxy}(33046)[root@haproxy ~]# vim /etc/haproxy/haproxy.cfg
2):启动多线程
[root@haproxy conf.d]# vim /etc/haproxy/haproxy.cfg
 [root@haproxy ~]# systemctl restart haproxy.service 重启
3):查看多线程信息
[root@haproxy ~]# pstree -p | grep haproxy
|-haproxy(33058)-+-haproxy(33060)
| `-haproxy(33061)
4)启动多线程
[root@haproxy ~]# vim /etc/haproxy/haproxy.cfg
[root@haproxy ~]# systemctl restart haproxy.service 重启
[root@haproxy ~]# pstree -p | grep haproxy
|-haproxy(33073)---haproxy(33075)---{haproxy}(33076)
[root@haproxy ~]# pstree -p | grep haproxy
|-haproxy(33084)---haproxy(33086)-+-{haproxy}(33087)
| |-{haproxy}(33088)
| `-{haproxy}(33089)
[root@haproxy ~]# cat /proc/33084/status | grep -i thread
Threads: 1
Speculation_Store_Bypass: thread vulnerable
4:日志
1):查看日志文件名
[root@haproxy ~]# vim /etc/haproxy/haproxy.cfg
2):编写文件
[root@haproxy ~]# vim /etc/rsyslog.conf
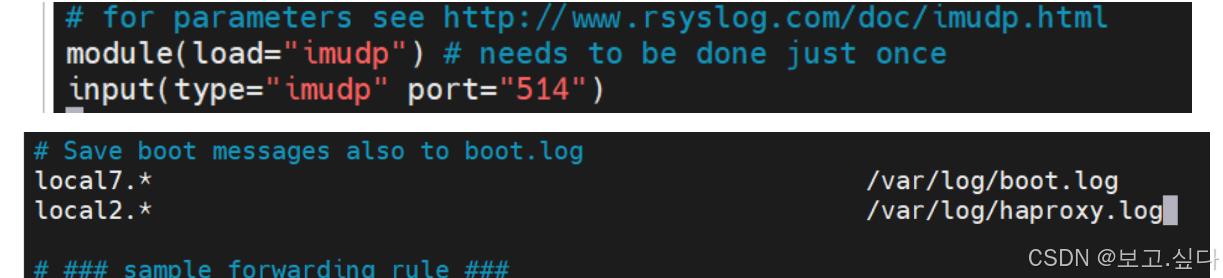
[root@haproxy ~]# systemctl restart rsyslog.service
3):查看日志
[root@haproxy ~]# cat /var/log/haproxy.log
Aug 7 16:10:08 localhost haproxy[33086]: 172.25.254.100:59108 [07/Aug/2024:16:10:08.997] webcluster webcluster/webl 0/0/0/1/1 200 225 - - ---- 1/1/0/0/0 0/0 "GET / HTTP/1.1"
三、proxies
1、proxies参数说明
| 参数 | 类型 | 作用 |
| default[] | proxies | 默认配置项,针对以下的frontend、backend和listen生效,可以多个namet也可以没有name |
| frontend | proxies | 前端servername,类似于Nginx的一个虚拟主机server和LVS服务集群 |
| backend | proxies | 后端服务器组,等Fnginx的upstream和LVS中的RS服务器 |
| listen | proxies | 将frontend和backend合并在一起配置,相对于frontend和backend配置更简洁,生产常用 |
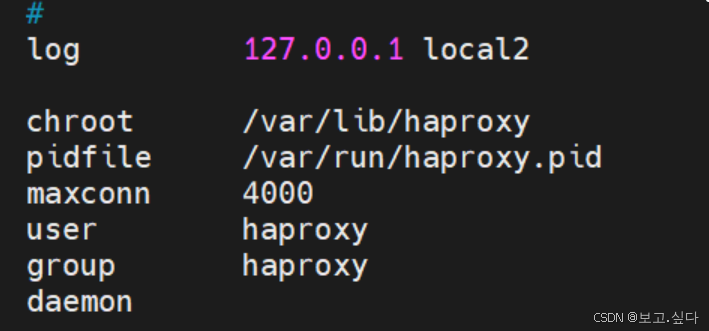
2、Proxies配置-defaults
3、Proxies配置-frontend
frontend 配置参数:
bind :指定 HAProxy 的监听地址,可以是 IPV4 或 IPV6 ,可以同时监听多个 IP 或端口,可同时用于 listen 字段中# 格式:bind [<address>]:<port_range> [, ...] [param*]# 注意:如果需要绑定在非本机的 IP ,需要开启内核参数: net.ipv4.ip_nonlocal_bind=1backlog <backlog> # 针对所有 server 配置 , 当前端服务器的连接数达到上限后的后援队列长度,注意:不支持
frontend 配置示例
haproxy ~]# vim /etc/haproxy/haproxy.cfg... 上面内容省略 ...frontend lee-webserver-80bind 172.25.254.100:80mode httpuse_backend lee-webserver-80-RS # 调用 backend 的名称
4、Proxies配置-backend
- 定义一组后端服务器,backend服务器将被frontend进行调用。
- 注意: backend 的名称必须唯一,并且必须在listen或frontend中事先定义才可以使用,否则服务无法启动
mode http|tcp # 指定负载协议类型 , 和对应的 frontend 必须一致option # 配置选项server # 定义后端 real server, 必须指定 IP 和端口注意: option 后面加 httpchk , smtpchk,mysql-check,pgsql-check , ssl-hello-chk 方法,可用于实现更 多应用层检测功能。
server 配置
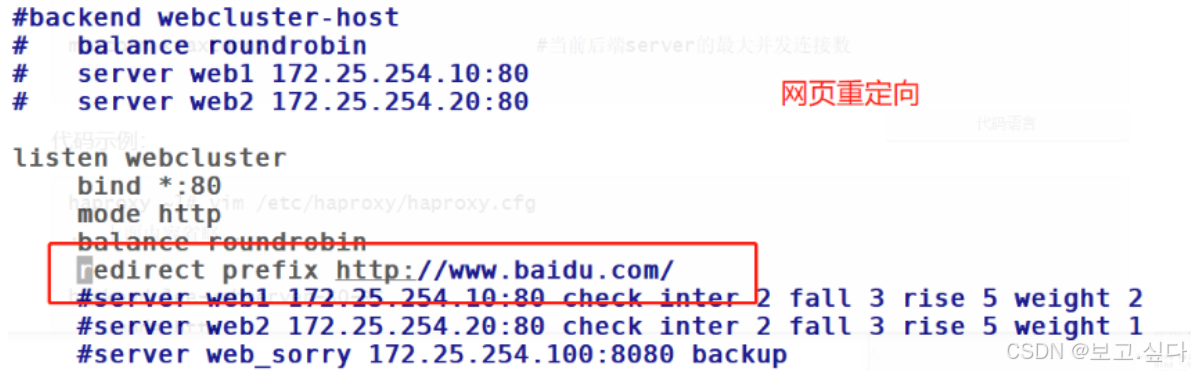
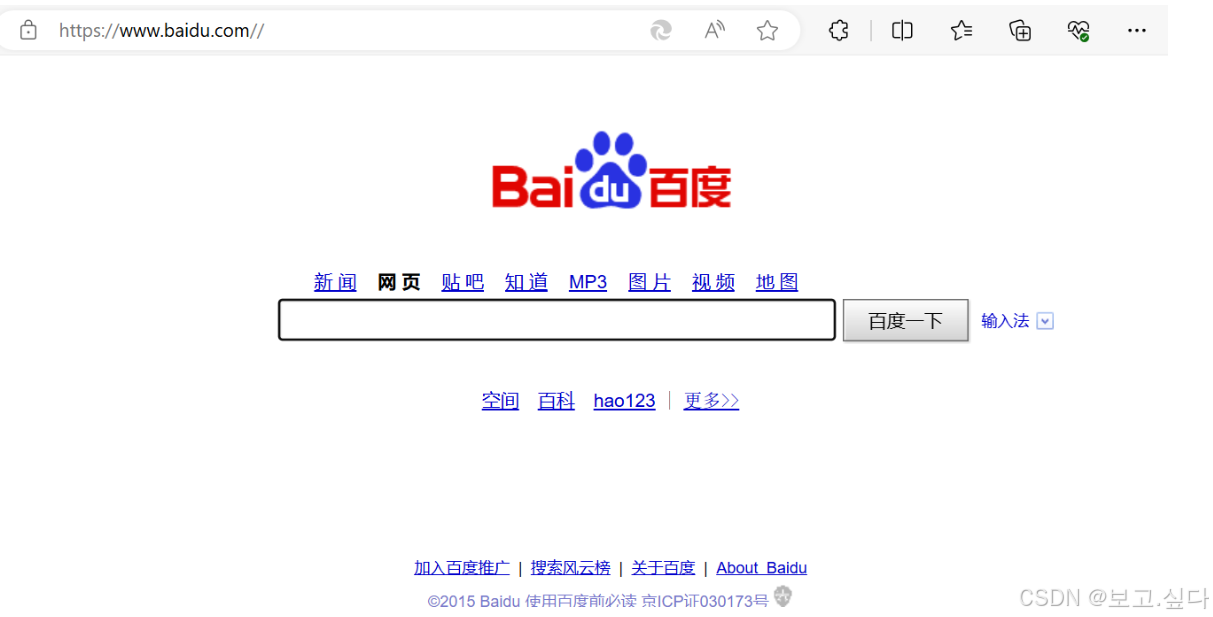
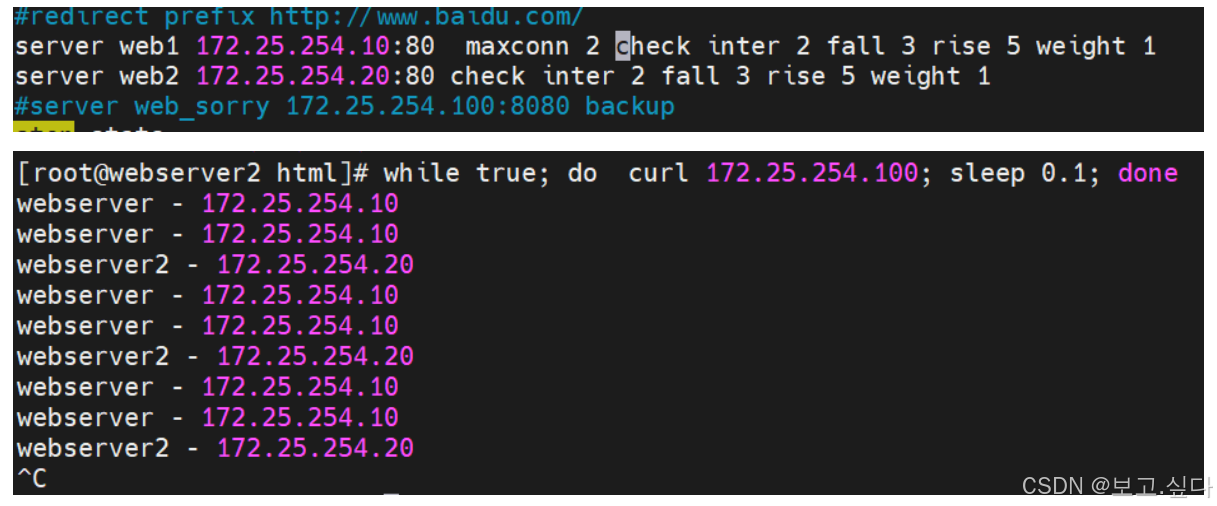
# 针对一个 server 配置check # 对指定 real 进行健康状态检查,如果不加此设置,默认不开启检查 , 只有 check 后面没有其它配置也可以启用检查功能# 默认对相应的后端服务器 IP 和端口 , 利用 TCP 连接进行周期性健康性检查 , 注意必须指定端口才能实现健康性检查addr <IP> # 可指定的健康状态监测 IP ,可以是专门的数据网段,减少业务网络的流量port <num> # 指定的健康状态监测端口inter <num> # 健康状态检查间隔时间,默认 2000 msfall <num> # 后端服务器从线上转为线下的检查的连续失效次数,默认为 3 代码示例:rise <num> # 后端服务器从下线恢复上线的检查的连续有效次数,默认为 2weight <weight> # 默认为 1 ,最大值为 256 , 0( 状态为蓝色 ) 表示不参与负载均衡,但仍接受持久连接backup # 将后端服务器标记为备份状态 , 只在所有非备份主机 down 机时提供服务,类似 SorryServerdisabled # 将后端服务器标记为不可用状态,即维护状态,除了持久模式# 将不再接受连接 , 状态为深黄色 , 优雅下线 , 不再接受新用户的请求redirect prefix http://www.baidu.com/ # 将请求临时 (302) 重定向至其它 URL ,只适用于 http 模式maxconn <maxconn> # 当前后端 server 的最大并发连接数
5、Proxies配置-listen 简化配置
listen配置示例:
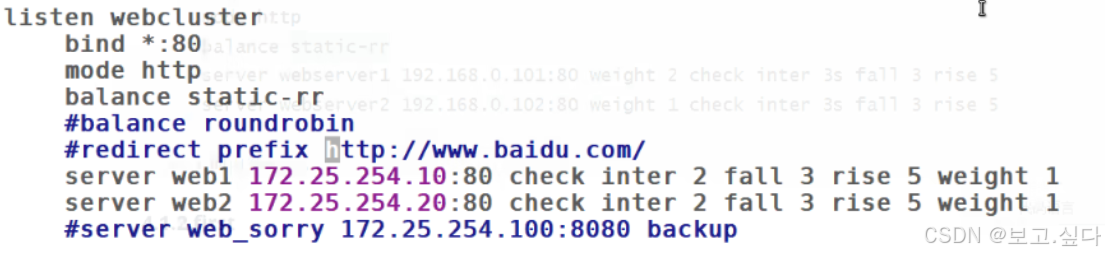
haproxy ~] # vim /etc/haproxy/haproxy.cfg... 上面内容省略 ...listen webserver_80bind 172 .25.254.100:80mode httpoption forwardforserver webserver1 192 .168.0.101:80 check inter 3s fall 3 rise 5server webserver2 192 .168.0.102:80 check inter 3s fall 3 rise 5... 上面内容省略.........
实验部分
1:backend配置
修改文件
[root@haproxy ~]# vim /etc/haproxy/haproxy.cfg

[root@haproxy ~]# systemctl reload haproxy 打开日志
[root@haproxy ~]# systemctl restart haproxy.service
测试
[root@haproxy ~]# curl 172.25.254.100
webserver - 172.25.254.10
[root@haproxy ~]# curl 172.25.254.100
webserver - 172.25.254.10
[root@haproxy ~]# curl 172.25.254.100
webserver2 - 172.25.254.20
2、backup --- sorryserver 的端囗
haproxy安装httpd
[root@haproxy ~]# yum install httpd -y
修改端口
[root@haproxy ~]# vim /etc/httpd/conf/httpd.conf

启动httpd服务
[root@haproxy ~]# echo sorry 下班了 > /var/www/html/index.html
[root@haproxy ~]# systemctl enable --now httpd
修改haproxy文件
[root@haproxy ~]# vim /etc/haproxy/haproxy.cfg

[root@haproxy ~]# systemctl restart haproxy
测试
[root@webserver ~]# systemctl stop nginx.service
[root@webserver2 ~]# systemctl stop nginx.service
[root@haproxy ~]# curl 172.25.254.100
sorry 下班了
[root@webserver ~]# systemctl enable --now nginx.service
[root@webserver2 ~]# systemctl enable --now nginx.service
[root@haproxy ~]# curl 172.25.254.100
webserver - 172.25.254.10
[root@haproxy ~]# curl 172.25.254.100
webserver - 172.25.254.10
[root@haproxy ~]# curl 172.25.254.100
webserver2 - 172.25.254.20
3、下线指定
将10下线
[root@haproxy ~]# vim /etc/haproxy/haproxy.cfg

[root@haproxy ~]# systemctl restart haproxy
测试
[root@haproxy ~]# curl 172.25.254.100
webserver2 - 172.25.254.20
[root@haproxy ~]# curl 172.25.254.100
webserver2 - 172.25.254.20
4、网页重定向
修改配置文件
[root@haproxy ~]# vim /etc/haproxy/haproxy.cfg
[root@haproxy ~]# systemctl restart haproxy.service
测试
四、haproxy热处理
1、socat 工具
对服务器动态权重和其它状态可以利用 socat 工具进行调整, Socat 是 Linux 下的一个多功能的网络工具,名字来由是Socket CAT,相当于netCAT 的增强版 .Socat 的主要特点就是在两个数据流之间建立双向通道,且支持众多协议和链接方式。如 IP、TCP 、 UDP 、 IPv6 、 Socket 文件等
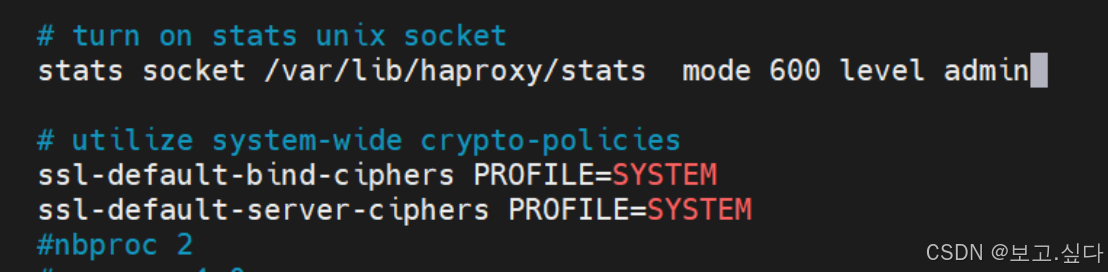
范例:利用工具 socat 对服务器动态权重调整# 修改配置文件[root@haproxy ~] # vim /etc/haproxy/haproxy.cfgstats socket /var/lib/haproxy/stats mode 600 level admin# 查看帮助haproxy ~] # socat -hhaproxy ~] # echo "help" | socat stdio /var/lib/haproxy/statsThe following commands are valid at this level:help : this messageprompt : toggle interactive mode with promptquit : disconnect。。。省略 。。。enable server : enable a disabled server (use 'set server' instead) # 启用服务器set maxconn server : change a server 's maxconn settingset server : change a server 's state, weight or address # 设置服务器get weight : report a server 's current weight # 查看权重set weight : change a server 's weight (deprecated) # 设置权重
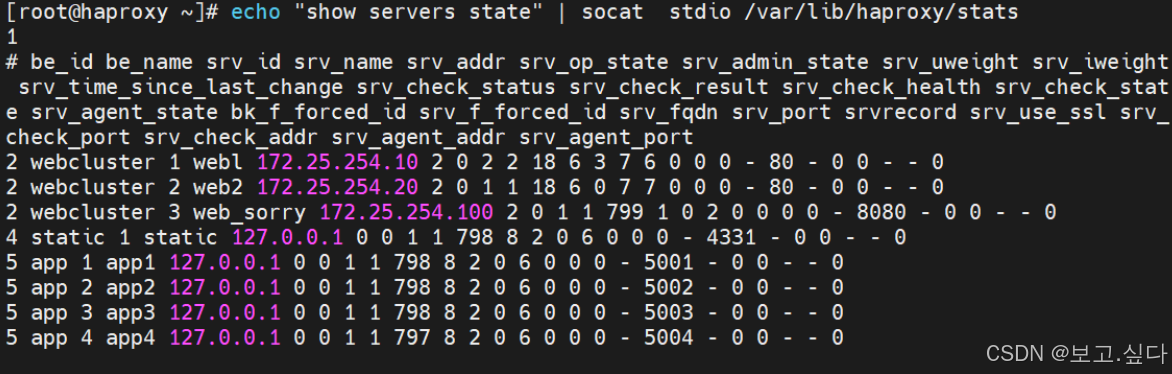
# 查看 haproxy 状态[root@haproxy ~]# echo "show info" | socat stdio /var/lib/haproxy/stats# 查看集群状态[root@haproxy ~]# echo "show servers state" | socat stdio /var/lib/haproxy/stats# 查看集群权重[root@haproxy ~]# echo get weight webcluster/web1 | socat stdio/var/lib/haproxy/stats2 (initial 2)[root@haproxy ~]# echo get weight webcluster/web2 | socat stdio /var/lib/haproxy/stats1 (initial 1)# 设置权重[root@haproxy ~]# echo "set weight webcluster/web1 1 " | socat stdio /var/lib/haproxy/stats[root@haproxy ~]# echo "set weight webcluster/web1 2 " | socat stdio /var/lib/haproxy/stats# 下线后端服务器[root@haproxy ~]# echo "disable server webcluster/web1 " | socat stdio /var/lib/haproxy/stats# 上线后端服务器[root@haproxy ~]# echo "enable server webcluster/web1 " | socat stdio /var/lib/haproxy/stats
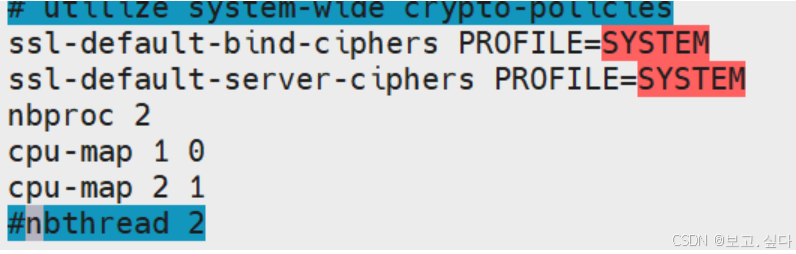
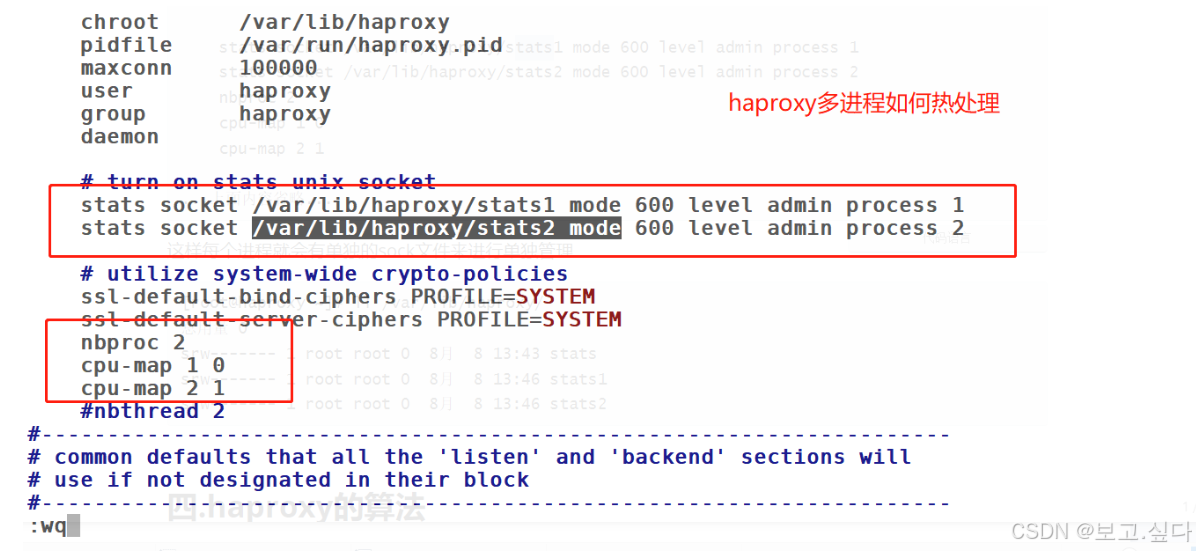
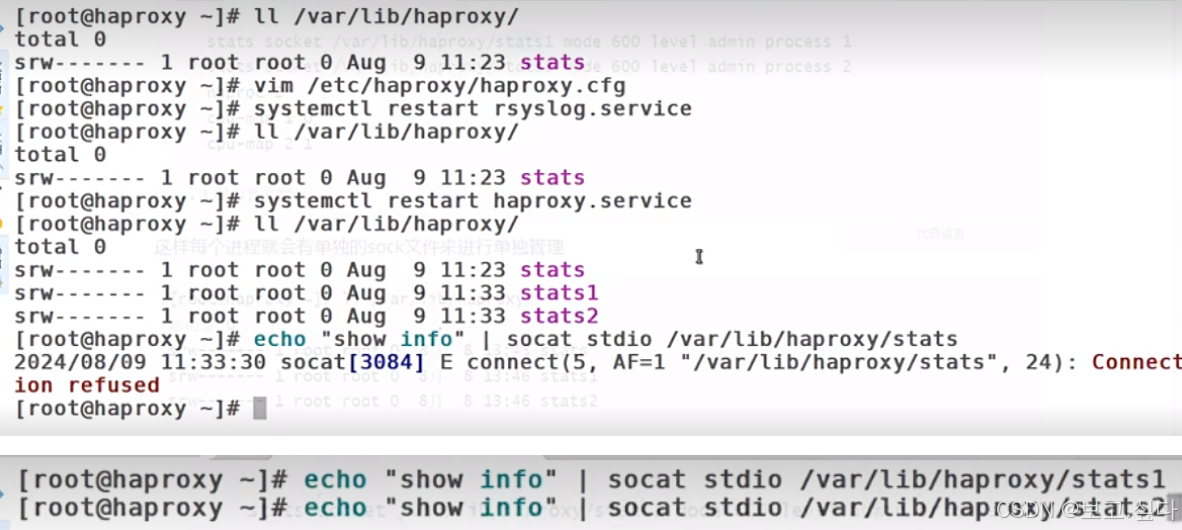
示例:haproxy ~]# vim /etc/haproxy/haproxy.cfg... 上面内容省略 ...stats socket /var/lib/haproxy/stats1 mode 600 level admin process 1stats socket /var/lib/haproxy/stats2 mode 600 level admin process 2nbproc 2cpu-map 1 0cpu-map 2 1... 上面内容省略这样每个进程就会有单独的sock 文件来进行单独管理[root@haproxy ~]# ll /var/lib/haproxy/总用量 0srw------- 1 root root 0 8 月 8 13:43 statssrw------- 1 root root 0 8 月 8 13:46 stats1srw------- 1 root root 0 8 月 8 13:46 stats2
实验部分
单线程
[root@haproxy ~]# vim /etc/haproxy/haproxy.cfg
[root@haproxy ~]# systemctl restart haproxy.service
[root@haproxy ~]# ll /var/lib/haproxy/stats
srw------- 1 root root 0 8月 9 11:14 /var/lib/haproxy/stats
[root@haproxy ~]# dnf install socat -y
[root@haproxy ~]# echo "help" | socat stdio /var/lib/haproxy/stats
[root@haproxy ~]# echo "show info" | socat stdio /var/lib/haproxy/stats
######查看集群状态########
####修改权重#####
####修改权重#####
[root@haproxy ~]# echo get weight webcluster/web1 | socat stdio /var/lib/haproxy/stats
2 (initial 2)
[root@haproxy ~]# echo "set weight webcluster/web1 1" | socat stdio /var/lib/haproxy/stats
[root@haproxy ~]# echo get weight webcluster/web1 | socat stdio /var/lib/haproxy/stats
1 (initial 2)
测试
[root@haproxy ~]# curl 172.25.254.100
webserver - 172.25.254.10
[root@haproxy ~]# curl 172.25.254.100
webserver2 - 172.25.254.20
[root@haproxy ~]# curl 172.25.254.100
webserver - 172.25.254.10
[root@haproxy ~]# curl 172.25.254.100
webserver2 - 172.25.254.20
#####修改权重为2#####
[root@haproxy ~]# echo "set weight webcluster/web1 2" | socat stdio /var/lib/haproxy/stats
[root@haproxy ~]# echo get weight webcluster/web1 | socat stdio /var/lib/haproxy/stats
2 (initial 2)
测试
[root@haproxy ~]#for i in {1..10}; do curl 172.25.254.100; done
webserver - 172.25.254.10 webserver2 - 172.25.254.20 webserver - 172.25.254.10 webserver - 172.25.254.10 webserver2 - 172.25.254.20 webserver - 172.25.254.10 webserver - 172.25.254.10 webserver2 - 172.25.254.20 webserver - 172.25.254.10 webserver - 172.25.254.10
####下线服务器######
[root@haproxy ~]# echo "disable server webcluster/web1" | socat stdio /var/lib/haproxy/stats
[root@haproxy ~]# for i in {1..10}; do curl 172.25.254.100; done
webserver2 - 172.25.254.20
webserver2 - 172.25.254.20
webserver2 - 172.25.254.20
webserver2 - 172.25.254.20
webserver2 - 172.25.254.20
webserver2 - 172.25.254.20
webserver2 - 172.25.254.20
webserver2 - 172.25.254.20
webserver2 - 172.25.254.20
webserver2 - 172.25.254.20
######上线服务器#####
[root@haproxy ~]# echo "enable server webcluster/web1" | socat stdio /var/lib/haproxy/stats
[root@haproxy ~]# for i in {1..10}; do curl 172.25.254.100; done
webserver2 - 172.25.254.20
webserver - 172.25.254.10
webserver - 172.25.254.10
webserver2 - 172.25.254.20
webserver - 172.25.254.10
webserver - 172.25.254.10
webserver - 172.25.254.10
webserver - 172.25.254.10
webserver2 - 172.25.254.20
webserver - 172.25.254.10
多线程
五、haproxy算法
1、静态算法
1.1 static-rr:基于权重的轮询调度
- 不支持运行时利用socat进行权重的动态调整(只支持0和1,不支持其它值)
- 不支持端服务器慢启动
- 其后端主机数量没有限制,相当于LVS中的 wrr
1.2 first
- 根据服务器在列表中的位置,自上而下进行调度
- 其只会当第一台服务器的连接数达到上限,新请求才会分配给下一台服务
- 其会忽略服务器的权重设置
- 不支持用socat进行动态修改权重,可以设置0和1,可以设置其它值但无效
2、动态算法
- 基于后端服务器状态进行调度适当调整,
- 新请求将优先调度至当前负载较低的服务器
- 权重可以在haproxy运行时动态调整无需重启
2.1 roundrobin
1. 基于权重的轮询动态调度算法,2. 支持权重的运行时调整,不同于 lvs 中的 rr 轮训模式,3. HAProxy 中的 roundrobin 支持慢启动 ( 新加的服务器会逐渐增加转发数 ) ,4. 其每个后端 backend 中最多支持 4095 个 real server ,5. 支持对 real server 权重动态调整,6. roundrobin 为默认调度算法 , 此算法使用广泛
2.2 leastconn
- leastconn加权的最少连接的动态
- 支持权重的运行时调整和慢启动,即:根据当前连接最少的后端服务器而非权重进行优先调度(新客户端连接)
- 比较适合长连接的场景使用,比如:MySQL等场景。
3、其他算法
3.1 source
源地址 hash ,基于用户源地址 hash 并将请求转发到后端服务器,后续同一个源地址请求将被转发至同一个后端web 服务器。此方式当后端服务器数据量发生变化时,会导致很多用户的请求转发至新的后端服务器,默认为静态方式,但是可以通过hash-type 支持的选项更改这个算法一般是在不插入 Cookie 的 TCP模式下使用,也可给拒绝会话cookie 的客户提供最好的会话粘性,适用于 session 会话保持但不支持cookie和缓存的场景源地址有两种转发客户端请求到后端服务器的服务器选取计算方式,分别是取模法和一致性hash
3.1.1map-base 取模法
比如当源 hash 值时 1111 , 1112 , 1113 ,三台服务器 a b c 的权重均为 1 ,即 abc 的调度标签分别会被设定为 0 1 2 ( 1111%3=1 , 1112%3=2 , 1113%3=0 )1111 ----- > nodeb1112 ------> nodec1113 ------> nodea如果 a 下线后,权重数量发生变化1111%2=1 , 1112%2=0 , 1113%2=11112 和 1113 被调度到的主机都发生变化,这样会导致会话丢失
haproxy ~]# vim /etc/haproxy/haproxy.cfg... 上面内容省略 ...listen webserver_80bind 172.25.254.100:80mode httpbalance sourceserver webserver1 192.168.0.101:80 weight 1 check inter 3s fall 3 rise 5server webserver2 192.168.0.102:80 weight 1 check inter 3s fall 3 rise 5... 上面内容省略 ...# 不支持动态调整权重值[root@haproxy ~]# echo "set weight webserver_80/webserver1 2" | socat stdio/var/lib/haproxy/haproxy.sockBackend is using a static LB algorithm and only accepts weights '0%' and '100%'.# 只能动态上线和下线[root@haproxy ~]# echo "set weight webserver_80/webserver1 0" | socat stdio/var/lib/haproxy/haproxy.sock[root@haproxy ~]# echo "get weight webserver_80/webserver1" | socat stdio/var/lib/haproxy/haproxy.sock0 (initial 1)
3.1.2 一致性hash
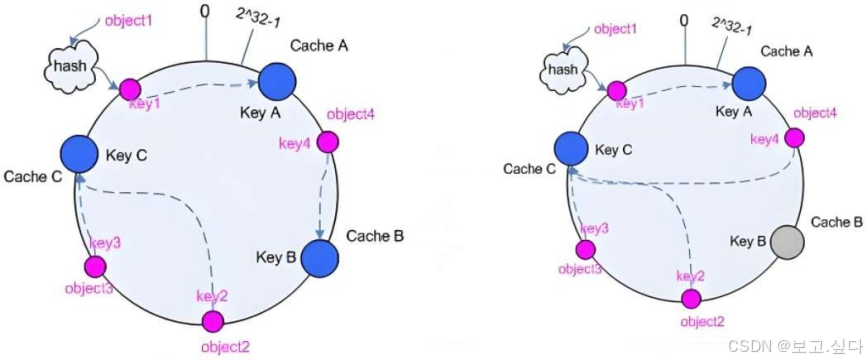
一致性哈希,当服务器的总权重发生变化时,对调度结果影响是局部的,不会引起大的变动 hash ( o )mod n该 hash 算法是动态的,支持使用 socat 等工具进行在线权重调整,支持慢启动
1 、后端服务器哈希环点 keyA=hash( 后端服务器虚拟 ip)%(2^32)2 、客户机哈希环点 key1=hash(client_ip)%(2^32) 得到的值在 [0---4294967295] 之间,3 、将 keyA 和 key1 都放在 hash 环上,将用户请求调度到离 key1 最近的 keyA 对应的后端服务器

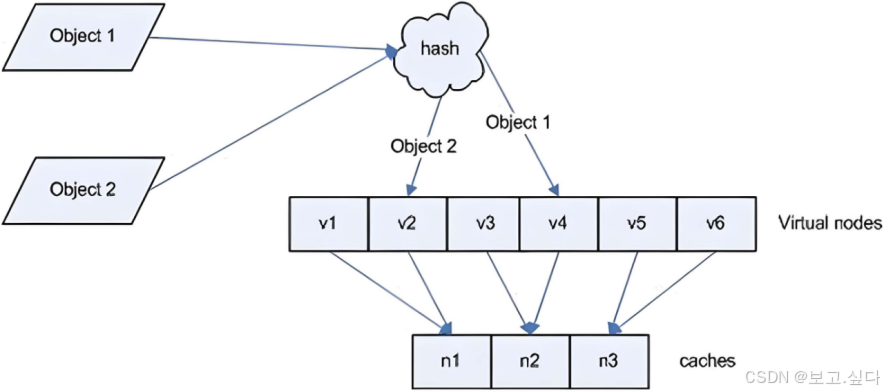
增加虚拟服务器 IP 数量,比如:一个后端服务器根据权重为 1 生成 1000 个虚拟 IP ,再 hash 。而后端服务器权重为2 则生成 2000 的虚拟 IP ,再 bash, 最终在 hash 环上生成 3000 个节点,从而解决 hash 环偏斜问题
3.2 uri
基于对用户请求的 URI 的左半部分或整个 uri 做 hash ,再将 hash 结果对总权重进行取模后根据最终结果将请求转发到后端指定服务器适用于后端是缓存服务器场景默认是静态算法,也可以通过 hash-type 指定 map-based 和 consistent ,来定义使用取模法还是一致性hash
Note注意:此算法基于应用层,所以只支持 mode http ,不支持 mode tcp

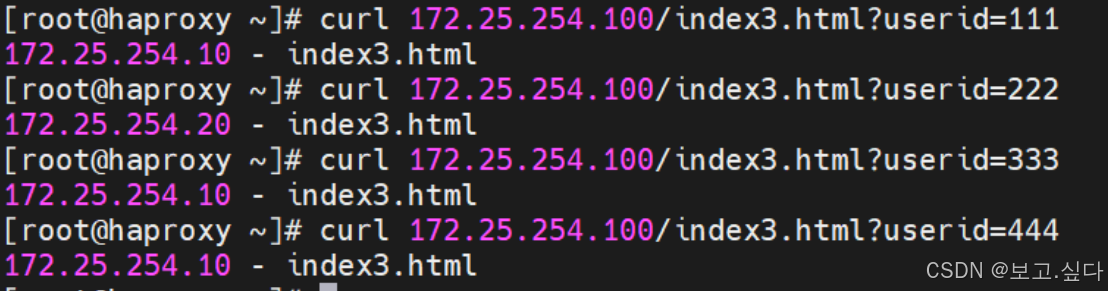
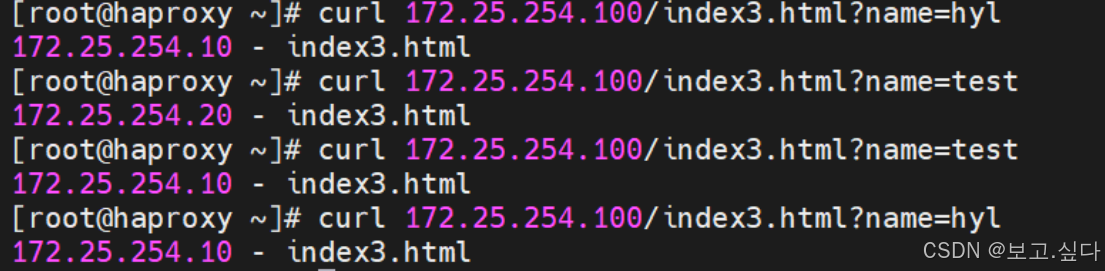
3.3 url_param
url_param 对用户请求的 url 中的 params 部分中的一个参数 key 对应的 value 值作 hash 计算,并由服务器总权重相除以后派发至某挑出的服务器, 后端搜索同一个数据会被调度到同一个服务器,多用与电商通常用于追踪用户,以确保来自同一个用户的请求始终发往同一个 real server如果无没 key ,将按 roundrobin 算法
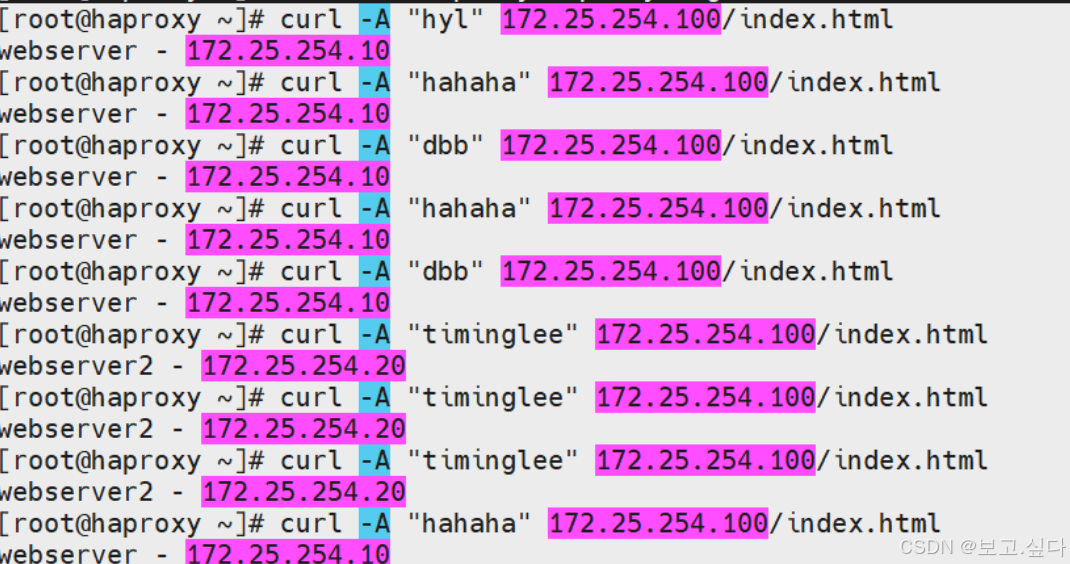
3.3.1 hdr
针对用户每个 http 头部 (header) 请求中的指定信息做 hash ,此处由 name 指定的 http 首部将会被取出并做 hash 计算,然后由服务器总权重取模以后派发至某挑出的服务器,如果无有效值,则会使用默认的轮询调度
4、算法总结
# 静态static-rr--------->tcp/httpfirst------------->tcp/http# 动态roundrobin-------->tcp/httpleastconn--------->tcp/http# 以下静态和动态取决于 hash_type 是否 consistentsource------------>tcp/httpUri--------------->httpurl_param--------->httphdr--------------->http
5、各算法使用场景
first # 使用较少static-rr # 做了 session 共享的 web 集群roundrobinleastconn # 数据库source# 基于客户端公网 IP 的会话保持Uri--------------->http # 缓存服务器, CDN 服务商,蓝汛、百度、阿里云、腾讯url_param--------->http # 可以实现 session 保持hdr # 基于客户端请求报文头部做下一步处理
实验部分
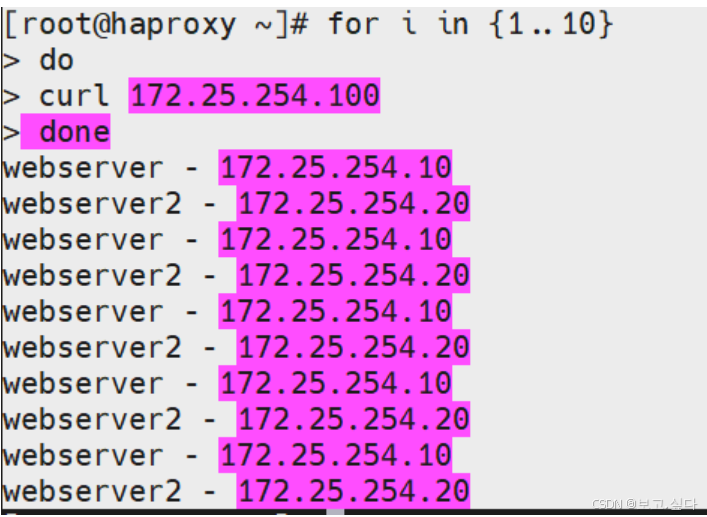
1、static-rr
修改文件
[root@haproxy conf.d]# vim /etc/haproxy/haproxy.cfg
[root@haproxy conf.d]# systemctl restart haproxy.service
测试
2、first
修改文件
[root@haproxy ~]# vim /etc/haproxy/haproxy.cfg

[root@haproxy ~]# systemctl restart haproxy.service
测试
[root@haproxy ~]# while true;do curl 172.25.254.100;sleep 0.1;done
·webserver - 172.25.254.10
webserver - 172.25.254.10
webserver - 172.25.254.10
webserver - 172.25.254.10
webserver - 172.25.254.10
webserver - 172.25.254.10
webserver - 172.25.254.10
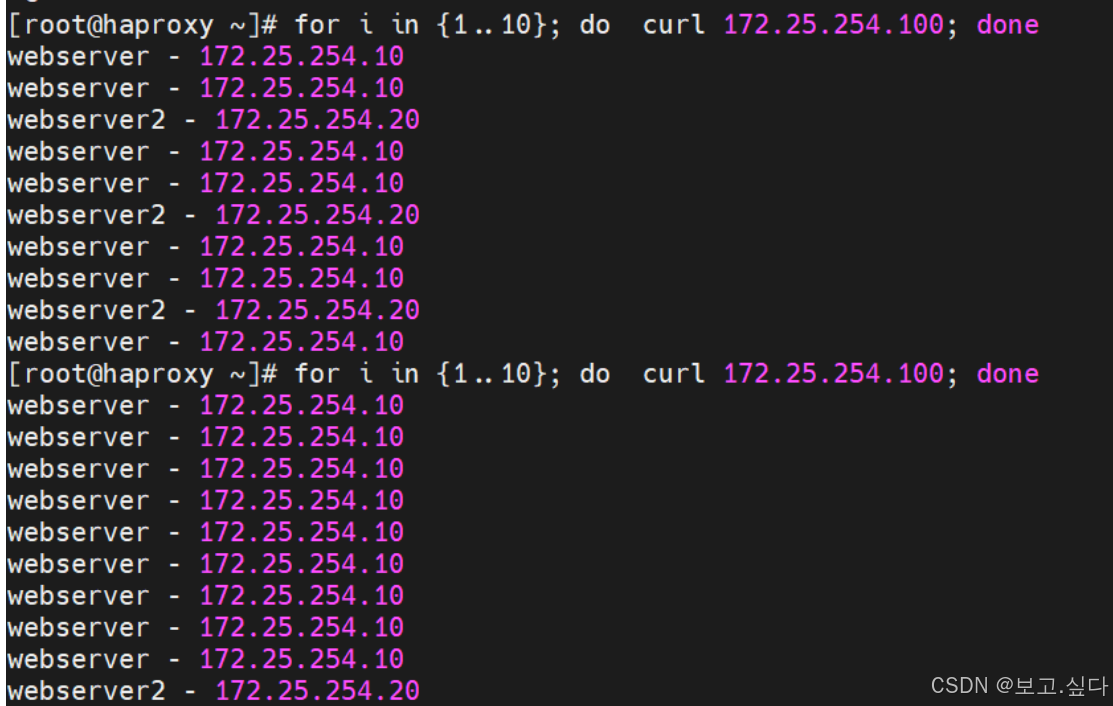
3、roundrobin
修改文件
[root@haproxy ~]# vim /etc/haproxy/haproxy.cfg
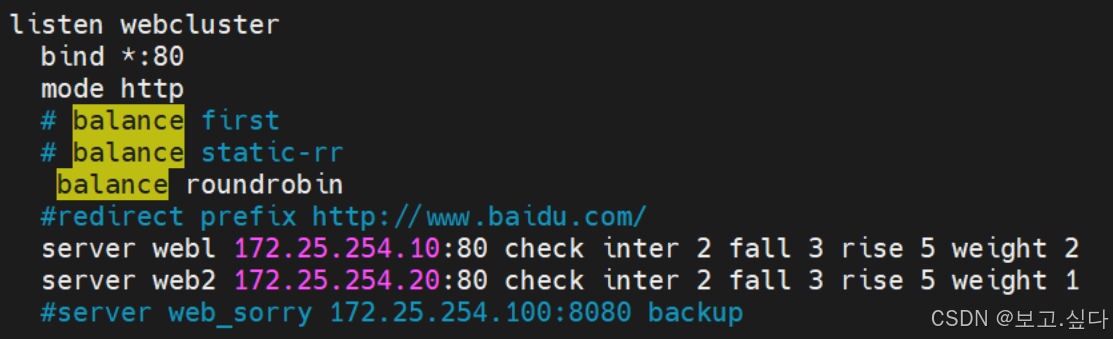
[root@haproxy conf.d]# systemctl restart haproxy.service
测试
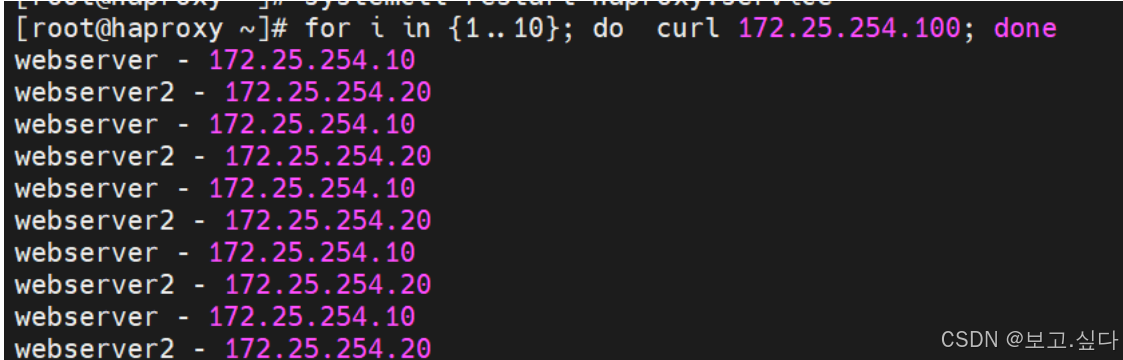
4、最小链接leastconn
修改文件
[root@haproxy ~]# vim /etc/haproxy/haproxy.cfg
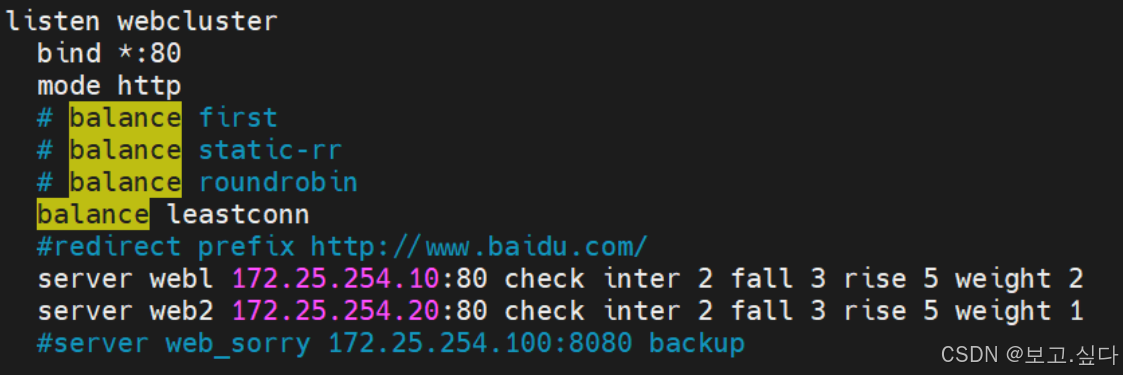
[root@haproxy conf.d]# systemctl restart haproxy.service
测试
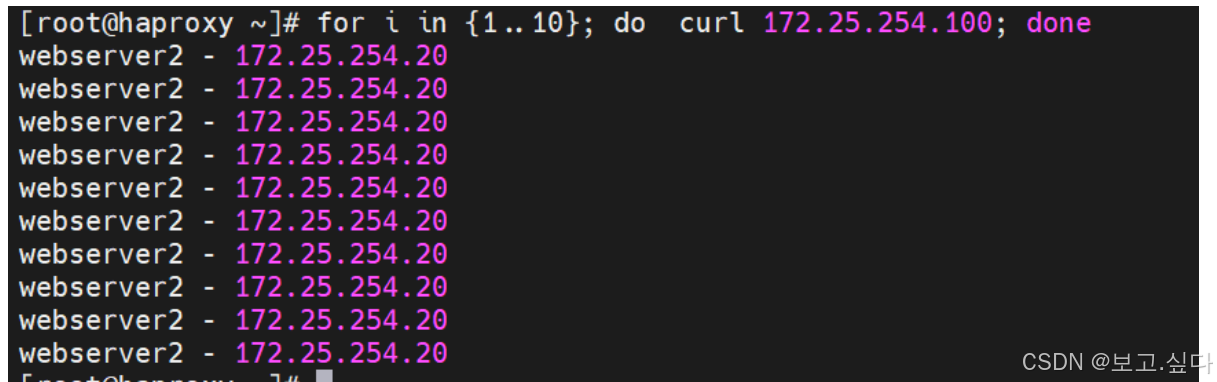
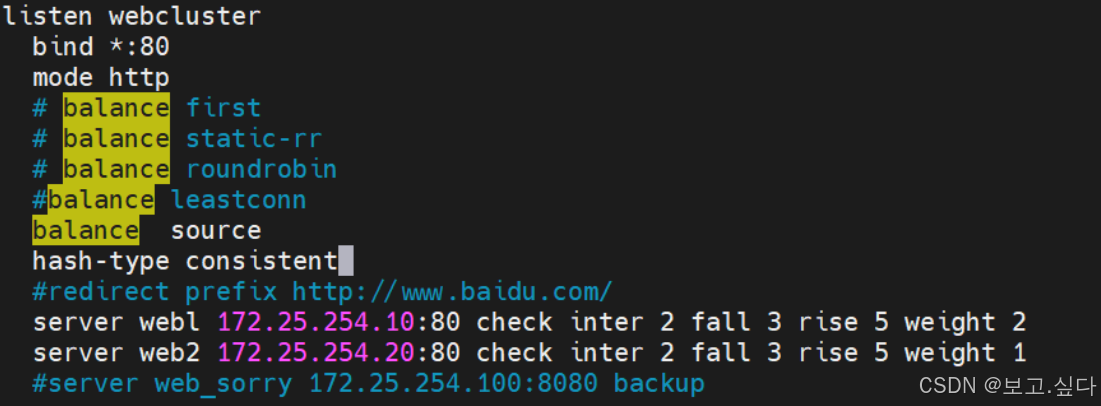
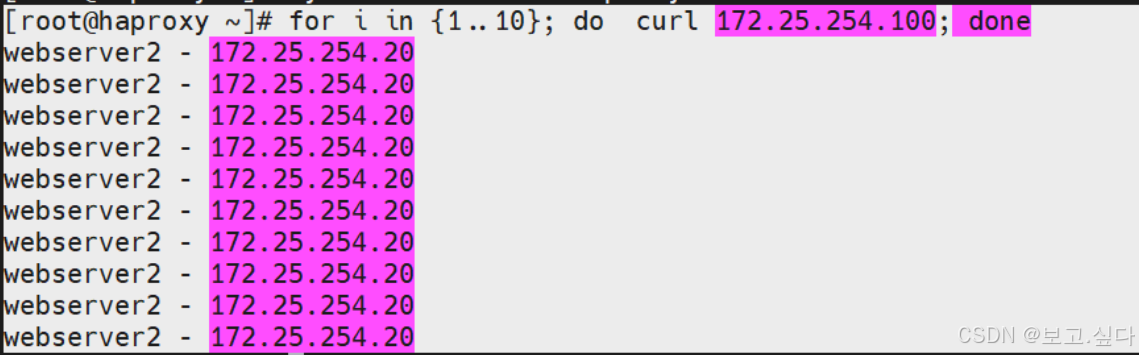
5、source
修改文件
[root@haproxy ~]# vim /etc/haproxy/haproxy.cfg
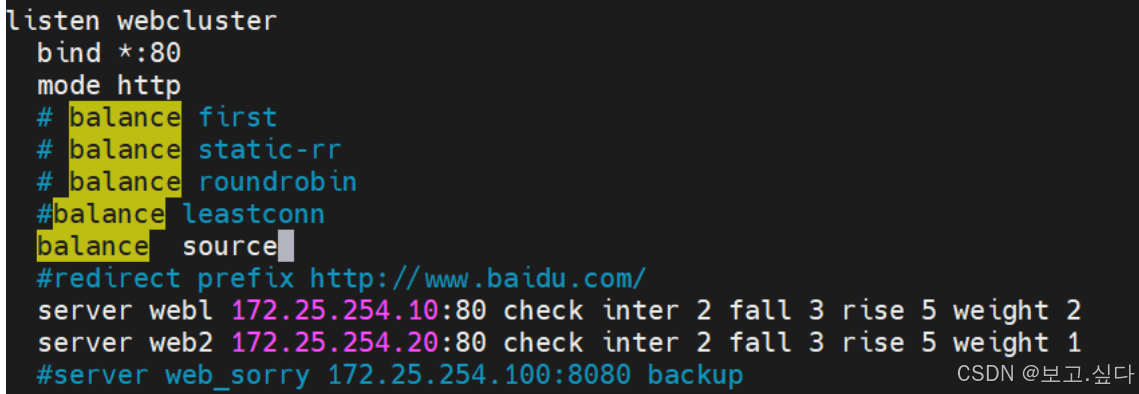
[root@haproxy conf.d]# systemctl restart haproxy.service
测试
6、一致性hash
修改文件
[root@haproxy ~]# vim /etc/haproxy/haproxy.cfg
[root@haproxy conf.d]# systemctl restart haproxy.service
测试
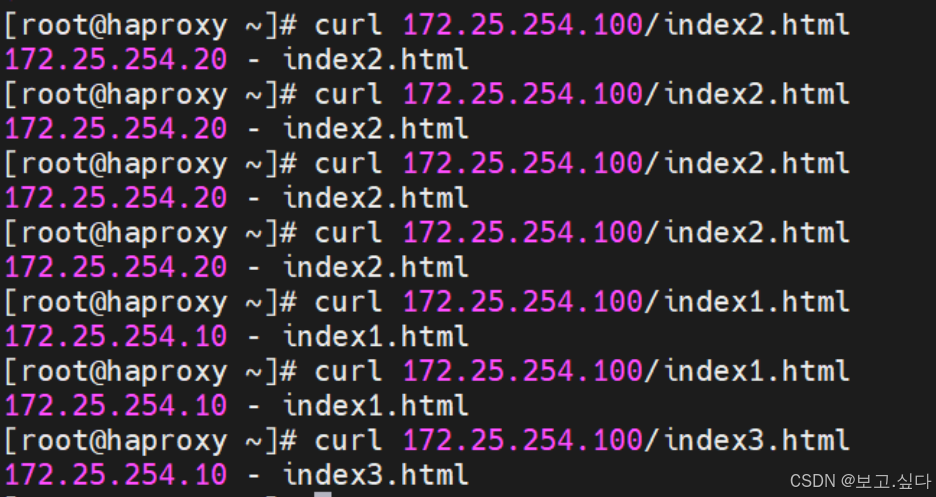
7、uri
修改文件
[root@haproxy ~]# vim /etc/haproxy/haproxy.cfg
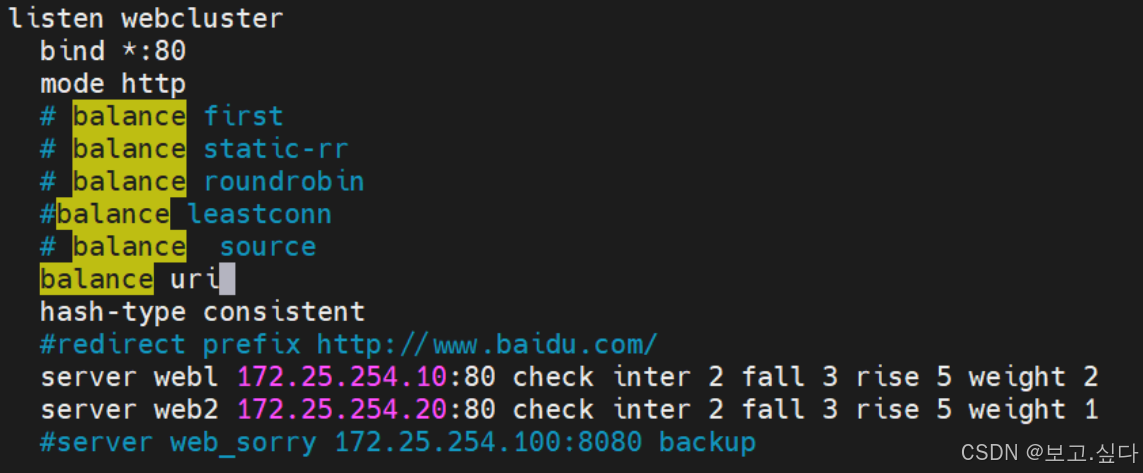
[root@haproxy conf.d]# systemctl restart haproxy.service
server配置
[root@webserver ~]# echo 172.25.254.10 - index1.html > /usr/share/nginx/html/index1.html
[root@webserver ~]# echo 172.25.254.10 - index2.html > /usr/share/nginx/html/index2.html [root@webserver ~]# echo 172.25.254.10 - index3.html > /usr/share/nginx/html/index3.html
[root@webserver2 ~]# echo 172.25.254.20 - index1.html > /usr/share/nginx/html/index1.html
[root@webserver2 ~]# echo 172.25.254.20 - index2.html > /usr/share/nginx/html/index2.html
[root@webserver2 ~]# echo 172.25.254.20 - index3.html > /usr/share/nginx/html/index3.html
测试
8、url_param
修改文件
[root@haproxy ~]# vim /etc/haproxy/haproxy.cfg
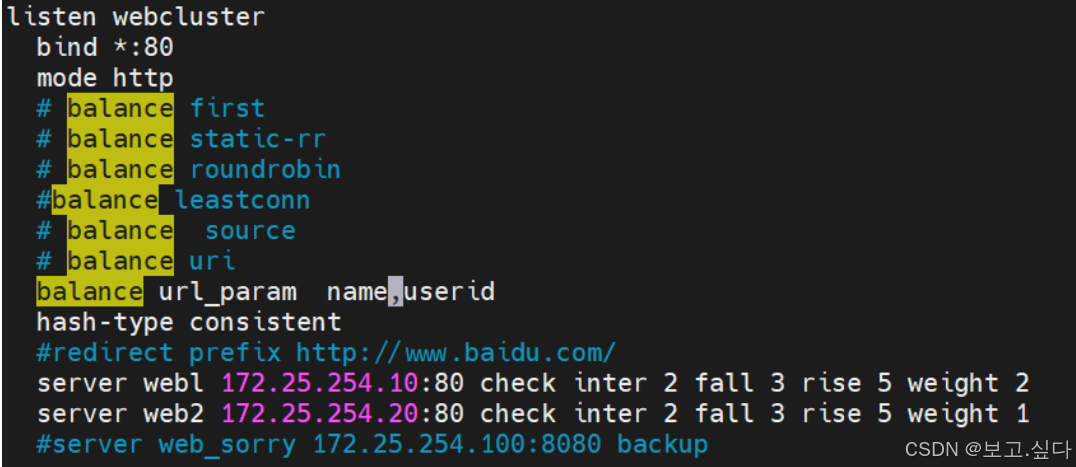
[root@haproxy conf.d]# systemctl restart haproxy.service
测试
ID测试
name测试
9、hdr
修改文件
[root@haproxy ~]# vim /etc/haproxy/haproxy.cfg

[root@haproxy conf.d]# systemctl restart haproxy.service
测试
六、状态页
1、 状态页配置项
stats enable # 基于默认的参数启用 stats pagestats hide-version # 将状态页中 haproxy 版本隐藏stats refresh <delay> # 设定自动刷新时间间隔,默认不自动刷新stats uri <prefix> # 自定义 stats page uri ,默认值: /haproxy?statsstats auth <user>:<passwd> # 认证时的账号和密码,可定义多个用户 , 每行指定一个用户# 默认: no authenticationstats admin { if | unless } <cond> # 启用 stats page 中的管理功能
2、启用状态页
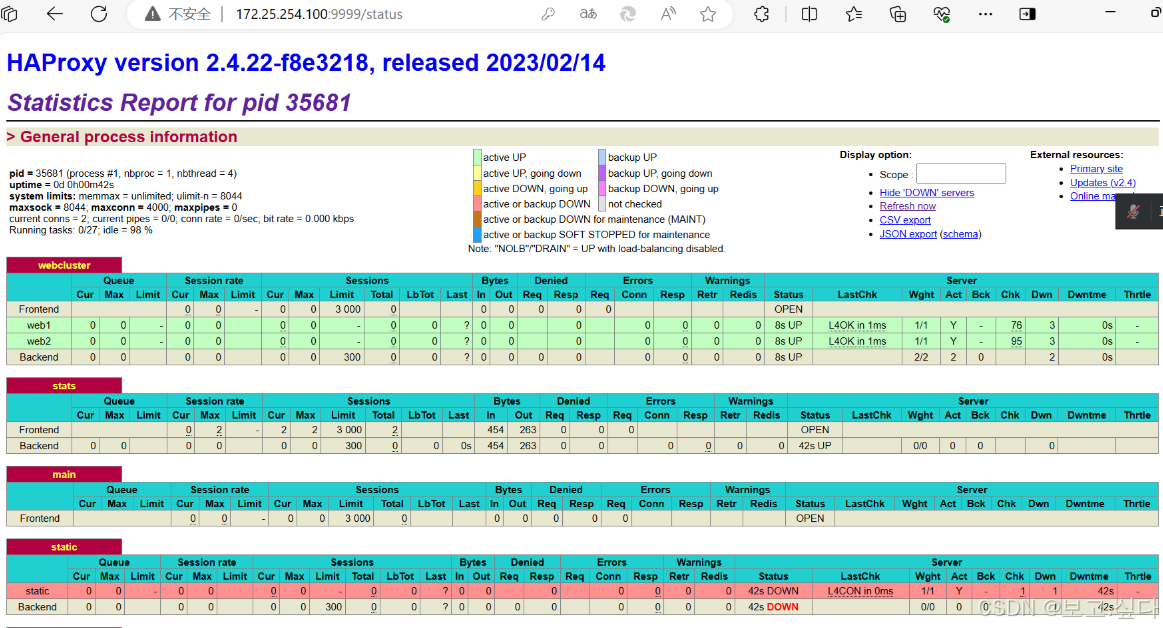
haproxy ~]# vim /etc/haproxy/haproxy.cfg... 上面内容省略 ...listen stats :mode httpbind 0.0.0.0:8888stats enablelog globalstats uri /status # 自定义 stats page uristats auth lee:lee # 认证,此行可以出现多次... 上面内容省略 ...测试:浏览器访问: 172.25.254.100:8888/status
3、 登录状态页
#pid 为当前 pid 号, process 为当前进程号, nbproc 和 nbthread 为一共多少进程和每个进程多少个线程pid = 27134 (process #1, nbproc = 1, nbthread = 1)# 启动了多长时间uptime = 0d 0h00m04s# 系统资源限制:内存 / 最大打开文件数 /system limits: memmax = unlimited; ulimit-n = 200029# 最大 socket 连接数 / 单进程最大连接数 / 最大管道数 maxpipesmaxsock = 200029; maxconn = 100000; maxpipes = 0# 当前连接数 / 当前管道数 / 当前连接速率current conns = 2; current pipes = 0/0; conn rate = 2/sec; bit rate = 0.000 kbp# 运行的任务 / 当前空闲率Running tasks: 1/14; idle = 100 %active UP : # 在线服务器backup UP : # 标记为 backup 的服务器active UP, going down : # 监测未通过正在进入 down 过程backup UP, going down : # 备份服务器正在进入 down 过程active DOWN, going up : #down 的服务器正在进入 up 过程backup DOWN, going up : # 备份服务器正在进入 up 过程active or backup DOWN : # 在线的服务器或者是 backup 的服务器已经转换成了 down 状态not checked : # 标记为不监测的服务器#active 或者 backup 服务器人为下线的active or backup DOWN for maintenance (MAINT)#active 或者 backup 被人为软下线 ( 人为将 weight 改成 0)active or backup SOFT STOPPED for maintenance
实验配置
修改文件
[root@haproxy ~]# vim /etc/haproxy/haproxy.cfg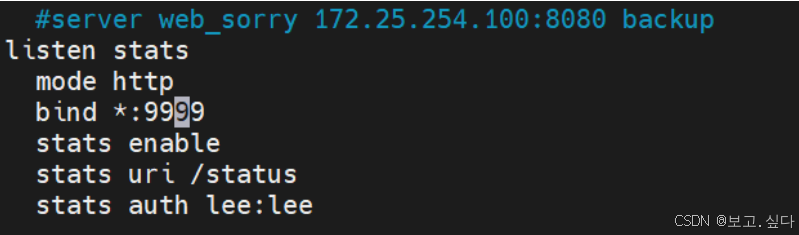
[root@haproxy conf.d]# systemctl restart haproxy.service
测试
七、cookie
1、基于cookie的会话保持
cookie value :为当前 server 指定 cookie 值,实现基于 cookie 的会话黏性,相对于基于 source 地址 hash 调度算法对客户端的粒度更精准,但同时也加大了haproxy 负载,目前此模式使用较少, 已经被 session 共享服务器代替Note注意:不支持 tcp mode ,使用 http mode
2、配置选项
cookie name [ rewrite | insert | prefix ][ indirect ] [ nocache ][ postonly ] [preserve ][ httponly ] [ secure ][ domain ]* [ maxidle <idle> ][ maxlife ]name : #cookie 的 key 名称,用于实现持久连接insert : # 插入新的 cookie, 默认不插入 cookieindirect : # 如果客户端已经有 cookie, 则不会再发送 cookie 信息nocache:# 当 client 和 hapoxy 之间有缓存服务器(如: CDN )时,不允许中间缓存器缓存 cookie , #因为这会导致很多经过同一个 CDN 的请求都发送到同一台后端服务器
实验配置
修改文件


测试

八、ip透传
七层
webserver
[root@webserver ~]# systemctl stop nginx.service [root@webserver ~]# dnf install httppd
[root@webserver ~]# echo webserver - 172.25.254.10 > /var/www/html/index.html [root@webserver ~]# systemctl enable --now httpd Created symlink /etc/systemd/system/multi-user.target.wants/httpd.service → /usr/lib/systemd/system/httpd.service.
测试
[root@haproxy ~]# curl 172.25.254.100 webserver - 172.25.254.10
关闭透传
[root@haproxy ~]# vim /etc/haproxy/haproxy.cfg

[root@haproxy ~]# systemctl restart haproxy.service
[root@haproxy ~]# curl 172.25.254.100 webserver2 - 172.25.254.20
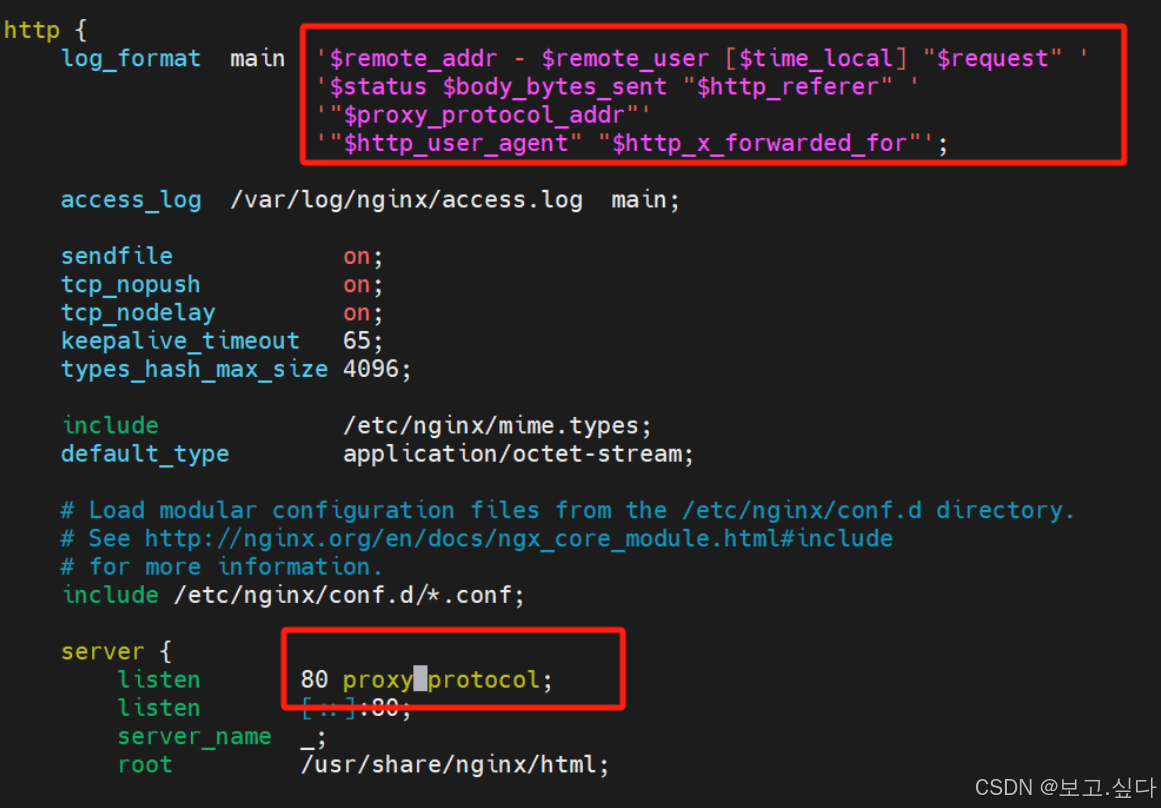
查看日志
[root@webserver2 ~]# cat /var/log/nginx/access.log

打开透传查看日志

server1日志不能显示

编辑httpd文件
[root@webserver ~]# vim /etc/httpd/conf/httpd.conf

[root@webserver ~]# systemctl restart httpd
测试
[root@haproxy ~]# curl 172.25.254.100 webserver - 172.25.254.10

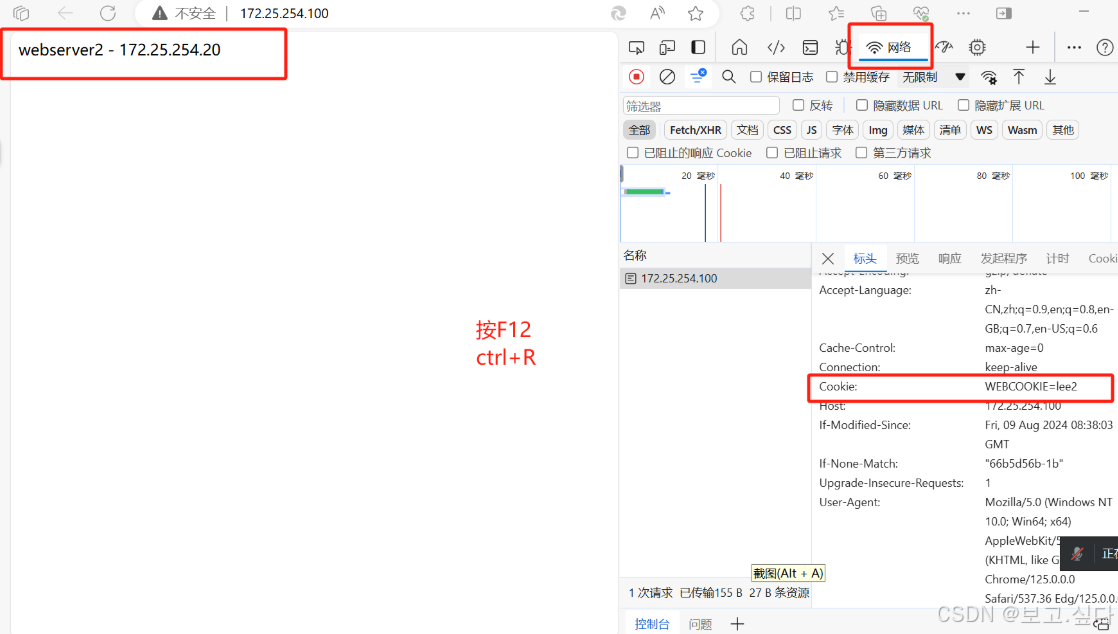
编辑nginx文件
[root@webserver2 ~]# vim /etc/nginx/nginx.conf
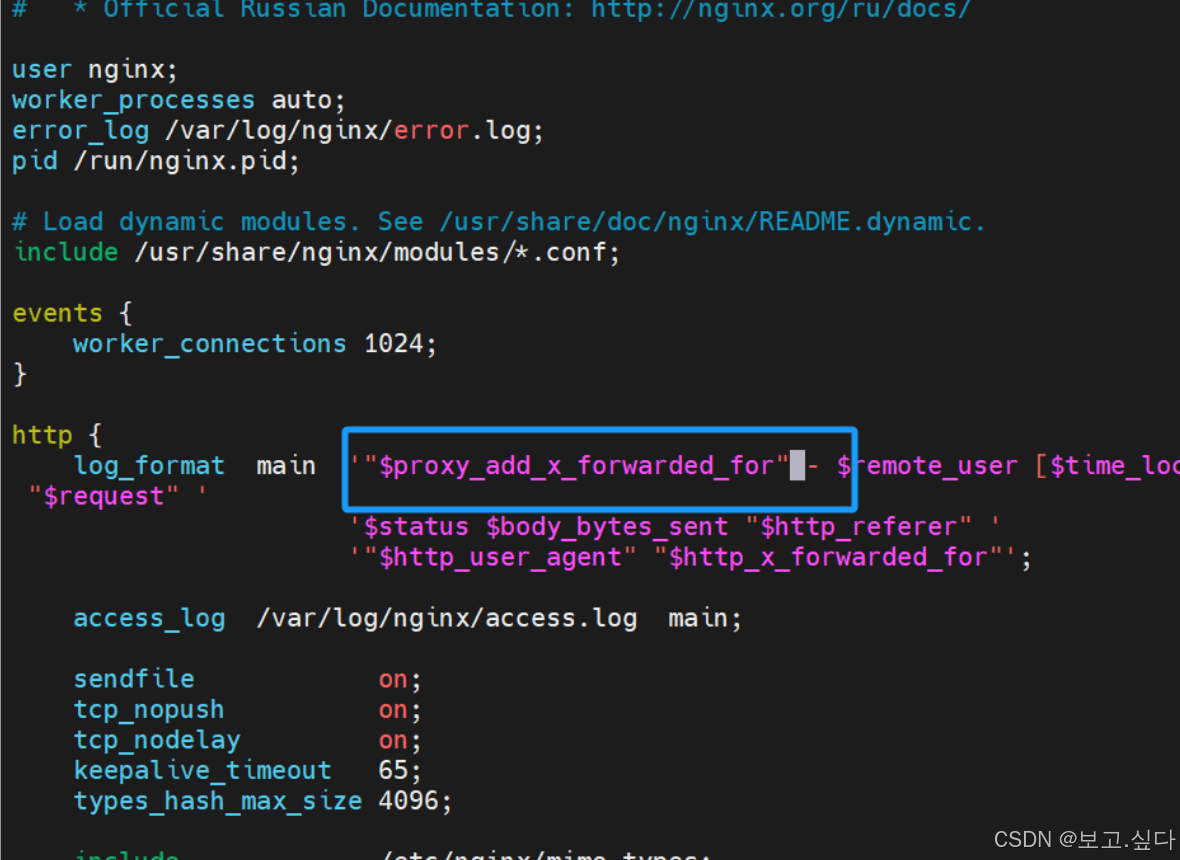
[root@webserver2 ~]# systemctl restart nginx.service
测试
[root@haproxy ~]# curl 172.25.254.100 webserver2 - 172.25.254.20
[root@webserver2 ~]# cat /var/log/nginx/access.log

四层
更改为tcp四层
[root@haproxy ~]# vim /etc/haproxy/haproxy.cfg [root@haproxy ~]# systemctl restart haproxy.service
修改nginx文件
[root@webserver2 ~]# vim /etc/nginx/nginx.conf [root@webserver2 ~]# systemctl restart nginx.service
webserver2添加 send-proxy

测试

[root@webserver2 ~]# cat /var/log/nginx/access.log

九、ACL
1、ACL
访问控制列表 ACL , Access Control Lists )是一种基于包过滤的访问控制技术它可以根据设定的条件对经过服务器传输的数据包进行过滤 ( 条件匹配 ) 即对接收到的报文进行匹配和过滤,基于请求报文头部中的源地址、源端口、目标地址、目标端口、请求方法、URL、文件后缀等信息内容进行匹配并执行进一步操作,比如允许其通过或丢弃。
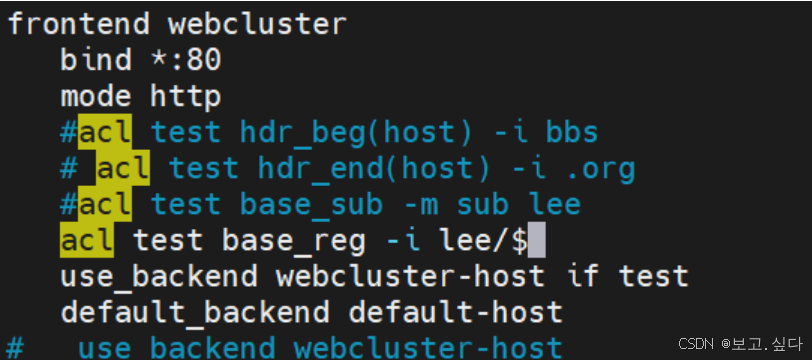
# 示例frontend test_aclbind *:80mode http#acl bad_browers hdr_beg(User-Agent) -i curl#http-request deny if bad_browers#acl test hdr_dom(host) -i www.timinglee.org#acl test hdr_end(host) -i .org#acl test base_sub -m sub org#acl test path_sub -m sub /a#acl test path_end -m sub /a#acl test path_reg -i ^/tacl test url_sub -m sub leeacl test path_dir -m sub ause_backend test_web if testdefault_backend default_webserverbackend default_webservermode httpserver web1 172.25.254.20:80 check inter 3 fall 3 rise 5backend test_webmode httpserver web2 172.25.254.30:80 check inter 3 fall 3 rise 5
2、 ACL配置选项
# 用 acl 来定义或声明一个 aclacl <aclname> <criterion> [flags] [operator] [<value>]acl 名称 匹配规范 匹配模式 具体操作符 操作对象类型
3、ACL-Name 名称
acl test path_end -m sub /a#ACL 名称,可以使用大字母 A-Z 、小写字母 a-z 、数字 0-9 、冒号:、点 . 、中横线和下划线,并且严格区分大小写,比如:my_acl 和 My_Acl 就是两个完全不同的 acl5.8.1.2 ACL-criterion
4、 ACL-criterion 匹配规范
5、ACL-flags 匹配模式
-i 不区分大小写-m 使用指定的正则表达式匹配方法-n 不做 DNS 解析-u 禁止 acl 重名,否则多个同名 ACL 匹配或关系
6、ACL-operator 具体操作符
整数比较: eq 、 ge 、 gt 、 le 、 lt字符比较:- exact match (-m str) : 字符串必须完全匹配模式- substring match (-m sub) : 在提取的字符串中查找模式,如果其中任何一个被发现, ACL 将匹配- prefix match (-m beg) : 在提取的字符串首部中查找模式,如果其中任何一个被发现, ACL 将匹配- suffix match (-m end) : 将模式与提取字符串的尾部进行比较,如果其中任何一个匹配,则 ACL 进行匹配- subdir match (-m dir) : 查看提取出来的用斜线分隔( “/" )的字符串,如其中任一个匹配,则 ACL进行匹配- domain match (-m dom) : 查找提取的用点( “." )分隔字符串,如果其中任何一个匹配,则 ACL 进行匹配
7、 ACL-value 操作对象
The ACL engine can match these types against patterns of the following types :- Boolean # 布尔值- integer or integer range # 整数或整数范围,比如用于匹配端口范围- IP address / network #IP 地址或 IP 范围 , 192.168.0.1 ,192.168.0.1/24- string--> www.timinglee.orgexact # 精确比较substring # 子串suffix # 后缀比较prefix # 前缀比较subdir # 路径, /wp-includes/js/jquery/jquery.jsdomain # 域名, www.timinglee.org- regular expression # 正则表达式- hex block #16 进制
8、多个ACL的组合调用方式
多个 ACL 的逻辑处理与:隐式(默认)使用或:使用 “or" 或 “||" 表示否定:使用 "!" 表示多个 ACL 调用方式:# 示例:if valid_src valid_port # 与关系, ACL 中 A 和 B 都要满足为 true ,默认为与if invalid_src || invalid_port # 或, ACL 中 A 或者 B 满足一个为 trueif ! invalid_src # 非,取反,不满足 ACL 才为 true
实验部分
hdr_dom(host)
修改配置文件
[root@haproxy conf.d]# vim /etc/haproxy/haproxy.cfg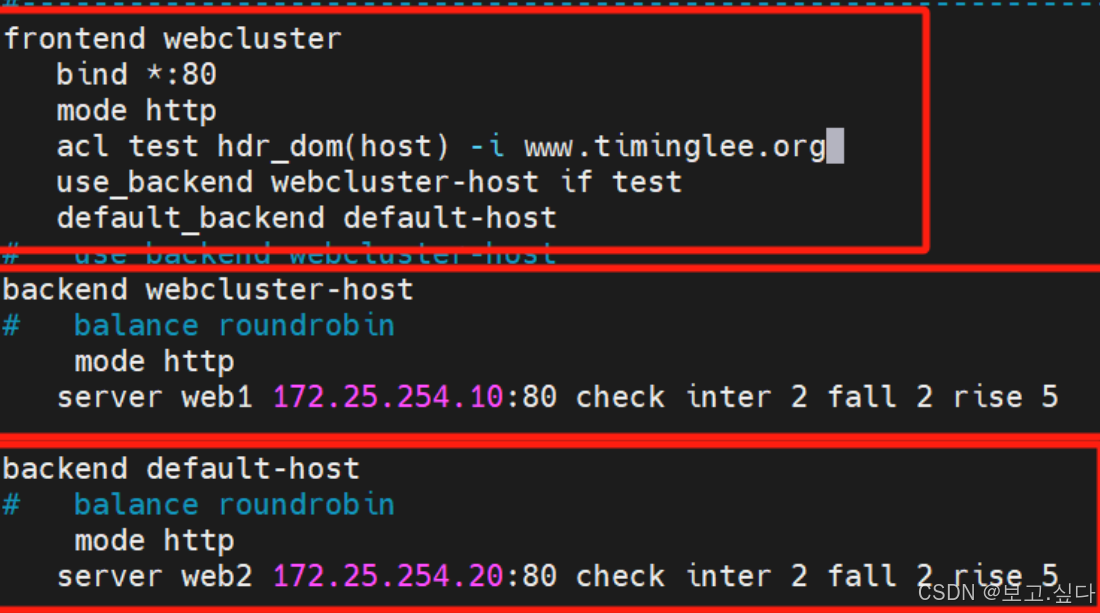
[root@haproxy conf.d]# systemctl restart haproxy.service
编写解析文件
C:\Windows\System32\drivers\etc\hosts

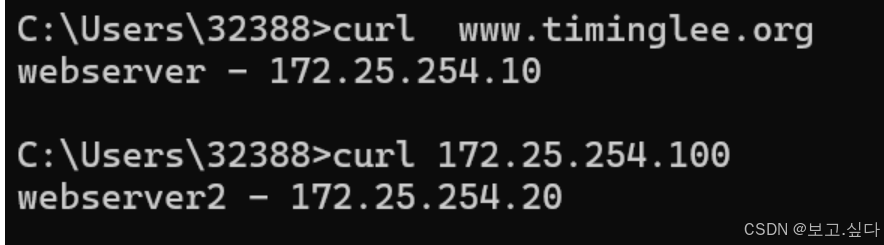
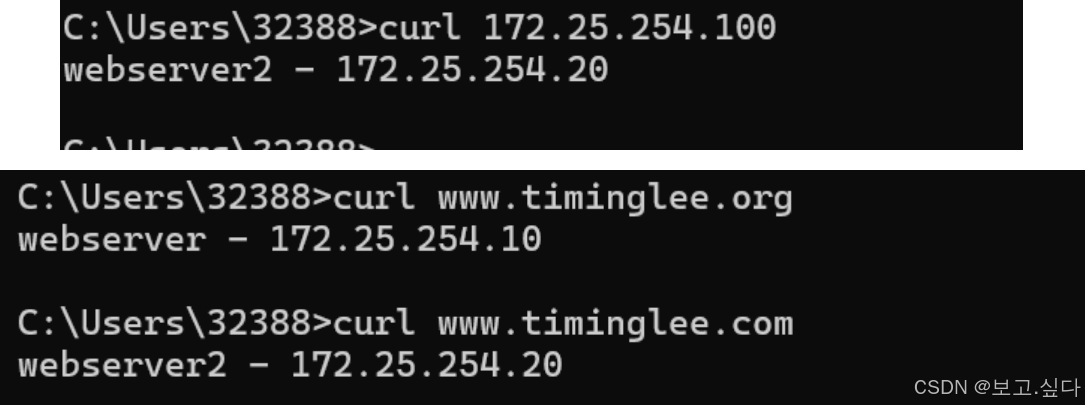
测试
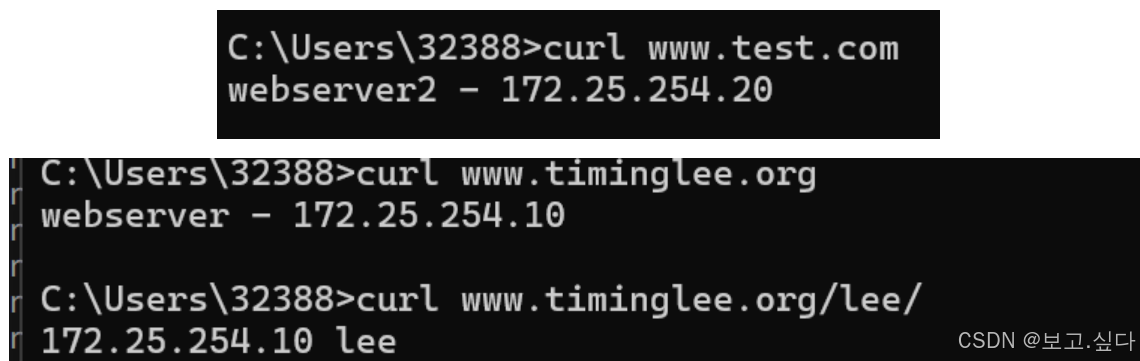
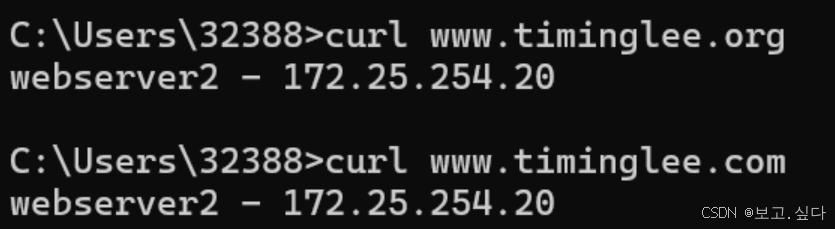
hdr_end(host) 以...结尾
[root@haproxy conf.d]# vim /etc/haproxy/haproxy.cfg
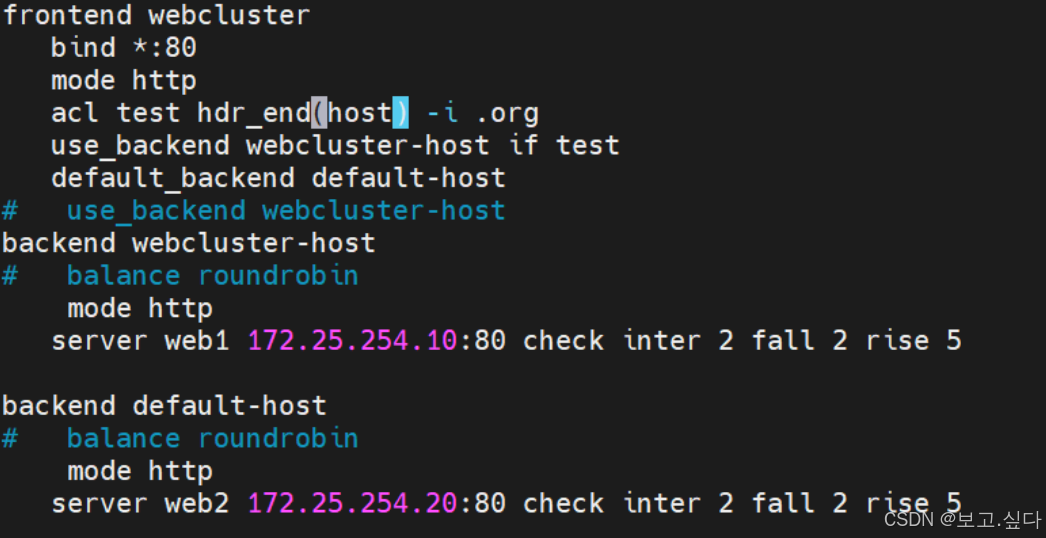
[root@haproxy conf.d]# systemctl restart haproxy.service

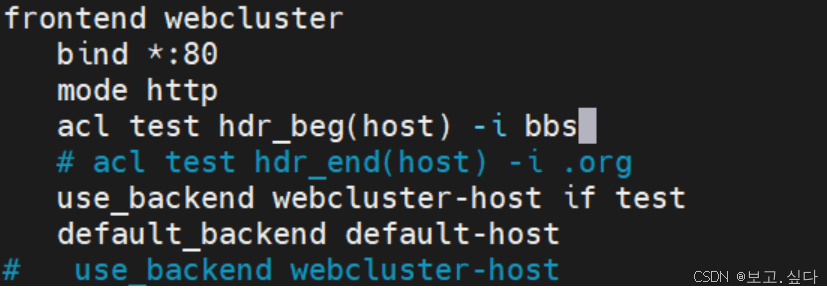
hdr_beg 前缀匹配

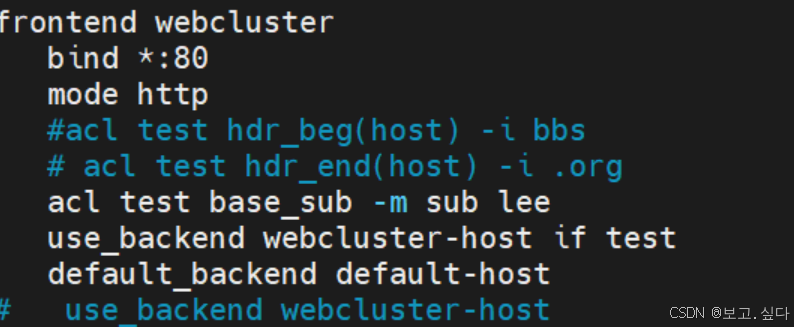
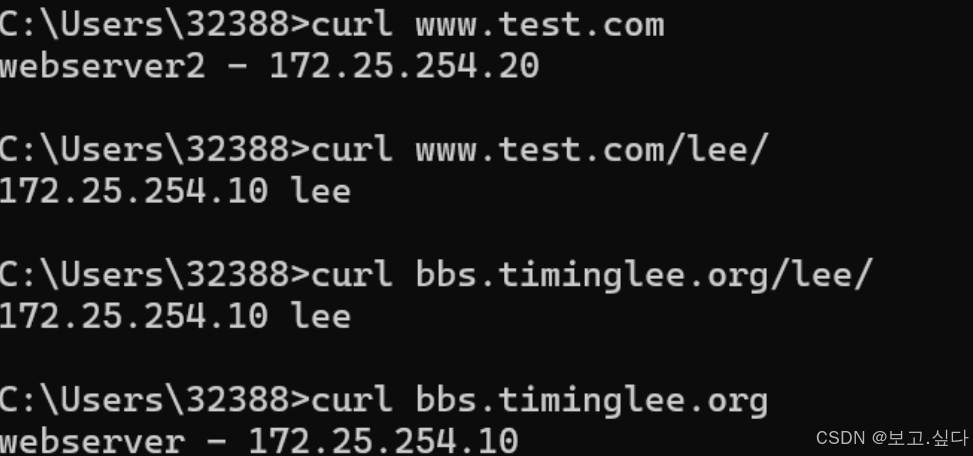
base_sub (含lee)
[root@webserver ~]# mkdir /var/www/html/lee -p [root@webserver ~]# echo 172.25.254.10 lee > /var/www/html/lee/index.html
[root@webserver ~]# systemctl restart httpd
[root@webserver ~]# curl 172.25.254.10/lee/ 172.25.254.10 lee

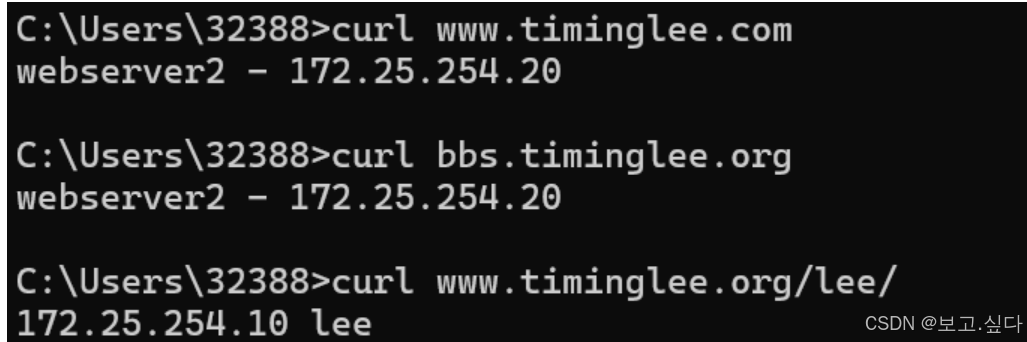
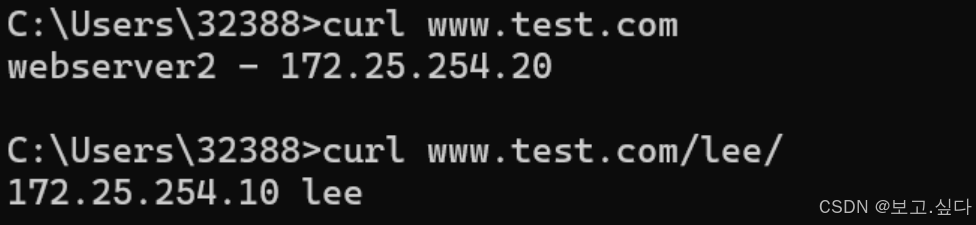
base_reg (含/lee/)
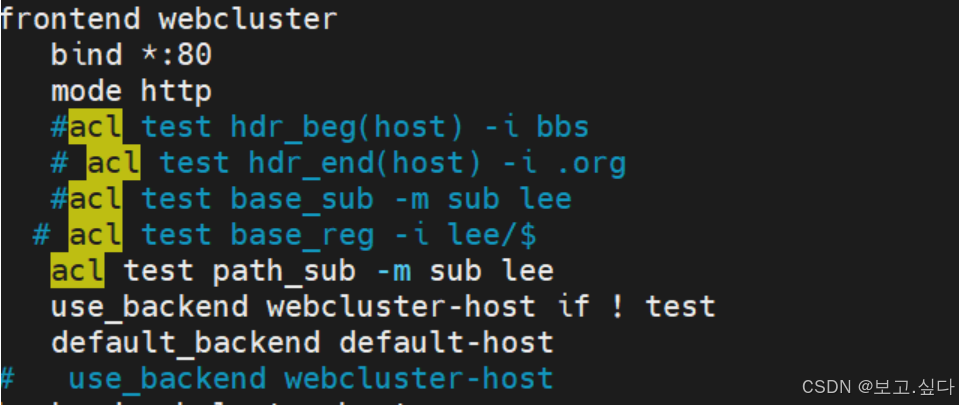
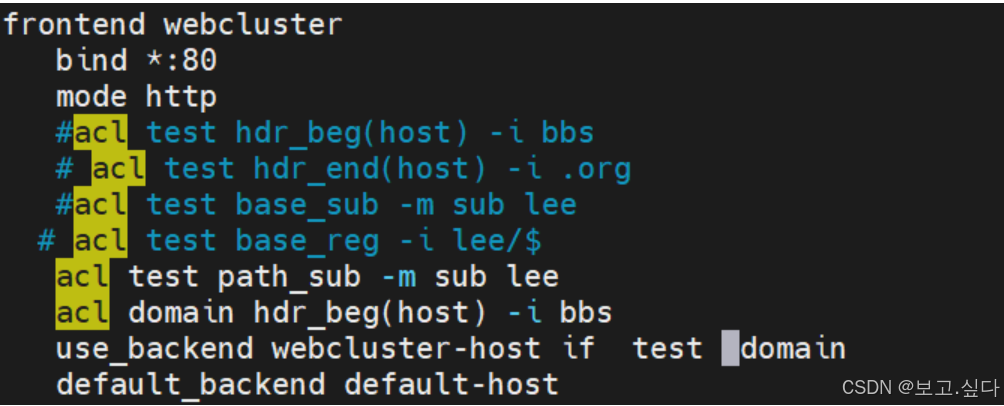
path_sub (if test)


path_sub (if ! test)
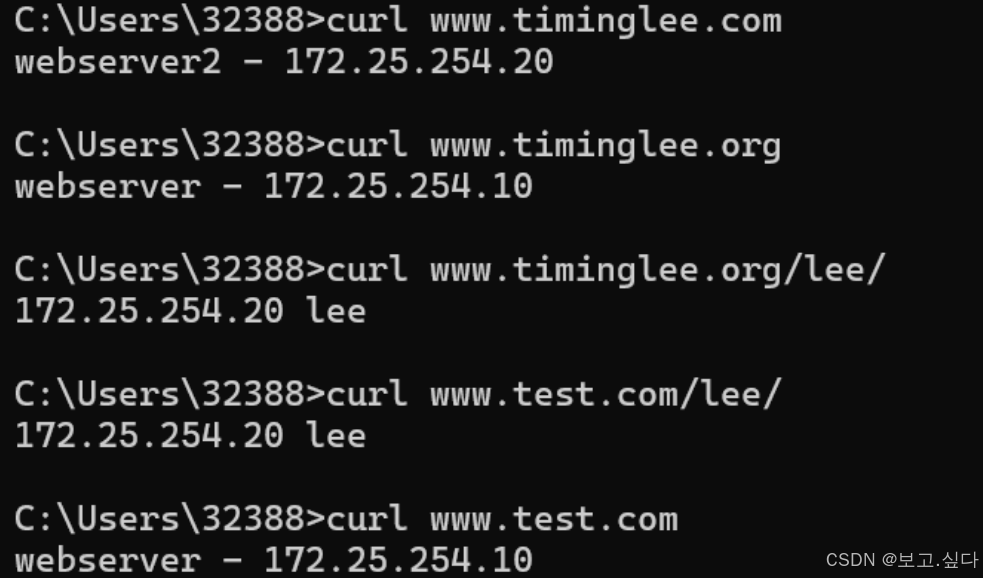
path_sub (if test || domain)
[root@webserver2 ~]# mkdir /usr/share/nginx/html/lee -p [root@webserver2 ~]# echo 172.25.254.20 lee > /usr/share/nginx/html/lee/index.html [root@webserver2 ~]# systemctl restart nginx.service
[root@webserver2 ~]# curl 172.25.254.20/lee/ 172.25.254.20 lee
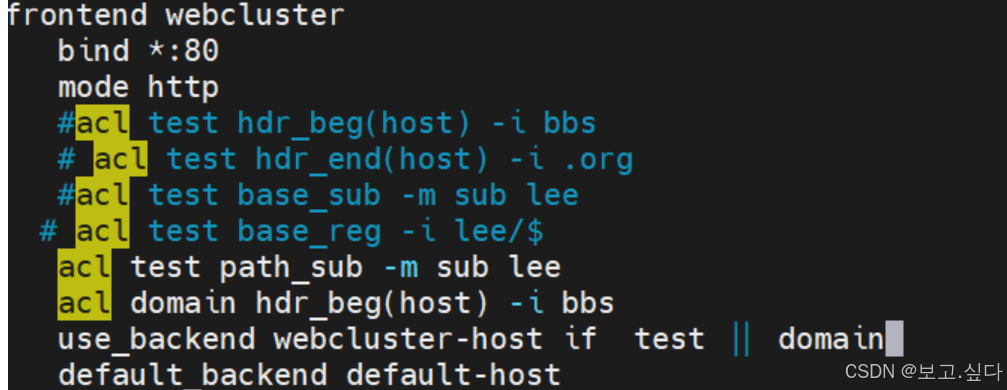

path_sub (if test domain)
十、ACL的应用的实例
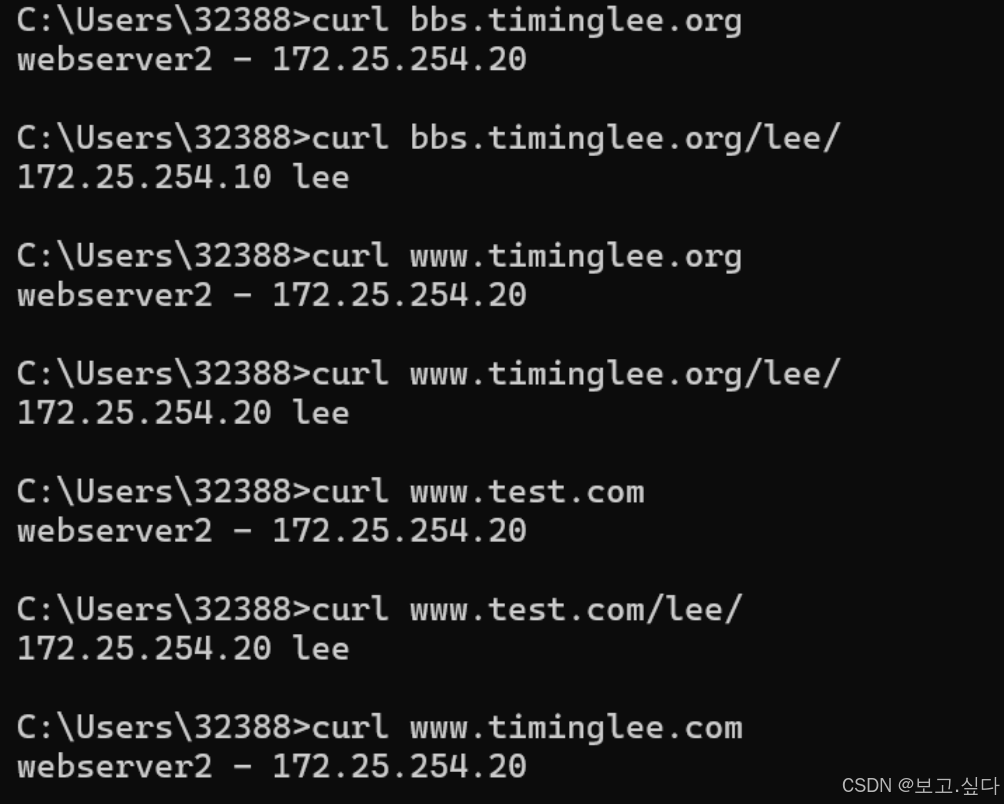
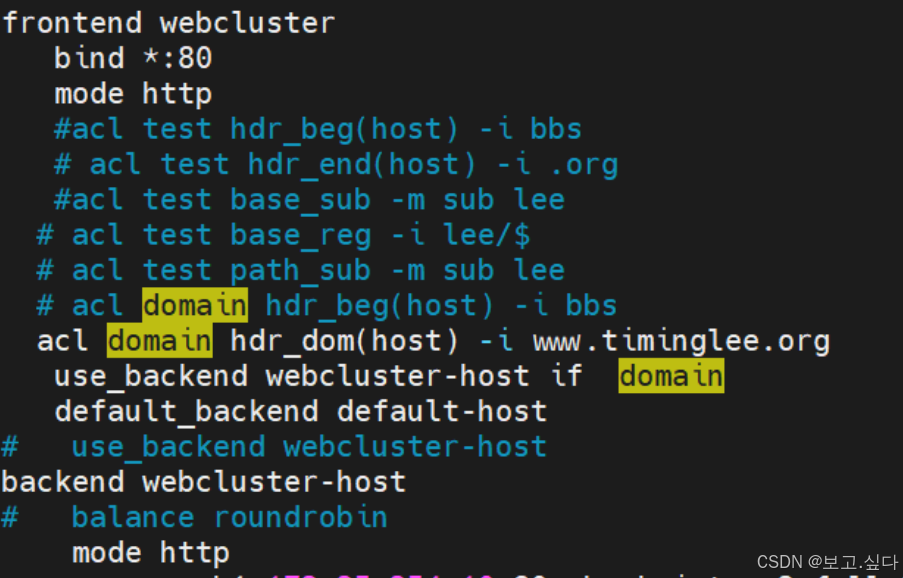
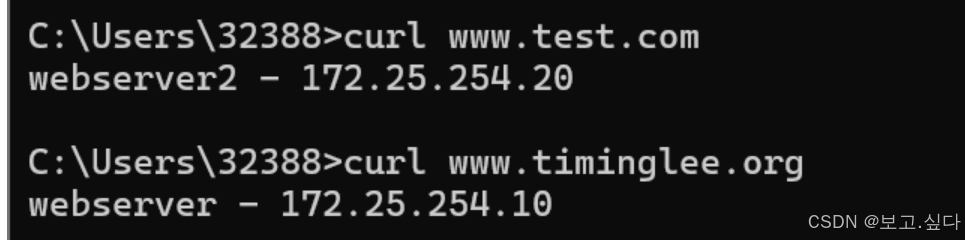
域名匹配
修改文件
[root@haproxy conf.d]# vim /etc/haproxy/haproxy.cfg
[root@haproxy conf.d]# systemctl restart haproxy.service
测试

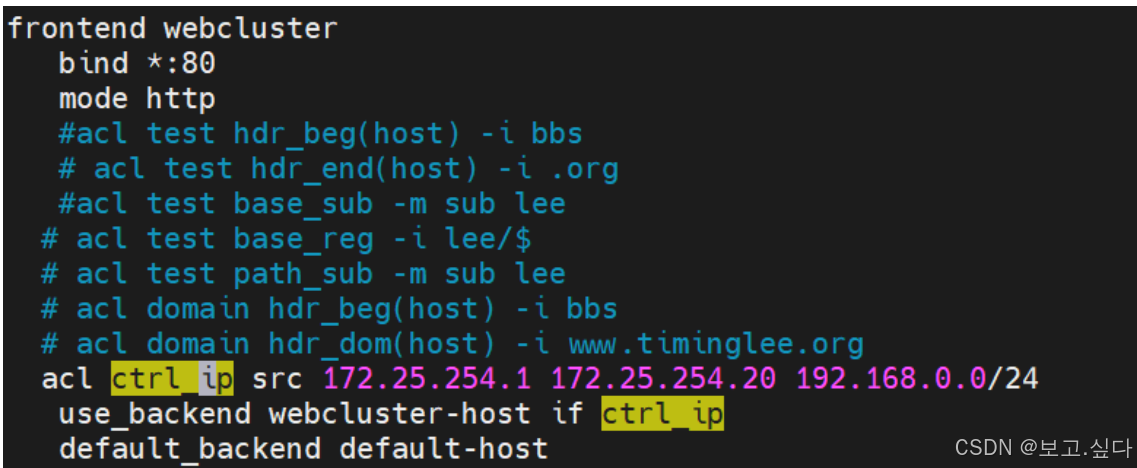
基于源ip或子网调度访问
[root@webserver ~]# curl 172.25.254.100 webserver2 - 172.25.254.20
[root@webserver2 ~]# curl 172.25.254.100 webserver - 172.25.254.10

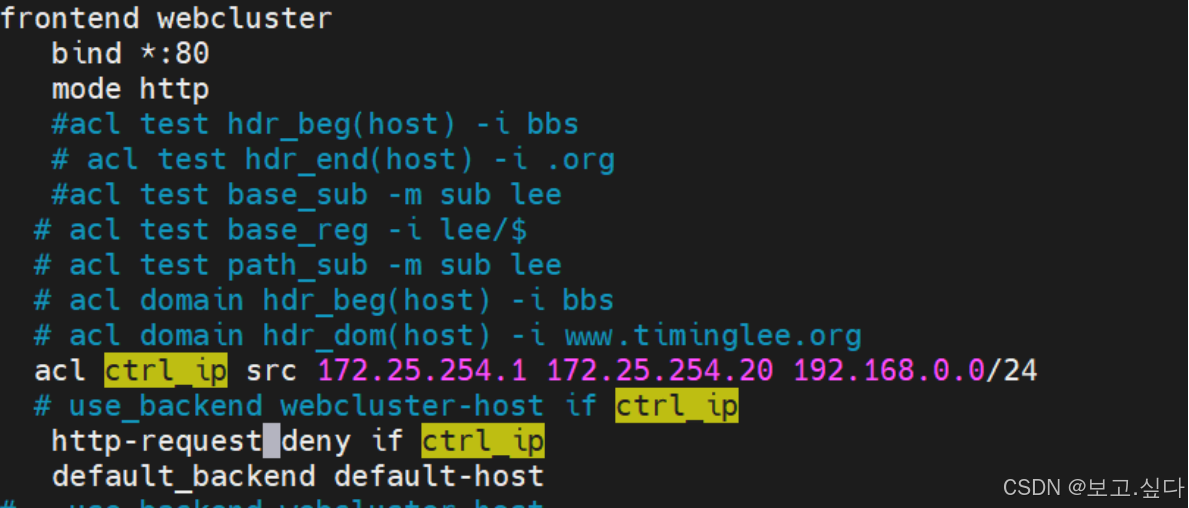
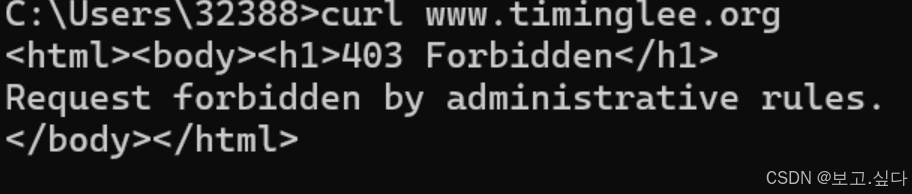
基于源点地址访问控制


匹配浏览器类型
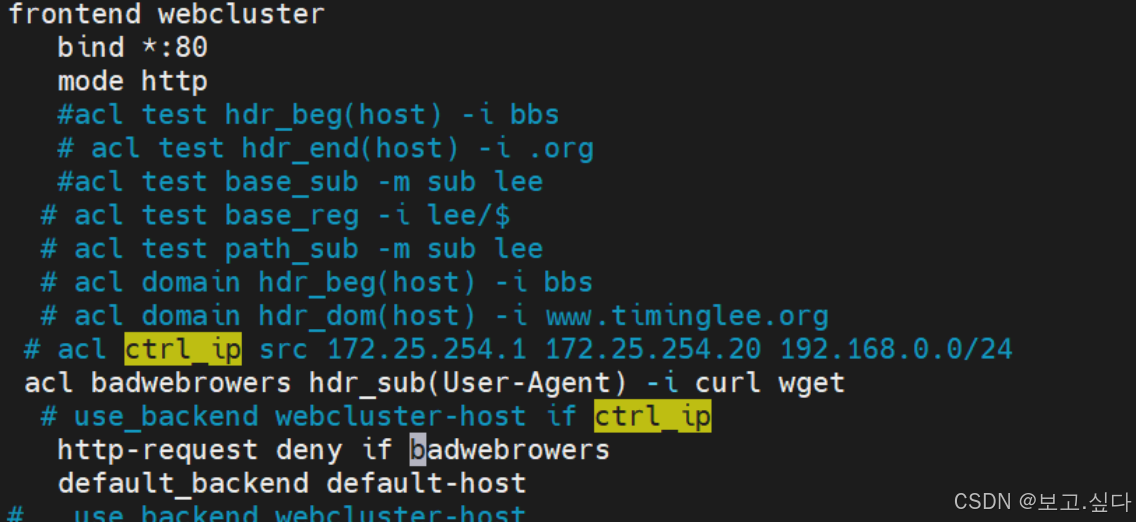


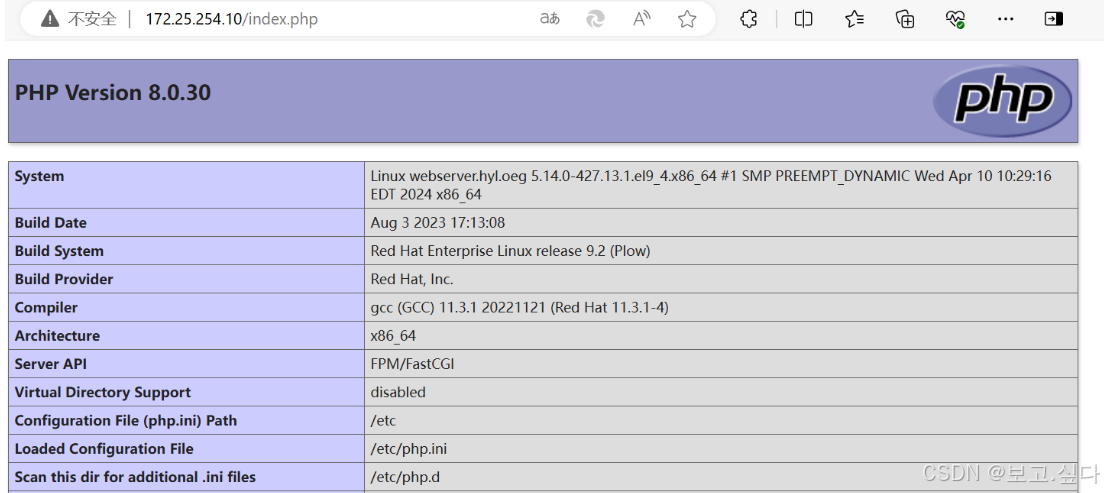
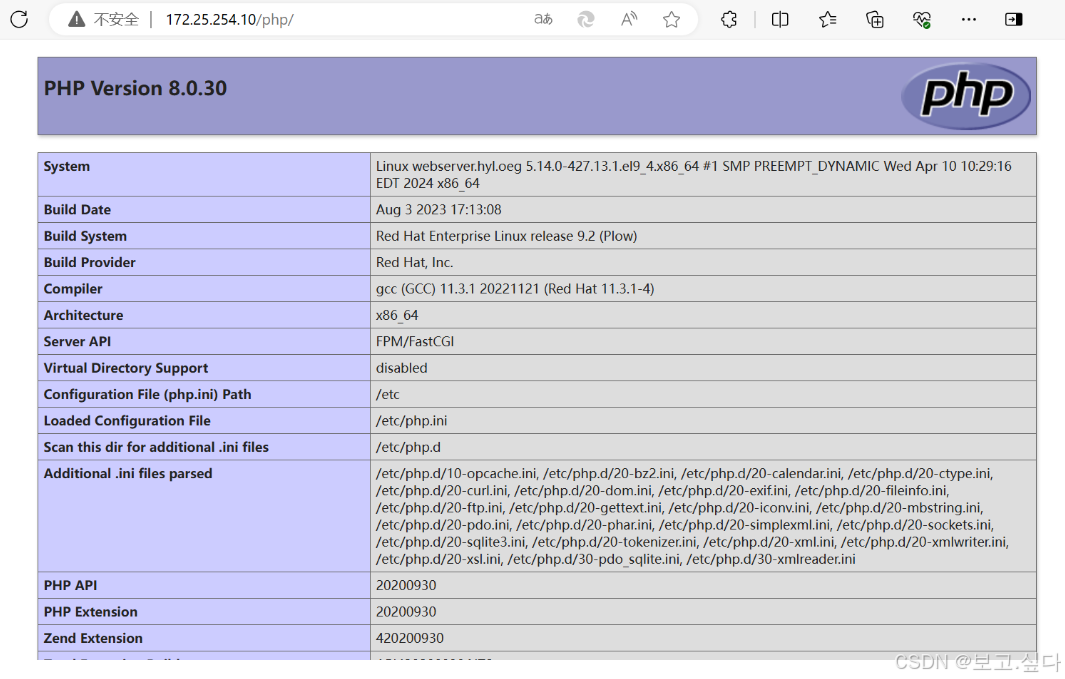
基于文件后缀名实现动静分离
[root@webserver ~]# systemctl restart httpd [root@webserver ~]# vim /var/www/html/index.php [root@webserver ~]# cat /var/www/html/index.php <?php phpinfo();
?>
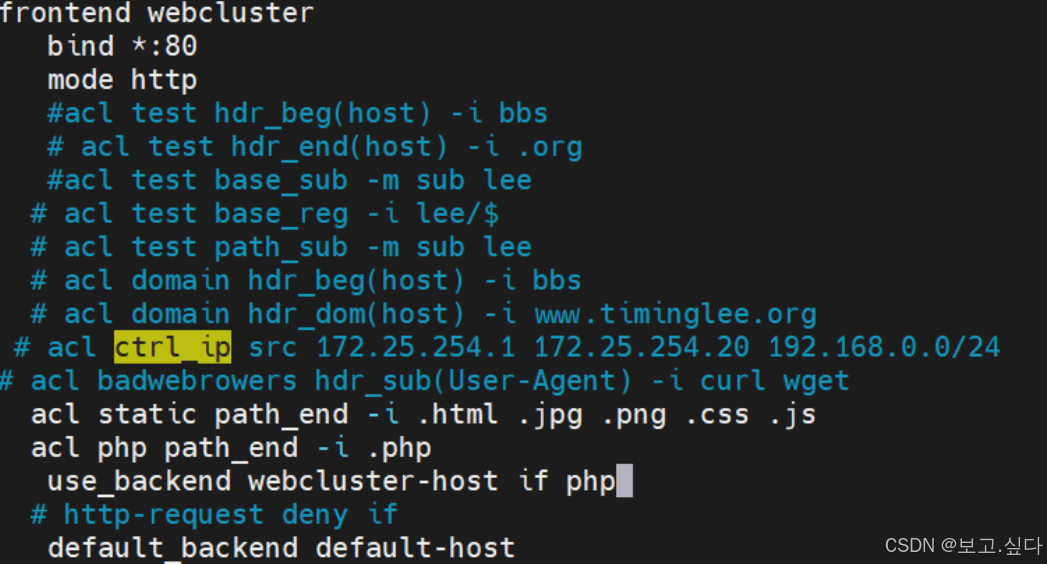
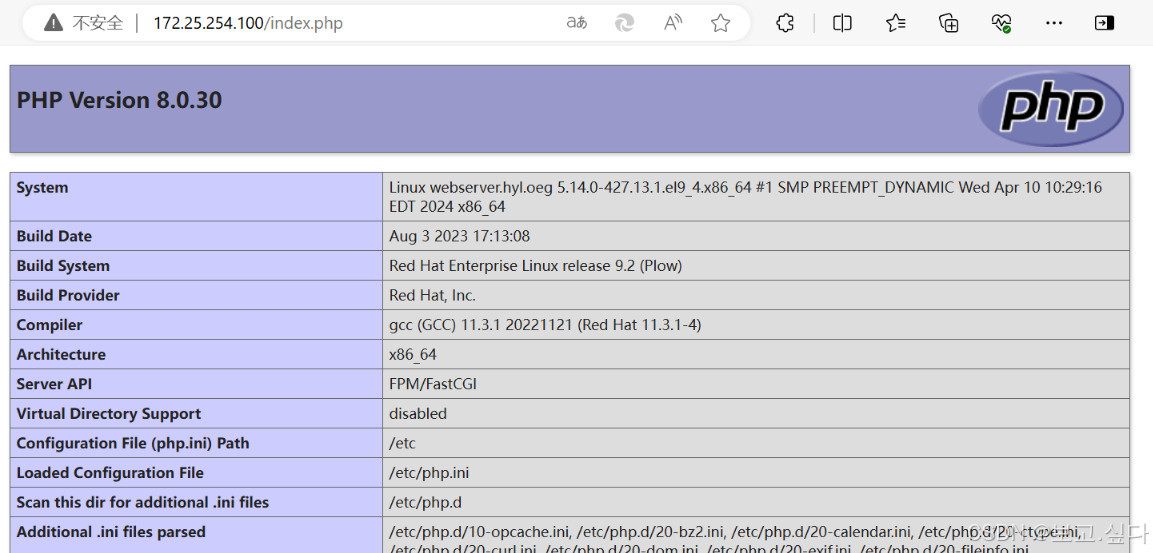
匹配访问路径实现动静分离
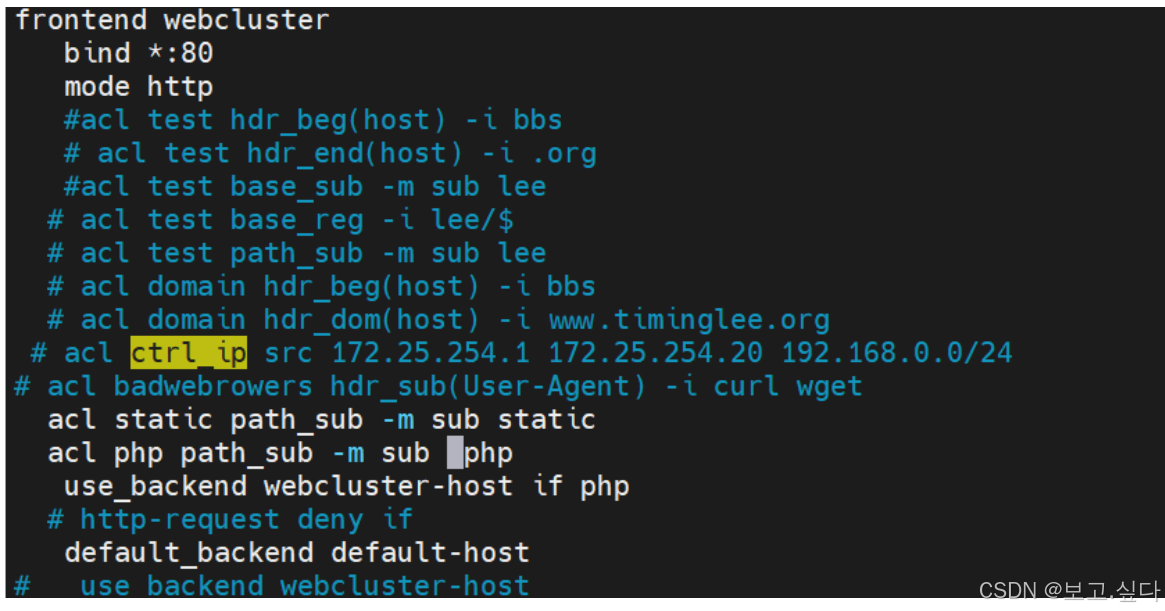
[root@webserver2 ~]# mkdir /usr/share/nginx/html/static -p [root@webserver2 ~]# echo static - 172.25.254.20 > /usr/share/nginx/html/static/index.html
[root@webserver2 ~]# curl 172.25.254.20/static/ static - 172.25.254.20
[root@webserver ~]# mkdir /var/www/html/php -p [root@webserver ~]# cp /var/www/html/index.php /var/www/html/php/

十一、自定义错误页面
1、haproxy默认使用的错误错误页面
[root@haproxy ~]# rpm -ql haproxy24z-2.4.27-1.el7.zenetys.x86_64 | grep -E http$/usr/share/haproxy/400.http/usr/share/haproxy/403.http/usr/share/haproxy/408.http/usr/share/haproxy/500.http/usr/share/haproxy/502.http/usr/share/haproxy/503.http/usr/share/haproxy/504.http
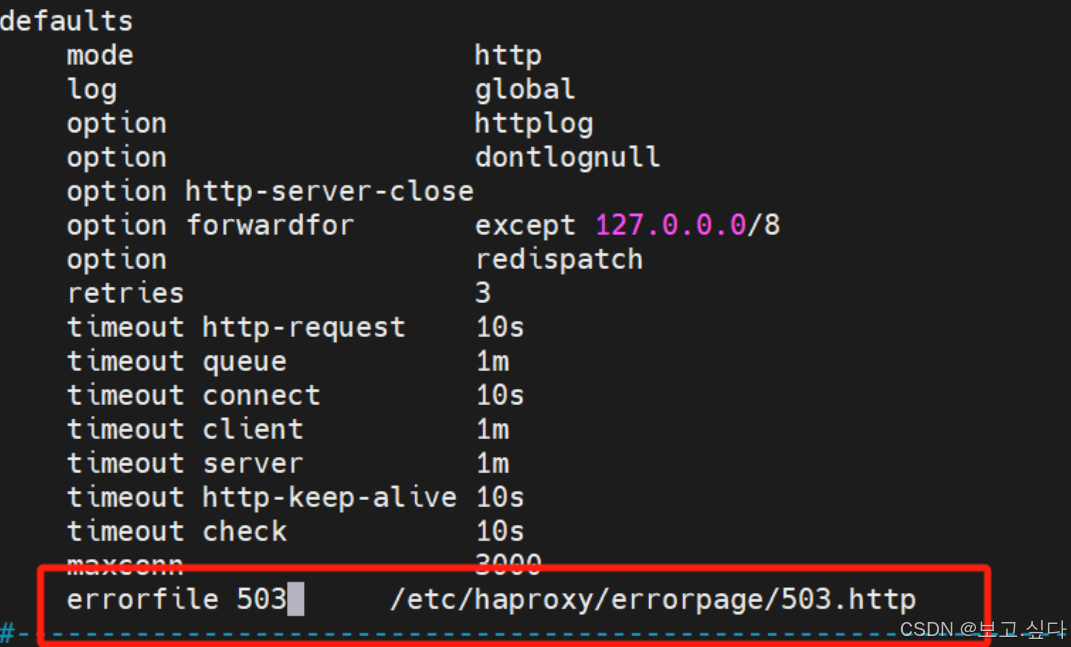
2、基于自定义的错误页面文件
# 自定义错误页errorfile <code> <file><code> #HTTP status code. 支持 200, 400, 403, 405, 408, 425, 429, 500, 502 , 503,504<file> # 包含完整 HTTP 响应头的错误页文件的绝对路径。 建议后缀 ".http" ,以和一般的 html 文件相区分# 示例:errorfile 503 /haproxy/errorpages/503page.http
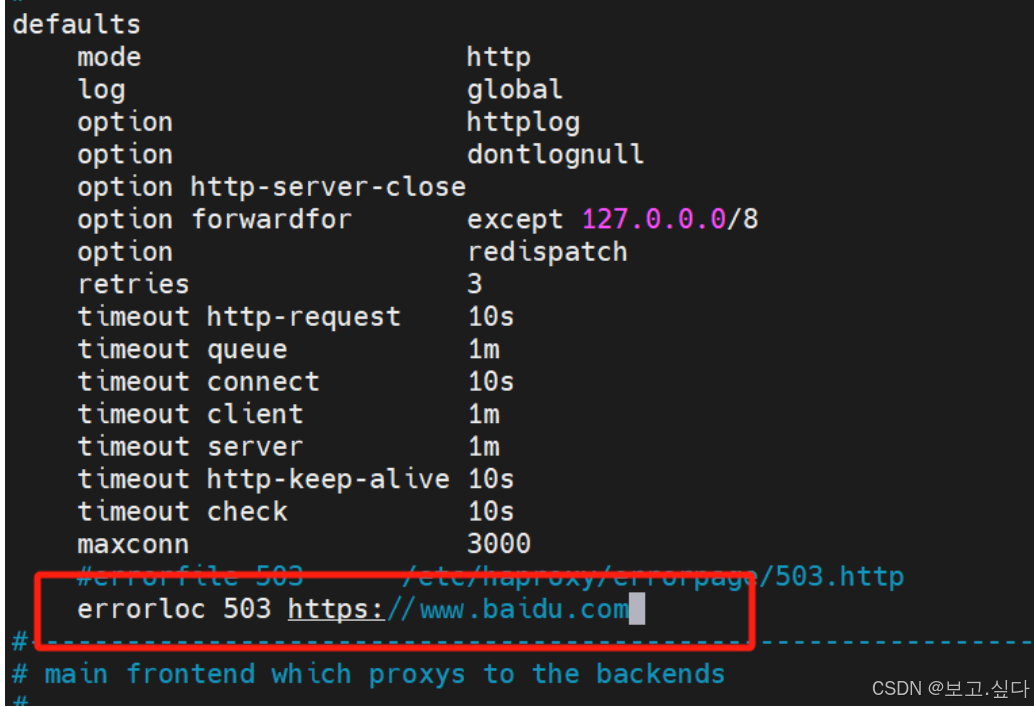
3、基于http重定向错误页面
# 错误页面重定向errorloc <code> <url># 相当于 errorloc302 <code> <url> ,利用 302 重定向至指 URL# 示例:errorloc 503 https://www.baidu.com
实验部分
自定义错误文件
[root@haproxy ~]# mkdir /etc/haproxy/errorpage -p
[root@haproxy ~]# vim /etc/haproxy/errorpage/503.http
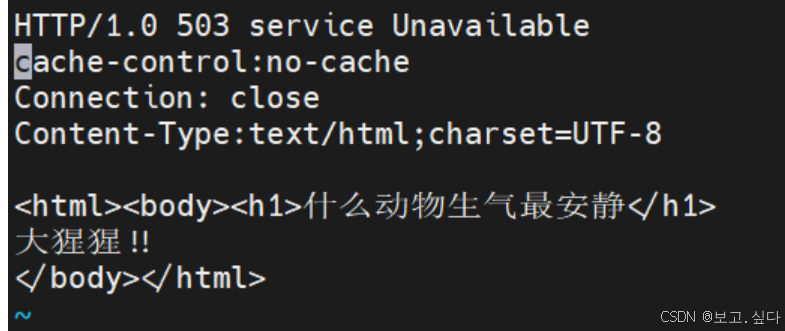
[root@haproxy ~]# vim /etc/haproxy/haproxy.cfg
[root@haproxy ~]# systemctl restart haproxy.service [root@haproxy ~]#
[root@webserver ~]# systemctl stop httpd
[root@webserver2 ~]# systemctl stop nginx.service
自定义测试

[root@webserver2 ~]# systemctl restart nginx.service
[root@webserver2 ~]# systemctl status nginx.service

http重定向
测试

十二、四层负载示例
在后台服务器安装和配置mariadb服务
[root@haproxy ~]#yum install mariadb-server -y
[root@webserver ~]# yum install mariadb-server -y
[root@webserver2 ~]# yum install mariadb-server -y
[root@webserver ~]# vim /etc/my.cnf.d/mariadb-server.cnf
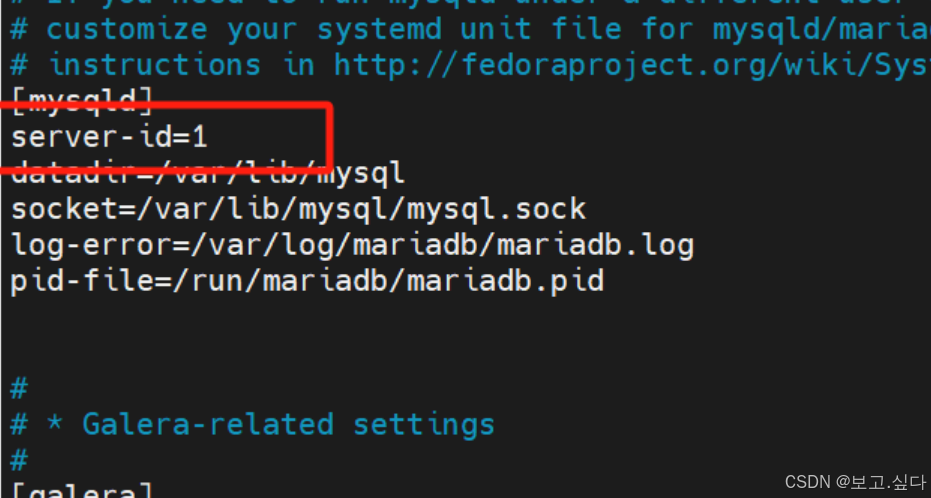
[root@webserver ~]# systemctl start mariadb.service
[root@webserver2 ~]# vim /etc/my.cnf.d/mariadb-server.cnf
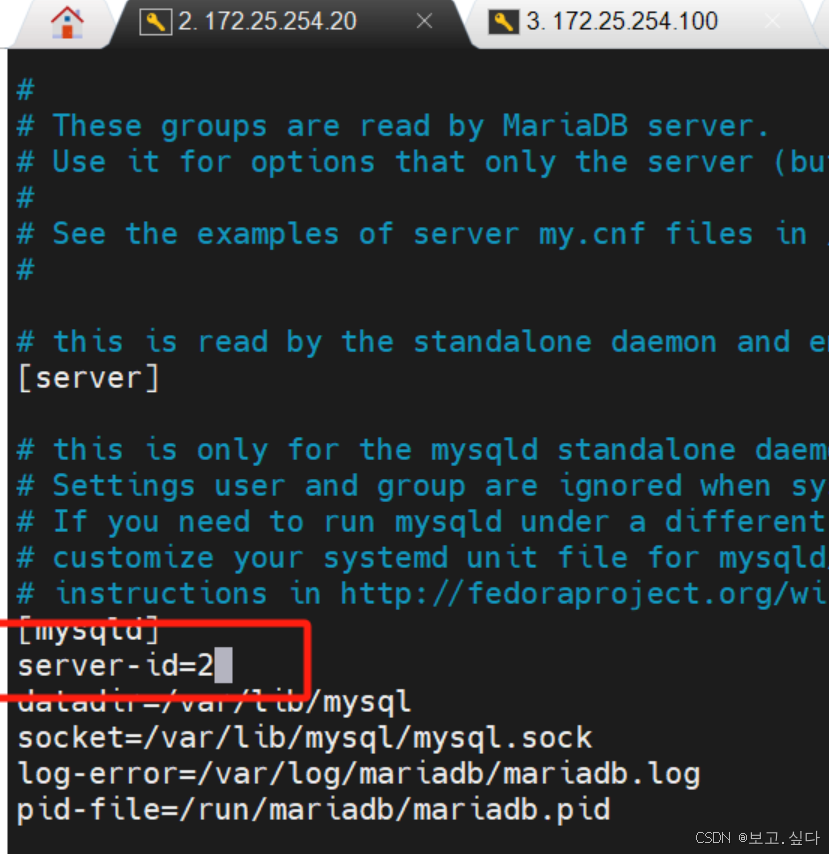
[root@webserver2 ~]# systemctl start mariadb.service
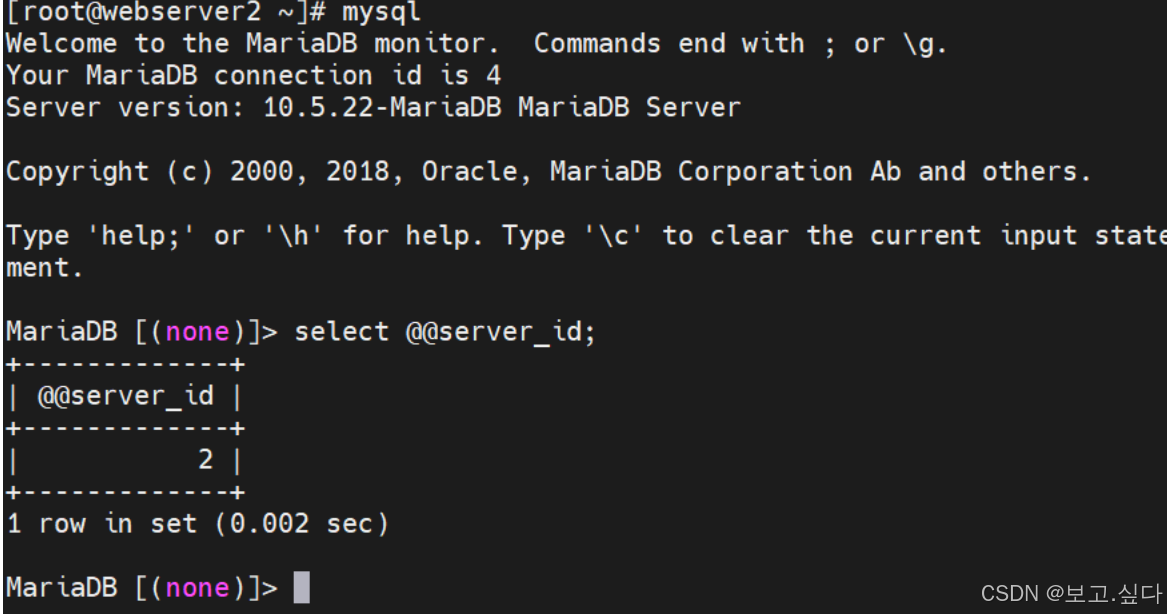

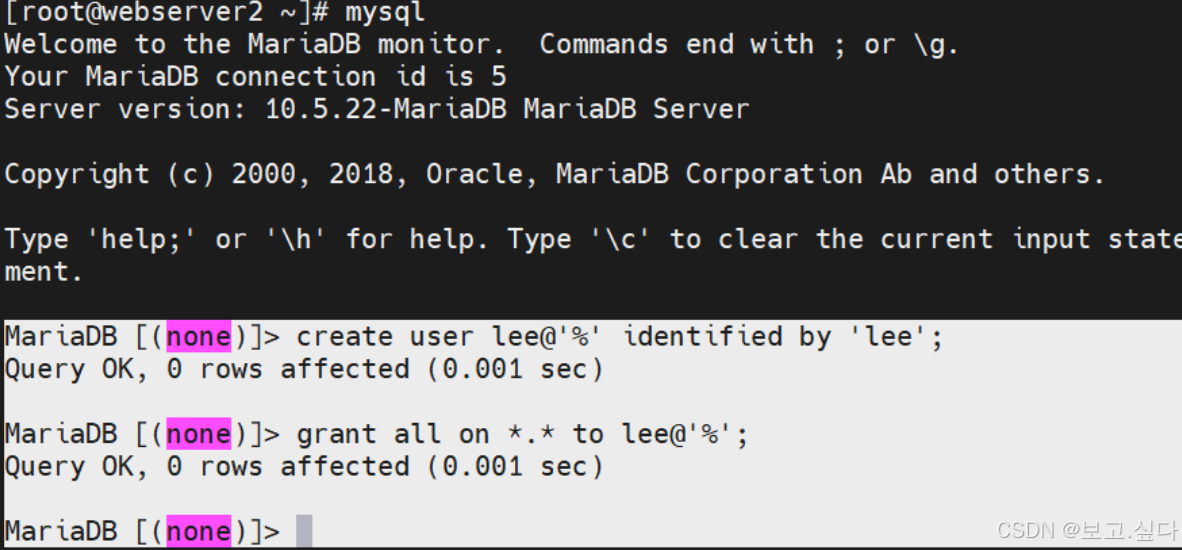
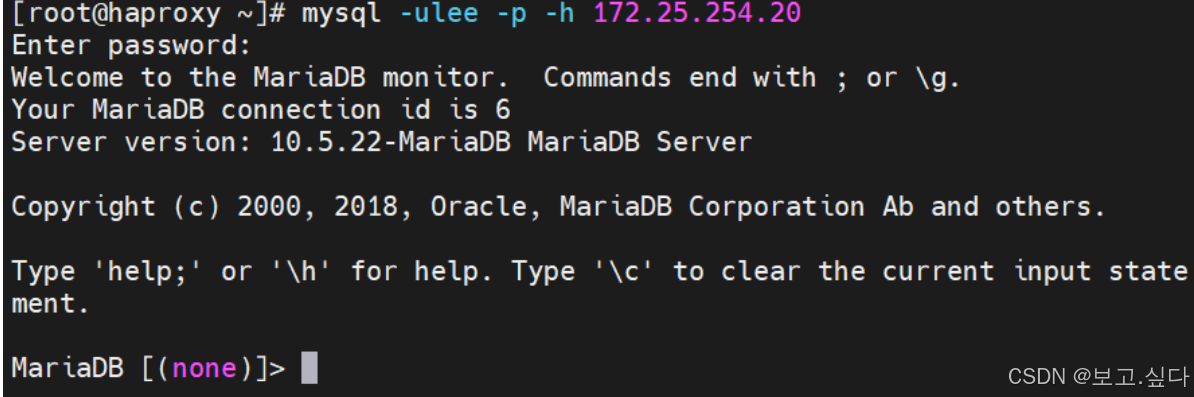
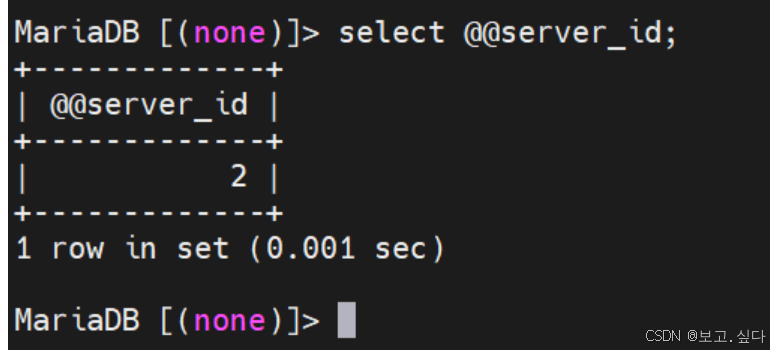
实现四层负载
[root@haproxy ~]# vim /etc/haproxy/haproxy.cfg
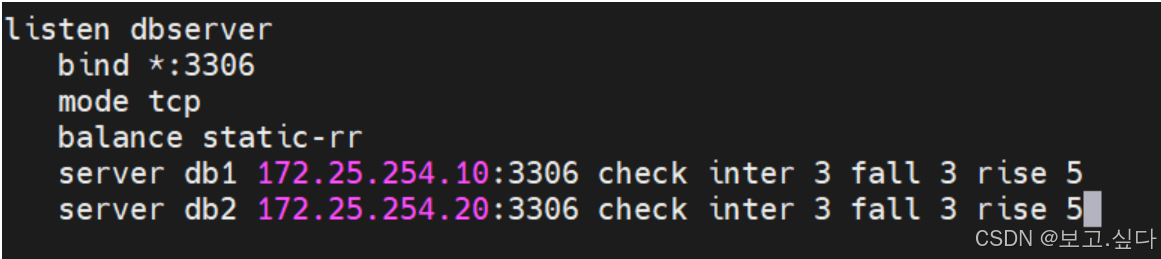
[root@haproxy ~]# systemctl restart haproxy.service
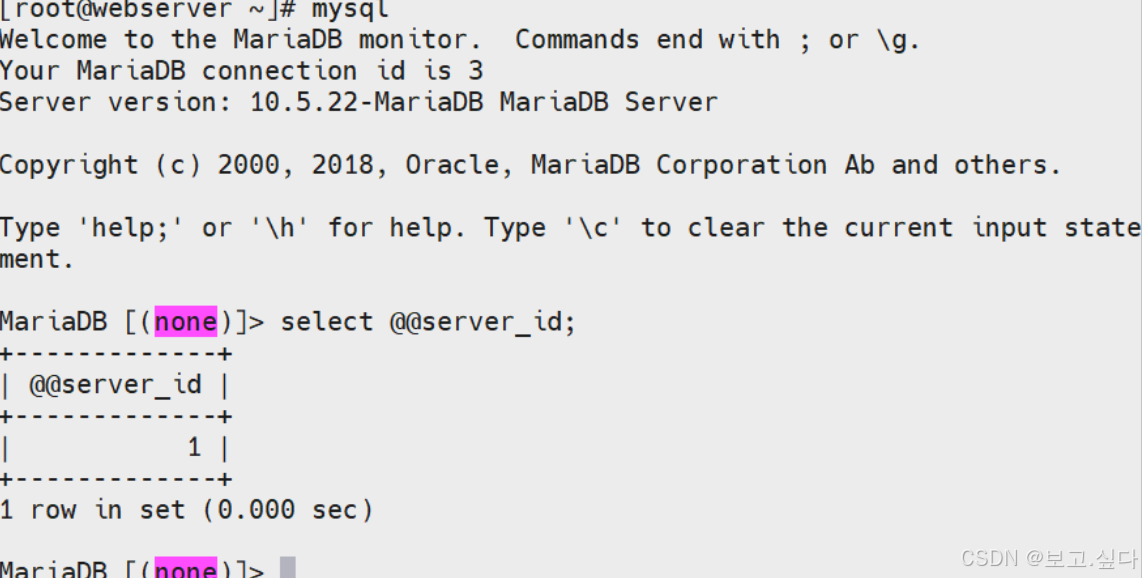
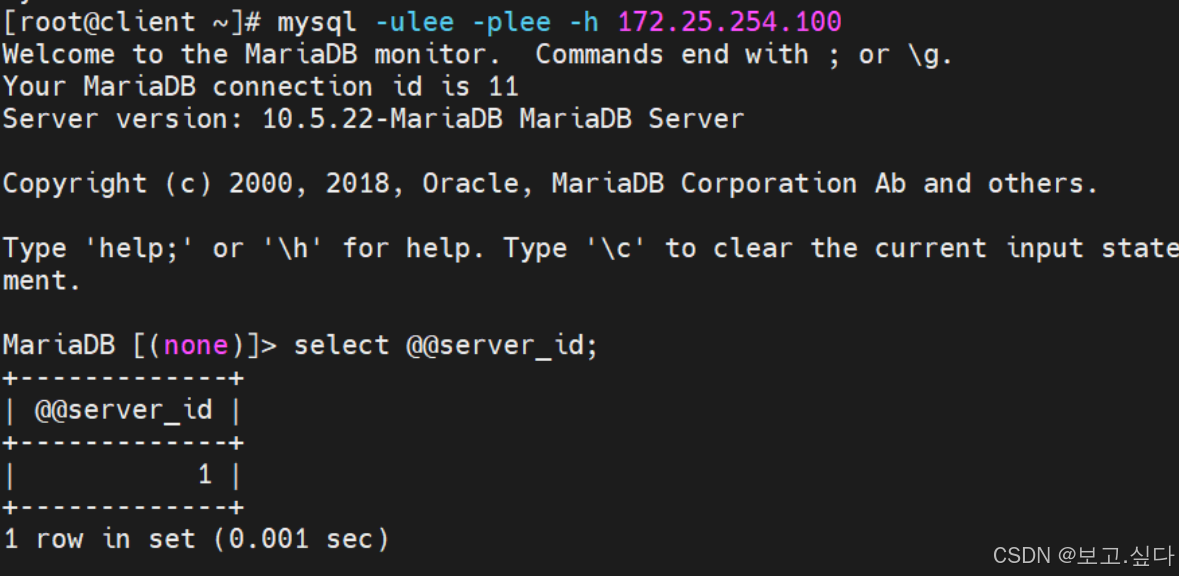
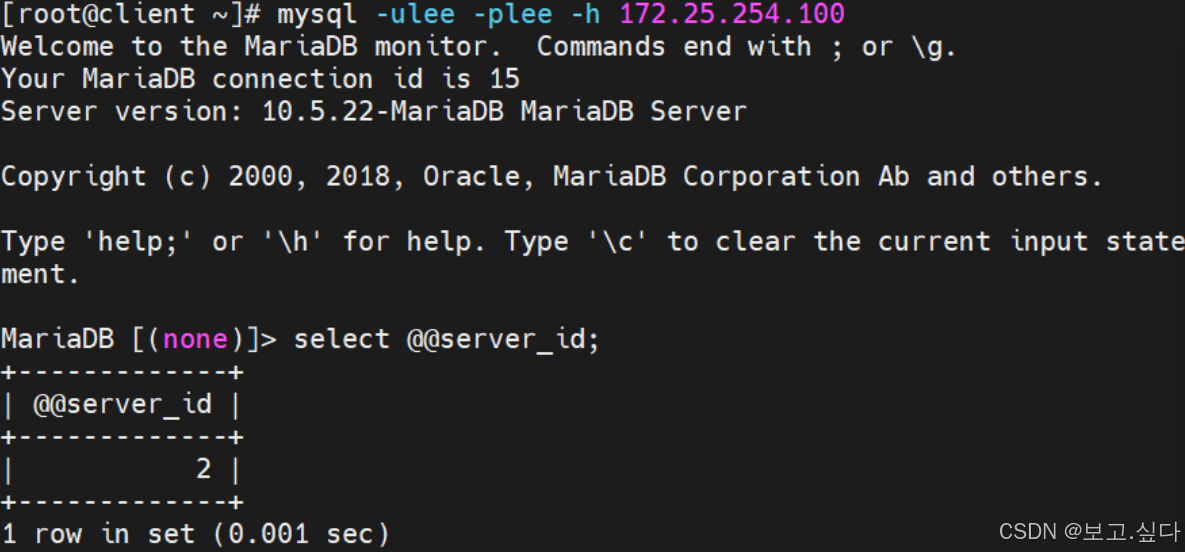
测试
十三、haproxy的https
证书制作
[root@haproxy ~]# mkdir -p /etc/haproxy/certs
[root@haproxy ~]# openssl req -newkey rsa:2048 -nodes -sha256 -keyout /etc/haproxy/certs/timinglee.org.key -x509 -days 365 -out /etc/haproxy/certs/timinglee.org.crt
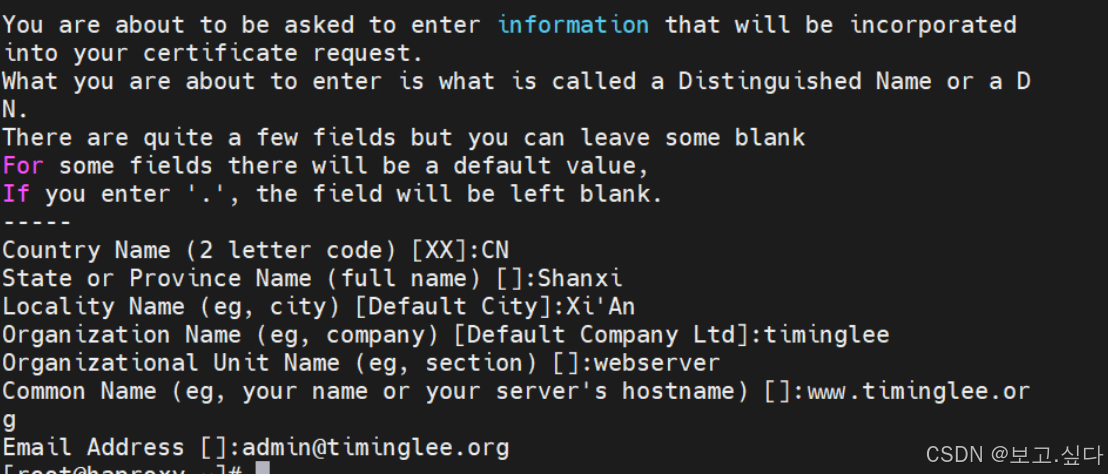
[root@haproxy ~]# ls /etc/haproxy/certs/ timinglee.org.crt timinglee.org.key
[root@haproxy ~]# cat /etc/haproxy/certs/timinglee.org.key /etc/haproxy/certs/timinglee.org.crt > /etc/haproxy/certs/timinglee.pem
[root@haproxy ~]# cat /etc/haproxy/certs/timinglee.pem
httpd配置
[root@haproxy ~]# vim /etc/haproxy/haproxy.cfg
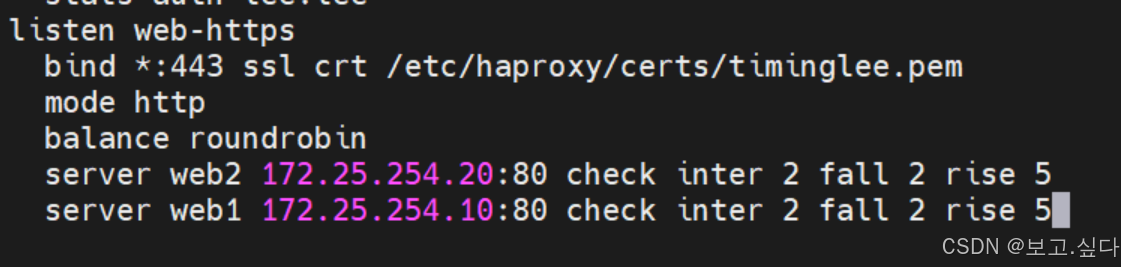
[root@haproxy ~]# systemctl restart haproxy.service

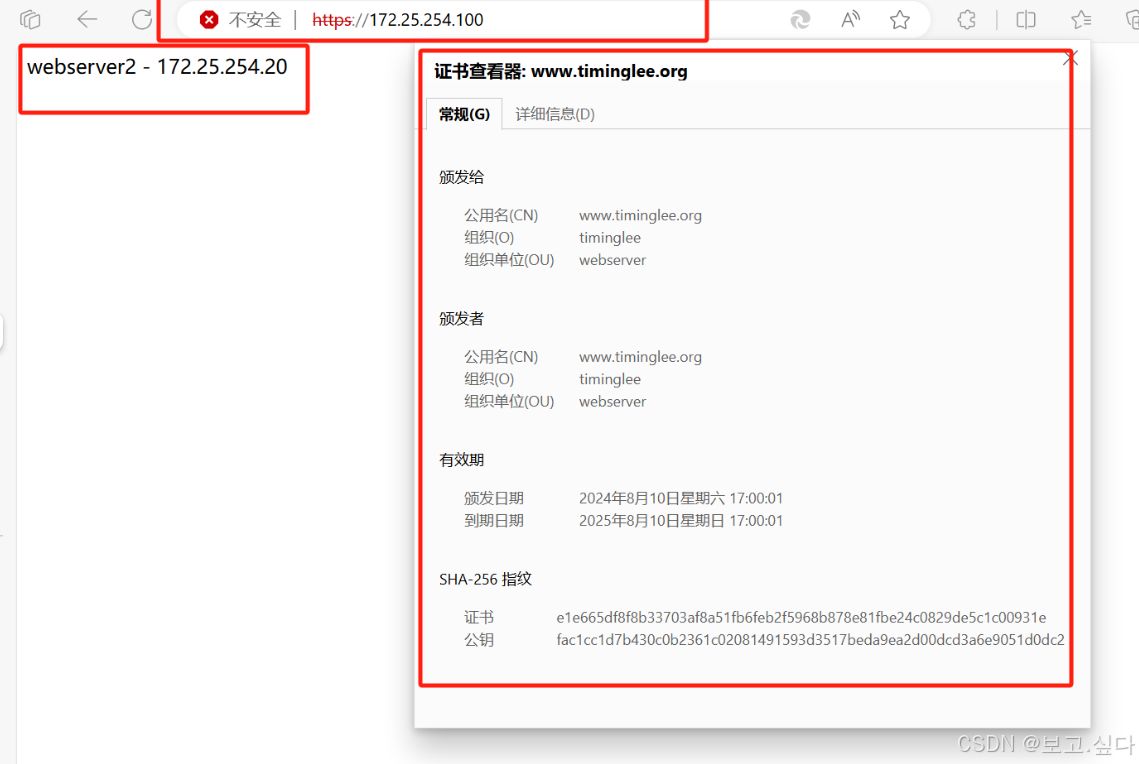
测试
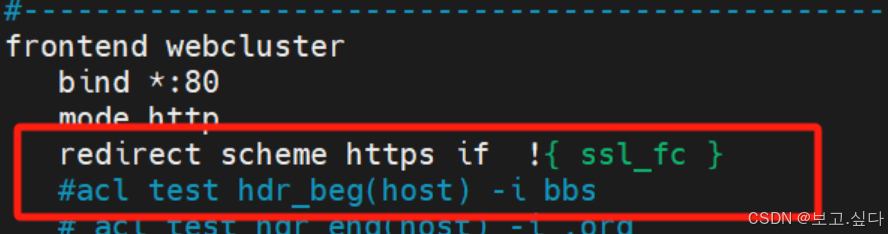
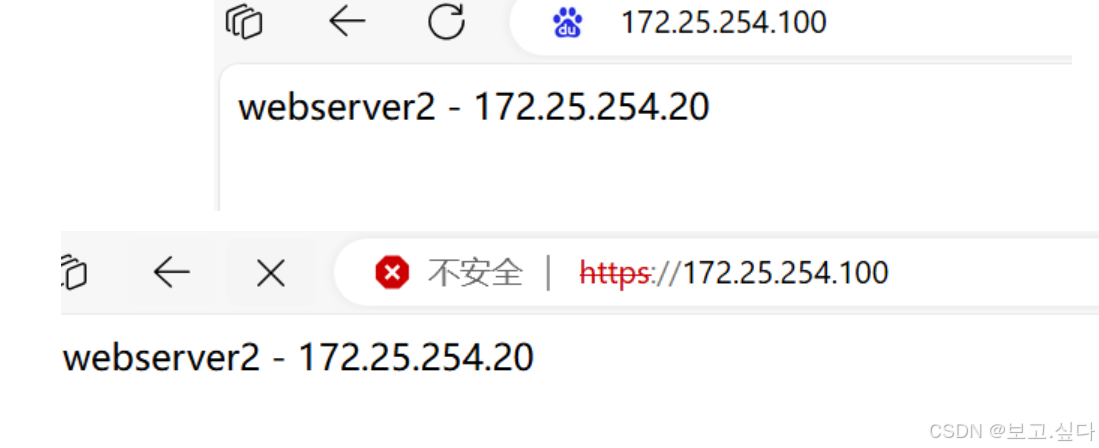
全站加密
相关文章:
全网超详细haproxy七层代理
一:负载均衡 1、概念 负载均衡: Load Balance ,简称 LB ,是一种服务或基于硬件设备等实现的高可用反向代理技术, 负载均 衡将特定的业务(web 服务、网络流量等 ) 分担给指定的一个或多个后端特定的服务器或设 备&…...

Docker日志文件全局配置
这段配置是Docker容器的日志驱动配置,具体来说是json-file日志驱动的配置。这个配置的作用是定义容器日志文件的大小和数量限制。 {"log-driver": "json-file","log-opts": {"max-size": "500m","max-file…...

bia文件中码偏差对实时PPP解算分析
1. 码偏差对定位影响 码偏差对未知收敛时间有影响,对最终精度影响不大(权比1000:1)...
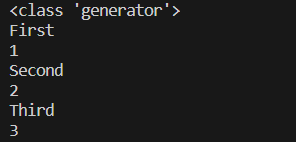
探索list与iterator的区别及yield的用法
1 问题 探索list与iterator的区别探索yield的用法 2 方法 通过网上学习后了解到 List返回的类型是list,list只会查询一级缓存。list()中返回的List中每个对象都是原本的对象。查询的时候没遍历一个对象会产生一条sql;而iterator这个迭代器返回的类型是it…...

github技巧和bug解决方法短篇收集
有一些几句话就可以说明白的观点或者解决的的问题,小虎单独收集到这里。 Commits没有算入每天的activity fork的仓库是不算的。 Commits made in a fork will not count toward your contributions. 参考: Contribution activity not shown for github…...

学习笔记五:在k8s中安装EFK组件(elasticsearch+fluentd+kibana)
在k8s 1.3安装EFK组件 前置条件上传压缩包安装nfs供应商创建nfs作为存储的供应商通过deployment创建pod用来运行nfs-provisioner 安装elasticsearch组件安装kibana组件安装fluentd组件 前置条件 查看k8s版本 kubectl get node -owide相关安装包 链接:https://pan.ba…...

Golang编译-如何忽略某些文件去编译
在 Go 语言中,编译好的二进制文件不会被再次加入到编译过程中。Go 编译器只会编译源代码文件(如 .go 文件),而不会将已经编译好的二进制文件(如可执行文件或静态库)作为输入来进行编译。 详细解释…...

有哪些适合中型企业的人力资源管理系统推荐?
本文主要介绍了以下几款人力资源管理系统:Moka、OrangeHRM、Verint、希沃人事、UKG Pro、大易Dayee、DingTalk、致远OA、卓望ShineHR、GoCo。 在选择人力资源管理系统时,中型企业面临着诸多挑战:如何确保系统既能满足现有需求,又能…...

活动回顾|首次 Cloudberry Database Meetup · 北京站成功举办
8 月 3 日,由酷克数据 HashData 主办的 Cloudberry Database Meetup 北京站活动圆满结束。本次 Meetup 以“以开源应对 Greenplum 闭源,原厂开发者再聚首”为主题,深入探讨了 Greenplum 闭源所带来的影响,并聚焦于 Cloudberry Dat…...

C语言 软件设计的七大原则,及其应用案例
1. 单一职责原则 (Single Responsibility Principle, SRP) 定义: 一个模块或函数应当只有一个引起变化的原因。 应用案例: 在嵌入式系统中,可以将传感器数据的读取和处理分开成不同的函数。例如: // 读取传感器数据的函数 floa…...

初学嵌入式-C语言常犯错误详解
1、对于下面这道题,估计有很多人会选择B答案,但其实答案是D 2.int a10, b9,c9,d; d b || (a>c),请问上述代码执行完毕后a b c d的值分别是 。 A、10 9 10 9 B、10 10 10 1 C、10 9 10 1 D、10 10 9 1 答案解释: 在C语言…...
Golang 语法入门
Golang 语法入门 Hello World package mainimport "fmt"func main() {fmt.Println("hello world") }变量 package mainimport "fmt"// 全局变量 var ans 123 var cnt intfunc main() {// 单个局部变量a : 114514// 多个局部变量b, c : 114, …...

Filebeat+Kafka+ELK
架构: 部署: #配置nginx,部署filebeat systemctl stop firewalld setenforce 0 systemctl restart nginx#解压filebeat tar -xf filebeat-6.7.2-linux-x86_64.tar.gz mv filebeat-6.7.2-linux-x86_64 filebeat#日志收集 cd firebeat vim fil…...

Python 为Excel单元格设置填充\背景色 (纯色、渐变、图案)
在使用Excel进行数据处理和分析时,对特定单元格进行背景颜色填充不仅能够提升工作表的视觉吸引力,还能帮助用户快速识别和区分不同类别的数据,增强数据的可读性和理解性。 本文将通过以下三个示例详细介绍如何使用Python在Excel中设置不同的单…...

家里浮毛粉尘到处飞?宠物空气净化器出动帮你解决
由于家里收养的十几只流浪猫咪夏季掉毛非常严重,整个房子弥漫着猫毛,而且这十几只里面有七八只还是长毛的品种,掉落的毛发都因为太长而直接掉落成毛团,而短毛的那几只也在掉毛,这十几只掉下的浮毛,家里已经…...

计算机网络ISO七层网络模型及TCP
思维导图(通俗理解) 首先,先用最通俗的话来描述ISO七层模型,思维导图结构如下: ISO七层网络模型概念 应用层(Application Layer):应用层是OSI模型的最高层,直接与用户交…...

机器学习知识点全面总结
一、机器学习基础概念 1、什么是机器学习 机器学习是一种人工智能技术,通过对数据的学习和分析,让计算机系统自动提高其性能。简而言之,机器学习是一种从数据中学习规律和模式的方法,通过数据来预测、分类或者决策。 机器学习的本…...

【研发日记】嵌入式处理器技能解锁(三)——TI C2000 DSP的C28x内核
文章目录 前言 背景介绍 C28x内核 浮点单元(FPU) 快速整数除法单元(FINTDIV) 三角数学单元(TMU) VCRC单元 CPU总线 指令流水线 总结 参考资料 前言 见《【研发日记】嵌入式处理器技能解锁(一)——多任务异步执行调度的三种方法》 见《【研发日记】嵌入式处理器技能解…...

LeetCode.27.移除元素
题目描述: 给你一个数组 nums 和一个值 val,你需要 原地 移除所有数值等于 val 的元素。元素的顺序可能发生改变。然后返回 nums 中与 val 不同的元素的数量。 假设 nums 中不等于 val 的元素数量为 k,要通过此题,您需要执行以…...
可重入锁总结)
redis面试(十二)可重入锁总结
可重入锁总结 从实现原理以及源码的层面,真正剖析和了解到了redis分布式锁的企业级的实现,这个分布式锁实现的还是非常漂亮的,麻雀虽小,五脏俱全,分布式的可重入锁,总结一下流程 (1࿰…...

ANIMATEDIFF PRO教学创新:Jupyter Notebook交互式教程
ANIMATEDIFF PRO教学创新:Jupyter Notebook交互式教程 让AI动画学习变得像玩游戏一样有趣,实时调整参数,即刻看到效果变化 1. 引言:为什么需要交互式动画教学? 传统的AI动画教学有个痛点:学生写了一大段代…...

GEC6818嵌入式Linux智能车库系统开发实战
1. 项目概述这个基于GEC6818嵌入式Linux的智能车库系统,是我去年为一个商业停车场改造项目开发的解决方案。当时客户的主要痛点在于传统人工管理效率低下,经常出现收费纠纷和停车位利用率不高的问题。经过三个月的开发和调试,最终实现了这套集…...

xiaomusic启动故障终极解决指南:设备认证配置与开源智能家居集成方案
xiaomusic启动故障终极解决指南:设备认证配置与开源智能家居集成方案 【免费下载链接】xiaomusic 使用小爱音箱播放音乐,音乐使用 yt-dlp 下载。 项目地址: https://gitcode.com/GitHub_Trending/xia/xiaomusic 问题定位:识别xiaomusi…...

GLM-4.1V-9B-Base模型微调入门:使用accelerate库进行高效参数优化
GLM-4.1V-9B-Base模型微调入门:使用accelerate库进行高效参数优化 1. 引言 想为特定业务场景定制一个强大的多模态AI模型?GLM-4.1V-9B-Base作为支持图文理解与生成的大模型,通过微调可以快速适配各种下游任务。本文将带你从零开始ÿ…...

MultiAgentBench:一套真正评测多智能体协作与博弈能力的基准
摘要:大语言模型已经展现出作为自主智能体的显著能力,但现有基准要么只关注单智能体任务,要么局限于狭窄领域,无法刻画多智能体协作与竞争的动态过程。本文提出 MultiAgentBench,这是一个面向 LLM 多智能体系统的综合性…...

优化算法避坑指南:为什么BFGS比DFP更常用?从数值稳定性到工程实践详解
优化算法避坑指南:为什么BFGS比DFP更常用?从数值稳定性到工程实践详解 在机器学习模型训练和工程优化问题中,我们常常需要求解无约束优化问题。当目标函数的海森矩阵难以计算或维度较高时,拟牛顿法因其出色的平衡性成为首选。但面…...
)
从混乱到清晰:用QJsonObject重构你的Qt网络API数据解析层(避坑指南)
从混乱到清晰:用QJsonObject重构你的Qt网络API数据解析层(避坑指南) 在Qt开发中,与后端RESTful API交互是常见需求,但面对复杂、嵌套的JSON响应数据时,很多开发者容易陷入"面条代码"的泥潭。本文…...

为什么自动驾驶地铁离不开形式化方法?从法国B方法到上海15号线的实战解析
数学如何为自动驾驶地铁筑起安全屏障:从B方法到工业级验证的深度实践 当一列无人驾驶的地铁以80公里时速穿越隧道时,系统每毫秒需要处理200传感器信号、执行30余项控制决策。巴黎地铁14号线自1998年开通以来保持零重大事故记录,上海15号线全自…...

别再手动数了!用Apache POI和iText,5行代码搞定Java批量统计文档页数
5行代码实现Java批量文档页数统计:Apache POI与iText的高效实践 当你在整理年度报告、审计文档或准备印刷材料时,是否曾被成百上千份文档的页数统计折磨得焦头烂额?手动打开每个文件查看页数不仅效率低下,还容易出错。今天&#x…...

闽北哥-一个人最顶级的能力:复归于朴
一个人最顶级的能力 ——复归于朴**“道家说‘复归于朴’, 儒家说‘赤子之心’, 佛家说‘本自具足’, 鬼谷子说‘知世故而不世故’—— 他们都指向同一种状态: 在红尘中,活出婴儿般的清澈。”🌿 这不是天真…...