Elasticsearch基本安全加上安全的 HTTPS 流量
基本安全加上安全的 HTTPS 流量
-
在生产环境中,除非您在 HTTP 层启用 TLS,否则某些 Elasticsearch 功能(例如令牌和 API 密钥)将被禁用。这个额外的安全层确保进出集群的所有通信都是安全的。
-
当您在模式下运行该elasticsearch-certutil工具时http,该工具会询问几个有关您希望如何生成证书的问题。虽然有许多选项,但以下选项会生成适用于大多数环境的证书。
-
该elasticsearch-certutil工具提示您的第一个问题是您是否要生成证书签名请求 (CSR)。回答 n您是要签署自己的证书,还是y要签署中央 CA 的证书。
- 签署自己的证书
- 如果您想使用您自已生成的CA证书 。 回答 n,当系统询问您是否要生成 CSR 时。然后指定 CA 证书的位置,即由该工具签署和生成证书.p12。
- 使用中央 CA 签署证书
- 如果您在中央安全团队的环境中工作,他们可能会为您生成证书。您组织内的基础设施可能已经配置为信任现有的 CA,因此如果您使用 CSR 并将该请求发送给控制您的 CA 的团队,则客户端可能更容易连接到 Elasticsearch。要使用中央 CA,请回答y第一个问题。
先决条件
- 完成为 Elastic Stack 设置基本安全性中的所有步骤。请参考以下文档:
Elasticsearch 设置基本安全性
为 Elasticsearch 加密 HTTP 客户端通信
- 在集群中的每个节点 上,停止 Elasticsearch 和 Kibana(如果它们正在运行)。
root@ubuntu-x64_02:/usr/local/elasticsearch9201# systemctl stop elasticsearch9201
root@ubuntu-x64_02:/usr/local/elasticsearch9201# systemctl stop elasticsearch9202
root@ubuntu-x64_02:/usr/local/elasticsearch9201# systemctl stop elasticsearch9203
-
在任何单个节点上,从您安装 Elasticsearch 的目录运行 Elasticsearch HTTP 证书工具以生成证书签名请求 (CSR)。
-
此命令生成一个.zip文件,其中包含用于 Elasticsearch 和 Kibana 的证书和密钥。每个文件夹都包含一个README.txt 说明如何使用这些文件。
root@ubuntu-x64_02:/usr/local/elasticsearch9201#./bin/elasticsearch-certutil http
- 当系统询问您是否要生成 CSR 时,请输入: n
## Do you wish to generate a Certificate Signing Request (CSR)?A CSR is used when you want your certificate to be created by an existing
Certificate Authority (CA) that you do not control (that is, you do not have
access to the keys for that CA). If you are in a corporate environment with a central security team, then you
may have an existing Corporate CA that can generate your certificate for you.
Infrastructure within your organisation may already be configured to trust this
CA, so it may be easier for clients to connect to Elasticsearch if you use a
CSR and send that request to the team that controls your CA.If you choose not to generate a CSR, this tool will generate a new certificate
for you. That certificate will be signed by a CA under your control. This is a
quick and easy way to secure your cluster with TLS, but you will need to
configure all your clients to trust that custom CA.Generate a CSR? [y/N]N
- 当系统询问您是否要使用现有 CA 时,请输入: y
## Do you have an existing Certificate Authority (CA) key-pair that you wish to use to sign your certificate?If you have an existing CA certificate and key, then you can use that CA to
sign your new http certificate. This allows you to use the same CA across
multiple Elasticsearch clusters which can make it easier to configure clients,
and may be easier for you to manage.If you do not have an existing CA, one will be generated for you.Use an existing CA? [y/N]y
- 输入您的 CA 的路径。elastic-stack-ca.p12 这是您为集群生成的文件 的绝对路径。如: /usr/local/elasticsearch9201/elastic-stack-ca.p12
- 输入您的 CA 的密码。如果没有,则为空,在这种情况下,您只需在提示符下按ENTER键
## What is the path to your CA?Please enter the full pathname to the Certificate Authority that you wish to
use for signing your new http certificate. This can be in PKCS#12 (.p12), JKS
(.jks) or PEM (.crt, .key, .pem) format.
CA Path: /usr/local/elasticsearch9201/elastic-stack-ca.p12
Reading a PKCS12 keystore requires a password.
It is possible for the keystore is password to be blank,
in which case you can simply press <ENTER> at the prompt
Password for elastic-stack-ca.p12:
- 输入证书的到期值。您可以: 以年、月或日为单位输入有效期。例如,输入90D
## How long should your certificates be valid?Every certificate has an expiry date. When the expiry date is reached clients
will stop trusting your certificate and TLS connections will fail.Best practice suggests that you should either:
(a) set this to a short duration (90 - 120 days) and have automatic processes
to generate a new certificate before the old one expires, or
(b) set it to a longer duration (3 - 5 years) and then perform a manual update
a few months before it expires.You may enter the validity period in years (e.g. 3Y), months (e.g. 18M), or days (e.g. 90D)For how long should your certificate be valid? [5y] 3Y
- 当系统询问您是否要为每个节点生成一个证书时,输入Y , 每个证书都有自己的私钥,并针对特定的主机名或 IP 地址颁发
## Do you wish to generate one certificate per node?If you have multiple nodes in your cluster, then you may choose to generate a
separate certificate for each of these nodes. Each certificate will have its
own private key, and will be issued for a specific hostname or IP address.Alternatively, you may wish to generate a single certificate that is valid
across all the hostnames or addresses in your cluster.If all of your nodes will be accessed through a single domain
(e.g. node01.es.example.com, node02.es.example.com, etc) then you may find it
simpler to generate one certificate with a wildcard hostname (*.es.example.com)
and use that across all of your nodes.However, if you do not have a common domain name, and you expect to add
additional nodes to your cluster in the future, then you should generate a
certificate per node so that you can more easily generate new certificates when
you provision new nodes.Generate a certificate per node? [y/N]Y
- 出现提示时,输入集群中第一个节点的名称。使用生成节点证书时使用的相同节点名称。
## What is the name of node #1?This name will be used as part of the certificate file name, and as a
descriptive name within the certificate.You can use any descriptive name that you like, but we recommend using the name
of the Elasticsearch node.node #1 name: node-1
- 输入用于连接到您的第一个节点的所有主机名。这些主机名将作为 DNS 名称添加到证书的主题备用名称 (SAN) 字段中。
## Which hostnames will be used to connect to node-1?These hostnames will be added as "DNS" names in the "Subject Alternative Name"
(SAN) field in your certificate.You should list every hostname and variant that people will use to connect to
your cluster over http.
Do not list IP addresses here, you will be asked to enter them later.If you wish to use a wildcard certificate (for example *.es.example.com) you
can enter that here.Enter all the hostnames that you need, one per line.
When you are done, press <ENTER> once more to move on to the next step.node-1.es.example.com You entered the following hostnames.- node-1.es.example.com      Is this correct [Y/n]Y
- 输入客户端可用于连接到您的节点的 IP 地址。这里使用本地回环地址
## Which IP addresses will be used to connect to node-1?If your clients will ever connect to your nodes by numeric IP address, then you
can list these as valid IP "Subject Alternative Name" (SAN) fields in your
certificate.If you do not have fixed IP addresses, or not wish to support direct IP access
to your cluster then you can just press <ENTER> to skip this step.Enter all the IP addresses that you need, one per line.
When you are done, press <ENTER> once more to move on to the next step.127.0.0.1 You entered the following IP addresses.- 127.0.0.1Is this correct [Y/n]Y
- 对集群中的每个附加节点重复这些步骤。
- 为每个节点生成证书后,在出现提示时输入私钥密码。或直接回车为空。
## What password do you want for your private key(s)?Your private key(s) will be stored in a PKCS#12 keystore file named "http.p12".
This type of keystore is always password protected, but it is possible to use a
blank password.If you wish to use a blank password, simply press <enter> at the prompt below.
Provide a password for the "http.p12" file:  [<ENTER> for none]
- 默认保存到当前目录
## Where should we save the generated files?A number of files will be generated including your private key(s),
public certificate(s), and sample configuration options for Elastic Stack products.These files will be included in a single zip archive.What filename should be used for the output zip file? [/usr/local/elasticsearch9201/elasticsearch-ssl-http.zip] Zip file written to /usr/local/elasticsearch9201/elasticsearch-ssl-http.zip- 解压生成的 elasticsearch-ssl-http.zip 文件。这个压缩文件包含一个用于 Elasticsearch 和 Kibana 的目录。
root@ubuntu-x64_02:/usr/local/elasticsearch9201# unzip elasticsearch-ssl-http.zip
Archive:  elasticsearch-ssl-http.zipcreating: elasticsearch/creating: elasticsearch/node-1/inflating: elasticsearch/node-1/README.txt  inflating: elasticsearch/node-1/http.p12  inflating: elasticsearch/node-1/sample-elasticsearch.yml  creating: elasticsearch/node-2/inflating: elasticsearch/node-2/README.txt  inflating: elasticsearch/node-2/http.p12  inflating: elasticsearch/node-2/sample-elasticsearch.yml  creating: elasticsearch/node-3/inflating: elasticsearch/node-3/README.txt  inflating: elasticsearch/node-3/http.p12  inflating: elasticsearch/node-3/sample-elasticsearch.yml  creating: kibana/inflating: kibana/README.txt       inflating: kibana/elasticsearch-ca.pem  inflating: kibana/sample-kibana.yml
- 查看证书生成目录 : es 节点证书
root@ubuntu-x64_02:/usr/local/elasticsearch9201# tree elasticsearch
elasticsearch
├── node-1
│   ├── http.p12
│   ├── README.txt
│   └── sample-elasticsearch.yml
├── node-2
│   ├── http.p12
│   ├── README.txt
│   └── sample-elasticsearch.yml
└── node-3├── http.p12├── README.txt└── sample-elasticsearch.yml3 directories, 9 files
- 查看证书生成目录 : kibana 证书
root@ubuntu-x64_02:/usr/local/elasticsearch9201# tree kibana/
kibana/
├── elasticsearch-ca.pem
├── README.txt
└── sample-kibana.yml0 directories, 3 files
- 在集群中的每个节点上,完成以下步骤:
- 将相关http.p12证书复制到$ES_PATH_CONF目录中。
root@ubuntu-x64_02:/usr/local/elasticsearch9201# cp  elasticsearch/node-1/http.p12   /usr/local/elasticsearch9201/config/
root@ubuntu-x64_02:/usr/local/elasticsearch9201# cp  elasticsearch/node-2/http.p12   /usr/local/elasticsearch9202/config/
root@ubuntu-x64_02:/usr/local/elasticsearch9201# cp  elasticsearch/node-3/http.p12   /usr/local/elasticsearch9203/config/
- 编辑该elasticsearch.yml文件以启用 HTTPS 安全并指定安全证书的位置http.p12。
cat >> /usr/local/elasticsearch9201/config/elasticsearch.yml  <<EOFxpack.security.http.ssl.enabled: true
xpack.security.http.ssl.keystore.path: http.p12EOFcat >> /usr/local/elasticsearch9202/config/elasticsearch.yml  <<EOFxpack.security.http.ssl.enabled: true
xpack.security.http.ssl.keystore.path: http.p12EOFcat >> /usr/local/elasticsearch9203/config/elasticsearch.yml  <<EOFxpack.security.http.ssl.enabled: true
xpack.security.http.ssl.keystore.path: http.p12EOF
- 将您的私钥密码添加到 Elasticsearch 的安全设置中。
root@ubuntu-x64_02:/usr/local/elasticsearch9201# cd /usr/local/elasticsearch9201; ./bin/elasticsearch-keystore add xpack.security.http.ssl.keystore.secure_password
Enter value for xpack.security.http.ssl.keystore.secure_password: root@ubuntu-x64_02:/usr/local/elasticsearch9201# cd /usr/local/elasticsearch9202; ./bin/elasticsearch-keystore add xpack.security.http.ssl.keystore.secure_password
Enter value for xpack.security.http.ssl.keystore.secure_password: root@ubuntu-x64_02:/usr/local/elasticsearch9202# cd /usr/local/elasticsearch9203; ./bin/elasticsearch-keystore add xpack.security.http.ssl.keystore.secure_password
Enter value for xpack.security.http.ssl.keystore.secure_password:
- 修改文件 权限
root@ubuntu-x64_02:/usr/local/elasticsearch9203# chown -R elk:elk /usr/local/elasticsearch9201
root@ubuntu-x64_02:/usr/local/elasticsearch9203# chown -R elk:elk /usr/local/elasticsearch9202
root@ubuntu-x64_02:/usr/local/elasticsearch9203# chown -R elk:elk /usr/local/elasticsearch9203
- 启动 Elasticsearch.
root@ubuntu-x64_02:/usr/local/elasticsearch9203# systemctl start elasticsearch9201
root@ubuntu-x64_02:/usr/local/elasticsearch9203# systemctl start elasticsearch9202
root@ubuntu-x64_02:/usr/local/elasticsearch9203# systemctl start elasticsearch9203
- 添加 hosts 解释
root@ubuntu-x64_02:/usr/local/elasticsearch9203# echo "127.0.0.1 node-1.es.example.com" >> /etc/hosts
root@ubuntu-x64_02:/usr/local/elasticsearch9203# echo "127.0.0.1 node-2.es.example.com" >> /etc/hosts
root@ubuntu-x64_02:/usr/local/elasticsearch9203# echo "127.0.0.1 node-3.es.example.com" >> /etc/hosts
- 使用 -k 选项,不较验 CA 证书 , 否则会 导致无法验证问题
root@ubuntu-x64_02:/usr/local/elasticsearch9201# curl -k -u elastic:123456 https://node-1.es.example.com:9201/_cat/nodes/?v;
ip        heap.percent ram.percent cpu load_1m load_5m load_15m node.role   master name
127.0.0.1           56          97   6    0.28    0.14     0.21 cdfhilmrstw -      node-1
127.0.0.1           48          97   6    0.28    0.14     0.21 cdfhilmrstw -      node-3
127.0.0.1           63          97   6    0.28    0.14     0.21 cdfhilmrstw *      node-2
为 Kibana 加密 HTTP 客户端通信
- 浏览器将流量发送到 Kibana,而 Kibana 将流量发送到 Elasticsearch。这些通信通道被单独配置为使用 TLS。您加密浏览器和 Kibana 之间的流量,然后加密 Kibana 和 Elasticsearch 之间的流量。
加密 Kibana 和 Elasticsearch 之间的流量
- 当您使用该选项运行该elasticsearch-certutil工具时http,它会创建一个/kibana包含elasticsearch-ca.pem文件的目录。您使用此文件将 Kibana 配置为信任 HTTP 层的 Elasticsearch CA。
- 将文件复制elasticsearch-ca.pem到 Kibana 配置目录,如路径所定义$KBN_PATH_CONF。
root@ubuntu-x64_02:/usr/local/elasticsearch9201# cp kibana/elasticsearch-ca.pem /usr/local/kibana/config/- 打开kibana.yml并添加以下行以指定 HTTP 层的安全证书的位置。
cat >> /usr/local/kibana/config/kibana.yml <<EOFelasticsearch.ssl.certificateAuthorities: /usr/local/kibana/config/elasticsearch-ca.pemEOF
- 添加以下行以指定 Elasticsearch 集群的 HTTPS URL。
root@ubuntu-x64_02:/usr/local/elasticsearch9201# cat  /usr/local/kibana/config/kibana.yml| grep "elasticsearch.hosts"
elasticsearch.hosts: ["https://127.0.0.1:9201" ,"https://127.0.0.1:9202" ,"https://127.0.0.1:9203"]
- 修改权限
root@ubuntu-x64_02:/usr/local/elasticsearch9201# chown -R elk:elk /usr/local/kibana
- 重启 kibana
root@ubuntu-x64_02:/usr/local/elasticsearch9201# systemctl restart kibana.service
加密浏览器和 Kibana 之间的流量
-
Kibana 为您创建服务器证书和私钥。Kibana 在从 Web 浏览器接收连接时使用此服务器证书和相应的私钥。
-
以下为 Kibana 创建证书签名请求 (CSR)。CSR 包含 CA 用于生成和签署安全证书的信息。证书可以是受信任的(由公共、受信任的 CA 签名)或不受信任的(由内部 CA 签名)。自签名或内部签名证书可用于开发环境和构建概念验证,但不应在生产环境中使用。
-
在投入生产之前,使用受信任的 CA(例如Let’s Encrypt)或您组织的内部 CA 来签署证书。使用签名证书建立浏览器信任以连接到 Kibana 以进行内部访问或在公共互联网上访问。
-
为 Kibana 生成服务器证书和私钥。
root@ubuntu-x64_02:/usr/local/elasticsearch9201# ./bin/elasticsearch-certutil csr -name kibana-server -dns kibana.example.com
- 解压缩csr-bundle.zip文件以获得kibana-server.csr未签名的安全证书和kibana-server.key未加密的私钥。
root@ubuntu-x64_02:/usr/local/elasticsearch9201# unzip csr-bundle.zip
Archive:  csr-bundle.zipcreating: kibana-server/inflating: kibana-server/kibana-server.csr  inflating: kibana-server/kibana-server.key
- 将证书kibana-server.csr签名请求发送给您的内部 CA 或受信任的 CA 进行签名以获得签名证书。签名文件可以是不同的格式,.crt 例如: kibana-server.crt.
- 使用自签CA生成证书签名
root@ubuntu-x64_02:/usr/local/elasticsearch9201# tree kibana-server/
kibana-server/
├── kibana-server.crt
├── kibana-server.csr
└── kibana-server.key0 directories, 3 files
- 打开kibana.yml并添加以下行以配置 Kibana 以访问服务器证书和未加密的私钥。
root@ubuntu-x64_02:/usr/local/elasticsearch9201# cp ./kibana-server/kibana-server.crt  /usr/local/kibana/config/
root@ubuntu-x64_02:/usr/local/elasticsearch9201# cp ./kibana-server/kibana-server.key  /usr/local/kibana/config/cat >> /usr/local/kibana/config/kibana.yml  <<EOFserver.ssl.certificate: /usr/local/kibana/config/kibana-server.crt
server.ssl.key: /usr/local/kibana/config/kibana-server.keyEOF# 目录结构
root@ubuntu-x64_02:/usr/local/elasticsearch9201# ls -tlh /usr/local/kibana/config/
total 44K
-rw-r--r-- 1 root root  989 Mar 23 15:24 kibana-server.crt
-rw-r--r-- 1 elk  elk  5.5K Mar 23 15:20 kibana.yml
-rw-r--r-- 1 elk  elk  1.7K Mar 23 14:56 kibana-server.key
-rw-r--r-- 1 elk  elk  1.2K Mar 22 18:04 elasticsearch-ca.pem
-rw-r--r-- 1 elk  elk   190 Mar 20 19:20 kibana.keystore
-rw-r--r-- 1 elk  elk  5.2K Mar 20 17:26 kibana.yml.bak
-rwxr-xr-x 1 elk  elk  5.2K Jul  9  2022 kibana.yml_20220709073134.bak
-rwxr-xr-x 1 elk elk 216 Jul 9 2022 node.options- kibana.yml添加以下行入站连接启用 TLS
cat >> /usr/local/kibana/config/kibana.yml  <<EOFserver.ssl.enabled: trueEOF# 修改权限
root@ubuntu-x64_02:/usr/local/elasticsearch9201# chown -R elk:elk /usr/local/kibana- 进行这些更改后,您必须始终通过 HTTPS 访问 Kibana。例如,https://<your_kibana_host>.com。
server.publicBaseUrl: "https://192.168.88.12:5601"
- 启动 kibana
root@ubuntu-x64_02:/usr/local/elasticsearch9201# systemctl restart kibana.service
- 检查状态
root@ubuntu-x64_02:/usr/local/elasticsearch9201# systemctl status  kibana.service
● kibana.service - kibanaLoaded: loaded (/lib/systemd/system/kibana.service; disabled; vendor preset: enabled)Active: active (running) since Thu 2023-03-23 15:26:50 CST; 6s agoProcess: 4306 ExecStop=/usr/bin/kill -15 $MAINPID (code=exited, status=203/EXEC)Main PID: 4312 (node)Tasks: 18Memory: 200.5MCPU: 6.855sCGroup: /system.slice/kibana.service├─4312 /usr/local/kibana/bin/../node/bin/node /usr/local/kibana/bin/../src/cli/dist└─4325 /usr/local/kibana/node/bin/node --preserve-symlinks-main --preserve-symlinks /usr/local/kibana/src/cli/distMar 23 15:26:50 ubuntu-x64_02 systemd[1]: kibana.service: Unit entered failed state.
Mar 23 15:26:50 ubuntu-x64_02 systemd[1]: kibana.service: Failed with result 'exit-code'.
Mar 23 15:26:50 ubuntu-x64_02 systemd[1]: Started kibana.- 登录 kibana ,输入 elastic:123456登录密码,由于CA是自签,浏览器会提示未验证,开发环境可以使用
小结
- 此方案建立在基本安全方案的基础上,并使用 TLS 保护所有 HTTP 流量。除了在 Elasticsearch 集群的传输接口上配置 TLS 之外,您还可以在 Elasticsearch 和 Kibana 的 HTTP 接口上配置 TLS。如果您需要 HTTP 层上的双向(双向)TLS,则需要配置相互验证的加密。
相关文章:
Elasticsearch基本安全加上安全的 HTTPS 流量
基本安全加上安全的 HTTPS 流量 在生产环境中,除非您在 HTTP 层启用 TLS,否则某些 Elasticsearch 功能(例如令牌和 API 密钥)将被禁用。这个额外的安全层确保进出集群的所有通信都是安全的。 当您在模式下运行该elasticsearch-ce…...
C语言-程序环境和预处理(2)
文章目录预处理详解1.预定义符号2.#define2.1#define定义的标识符2.2#define定义宏2.3#define替换规则注意事项:2.4#和###的作用##的作用2.5带副作用的宏参数2.6宏和函数的对比宏的优势:宏的劣势:宏和函数的一个对比命名约定3.undef4.条件编译…...
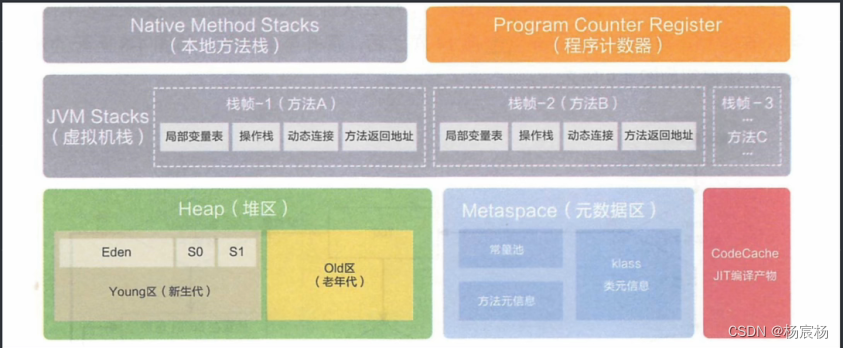
JVM 收集算法 垃圾收集器 元空间 引用
文章目录JVM 收集算法标记-清除算法标记-复制算法标记-整理算法JVM垃圾收集器Serial收集器ParNew收集器Parallel Scavenge /Parallel Old收集器CMS收集器Garbage First(G1)收集器元空间引用强引用软引用弱引用虚引用JVM 收集算法 前面我们了解了整个堆内存实际是以分代收集机制…...

clip精读
开头部分 1. 要点一 从文章题目来看-目的是:使用文本监督得到一个可以迁移的 视觉系统 2.要点二 之前是 fix-ed 的class 有诸多局限性,所以现在用大量不是精细标注的数据来学将更好,利用的语言多样性。——这个方法在 nlp其实广泛的存在&…...
vue 首次加载慢优化
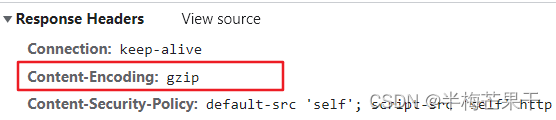
目前使用的是vue2版本 1.路由懒加载(实现按需加载) component: resolve > require([/views/physicalDetail/index], resolve)2.gzip压缩插件(需要运维nginx配合) 第一步,下载compression-webpack-plugin cnpm i c…...

WuThreat身份安全云-TVD每日漏洞情报-2023-03-21
漏洞名称:CairoSVG 文件服务器端请求伪造 漏洞级别:严重 漏洞编号:CVE-2023-27586 相关涉及:CairoSVG 在 2.7.0 版本之前 漏洞状态:POC 参考链接:https://tvd.wuthreat.com/#/listDetail?TVD_IDTVD-2023-06718 漏洞名称:WP Meta SEO WordPress 授权不当导致任意重定向 漏洞级…...

【Android -- 开发工具】Xshell 6 安装和使用教程
一、简介 Xshell 其实就是一个远程终端工具,它可以将你的个人电脑和你在远端的机器连接起来,通过向 Xshell 输入命令然后他通过网络将命令传送给远端Linux机器然后远端的Linux机器将其运行结果通过网络传回个人电脑。 二、Xshell 6 的安装 首先&#…...
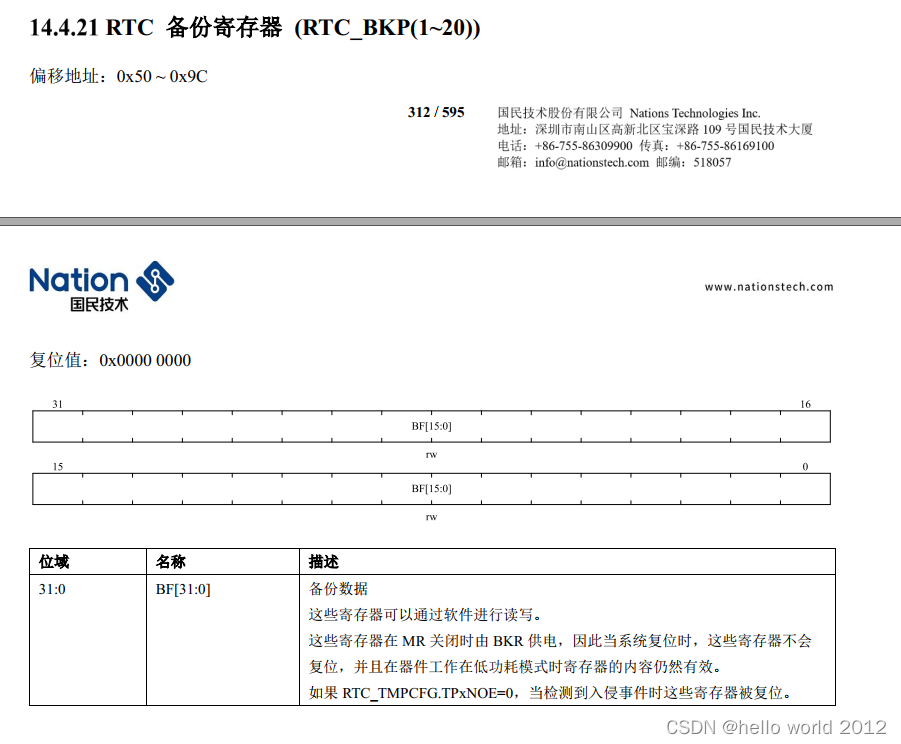
国民技术RTC备份寄存器RTC_BKP
根据手册资料知道RTC_BKP的地址,代码如下 #include "main.h" #include "usart.h"void USART2_Configuration(void) {USART_InitType USART_InitStructure;GPIO_InitType GPIO_InitStructure;GPIO_InitStruct(&GPIO_InitStructure);RCC_Ena…...
resnet网络特征提取过程可视化
我们在训练图片时,是不是要看看具体提取时的每个特征图提取的样子,找了很多,终于功夫不负有心人,找到了,通过修改的代码: resnet代码: import torch import torch.nn as nn from torchvision…...
FPGA打砖块游戏设计(有上板照片)VHDL
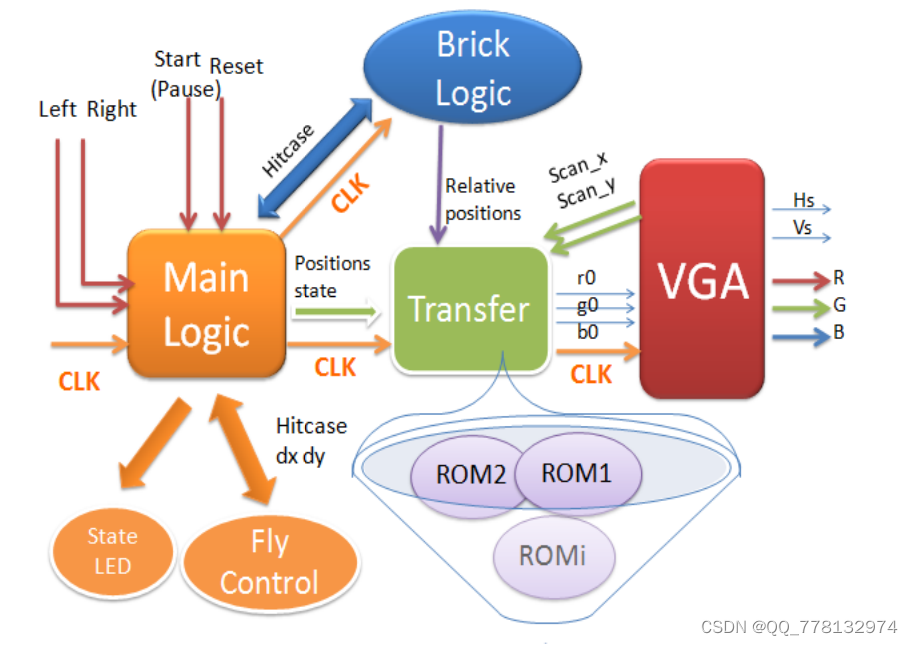
这是一款经典打砖块游戏,我们的努力让它更精致更好玩,我们将它取名为打砖块游戏(Flyball),以下是该系统的一些基本功能: 画面简约而经典,色彩绚丽而活泼,动画流畅 玩家顺序挑战3个不同难度的级别,趣味十足 计分功能,卡通字母数字 4条生命值,由生命条显示…...

【Unity入门】3D物体
【Unity入门】3D物体 大家好,我是Lampard~~ 欢迎来到Unity入门系列博客,所学知识来自B站阿发老师~感谢 (一)物体移动旋转缩放 (1)物体移动 在上一篇文章【Unity入门】场景视图操作我们学会了在场景中创建3…...
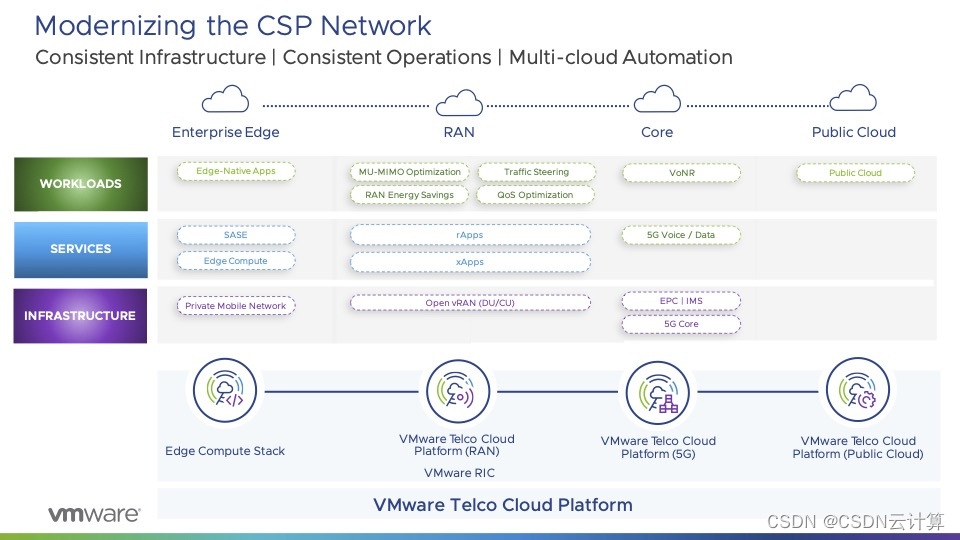
网络现代化势在必行,VMware 发布软件定义网络 SD-WAN 全新方案
出品 | CSDN云计算 作为计算存储网络基础设施三大件之一,网络一直是 IT 核心技术,并不断向前发展。 数字化转型浪潮下,各行业都在探索创新应用,而数字化创新,也是对 5G 和云边端等网络基础设施提出更高需求,…...

java学习笔记——抽象类
2.1 概述 由来 父类中的方法,被他的子类们重写,子类各自的实现都不尽相同。那么父类的方法声明和方法主体,只有声明还有意义,而方法主体则没有存在的意义了。我们把没有主体的方法称为抽象方法。java语法规定,包含抽象…...

Redis删除策略
删除策略就是针对已过期数据的处理策略。 针对过期数据要进行删除的时候都有哪些删除策略呢? 1.定时删除2.惰性删除3.定期删除1、立即删除 当key设置有过期时间,且过期时间到达时,由定时器任务立即执行对键的删除操作。 优点:节…...

【新星计划2023】SQL SERVER (01) -- 基础知识
【新星计划2023】SQL SERVER -- 基础知识1. Introduction1.1 Official Website1.2 Conn Tool2. 基础命令2.1 建库建表2.2 Alter2.3 Drop2.3 Big Data -- Postgres3.Awakening1. Introduction 1.1 Official Website 官方文档(小技巧) Officail Website: …...

nginx配置详解
一.nginx常用命令1.Windows(1).查看nginx的版本号nginx -v(2).启动nginxstart nginx(3).快速停止或关闭nginxnginx -s stop(4).正常停止或关闭nginxnginx -s quit(5).配置文件nginx.conf修改重装载命令nginx -s reload2.Linux(1).进入 nginx 目录中cd /usr/local/nginx/sbin(2)…...

关于Java中堆和栈的学习
文章目录1.概述1.1 堆1.2 栈2.堆内存2.1 什么是堆内存?2.2堆内存的特点是什么?2.3new对象在堆中如何分配?3.栈内存3.1什么是栈内存?3.2栈内存的特点3.3栈内存的内存分配机制3.4数据共享4.栈与堆的区别4.1差异4.2相同5. 面试题: java堆和栈的区别**申请方式****申请后系统的…...

ORBSLAM3 --- 闭环及地图融合线程
目录 1.闭环及地图合并线程的目的和意义 2.闭环及地图合并流程 3.ORBSLAM3中的闭环与地图融合线程解...
)
libvirt零知识学习6 —— libvirt源码编译安装(4)
接前一篇文章libvirt零知识学习5 —— libvirt源码编译安装(3) 上一篇文章中解决了YAJL包的编译时依赖问题。但是在解决后再次执行meson build时又遇到了新的错误“ERROR: Program rst2html5 rst2html5.py rst2html5-3 not found or not executable”。本…...

数据仓库相关面试题
1.请介绍一下星型模型和雪花模型的区别及适用场景。 星型模型和雪花模型是数据仓库中常见的两种数据建模方式。 星型模型是由一个中心事实表和多个与之相关的维度表构成的,维度表通常只有一层,每个维度表只关联一个事实表。在星型模型中,事实…...

Llama-3.2V-11B-cot实操:通过OpenCV预处理增强小目标检测能力再送入推理
Llama-3.2V-11B-cot实操:通过OpenCV预处理增强小目标检测能力再送入推理 1. 引言:当视觉大模型遇上“小目标”难题 想象一下,你正在用一款强大的视觉AI模型分析一张复杂的卫星图像,试图找出地面上的车辆。模型很聪明,…...

3大效率引擎:LeagueAkari本地工具如何重塑英雄联盟游戏体验
3大效率引擎:LeagueAkari本地工具如何重塑英雄联盟游戏体验 【免费下载链接】LeagueAkari ✨兴趣使然的,功能全面的英雄联盟工具集。支持战绩查询、自动秒选等功能。基于 LCU API。 项目地址: https://gitcode.com/gh_mirrors/le/LeagueAkari 在快…...
)
基于YOLOv8/YOLOv10/YOLOv11/YOLOv12与SpringBoot的安全锥检测系统(DeepSeek智能分析+web交互界面+前后端分离+YOLO数据)
摘要 随着道路交通施工、临时交通管制等场景的日益频繁,安全锥作为重要的道路安全警示设施,其部署的规范性、完整性直接关系到现场作业人员与过往车辆的安全。传统的人工巡检方式存在效率低下、成本高昂、难以实现全天候监控等弊端。为此,本…...

用Chisel实现RISC-V寄存器文件:Scala集合类的实战应用
用Chisel实现RISC-V寄存器文件:Scala集合类的实战应用 在硬件设计领域,RISC-V架构以其开源、模块化的特性迅速崛起,而Chisel作为一种基于Scala的硬件构建语言,正在重新定义数字电路的设计方式。本文将带您深入探索如何利用Scala强…...

RPA文件高效提取实战指南:从零基础到专业应用
RPA文件高效提取实战指南:从零基础到专业应用 【免费下载链接】unrpa A program to extract files from the RPA archive format. 项目地址: https://gitcode.com/gh_mirrors/un/unrpa 解决资源提取难题:unrpa的核心价值解析 当你尝试打开RenPy游…...

Screenbox:Windows平台媒体播放体验革新的开源解决方案
Screenbox:Windows平台媒体播放体验革新的开源解决方案 【免费下载链接】Screenbox LibVLC-based media player for the Universal Windows Platform 项目地址: https://gitcode.com/gh_mirrors/sc/Screenbox 副标题:3大核心优势4类应用场景5分钟…...

SparkFun Qwiic Button/Switch I²C驱动详解与嵌入式应用
1. 项目概述SparkFun Qwiic Button 和 Qwiic Switch 是两款基于 IC 总线的即插即用型物理输入模块,专为快速原型开发与嵌入式系统人机交互(HMI)设计。二者均采用标准 Qwiic 连接器(JST SH 4-pin),无需焊接、…...

【安卓逆向】APK反编译与回编译实战:从工具使用到代码修改
1. 安卓逆向入门:为什么需要APK反编译? 刚接触安卓逆向时,很多人会疑惑:为什么放着现成的APK不用,非要大费周章反编译?我刚开始做安卓开发时也这么想,直到有次线上版本出现紧急Bug,但…...

基于STM32的仓储环境闭环控制系统设计
1. 项目概述1.1 系统设计目标与工程定位本系统面向中小型仓储场景,聚焦环境参数闭环控制与多级安全响应机制的硬件实现。设计核心并非构建通用物联网平台,而是解决三类刚性工程需求:环境稳定性保障:对温湿度、光照等影响物资保存质…...

LingBot-Depth-ViT-L14效果展示:深度图量化误差分析与float32原始数据价值
LingBot-Depth-ViT-L14效果展示:深度图量化误差分析与float32原始数据价值 1. 引言:从“看得见”到“测得出” 想象一下,你给机器人装上了一双眼睛,它能看到世界,却不知道眼前的桌子离它有多远,地上的台阶…...