vue后台管理系统从0到1(5)
文章目录
- vue后台管理系统从0到1(5)
- 完善侧边栏
- 修改bug
- 渲染header导航栏
vue后台管理系统从0到1(5)
接上一期,我们需要完善我们的侧边狼
完善侧边栏
我们在 element 组件中可以看见,这一个侧边栏是符合我们的要求的

我们就使用这样一个侧边栏动态渲染我们的各个选项,但是目前没有接入后端接口,我们需要自己先定义静态侧边栏数据,然后在使用v-for动态渲染上去

这是我写好的侧边栏动态v-for渲染代码

这里是渲染数据和渲染方法
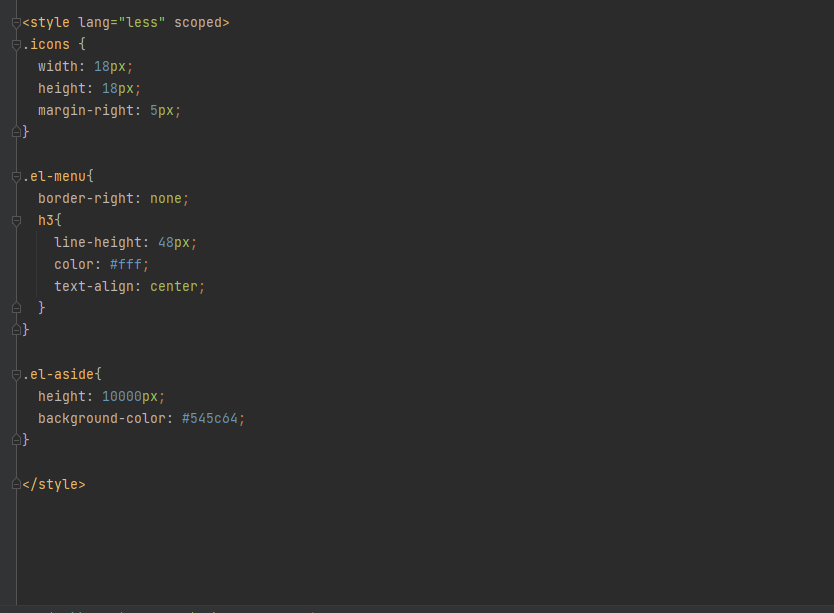
这里是加上的样式
以上代码,不懂的自己查gpt或者查一些ai
CommonAside.vue 完整代码
<template><el-aside width="200px"><el-menu @select="handleMenuSelect" background-color="#545c64" text-color="#fff"><h3>通用后台管理系统</h3><el-menu-itemv-for="item in noChildren":index="item.path":key="item.path"><i :class="item.icon"></i><span>{{ item.label }}</span></el-menu-item><el-sub-menuv-for="item in hasChildren":index="item.path":key="item.path"><template #title><i :class="item.icon"></i><span>{{ item.label }}</span></template><el-menu-itemv-for="subItem in item.children":index="subItem.path":key="subItem.path"><i :class="subItem.icon"></i><span>{{ subItem.label }}</span></el-menu-item></el-sub-menu></el-menu></el-aside>
</template><script setup>
import { ref, computed } from 'vue';
import { useRouter } from 'vue-router';const router = useRouter();
const list = ref([{ path: '/home', name: 'home', label: '首页', icon: 'el-icon-house', url: 'Home' },{ path: '/mall', name: 'mall', label: '商品管理', icon: 'el-icon-video-play', url: 'Mall' },{ path: '/user', name: 'user', label: '用户管理', icon: 'el-icon-user', url: 'User' },{path: '/other', label: '其他', icon: 'el-icon-location',children: [{ path: '/page1', name: 'page1', label: '页面1', icon: 'el-icon-setting', url: 'Page1' },{ path: '/page2', name: 'page2', label: '页2', icon: 'el-icon-setting', url: 'Page2' }]}
]);const noChildren = computed(() => list.value.filter(item => !item.children));
const hasChildren = computed(() => list.value.filter(item => item.children));const handleMenuSelect = (index) => {const item = list.value.find(item => item.path === index) ||list.value.flat().find(item => item.path === index);if (item) {router.push(item.path);}
};
</script><style lang="less" scoped>
.icons {width: 18px;height: 18px;margin-right: 5px;
}.el-menu{border-right: none;h3{line-height: 48px;color: #fff;text-align: center;}
}.el-aside{height: 10000px;background-color: #545c64;
}</style>
为了防止出错,重构 Main.vue 代码如下,不懂的gpt,我认为重要的是整个项目完成的流程

<script setup>
// 可以在这里添加组件的逻辑
import CommonAside from '@/components/CommonAside.vue'
</script><template><div class="common-layout"><el-container><el-aside width="200px"  class="aside-container"><!-- 侧边栏内容 --><common-aside></common-aside></el-aside><el-container><el-header class="el-header"><common-header></common-header></el-header><el-main class="right-main">main</el-main></el-container></el-container></div>
</template><style>.common-layout{width: 100%;height: 100%;margin: 0;padding: 0;overflow: hidden;
}
el-container{width: 100%;height: 100%;margin: 0;padding: 0;overflow: hidden;
}
.el-header{background-color: #333;
}
</style>
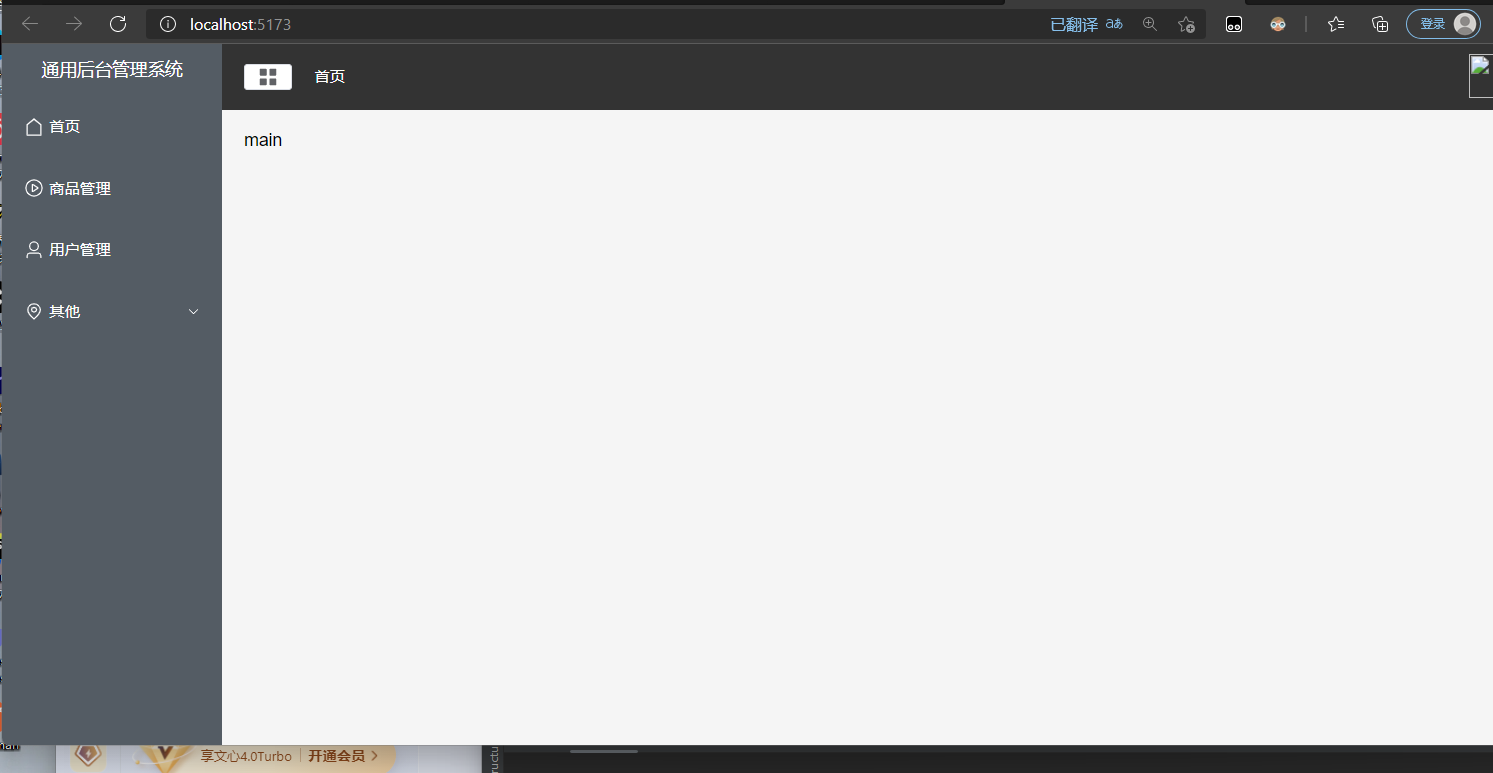
然后就是重新跑项目:

如果对于以上代码有问题可以私信我,我们的侧边栏就渲染完成了,这里有一个bug,就是我们的 icon 没有加载出来,我还没有发现问题在哪,如果你们发现了,可以私信我。
紧接着上文,我们的项目目前仍然存在侧边栏 icon 加载问题,我今天好好的看了一下代码,发现展示 icon 的地方代码出了问题
修改bug
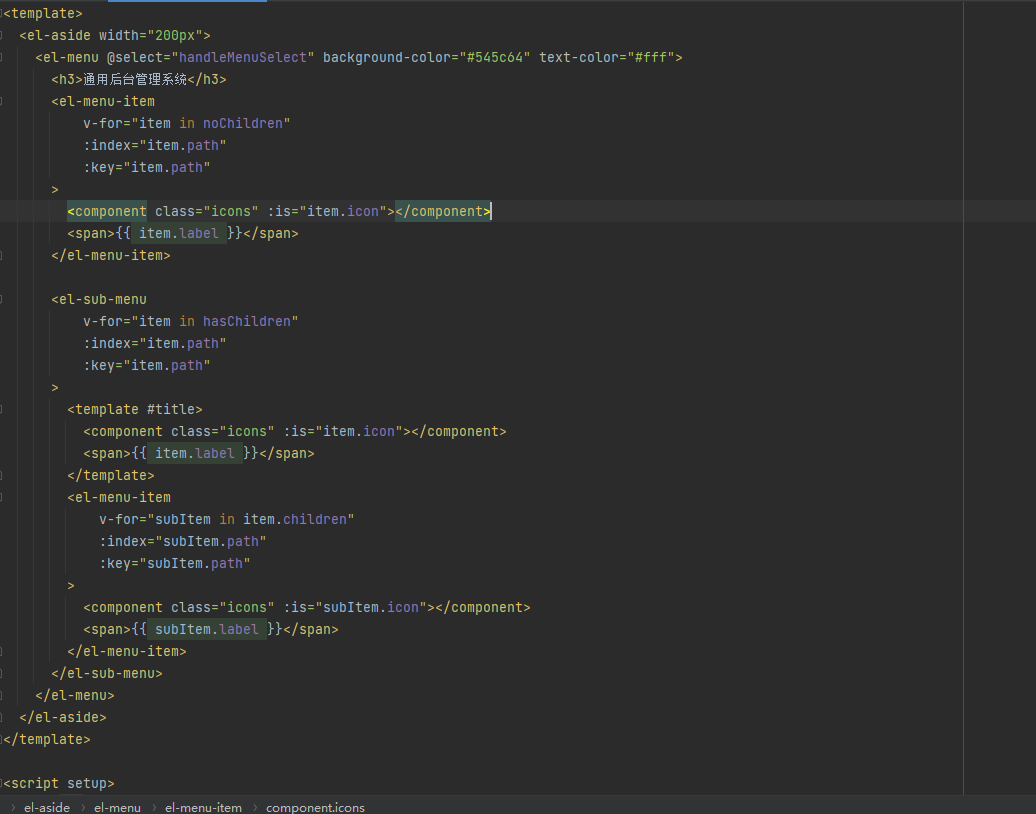
这是我修改过的代码
我原本写的展示 icon 使用 标签,并且把 icon 的渲染写成了 class 属性里
重构 commonAside.vue 如下:
<template><el-aside width="200px"><el-menu @select="handleMenuSelect" background-color="#545c64" text-color="#fff"><h3>通用后台管理系统</h3><el-menu-itemv-for="item in noChildren":index="item.path":key="item.path"><component class="icons" :is="item.icon"></component><span>{{ item.label }}</span></el-menu-item><el-sub-menuv-for="item in hasChildren":index="item.path":key="item.path"><template #title><component class="icons" :is="item.icon"></component><span>{{ item.label }}</span></template><el-menu-itemv-for="subItem in item.children":index="subItem.path":key="subItem.path"><component class="icons" :is="subItem.icon"></component><span>{{ subItem.label }}</span></el-menu-item></el-sub-menu></el-menu></el-aside>
</template><script setup>
import { ref, computed } from 'vue';
import { useRouter } from 'vue-router';const router = useRouter();
const list = ref([{ path: '/home', name: 'home', label: '首页', icon: 'house', url: 'Home' },{ path: '/mall', name: 'mall', label: '商品管理', icon: 'video-play', url: 'Mall' },{ path: '/user', name: 'user', label: '用户管理', icon: 'user', url: 'User' },{path: '/other', label: '其他', icon: 'location',children: [{ path: '/page1', name: 'page1', label: '页面1', icon: 'setting', url: 'Page1' },{ path: '/page2', name: 'page2', label: '页2', icon: 'setting', url: 'Page2' }]}
]);const noChildren = computed(() => list.value.filter(item => !item.children));
const hasChildren = computed(() => list.value.filter(item => item.children));const handleMenuSelect = (index) => {const item = list.value.find(item => item.path === index) ||list.value.flat().find(item => item.path === index);if (item) {router.push(item.path);}
};
</script><style lang="less" scoped>
.icons {width: 18px;height: 18px;margin-right: 5px;
}.el-menu{border-right: none;h3{line-height: 48px;color: #fff;text-align: center;}
}.el-aside{height: 10000px;background-color: #545c64;
}</style>
渲染header导航栏
然后我们接着渲染我们的 header 导航栏部分,目标是渲染成这样

那么第一步分析界面布局
可以得出以下两个部分,也是我们需要分开写的两个部件
首先,使用一个 header 把整体包起来
<div class="header"></div>
然后我们把导航栏分成左右两部分,左边有图标和首页字体,右边是用户头像
<div class="header"><div class="l-content"></div><div class="r-content"></div></div>
然后我们具体实现左右两边的东西
<div class="header"><div class="l-content">//图标<el-button size="small"><component class="icons" is="menu"></component></el-button>//面包屑字体<el-breadcrumb separator="/" class="bread"><el-breadcrumb-item :to="{path:'/'}">首页</el-breadcrumb-item></el-breadcrumb></div><div class="r-content">//用户头像<el-dropdown><span class="el-dropdown-link"><img :src="getImageUrl(user)" class="user"/></span><template #dropdown>//单击头像退出按钮<el-dropdown-menu><el-dropdown-item>个人中心</el-dropdown-item><el-dropdown-item>退出</el-dropdown-item></el-dropdown-menu></template></el-dropdown></div></div>然后我们加入样式
<style lang="less" scoped>
.header {display: flex;justify-content: space-between;align-items: center;width: 100%;height: 100%;background-color: #333;}.icons {width: 20px;height: 20px;
}.l-content {display: flex;align-items: center;.el-button{margin-right: 20px;}}.r-content  {.user{width: 40px;height: 40px;border-radius: 50%;}
}/* 注意::deep() 是一个 Vue.js 中的作用域穿透伪元素,用于在 scoped CSS 中访问子组件的样式。但它不是标准的 CSS 语法,且在新版本的 Vue.js 中可能已经被废弃或替换。如果这段代码是在 Vue.js 项目中使用的,请确保你的项目支持这种语法。此外,由于选择器中包含特殊字符(如点号和括号),你可能需要对其进行适当的转义或使用其他方法来实现相同的效果。但在这里,为了保持原始信息的完整性,我保留了这段代码的原样。 */
:deep(.bread span) {color: #fff !important;cursor: pointer !important;
}</style>
再加入渲染数据的代码
<script setup>
import {ref, computed} from 'vue';
import {useRouter} from 'vue-router';const router = useRouter();
const list = ref([{path: '/home', name: 'home', label: '首页', icon: 'el-icon-house', url: 'Home'},{path: '/mall', name: 'mall', label: '商品管理', icon: 'el-icon-video-play', url: 'Mall'},{path: '/user', name: 'user', label: '用户管理', icon: 'el-icon-user', url: 'User'},{path: '/other', label: '其他', icon: 'el-icon-location',children: [{path: '/page1', name: 'page1', label: '页面1', icon: 'el-icon-setting', url: 'Page1'},{path: '/page2', name: 'page2', label: '页2', icon: 'el-icon-setting', url: 'Page2'}]}
]);const getImageUrl = (user) => {return new URL(`../assets/images/${user}.png`, import.meta.url).href;
};
</script>
最后整合代码:
CommonHeader.vue代码:
<template><div class="header"><div class="l-content"><el-button size="small"><component class="icons" is="menu"></component></el-button><el-breadcrumb separator="/" class="bread"><el-breadcrumb-item :to="{path:'/'}">首页</el-breadcrumb-item></el-breadcrumb></div><div class="r-content"><el-dropdown><span class="el-dropdown-link"><img :src="getImageUrl(user)" class="user"/></span><template #dropdown><el-dropdown-menu><el-dropdown-item>个人中心</el-dropdown-item><el-dropdown-item>退出</el-dropdown-item></el-dropdown-menu></template></el-dropdown></div></div></template><script setup>
import {ref, computed} from 'vue';
import {useRouter} from 'vue-router';const router = useRouter();
const list = ref([{path: '/home', name: 'home', label: '首页', icon: 'el-icon-house', url: 'Home'},{path: '/mall', name: 'mall', label: '商品管理', icon: 'el-icon-video-play', url: 'Mall'},{path: '/user', name: 'user', label: '用户管理', icon: 'el-icon-user', url: 'User'},{path: '/other', label: '其他', icon: 'el-icon-location',children: [{path: '/page1', name: 'page1', label: '页面1', icon: 'el-icon-setting', url: 'Page1'},{path: '/page2', name: 'page2', label: '页2', icon: 'el-icon-setting', url: 'Page2'}]}
]);const getImageUrl = (user) => {return new URL(`../assets/images/${user}.png`, import.meta.url).href;
};
</script><style lang="less" scoped>
.header {display: flex;justify-content: space-between;align-items: center;width: 100%;height: 100%;background-color: #333;}.icons {width: 20px;height: 20px;
}.l-content {display: flex;align-items: center;.el-button{margin-right: 20px;}}.r-content  {.user{width: 40px;height: 40px;border-radius: 50%;}
}/* 注意::deep() 是一个 Vue.js 中的作用域穿透伪元素,用于在 scoped CSS 中访问子组件的样式。但它不是标准的 CSS 语法,且在新版本的 Vue.js 中可能已经被废弃或替换。如果这段代码是在 Vue.js 项目中使用的,请确保你的项目支持这种语法。此外,由于选择器中包含特殊字符(如点号和括号),你可能需要对其进行适当的转义或使用其他方法来实现相同的效果。但在这里,为了保持原始信息的完整性,我保留了这段代码的原样。 */
:deep(.bread span) {color: #fff !important;cursor: pointer !important;
}</style>
然后,我们启动项目,查看如下:
这样一个新的组件就被我们写好了。
相关文章:
vue后台管理系统从0到1(5)
文章目录 vue后台管理系统从0到1(5)完善侧边栏修改bug渲染header导航栏 vue后台管理系统从0到1(5) 接上一期,我们需要完善我们的侧边狼 完善侧边栏 我们在 element 组件中可以看见,这一个侧边栏是符合我们…...
OpenAI的新功能Canvas,效果还不错
时隔两年,ChatGPT终迎来界面全新升级! 这一次,OpenAI官宣推出类似 Anthropic 的 Artifacts 的界面交互功能 canvas,并称这是一种使用 ChatGPT 写作和编程的新方式。不论是写作,还是编码,都可以开启全新的交…...

了解一些常用的Javascript对象方法
javascript 的对象包含许多有用的方法,可以帮助开发人员轻松操作对象。让我们通过简短的解释和示例来了解一些最重要的内容 object.create()object.assign()object.keys()object.values()object.entries()object.freeze()object.seal()object.preventextensions()o…...

【知识科普】GraphQL一个强大的API查询语言
文章目录 概述📚 GraphQL 的类型系统是如何工作的?🔍 能否举例说明 GraphQL 的类型系统在实际应用中是如何工作的?位置步骤 1: 定义类型步骤 2: 实现解析器步骤 3: 客户端查询步骤 4: 执行查询 🛠️ 在实际开发中&…...

Spring Boot 整合达梦
Maven 依赖 <dependency><groupId>com.dameng</groupId><artifactId>DmJdbcDriver18</artifactId><version>8.1.2.192</version></dependency> yml配置 datasource:master:url: jdbc:dm://192.168.211.113:30236username: WE…...

Vue.js 组件开发基本步骤
Vue.js 是一个构建用户界面的渐进式框架,它被设计为能够轻松地被集成进项目的部分功能,或者用于构建完整的前端应用。组件化是 Vue.js 的核心概念之一,它允许开发者将界面拆分成独立、可复用的组件,每个组件负责应用中的一小部分功…...

博客搭建之路:hexo使用next主题渲染流程图
文章目录 hexo使用next主题渲染流程图 hexo使用next主题渲染流程图 hexo版本5.0.2 npm版本6.14.7 next版本7.8.0 next主题的配置文件中搜索找到mermaid,把enable配置改为true mermaid:enable: true# Available themes: default | dark | forest | neutraltheme: de…...

【数据结构与算法】线性表顺序存储结构
文章目录 一.顺序表的存储结构定义1.1定义1.2 图示1.3结构代码*C语言的内存动态分配 二.顺序表基本运算*参数传递2.1建立2.2初始化(InitList(&L))2.3销毁(DestroyList(&L))2.4判断线性表是否为空表(ListEmpty(L))2.5求线性表的长度(ListLength(L))2.6输出线性表(DispLi…...
Unix Standardization and Implementations
Unix标准化 在Unix未制定较为完备的标准时,各个平台的系统调用方式各异,所开发出的应用程序存在可移植性差的特点,因此人们呼吁指定一套Unix标准来规范接口,增加应用程序的可移植性。所谓Unix标准即适用于Unix环境下的一系列函数…...
Windows 与 Java 环境下的 Redis 利用分析
1 前言 在最近的一次攻防演练中,遇到了两个未授权访问的 Redis 实例。起初以为可以直接利用,但后来发现竟然是Windows Java (Tomcat)。因为网上没有看到相关的利用文章,所以在经过摸索,成功解决之后决定简单写一写。 本文介绍了…...
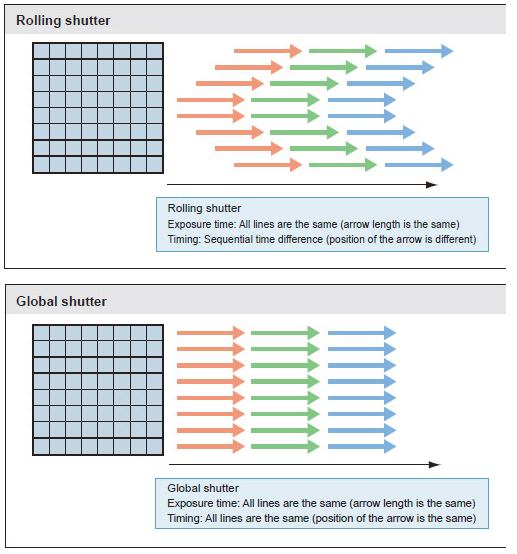
机器视觉系统硬件组成之工业相机篇
工业相机是一种非常重要的机器视觉器件,它能够将被采集的图像信息通过电路转换成电信号,再通过模数转换器(ADC)将其转化为数字信号,最后以标准的视频信号输出。工业相机在机器视觉领域得到了广泛应用,包括质…...
离线安装bitnami-gitlab8.8.4+汉化
注意: 常规安装gitlab需要联网,而按装bitnami-gitlab无需联网(bitnami-gitlab用于内网环境无法联网时安装gitlab,两者是一个东西只是名字不一样)bitnami-gitlab-8.8.4版本可以汉化成功新用户注册账户无需激活也可以直接登录,因为…...
亚马逊日本站推出AI日语listing功能,Listing一键发布,轻松无忧!
随着大数据与人工智能技术的成熟,AI在电商的应用也越来越多,各大电商平台都在陆续引进AI人工智能,有客服方面的,也有发布Listing方面的。 10月17日消息,亚马逊日本站近日宣布推出一项支持日语的人工智能listing功能&am…...
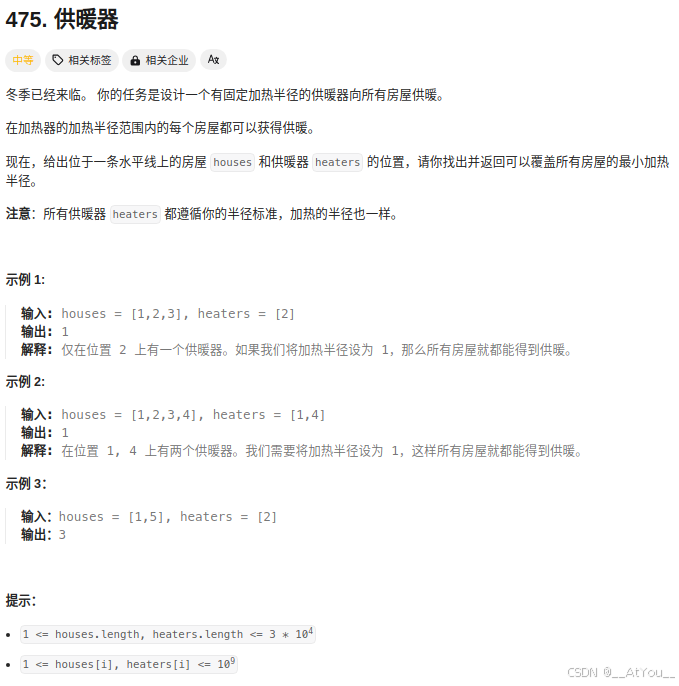
Golang | Leetcode Golang题解之第475题供暖器
题目: 题解: func findRadius(houses, heaters []int) (ans int) {sort.Ints(houses)sort.Ints(heaters)j : 0for _, house : range houses {dis : abs(house - heaters[j])for j1 < len(heaters) && abs(house-heaters[j]) > abs(house-…...
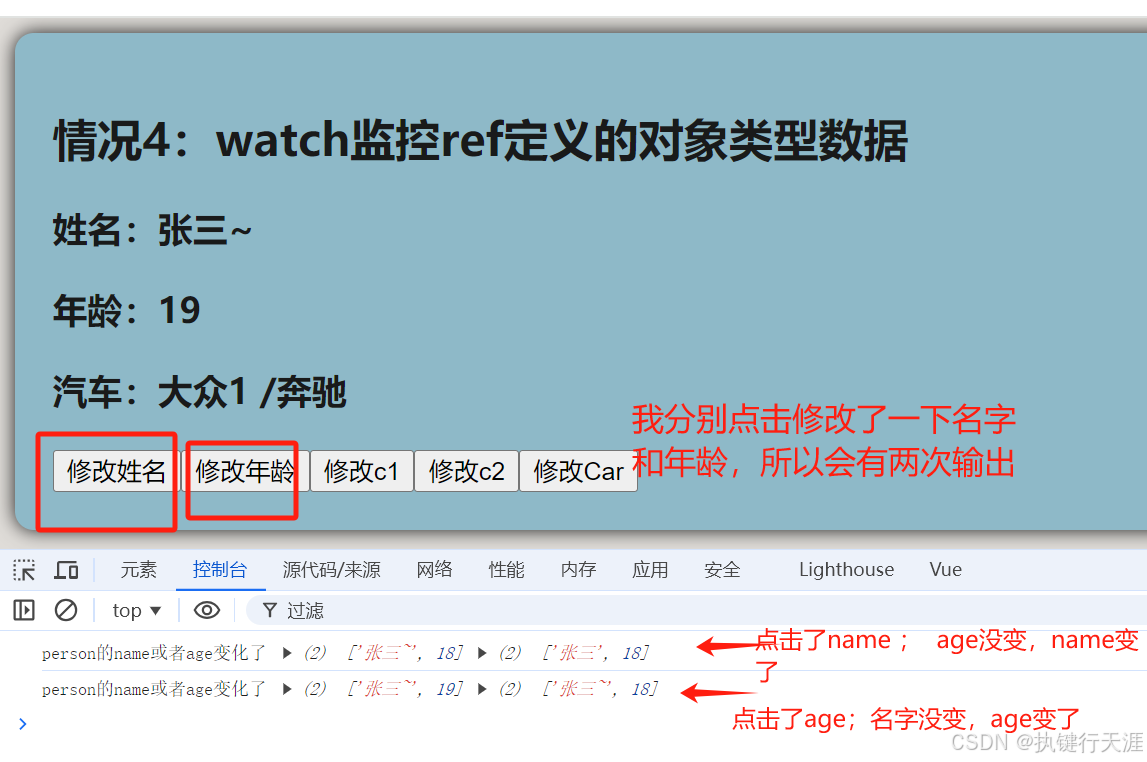
【Vue】Vue3.0 (十二)、watchEffect 和watch的区别及使用
上篇文章: 【Vue】Vue3.0 (十二)、watch对ref定义的基本类型、对象类型;reactive定义的对象类型的监视使用 🏡作者主页:点击! 🤖Vue专栏:点击! ⏰️创作时间&…...

PHP-laravel框架
laravel框架 laravel 搭建与路由基础 基本路由与视图路由 视图使用控制器模板分配变量...
永恒之蓝漏洞
MS17-010是微软于2017年3月发布的一个安全补丁,旨在修复Windows操作系统中的一个严重漏洞,该漏洞被称为“永恒之蓝”(EternalBlue)。这个漏洞影响了Windows的Server Message Block(SMB)协议,允许…...
Eking管理易 Html5Upload 前台任意文件上传漏洞复现
0x01 产品描述: Eking管理易是一款专为广告制品制作企业量身定制的管理软件产品,旨在帮助企业实现规范化、科学化管理,提升运营效率和降低运营成本。 该软件由广州易凯软件技术有限公司开发,基于JAVA企业版技术研发࿰…...
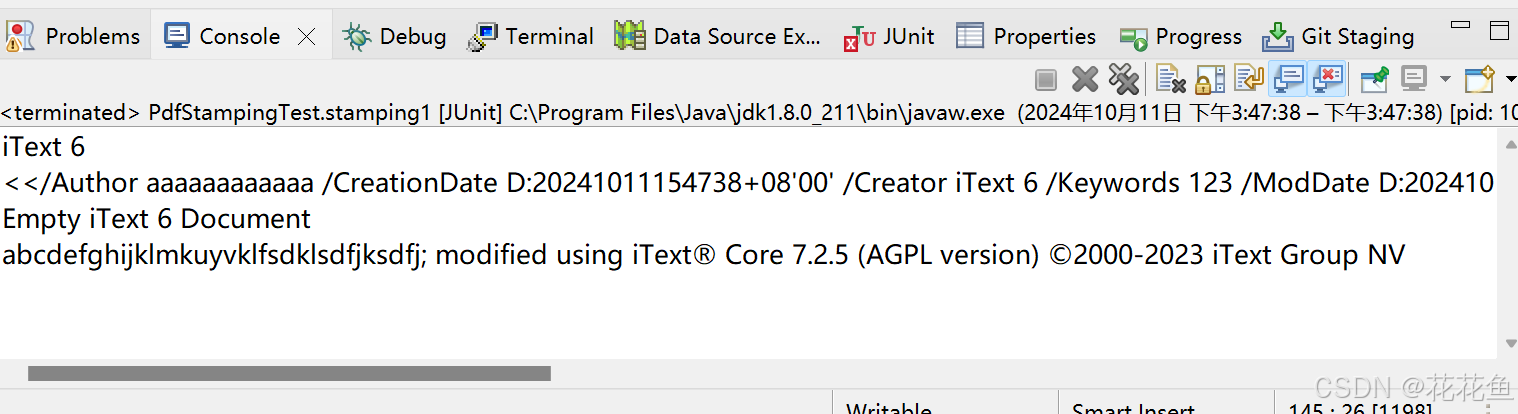
spring boot itext7 修改生成文档的作者、制作者、标题,并且读取相关的信息。
1、官方的example文件:iText GitHub itext-java-7.2.5\kernel\src\test\java\com\itextpdf\kernel\pdf\PdfStampingTest.java 2、修改代码: Testpublic void stamping1() throws IOException {String filename1 destinationFolder "stamping1_…...
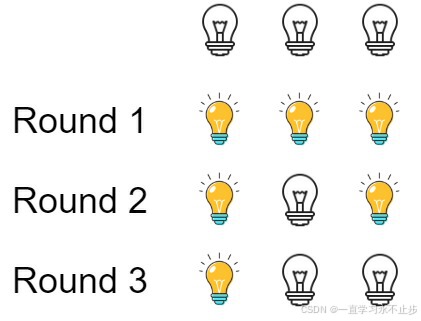
LeetCode题练习与总结:灯泡开关--319
一、题目描述 初始时有 n 个灯泡处于关闭状态。第一轮,你将会打开所有灯泡。接下来的第二轮,你将会每两个灯泡关闭第二个。 第三轮,你每三个灯泡就切换第三个灯泡的开关(即,打开变关闭,关闭变打开&#x…...

软阴影:那个让虚拟世界“温柔起来“的光影小秘密
一、从一只小猫的影子说起 前几天我在朋友家做客,他家养了一只胖乎乎的橘猫,正趴在阳台的窗边晒太阳。我无意间瞥了一眼那只猫脚边的影子,突然被一个细节震撼了—— 那只猫的影子——并不是一片均匀的黑。 仔细看——猫肚子紧贴地板的地方——…...

我靠这个测试设计方法,把漏测率降低了80%
当“直觉测试”撞上南墙很长一段时间里,我和许多测试同行一样,测试用例的设计主要依靠两样东西:需求文档和“测试直觉”。这种模式在业务逻辑相对简单、迭代速度平缓时还能勉强应付。一旦面对复杂的企业级应用、高频的敏捷迭代,或…...

电容损坏深度诊断,从外观到 ESR精准区分容衰与漏电
在 PCB 故障中,电容损坏占比超 40%,是当之无愧的 “头号杀手”。很多工程师仅靠 “鼓包漏液” 判断电容好坏,殊不知80% 的电容损坏是隐性的—— 外观平整但容值衰减、ESR 升高、轻微漏电,导致供电不稳、系统重启、噪声增大&#x…...
)
毕业设计 yolov11骨折检测医疗辅助系统(源码+论文)
文章目录 0 前言1 项目运行效果2 课题背景2.1 研究背景2.2 国内外研究现状2.3 研究意义 3 设计框架(骨折检测系统设计框架说明)3.1. 系统架构图3.2. 技术选型3.2.1 核心组件3.2.2 辅助工具 3.3. 核心模块设计3.3.1 YOLO模型训练模块训练流程图关键伪代码…...

告别CAJ格式困扰:3分钟学会用开源工具将知网文献转为PDF
告别CAJ格式困扰:3分钟学会用开源工具将知网文献转为PDF 【免费下载链接】caj2pdf Convert CAJ (China Academic Journals) files to PDF. 转换中国知网 CAJ 格式文献为 PDF。佛系转换,成功与否,皆是玄学。 项目地址: https://gitcode.com/…...

基于树莓派打造万能遥控器:从硬件选型到Web控制界面全解析
1. 项目概述:打造一个能“学习”的万能遥控器家里遥控器越来越多,电视、空调、风扇、灯带……每个设备都配一个,找起来麻烦,用起来也乱。市面上所谓的“万能遥控器”其实并不万能,它内置的码库有限,很多小众…...

3步快速上手Whisper-WebUI:轻松实现语音转字幕的完整指南
3步快速上手Whisper-WebUI:轻松实现语音转字幕的完整指南 【免费下载链接】Whisper-WebUI A Web UI for easy subtitle using whisper model. 项目地址: https://gitcode.com/gh_mirrors/wh/Whisper-WebUI 还在为视频制作繁琐的字幕而烦恼吗?Whis…...

CMSIS-DAP调试器原理与应用:以Elektor mbed interface为例
1. 项目概述:Elektor mbed interface [150554] 是什么?如果你玩过ARM Cortex-M系列的单片机,尤其是NXP LPC800系列,那你可能对“CMSIS-DAP”这个调试器标准不陌生。它是由ARM官方推出的一个开源调试接口标准,最大的好处…...

基于Jetson Nano与JNEEG Shield的脑电信号采集与边缘AI处理实战
1. 项目概述:低成本脑机接口的硬件基石 如果你对脑机接口、生物信号处理或者边缘AI应用感兴趣,但又苦于专业设备动辄数万甚至数十万的高昂门槛,那么JNEEG Shield的出现,可能会为你打开一扇新的大门。这是一个专为NVIDIA Jetson Na…...

面试官问LinkedBlockingQueue和ArrayBlockingQueue区别?别只答有界无界了,这3个实战坑才是重点
面试官追问LinkedBlockingQueue与ArrayBlockingQueue?别只答基础区别,这3个实战陷阱才是关键 当面试官抛出"LinkedBlockingQueue和ArrayBlockingQueue有什么区别"这个问题时,80%的候选人会条件反射般回答"一个有界一个无界&qu…...