resnetv1骨干
# 普通的卷积残差块
def apply_basic_block(
x, filters, kernel_size=3, stride=1, conv_shortcut=True, name=None
):
# 预设块名称前缀
if name is None:
name = f"v1_basic_block_{keras.backend.get_uid('v1_basic_block_')}"
# 设置残差连接前段
# 如果conv_shortcut为True,用点卷积切换通道,之后批次标准化,这时一般要下采样
if conv_shortcut:
shortcut = keras.layers.Conv2D(
filters,
1,
strides=stride,
use_bias=False,
name=name + "_0_conv",
)(x)
shortcut = keras.layers.BatchNormalization(
axis=BN_AXIS, epsilon=BN_EPSILON, name=name + "_0_bn"
)(shortcut)
else: # 否则不变
shortcut = x
# 普通卷积,strides=2时,下采样
x = keras.layers.Conv2D(
filters,
kernel_size,
padding="SAME",
strides=stride,
use_bias=False,
name=name + "_1_conv",
)(x)
# 批次激活块
x = keras.layers.BatchNormalization(
axis=BN_AXIS, epsilon=BN_EPSILON, name=name + "_1_bn"
)(x)
x = keras.layers.Activation("relu", name=name + "_1_relu")(x)
# 第二个普通卷积,步长为1
x = keras.layers.Conv2D(
filters,
kernel_size,
padding="SAME",
use_bias=False,
name=name + "_2_conv",
)(x)
x = keras.layers.BatchNormalization( # 批次标准化
axis=BN_AXIS, epsilon=BN_EPSILON, name=name + "_2_bn"
)(x)
# 注意:残差连接前的两个残差块,都只是批次标准化处理,并没用激活函数
# 这是因为激活函数会破坏残差的线性,因为卷积是线性的
x = keras.layers.Add(name=name + "_add")([shortcut, x])
# 之后经过激活函数处理
x = keras.layers.Activation("relu", name=name + "_out")(x)
return x
# 特殊的卷积提取块(宽--窄--宽)
def apply_block(
x, filters, kernel_size=3, stride=1, conv_shortcut=True, name=None
):
# 预设块前缀 v1_block_1
if name is None:
name = f"v1_block_{keras.backend.get_uid('v1_block')}"
# 如果设置了conv_shortcut=True,用点卷积切换通道(4c),之后批次标准化,这时一般要下采样
# 这是设置残差前段
if conv_shortcut:
shortcut = keras.layers.Conv2D(
4 * filters,
1,
strides=stride,
use_bias=False,
name=name + "_0_conv",
)(x)
shortcut = keras.layers.BatchNormalization(
axis=BN_AXIS, epsilon=BN_EPSILON, name=name + "_0_bn"
)(shortcut)
else: # 否则,残差前段=x(传入数据)
shortcut = x
# 点卷积切换通道,strides=2时,下采样
x = keras.layers.Conv2D(
filters, 1, strides=stride, use_bias=False, name=name + "_1_conv"
)(x)
# 批次激活块
x = keras.layers.BatchNormalization(
axis=BN_AXIS, epsilon=BN_EPSILON, name=name + "_1_bn"
)(x)
x = keras.layers.Activation("relu", name=name + "_1_relu")(x)
# 普通卷积,步长采用默认1
x = keras.layers.Conv2D(
filters,
kernel_size,
padding="SAME",
use_bias=False,
name=name + "_2_conv",
)(x)
# 批次激活块
x = keras.layers.BatchNormalization(
axis=BN_AXIS, epsilon=BN_EPSILON, name=name + "_2_bn"
)(x)
x = keras.layers.Activation("relu", name=name + "_2_relu")(x)
# 点卷积切换通道到4c
x = keras.layers.Conv2D(
4 * filters, 1, use_bias=False, name=name + "_3_conv"
)(x)
x = keras.layers.BatchNormalization( # 批次标准化
axis=BN_AXIS, epsilon=BN_EPSILON, name=name + "_3_bn"
)(x)
# 残差连接,残差前不用激活函数,因为会破坏残差的线性
x = keras.layers.Add(name=name + "_add")([shortcut, x])
# 残差后用激活函数(这时通道是4c)
x = keras.layers.Activation("relu", name=name + "_out")(x)
return x
# 堆叠的残差块
def apply_stack(
x,
filters,
blocks,
stride=2,
name=None,
block_type="block",
first_shortcut=True,
):
# 设置默认名称前缀
if name is None:
name = "v1_stack"
# 根据block_type的类型使用不同的提取块函数
if block_type == "basic_block":
block_fn = apply_basic_block # 基本卷积残差块
elif block_type == "block":
block_fn = apply_block # 特殊的卷积残差块
else:
raise ValueError(
"""`block_type` must be either "basic_block" or "block". """
f"Received block_type={block_type}."
)
# 第一次特征提取,通常要下采样
x = block_fn(
x,
filters,
stride=stride,
name=name + "_block1",
conv_shortcut=first_shortcut,
)
# 之后的特征提取,步长一般是1,不进行下采样,只是残差
for i in range(2, blocks + 1):
x = block_fn(
x, filters, conv_shortcut=False, name=name + "_block" + str(i)
)
return x
# keras_cv_export:导入当前类的路径
@keras_cv_export("keras_cv.models.ResNetBackbone")
class ResNetBackbone(Backbone): # resnet骨干
def __init__(
self,
*,
stackwise_filters, # 通道
stackwise_blocks,
stackwise_strides, # 步长列表
include_rescaling, # 是否内部归一化
input_shape=(None, None, 3), # 输入形状
input_tensor=None, # 输入的数据
block_type="block",
**kwargs,
):
# 模型输入
inputs = utils.parse_model_inputs(input_shape, input_tensor) # (224,224,3)
x = inputs # 中间变量
# 如果要内部归一化
if include_rescaling:
x = keras.layers.Rescaling(1 / 255.0)(x) # 归一化
# 第一次下采样(112,112,3)
x = keras.layers.Conv2D(
64, 7, strides=2, use_bias=False, padding="same", name="conv1_conv"
)(x)
# 批次激活块
x = keras.layers.BatchNormalization(
axis=BN_AXIS, epsilon=BN_EPSILON, name="conv1_bn"
)(x)
x = keras.layers.Activation("relu", name="conv1_relu")(x)
# 最大池化(56,56,3)
x = keras.layers.MaxPooling2D(
3, strides=2, padding="same", name="pool1_pool"
)(x)
# 不同层级
num_stacks = len(stackwise_filters)
# 对应金字塔层级的特征图
pyramid_level_inputs = {}
# 遍历不同层级
for stack_index in range(num_stacks):
# 应用特征提取模块
x = apply_stack(
x,
filters=stackwise_filters[stack_index],
blocks=stackwise_blocks[stack_index], # 相同配置的块深度
stride=stackwise_strides[stack_index],
block_type=block_type, # 提取块的类型,根据这个选是用基本的卷积块,还是瓶颈块
# 你看变量名称会坑死你,其实这个是说第一次如果要下采样的话,那残差前段也要跟着下采样
# 不然你无法残差,条件就是如果block_type == "block"(特殊的卷积残差块)或者
# stack_index > 0(基本卷积残差块)
first_shortcut=(block_type == "block" or stack_index > 0),
name=f"v2_stack_{stack_index}",
)
# 对应金字塔层级特征图
pyramid_level_inputs[f"P{stack_index + 2}"] = (
utils.get_tensor_input_name(x)
)
# Create model.
super().__init__(inputs=inputs, outputs=x, **kwargs)
# 设置实例属性
self.pyramid_level_inputs = pyramid_level_inputs
self.stackwise_filters = stackwise_filters
self.stackwise_blocks = stackwise_blocks
self.stackwise_strides = stackwise_strides
self.include_rescaling = include_rescaling
self.input_tensor = input_tensor
self.block_type = block_type
def get_config(self):
config = super().get_config() # 获取父类的配置字典
config.update( # 更新字典,加入了子类的配置
{
"stackwise_filters": self.stackwise_filters,
"stackwise_blocks": self.stackwise_blocks,
"stackwise_strides": self.stackwise_strides,
"include_rescaling": self.include_rescaling,
# Remove batch dimension from `input_shape`
"input_shape": self.input_shape[1:],
"input_tensor": self.input_tensor,
"block_type": self.block_type,
}
)
return config
# 类属性(返回预设的配置)
@classproperty
def presets(cls):
"""Dictionary of preset names and configurations."""
return copy.deepcopy(backbone_presets)
# 类属性(包含权重的配置)
@classproperty
def presets_with_weights(cls):
return copy.deepcopy(backbone_presets_with_weights)
# 使用自定义配置随机初始化backbone
model = ResNetBackbone(
input_shape=(224,224,3),
stackwise_filters=[64, 128, 256, 512], # 通道数
stackwise_blocks=[2, 2, 2, 2], # 块深度
stackwise_strides=[1, 2, 2, 2], # 步长
include_rescaling=False,
)
len(model.layers)
model.pyramid_level_inputs
[model.get_layer(i).output for i in model.pyramid_level_inputs.values()]
model.summary()
input_data = tf.ones(shape=(8, 224, 224, 3))
output = model(input_data)
output.shape
# 注解,导入类的路径
@keras_cv_export("keras_cv.models.ResNet18Backbone")
class ResNet18Backbone(ResNetBackbone):
def __new__(
cls,
include_rescaling=True,
input_shape=(None, None, 3),
input_tensor=None,
**kwargs,
):
# 把传入参数更新到kwargs里
kwargs.update(
{
"include_rescaling": include_rescaling,
"input_shape": input_shape,
"input_tensor": input_tensor,
}
)
# 获取resnet18骨干网络
return ResNetBackbone.from_preset("resnet18", **kwargs)
@classproperty
def presets(cls):
return {}
@classproperty
def presets_with_weights(cls):
return {}
model1=ResNet18Backbone(input_shape=(224,224, 3))
model1.summary()
model1.pyramid_level_inputs
@keras_cv_export("keras_cv.models.ResNet34Backbone")
class ResNet34Backbone(ResNetBackbone):
def __new__(
cls,
include_rescaling=True,
input_shape=(None, None, 3),
input_tensor=None,
**kwargs,
):
# Pack args in kwargs
kwargs.update(
{
"include_rescaling": include_rescaling,
"input_shape": input_shape,
"input_tensor": input_tensor,
}
)
return ResNetBackbone.from_preset("resnet34", **kwargs)
@classproperty
def presets(cls):
"""Dictionary of preset names and configurations."""
return {}
@classproperty
def presets_with_weights(cls):
"""Dictionary of preset names and configurations that include
weights."""
return {}
@keras_cv_export("keras_cv.models.ResNet50Backbone")
class ResNet50Backbone(ResNetBackbone):
def __new__(
cls,
include_rescaling=True,
input_shape=(None, None, 3),
input_tensor=None,
**kwargs,
):
# Pack args in kwargs
kwargs.update(
{
"include_rescaling": include_rescaling,
"input_shape": input_shape,
"input_tensor": input_tensor,
}
)
return ResNetBackbone.from_preset("resnet50", **kwargs)
@classproperty
def presets(cls):
"""Dictionary of preset names and configurations."""
return {
"resnet50_imagenet": copy.deepcopy(
backbone_presets["resnet50_imagenet"]
),
}
@classproperty
def presets_with_weights(cls):
"""Dictionary of preset names and configurations that include
weights."""
return cls.presets
@keras_cv_export("keras_cv.models.ResNet101Backbone")
class ResNet101Backbone(ResNetBackbone):
def __new__(
cls,
include_rescaling=True,
input_shape=(None, None, 3),
input_tensor=None,
**kwargs,
):
# Pack args in kwargs
kwargs.update(
{
"include_rescaling": include_rescaling,
"input_shape": input_shape,
"input_tensor": input_tensor,
}
)
return ResNetBackbone.from_preset("resnet101", **kwargs)
@classproperty
def presets(cls):
"""Dictionary of preset names and configurations."""
return {}
@classproperty
def presets_with_weights(cls):
"""Dictionary of preset names and configurations that include
weights."""
return {}
@keras_cv_export("keras_cv.models.ResNet152Backbone")
class ResNet152Backbone(ResNetBackbone):
def __new__(
cls,
include_rescaling=True,
input_shape=(None, None, 3),
input_tensor=None,
**kwargs,
):
# Pack args in kwargs
kwargs.update(
{
"include_rescaling": include_rescaling,
"input_shape": input_shape,
"input_tensor": input_tensor,
}
)
return ResNetBackbone.from_preset("resnet152", **kwargs)
@classproperty
def presets(cls):
"""Dictionary of preset names and configurations."""
return {}
@classproperty
def presets_with_weights(cls):
"""Dictionary of preset names and configurations that include
weights."""
return {}
model2=ResNet152Backbone(input_shape=(224,224,3))
len(model2.layers)
[model2.get_layer(i).output for i in model2.pyramid_level_inputs.values()]
model2.get_config()
{'name': 'res_net_backbone','trainable': True,'stackwise_filters': [64, 128, 256, 512],'stackwise_blocks': [3, 8, 36, 3],'stackwise_strides': [1, 2, 2, 2],'include_rescaling': True,'input_shape': (224, 224, 3),'input_tensor': None,'block_type': 'block'}相关文章:

resnetv1骨干
# 普通的卷积残差块 def apply_basic_block( x, filters, kernel_size3, stride1, conv_shortcutTrue, nameNone ): # 预设块名称前缀 if name is None: name f"v1_basic_block_{keras.backend.get_uid(v1_basic_block_)}" # 设置残差连接前…...
设计模式,面试级别的详解(持续更新中)
设计模式,面试级别的详解(持续更新中) 软件的设计原则 常⽤的⾯向对象设计原则包括7个,这些原则并不是孤⽴存在的,它们相互依赖,相互补充。 开闭原则(Open Closed Principle,OCP)单⼀职责原则…...
第9篇:网络访问控制与认证机制
目录 引言 9.1 访问控制策略概述 9.2 认证机制的使用 9.3 密钥分发与证书机制 9.4 访问控制与认证在网络安全中的应用 9.5 网络访问控制与认证的挑战 9.6 总结 第9篇:网络访问控制与认证机制 引言 随着计算机网络的不断普及,安全问题日益受到关…...
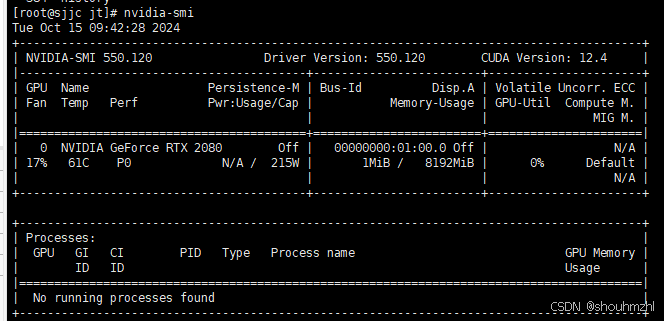
CentOS安装NVIDIA驱动、CUDA以及nvidia-container-toolkit
0.提前准备 0.1.更新yum源(以阿里为例) 0.1.1 备份当前的yum源 mv /etc/yum.repos.d/CentOS-Base.repo /etc/yum.repos.d/CentOS-Base.repo.backup 0.1.2 下载新的CentOS-Base.repo 到/etc/yum.repos.d/ CentOS 5 wget -O /etc/yum.repos.d/CentOS-Base…...
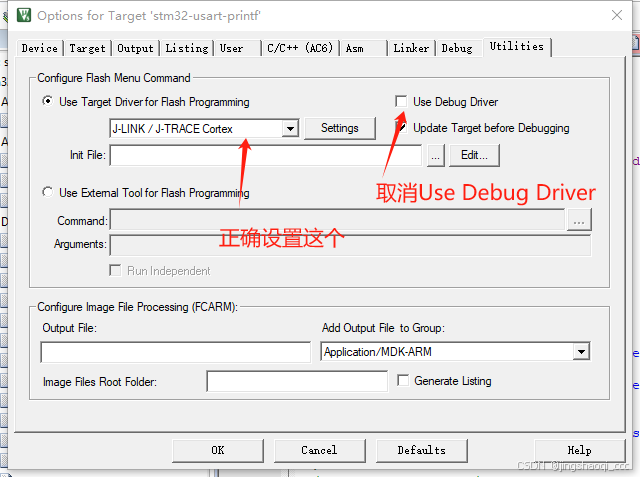
STM32调试,发现HAL_Init();之后无法调试,甚至无法让程序停下来
参考文档: STM32调试,发现HAL_Init();之后无法调试,甚至无法让程序停下来 - asml - 博客园 症状 最近开始学习STM32Cube,发现新建工程后无法正常调试,过了HAL_Init();之后就无法继续调试了. 无法进行让程序暂停以及停止等操作.并在输出窗口不断刷出 ERROR: Can n…...

Ajax(web笔记)
文章目录 1.Ajax的概念2.Ajax 的作用3.原生Ajax4.Axios4.1Axios的概念4.2Axios入门 1.Ajax的概念 AsynchronousJavaScriptAndXML,异步的JavaScript和XML 2.Ajax 的作用 数据交换:过Ajax可以给服务器发送请求,并获取服务器响应的数据。异步交互:可以在…...

多入口+vite+vue3预渲染方案
如果你的项目要求加载速度要快,我们如果使用传统的vue3+sfc模式去开发,因为只有一个根节点,空白页面加载出来之后js才回去加载组件渲染,这样页面总是有一个短暂的空白。我们这里不讨论服务器端ssr和预渲染方案,仅仅是为了满足比较极端的优化需求,在这种情况下我的这套方案…...
Vue3+Ts函数封装与应用
目录 一、基础函数 二、实际应用 2.1、根据id找到对应的value值(找第一个) 2.2、根据id找到对应的value值(找所有) 2.3、不重复的升序数组找数字(二分查找) 2.4、重复的无序数组找数字(统计个数) 2.5、将数组整理为树结构(省市区为例) 为什么要积累呢?因为面…...

C语言全局变量和局部变量同时应用的题题型[求一堆数组中10个学生的成绩里最高分、最低分和平均分。]
C语言函数 全局变量与局部结合变量题。 本片代码中包含全局变量max和min。 以及局部变量aver。 全局变量运用于从定义变量开始,局部变量运用于定义它的调用函数内。 正文开始: #include <stdio.h> int max0,min0; int main() { int average(int array[…...
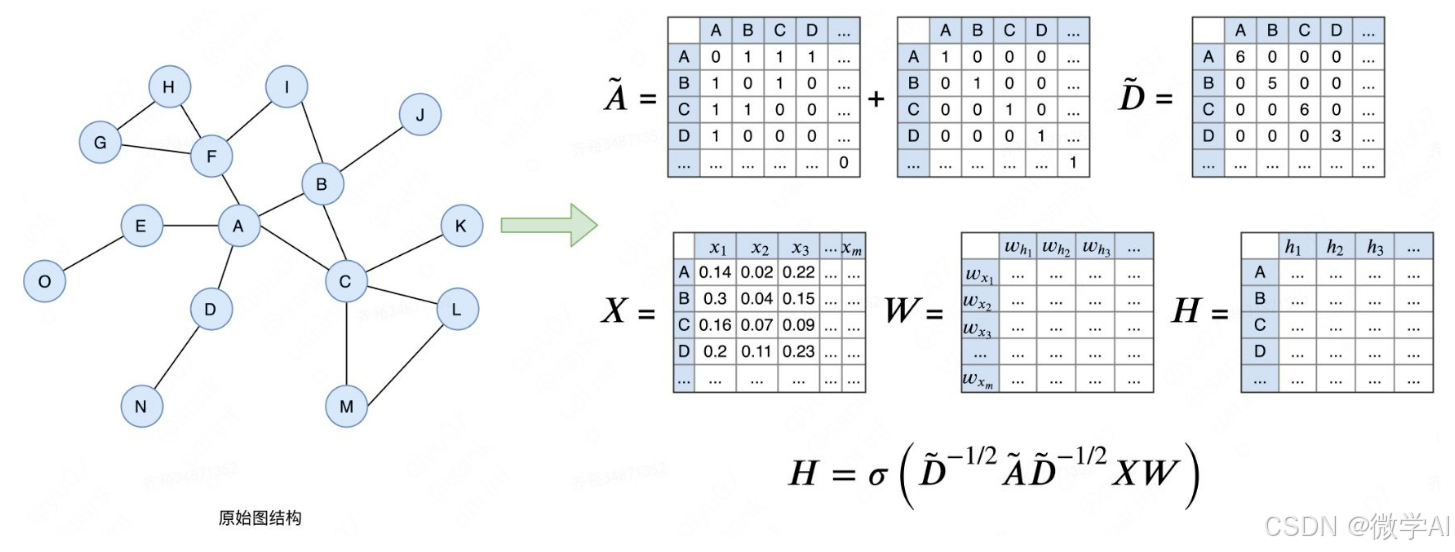
深度学习实战94-基于图卷积神经网络GCN模型的搭建以及在金融领域的场景
大家好,我是微学AI,今天给大家介绍一下深度学习实战94-基于图卷积神经网络GCN模型的搭建以及在金融领域的场景。文章首先介绍了GCN模型的原理及模型结构,随后提供了数据样例,并详细展示了实战代码。通过本文,读者可以深入了解GCN模型在金融场景下的应用,同时掌握代码的具…...

.NET 6新特性 | System.Text.Json功能改进
在.NET 6.0中,JSON处理库得到了显著的改进,主要体现在System.Text.Json上。以下是对.NET 6.0中改进的JSON处理库的详细分析: 一、System.Text.Json的引入与优势 在.NET 6中,Microsoft引入了新的JSON库System.Text.Json作为官方推…...

Matlab如何对全局优化算法启动并行计算
在 MATLAB 中,启用并行计算可以显著提高一些优化算法(如遗传算法 ga 和粒子群算法 particleswarm)的速度,特别是在种群或粒子群较大时。要启用并行计算,可以使用 UseParallel 参数。 1. 启用并行计算步骤 Step 1: 检…...
)
MYSQL-查看数据库中的存储过程语法(六)
13.7.5.9 SHOW CREATE PROCEDURE 语句 SHOW CREATE PROCEDURE proc_name此语句是 MySQL 扩展。它返回确切的字符串 ,可用于重新创建命名的存储过程。SHOW CREATE FUNCTION,显示有关存储函数的信息 (参见第 13.7.5.8 节“ SHOW CREATE FUNCTI…...
--模型部署 <连接客户端与服务端>)
【深度学习】(12)--模型部署 <连接客户端与服务端>
文章目录 模型部署一、模型部署的定义与目的二、模型部署的步骤三、模型部署的方式四、Flask框架五、实现模型部署1. 搭建服务端1.1 初始化Flask app1.2 加载模型1.3 数据预处理1.4 构建装饰器1.5 完整代码 2. 搭建客户端2.1 服务端网址2.2 发送请求2.3 完整代码 六、运行使用 …...

优化SQL查询的最佳实践:提升数据库性能的关键
SQL 查询是数据库操作的核心,特别是当数据量庞大时,性能问题尤为明显。优化 SQL 查询不仅能减少响应时间,还能提高系统整体的可伸缩性。本文将从索引、查询结构、数据库设计和缓存等方面详细介绍如何优化 SQL 查询以提升性能。 一、索引的使…...

【AIGC视频生成】视频扩散模型(综述+最新进展)
文章目录 一、综述1.1 扩散模型1.1.1 Denoising Diffusion Probabilistic Models (DDPMs)1.1.2 Score-Based Generative Models (SGMs)1.1.3 Stochastic Differential Equations (Score SDEs) 1.2 相关任务1.3 数据集1.4 评价指标 二、年度进展1.runway gen2.1 Gen-1࿱…...
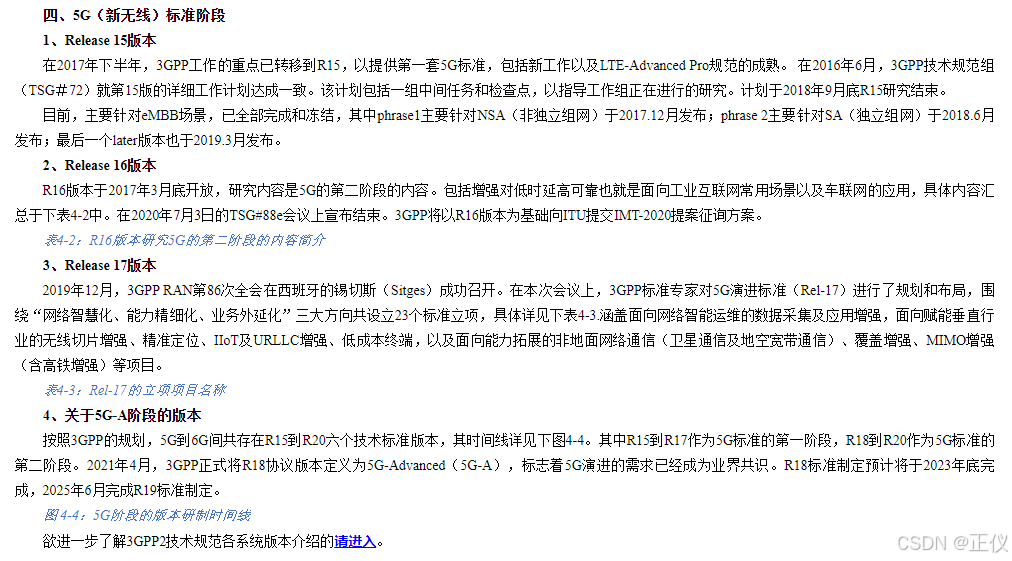
如何下载3GPP协议?
一、进入3GPP网页 https://www.3gpp.org/ 二、点击“Specifications &Technologies” 三、点击“FTP Server” 网址: https://www.3gpp.org/specifications-technologies 四、找到“latest”,查看最新版 网址: https://www.3gpp.org/ftp…...
目标检测系统操作说明【用户使用指南】(python+pyside6界面+系统源码+可训练的数据集+也完成的训练模型)
1.100多种【基于YOLOv8/v10/v11的目标检测系统】目录(pythonpyside6界面系统源码可训练的数据集也完成的训练模型) 2.目标检测系统【环境搭建过程】(GPU版本) 3.目标检测系统【环境详细配置过程】(CPU版本࿰…...

Vue中使用路由
目录 单页应用程序:SPA - Single Page Application路由 VueRouterVueRouter使用步骤组件存放目录问题 路由模块封装声明式导航 - 导航连接两个类名自定义匹配类名 声明式导航 - 跳转传参Vue路由 - 重定向Vue路由 - 404Vue路由 - 模式设置 编程式导航 - 基本跳转编程…...

【Linux】多线程安全之道:互斥、加锁技术与底层原理
目录 1.线程的互斥 1.1.进程线程间的互斥相关背景概念 1.2.互斥量mutex的基本概念 所以多线程之间为什么要有互斥? 为什么抢票会抢到负数,无法获得正确结果? 为什么--操作不是原子性的呢? 解决方式: 2.三种加锁…...

DeOldify图像上色服务全流程体验:开箱即用,效果超预期
DeOldify图像上色服务全流程体验:开箱即用,效果超预期 1. 引言:让黑白记忆瞬间焕彩 翻看家里的老相册,那些泛黄的黑白照片总能勾起无限回忆,但总觉得少了些什么——是色彩。色彩能让记忆变得鲜活,让故事更…...

STM32F407多协议信号处理开发板设计解析
1. 项目概述STM32F407VGT6开发板(信号款)是一块面向中高阶嵌入式应用的通用型硬件平台,定位介于教学评估板与工业原型板之间。其设计目标并非追求最小系统或极致成本控制,而是围绕“信号链完整性”与“多协议通信协同”构建可扩展…...

wan2.1-vae惊艳细节展示:发丝纹理/布料褶皱/文字笔画等微观表现力
wan2.1-vae惊艳细节展示:发丝纹理/布料褶皱/文字笔画等微观表现力 你有没有想过,为什么有些AI生成的图片,乍一看很惊艳,但放大一看,总觉得少了点什么?可能是人物的发丝糊成一团,衣服的布料像塑…...

重构微信好友添加效率:基于Python+ADB的自动化解决方案
重构微信好友添加效率:基于PythonADB的自动化解决方案 【免费下载链接】auto_add_wechat_friends_py 微信添加好友 批量发送添加请求 脚本 python 项目地址: https://gitcode.com/gh_mirrors/au/auto_add_wechat_friends_py 识别痛点:社交运营的效…...

别卷加班了!未来企业只拼这3点,玄同科技早已替你铺好赢路
凌晨三点的写字楼还亮着半栋灯,HR在疯狂筛简历,财务在熬夜做报表,市场部在反复修改方案——你以为这是“努力”,其实是在被时代淘汰。OpenAI的CEO Sam Altman早就点破了未来商业的真相:“以后会有一个人的独角兽”。不…...

UG NX 移除参数
在UG NX中,“移除参数”(也称为“消参”)是一个用于断开模型与其特征历史关联的关键操作。执行后,模型的建模步骤将被清除,变成一个没有参数的“体”。 简单来说,参数化模型像一个记录了所有“施工步骤”的…...

目前最全的计算机视觉公开数据集汇总 持续更新 400+数据集
总计:47个类别,涵盖约400+个具体数据集 这47个类别基本覆盖了计算机视觉的全部主流研究领域,从底层图像处理(去噪/增强/修复)到中层视觉(检测/分割/跟踪),再到高层理解(识别/问答/推理),以及3D视觉、多模态学习和特殊应用场景。 目录 一、通用视觉基础数据集(分…...

【智能车心得】独轮车平衡控制:从倒立摆模型到串级PID实践
1. 从“独轮杂技”到智能车:平衡控制的魅力与挑战 大家好,我是老张,一个在智能车和机器人领域摸爬滚打了十多年的工程师。今天想和大家聊聊一个特别有意思的话题——独轮车的平衡控制。很多朋友第一次看到智能车竞赛里的独轮车,都…...

CodeAct范式:让大模型通过代码执行增强复杂任务处理能力
1. CodeAct是什么?为什么说它让大模型“长出了手” 大家好,我是老张,在AI和智能硬件这行摸爬滚打了十几年。今天想和大家聊聊一个最近让我特别兴奋的技术范式——CodeAct。你可能已经听腻了各种“智能体”、“Agent”的概念,感觉它…...

119 PDF操作iText7实战指南
PDF操作iText7实战指南 本文深入讲解iText7在企业级应用中的实战应用,涵盖PDF文档的创建、内容添加、表格绘制、数字签名等核心功能,掌握PDF自动化生成技术。 1 为什么选择iText7 1.1 企业级PDF生成需求 在金融、保险、电商等行业,PDF文档生成是核心业务功能之一: 典型应用场…...