SystemVerilog学习笔记(十一):接口
在Verilog中,模块之间的通信是使用模块端口指定的。
Verilog模块连接的缺点
- 声明必须在多个模块中重复。
- 存在声明不匹配的风险。
- 设计规格的更改可能需要修改多个模块。
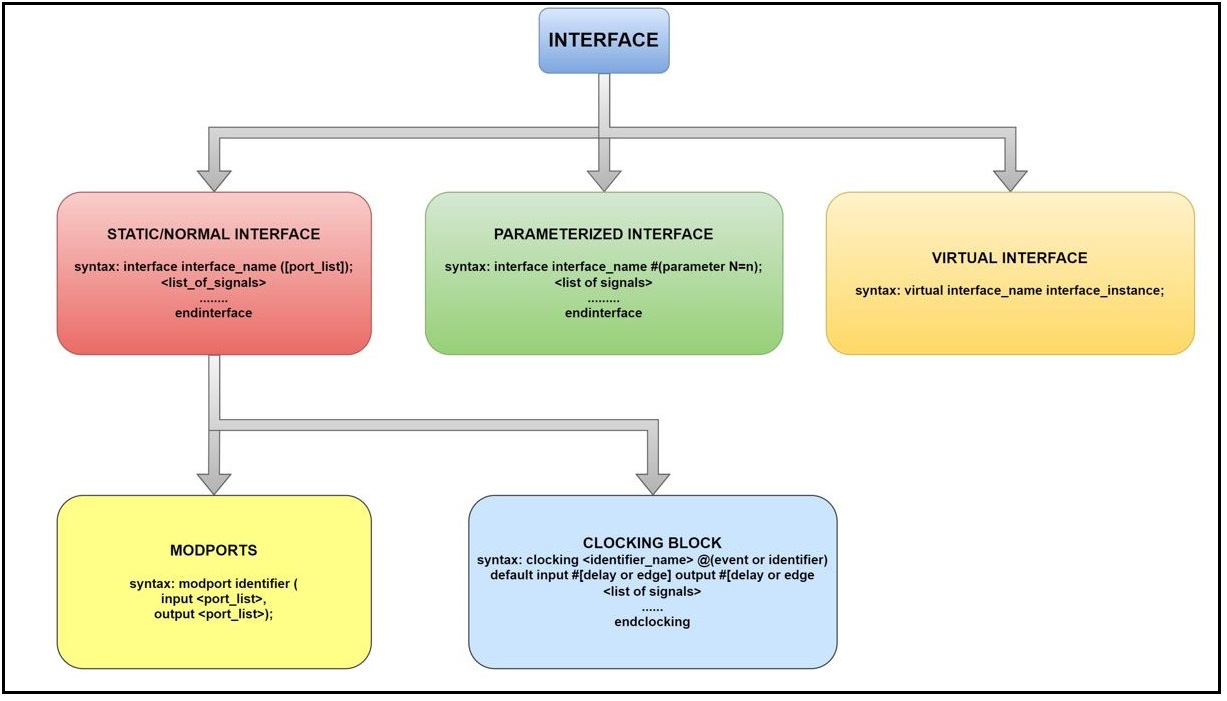
接口
SystemVerilog引入了 interface 结构,它封装了模块之间的通信。一个 interface 是一组信号或线路,通过它测试台与设计进行通信。
| 序号 | 数据类型 |
|---|---|
| 1. | 接口 |
| 2. | 参数化接口 |
| 3. | Modports |
| 4. | 时钟块 |
| 5. | 虚拟接口 |
接口结构用于连接设计和测试台。
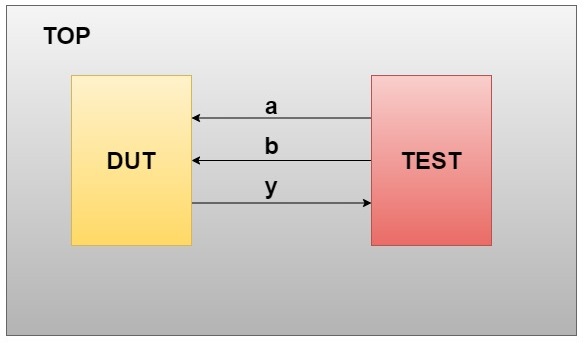
不使用Interface的Systemverilog
下图显示了不使用接口连接设计和测试台的情况。
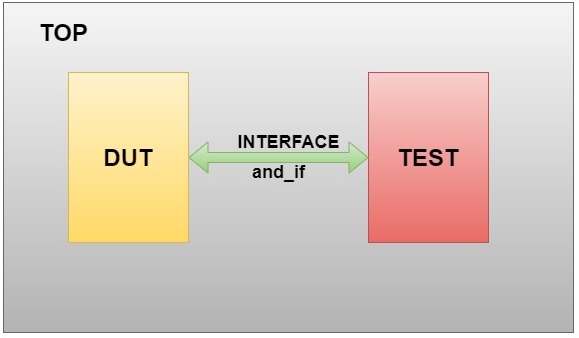
SystemVerilog接口
下图显示了使用接口连接设计和测试台的情况。
语法:
interface (interface_name) ([port_list]);  [list_of_signals]
endinterface
示例:
接口声明
interface and_if; logic input_a,input_b,output_y;
endinterface

这里的接口由一组信号组成,在测试模块中,我们调用接口句柄,但我们没有声明信号的方向。在测试模块中,我们将 a_input 和 b_input 的值传递给接口。在顶层模块中,我们使用接口实例化 DUT 信号。DUT 的输出 ‘y’ 通过接口发送到测试模块。接口中没有使用 modport。我们可以通过在信号上声明 ‘/’ 来声明每个信号的大小。这用于知道信号的矢量大小。
AND门的顶层模块
//Here the interface,testbench,design module are called.module top();//interface moduleand_if inf();//design module instantiateandg a1(.input_a(inf.input_a), .input_b(inf.input_b), .output_y(inf.output_y));//testbenchtb a2(inf);endmodule:top
Design code for AND gate
//module declaration module andg(input_a,input_b,output_y); input input_a,input_b; output output_y; //assign output assign output_y=input_a&input_b; endmodule:andg
Testbench for AND gate
//testbench for and gate module tb(and_if inf); initial begin $display("\n// and gate output"); $monitor("\ninput_a=%b\t input_b=%b\t output_y=%b",inf.input_a,inf.input_b,inf.output_y); inf.input_a = 0; inf.input_b = 0; #1; inf.input_a = 1; inf.input_b = 0; #1; inf.input_a = 0; inf.input_b = 1; #1; inf.input_a = 1; inf.input_b = 1; end endmodule:tb
下图显示了使用接口的AND门的输出。

SystemVerilog接口的优点
- 在Verilog中,添加新信号时,必须手动更改模块实例化的每个地方。SystemVerilog使得在接口块中为现有连接添加新信号变得更加容易。
- 它增加了跨项目的可重用性。
- 一组信号可以通过其句柄轻松共享在组件之间传递。
- 它提供方向信息(modports)和时序信息(时钟块)。
参数化接口
可以在接口中使用参数,使用Verilog的参数重新定义构造使接口内部的向量大小和其他声明可重新配置。
语法:
interface (interface_name) #(parameter parameter_name = initialize);[list_of_signals]
endinterface
示例:
interface count_if #(parameter N=2) ;
logic reset,clk;
logic [N:0] counter;
endinterface:count_if
计数器的顶层模块
//Here the interface,testbench,design module are called.module top();//parameterised interfacecount_if inf();//design code of up_counterup_counter u1(.clk(inf.clk), .reset(inf.reset), .counter(inf.counter));//testbench for up_counterupcounter_testbench u2(inf);endmodule:top
计数器的设计代码
//Design code for up countermodule up_counter(clk,reset,counter);input clk, reset;output [2:0] counter;reg [2:0] counter_up;//up counteralways @(posedge clk or posedge reset)begin//if reset=0 count will be incrementedif(reset)counter_up <= 3'd0;elsecounter_up <= counter_up + 3'd1;end assign counter = counter_up;endmodule:up_counter
计数器的测试台(Test bench)
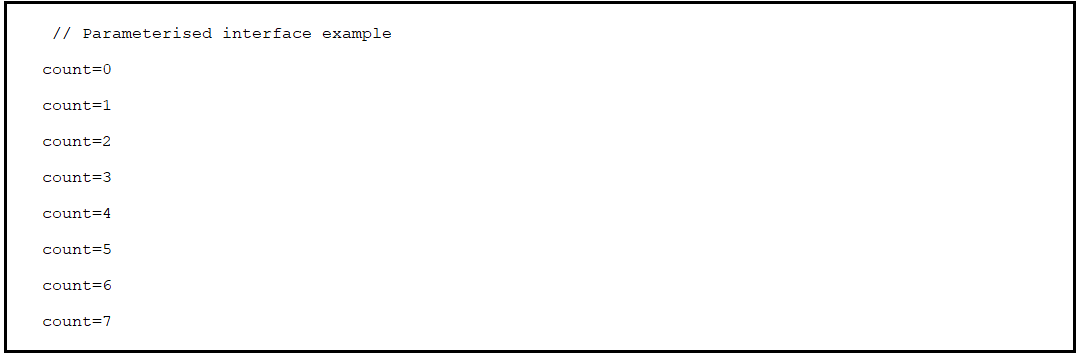
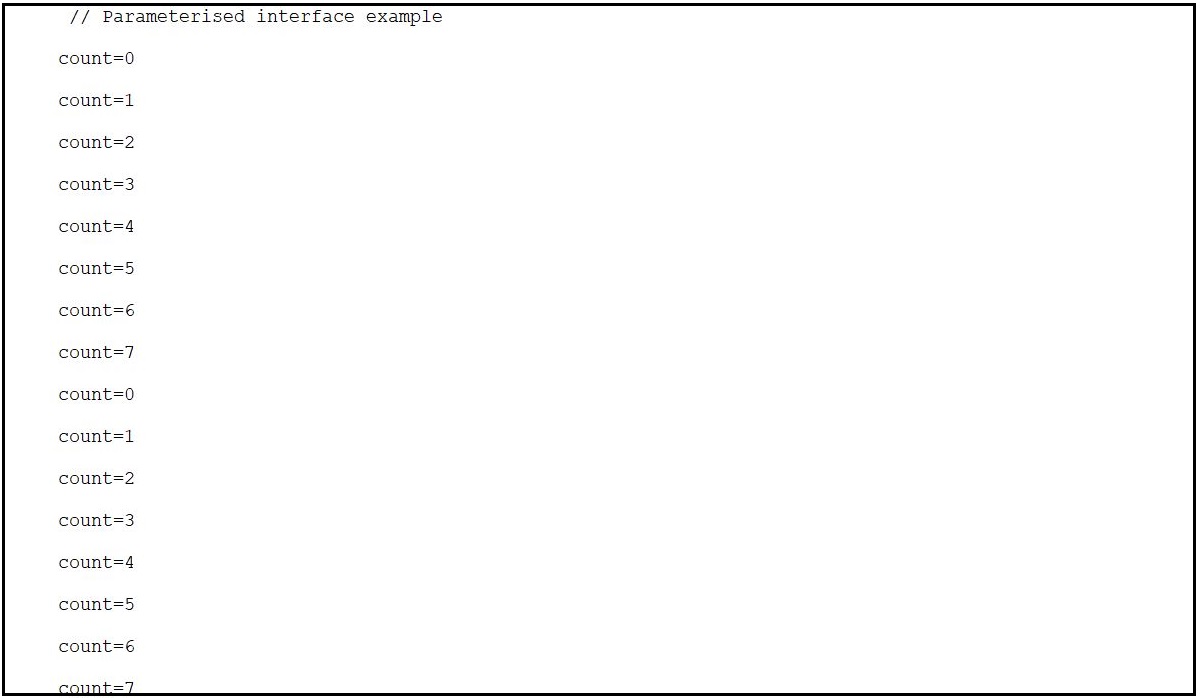
//testbench for up countermodule upcounter_testbench(count_if inf);initial begin$display("\n // Parameterised interface example");//used to monitor the count values$monitor("\ncount=%0d",inf.counter);inf.clk=0;forever #5 inf.clk=~inf.clk;endinitial begininf.reset=1;#20;inf.reset=0;#70 $finish;endendmodule:upcounter_testbench
这里我们考虑了3位输出,其中计数器从0计数到7。
下图显示了带有参数化接口的计数器的输出。
通过两种方式可以更新参数值
- 传递常量值
- 使用‘defparam’关键字
传递常量值
在这种情况下,参数的值通过顶层模块实例化接口传递给接口。例如: count_if#(2) intf();
count_if 是接口名称。
#(2)- 是传递给接口模块的参数值。
示例:
接口模块
interface count_if #(parameter N);logic rst,clk; logic [N:0] counter; logic [N:0] counter_up; endinterface:count_if
顶层模块
module top(); //parameterised interface //pass by constant value count_if#(2) intf(); //design code of up_counter up_counter u1(intf); //testbench for up_counter upcounter_testbench u2(intf); endmodule:top
输出
下图中的图,up_counter的输出从0计数到7。这里参数的值通过顶层模块实例化中的接口传递。
使用‘defparam’关键字
defparam 用于通过使用层次名称实例来覆盖参数值。defparam允许在编译时更改参数值。
例如: defparam intf.N=1;
这里intf是接口的句柄。
N是参数。
接口模块
interface count_if #(parameter N=4);// declaration of design signalslogic rst,clk;logic [N:0] counter;logic [N:0] counter_up;endinterface:count_if
顶层模块
module top();//parameterised interfacecount_if intf();//Declaration of defparam defparam intf.N=1;//instantiation of design moduleup_counter u1(intf);//testbench for up_counterupcounter_testbench u2(intf);endmodule:top
输出:
下图中的图8显示,接口参数值N=4。但是通过使用关键字defparam,在顶层模块实例化时,我们可以覆盖参数的值。

模块端口
- Modport 用于指定在接口内声明的信号的端口方向。modport 在接口内部用关键字 modport 声明。
- Modport 是模块端口的缩写。
Modport 的特点:
- 可以具有输入、双向和输出。
- 通过指定端口方向,modport 为信号提供访问限制。
- 接口可以有任意数量的 modport,接口中声明的信号可以分组在多个 modport 中。
- modport 可综合化。
语法:
modport identifier (input <port_list>, output<port_list>);
示例:
interface and_intr;    logic p,q;  logic r;  modport DUT_MP(input p,input q,output r);   modport TB_MP(output p,output q,input r);
endinterface : and_intr
AND 门的顶层模块,在测试台和设计文件中调用 modport 名称:
// creating top module // in this file design,testbench,interface modules are calledmodule top();// interfce module calledand_intr inf();// design module calledand_gate a1(inf);// testbench module called tb a2(inf);endmodule : top
AND 门的设计文件:
// and gate design file // module defination for and gate with interface instanciation module and_gate(and_intr inf);// assign the output using continuous assignmentassign inf.DUT_MP.r = (inf.DUT_MP.p) & (inf.DUT_MP.q); endmodule : and_gate
AND 门的测试台文件:
// testbench file for and gate design// module defination for testbench with interface instanciationmodule tb(and_intr inf);initialbegin$display("// and gate output using modports\n");repeat(5)begininf.TB_MP.p = $random;#1;inf.TB_MP.q = $random;#1;$display("input_p=%b\t input_q=%b\t output_r=%b",inf.TB_MP.p,inf.TB_MP.q,inf.TB_MP.r);endendendmodule : tb
使用接口中的 modport,在上述提到的两种方式下,AND 门的输出保持不变。如下图所示。

时钟块
时钟块被定义为一种机制,用于将输入和输出信号的采样和驱动与时钟事件同步。在测试台内使用时钟块非常有用,可以避免模拟中的竞态条件。我们可以明确地指定信号与特定时钟同步时的时间。时钟块只能在模块、接口内声明。时钟块只涉及输入和输出如何进行采样和同步。将值分配给变量是由模块、接口而不是时钟块完成的。
时钟块术语
1. 时钟事件
clocking 时钟块名称 @(posedge clk);
事件规范用于同步时钟块,@(posedge clk) 是时钟事件。
2. 时钟信号
input  from_Dut;
output to_Dut;
时钟块采样和驱动的信号,from_DUT 和 to_DUT 是时钟信号。
3. 时钟偏移
时钟偏移指定了在哪个输入和输出时钟信号要被采样或驱动。偏移必须是一个常量表达式,并且可以指定为参数。
输入和输出偏移
default input #1step output #0;
默认输入偏移和输出偏移声明如下,default input #1step output #0;。这里默认输入偏移需要 #1step 延迟来获取稳定输入的采样过程。输出偏移仅需要 #0 延迟,这意味着我们在当前时间段内得到稳定的输出。
下图显示了默认的输入和输出偏移。

下图显示了输入偏移和输出偏移。

输入信号相对于时钟事件进行采样。如果指定了输入偏移,则信号在时钟事件之前的偏移时间单位被采样。然后,输出信号在相应的时钟事件之后的偏移时间单位被驱动。输入偏移隐式为负,因为它发生在时钟之前。
例如,default input #3ps output #2。
语法:
clocking cb @(posedge clk);
default input #1step output #0;
input  from_Dut;
output to_Dut;
endclocking
示例:D_flipflop

上图显示了 d_ff 的设计模块图。接口连接了 DUT 和测试。测试提供随机值 d,通过接口驱动到 DUT。DUT 给出采样值 q。采样值 q 被给定为测试的输入。在这里,顶层模块包括所有块,如测试、接口和 DUT。每个块的实例在顶层模块中创建。
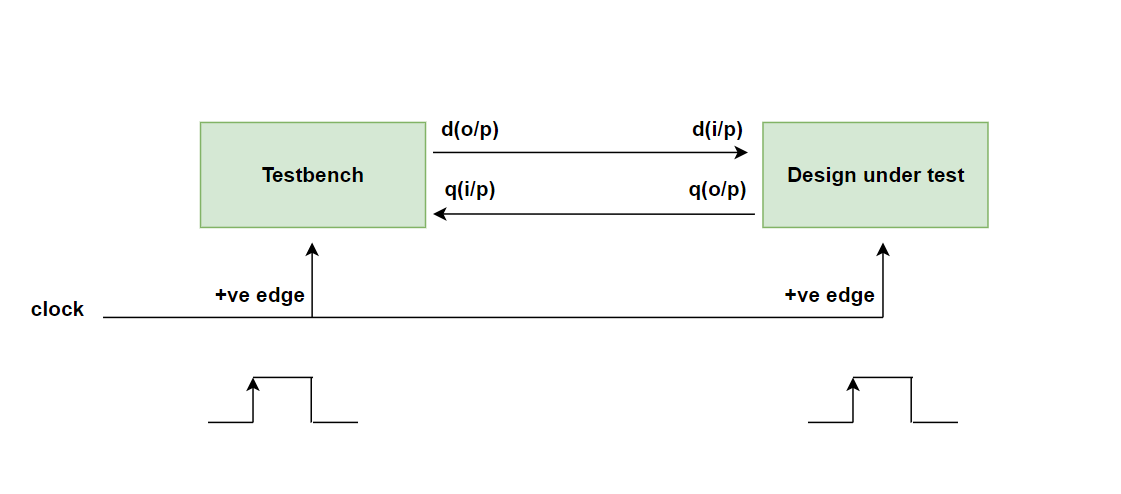
在这个例子中,DUT(时钟块时钟)和测试都在正边沿(接口时钟)触发。在这种情况下,波形输出和显示语句输出不匹配。输出显示在下图中。
示例代码:
DUT 代码:
// module:d_flipflop module d_flipflop(dff.dut intf); //clocking block cd always @(intf.cd) //Non-Blocking assignment intf.cd.q <= intf.cd.d; endmodule : d_flipflop
Interface 代码:
//module: Interface interface dff(input clk); //declare the signals logic d; logic q; //Clocking block for dut clocking cd @(posedge clk); default input #1step output #0; output q; input d; endclocking //modport for dut modport dut(clocking cd); //modport for tb modport tb(input q, output d, input clk);` endinterface: dff
测试代码:
//module: testmodule test(dff.tb intf);//task:drvtask drv;//looprepeat(10)begin//test triggering at posedge@(posedge intf.clk )//randomzing the dintf.d <= $random;$display("test side[%0t]=d_tb_drive:%d q_dut_sample:%d",$time,intf.d, intf.q);end$finish;endtask //calling the task drvinitial begindrv();end endmodule :test
顶层模块
//including the file test.sv and interface.sv `include "test.sv" `include "interface.sv" module top;bit clk=1;initialforever #5 clk = ~clk;//creating interface instancedff intf(clk);//d_flipflop instanced_flipflop t1(intf); //test Instancetest t2(intf);initial$monitor("DUT side [%0t]=d_tb_drive:%d q_dut_sample:%d",$time,intf.cd.d, intf.cd.q);endmodule : top
在下面的输出中,首先给出DUT和测试的正边沿。在这个例子中,在0时间,DUT和测试的输出都是x,然后在10纳秒时,测试随机化d值x为0,这时DUT得到0并给出采样q输出为0,这个时钟周期测试(tb)只随机化值d = 0,但测试(tb)采样了先前的值q = x。在10纳秒时,我的DUT给出输出d = 0和q = 0,而此时我的测试(tb)给出输出d = 0和q = x。现在,在20纳秒时,测试将d值从0随机化为1,此时DUT得到1并给出采样的q输出为1,这个时钟周期测试(tb)只随机化值d = 1,但测试(tb)采样了先前的值q = 0。在20纳秒时,我的DUT给出输出d = 1和q = 1,而此时我的测试给出输出d = 1和q = 0。
输出记录
下图14显示了 d 触发器的输出。

所有时钟周期的 d_ff 输出
下图15显示了 d 触发器的输出波形。

时钟块的优势
- 时钟块提供了测试台和DUT之间无竞争条件。
- 时钟块可以在接口、模块内声明。
- 时钟块帮助用户以更高层次的抽象编写测试台。
- 仿真速度更快。
- 将设计的时钟活动与数据分配活动分离。
- 在设计执行中节省了大量的代码和时间。
虚拟接口
-
虚拟接口是表示接口实例的变量。
-
虚拟接口用于在类中创建接口实例,因为接口是静态组件,而SystemVerilog测试台是动态组件。我们不能直接在类中声明接口,但使用变量 virtual,我们可以在类中声明接口实例。
语法:virtual interface_name instance_name;
interface_name:接口的名称
instance_name:虚拟接口实例的名称,可以在类中使用变量 Ex: vif.variable;
-
虚拟接口必须在类中初始化,指向实际接口。 在类中声明虚拟接口
例如:Virtual intf vif; -
访问未初始化的虚拟接口会导致致命错误。
-
虚拟接口可以作为任务和函数方法的参数传递。
-
虚拟接口可以是类的属性,并且可以通过使用函数参数进行初始化,即它可以在特定类中调用实际接口并在该类中创建接口实例。
例如:function new(virtual intf vif); -
虚拟接口可以作为函数方法的参数传递。 通过使用 new() 构造,在类中调用实际接口 ‘intf’ 来声明虚拟接口,可以在类中的过程或函数参数中使用。
-
在类函数和任务方法内部,可以通过虚拟接口句柄访问接口变量,如 virtual_instance_name.variable;
Example : vif.a
vif 是虚拟实例名称;
a 是类的变量/属性
-
关键字/信号虚拟接口变量在整个仿真时间内表示不同的接口实例。
语法:
interface <interface_name>(); <port_list>; .......... endmodule To connect static(interface module) toto dynamic(class) we use virtual interface class clase_name; virtual <interface_name> <interface_instance>; ....... properties; ..... function() .....endfunction task(); ...... endtask endclass
Example1: Fulladder
全加器的设计代码
//Module:fullinput_adder module fulladder(in_a,in_b,in_c,out_sum,out_carry) ; //Declaration of input variablesinput in_a,in_b,in_c;//Declaration of output variablesoutput out_sum;output out_carry;//continuous input_assignment statementassign out_sum = in_a^in_b^in_c;assign out_carry = (in_a&in_b)|(in_b&in_c)| (in_c&in_a); endmodule:fulladder
全加器的接口模块
interface adder();//declaring the signalslogic in_a,in_b,in_c;logic out_sum,out_carry;endinterface
类内的虚拟接口声明
//class:driver class driver; //Declaration of virtual interface //syntax: virtual interface_name interface_instance;virtual adder vif;//constructor function new(virtual adder vif); //this.vif refer to class driver //vif refer to the function argument this.vif = vif; endfunction //task task run(); repeat(10) begin //interface_instance.variable vif.in_a = $random; vif.in_b = $random; vif.in_c = $random; $display(""); $display("//INPUT:Inputs of full adder \n a=%0b, b=%0b, cin =%0b", vif.in_a,vif.in_b, vif.in_c); #5; $display(""); $display("//OUTPUT:Outputs of full adder \n sum=%0b, carry = %0b\n", vif.out_sum, vif.out_carry); end endtask endclass
全加器的测试模块
`//include the driver file include "driver.sv" //module:test module test(adder intf); //declaring the driver instance driver drv; initial begin //creating the driver instance drv = new(intf); //calling the task run drv.run(); end endmodule:test
全加器的顶层模块
//including the test.sv and interface.sv files`include "test.sv"`include "interface.sv"//module:topmodule top;//creating an instance of interfaceadder intf();// the instance of test t1.test t1(intf);//fulladder DUT instance , connecting the interface signal to instance DUTfulladder dut(.in_a(intf.in_a), .in_b(intf.in_b), .in_c(intf.in_c), .out_sum(intf.out_sum), .out_carry(intf.out_carry));endmodule
下图显示了代码的设计块:

在图16中,驱动器是一个类,在这里我们声明了虚拟接口,因为在类内部我们不能直接调用接口,因为接口是静态组件而类是动态组件。所以这个虚拟关键字被用来在类内部创建实例(它将创建虚拟接口)。在驱动器中,我们生成随机刺激并发送到接口,DUT连接到接口。DUT的输出给予接口。测试块包括类组件,即(driver.sv),顶层模块包括所有组件,如测试、接口和DUT。所有组件的实例都在顶层模块/块中创建。
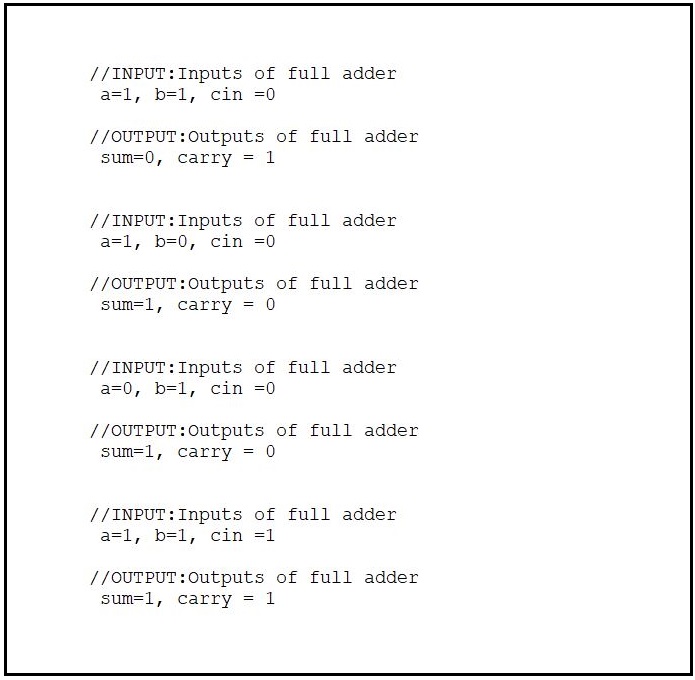
下图显示了全加器的输出:
在图17中显示了全加器的输出,其中 a、b 和 cin 是全加器的输入,sum 和 carry 是全加器的输出。
相关文章:
SystemVerilog学习笔记(十一):接口
在Verilog中,模块之间的通信是使用模块端口指定的。 Verilog模块连接的缺点 声明必须在多个模块中重复。存在声明不匹配的风险。设计规格的更改可能需要修改多个模块。 接口 SystemVerilog引入了 interface 结构,它封装了模块之间的通信。一个 inter…...

华大单片机跑历程IO口被写保护怎么解决
一,说明 使用的单片机是HC32F460KETA华大单片机,使用的代码历程是小华单片机历程,具体历程在小华官网都可以找到。 在使用小华历程跑模拟IIC时,SCL时钟是有的,但是IO输入被LOCK了,所以在跑历程进行断点…...

Iotop使用
文章目录 Iotop依赖及编译1:内核配置2: 环境配置3.依赖库ncurses3.1 Ncurses的编译配置 4. Iotop的编译及修改5.测试效果如下: Iotop依赖及编译 源码路径:https://github.com/Tomas-M/iotop#how-to-build-from-source (GitHub - Tomas-M/iotop: A top u…...
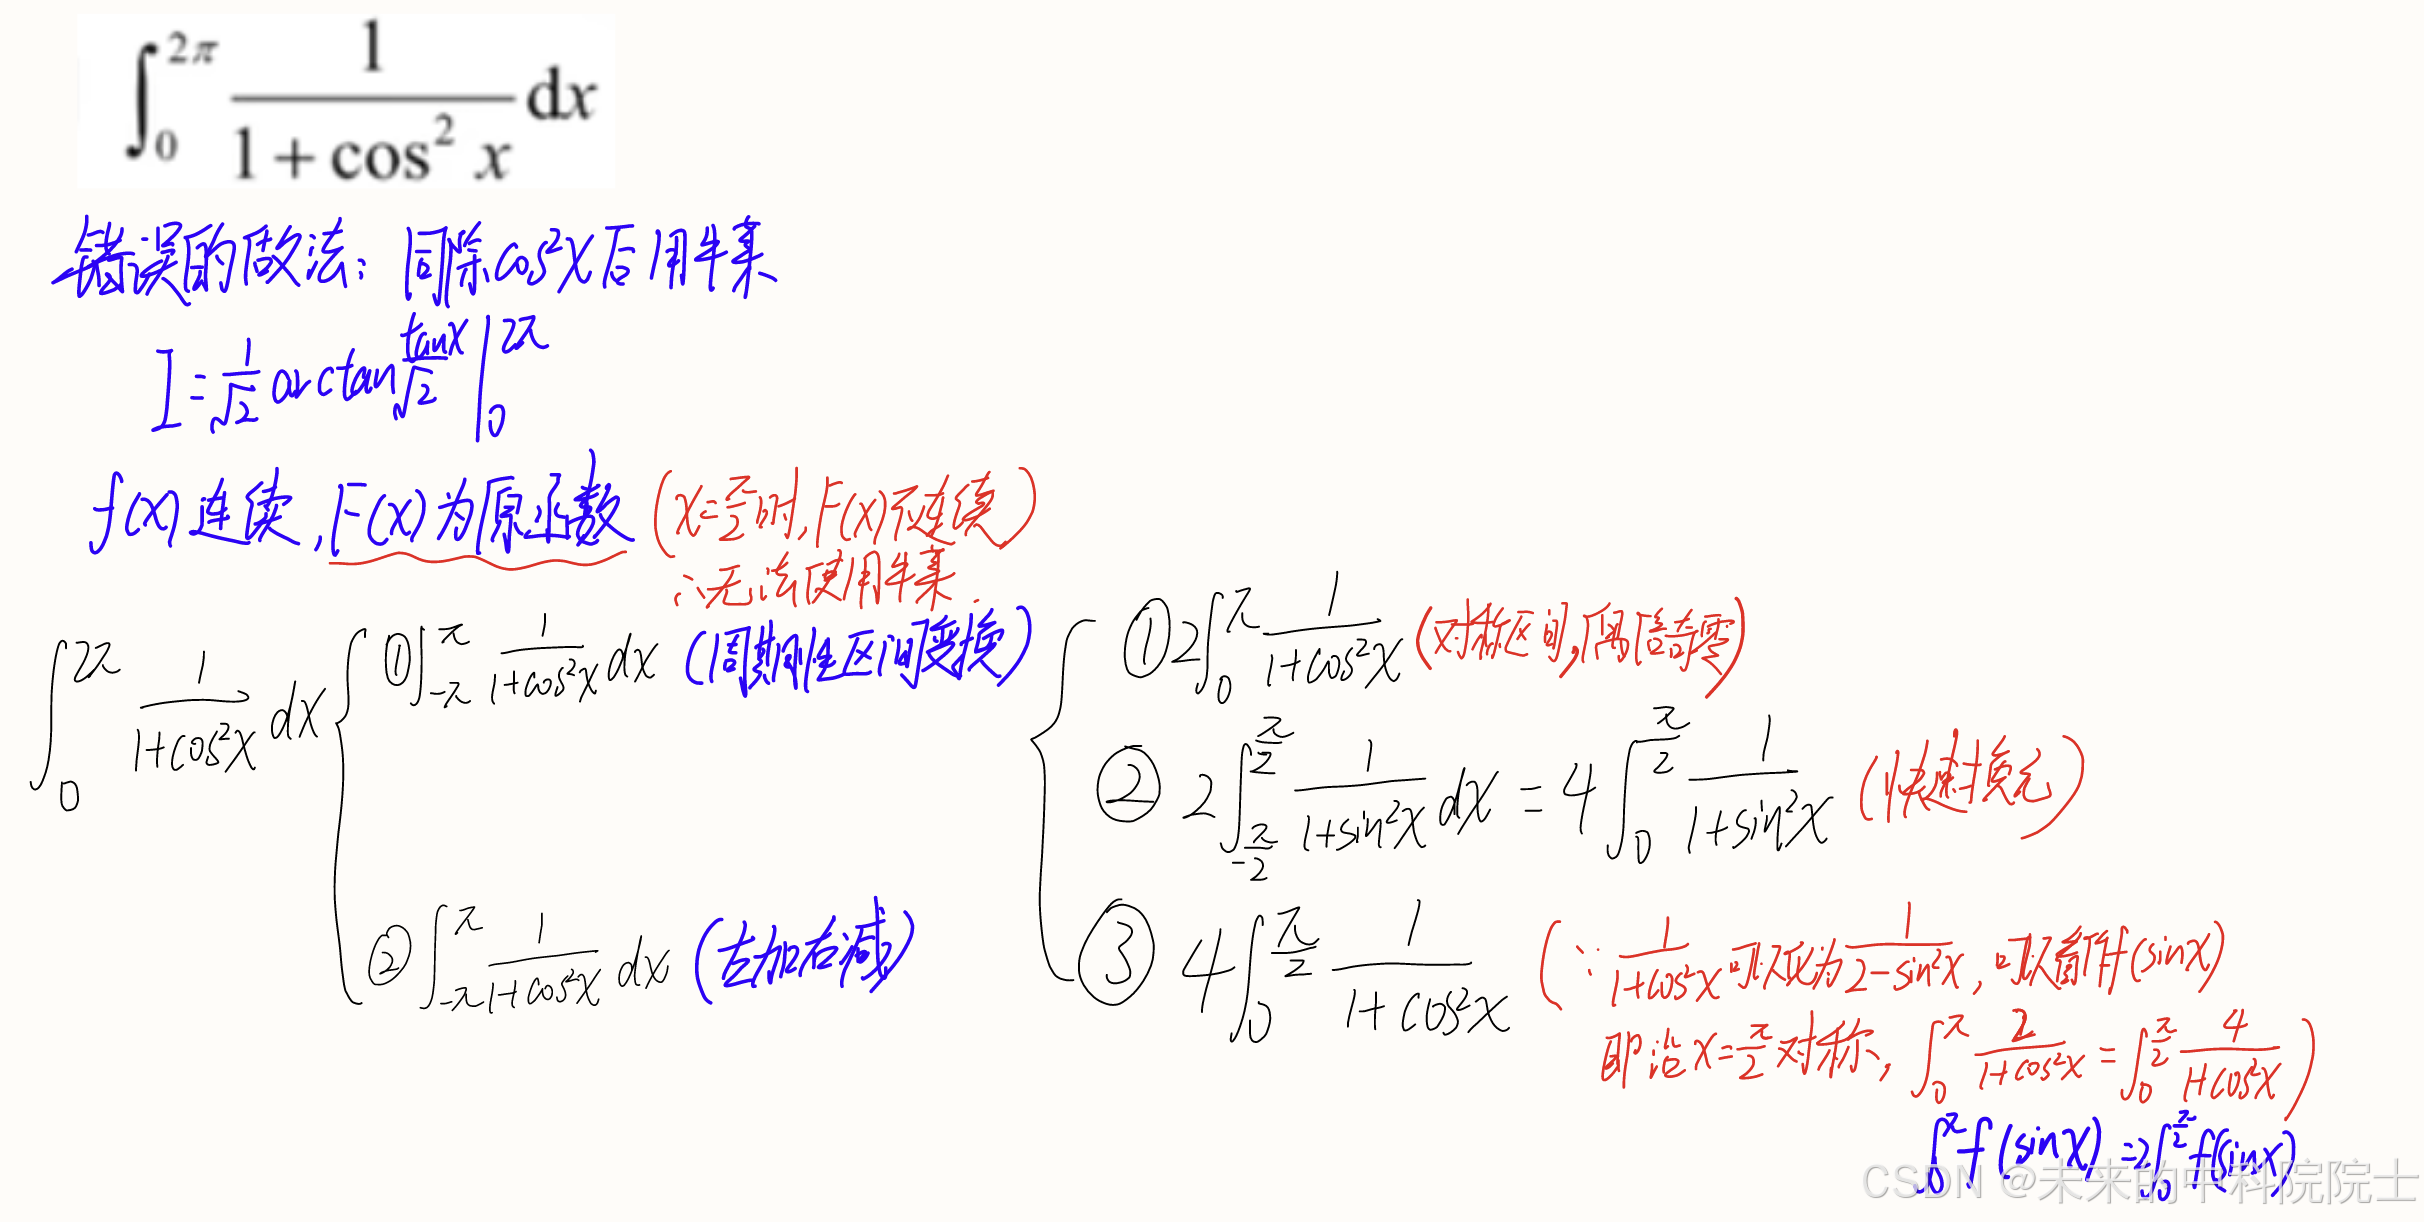
定积分的快速计算技巧
快速换元公式——左加右减 对称区间,偶倍奇零 如果遇到对称区间,拿不准是奇函数还是偶函数直接用如下公式: 奇函数时: 偶函数时: arctanx与tanx的和式计算: 周期函数的积分性质 定积分几何意义 定积分的…...
第T7周:Tensorflow实现咖啡豆识别
🍨 本文为🔗365天深度学习训练营 中的学习记录博客🍖 原作者:K同学啊 目标 具体实现 (一)环境 语言环境:Python 3.10 编 译 器: PyCharm 框 架: (二)具体步骤 1. 使…...

imagehash图片去重:保留图片文件名
简介 在日常工作中,我们可能需要管理大量图片,这些图片中可能存在图像相同文件名不同的情况。手动删除这些重复的图片既费时又费力。为了解决这个问题,我们可以编写一个Python脚本来自动化这个过程。 准备工作 在开始之前,请确保…...
在Docker环境下为Nginx配置HTTPS
前言 配置HTTPS已经成为网站部署的必要步骤。本教程将详细介绍如何在Docker环境下为Nginx配置HTTPS,使用自签名证书来实现加密通信。虽然在生产环境中建议使用权威CA机构颁发的证书,但在开发测试或内网环境中,自签名证书是一个很好的选择。 …...

vue面试题9|[2024-11-15]
问题1:scoped原理 1.作用:让样式在本组件中生效,不影响其他组件 2.原理:给节点新增自定义属性,然后css根据属性选择器添加样式。 问题2:让css只在当前组件生效 <style scoped> 问题3:scss…...

大数据技术在金融风控中的应用
💓 博客主页:瑕疵的CSDN主页 📝 Gitee主页:瑕疵的gitee主页 ⏩ 文章专栏:《热点资讯》 大数据技术在金融风控中的应用 大数据技术在金融风控中的应用 大数据技术在金融风控中的应用 引言 大数据技术概述 定义与原理 发…...

安装一键式重置密码插件(Linux)-CloudResetPwdAgent
为了保证使用镜像创建的裸金属服务器可以实现一键式密码重置功能,建议您在制作镜像时安装重置密码插件“CloudResetPwdAgent”。 前提条件 需保证虚拟机根目录可写入,且剩余空间大于600MB。 1.下载插件包 华为云已提供下载包连接 在PC机里下载好软件…...
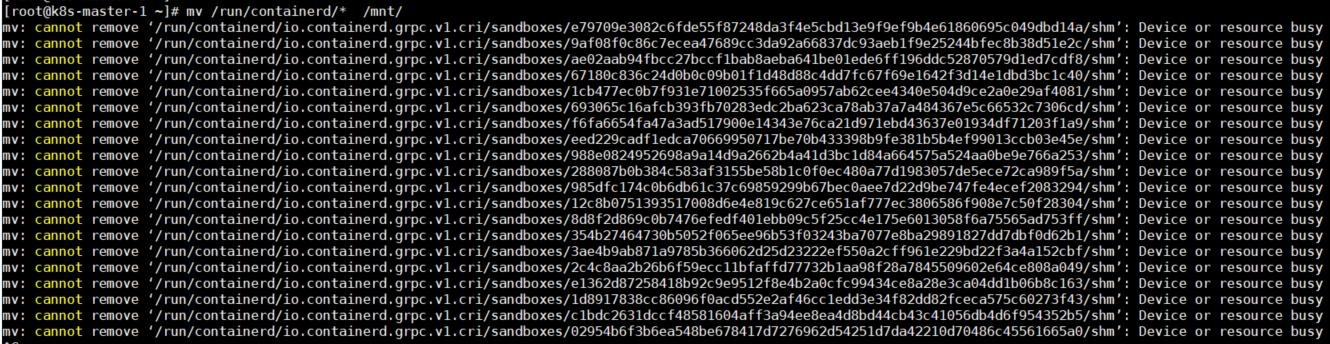
如何平滑切换Containerd数据目录
如何平滑切换Containerd数据目录 大家好,我是秋意零。 这是工作中遇到的一个问题。搭建的服务平台,在使用的过程中频繁出现镜像本地拉取不到问题(在项目群聊中老是被人出来😅)原因是由于/目录空间不足导致࿰…...
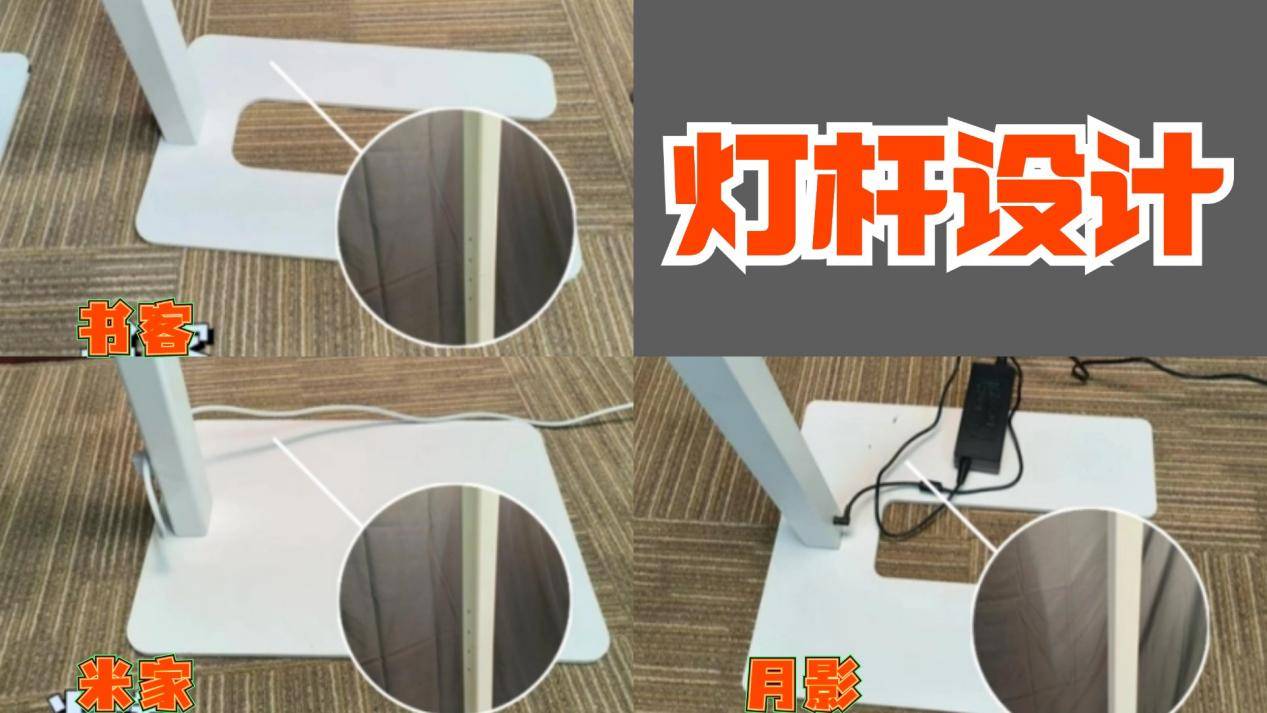
月影和米家大路灯哪个好?书客、月影、米家谁会更胜一筹!
月影和米家大路灯哪个好?近两年以来,护眼大路灯以良好的品质走进大众的视线,成为许多用眼人群的刚需品,不少用户说可以改善光线质量,视觉疲劳感夜可以减少,但又有人说护眼大路灯是“幌子、智商税”…...

instanceof 的模式匹配(二)
在经过了JEP305(jdk14)和JEP375(jdk15)的两轮预览之后,模式匹配终于迎来了他的交付日期,在2022年发布的JDK16中,伴随着JEP 394的发布,预览结束了,我们来看一下这个特性的结束点到底说了什么。 在这次预览之中ÿ…...

【Spring】Bean的作用域和Spring的执行流程
目录 1.Bean的作用域 1.1 Singleton(单例) 1.2 Prototype(原型) 1.3 适用于SpringMVC的作用域 2.Spring的执行流程 2.1 Spring容器的初始化 2.2 Bean的创建和装配 2.3 Bean的生命周期管理 2.4 其他重要概念 3. Spring的执行流程简洁版 1.Bean的作用域 Spring Bean的…...

自动驾驶系列—从数据采集到存储:解密自动驾驶传感器数据采集盒子的关键技术
🌟🌟 欢迎来到我的技术小筑,一个专为技术探索者打造的交流空间。在这里,我们不仅分享代码的智慧,还探讨技术的深度与广度。无论您是资深开发者还是技术新手,这里都有一片属于您的天空。让我们在知识的海洋中…...

QtWebServer
QtWebServer 是创建基于 Qt 的高性能 Web 应用程序服务器的尝试,即。运行本机 C/Qt 代码以交付网站的 Web 服务器。 一个完美的用例是为较小的服务提供 REST API。 在 Qt 应用程序中,您可以设置资源并将其绑定到物理提供程序,例如文件或数据…...

网络基础概念与应用:深入理解计算机网络
引言 计算机网络作为现代信息技术的重要支柱,是连接世界各地的重要纽带。它使得计算机能够相互通信、协同工作,从而极大地提高了我们的工作效率和生活质量。本篇文章将深入探讨计算机网络的基础概念,覆盖网络的分层模型、协议、数据传输原理…...

<el-select> :remote-method用法
el-select :remote-method用法 说明代码实现单选多选 说明 在 Vue.js 中, 是 Element UI 库提供的一个下拉选择框组件。:remote-method 是 组件的一个属性,用于指定一个远程方法,该方法将在用户输入时被调用,以获取下拉列表的选项…...

CKA认证 | Day3 K8s管理应用生命周期(上)
第四章 应用程序生命周期管理(上) 1、在Kubernetes中部署应用流程 1.1 使用Deployment部署Java应用 在 Kubernetes 中,Deployment 是一种控制器,用于管理 Pod 的部署和更新。以下是使用 Deployment 部署 Java 应用的步骤&#x…...

JavaWeb——HTML、CSS
目录 1.概述 2.HTML a.HTML结构标签 b.图片标签 c.标题标签 d.水平线标签 e.布局标签 f.超链接标签 e.视频标签 f.音频标签 e.换行标签 f.段落标签 g.加粗标签 h.表格 1.声明表格 2.表行 3.普通表格 4.加粗表格 i.表单标签 1.声明表单 2. 表单 3.下拉列表…...

【Ansible 入门实战】三种变量详解
Ansible 同名变量优先级实战详解这篇教程基于你当前的 Ansible 环境,通过 三种同名变量(主机变量 / 外部变量 / Play 变量) 的对比实验,完整展示变量优先级的验证过程。一、实验目标在同一个 Ansible Playbook 中,定义…...

Wave Terminal:集成 AI 功能的强大终端,助你高效工作!
Wave Terminal:集成 AI 功能的强大终端应用,高效工作新选择!Wave Terminal 是一款功能强大的终端应用程序,它将多种工具集于一身,还集成了 AI 功能,支持 Linux、MacOS 和 Windows 系统。使用 Linux 终端数十…...
)
工业网络零中断的秘密:手把手教你理解并配置PRP协议(基于IEC 62439-3)
工业网络零中断的秘密:手把手教你理解并配置PRP协议(基于IEC 62439-3) 在钢铁厂轧机轰鸣的生产线上,或是高铁信号控制系统的毫秒级响应中,任何网络中断都意味着数百万损失甚至安全事故。传统冗余技术如RSTP需要秒级收敛…...

Claude Code 配置手册
验证已经安装node和npmnode -v npm -v如果显示版本号且 ≥ 18.0.0,则说明安装成功安装CLInpm i -g anthropic-ai/claude-codelatest npm i -g openai/codexlatest npm i -g google/gemini-clilatest根目录下新建 settings.json 配置文件vim ~/.claude/settings.json…...

HDLbits奇偶校验坑点复盘:我如何被Fsm serialdp“折磨”到发邮件问作者?
HDLbits奇偶校验坑点复盘:从状态机类型差异到调试方法论 凌晨三点,显示器上的波形依然和预期不符。这是我第七次重写Fsm serialdp的状态机代码,仿真结果中done信号始终在错误的时间点跳变。作为HDLbits的终极挑战之一,这道串口接收…...

RT-Thread启动流程与BSP移植实战:从内核启动到硬件适配
1. 项目概述:从启动到适配,深入RT-Thread内核如果你刚开始接触RT-Thread,或者正打算把它移植到一个新的硬件平台上,那么“启动流程”和“板级支持”这两个问题,几乎是你绕不开的坎。这不仅仅是两个孤立的技术点&#x…...
)
保姆级教程:在Windows上跑通Deeplabv3+,用Cityscapes数据集训练语义分割模型(附避坑指南)
保姆级教程:在Windows上跑通Deeplabv3,用Cityscapes数据集训练语义分割模型(附避坑指南) 语义分割作为计算机视觉领域的核心技术之一,正在自动驾驶、医疗影像分析等领域发挥越来越重要的作用。而Deeplabv3作为语义分割…...

【计算机毕业设计】基于Springboot的工作流程管理系统设计与实现+万字文档
博主介绍:✌全网粉丝3W,csdn特邀作者、CSDN新星计划导师、Java领域优质创作者,掘金/华为云/阿里云/InfoQ等平台优质作者、专注于Java技术领域和学生毕业项目实战,高校老师/讲师/同行前辈交流✌ 技术范围:SpringBoot、Vue、SSM、HLMT、Jsp、PHP、Nodejs、…...
)
保姆级教程:用Python+OpenCV高效切割Potsdam语义分割数据集(附完整代码)
PythonOpenCV实战:Potsdam语义分割数据集高效切割全流程解析 第一次接触Potsdam数据集时,面对那些6000x6000像素的巨幅航拍图像,我的GPU在训练时直接报显存不足的错误。这让我意识到,高分辨率图像的切割预处理不是可选项…...

YOLOv8推理性能跃迁:从CPU到GPU的实战迁移指南
1. 为什么要把YOLOv8推理从CPU迁移到GPU? 第一次用YOLOv8做目标检测时,我盯着屏幕上蜗牛般的推理速度差点崩溃——一张1080P的图片要处理3秒!直到把环境切换到GPU,速度直接飙升到30帧/秒,这种性能飞跃让我彻底明白了硬…...