【Vaadin flow 实战】第5讲-使用常用UI组件绘制页面元素
vaadin flow官方提供的UI组件文档地址是
https://vaadin.com/docs/latest/components
这里,我简单实战了官方提供的一些免费的UI组件,使用案例如下:
Accordion 手风琴
Accordion 手风琴效果组件

Accordion 手风琴-测试案例代码
@Slf4j
@PageTitle("HelpViewPage")
@Route(value = "helpView",layout = MainLayout.class)
@Menu(order = 5, icon = LineAwesomeIconUrl.FILE)
public class HelpView extends VerticalLayout{public HelpView() {Span s1 = new Span("手风琴");Accordion accordion = displayAccordion();add(s1,accordion);}private Accordion displayAccordion(){Accordion accordion = new Accordion();Span name = new Span("Sophia Williams");Span email = new Span("sophia.williams@company.com");Span phone = new Span("(501) 555-9128");VerticalLayout accordionItemLayout = new VerticalLayout(name,email, phone);accordionItemLayout.setSpacing(false);accordionItemLayout.setPadding(false);accordion.add("Personal information", accordionItemLayout);Span name2 = new Span("4027 Amber Lake Canyon");Span email2 = new Span("72333-5884 Cozy Nook");Span phone2 = new Span("Arkansas");VerticalLayout accordionItemLayout2 = new VerticalLayout(name2, email2, phone2);accordionItemLayout2.setSpacing(false);accordionItemLayout2.setPadding(false);accordion.add("Billing Address", accordionItemLayout2);return accordion;}
}
Avatar 头像
Avatar 头像

Avatar 头像-测试案例代码
@Slf4j
@PageTitle("HelpViewPage")
@Route(value = "helpView",layout = MainLayout.class)
@Menu(order = 5, icon = LineAwesomeIconUrl.FILE)
public class HelpView extends VerticalLayout{public HelpView() {Span s2 = new Span("Avatar 头像");Avatar avatarBasic = new Avatar();Avatar avatarName = new Avatar("TEST");AvatarGroup avatarGroup = new AvatarGroup();for (Country country : getCountries()) {String name = country.getName();AvatarGroup.AvatarGroupItem avatar = new AvatarGroup.AvatarGroupItem(name);avatarGroup.add(avatar);}Avatar userAvatar = new Avatar();userAvatar.setImage("https://images.unsplash.com/photo-1519681393784-d120267933ba?ixid=MXwxMjA3fDB8MHxwaG90by1wYWdlfHx8fGVufDB8fHw%3D&ixlib=rb-1.2.1&auto=format&fit=crop&w=750&q=80");add(s2,avatarBasic, avatarName,avatarGroup,userAvatar);}}
Badge 徽章

Badge 徽章-测试案例代码
@Slf4j
@PageTitle("HelpViewPage")
@Route(value = "helpView",layout = MainLayout.class)
@Menu(order = 5, icon = LineAwesomeIconUrl.FILE)
public class HelpView extends VerticalLayout{public HelpView() {Span s3 = new Span("Badge 徽章");Span pending = new Span("Pending");pending.getElement().getThemeList().add("badge");Span confirmed = new Span("Confirmed");confirmed.getElement().getThemeList().add("badge success");Span denied = new Span("Denied");denied.getElement().getThemeList().add("badge error");Span onHold = new Span("On hold");onHold.getElement().getThemeList().add("badge contrast");HorizontalLayout hLayout = new HorizontalLayout(pending, confirmed, denied, onHold);// Icon before textSpan pending1 = new Span(createIcon(VaadinIcon.CLOCK),new Span("Pending"));pending1.getElement().getThemeList().add("badge");
// Icon after textSpan pending2 = new Span(new Span("Pending"),createIcon(VaadinIcon.CLOCK));pending2.getElement().getThemeList().add("badge");HorizontalLayout h2Layout = new HorizontalLayout(pending1, pending2);add(s3,hLayout,h2Layout);}}
Button 按钮

Button 按钮-测试案例代码
@Slf4j
@PageTitle("HelpViewPage")
@Route(value = "helpView",layout = MainLayout.class)
@Menu(order = 5, icon = LineAwesomeIconUrl.FILE)
public class HelpView extends VerticalLayout{public HelpView() {Span s4 = new Span("Button");Button primaryButton = new Button("Primary");primaryButton.addThemeVariants(ButtonVariant.LUMO_PRIMARY);Button secondaryButton = new Button("Secondary");Button tertiaryButton = new Button("Tertiary");tertiaryButton.addThemeVariants(ButtonVariant.LUMO_TERTIARY);HorizontalLayout h3Layout = new HorizontalLayout(primaryButton, secondaryButton,tertiaryButton);Button primaryButton2 = new Button("Primary");primaryButton2.addThemeVariants(ButtonVariant.LUMO_PRIMARY, ButtonVariant.LUMO_ERROR);Button secondaryButton2 = new Button("Secondary");secondaryButton2.addThemeVariants(ButtonVariant.LUMO_ERROR);Button tertiaryButton2 = new Button("Tertiary");tertiaryButton2.addThemeVariants(ButtonVariant.LUMO_TERTIARY, ButtonVariant.LUMO_ERROR);HorizontalLayout h4Layout = new HorizontalLayout(primaryButton2, secondaryButton2,tertiaryButton2);Button primaryButton3 = new Button("Primary");primaryButton3.addThemeVariants(ButtonVariant.LUMO_PRIMARY,ButtonVariant.LUMO_WARNING);Button secondaryButton3 = new Button("Secondary");secondaryButton3.addThemeVariants(ButtonVariant.LUMO_WARNING);Button tertiaryButton3 = new Button("Tertiary");tertiaryButton3.addThemeVariants(ButtonVariant.LUMO_TERTIARY,ButtonVariant.LUMO_WARNING);HorizontalLayout h5Layout = new HorizontalLayout(primaryButton3, secondaryButton3,tertiaryButton3);Button largeButton = new Button("Large");largeButton.addThemeVariants(ButtonVariant.LUMO_LARGE);Button normalButton = new Button("Normal");Button smallButton = new Button("Small");smallButton.addThemeVariants(ButtonVariant.LUMO_SMALL);HorizontalLayout h6Layout = new HorizontalLayout(largeButton, normalButton,smallButton);add(s4,h3Layout,h4Layout,h5Layout,h6Layout);}}
CheckboxGroup 多选框

CheckboxGroup 多选框-测试案例代码
@Slf4j
@PageTitle("HelpViewPage")
@Route(value = "helpView",layout = MainLayout.class)
@Menu(order = 5, icon = LineAwesomeIconUrl.FILE)
public class HelpView extends VerticalLayout{public HelpView() {Span s5 = new Span("CheckboxGroup-demo");CheckboxGroup<String> checkboxGroup = new CheckboxGroup<>();checkboxGroup.setLabel("Export data");checkboxGroup.setItems("Order ID", "Product name", "Customer","Status");checkboxGroup.select("Order ID", "Customer");checkboxGroup.addThemeVariants(CheckboxGroupVariant.LUMO_VERTICAL);// 添加值改变事件监听器checkboxGroup.addValueChangeListener(event -> {// 处理选择的值Set<String> selectedValues = event.getValue();// 这里可以添加逻辑,比如更新 UI 或处理数据log.info("选中的checkbox:{}",selectedValues.toString());});add(s5,checkboxGroup);}}
ComboBox 组合框(下拉框)

ComboBox 组合框-测试案例代码
@Slf4j
@PageTitle("HelpViewPage")
@Route(value = "helpView",layout = MainLayout.class)
@Menu(order = 5, icon = LineAwesomeIconUrl.FILE)
public class HelpView extends VerticalLayout{public HelpView() {Span s6 = new Span("ComboBox");ComboBox<Country> countryComboBox = new ComboBox<>("Select Country");countryComboBox.setItems(getCountries()); // 设置 ComboBox 的项countryComboBox.setItemLabelGenerator(Country::getName); // 用于前端显示的标签// 监听选项变化countryComboBox.addValueChangeListener(event -> {Country selectedCountry = event.getValue();if (selectedCountry != null) {Long selectedId = selectedCountry.getId(); // 获取 ID// 在这里可以处理 ID,如存储到数据库等log.info("Selected country id: {}", selectedId);Notification.show("选中了"+selectedCountry.getName());}});add(s6,countryComboBox);}}
ConfirmDialog 对话框


ConfirmDialog 对话框-测试案例代码
@Slf4j
@PageTitle("HelpViewPage")
@Route(value = "helpView",layout = MainLayout.class)
@Menu(order = 5, icon = LineAwesomeIconUrl.FILE)
public class HelpView extends VerticalLayout{public HelpView() {Span s7 = new Span("ConfirmDialog");//demo1 删除确认Button deleteButton = new Button("删除项");// 添加按钮点击事件deleteButton.addClickListener(event -> {// 创建确认对话框ConfirmDialog dialog = new ConfirmDialog();dialog.setHeader("确认");dialog.setText("您确定要删除该项吗?");// 设置确认按钮的事件dialog.setCancelable(true);dialog.setConfirmText("确认");dialog.setConfirmButtonTheme("error primary");dialog.setCancelText("取消");dialog.addConfirmListener(confirmEvent -> {// 处理确认事件log.info("确认删除");Notification.show("项已删除!");});dialog.addCancelListener(cancelEvent -> {// 处理取消事件log.info("操作已取消");Notification.show("操作已取消!");});// 显示对话框dialog.open();});//demo2 使用建议Button recommendButton = new Button("提示");recommendButton.addClickListener(event -> {ConfirmDialog dialog = new ConfirmDialog();dialog.setHeader("导出失败");dialog.setText(new Html("<p>导出报告Q4时出错。请重试,如果问题仍然存在,请联系 <a href=\"mailto:support@company.com\">support@company.com</a></p>"));dialog.setConfirmText("我知道了");dialog.addConfirmListener(confirmEvent -> {// 处理确认事件log.info("我知道了");Notification.show("我知道了!");});// 显示对话框dialog.open();});//demo3 拒绝按钮Button rejectButton = new Button("拒绝保存");rejectButton.addClickListener(event -> {ConfirmDialog dialog = new ConfirmDialog();dialog.setHeader("未保存的更改");dialog.setText("您想在导航离开之前放弃或保存更改吗");dialog.setCancelable(true);dialog.setCancelText("取消");dialog.addCancelListener(cancelEvent -> {// 处理取消事件log.info("操作已取消");Notification.show("操作已取消!");});dialog.setRejectable(true);dialog.setRejectText("丢弃变更");dialog.setConfirmText("保存变更");// 显示对话框dialog.open();});add(s7,deleteButton,recommendButton,rejectButton);}}
DatePicker 日期选择

DatePicker 日期选择-测试案例代码
@Slf4j
@PageTitle("HelpViewPage")
@Route(value = "helpView",layout = MainLayout.class)
@Menu(order = 5, icon = LineAwesomeIconUrl.FILE)
public class HelpView extends VerticalLayout{public HelpView() {Span s8 = new Span("DatePicker");DatePicker datePicker = new DatePicker("选择日期");datePicker.setLabel("选择一个日期");// 设置日期格式datePicker.setI18n(new DatePicker.DatePickerI18n().setCancel("取消").setToday("今天").setMonthNames(List.of("一月", "二月", "三月", "四月", "五月", "六月","七月", "八月", "九月", "十月", "十一月", "十二月")));// 添加监听器以捕获日期选择事件datePicker.addValueChangeListener(event -> {// 获取选择的日期LocalDate date = event.getValue();log.info("选择的日期:{}",date.toString());});add(s8,datePicker);}}
DateTimePicker 日期时间选择

DateTimePicker 日期时间选择-测试案例代码
@Slf4j
@PageTitle("HelpViewPage")
@Route(value = "helpView",layout = MainLayout.class)
@Menu(order = 5, icon = LineAwesomeIconUrl.FILE)
public class HelpView extends VerticalLayout{public HelpView() {Span s9 = new Span("DateTimePicker");DateTimePicker dateTimePicker = new DateTimePicker("选择日期和时间");// 可以设置默认值dateTimePicker.setValue(LocalDateTime.now());// 你可以为选择事件添加监听器dateTimePicker.addValueChangeListener(event -> {LocalDateTime selectedDateTime = event.getValue();System.out.println("选择的日期时间: " + selectedDateTime);});add(s9,dateTimePicker);}}
TimePicker 时间选择

TimePicker 时间选择-测试案例代码
@Slf4j
@PageTitle("HelpViewPage")
@Route(value = "helpView",layout = MainLayout.class)
@Menu(order = 5, icon = LineAwesomeIconUrl.FILE)
public class HelpView extends VerticalLayout{public HelpView() {Span s010 = new Span("TimePicker");TimePicker timePicker = new TimePicker();timePicker.setLabel("Meeting time");timePicker.setStep(Duration.ofMinutes(30));timePicker.setValue(LocalTime.of(12, 30));add(s010,timePicker);}}
Dialog 弹窗


Dialog 弹窗-测试案例代码
@Slf4j
@PageTitle("HelpViewPage")
@Route(value = "helpView",layout = MainLayout.class)
@Menu(order = 5, icon = LineAwesomeIconUrl.FILE)
public class HelpView extends VerticalLayout{public HelpView() {Span s10 = new Span("Dialog");Button showDialogButton = new Button("new弹窗");showDialogButton.addClickListener(event -> {Dialog dialog = new Dialog();dialog.setWidth("368px");dialog.setHeaderTitle("New employee");TextField tf1 = new TextField("First Name");tf1.setWidth("276px");TextField tf2 = new TextField("Last Name");tf2.setWidth("276px");VerticalLayout layout = new VerticalLayout();layout.add(tf1,tf2);dialog.add(layout);Button saveButton = new Button("Save",e->{String value = tf1.getValue();if (StringUtils.isEmpty(value)) {Notification.show("First Name 不能为空!");}else {s10.setText(value);// 关闭对话框dialog.close();}});saveButton.addThemeVariants(ButtonVariant.LUMO_PRIMARY);Button cancelButton = new Button("Cancel", e -> dialog.close());dialog.getFooter().add(cancelButton);dialog.getFooter().add(saveButton);// 显示对话框dialog.open();});Button openDialogButton = new Button("view弹窗", event -> openDialog());add(s10,showDialogButton,openDialogButton);}private void openDialog() {Dialog dialog = new Dialog();dialog.setWidth("388px"); // 设置弹窗宽度// 创建输入框TextField nameField = new TextField("Name", "Enter your name");nameField.setWidth("300px");nameField.setValue("test");nameField.setReadOnly(true);TextField emailField = new TextField("Email", "Enter your email");emailField.setWidth("300px");emailField.setValue("efdxuwef@163.com");emailField.setReadOnly(true);TextField addressField = new TextField("Address", "Enter your address");addressField.setWidth("300px");addressField.setValue("4188 Crystal Orchard, Mousie, USA");addressField.setReadOnly(true);VerticalLayout layout = new VerticalLayout();layout.add(nameField);layout.add(emailField);layout.add(addressField);// 添加输入框到对话框dialog.add(layout);dialog.setHeaderTitle("User details");Button closeButton = new Button(new Icon("lumo", "cross"),(e) -> dialog.close());closeButton.addThemeVariants(ButtonVariant.LUMO_TERTIARY);dialog.getHeader().add(closeButton);dialog.open();}
}
Input 各种输入窗

Input 各种输入窗-测试案例代码,需要在自定义css文件里配置css ,然后在Java中声明使用的组件css
.password-strength-week{color: red;
}.password-strength-moderate{color: yellowgreen;
}.password-strength-strong{color: darkgreen;
}
@Slf4j
@PageTitle("HelpViewPage")
@Route(value = "helpView",layout = MainLayout.class)
@Menu(order = 5, icon = LineAwesomeIconUrl.FILE)
public class HelpView extends VerticalLayout{public HelpView() {Span s11 = new Span("各种输入窗");EmailField validEmailField = new EmailField();validEmailField.setLabel("Email address");validEmailField.getElement().setAttribute("name", "email");validEmailField.setValue("julia@email.com");validEmailField.setErrorMessage("Enter a valid email address");validEmailField.setPrefixComponent(VaadinIcon.ENVELOPE.create());validEmailField.setClearButtonVisible(true);NumberField dollarField = new NumberField();dollarField.setLabel("Balance");dollarField.setValue(200.0);Div dollarPrefix = new Div();dollarPrefix.setText("$");dollarField.setPrefixComponent(dollarPrefix);dollarField.setClearButtonVisible(true);IntegerField integerField = new IntegerField();integerField.setLabel("Quantity");integerField.setHelperText("Max 10 items");integerField.setRequiredIndicatorVisible(true);integerField.setMin(1);integerField.setMax(10);integerField.setValue(2);integerField.setStepButtonsVisible(true);integerField.setI18n(new IntegerField.IntegerFieldI18n().setRequiredErrorMessage("Field is required").setBadInputErrorMessage("Invalid number format").setMinErrorMessage("Quantity must be at least 1").setMaxErrorMessage("Maximum 10 items available"));BigDecimalField bigDecimalField = new BigDecimalField();bigDecimalField.setLabel("Result");bigDecimalField.setWidth("240px");bigDecimalField.setValue(new BigDecimal("948205817.472950487"));IntegerField xField = new IntegerField();xField.setLabel("X");xField.setValue(-1284);NumberField numberField = new NumberField();numberField.setLabel("Duration (hours)");numberField.setStep(0.5);numberField.setValue(12.5);numberField.setStepButtonsVisible(true);numberField.setI18n(new NumberField.NumberFieldI18n().setBadInputErrorMessage("Invalid number format").setStepErrorMessage("Duration must be a multiple of 0.5"));PasswordField passwordField1 = new PasswordField();passwordField1.setLabel("Password");passwordField1.setValue("Ex@mplePassw0rd");passwordField1.setClearButtonVisible(true);passwordField1.setPrefixComponent(VaadinIcon.LOCK.create());HorizontalLayout layout = new HorizontalLayout();
//        layout.setPadding(true);layout.add(validEmailField);layout.add(dollarField);layout.add(integerField);layout.add(bigDecimalField);layout.add(xField);layout.add(numberField);layout.add(passwordField1);PasswordField passwordField = new PasswordField();passwordField.setLabel("Password2");Icon checkIcon = VaadinIcon.CHECK.create();checkIcon.setVisible(false);checkIcon.getStyle().set("color", "var(--lumo-success-color)");passwordField.setSuffixComponent(checkIcon);Div passwordStrength = new Div();Span passwordStrengthText = new Span("week");passwordStrengthText.setClassName("password-strength-week");passwordStrength.add(new Text("Password strength: "),passwordStrengthText);passwordField.setHelperComponent(passwordStrength);passwordField.setClearButtonVisible(false);passwordField.setValueChangeMode(ValueChangeMode.EAGER); //设置实时监听passwordField.addValueChangeListener(event -> {String value = event.getValue();log.info("ValueChangeListener value: {}" , value);if (value.length() <= 3) {checkIcon.setVisible(false);passwordStrengthText.setText("week");passwordStrengthText.setClassName("password-strength-week"); //使用了外部自定义CSS}if (value.length() >3 && value.length() <= 6) {checkIcon.setVisible(false);passwordStrengthText.setText("moderate");passwordStrengthText.setClassName("password-strength-moderate"); //使用了外部自定义CSS}if (value.length() >6 && value.length() <= 9) {passwordStrengthText.setText("strong");passwordStrengthText.setClassName("password-strength-strong"); //使用了外部自定义CSScheckIcon.setVisible(true);}});TextField textField = new TextField();textField.setLabel("Street Address");textField.setValue("Ruukinkatu 2");textField.setClearButtonVisible(true);textField.setPrefixComponent(VaadinIcon.MAP_MARKER.create());TextField phoneField = new TextField("Phone number");phoneField.setRequiredIndicatorVisible(true);phoneField.setPattern("^[+]?[\\(]?[0-9]{3}[\\)]?[\\-]?[0-9]{3}[\\-]?[0-9]{4,6}$");phoneField.setAllowedCharPattern("[0-9()+-]");phoneField.setMinLength(5);phoneField.setMaxLength(18);phoneField.setHelperText("Format: +(123)456-7890");phoneField.setI18n(new TextField.TextFieldI18n().setRequiredErrorMessage("Field is required").setMinLengthErrorMessage("Minimum length is 5 characters").setMaxLengthErrorMessage("Maximum length is 18 characters").setPatternErrorMessage("Invalid phone number format"));TextArea textArea = new TextArea();textArea.setLabel("Comment");textArea.setMaxLength(150);textArea.setValueChangeMode(ValueChangeMode.EAGER);textArea.addValueChangeListener(e -> {e.getSource().setHelperText(e.getValue().length() + "/" + 150);});textArea.setValue("Great job. This is excellent!");TextField findField = new TextField();findField.setPlaceholder("Search");findField.setPrefixComponent(new Icon("lumo", "search"));findField.setTooltipText("Wrap in “quotes” for exact phrase");add(s11,layout,passwordField,textField,phoneField,textArea,findField);}}
TabSheet 选项卡

TabSheet 选项卡-测试代码案例
@Slf4j
@PageTitle("HelpViewPage")
@Route(value = "helpView",layout = MainLayout.class)
@Menu(order = 5, icon = LineAwesomeIconUrl.FILE)
public class HelpView extends VerticalLayout{public HelpView() {TabSheet tabSheet = new TabSheet();tabSheet.add("Dashboard",new Div(new Text("This is the Dashboard tab content")));tabSheet.add("Payment",new Div(new Text("This is the Payment tab content")));tabSheet.add("Shipping",new Div(new Text("This is the Shipping tab content")));add(tabSheet);}
}
RadioButtonGroup 单选按钮组

RadioButtonGroup 单选按钮组-测试代码案例
@Slf4j
@PageTitle("HelpViewPage")
@Route(value = "helpView",layout = MainLayout.class)
@Menu(order = 5, icon = LineAwesomeIconUrl.FILE)
public class HelpView extends VerticalLayout{public HelpView() {RadioButtonGroup<String> radioGroup = new RadioButtonGroup<>();radioGroup.addThemeVariants(RadioGroupVariant.LUMO_VERTICAL);radioGroup.setLabel("Travel class");radioGroup.setItems("Economy", "Business", "First Class");radioGroup.addValueChangeListener(event -> {String value = event.getValue();log.info("RadioButtonGroup ValueChangeListener value: {}" , value);});add(radioGroup);
}
}
ProgressBar 进度条

ProgressBar 进度条-测试代码案例
@Slf4j
@PageTitle("HelpViewPage")
@Route(value = "helpView",layout = MainLayout.class)
@Menu(order = 5, icon = LineAwesomeIconUrl.FILE)
public class HelpView extends VerticalLayout{public HelpView() {
ProgressBar progressBar = new ProgressBar();progressBar.setValue(0.5);ProgressBar progressBar2 = new ProgressBar();progressBar2.setIndeterminate(true);// ContrastProgressBar progressBarContrast = new ProgressBar();progressBarContrast.addThemeVariants(ProgressBarVariant.LUMO_CONTRAST);progressBarContrast.setValue(0.5);// SuccessProgressBar progressBarSuccess = new ProgressBar();progressBarSuccess.addThemeVariants(ProgressBarVariant.LUMO_SUCCESS);progressBarSuccess.setValue(0.75);// ErrorProgressBar progressBarError = new ProgressBar();progressBarError.addThemeVariants(ProgressBarVariant.LUMO_ERROR);progressBarError.setValue(0.2);add(progressBar,progressBar2,progressBarContrast,progressBarSuccess,progressBarError);ProgressBar progressBarExport = new ProgressBar();progressBarExport.setIndeterminate(true);// Associates the labels with the bar programmatically, for screen
// readers:progressBarExport.getElement().setAttribute("aria-labelledby", "pblbl");progressBarExport.getElement().setAttribute("aria-describedby", "sublbl");NativeLabel progressBarLabel = new NativeLabel("Generating report...");progressBarLabel.setId("pblbl");progressBarLabel.addClassName(LumoUtility.TextColor.SECONDARY);Span progressBarSubLabel = new Span("Process can take upwards of 10 minutes");progressBarSubLabel.setId("sublbl");progressBarSubLabel.addClassNames(LumoUtility.TextColor.SECONDARY, LumoUtility.FontSize.XSMALL);add(progressBarLabel, progressBarExport, progressBarSubLabel);}}
MultiSelectComboBox 多选下拉框

MultiSelectComboBox 多选下拉框-测试代码案例
@Slf4j
@PageTitle("HelpViewPage")
@Route(value = "helpView",layout = MainLayout.class)
@Menu(order = 5, icon = LineAwesomeIconUrl.FILE)
public class HelpView extends VerticalLayout{public HelpView() {Span s16 = new Span("MultiSelectComboBox demo");MultiSelectComboBox<Country> comboBox = new MultiSelectComboBox<>("Countries");comboBox.setItems(getCountries());comboBox.setItemLabelGenerator(Country::getName);comboBox.addValueChangeListener(event -> {Set<Country> countrySet =  event.getValue();log.info("countrySet: {}", countrySet);});add(s16,comboBox);
}
}
MessageInput 消息输入框


MessageInput 消息输入框-测试代码案例
@Slf4j
@PageTitle("HelpViewPage")
@Route(value = "helpView",layout = MainLayout.class)
@Menu(order = 5, icon = LineAwesomeIconUrl.FILE)
public class HelpView extends VerticalLayout{public HelpView() {
MessageInput input = new MessageInput();input.addSubmitListener(submitEvent -> {Notification.show("Message received: " + submitEvent.getValue(),3000, Notification.Position.MIDDLE);});add(input);}}
Notification 通知


Notification 通知–测试代码案例
Span s18 = new Span("Notification demo");Button toast1 = new Button("toast1", event -> {// When creating a notification using the `show` static method,
// the duration is 5-sec by default.Notification.show("Financial report generated");});Button toast2 = new Button("toast2", event -> {Notification notification = Notification.show("Application submitted!");notification.addThemeVariants(NotificationVariant.LUMO_SUCCESS);});Button toast3 = new Button("toast3",evt -> {Notification notification = new Notification();notification.addThemeVariants(NotificationVariant.LUMO_WARNING);Div text = new Div(new Text("Your session will expire in 5 minutes due to inactivity."),new HtmlComponent("br"),new Text("Close this warning to continue working."));Button closeButton = new Button(new Icon("lumo", "cross"));closeButton.addThemeVariants(ButtonVariant.LUMO_TERTIARY_INLINE);closeButton.setAriaLabel("Close");closeButton.addClickListener(event -> {notification.close();});HorizontalLayout layoutH = new HorizontalLayout(text, closeButton);layoutH.setAlignItems(Alignment.CENTER);notification.add(layoutH);notification.open();});Button toast4 = new Button("toast4",evt -> {Notification notification = new Notification();notification.addThemeVariants(NotificationVariant.LUMO_ERROR);Div text = new Div(new Text("Failed to generate report"));Button closeButton = new Button(new Icon("lumo", "cross"));closeButton.addThemeVariants(ButtonVariant.LUMO_TERTIARY_INLINE);closeButton.setAriaLabel("Close");closeButton.addClickListener(event -> {notification.close();});HorizontalLayout layoutH = new HorizontalLayout(text, closeButton);layoutH.setAlignItems(Alignment.CENTER);notification.add(layoutH);notification.open();});add(s18,toast1,toast2,toast3,toast4);
MultiSelectListBox 列表框

MultiSelectListBox 列表框-测试代码案例
//列表框允许用户从可滚动的项目列表中选择一个或多个值Span s19 = new Span("MultiSelectListBox demo");MultiSelectListBox<Country> listBox = new MultiSelectListBox<>();listBox.setItems(getCountries());listBox.select(getCountries().get(0), getCountries().get(3));listBox.setHeight("200px");listBox.setClassName("lstbox"); //这里使用了自定义CSS文件中的CSS类名listBox.setTooltipText("this is a listbox");// 设置展示给用户的名称listBox.setItemLabelGenerator(Country::getName);// 添加一个值改变监听器listBox.addValueChangeListener(event -> {String selectedCountries = event.getValue().stream().map(Country::getName).reduce((a, b) -> a + ", " + b).orElse("No countries selected");Notification.show(selectedCountries);});add(s19,listBox);
对应的自定义CSS配置

绘制自定义卡片

测试代码案例, 需要在自定义css文件里配置css ,然后在Java中声明使用的组件css
.card {transition: transform 0.2s;
}.card:hover {transform: scale(1.05);
}
 Div card = new Div();card.setClassName("card"); //使用的自定义csscard.getElement().getStyle().set("border", "1px solid #ccc");card.getElement().getStyle().set("border-radius", "5px");card.getElement().getStyle().set("padding", "16px");card.getElement().getStyle().set("width", "300px");card.getElement().getStyle().set("box-shadow", "0 4px 8px rgba(0,0,0,0.1)");// 添加标题H3 title = new H3("Card Title");card.add(title);// 添加图片
//        Image image = new Image("https://via.placeholder.com/300", "Placeholder image");Image image = new Image("https://images.unsplash.com/photo-1512273222628-4daea6e55abb?ixid=MXwxMjA3fDB8MHxwaG90by1wYWdlfHx8fGVufDB8fHw%3D&ixlib=rb-1.2.1&auto=format&fit=crop&w=750&q=80", "Placeholder image");image.setWidth("300px");card.add(image);// 添加按钮Button button = new Button("Click me");card.add(button);add(card);
FormLayout 表单布局

测试代码案例
Span fSpan = new Span("FormLayout demo");TextField firstName = new TextField("First name");TextField lastName = new TextField("Last name");TextField username = new TextField("Username");PasswordField password = new PasswordField("Password");PasswordField confirmPassword = new PasswordField("Confirm password");FormLayout formLayout = new FormLayout();formLayout.add(firstName, lastName, username, password, confirmPassword);formLayout.setResponsiveSteps(// Use one column by defaultnew FormLayout.ResponsiveStep("0", 1),// Use two columns, if layout's width exceeds 500pxnew FormLayout.ResponsiveStep("500px", 2));
// Stretch the username field over 2 columnsformLayout.setColspan(username, 2);add(fSpan,formLayout);
Upload 文件上传组件

测试代码案例
Span sSpan = new Span("Upload demo");MultiFileMemoryBuffer buffer = new MultiFileMemoryBuffer();Upload upload = new Upload(buffer);//限制上传文件格式// upload.setAcceptedFileTypes("application/pdf", ".pdf");//默认情况下,“上传”不限制可以上传的文件数量。但是,您可以设置文件计数限制upload.setMaxFiles(3);//设置最大字节数来限制文件大小。但默认情况下,没有限制// 10MBint maxFileSizeInBytes = 10 * 1024 * 1024;upload.setMaxFileSize(maxFileSizeInBytes);upload.addSucceededListener(event -> {String fileName = event.getFileName();log.info("fileName:{}", fileName);String mainName = FileNameUtil.mainName(fileName);log.info("file mainName:{}", mainName);String extName = FileNameUtil.extName(fileName);log.info("file extName:{}", extName);InputStream in = buffer.getInputStream(fileName);// Do something with the file data// processFile(inputStream, fileName);BufferedOutputStream out = FileUtil.getOutputStream("/Users/xxx/Documents/"+fileName);long copySize = IoUtil.copy(in, out, IoUtil.DEFAULT_BUFFER_SIZE);System.err.println(copySize);IoUtil.closeIfPosible(in);IoUtil.closeIfPosible(out);});upload.addFileRejectedListener(event -> {String errorMessage = event.getErrorMessage();Notification notification = Notification.show(errorMessage, 5000,Notification.Position.MIDDLE);notification.addThemeVariants(NotificationVariant.LUMO_ERROR);});add(sSpan,upload);
Image 图片展示组件

测试代码案例
// Image imageTest = new Image("images/empty-plant.png", "My Alt Image");Image imageTest = new Image("https://images.unsplash.com/photo-1519681393784-d120267933ba?ixid=MXwxMjA3fDB8MHxwaG90by1wYWdlfHx8fGVufDB8fHw%3D&ixlib=rb-1.2.1&auto=format&fit=crop&w=750&q=80", "My Alt Image");SvgIcon svgIcon = new SvgIcon();svgIcon.setSrc("icons/hellokitty_1.svg");SvgIcon svgIcon2 = new SvgIcon();svgIcon2.setSrc("icons/hellokitty.svg");SvgIcon svgIcon3 = new SvgIcon();svgIcon3.setSrc("icons/hello.svg");add(imageTest,svgIcon,svgIcon2,svgIcon3);
相关文章:
【Vaadin flow 实战】第5讲-使用常用UI组件绘制页面元素
vaadin flow官方提供的UI组件文档地址是 https://vaadin.com/docs/latest/components这里,我简单实战了官方提供的一些免费的UI组件,使用案例如下: Accordion 手风琴 Accordion 手风琴效果组件 Accordion 手风琴-测试案例代码 Slf4j PageT…...

强化学习 DAY1:什么是 RL、马尔科夫决策、贝尔曼方程
第一部分 RL基础:什么是RL与MRP、MDP 1.1 入门强化学习所需掌握的基本概念 1.1.1 什么是强化学习:依据策略执行动作-感知状态-得到奖励 强化学习里面的概念、公式,相比ML/DL特别多,初学者刚学RL时,很容易被接连不断…...
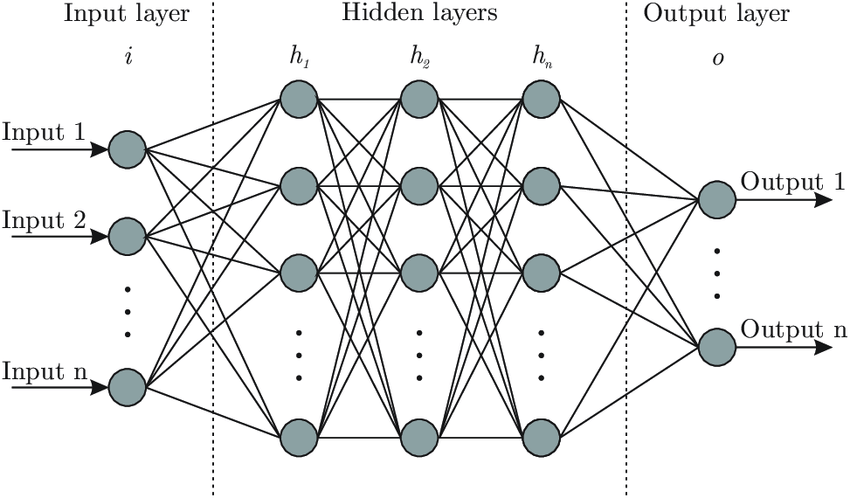
理解神经网络:Brain.js 背后的核心思想
温馨提示 这篇文章篇幅较长,主要是为后续内容做铺垫和说明。如果你觉得文字太多,可以: 先收藏,等后面文章遇到不懂的地方再回来查阅。直接跳读,重点关注加粗或高亮的部分。放心,这种“文字轰炸”不会常有的,哈哈~ 感谢你的耐心阅读!😊 欢迎来到 brain.js 的学习之旅!…...

【Docker】dockerfile识别当前构建的镜像平台
在编写dockerfile的时候,可能会遇到需要针对不同平台进行不同操作的时候,这需要我们对dockerfile进行针对性修改。 比如opencv的依赖项libjasper-dev在ubuntu18.04上就需要根据不同的平台做不同的处理,关于这个库的安装在另外一篇博客里面有…...
【VM】VirtualBox安装CentOS8虚拟机
阅读本文前,请先根据 VirtualBox软件安装教程 安装VirtualBox虚拟机软件。 1. 下载centos8系统iso镜像 可以去两个地方下载,推荐跟随本文的操作用阿里云的镜像 centos官网:https://www.centos.org/download/阿里云镜像:http://…...
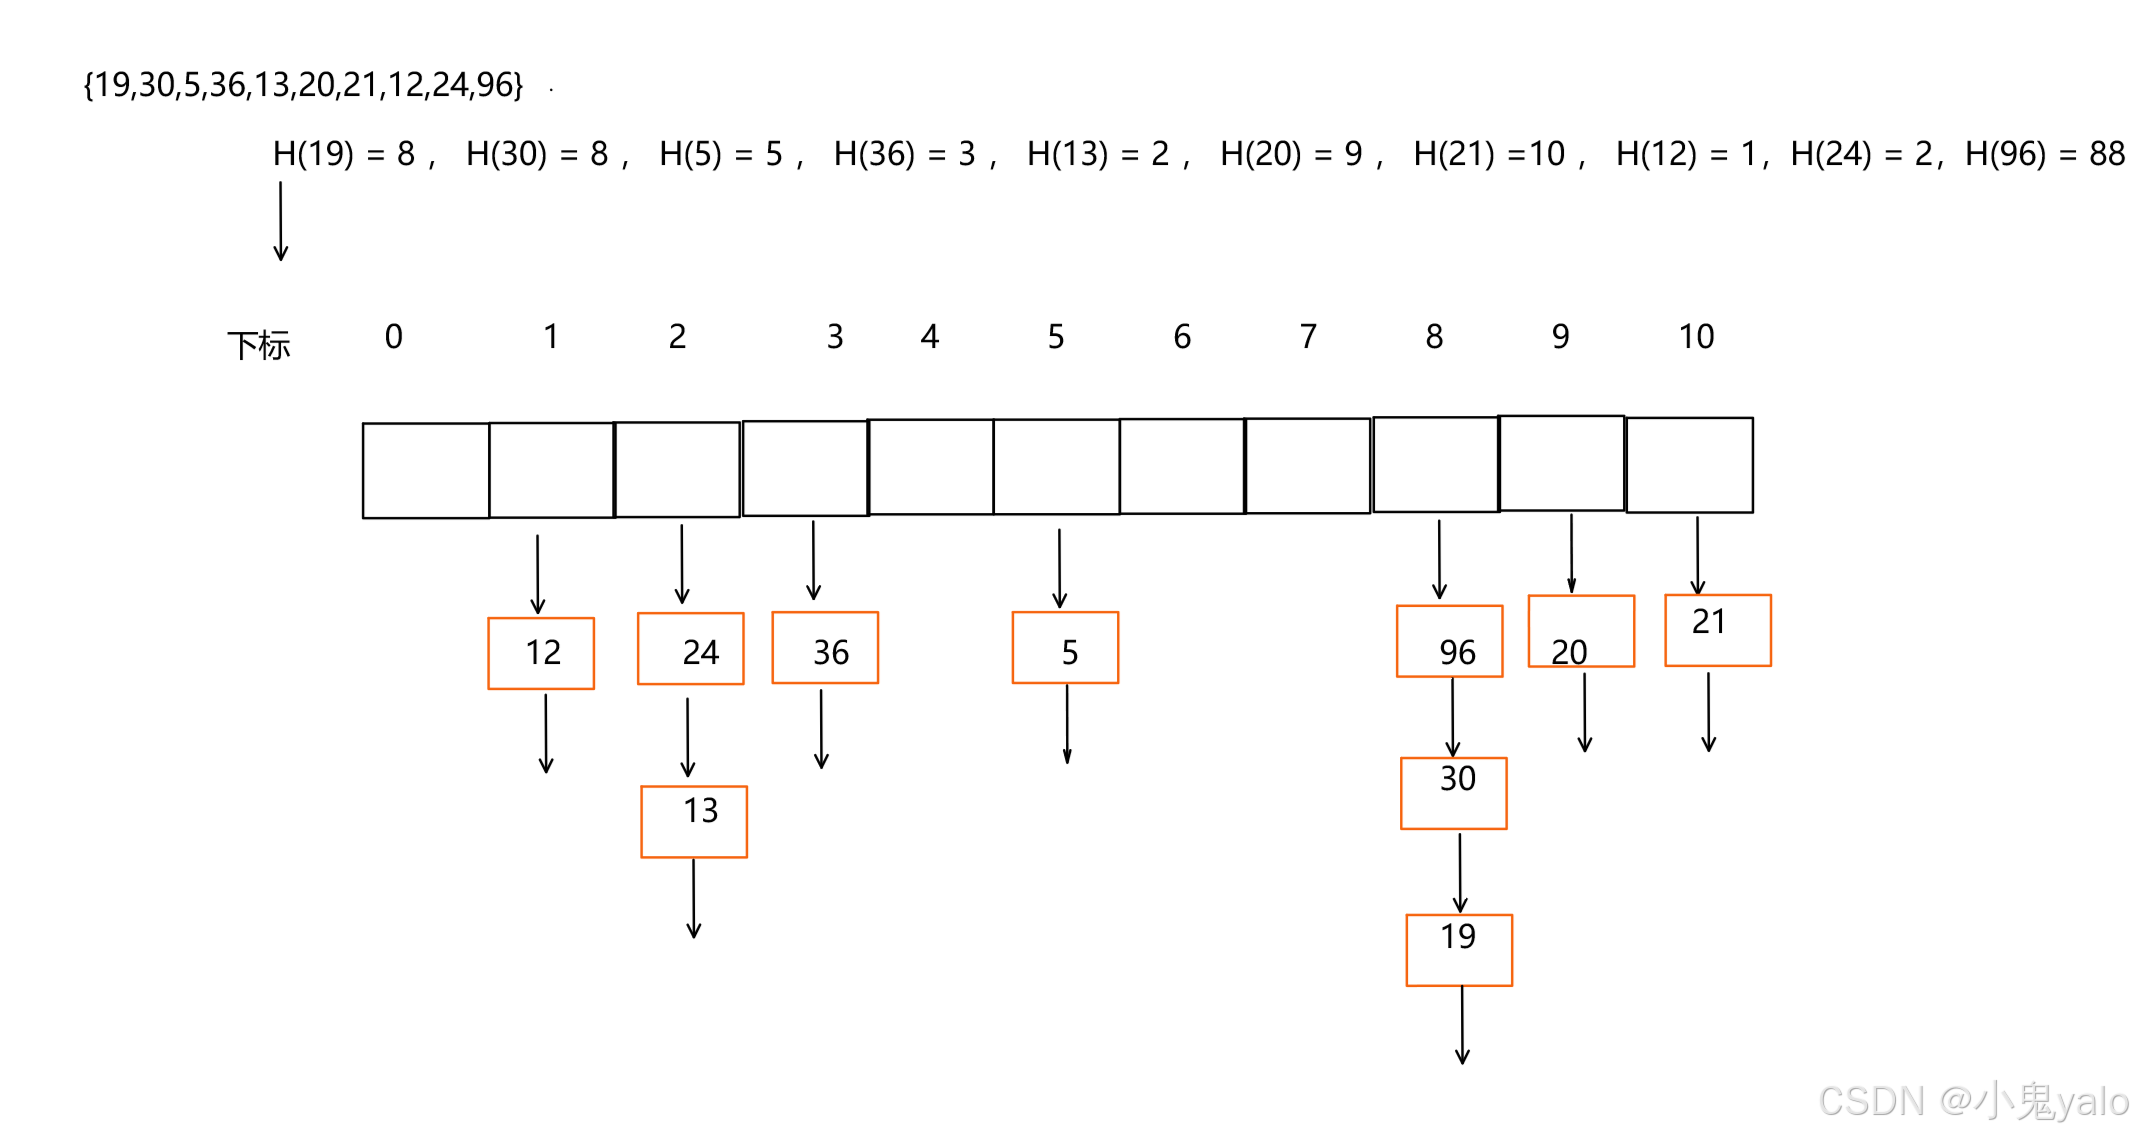
【C++篇】哈希表
目录 一,哈希概念 1.1,直接定址法 1.2,哈希冲突 1.3,负载因子 二,哈希函数 2.1,除法散列法 /除留余数法 2.2,乘法散列法 2.3,全域散列法 三,处理哈希冲突 3.1&…...

Java篇之继承
目录 一. 继承 1. 为什么需要继承 2. 继承的概念 3. 继承的语法 4. 访问父类成员 4.1 子类中访问父类的成员变量 4.2 子类中访问父类的成员方法 5. super关键字 6. super和this关键字 7. 子类构造方法 8. 代码块的执行顺序 9. protected访问修饰限定符 10. 继承方式…...

边缘检测算法(candy)
人工智能例子汇总:AI常见的算法和例子-CSDN博客 Canny 边缘检测的步骤 1. 灰度转换 如果输入的是彩色图像,则需要先转换为 灰度图像,因为边缘检测通常在单通道图像上进行。 2. 高斯滤波(Gaussian Blur) 由于边缘…...

设计模式Python版 组合模式
文章目录 前言一、组合模式二、组合模式实现方式三、组合模式示例四、组合模式在Django中的应用 前言 GOF设计模式分三大类: 创建型模式:关注对象的创建过程,包括单例模式、简单工厂模式、工厂方法模式、抽象工厂模式、原型模式和建造者模式…...
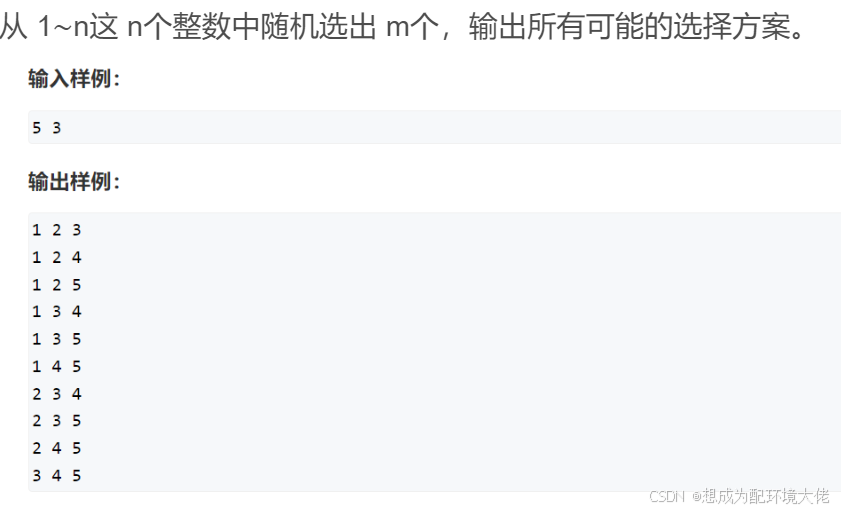
dfs枚举问题
碎碎念:要开始刷算法题备战蓝桥杯了,一切的开头一定是dfs 定义 枚举问题就是咱数学上学到的,从n个数里面选m个数,有三种题型(来自Acwing) 从 1∼n 这 n个整数中随机选取任意多个,输出所有可能的选择方案。 把 1∼n这…...
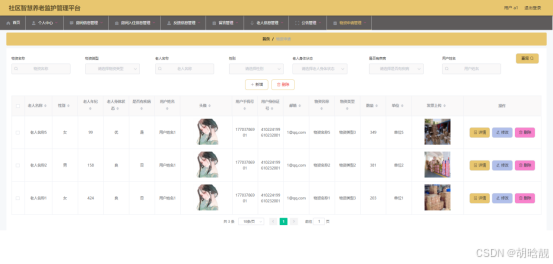
【开源免费】基于SpringBoot+Vue.JS社区智慧养老监护管理平台(JAVA毕业设计)
本文项目编号 T 163 ,文末自助获取源码 \color{red}{T163,文末自助获取源码} T163,文末自助获取源码 目录 一、系统介绍二、数据库设计三、配套教程3.1 启动教程3.2 讲解视频3.3 二次开发教程 四、功能截图五、文案资料5.1 选题背景5.2 国内…...
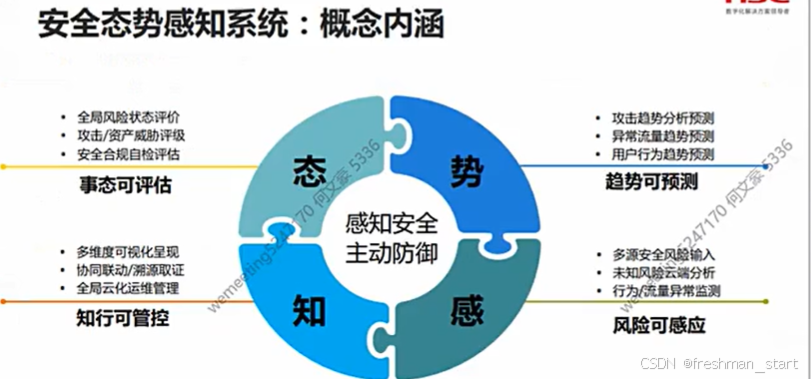
安全防护前置
就业概述 网络安全工程师/安全运维工程师/安全工程师 安全架构师/安全专员/研究院(数学要好) 厂商工程师(售前/售后) 系统集成工程师(所有计算机知识都要会一点) 学习目标 前言 网络安全事件 蠕虫病毒--&…...
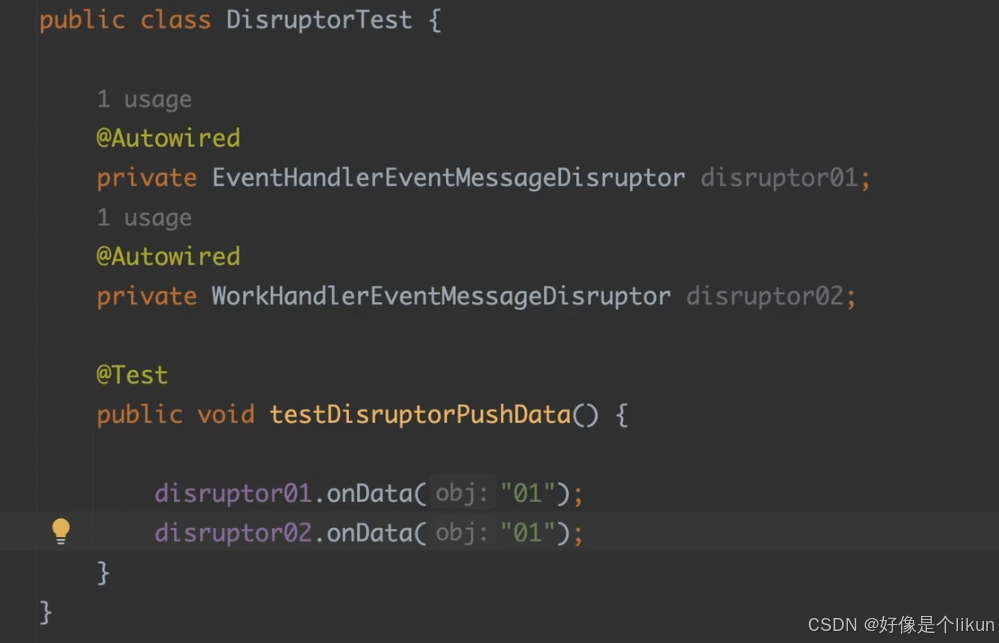
高性能消息队列Disruptor
定义一个事件模型 之后创建一个java类来使用这个数据模型。 /* <h1>事件模型工程类,用于生产事件消息</h1> */ no usages public class EventMessageFactory implements EventFactory<EventMessage> { Overridepublic EventMessage newInstance(…...

kamailio中的sctp模块
以下是关于 Kamailio 配置中 enable_sctpno 的详细解释: 1. 参数作用 enable_sctp: 该参数用于控制 Kamailio 是否启用 SCTP(Stream Control Transmission Protocol) 协议支持。 设置为 yes:启用 SCTP,并加…...
)
前端学习-事件解绑,mouseover和mouseenter的区别(二十九)
目录 前言 解绑事件 语法 鼠标经过事件的区别 鼠标经过事件 示例代码 两种注册事件的区别 总结 前言 人道洛阳花似锦,偏我来时不逢春 解绑事件 on事件方式,直接使用null覆盖就可以实现事件的解绑 语法 btn.onclick function(){alert(点击了…...

独立游戏RPG回顾:高成本
刚看了某纪录片, 内容是rpg项目的回顾。也是这个以钱为核心话题的系列的最后一集。 对这期特别有代入感,因为主角是曾经的同事,曾经在某天晚上听过其项目组的争论。 对其这些年的起伏特别的能体会。 主角是制作人,在访谈中透露这…...

10.4 LangChain核心架构揭秘:模块化设计如何重塑大模型应用开发?
LangChain核心架构揭秘:模块化设计如何重塑大模型应用开发? 关键词: LangChain模块化设计、大模型开发框架、LangChain核心概念、AI应用开发、LLM工程化 一、LangChain的模块化设计哲学:从“手工作坊”到“工业化生产” 传统开发痛点: 代码重复:每个项目从零开始编写胶…...
【学习笔记】深度学习网络-正则化方法
作者选择了由 Ian Goodfellow、Yoshua Bengio 和 Aaron Courville 三位大佬撰写的《Deep Learning》(人工智能领域的经典教程,深度学习领域研究生必读教材),开始深度学习领域学习,深入全面的理解深度学习的理论知识。 在之前的文章中介绍了深度学习中用…...

网站快速收录:如何优化网站头部与底部信息?
本文转自:百万收录网 原文链接:https://www.baiwanshoulu.com/46.html 为了加快网站的收录速度,优化网站头部与底部信息是关键一环。以下是一些具体的优化建议: 网站头部信息优化 标题标签(TitleTag)优化…...
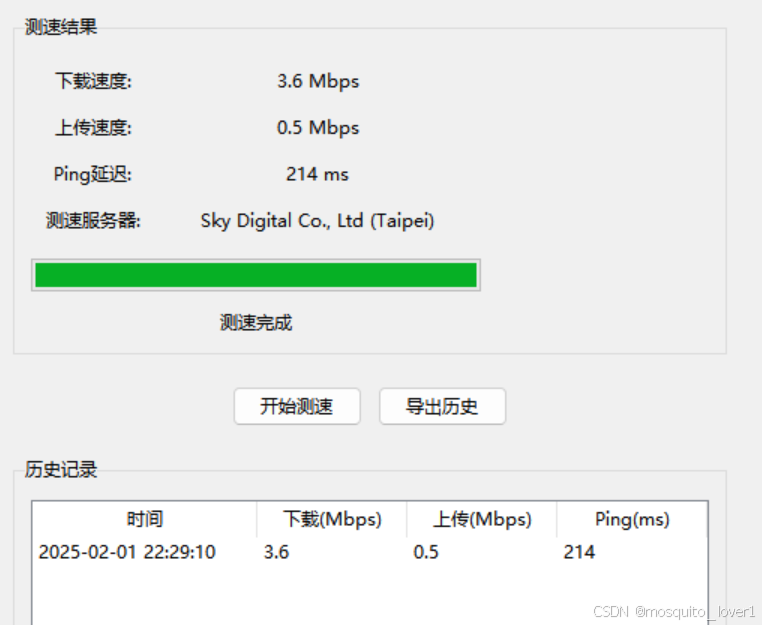
网络测试工具
工具介绍: 这是一个功能完整的网络测速工具,可以测试网络的下载速度、上传速度和延迟。 功能特点: 1. 速度测试 - 下载速度测试 - 上传速度测试 - Ping延迟测试 - 自动选择最佳服务器 2. 实时显示 - 进度条显示测试进度 - 实时显示测试状…...

C语言学习的第一周
1.自我介绍我姓马,来自成都的一个双非一本,目前大一,神秘专业,目前学c语言是兴趣使然和为了未来转码作铺垫,多项技能傍身也没错嘛2.学习目标打下c语言的坚实基础,方向初步是逐步从c语言到c再到更深度的知识…...

电容是什么?一个“快充快放”的微型充电宝昭
一、前言:什么是 OFA VQA 模型? OFA(One For All)是字节跳动提出的多模态预训练模型,支持视觉问答、图像描述、图像编辑等多种任务,其中视觉问答(VQA)是最常用的功能之一——输入一张…...

5年数据开发转AI Agent|30天学习路线
✅给想转的数开兄弟姐妹的真心话: 别裸辞!先试水再转:利用业余时间学基础、做1-2个小Demo,验证自己是否真的感兴趣,再决定要不要all in; 把数开经验变成你的护城河:面试别只说你学了什么Agent框…...

MeteorSeed赐
这个代码的核心功能是:基于输入词的长度动态选择反义词示例,并调用大模型生成反义词,体现了 “动态少样本提示(Dynamic Few-Shot Prompting)” 与 “上下文长度感知的示例选择” 的能力。 from langchain.prompts imp…...

[R3nzSkin]无限视距技术解析:突破MOBA视野限制的实现与应用
[R3nzSkin]无限视距技术解析:突破MOBA视野限制的实现与应用 【免费下载链接】R3nzSkin Skin changer for League of Legends (LOL) 项目地址: https://gitcode.com/gh_mirrors/r3n/R3nzSkin 一、视野革新:重新定义MOBA竞技格局 重构战场感知维度…...

第三章:面向对象编程
第三章:面向对象编程 【免费下载链接】wereader 一个浏览器扩展:主要用于微信读书做笔记,对常使用 Markdown 做笔记的读者比较有帮助。 项目地址: https://gitcode.com/gh_mirrors/wer/wereader 3.1 类与对象 面向对象编程的核心是类和…...

解锁商场流量密码:一次地贴定制如何让我的活动效果翻倍?
在商场运营与活动营销中,流量获取与转化始终是核心痛点——高空广告成本高、受众触达不精准,传统海报易被忽略,线上引流又面临流量碎片化、转化链路长的困境。而商场地贴作为一种低成本、高触达、强引导的户外广告物料,往往被多数…...

别再手动敲代码了!我用GitHub Copilot+Python Django,10分钟搞定电商用户注册模块
用GitHub Copilot和Django十分钟搭建电商用户注册系统 最近在重构一个老旧的电商项目时,我面临着一个看似简单却极其耗时的任务:重写用户注册模块。按照传统方式,我需要手动创建Django表单、编写验证逻辑、设计数据库模型,整个过程…...

【.NET 9低代码开发终极指南】:20年微软生态专家亲授——零前端经验如何3天交付生产级业务应用?
第一章:.NET 9低代码开发全景认知与核心价值定位.NET 9 将低代码能力深度融入平台原生架构,不再依赖第三方插件或独立运行时,而是通过统一的组件模型、声明式 UI 编程范式与智能元数据驱动机制,实现“写少做多”的开发体验。其核心…...
到VirtualThread.unpark():Java 25虚拟线程配置全流程拆解(含JFR火焰图对比+GC日志精读))
从Thread.sleep()到VirtualThread.unpark():Java 25虚拟线程配置全流程拆解(含JFR火焰图对比+GC日志精读)
第一章:Java 25虚拟线程演进本质与高并发架构适配定位Java 25正式将虚拟线程(Virtual Threads)从预览特性转为标准特性,标志着JVM并发模型进入轻量级调度新范式。其演进本质并非简单增加一种线程类型,而是重构了“线程…...