mysql主主架构搭建,删库恢复
mysql主主架构搭建,删库恢复
- 搭建mysql主主架构
- 环境信息
- 安装msql服务
- mysql1
- mysql2
- 设置mysql2同步mysql1
- 设置mysql1同步mysql2
- 授权测试用账户
- 安装配置keepalived
- mysql1
- 检查脚本
- mysql2
- 检查脚本
- 备份策略
- mysqldump全量备份
- mysqldump增量备份
- 数据库目录全量备份
- 删除mysql1数据库目录,恢复数据
- 删除mysql1的数据库目录
- 停止mysql1的数据库
- 全备份mysql2的数据
- 备份数据上传mysql1
- mysql1启动数据库服务
- 导入备份数据
- 恢复授权信息
- 设置mysql1同步mysql2
- 设置mysql2同步mysql1的数据
- 启动mysql1上的keepalived
- 测试用库表
搭建mysql主主架构
环境信息
| 主机名 | IP地址 | 服务 | 角色 |
|---|---|---|---|
| mysql1 | 192.168.44.188 | mysql,keepalived | mysql-master,keepalived-master |
| mysql2 | 192.168.44.190 | mysql,keepalived | mysql-master,keepalived-backup |
| 192.168.44.100(vip) |
安装msql服务
mysql1
[root@mysql1 ~]# tar xf mysql-5.7.39-1.el7.x86_64.rpm-bundle.tar
[root@mysql1 ~]# yum -y install *.rpm[root@mysql1 ~]# vim /etc/my.cnf
[mysqld]
server_id=0001
log_bin=mysql-0001[root@mysql1 ~]# systemctl enable mysqld --now
#查看初始密码
[root@mysql1 ~]# grep password /var/log/mysqld.log | tail -1
#使用初始密码登录
[root@mysql1 ~]# mysql -uroot -p'AFKMqF?Kd2ul'mysql> alter user root@localhost identified by 'zzz-123-ZZZ';
Query OK, 0 rows affected (0.00 sec)mysql> grant replication slave on *.* to repluser@"%" identified by "zzz-123-ZZZ";
Query OK, 0 rows affected, 1 warning (0.00 sec)mysql> show master status;
+-------------------+----------+--------------+------------------+-------------------+
| File              | Position | Binlog_Do_DB | Binlog_Ignore_DB | Executed_Gtid_Set |
+-------------------+----------+--------------+------------------+-------------------+
| mysql-0001.000002 |      685 |              |                  |                   |
+-------------------+----------+--------------+------------------+-------------------+
1 row in set (0.00 sec)
mysql2
[root@mysql2 ~]# tar xf mysql-5.7.39-1.el7.x86_64.rpm-bundle.tar
[root@mysql2 ~]# yum -y install *.rpm[root@mysql2 ~]# vim /etc/my.cnf
[mysqld]
server_id=0002
log_bin=mysql-0002[root@mysql2 ~]# systemctl enable mysqld --now
#查看初始密码
[root@mysql2 ~]# grep password /var/log/mysqld.log | tail -1
#使用初始密码登录
[root@mysql2 ~]# mysql -uroot -p'(se1aYk;r3:g'mysql> alter user root@localhost identified by 'zzz-123-ZZZ';
Query OK, 0 rows affected (0.00 sec)mysql> alter user root@localhost identified by 'zzz-123-ZZZ';
Query OK, 0 rows affected (0.00 sec)mysql> grant replication slave on *.* to repluser@"%" identified by "zzz-123-ZZZ";
Query OK, 0 rows affected, 1 warning (0.00 sec)
设置mysql2同步mysql1
#配置mysql2为mysql1的从服务器,填写mysql1查询master status,中的file和 Position
mysql> change master to master_host="192.168.44.188",master_user="repluser",master_password="zzz-123-ZZZ",master_log_file="mysql-0001.000002",master_log_pos=685;
Query OK, 0 rows affected, 2 warnings (0.18 sec)#配置后查看master信息
mysql> show master status;
+-------------------+----------+--------------+------------------+-------------------+
| File              | Position | Binlog_Do_DB | Binlog_Ignore_DB | Executed_Gtid_Set |
+-------------------+----------+--------------+------------------+-------------------+
| mysql-0002.000002 |      929 |              |                  |                   |
+-------------------+----------+--------------+------------------+-------------------+
1 row in set (0.00 sec)#查看同步信息
mysql> show slave status\G
*************************** 1. row ***************************Slave_IO_State: Waiting for master to send eventMaster_Host: 192.168.44.188Master_User: repluserMaster_Port: 3306Connect_Retry: 60Master_Log_File: mysql-0001.000002Read_Master_Log_Pos: 685Relay_Log_File: mysql2-relay-bin.000002Relay_Log_Pos: 321Relay_Master_Log_File: mysql-0001.000002Slave_IO_Running: YesSlave_SQL_Running: YesReplicate_Do_DB:Replicate_Ignore_DB:Replicate_Do_Table:Replicate_Ignore_Table:Replicate_Wild_Do_Table:Replicate_Wild_Ignore_Table:Last_Errno: 0Last_Error:Skip_Counter: 0Exec_Master_Log_Pos: 685Relay_Log_Space: 529Until_Condition: NoneUntil_Log_File:Until_Log_Pos: 0Master_SSL_Allowed: NoMaster_SSL_CA_File:Master_SSL_CA_Path:Master_SSL_Cert:Master_SSL_Cipher:Master_SSL_Key:Seconds_Behind_Master: 0
Master_SSL_Verify_Server_Cert: NoLast_IO_Errno: 0Last_IO_Error:Last_SQL_Errno: 0Last_SQL_Error:Replicate_Ignore_Server_Ids:Master_Server_Id: 1Master_UUID: 196aed76-23c3-11ee-970c-000c29919b39Master_Info_File: /var/lib/mysql/master.infoSQL_Delay: 0SQL_Remaining_Delay: NULLSlave_SQL_Running_State: Slave has read all relay log; waiting for more updatesMaster_Retry_Count: 86400Master_Bind:Last_IO_Error_Timestamp:Last_SQL_Error_Timestamp:Master_SSL_Crl:Master_SSL_Crlpath:Retrieved_Gtid_Set:Executed_Gtid_Set:Auto_Position: 0Replicate_Rewrite_DB:Channel_Name:Master_TLS_Version:
1 row in set (0.00 sec)mysql> exit
设置mysql1同步mysql2
#配置mysql1为mysql2的从服务器,填写mysql1查询master status,中的file和 Position
mysql> change master to master_host="192.168.44.190",master_user="repluser",master_password="zzz-123-ZZZ",master_log_file="mysql-0001.000002",master_log_pos=929;
mysql> start slave;
Query OK, 0 rows affected (0.00 sec)#查看同步信息
mysql> show slave status\G
*************************** 1. row ***************************Slave_IO_State: Waiting for master to send eventMaster_Host: 192.168.44.190Master_User: repluserMaster_Port: 3306Connect_Retry: 60Master_Log_File: mysql-0002.000002Read_Master_Log_Pos: 929Relay_Log_File: mysql1-relay-bin.000002Relay_Log_Pos: 321Relay_Master_Log_File: mysql-0002.000002Slave_IO_Running: YesSlave_SQL_Running: YesReplicate_Do_DB:Replicate_Ignore_DB:Replicate_Do_Table:Replicate_Ignore_Table:Replicate_Wild_Do_Table:Replicate_Wild_Ignore_Table:Last_Errno: 0Last_Error:Skip_Counter: 0Exec_Master_Log_Pos: 929Relay_Log_Space: 529Until_Condition: NoneUntil_Log_File:Until_Log_Pos: 0Master_SSL_Allowed: NoMaster_SSL_CA_File:Master_SSL_CA_Path:Master_SSL_Cert:Master_SSL_Cipher:Master_SSL_Key:Seconds_Behind_Master: 0
Master_SSL_Verify_Server_Cert: NoLast_IO_Errno: 0Last_IO_Error:Last_SQL_Errno: 0Last_SQL_Error:Replicate_Ignore_Server_Ids:Master_Server_Id: 2Master_UUID: 2f686140-23c3-11ee-98f2-000c29fe7242Master_Info_File: /var/lib/mysql/master.infoSQL_Delay: 0SQL_Remaining_Delay: NULLSlave_SQL_Running_State: Slave has read all relay log; waiting for more updatesMaster_Retry_Count: 86400Master_Bind:Last_IO_Error_Timestamp:Last_SQL_Error_Timestamp:Master_SSL_Crl:Master_SSL_Crlpath:Retrieved_Gtid_Set:Executed_Gtid_Set:Auto_Position: 0Replicate_Rewrite_DB:Channel_Name:Master_TLS_Version:
1 row in set (0.00 sec)
授权测试用账户
#对测试mysql运行状态的用户授权
mysql> GRANT ALL PRIVILEGES ON *.* TO 'test_user'@'%' IDENTIFIED BY 'zzz-123-ZZZ' WITH GRANT OPTION;
Query OK, 0 rows affected, 1 warning (0.03 sec)mysql> FLUSH PRIVILEGES;
Query OK, 0 rows affected (0.00 sec)
安装配置keepalived
mysql1
[root@mysql1 ~]# yum -y install keepalived.x86_64
[root@mysql1 ~]# vim /etc/keepalived/keepalived.conf
/etc/keepalived/keepalived.conf
! Configuration File for keepalivedglobal_defs {notification_email {acassen@firewall.locfailover@firewall.locsysadmin@firewall.loc}notification_email_from Alexandre.Cassen@firewall.locsmtp_server 192.168.200.1smtp_connect_timeout 30router_id mysql1		#集群唯一标识vrrp_iptables		#防火墙放行vrrp_skip_check_adv_addrvrrp_strictvrrp_garp_interval 0vrrp_gna_interval 0
}
vrrp_script check_mysql {script "/usr/local/bin/check_mysql.sh"    # 检测MySQL服务的脚本路径interval 3                   # 检测频率(单位:秒)
#    weight -4                    # 检测失败时扣除的权重 通过脚本停止了keepalived服务,此处不再配置
#    fall 2                       # 连续检测失败次数
#    rise 2                       # 连续检测成功次数
}vrrp_instance VI_1 {state MASTER			#节点为masterinterface ens33			#网卡名virtual_router_id 51priority 100			#节点权重,越大越重advert_int 1authentication {auth_type PASSauth_pass 1111}virtual_ipaddress {192.168.44.100/24	#虚拟ip}track_script {check_mysql                # 监测MySQL服务脚本的名称}
}
检查脚本
[root@mysql1 ~]# vim /usr/local/bin/check_mysql.sh
/usr/local/bin/check_mysql.sh
#!/bin/bash# 定义MySQL相关配置
MYSQL_USER="test_user"
MYSQL_PASS="zzz-123-ZZZ"
MYSQL_HOST="192.168.44.188"
MYSQL_PORT="3306"
MYSQL_VIP="192.168.44.100"# 检测MySQL状态
check_mysql_status() {# 尝试连接MySQL并执行查询if ! mysql -h "${MYSQL_HOST}" -P "${MYSQL_PORT}" -u "${MYSQL_USER}" -p"${MYSQL_PASS}" -e "SELECT 1" >/dev/null; thenecho "无法连接到MySQL!"return 1fi# MySQL状态正常return 0
}if check_mysql_status; thenecho "MySQL服务正常"exit 0
elseecho "MySQL服务异常"# 停止Keepalived服务systemctl stop keepalived.service# 释放VIP(虚拟IP)ip address del "${MYSQL_VIP}"/24 dev ens33exit 1
fi
[root@mysql1 ~]# chmod a+x /usr/local/bin/check_mysql.sh
[root@mysql1 ~]# systemctl enable keepalived.service --now
[root@mysql1 ~]# systemctl status keepalived.service
mysql2
[root@mysql2 ~]# yum -y install keepalived.x86_64
[root@mysql2 ~]# vim /etc/keepalived/keepalived.conf
/etc/keepalived/keepalived.conf
! Configuration File for keepalivedglobal_defs {notification_email {acassen@firewall.locfailover@firewall.locsysadmin@firewall.loc}notification_email_from Alexandre.Cassen@firewall.locsmtp_server 192.168.200.1smtp_connect_timeout 30router_id mysql2	#集群唯一标识vrrp_iptables		#防火墙放行vrrp_skip_check_adv_addrvrrp_strictvrrp_garp_interval 0vrrp_gna_interval 0
}
vrrp_script check_mysql {script "/usr/local/bin/check_mysql.sh"    # 检测MySQL服务的脚本路径interval 3                   # 检测频率(单位:秒)
#    weight -4                    # 检测失败时扣除的权重 通过脚本停止了keepalived服务,此处不再配置
#    fall 2                       # 连续检测失败次数
#    rise 2                       # 连续检测成功次数
}vrrp_instance VI_1 {state BACKUP			#节点为BACKUPinterface ens33			#网卡名virtual_router_id 51priority 98			#节点权重,比master要小advert_int 1authentication {auth_type PASSauth_pass 1111}virtual_ipaddress {192.168.44.100/24	#虚拟ip}track_script {check_mysql                # 监测MySQL服务脚本的名称}
}
检查脚本
[root@mysql2 ~]# vim /usr/local/bin/check_mysql.sh
/usr/local/bin/check_mysql.sh
#!/bin/bash# 定义MySQL相关配置
MYSQL_USER="test_user"
MYSQL_PASS="zzz-123-ZZZ"
MYSQL_HOST="192.168.44.190"
MYSQL_PORT="3306"
MYSQL_VIP="192.168.44.100"# 检测MySQL状态
check_mysql_status() {# 尝试连接MySQL并执行查询if ! mysql -h "${MYSQL_HOST}" -P "${MYSQL_PORT}" -u "${MYSQL_USER}" -p"${MYSQL_PASS}" -e "SELECT 1" >/dev/null; thenecho "无法连接到MySQL!"return 1fi# MySQL状态正常return 0
}if check_mysql_status; thenecho "MySQL服务正常"exit 0
elseecho "MySQL服务异常"# 停止Keepalived服务systemctl stop keepalived.service# 释放VIP(虚拟IP)ip address del "${MYSQL_VIP}"/24 dev ens33exit 1
fi
[root@mysql1 ~]# chmod a+x /usr/local/bin/check_mysql.sh
[root@mysql1 ~]# systemctl enable keepalived.service --now
[root@mysql1 ~]# systemctl status keepalived.service
备份策略
mysqldump全量备份
#!/bin/bash#全量备份TIME=$(date +%Y-%m-%d)
BACKUP_DIR="/mysqldump_back/"mysqldump -u 用户名 -p --master-data=2 --all-databases --result-file=${BACKUP_DIR}back-${TIME}.sql
mysqldump增量备份
#此脚本尚未亲测
#!/bin/bash#先手动全量备份,后执行脚本
mysqldump -u 用户名 -p --master-data=2 --all-databases --result-file=${BACKUP_DIR}last_backup.sqlTIME=$(date +%Y-%m-%d)
BACKUP_DIR="/路径/"
LAST_BACKUP="${BACKUP_DIR}last_backup.sql"mysqldump -u 用户名 -p --master-data=2 --databases --result-file=${BACKUP_DIR}back-${TIME}.sql --incremental=snar
rsync ${BACKUP_DIR}back-${TIME}.sql ${LAST_BACKUP}
数据库目录全量备份
#/bin/bash
rsync -av /var/lib/mysql /mysqlback/var-lib-mysql
删除mysql1数据库目录,恢复数据
删除mysql1的数据库目录
[root@mysql1 ~]# rm -rf /var/lib/mysql
查看keepalived停止,VIP漂移到mysql2
停止mysql1的数据库
[root@mysql1 ~]# systemctl stop mysqld
全备份mysql2的数据
[root@mysql2 ~]# mysqldump -uroot -pzzz-123-ZZZ --all-databases --master-data=2 > /root/20230716allback.sql
[root@mysql2 zzz]# grep mysql-0002 /root/20230716allback.sql
-- CHANGE MASTER TO MASTER_LOG_FILE='mysql-0002.000002', MASTER_LOG_POS=1493;
备份数据上传mysql1
[root@mysql2 ~]# scp /root/20230716allback.sql 192.168.44.188:/root
mysql1启动数据库服务
[root@mysql1 ~]# systemctl start mysqld
#生成初始密码,初始密码登录,改密码#数据库没有生成初始密码
[root@mysql1 ~]# grep "password" /var/log/mysqld.log | tail -1
2023-07-16T07:28:38.032091Z 882 [Note] Access denied for user 'test_user'@'localhost' (using password: YES)
#停止mysql服务,删除数据库目录,再次启动数据库
[root@mysql1 ~]# systemctl stop mysqld.service
[root@mysql1 ~]# rm -rf /var/lib/mysql
[root@mysql1 ~]# systemctl start mysqld
[root@mysql1 ~]# grep "password" /var/log/mysqld.log | tail -1
2023-07-16T07:30:43.170590Z 15 [Note] Access denied for user 'test_user'@'localhost' (using password: YES)
#依旧没有生成初始密码#重置root密码
vim /etc/mysql
#增加免密配置
skip-grant-tables#重启数据库
systemctl restart mysqld#免密登录
mysql#修改root密码
mysql> update  mysql.user set authentication_string=password("123qqq...A")
where user="root" and host="localhost";
#确保修改生效
mysql> flush privileges;
mysql> exit; 断开连接#注释免密登录
vim /etc/mysql
#增加免密配置
#skip-grant-tables#重启数据库
systemctl restart mysqld#使用密码登录
[root@mysql1 ~]# mysql -uroot -p123qqq...A#重置密码
mysql> alter user root@localhost identified by 'zzz-123-ZZZ';
Query OK, 0 rows affected (0.00 sec)mysql> exit
#修改好密码后
#登录查看为空库
[root@mysql1 ~]# mysql -uroot -pzzz-123-ZZZ
mysql: [Warning] Using a password on the command line interface can be insecure.
Welcome to the MySQL monitor.  Commands end with ; or \g.
Your MySQL connection id is 337
Server version: 5.7.39-log MySQL Community Server (GPL)Copyright (c) 2000, 2022, Oracle and/or its affiliates.Oracle is a registered trademark of Oracle Corporation and/or its
affiliates. Other names may be trademarks of their respective
owners.Type 'help;' or '\h' for help. Type '\c' to clear the current input statement.mysql> show databases;
+--------------------+
| Database           |
+--------------------+
| information_schema |
| mysql              |
| performance_schema |
| sys                |
+--------------------+
4 rows in set (0.01 sec)
mysql> exit
导入备份数据
[root@mysql1 ~]# mysql -uroot -pzzz-123-ZZZ < /root/20230716allback.sql
#查看数据
[root@mysql1 ~]# mysql -uroot -pzzz-123-ZZZ
mysql: [Warning] Using a password on the command line interface can be insecure.
Welcome to the MySQL monitor.  Commands end with ; or \g.
Your MySQL connection id is 631
Server version: 5.7.39-log MySQL Community Server (GPL)Copyright (c) 2000, 2022, Oracle and/or its affiliates.Oracle is a registered trademark of Oracle Corporation and/or its
affiliates. Other names may be trademarks of their respective
owners.Type 'help;' or '\h' for help. Type '\c' to clear the current input statement.mysql> show databases;
+--------------------+
| Database           |
+--------------------+
| information_schema |
| mysql              |
| performance_schema |
| sys                |
| test1              |
+--------------------+
5 rows in set (0.00 sec)mysql> use test1;
Reading table information for completion of table and column names
You can turn off this feature to get a quicker startup with -ADatabase changed
mysql> show tables;
+-----------------+
| Tables_in_test1 |
+-----------------+
| table1          |
| table2          |
+-----------------+
2 rows in set (0.00 sec)#查看授权信息
mysql> show grants for repluser;
ERROR 1141 (42000): There is no such grant defined for user 'repluser' on host '%'
查看mysql2授权信息
[root@mysql2 zzz]# mysql -uroot -pzzz-123-ZZZ -e "show grants for repluser"
mysql: [Warning] Using a password on the command line interface can be insecure.
+--------------------------------------------------+
| Grants for repluser@%                            |
+--------------------------------------------------+
| GRANT REPLICATION SLAVE ON *.* TO 'repluser'@'%' |
+--------------------------------------------------+
恢复授权信息
#即授权信息未被恢复#恢复授权信息
#上传mysql2数据库目录的mysql目录到mysql1
[root@mysql1 ~]# scp -r 192.168.44.190:/var/lib/mysql/mysql /var/lib/mysql/
#查看 上传来的mysql目录的属性信息
[root@mysql1 ~]# ll var/lib/mysql/mysql
[root@mysql1 ~]# chown -R mysql:mysql /var/lib/mysql#mysql1的数据库服务重新加载配置
[root@mysql1 ~]# ps -ef | grep mysql
mysql     93344      1  0 15:38 ?        00:00:01 /usr/sbin/mysqld --daemonize --pid-file=/var/run/mysqld/mysqld.pid
root     116253   1275  0 15:52 pts/0    00:00:00 grep --color=auto mysql
[root@mysql1 ~]#
[root@mysql1 ~]#
#kill -1 或 kill -SIGHUP
[root@mysql1 ~]# kill -1 93344#再次查看授权信息,此时MySQL1的root密码也和mysql2同步
[root@mysql1 ~]# mysql -uroot -pzzz-123-ZZZ -e "show grants for repluser"
mysql: [Warning] Using a password on the command line interface can be insecure.
+--------------------------------------------------+
| Grants for repluser@%                            |
+--------------------------------------------------+
| GRANT REPLICATION SLAVE ON *.* TO 'repluser'@'%' |
+--------------------------------------------------+
设置mysql1同步mysql2
设置mysql1同步mysql2的数据,使用备份数据里的binlog数据
[root@mysql2 zzz]# grep mysql-0002 /root/20230716allback.sql
-- CHANGE MASTER TO MASTER_LOG_FILE='mysql-0002.000002', MASTER_LOG_POS=1493;
[root@mysql1 ~]# mysql -uroot -pzzz-123-ZZZ
mysql: [Warning] Using a password on the command line interface can be insecure.
Welcome to the MySQL monitor.  Commands end with ; or \g.
Your MySQL connection id is 2388
Server version: 5.7.39-log MySQL Community Server (GPL)Copyright (c) 2000, 2022, Oracle and/or its affiliates.Oracle is a registered trademark of Oracle Corporation and/or its
affiliates. Other names may be trademarks of their respective
owners.Type 'help;' or '\h' for help. Type '\c' to clear the current input statement.mysql> change master to master_host="192.168.44.190",master_user="repluser",master_password="zzz-123-ZZZ",master_log_file="mysql-0002.000002",master_log_pos=1493;
Query OK, 0 rows affected, 2 warnings (0.00 sec)mysql>
mysql>
mysql> start slave;
Query OK, 0 rows affected (0.00 sec)mysql> show slave status\G
*************************** 1. row ***************************Slave_IO_State: Waiting for master to send eventMaster_Host: 192.168.44.187Master_User: repluserMaster_Port: 3306Connect_Retry: 60Master_Log_File: mysql-0002.000003Read_Master_Log_Pos: 154Relay_Log_File: mysql1-relay-bin.000003Relay_Log_Pos: 369Relay_Master_Log_File: mysql-0002.000003Slave_IO_Running: YesSlave_SQL_Running: YesReplicate_Do_DB:Replicate_Ignore_DB:Replicate_Do_Table:Replicate_Ignore_Table:Replicate_Wild_Do_Table:Replicate_Wild_Ignore_Table:Last_Errno: 0Last_Error:Skip_Counter: 0Exec_Master_Log_Pos: 154Relay_Log_Space: 744Until_Condition: NoneUntil_Log_File:Until_Log_Pos: 0Master_SSL_Allowed: NoMaster_SSL_CA_File:Master_SSL_CA_Path:Master_SSL_Cert:Master_SSL_Cipher:Master_SSL_Key:Seconds_Behind_Master: 0
Master_SSL_Verify_Server_Cert: NoLast_IO_Errno: 0Last_IO_Error:Last_SQL_Errno: 0Last_SQL_Error:Replicate_Ignore_Server_Ids:Master_Server_Id: 2Master_UUID: 88729250-22fc-11ee-af60-000c29fe7242Master_Info_File: /var/lib/mysql/master.infoSQL_Delay: 0SQL_Remaining_Delay: NULLSlave_SQL_Running_State: Slave has read all relay log; waiting for more updatesMaster_Retry_Count: 86400Master_Bind:Last_IO_Error_Timestamp:Last_SQL_Error_Timestamp:Master_SSL_Crl:Master_SSL_Crlpath:Retrieved_Gtid_Set:Executed_Gtid_Set:Auto_Position: 0Replicate_Rewrite_DB:Channel_Name:Master_TLS_Version:
1 row in set (0.00 sec)
设置mysql2同步mysql1的数据
#查看mysql1的master信息
mysql> show master status;
+-------------------+----------+--------------+------------------+-------------------+
| File              | Position | Binlog_Do_DB | Binlog_Ignore_DB | Executed_Gtid_Set |
+-------------------+----------+--------------+------------------+-------------------+
| mysql-0001.000004 |   549254 |              |                  |                   |
+-------------------+----------+--------------+------------------+-------------------+
1 row in set (0.00 sec)
#配置mysql2同步mysql1的数据
mysql> stop slave;
Query OK, 0 rows affected (0.00 sec)mysql>
mysql> RESET SLAVE ALL;
Query OK, 0 rows affected (0.00 sec)mysql> change master to master_host="192.168.44.186",master_user="repluser",master_password="zzz-123-ZZZ",master_log_file="mysql-0001.000004",master_log_pos=549254;
Query OK, 0 rows affected, 2 warnings (0.01 sec)mysql> start slave;
Query OK, 0 rows affected (0.00 sec)mysql>
mysql>
mysql> show slave status\G
*************************** 1. row ***************************Slave_IO_State: Waiting for master to send eventMaster_Host: 192.168.44.186Master_User: repluserMaster_Port: 3306Connect_Retry: 60Master_Log_File: mysql-0001.000004Read_Master_Log_Pos: 707915Relay_Log_File: mysql2-relay-bin.000002Relay_Log_Pos: 158982Relay_Master_Log_File: mysql-0001.000004Slave_IO_Running: YesSlave_SQL_Running: YesReplicate_Do_DB:Replicate_Ignore_DB:Replicate_Do_Table:Replicate_Ignore_Table:Replicate_Wild_Do_Table:Replicate_Wild_Ignore_Table:Last_Errno: 0Last_Error:Skip_Counter: 0Exec_Master_Log_Pos: 707915Relay_Log_Space: 159190Until_Condition: NoneUntil_Log_File:Until_Log_Pos: 0Master_SSL_Allowed: NoMaster_SSL_CA_File:Master_SSL_CA_Path:Master_SSL_Cert:Master_SSL_Cipher:Master_SSL_Key:Seconds_Behind_Master: 0
Master_SSL_Verify_Server_Cert: NoLast_IO_Errno: 0Last_IO_Error:Last_SQL_Errno: 0Last_SQL_Error:Replicate_Ignore_Server_Ids:Master_Server_Id: 1Master_UUID: 0f1f81d7-23b1-11ee-b1e8-000c29919b39Master_Info_File: /var/lib/mysql/master.infoSQL_Delay: 0SQL_Remaining_Delay: NULLSlave_SQL_Running_State: Slave has read all relay log; waiting for more updatesMaster_Retry_Count: 86400Master_Bind:Last_IO_Error_Timestamp:Last_SQL_Error_Timestamp:Master_SSL_Crl:Master_SSL_Crlpath:Retrieved_Gtid_Set:Executed_Gtid_Set:Auto_Position: 0Replicate_Rewrite_DB:Channel_Name:Master_TLS_Version:
1 row in set (0.00 sec)
数据恢复完成,主主同步恢复
启动mysql1上的keepalived
[root@mysql1 ~]# systemctl start keepalived.service
#此时vip会回到mysql1
测试用库表
期间创建test库,和表table1,表table2测试数据
CREATE DATABASE test CHARACTER SET utf8;CREATE TABLE table1 (id INT AUTO_INCREMENT PRIMARY KEY,home VARCHAR(255),love VARCHAR(255),age INT
);CREATE TABLE table2 (id INT ,home VARCHAR(255),love VARCHAR(255),age INT
);
创建两个脚本测试插入随机数据
#!/bin/bashvip_my="192.168.44.100"while true
do# 生成一个随机数作为 age 字段的值age=$(shuf -i 1-100 -n 1)# 生成一个随机字符串作为 home 和 love 字段的值,长度为 10home=$(cat /dev/urandom | tr -dc 'a-zA-Z0-9' | fold -w 10 | head -n 1)love=$(cat /dev/urandom | tr -dc 'a-zA-Z0-9' | fold -w 10 | head -n 1)# 检查是否已经存在相同的 home 和 love 值result=$(mysql -h ${vip_my} -u test_user -pzzz-123-ZZZ -e "SELECT COUNT(*) FROM test.table1 WHERE home='$home' AND love='$love';" -s)# 如果不存在相同的值,则插入新的记录if [ "$result" -eq 0 ]; thenmysql -h${vip_my} -u test_user -pzzz-123-ZZZ -e "INSERT INTO test.table1 (home, love, age) VALUES ('$home', '$love', $age);"fisleep 1  # 暂停 1 秒
done#!/bin/bashvip_my="192.168.44.100"while true
do# 生成一个随机数作为 id 字段的值,因为table2的id未设置自增长id=$(shuf -i 1-100000 -n 1)# 生成一个随机字符串作为 home 和 love 字段的值,长度为 10home=$(cat /dev/urandom | tr -dc 'a-zA-Z0-9' | fold -w 10 | head -n 1)love=$(cat /dev/urandom | tr -dc 'a-zA-Z0-9' | fold -w 10 | head -n 1)# 生成一个随机数作为 age 字段的值age=$(shuf -i 1-100 -n 1)# 插入数据到 table2 表mysql -h${vip_my} -u test_user -pzzz-123-ZZZ -e "INSERT INTO test.table2 (id, home, love, age) VALUES ($id, '$home', '$love', $age);"sleep 1 # 暂停 1 秒
done相关文章:

mysql主主架构搭建,删库恢复
mysql主主架构搭建,删库恢复 搭建mysql主主架构环境信息安装msql服务mysql1mysql2设置mysql2同步mysql1设置mysql1同步mysql2授权测试用账户 安装配置keepalivedmysql1检查脚本mysql2检查脚本 备份策略mysqldump全量备份mysqldump增量备份数据库目录全量备份 删除my…...

pythonweek1
引言 做任何事情都要脚踏实地,虽然大一上已经学习了python的基础语法,大一下也学习了C加加中的类与对象,但是自我觉得基础还不太扎实,又害怕有什么遗漏,所以就花时间重新学习了python的基础,学习Python的基…...
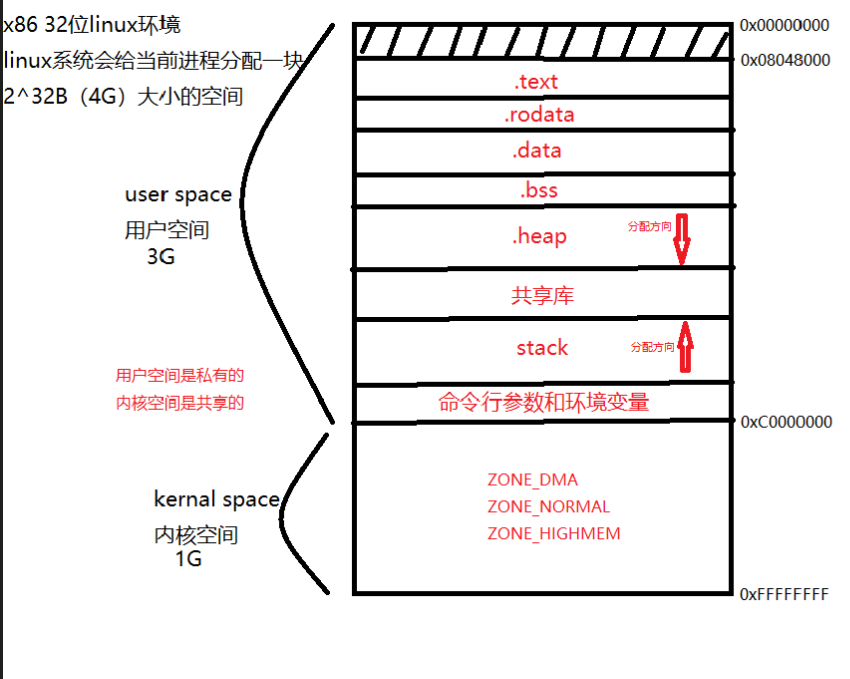
进程虚拟地址空间区域划分
目录 图示 详解 代码段 备注:x86 32位linux环境下,进程虚拟地址空间区域划分 图示 详解 用户空间 用于存储用户进程代码和数据,只能由用户进程访问 内核空间 用于存储操作系统内核代码和数据,只能由操作系统内核访问 text t…...

OpenAI Code Interpreter 的开源实现:GPT Code UI
本篇文章聊聊 OpenAI Code Interpreter 的一众开源实现方案中,获得较多支持者,但暂时还比较早期的项目:GPT Code UI。 写在前面 这篇文章本该更早的时候发布,但是 LLaMA2 发布后实在心痒难忍,于是就拖了一阵。结合 L…...

macOS Ventura 13.5 (22G74) 正式版发布,ISO、IPSW、PKG 下载
macOS Ventura 13.5 (22G74) 正式版发布,ISO、IPSW、PKG 下载 本站下载的 macOS Ventura 软件包,既可以拖拽到 Applications(应用程序)下直接安装,也可以制作启动 U 盘安装,或者在虚拟机中启动安装。另外也…...

Electron 主进程和渲染进程传值及窗口间传值
1 渲染进程调用主进程得方法 下面是渲染进程得代码: let { ipcRenderer} require( electron ); ipcRenderer.send( xxx ); //渲染进程中调用 下面是主进程得代码: var { ipcMain } require( electron ); ipcMain.on("xxx",function () { } )...

C#设计模式之---建造者模式
建造者模式(Builder Pattern) 建造者模式(Builder Pattern)是将一个复杂对象的构建与它的表示分离,使得同样的构建过程可以创建不同的表示。建造者模式使得建造代码与表示代码的分离,可以使客户端不必知道…...

output delay 约束
output delay 约束 一、output delay约束概述二、output delay约束系统同步三、output delay约束源同步 一、output delay约束概述 特别注意:在源同步接口中,定义接口约束之前,需要用create_generated_clock 先定义送出的随路时钟。 二、out…...
html2Canvas+jsPDF 下载PDF 遇到跨域的对象存储的图片无法显示
一、问题原因 对象存储的域名和你网址的域名不一样,此时用Canvas相关插件 将DOM元素转化为PDF,就会出现跨域错误。 二、解决办法 两步 1. 图片元素上设置属性 crossorigin"anonymous" 支持原生img和eleme组件 2. 存储桶设置资源跨域访问…...

【C#】并行编程实战:异步流
本来这章该讲的是 ASP .NET Core 中的 IIS 和 Kestrel ,但是我看了下这个是给服务器用的。而我只是个 Unity 客户端程序,对于服务器的了解趋近于零。 鉴于我对服务器知识和需求的匮乏,这里就不讲原书(大部分)内容了。本…...

在家下载论文使用哪些论文下载工具比较好
在家下载论文如果不借助论文下载工具是非常艰难的事情,因为很多查找下载论文的数据库都是需要账号权限才可使用的。 例如,我们查找中文论文常用的知网、万方等数据库以及众多国外论文数据库。 在家下载知网、万方数据库论文可用下面的方法:…...

【LeetCode 算法】Handling Sum Queries After Update 更新数组后处理求和查询-Segment Tree
文章目录 Handling Sum Queries After Update 更新数组后处理求和查询问题描述:分析代码线段树 Tag Handling Sum Queries After Update 更新数组后处理求和查询 问题描述: 给你两个下标从 0 开始的数组 n u m s 1 和 n u m s 2 nums1 和 nums2 nums1…...

基于Linux操作系统中的MySQL数据库SQL语句(三十一)
MySQL数据库SQL语句 目录 一、SQL语句类型 1、DDL 2、DML 3、DCL 4、DQL 二、数据库操作 1、查看 2、创建 2.1、默认字符集 2.2、指定字符集 3、进入 4、删除 5、更改 6、练习 三、数据表操作 (一)数据类型 1、数值类型 1.1、TINYINT …...
)
【Matlab】基于BP神经网络的数据回归预测新数据(Excel可直接替换数据)
【Matlab】基于BP神经网络的数据回归预测新数据(Excel可直接替换数据) 1.模型原理2.数学公式3.文件结构4.Excel数据5.分块代码5.1 main.m5.2 NewData.m6.完整代码6.1 main.m6.2 NewData.m7.运行结果1.模型原理 基于BP神经网络的数据回归预测是一种常见的机器学习方法,用于处…...

HTTPS连接过程中的中间人攻击
HTTPS连接过程中的中间人攻击 HTTPS连接过程中间人劫持攻击 HTTPS连接过程 https协议就是httpssl/tls协议,如下图所示为其连接过程: HTTPS连接的整个工程如下: https请求:客户端向服务端发送https请求;生成公钥和私…...
redis启动失败,oO0OoO0OoO0Oo Redis is starting oO0OoO0OoO0Oo
在redis文件夹下,启动redis正常。 但是加入到system后启动redis失败。 一直处于starting状态。 对比正常redis服务的配置之后,把redis.conf里的守护进程关掉就可以了(但是没用system管理之前,直接./redis.server启动是可以的&…...
milvus: 专为向量查询与检索设计的向量数据库
1. 什么是milvus? milvus docs milvus release Milvus的目标是:store, index, and manage massive embedding vectors generated by deep neural networks and other machine learning (ML) models. Milvus 向量数据库专为向量查询与检索设计…...

【C# 数据结构】Heap 堆
【C# 数据结构】Heap 堆 先看看C#中有那些常用的结构堆的介绍完全二叉树最大堆 Heap对类进行排序实现 IComparable<T> 接口 对CompareTo的一点解释 参考资料 先看看C#中有那些常用的结构 作为 数据结构系类文章 的开篇文章,我们先了解一下C# 有哪些常用的数据…...

智慧园区楼宇合集:数字孪生管控系统
智慧园区是指将物联网、大数据、人工智能等技术应用于传统建筑和基础设施,以实现对园区的全面监控、管理和服务的一种建筑形态。通过将园区内设备、设施和系统联网,实现数据的传输、共享和响应,提高园区的管理效率和运营效益,为居…...
Ajax 黑马学习
Ajax 资源 数据是服务器对外提供的资源,通过 请求 - 处理 - 响应方式获取 请求服务器数据, 用到 XMLHttpRequest 对象 XMLHttpRequest 是浏览器提供的js成员, 通过它可以请求服务器上的数据资源 let xmlHttpRequest new XMLHttpRequest(); 请求方式 : get向服务器获取数据…...

如何通过Onekey技术解决Steam资源仓库的高效同步与版本控制难题
如何通过Onekey技术解决Steam资源仓库的高效同步与版本控制难题 【免费下载链接】Onekey Onekey Steam Depot Manifest Downloader 项目地址: https://gitcode.com/gh_mirrors/one/Onekey 问题:Steam资源管理的核心矛盾与行业痛点 在数字内容分发领域&#…...

解决IDE性能瓶颈与代码补全效率问题:TabNine AI引擎架构优化与生产环境部署实践
解决IDE性能瓶颈与代码补全效率问题:TabNine AI引擎架构优化与生产环境部署实践 【免费下载链接】TabNine AI Code Completions 项目地址: https://gitcode.com/gh_mirrors/ta/TabNine TabNine是一款基于人工智能的全语言代码自动补全工具,通过深…...

AI辅助开发:探索快马AI生成智能命令提示与分析的下一代终端工具
今天想和大家分享一个有趣的开发实践:如何用前端技术模拟实现一个具备AI辅助功能的智能命令行终端Web应用。这个项目的灵感来源于日常开发中频繁使用终端工具时遇到的痛点,比如记不住复杂命令、报错信息难以理解等问题。 基础终端界面搭建 首先需要创建一…...

BaiduNetdiskPlugin-macOS:解决百度网盘下载速度限制的实用优化方案
BaiduNetdiskPlugin-macOS:解决百度网盘下载速度限制的实用优化方案 【免费下载链接】BaiduNetdiskPlugin-macOS For macOS.百度网盘 破解SVIP、下载速度限制~ 项目地址: https://gitcode.com/gh_mirrors/ba/BaiduNetdiskPlugin-macOS 在macOS环境下使用百度…...

Cadence计算器实战:从波形运算到自定义函数编程
1. 差分信号处理的核心挑战 在模拟电路设计中,差分信号的处理一直是工程师们面临的常见难题。我刚入行时,第一次看到差分信号的波形图完全懵了——两条看似镜像对称的曲线,到底该怎么计算它们的共模电压、差模电压这些关键参数?传…...

AI服务的可观测性与运维
AI服务的可观测性与运维 当 AI 服务从开发环境走向生产,可观测性(Observability)成为运维的基石。传统的监控(CPU、内存、请求量)已不足以应对 AI 系统的复杂性,我们需要深入追踪 每个 AI 交互的细节&#…...

5分钟解锁百度网盘SVIP下载特权:Mac用户的终极加速指南
5分钟解锁百度网盘SVIP下载特权:Mac用户的终极加速指南 【免费下载链接】BaiduNetdiskPlugin-macOS For macOS.百度网盘 破解SVIP、下载速度限制~ 项目地址: https://gitcode.com/gh_mirrors/ba/BaiduNetdiskPlugin-macOS 你是否曾为百度网盘在Mac上的龟速下…...

3步解锁百度网盘SVIP特权:macOS用户必备的高速下载解决方案
3步解锁百度网盘SVIP特权:macOS用户必备的高速下载解决方案 【免费下载链接】BaiduNetdiskPlugin-macOS For macOS.百度网盘 破解SVIP、下载速度限制~ 项目地址: https://gitcode.com/gh_mirrors/ba/BaiduNetdiskPlugin-macOS 还在为百度网盘Mac客户端的龟速…...
)
别再死磕localhost了!Dify连接MySQL报错1130?手把手教你搞定IP授权(附MySQL 8.0+命令)
别再死磕localhost了!Dify连接MySQL报错1130?手把手教你搞定IP授权(附MySQL 8.0命令) 当你在Dify中尝试将LLM生成的数据导入本地MySQL数据库时,可能会遇到一个令人头疼的错误:pymysql.err.OperationalError…...

Instructions终极指南:5个简单步骤创建你的第一个iOS引导标记
Instructions终极指南:5个简单步骤创建你的第一个iOS引导标记 【免费下载链接】Instructions Create walkthroughs and guided tours (coach marks) in a simple way, with Swift. 项目地址: https://gitcode.com/gh_mirrors/in/Instructions Instructions是…...