Reinforcement Learning with Code 【Code 2. Tabular Sarsa】
Reinforcement Learning with Code 【Code 2. Tabular Sarsa】
This note records how the author begin to learn RL. Both theoretical understanding and code practice are presented. Many material are referenced such as ZhaoShiyu’s Mathematical Foundation of Reinforcement Learning.
This code refers to Mofan’s reinforcement learning course.
文章目录
- Reinforcement Learning with Code 【Code 2. Tabular Sarsa】
- 2.1 Problem and result
- 2.2 Environment
- 2.3 Tabular Sarsa Algorithm
- 2.4 Run this main
- 2.5 Check the Q table
- Reference
2.1 Problem and result
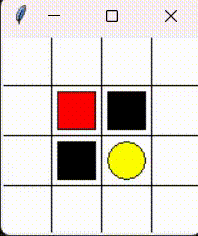
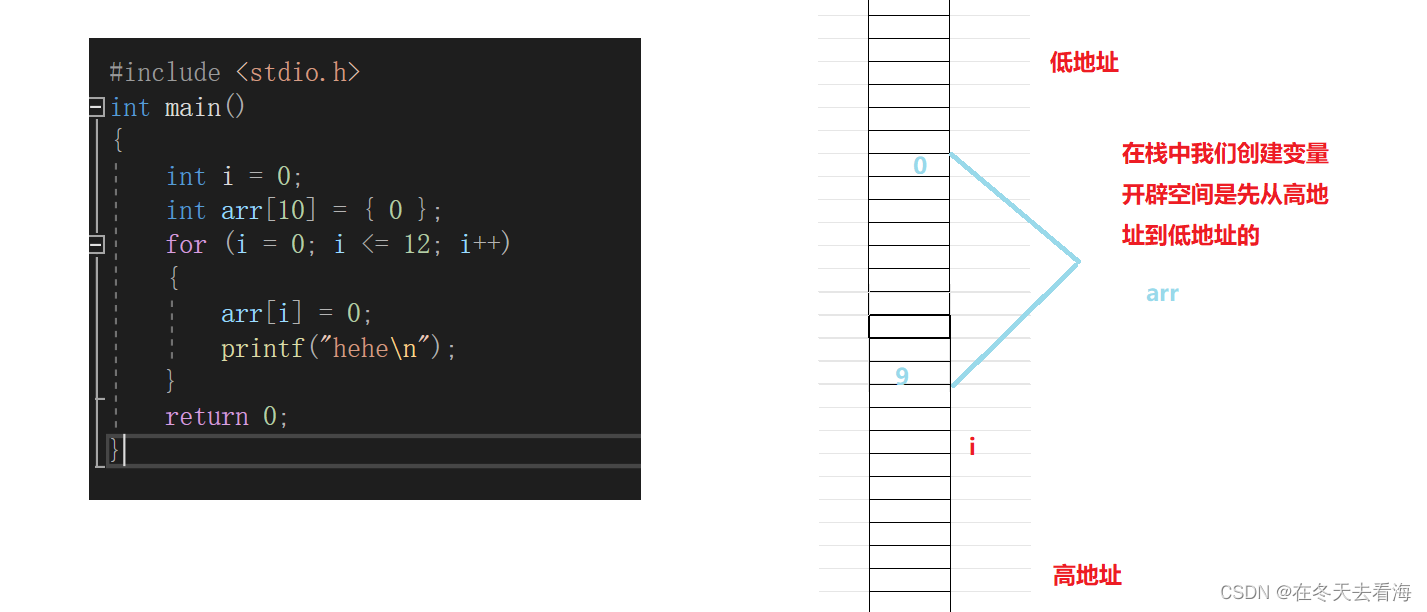
Please consider the problem that a little mouse (denoted by red block) wants to avoid trap (denoted by black block) to get the cheese (denoted by yellow circle). As the figure shows.
This chapter aims to realize tabular Sarsa algorithm sovle this problem.
2.2 Environment
We use the tkinter package of python to build our environment to interact with agent.
import numpy as np
import time
import sys
import tkinter as tk
# if sys.version_info.major == 2: # 检查python版本是否是python2
#     import Tkinter as tk
# else:
#     import tkinter as tkUNIT = 40   # pixels
MAZE_H = 4  # grid height
MAZE_W = 4  # grid widthclass Maze(tk.Tk, object):def __init__(self):super(Maze, self).__init__()# Action Spaceself.action_space = ['up', 'down', 'right', 'left'] # action space self.n_actions = len(self.action_space)# 绘制GUIself.title('Maze env')self.geometry('{0}x{1}'.format(MAZE_W * UNIT, MAZE_H * UNIT))   # 指定窗口大小 "width x height"self._build_maze()def _build_maze(self):self.canvas = tk.Canvas(self, bg='white',height=MAZE_H * UNIT,width=MAZE_W * UNIT)     # 创建背景画布# create gridsfor c in range(UNIT, MAZE_W * UNIT, UNIT): # 绘制列分隔线x0, y0, x1, y1 = c, 0, c, MAZE_H * UNITself.canvas.create_line(x0, y0, x1, y1)for r in range(UNIT, MAZE_H * UNIT, UNIT): # 绘制行分隔线x0, y0, x1, y1 = 0, r, MAZE_W * UNIT, rself.canvas.create_line(x0, y0, x1, y1)# create origin 第一个方格的中心,origin = np.array([UNIT/2, UNIT/2]) # hell1hell1_center = origin + np.array([UNIT * 2, UNIT])self.hell1 = self.canvas.create_rectangle(hell1_center[0] - (UNIT/2 - 5), hell1_center[1] - (UNIT/2 - 5),hell1_center[0] + (UNIT/2 - 5), hell1_center[1] + (UNIT/2 - 5),fill='black')# hell2hell2_center = origin + np.array([UNIT, UNIT * 2])self.hell2 = self.canvas.create_rectangle(hell2_center[0] - (UNIT/2 - 5), hell2_center[1] - (UNIT/2 - 5),hell2_center[0] + (UNIT/2 - 5), hell2_center[1] + (UNIT/2 - 5),fill='black')# create oval 绘制终点圆形oval_center = origin + np.array([UNIT*2, UNIT*2])self.oval = self.canvas.create_oval(oval_center[0] - (UNIT/2 - 5), oval_center[1] - (UNIT/2 - 5),oval_center[0] + (UNIT/2 - 5), oval_center[1] + (UNIT/2 - 5),fill='yellow')# create red rect 绘制agent红色方块,初始在方格左上角self.rect = self.canvas.create_rectangle(origin[0] - (UNIT/2 - 5), origin[1] - (UNIT/2 - 5),origin[0] + (UNIT/2 - 5), origin[1] + (UNIT/2 - 5),fill='red')# pack all 显示所有canvasself.canvas.pack()def get_state(self, rect):# convert the coordinate observation to state tuple# use the uniformed center as the state such as # |(1,1)|(2,1)|(3,1)|...# |(1,2)|(2,2)|(3,2)|...# |(1,3)|(2,3)|(3,3)|...# |....x0,y0,x1,y1 = self.canvas.coords(rect)x_center = (x0+x1)/2y_center = (y0+y1)/2state = ((x_center-(UNIT/2))/UNIT + 1, (y_center-(UNIT/2))/UNIT + 1)return statedef reset(self):self.update()self.after(500) # delay 500msself.canvas.delete(self.rect)   # delete origin rectangleorigin = np.array([UNIT/2, UNIT/2])self.rect = self.canvas.create_rectangle(origin[0] - (UNIT/2 - 5), origin[1] - (UNIT/2 - 5),origin[0] + (UNIT/2 - 5), origin[1] + (UNIT/2 - 5),fill='red')# return observation return self.get_state(self.rect)   def step(self, action):# agent和环境进行一次交互s = self.get_state(self.rect)   # 获得智能体的坐标base_action = np.array([0, 0])reach_boundary = Falseif action == self.action_space[0]:   # upif s[1] > 1:base_action[1] -= UNITelse: # 触碰到边界reward=-1并停留在原地reach_boundary = Trueelif action == self.action_space[1]:   # downif s[1] < MAZE_H:base_action[1] += UNITelse:reach_boundary = True   elif action == self.action_space[2]:   # rightif s[0] < MAZE_W:base_action[0] += UNITelse:reach_boundary = Trueelif action == self.action_space[3]:   # leftif s[0] > 1:base_action[0] -= UNITelse:reach_boundary = Trueself.canvas.move(self.rect, base_action[0], base_action[1])  # move agents_ = self.get_state(self.rect)  # next state# reward functionif s_ == self.get_state(self.oval):     # reach the terminalreward = 1done = Trues_ = 'success'elif s_ == self.get_state(self.hell1): # reach the blockreward = -1s_ = 'block_1'done = Falseelif s_ == self.get_state(self.hell2):reward = -1s_ = 'block_2'done = Falseelse:reward = 0done = Falseif reach_boundary:reward = -1return s_, reward, donedef render(self):time.sleep(0.15)self.update()if __name__ == '__main__':def test():for t in range(10):s = env.reset()print(s)while True:env.render()a = 'right's, r, done = env.step(a)print(s)if done:breakenv = Maze()env.after(100, test)      # 在延迟100ms后调用函数testenv.mainloop()
This part is important that the reward function design is include, which is as follows
reward = { 1 , if reach the cheese − 1 , if reach the trap or reach the boundary 0 , others \text{reward} = \left \{ \begin{aligned} & 1, \quad \text{if reach the cheese} \\ & -1, \quad \text{if reach the trap or reach the boundary} \\ & 0, \quad \text{others} \end{aligned} \right. reward=⎩ ⎨ ⎧1,if reach the cheese−1,if reach the trap or reach the boundary0,others
We need to explan some function of the class Maze.
- First, the function
_build_mazecreates the inital maze location.
In this example we use the left up coordination of each grid as the state of each block. - Second, the function
get_stateconverts the coordination of each grid to numerical representation such as ( 1 , 1 ) , ( 1 , 2 ) , ⋯ (1,1),(1,2),\cdots (1,1),(1,2),⋯. - Third, the function
resetrenew the state which means placing the mouse in the original grid. - Then, the function
stepwe let the agent interact with envrionment for one step, ang get the reward after the action. - Then, the function
rendercontrols updating the window.
2.3 Tabular Sarsa Algorithm
import numpy as np
import pandas as pdclass RL():def __init__(self, actions, learning_rate=0.01, reward_decay=0.9, e_greedy=0.9):self.actions = actions  # action listself.lr = learning_rateself.gamma = reward_decayself.epsilon = e_greedy # epsilon greedy update policyself.q_table = pd.DataFrame(columns=self.actions, dtype=np.float64)def check_state_exist(self, state):if state not in self.q_table.index:# append new state to q table, use the coordinate as the observation# self.q_table = self.q_table.append(       # DataFrame.append is invalid#     pd.Series(#         [0]*len(self.actions),#         index=self.q_table.columns,#         name=state,#     )# )self.q_table = pd.concat([self.q_table,pd.DataFrame(data=np.zeros((1,len(self.actions))),columns = self.q_table.columns,index = [state])])def choose_action(self, observation):"""Use the epsilon-greedy method to update policy"""self.check_state_exist(observation)# action selection# epsilon greedy algorithmif np.random.uniform() < self.epsilon:state_action = self.q_table.loc[observation, :]# some actions may have the same value, randomly choose on in these actions# state_action == np.max(state_action) generate bool mask# choose best actionaction = np.random.choice(state_action[state_action == np.max(state_action)].index)else:# choose random actionaction = np.random.choice(self.actions)return actiondef learn(self, s, a, r, s_):passclass SarsaTable(RL):"""Implement Sarsa algorithm which is on-policy"""def __init__(self, actions, learning_rate=0.01, reward_decay=0.9, e_greedy=0.9):super(SarsaTable,self).__init__(actions, learning_rate, reward_decay, e_greedy)def learn(self, s, a, r, s_, a_):self.check_state_exist(s_)q_predict = self.q_table.loc[s, a]if s_ != 'success' :q_target = r + self.gamma * self.q_table.loc[s_, a_]  # next state is not terminalelse:q_target = r  # next state is terminalself.q_table.loc[s, a] += self.lr * (q_target - q_predict)  # update
We store the Q-table as a DataFrame of pandas. The explanation of the functions are as follows.
- First, the function
check_state_existcheck the existence of one state, if not we append it to the Q-table. This is because once the state-action pair is visited, then we update it into the Q-table. - Second, the function
choose_actionis following the ϵ \epsilon ϵ-greedy algorithm
π ( a ∣ s ) = { 1 − ϵ ∣ A ( s ) ∣ ( ∣ A ( s ) ∣ − 1 ) , for the geedy action ϵ ∣ A ( s ) ∣ , for the other ∣ A ( s ) ∣ − 1 actions \pi(a|s) = \left \{ \begin{aligned} 1 - \frac{\epsilon}{|\mathcal{A}(s)|}(|\mathcal{A(s)}|-1), & \quad \text{for the geedy action} \\ \frac{\epsilon}{|\mathcal{A}(s)|}, & \quad \text{for the other } |\mathcal{A}(s)|-1 \text{ actions} \end{aligned} \right. π(a∣s)=⎩ ⎨ ⎧1−∣A(s)∣ϵ(∣A(s)∣−1),∣A(s)∣ϵ,for the geedy actionfor the other ∣A(s)∣−1 actions
- Third, the function
learnis update the q value as Q-learning algorithm purposed, which relays on the sample ( s t , a t , r t + 1 , s t + 1 , a t + 1 ) \textcolor{red}{(s_t,a_t,r_{t+1},s_{t+1},a_{t+1})} (st,at,rt+1,st+1,at+1). The sample denotes current state, current action, immediate reward, next state and next action respectively.
Sarsa : { q t + 1 ( s t , a t ) = q t ( s t , a t ) − α t ( s t , a t ) [ q t ( s t , a t ) − ( r t + 1 + γ q t ( s t + 1 , a t + 1 ) ) ] q t + 1 ( s , a ) = q t ( s , a ) , for all ( s , a ) ≠ ( s t , a t ) \text{Sarsa} : \left \{ \begin{aligned} \textcolor{red}{q_{t+1}(s_t,a_t)} & \textcolor{red}{= q_t(s_t,a_t) - \alpha_t(s_t,a_t) \Big[q_t(s_t,a_t) - (r_{t+1}+ \gamma \ q_t(s_{t+1},a_{t+1})) \Big]} \\ \textcolor{red}{q_{t+1}(s,a)} & \textcolor{red}{= q_t(s,a)}, \quad \text{for all } (s,a) \ne (s_t,a_t) \end{aligned} \right. Sarsa:⎩ ⎨ ⎧qt+1(st,at)qt+1(s,a)=qt(st,at)−αt(st,at)[qt(st,at)−(rt+1+γ qt(st+1,at+1))]=qt(s,a),for all (s,a)=(st,at)
2.4 Run this main
Run this main script that we can run the all codes.
from maze_env_custom import Maze
from RL_brain import SarsaTableMAX_EPISODE = 30def update():for episode in range(MAX_EPISODE):# initial observation, observation is the rect's coordiante# observation is [x0,y0, x1,y1]observation = env.reset()   # RL choose action based on observation ['up', 'down', 'right', 'left']action = RL.choose_action(str(observation))while True:# fresh envenv.render()# RL take action and get next observation and rewardobservation_, reward, done = env.step(action)action_ = RL.choose_action(str(observation_))# RL learn from this transitionRL.learn(str(observation), action, reward, str(observation_), action_)# swap observationobservation = observation_action = action_# break while loop when end of this episodeif done:break# show q_tableprint(RL.q_table)print('\n')# end of gameprint('game over')env.destroy()if __name__ == "__main__":env = Maze()RL = SarsaTable(env.action_space)env.after(100, update)env.mainloop()
2.5 Check the Q table
After a long run we can check the q-table to judge wheter the learning is reasonable. The q-table is as follows:
                      up      down     right          left
(1.0, 1.0) -6.837352e-02 -0.000135 -0.000266 -2.970185e-02
(2.0, 1.0) -4.901299e-02 -0.000334 -0.000484 -6.039572e-04
(2.0, 2.0) -3.988164e-04 -0.049010 -0.038785 -2.737623e-04
block_1     0.000000e+00  0.049010  0.000000  0.000000e+00
(4.0, 2.0) -2.646359e-04  0.001314 -0.019900 -1.000000e-02
(4.0, 1.0) -4.900994e-02  0.000014 -0.010000 -3.128178e-06
(3.0, 1.0) -2.970450e-02 -0.029433 -0.000516 -2.078845e-04
(1.0, 2.0) -4.933690e-04 -0.000374 -0.000951 -3.940947e-02
block_2    -1.979099e-07  0.000000  0.010000 -1.531800e-07
(1.0, 3.0) -3.525635e-04 -0.000056 -0.010000 -3.940439e-02
(1.0, 4.0) -7.194310e-07 -0.010000  0.000591 -1.990000e-02
(2.0, 4.0) -1.000000e-02 -0.019900  0.012381  0.000000e+00
(3.0, 4.0)  1.654862e-01  0.000000  0.000000  0.000000e+00
(4.0, 4.0)  0.000000e+00  0.000000 -0.010000  0.000000e+00
(4.0, 3.0)  0.000000e+00  0.000000  0.000000  5.851985e-02
success     0.000000e+00  0.000000  0.000000  0.000000e+00
For example, when at the original place if the mouse wants to move up or move left it will reach the boundary and get reward − 1 -1 −1. Hence the state value in q-table is minus.
Reference
赵世钰老师的课程
莫烦ReinforcementLearning course
相关文章:
Reinforcement Learning with Code 【Code 2. Tabular Sarsa】
Reinforcement Learning with Code 【Code 2. Tabular Sarsa】 This note records how the author begin to learn RL. Both theoretical understanding and code practice are presented. Many material are referenced such as ZhaoShiyu’s Mathematical Foundation of Rei…...
服务调用---------Ribbon和Feign
目录 1、Ribbon 1.1 Ribbon简介 1.2 Ribbon负载均衡 负载均衡原理 负载均衡策略 Ribbon和Nginx的区别 1.3 服务调用和Ribbon负载均衡实现 2、Feign&openFeign 3、Feign支持的配置 日志功能 连接池 feign-api远程包 1、Ribbon 1.1 Ribbon简介 Ribb…...

app自动化测试之Appium问题分析及定位
使用 Appium 进行测试时,会产生大量日志,一旦运行过程中遇到报错,可以通过 Appium 服务端的日志以及客户端的日志分析排查问题。 Appium Server日志-开启服务 通过命令行的方式启动 Appium Server,下面来分析一下启动日志&#…...

婚庆服务小程序app开发方案详解
开发一款婚庆行业服务小程序有哪些功能呢? 1、选择分类 选择婚庆、婚车、婚宴、司仪、彩妆、婚庆用品、跟拍、摄影等,筛选出对应的商家 2、选择商家 选择分类后,可以选择商家,查看各个商家的详细介绍情况。 3、选择服务套餐 各…...
集合简述
集合ListArrayListLinkedList SetHashSetTreeSet MapHashMapTreeMap 集合与数组的区别 集合 集合是java中的一个容器,可以在里面存放数据,容量可以发生改变 从集合框架结构可以分析得知: 1、集合主要分为Collection和Map两个接口 2、Collecti…...

常见的软件测试面试题汇总
一、 你们的测试流程是怎么样的? 答:1.项目开始阶段,BA(需求分析师)从用户方收集需求并将需求转化为规格说明书,接 下来在项目组领导会组织需求评审。 2.需求评审通过后,BA 会组织项目经理…...

学习笔记|大模型优质Prompt开发与应用课(二)|第二节:超高产文本生成机,传媒营销人必备神器
文章目录 01 文字写作技能的革新,各行各业新机遇四大类常见文字工作新闻记者的一天新闻记者的一天–写策划prompt 新闻记者的一天–排采访prompt生成结果prompt生成结果 大模型加持,文字写作我们如何提效营销创作营销创作-使用预置法为不同平台生成文案p…...

Linux基础-4
1、linux高阶命令 1.1、find 在linux文件系统中,用来查找一个文件放在哪里了。 //举例 find /etc -name "interfaces" //总结: //(1)什么时候用find? //当你知道你要找的文件名,但是你忘记了它被放在哪个目录下&…...

oracle-创建函数
oracle自定义函数 核心提示:函数用于返回特定数据。执行时得找一个变量接收函数的返回值; 语法如下: create or replace function function_name ( argu1 [mode1]datatype1, argu2 [mode2] datatype2, … ) return datatype is begin end; 执行 var v1 varchar2(1…...
【Ansible 的脚本 --- playbook 剧本】
目录 一、playbook 剧本介绍二、示例1、运行playbook2、定义、引用变量 三、使用playbook部署lnmp集群 一、playbook 剧本介绍 playbooks 本身由以下各部分组成 (1)Tasks:任务,即通过 task 调用 ansible 的模板将多个操作组织在…...

ubuntu释放缓存
sudo sysctl vm.drop_caches1 sudo sysctl vm.drop_caches2 sudo sysctl vm.drop_caches3释放页面缓存: $ sudo sysctl vm.drop_caches1释放目录项和索引节点缓存: $ sudo sysctl vm.drop_caches2释放页面缓存、目录项和索引节点缓存: $ sudo…...
实用调试技巧(1)
什么是bug?调试是什么?有多重要?debug和release的介绍。windows环境调试介绍。一些调试的实例。如何写出好(易于调试)的代码。编程常见的错误。 什么是Bug 我们在写代码的时候遇到的一些问题而导致程序出问题的就是Bu…...
uniapp:H5定位当前省市区街道信息
高德地图api,H5定位省市区街道信息。 由于uniapp的uni.getLocation在H5不能获取到省市区街道信息,所以这里使用高德的逆地理编码接口地址接口,通过传key和当前经纬度,获取到省市区街道数据。 这里需要注意的是:**高德…...
-[提示模板:部分填充的提示模板和提示合成])
自然语言处理从入门到应用——LangChain:提示(Prompts)-[提示模板:部分填充的提示模板和提示合成]
分类目录:《自然语言处理从入门到应用》总目录 部分填充的提示模板 提示模板是一个具有.format方法的类,它接受一个键值映射并返回一个字符串(一个提示),以传递给语言模型。与其他方法一样,将提示模板进行…...
论文笔记--GloVe: Global Vectors for Word Representation
论文笔记--GloVe: Global Vectors for Word Representation 1. 文章简介2. 文章概括3 文章重点技术3.1 两种常用的单词向量训练方法3.2 GloVe3.3 模型的复杂度 4. 文章亮点5. 原文传送门6. References 1. 文章简介 标题:GloVe: Global Vectors for Word Representa…...
day57|● 647. 回文子串 ● 516.最长回文子序列
647. 回文子串 https://leetcode.cn/problems/palindromic-substrings/solution/by-lfool-2mvg/ Given a string s, return the number of palindromic substrings in it. A string is a palindrome when it reads the same backward as forward. A substring is a contiguous…...

docker compose.yml学习
docker compose 安装docker-compose sudo curl -L "https://github.com/docker/compose/releases/download/v2.2.2/docker-compose-$(uname -s)-$(uname -m)" -o /usr/local/bin/docker-composechmod x /usr/local/bin/docker-composeln -s /usr/local/bin/docker-…...

【业务功能篇55】Springboot+easyPOI 导入导出
Apache POI是Apache软件基金会的开源项目,POI提供API给Java程序对Microsoft Office格式档案读和写的功能。 Apache POI 代码实现复杂,学习成本较高。 Easypoi 功能如同名字easy,主打的功能就是容易,让一个没见接触过poi的人员 就可以方便的写出Excel导出…...
对顶堆算法
对顶堆可以动态维护一个序列上的第k大的数,由一个大根堆和一个小根堆组成, 小根堆维护前k大的数(包含第k个)大根堆维护比第k个数小的数 [CSP-J2020] 直播获奖 题目描述 NOI2130 即将举行。为了增加观赏性,CCF 决定逐一评出每个选手的成绩&a…...

node.js的优点
提示:node.js的优点 文章目录 一、什么是node.js二、node.js的特性 一、什么是node.js 提示:什么是node.js? Node.js发布于2009年5月,由Ryan Dahl开发,是一个基于ChromeV8引擎的JavaScript运行环境,使用了一个事件驱…...

保姆级教程:用iSYSTEM winIDEA和iC5000给S32K148烧录程序,附完整配置流程
从零掌握iSYSTEM工具链:S32K148开发板烧录与调试全流程实战第一次接触iSYSTEM的winIDEA和iC5000仿真器时,很多嵌入式开发者都会感到无从下手。不同于常见的开源工具链,这套专业级开发环境在汽车电子和工业控制领域有着广泛应用,尤…...

AI智能体架构设计:从成本黑洞到价值引擎的解耦之道
1. 从成本黑洞到价值引擎:为什么你的AI智能体架构正在吞噬预算又到了季度技术复盘会,财务那边递过来的云账单和工程人力成本,是不是又让你倒吸一口凉气?你看着报表上那个名为“AI智能体平台”的项目,它的资源消耗曲线几…...

Blender渲染通道完全指南:如何像电影后期一样,分离出深度、阴影与反射图
Blender渲染通道完全指南:影视级后期制作的深度解析在数字内容创作领域,Blender已经从一个简单的3D建模工具成长为能够处理复杂视觉特效的全流程解决方案。对于追求影视级质量的中高级用户而言,掌握渲染通道技术是提升作品专业度的关键一步。…...

【DeepSeek测试用例生成实战指南】:20年QA专家亲授5大高覆盖率生成模式与3个避坑红线
更多请点击: https://codechina.net 第一章:DeepSeek测试用例生成的核心价值与适用边界 DeepSeek系列大模型在代码理解与生成任务中展现出显著的上下文建模能力,其测试用例生成功能并非通用“黑盒测试器”,而是聚焦于**单元级、函…...

组态王通用扫码枪配置
使用组态王扫码枪驱动,是绑定变量,扫码后直接就可以显示扫码内容。解决每次扫码输入数据时必须先用鼠标点进输入框内的问题。驱动安装先添加驱动,亚控网站的文件为 barcodescanner,这个文件是组态王通用扫码枪的驱动,但…...

航空航天为什么离不开高强镁合金?国产替代到哪一步了
飞机每减重一千克,全年大约节省四千两百美元的燃油费用——这是航空工程师熟悉的经验值。在商业航空领域,这个数字还只是财务账;在战斗机、导弹和卫星的世界里,减重的收益被换算成更远的航程、更大的载荷、更高的机动性࿰…...

电容损坏深度诊断,从外观到 ESR精准区分容衰与漏电
在 PCB 故障中,电容损坏占比超 40%,是当之无愧的 “头号杀手”。很多工程师仅靠 “鼓包漏液” 判断电容好坏,殊不知80% 的电容损坏是隐性的—— 外观平整但容值衰减、ESR 升高、轻微漏电,导致供电不稳、系统重启、噪声增大&#x…...

AI学习 - 大模型基础入门
AI学习 - 大模型基础入门 从零开始:Ollama 安装 → 本地模型运行 → Python 代码接入 → 理解核心概念 摘要 本文记录了在 Windows 上使用 Ollama 部署本地大模型、并通过 Python 代码接入调用的完整过程。内容涵盖:Ollama 安装与模型拉取、大模型基础概…...

在Hermes Agent项目中接入Taotoken作为自定义模型供应商
🚀 告别海外账号与网络限制!稳定直连全球优质大模型,限时半价接入中。 👉 点击领取海量免费额度 在Hermes Agent项目中接入Taotoken作为自定义模型供应商 基础教程类,针对使用Hermes Agent框架的开发者,详…...

解决方法:庐山派K230接串口没识别到端口问题
一、插入usb转串口工具之前二、插入usb转串口工具之后三、解决方法说明:🔍 核心原因:USB Serial 设备,没有被识别为 COM 口你现在看到的 USB Serial,说明开发板已经正常启动了,USB 也被电脑识别到了&#x…...