linux环境搭建私有gitlab仓库
搭建之前,需要安装相应的依赖包,并且要启动sshd服务
(1).安装policycoreutils-python openssh-server openssh-clients
[root@VM-0-2-centos ~]# sudo yum install -y curl policycoreutils-python openssh-server openssh-clients
[root@VM-0-2-centos ~]# sudo systemctl enable sshd
[root@VM-0-2-centos ~]# sudo systemctl start sshd
(2).在安装时可能会报错
在安装yum install -y curl policycoreutils-python openssh-server openssh-clients时可能会报如下错误:
Error: Unable to find a match: policycoreutils-python
产生这个错误的原因是未配置yum源,所以需要安装 EPEL 源,命令如下:
[root@VM-0-2-centos ~]# yum install https://dl.fedoraproject.org/pub/epel/epel-release-latest-8.noarch.rpm然后运行
[root@VM-0-2-centos ~]# yum install -y curl policycoreutils-python3 openssh-server openssh-clients(3).安装postfix
gitlab配置需要用到邮件发送,所以需要安装postfix
[root@VM-0-2-centos ~]# yum -y install postfix
#安装完之后,启动postfix
[root@VM-0-2-centos ~]# systemctl start postfix
启动过程中如果报错:Job for postfix.service failed because the control process exited with error code. See "systemctl status postfix.service" and "journalctl -xe" for details.
解决办法,vim打开/etc/postfix/main.cf, 修改如下两项,修改之前可以先备份:
#修改 /etc/postfix/main.cf的设置
inet_protocols = ipv4
inet_interfaces = all
修改完成后,再次启动,就不会报错了,设置postfix为开机自启动
[root@VM-0-2-centos ~]# systemctl enable postfix查看启动状态
[root@VM-0-2-centos ~]# systemctl status postfix2.gitlab安装
centos系统的下载地址:https://mirrors.tuna.tsinghua.edu.cn/gitlab-ce/yum/el7
找最新版去下载gitlab-ce-15.8.3-ce.0.el7.x86_64.rpm
下载rpm包并安装
[root@VM-0-2-centos ~]# wget https://mirrors.tuna.tsinghua.edu.cn/gitlab-ce/yum/el7/gitlab-ce-15.8.3-ce.0.el7.x86_64.rpm
[root@VM-0-2-centos ~]# mkdir /usr/local/gitlab
[root@VM-0-2-centos ~]# mv gitlab-ce-15.8.3-ce.0.el7.x86_64.rpm /usr/local/gitlab/
[root@VM-0-2-centos ~]# cd /usr/local/gitlab/
[root@VM-0-2-centos ~]# rpm -i itlab-ce-15.8.3-ce.0.el7.x86_64.rpm
[root@VM-0-2-centos ~]#  warning: itlab-ce-15.8.3-ce.0.el7.x86_64.rpm: Header V4 RSA/SHA1 Signature, key ID f27eab47: NOKEY
[root@VM-0-2-centos ~]# error: Failed dependencies:policycoreutils-python is needed by itlab-ce-15.8.3-ce.0.el7.x86_64.rpm
# 如果出现上面这个报错就执行yum install policycoreutils-python
如果运行上面的yum install policycoreutils-python命令还是报错,解决办法:
可以在安装rpm包命令的后面加两个参数,如:
[root@VM-0-2-centos ~]# rpm -i itlab-ce-15.8.3-ce.0.el7.x86_64.rpm --nodeps --force--force是强制安装
--nodeps是不依赖关系
加上那两个参数的意义就在于,
安装时不再分析包之间的依赖关系而直接安装,
也就不会再提示error: Failed dependencies:这样的错误了
上述 rpm -i itlab-ce-15.8.3-ce.0.el7.x86_64.rpm --nodeps --force命令成功后展示如下:
warning: gitlab-ce-10.0.0-ce.0.el7.x86_64.rpm: Header V4 RSA/SHA1 Signature, key ID f27eab47: NOKEY
It looks like GitLab has not been configured yet; skipping the upgrade script.*.                  *.***                 ********               *****.******             ***************            ********,,,,,,,,,***********,,,,,,,,,,,,,,,,,,,,*********,,,,,,,,,,,.,,,,,,,,,,,*******,,,,,,,,,,,,,,,,,,,,,*****,,,,,,,,,.,,,,,,,****,,,,,,.,,,***,,,,,*,._______ __  __          __/ ____(_) /_/ /   ____ _/ /_/ / __/ / __/ /   / __ `/ __ \/ /_/ / / /_/ /___/ /_/ / /_/ /\____/_/\__/_____/\__,_/_.___/Thank you for installing GitLab!
GitLab was unable to detect a valid hostname for your instance.
Please configure a URL for your GitLab instance by setting `external_url`
configuration in /etc/gitlab/gitlab.rb file.
Then, you can start your GitLab instance by running the following command:sudo gitlab-ctl reconfigureFor a comprehensive list of configuration options please see the Omnibus GitLab readme
https://gitlab.com/gitlab-org/omnibus-gitlab/blob/master/README.md安装完成之后,会出现gitlab官方文档地址https://gitlab.com/gitlab-org/omnibus-gitlab/blob/master/README.md
3.配置并启动gitlab-ce
gitlab安装完成后,需要设置一个访问地址(或域名),打开/etc/gitlab/gitlab.rb,将默认的external_url = 'http://git.example.com'修改为自己的IP地址:http://xxx.xx.xxx
[root@VM-0-2-centos ~]# vim /etc/gitlab/gitlab.rb原来默认的external_url
## GitLab URL
##! URL on which GitLab will be reachable.
##! For more details on configuring external_url see:
##! https://docs.gitlab.com/omnibus/settings/configuration.html#configuring-the-external-url-for-gitlab
external_url 'http://git.example.com'
修改成自己定义的url地址,端口自己设置一个,别和已有的冲突了
## GitLab URL
##! URL on which GitLab will be reachable.
##! For more details on configuring external_url see:
##! https://docs.gitlab.com/omnibus/settings/configuration.html#configuring-the-external-url-for-gitlab
external_url 'http://152.26.xx.xx:8181'
修改完成后:wq保存退出,执行以下命令,让配置生效
[root@VM-0-2-centos ~]# gitlab-ctl reconfigure启动Gitlab
[root@VM-0-2-centos ~]# gitlab-ctl start[root@VM-0-2-centos ~]# gitlab-ctl start
ok: run: gitaly: (pid 6638) 186s
ok: run: gitlab-monitor: (pid 6656) 186s
ok: run: gitlab-workhorse: (pid 6659) 186s
ok: run: logrotate: (pid 6703) 185s
ok: run: nginx: (pid 6709) 185s
ok: run: node-exporter: (pid 6715) 184s
ok: run: postgres-exporter: (pid 6720) 184s
ok: run: postgresql: (pid 7324) 44s
ok: run: prometheus: (pid 6752) 171s
ok: run: redis: (pid 6761) 171s
ok: run: redis-exporter: (pid 6765) 170s
ok: run: sidekiq: (pid 7299) 45s
ok: run: unicorn: (pid 7476) 18s启动完成后,在浏览器输入http://152.26.xx.xx:8181,就是gitlab的登录首页了
重启下服务,刷新页面就可以访问了
[root@VM-0-2-centos ~]# gitlab-ctl restart为了避免8080端口冲突问题,可以修改下unicorn的默认端口,vim打开/etc/gitlab/gitlab.rb配置文件,新增一项unicorn['port'] = 8101
## GitLab URL
##! URL on which GitLab will be reachable.
##! For more details on configuring external_url see:
##! https://docs.gitlab.com/omnibus/settings/configuration.html#configuring-the-external-url-for-gitlab
external_url 'http://152.26.xx.xx:8181'unicorn['port'] = 8101
修改完成后:wq保存退出,执行gitlab-ctl reconfigure命令,让配置生效,再重新启动服务
[root@VM-0-2-centos ~]# gitlab-ctl reconfigure
[root@VM-0-2-centos ~]# gitlab-ctl stop
[root@VM-0-2-centos ~]# gitlab-ctl start
gitlab常用命令
启动服务:gitlab-ctl start
查看状态:gitlab-ctl status
停掉服务:gitlab-ctl stop
重启服务:gitlab-ctl restart
让配置生效:gitlab-ctl reconfigure
当运行命令gitlab-ctl reconfigure时,如果报错:STDERR: initdb: error: invalid locale settings; check LANG and L...,这是默认字符集问题
There was an error running gitlab-ctl reconfigure:execute[/opt/gitlab/embedded/bin/initdb -D /var/opt/gitlab/postgresql/data -E UTF8] (postgresql::enable line 49) had an error: Mixlib::ShellOut::ShellCommandFailed: Expected process to exit with [0], but received '1'
---- Begin output of /opt/gitlab/embedded/bin/initdb -D /var/opt/gitlab/postgresql/data -E UTF8 ----
STDOUT: The files belonging to this database system will be owned by user "gitlab-psql".
This user must also own the server process.
STDERR: initdb: error: invalid locale settings; check LANG and LC_* environment variables
---- End output of /opt/gitlab/embedded/bin/initdb -D /var/opt/gitlab/postgresql/data -E UTF8 ----
Ran /opt/gitlab/embedded/bin/initdb -D /var/opt/gitlab/postgresql/data -E UTF8 returned 1
解决办法
确保服务器内存在4G以上
修改配置
vim /etc/profile
# 将以下内容添加到配置文件末尾
export LC_CTYPE=en_US.UTF-8
export LC_ALL=en_US.UTF-8
# 重读环境变量
[root@localhost src]# source /etc/profile
# 重新加载
[root@localhost src]# gitlab-ctl reconfigure
第一次进入最好修改密码4.搭建GItLab以后出现卡顿
(1).原因分析
gitlab 启动运行占用了大量的内存,2G内存在启动后已经所剩无几,想再进行git 相关操作自然也就会出现卡顿现象.正常 centos 应该是启用 swap 分区的,但是阿里云,腾讯云的服务器却没有swap分区
通过以下命令查看swap分区情况:
cat /proc/swaps(2).解决方法
1).创建 swap 分区(这里需要等待几秒)
dd if=/dev/zero of=/swap bs=512 count=8388616注意:创建swap大小为bs*count=4294971392(4G)
2).通过mkswap命令将上面新建出的文件做成swap分区
mkswap /swap3).查看内核参数vm.swappiness中的数值是否为0,如果为0则根据实际需要调整成60
# 查看参数
cat /proc/sys/vm/swappiness
# 设置参数
# sysctl -w vm.swappiness=60
4).启用 swap 分区
swapon /swapecho “/swap swap swap defaults 0 0” >> /etc/fstab
5).再次使用cat /proc/swaps 查看swap分区是否启动

可以看到,swap分区已经启用,现在通过 gitlab 进行操作会发现很流畅
相关文章:
linux环境搭建私有gitlab仓库
搭建之前,需要安装相应的依赖包,并且要启动sshd服务(1).安装policycoreutils-python openssh-server openssh-clients [rootVM-0-2-centos ~]# sudo yum install -y curl policycoreutils-python openssh-server openssh-clients [rootVM-0-2-centos ~]…...

SpringSecurity授权
文章目录工具类使用自定义失败处理代码配置跨域其他权限授权hasAnyAuthority自定义权限校验方法基于配置的权限控制工具类 import javax.servlet.http.HttpServletResponse; import java.io.IOException;public class WebUtils {/*** 将字符串渲染到客户端** param response 渲…...

学习 Python 之 Pygame 开发坦克大战(一)
学习 Python 之 Pygame 开发坦克大战(一)Pygame什么是Pygame?初识pygame1. 使用pygame创建窗口2. 设置窗口背景颜色3. 获取窗口中的事件4. 在窗口中展示图片(1). pygame中的直角坐标系(2). 展示图片(3). 给部分区域设置颜色5. 在窗口中显示文字6. 播放音…...

2.5|iot冯|方元-嵌入式linux系统开发入门|2.13+2.18
一、 Linux 指令操作题(共5题(共 20 分,每小题 4分)与系统工作、系统状态、工作目录、文件、目录、打包压缩与搜索等主题相关。1.文件1.1文件属性1.2文件类型属性字段的第1个字符表示文件类型,后9个字符中,…...
)
一起Talk Android吧(第四百九十六回:自定义View实例二:环形进度条)
文章目录 知识回顾实现思路实现方法示例代码各位看官们大家好,上一回中咱们说的例子是"如何使用Java版MQTT客户端",这一回中咱们说的例子是"自定义View实例二:环形进度条"。闲话休提,言归正转,让我们一起Talk Android吧! 知识回顾 看官们,我们又回…...

上传图片尺寸校验
使用方法 ● Image ● URL ● onload代码: async validImageSize(file, imgWidth, imgHeight) {const img new Image()img.src URL.createObjectURL(file)const { w, h } await new Promise((resolve, reject) > {img.onload () > {const { width: w, he…...
)
【Python】缺失值处理和拉格朗日插值法(含源代码实现)
目录:缺失值处理和拉格朗日插值法一、前言二、理论知识三、代码实现一、前言 对于含有缺失值的数据集,如果通过删除小部分记录达到既定的目标,那么删除含有缺失值的记录的方法是最有效的。然而,这种方法也有很多问题,…...
SpringCloudAlibaba-Sentinel
一、介绍官网:https://github.com/alibaba/Sentinel/下载jar包,启动,访问http://localhost:8080/创建module添加如下依赖<!--SpringCloud ailibaba sentinel --><dependency><groupId>com.alibaba.cloud</groupId><artifactId>spring…...

【程序化天空盒】过程记录02:云扰动 边缘光 消散效果
写在前面 写在前面唉,最近筋疲力竭,课题组的东西一堆没做,才刚刚开始带着思考准备练习作品,从去年5月份开始到现在真得学了快一年了,转行学其他的真的好累,,不过还是加油! 下面是做…...

链表OJ(三) 反转链表合集
目录 反转链表 反转链表 II 链表中的节点每k个一组翻转 描述 给定一个单链表的头结点pHead(该头节点是有值的,比如在下图,它的val是1),长度为n,反转该链表后,返回新链表的表头。 数据范围: 0≤n≤10000≤…...
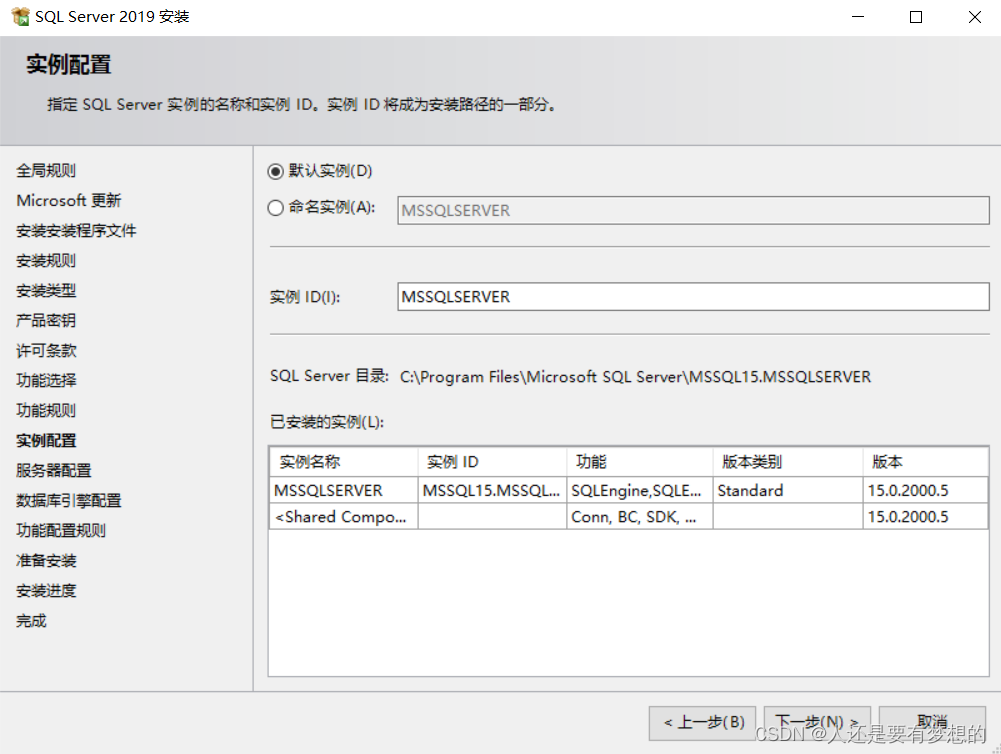
SQLSERVER2019安装步骤过程
第一步官网下载SQLSERVER软件包 目前官网只能下载最新版本2022版本。 通过迅雷下载网址 SQL Server 2019 Enterprise (x64) - DVD (Chinese-Simplified)企业版 ed2k://|file|cn_sql_server_2019_enterprise_x64_dvd_2bfe815a.iso|1632086016|58C258FF0F1D006DD3C1F5F17AF3E…...

Java模块化概述
3 模块化 3.1 模块化概述 Java语言随着这些年的发展已经成为了一]影响深远的编程语言,无数平台,系统都采用Java语言编写。但是,伴随着发展,Java也越来越庞大,逐渐发展成为-门“臃肿” 的语言。而且,无论是运行个大型的…...
)
Connext DDSPersistence Service持久性服务(2)
可选数据库组件及兼容性当Persistence Service配置为PERSISTENT模式时,您可以选择将主题数据存储在文件中还是存储在外部关系数据库中。 唯一支持的外部数据库是MySQL。 当PersistenceService在PERSISTENT模式下使用时,您可以将其配置为将DDS样本存储到关系数据库中,例如MyS…...

MongoDB
MongoDB 应用场景 在传统数据库(Mysql),在数据操作的 **High performance 对数据库高并发读写的需求、Hugu Storage 对海量数据的高效率存储和访问的需求、High Scalability && High Availability 对数据库高扩展和高可用性的需…...
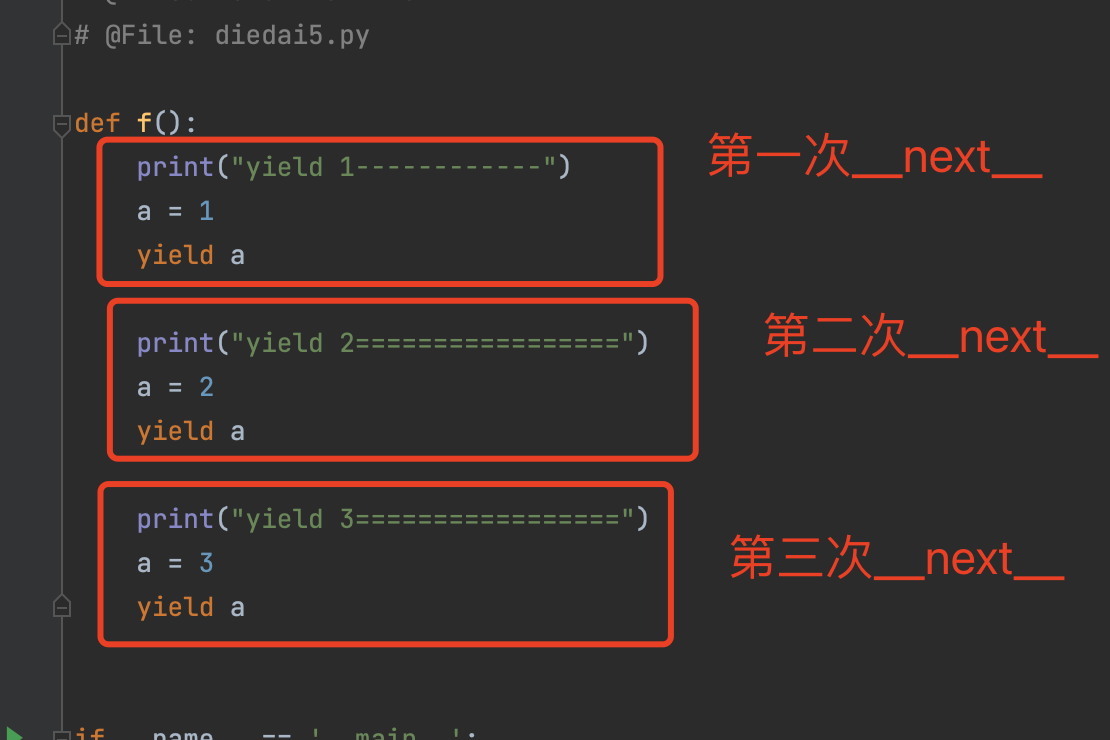
python 迭代器生成器
目录 一、可迭代对象 1.1 判断是否为可迭代对象 二、迭代器 2.1 判断对象是否是一个迭代器 2.2 手写一个迭代器 2.3 迭代器应用场景 三、生成器 3.1 生成器介绍 3.2 使用yield 关键字 生成器,来实现迭代器 3.3 生成器(yield关键字)…...

Iceberg基于Spark MergeInto语法实现数据的增量写入
SPARK SQL 基本语法 示例SQL如下 MERGE INTO target_table t USING source_table s ON s.id t.id //这里是JOIN的关联条件 WHEN MATCHED AND s.opType delete THEN DELETE // WHEN条件是对当前行进行打标的匹配条件 WHEN MATCHED AND s.opType update THEN…...
 对象)
JavaScript Array(数组) 对象
JavaScript 中的 Array(数组)对象是一种用来存储一系列值的容器,它可以包含任意类型的数据,包括数字、字符串、对象等等。通过使用数组对象,我们可以轻松地组织和处理数据,以及进行各种操作,比如…...

Debian如何更换apt源
中科大 deb https://mirrors.ustc.edu.cn/debian/ stretch main non-free contrib deb https://mirrors.ustc.edu.cn/debian/ stretch-updates main non-free contrib deb https://mirrors.ustc.edu.cn/debian/ stretch-backports main non-free contrib deb-src https://mirr…...

Connext DDSPersistence Service持久性服务
DDS持久性服务,它保存了DDS数据样本,以便即使发布应用程序已经终止,也可以稍后将其发送到加入系统的订阅应用程序。 简介Persistence Service是一个Connext DDS应用程序,它将DDS数据样本保存到临时或永久存储中,因此即使发布应用程序已经终止,也可以稍后将其交付给加入系…...

自抗扰控制ADRC之微分器TD
目录 前言 1 全程快速微分器 1.1仿真分析 1.2仿真模型 1.3仿真结果 1.4结论 2 Levant微分器 2.1仿真分析 2.2仿真模型 2.3仿真结果 3.总结 前言 工程上信号的微分是难以得到的,所以本文采用微分器实现带有噪声的信号及其微分信号提取,从而实现…...

上蔡假发定制亲测:这家2026年稳
在假发定制领域,用户普遍面临三大核心挑战:其一,传统假发产品在逼真度与舒适度之间难以平衡。数据显示,超过65%的消费者反映佩戴假发后出现头皮闷热、出汗不适等问题,尤其在夏季或运动场景下,透气性与防水性…...

Input Leap:一款让多设备共享键盘鼠标变得简单高效的开源KVM软件
Input Leap:一款让多设备共享键盘鼠标变得简单高效的开源KVM软件 【免费下载链接】input-leap Open-source KVM software 项目地址: https://gitcode.com/gh_mirrors/in/input-leap 你是否厌倦了在多个电脑之间来回切换键盘和鼠标?是否希望用一套…...

如何为 Claude Code 配置 Taotoken 的稳定 API 连接
🚀 告别海外账号与网络限制!稳定直连全球优质大模型,限时半价接入中。 👉 点击领取海量免费额度 如何为 Claude Code 配置 Taotoken 的稳定 API 连接 Claude Code 作为一款强大的 AI 编程助手,其原生服务在某些地区可…...
:Voice Cloning商用授权条款升级对SaaS产品的3重合规冲击)
ElevenLabs 2024定价突变预警(附迁移成本计算器):Voice Cloning商用授权条款升级对SaaS产品的3重合规冲击
更多请点击: https://intelliparadigm.com 第一章:ElevenLabs定价策略分析 核心订阅层级与功能边界 ElevenLabs 当前采用三层订阅模型(Starter、Creator、Professional),各层级在语音生成时长、并发请求、自定义声音…...

LibreCAD符号库创建终极指南:快速构建您的专业CAD图库
LibreCAD符号库创建终极指南:快速构建您的专业CAD图库 【免费下载链接】LibreCAD LibreCAD is a cross-platform 2D CAD program. It can read DXF and write DXF/PDF/SVG files, with basic support for DWG reading. It supports point/line/circle/ellipse/parab…...

ORTC与AI融合:从实时传输到智能通信的架构演进与实践
1. 项目概述:当实时通信遇上人工智能最近几年,我身边不少做音视频通信和做AI算法的朋友,聊天时总绕不开一个话题:ORTC(Object Real-Time Communication)和AI,这两者到底能擦出什么样的火花&…...

LangChain-Rust:用系统级语言重构大语言模型应用框架
1. 项目概述:当LangChain遇上Rust,会擦出怎样的火花?如果你和我一样,既是LangChain生态的深度用户,又对Rust语言的高性能与安全性念念不忘,那么看到“Abraxas-365/langchain-rust”这个项目标题时ÿ…...
注入失败,除了配置文件还有这8个地方要检查)
SpringBoot新手避坑:@Value(“${xxx}“)注入失败,除了配置文件还有这8个地方要检查
SpringBoot配置注入深度排查:当Value("${xxx}")失效时的8个关键检查点 刚接触SpringBoot的开发者往往会被其"约定优于配置"的理念所吸引,直到在控制台看到那个令人困惑的Could not resolve placeholder错误。这个看似简单的配置问题…...

问卷星 vs 腾讯问卷 vs 金数据:2026主流问卷工具AI开放能力最新横评
作为问卷调研行业的深度观察者,老N近期注意到调研工具链正在发生一场静悄悄的革命。最近,问卷星正式上线了AI工具包(wjx-ai-kit),其CLI(命令行工具)支持多达67个子命令,并适配了Clau…...

RPFM:重新定义全面战争MOD开发的工作流革命
RPFM:重新定义全面战争MOD开发的工作流革命 【免费下载链接】rpfm Rusted PackFile Manager (RPFM) is a... reimplementation in Rust and Qt6 of PackFile Manager (PFM), one of the best modding tools for Total War Games. 项目地址: https://gitcode.com/g…...