网络服务第二次作业

[root@localhost ~]# vim /etc/httpd/conf.d/vhosts.conf
<Virtualhost 192.168.101.200:80> #虚拟主机IP及端口
DocumentRoot /www/openlab #网页文件存放目录
ServerName www.openlab.com #服务器域名
</VirtualHost>
<Directory /www>
AllowOverride none #不允许覆盖
Require all granted #允许访问
</Directory>
#利用本机的/etc/hosts文件做域名解析
[root@localhost ~]# vim /etc/hosts
192.168.101.200 www.openlab.com
#创建网页根目录
[root@localhost ~]# mkdir -p /www/openlab
#编辑网页内容
[root@localhost ~]# echo 'welcome to openlab!!!' > /www/openlab/index.html
#重启hppd服务
[root@localhost ~]# systemctl restart httpd
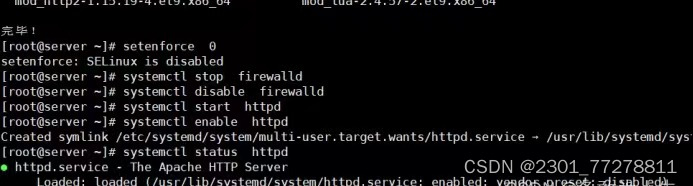
[root@localhost ~]# setenforce 0
#Client主机测试
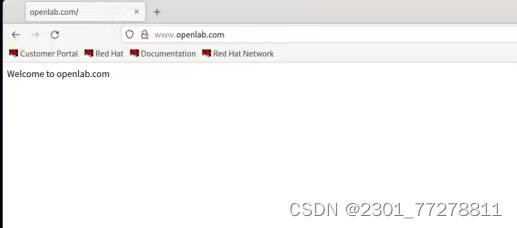
[root@localhost ~]# curl www.openlab.com
welcome to openlab!!!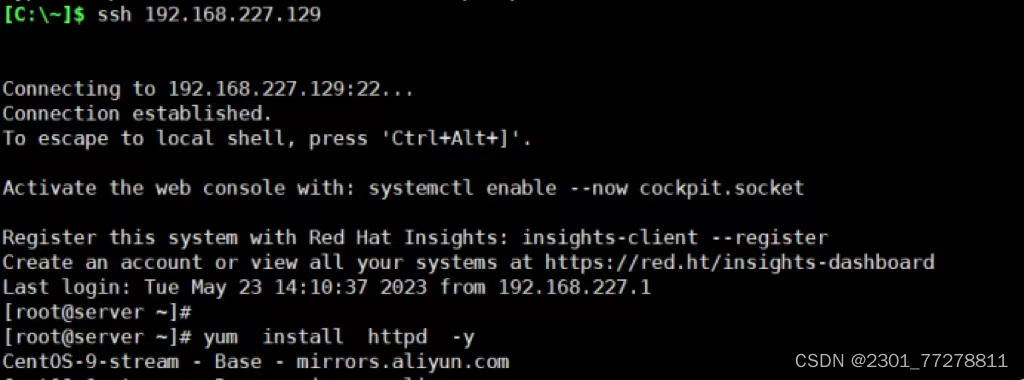
[root@server ~]# mkdir -p /www/openlab
[root@server ~]# systemctl restart httpd
[root@server ~]# vim /etc/hosts
[root@server ~]# vim /etc/httpd/conf.d/userdir.conf
[root@server ~]# vim /etc/httpd/conf.d/userdir.conf
[root@server ~]# mkdir -p /www/openlab/student
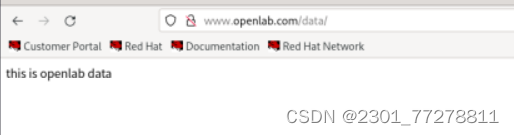
[root@server ~]# mkdir -p /www/openlab/data
[root@server ~]# mkdir -p /www/openlab/money
[root@server ~]# vim /etc/hosts
[root@server ~]# vim /etc/hosts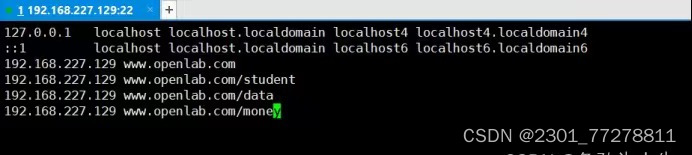
[root@server ~]# vim /etc/httpd/conf/httpd.conf
[root@server ~]# systemctl restart httpd
[root@server ~]# systemctl restart httpd
[root@server ~]# vim /etc/hosts
[root@server ~]# vim /etc/httpd/conf/httpd.conf

[root@server ~]# vim /etc/httpd/conf/httpd.conf
[root@server ~]# echo 'this is openlab data' > /www/openlab/data/index.html
[root@server ~]# echo 'this is openlab student' > /www/openlab/student/index.html
[root@server ~]# systemctl restart httpd
[root@server ~]# systemctl restart httpd
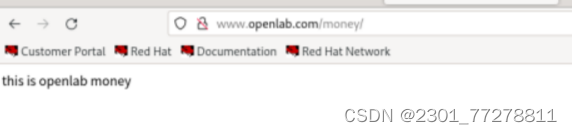
[root@server ~]# echo 'this is openlab money' > /www/openlab/money/index.html
[root@server ~]# vim /etc/httpd/conf/httpd.conf
[root@server ~]# systemctl restart httpd
[root@server ~]#

学生信息网站只有song和tian两人可以访问,其他用户不能访问。
[root@server ~]# vim /etc/httpd/conf.d/userdir.conf
#UserDir disabled # 此行增加#,注释掉,表示开放个人用户主页功能
UserDir /www/openlab/student # 此行去掉#,表示网站数据保存在/www/openlab/student
[root@server ~]# useradd song
[root@server ~]# passwd song
更改用户 song 的密码 。
新的密码: # 密码123456
无效的密码: 密码少于 8 个字符
重新输入新的密码:
passwd:所有的身份验证令牌已经成功更新。
[root@server ~]# useradd tian
[root@server ~]# passwd tian
更改用户 tian 的密码 。
新的密码: # 密码654321
无效的密码: 密码少于 8 个字符
重新输入新的密码:
passwd:所有的身份验证令牌已经成功更新。
[root@server ~]$ chmod -Rf 755 /www/openlab/student # 设置访问权限
[root@server ~]# systemctl restart httpd
[root@server ~]# htpasswd -c /etc/httpd/passwd song
New password: # 123456
Re-type new password:
Adding password for user song
# htpasswd : 生成密码数据的命令
# -c : 表示第一次生成,第二次给账户创建密码不能使用
# /etc/httpd/passwd : 存储密码的数据库文件
# song : 需要验证密码访问的账户名称
# 给tian账户这只访问控制,密码
[root@server ~]# htpasswd /etc/httpd/passwd tian
New password:
Re-type new password:
Adding password for user tian
# 注意:第二次给tian账户设置密码,不能加-c参数,否则会覆盖
[root@server ~]# vim /etc/httpd/conf/httpd.conf
#dd删除这里
#<VirtualHost 192.168.119.138>
# DocumentRoot /www/openlab/student
# ServerName 'www.openlab.com/student'
# alias /data /www/openlab/student
# <Directory /www/openlab/student>
# AllowOverride None
# require all granted
# </Directory>
# </VirtualHost>
[root@server ~]# vim /etc/httpd/conf.d/userdir.conf
# 定位第31-35行,删除后增加如下内容:
<Directory "/www/openlab/student">
authuserfile "/etc/httpd/passwd"
authname "My privately website"
authtype basic
require user song
</Directory>
<Directory "/www/openlab/student">
authuserfile "/etc/httpd/passwd"
authname "My privately website"
authtype basic
require user tian
</Directory>
[root@server ~]# systemctl restart httpd
# windows端打开浏览器,输入www.openlab.com/student,此时会有对话框出现需要输入密码


https服务
[root@server ~]# yum install mod_ssl -y
[root@server ~]# cd /etc/pki/tls/private/
[root@server private]# openssl genrsa -aes128 2048 > money.key
Enter PEM pass phrase: # 设置私钥文件的加密密码 ,123456
Verifying - Enter PEM pass phrase: # 重输密码,123456
[root@server private]# cd /etc/pki/tls/certs/
[root@server certs]# openssl req -utf8 -new -key /etc/pki/tls/private/money.key -x509 -days 365 -out money.crt
Enter pass phrase for /etc/pki/tls/private/zy.key: # 输入私钥加密的密码123456
You are about to be asked to enter information that will be incorporated
into your certificate request.
What you are about to enter is what is called a Distinguished Name or a DN.
There are quite a few fields but you can leave some blank
For some fields there will be a default value,
If you enter '.', the field will be left blank.
-----
Country Name (2 letter code) [XX]:86
State or Province Name (full name) []:shacnxi
Locality Name (eg, city) [Default City]:xi'an
Organization Name (eg, company) [Default Company Ltd]:OpenLab
Organizational Unit Name (eg, section) []:Finance
Common Name (eg, your name or your server's hostname) []:server
Email Address []:2297373285@qq.com
[root@server ~]# vim /etc/httpd/conf/httpd.conf
#dd删除这里
#<VirtualHost 192.168.119.138>
# DocumentRoot /www/openlab/money
# ServerName 'www.openlab.com/money'
# alias /money /www/openlab/data
# <Directory /www/openlab/money>
# AllowOverride None
# require all granted
# </Directory>
# </VirtualHost>
[root@server ~]# vim /etc/httpd/conf.d/ssl.conf
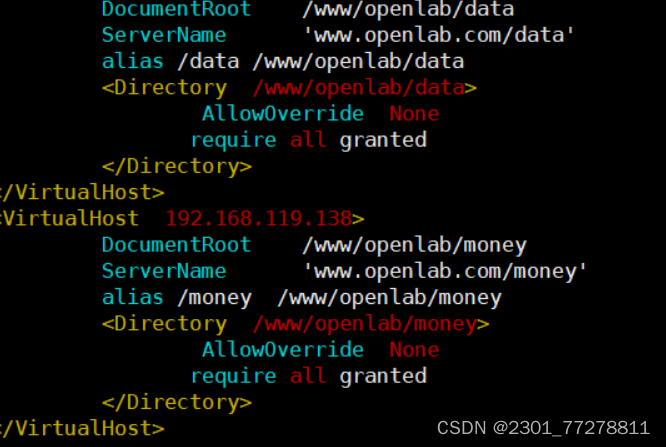
<VirtualHost 192.168.119.138:443>
SSLEngine on
SSLCertificateFile /etc/pki/tls/certs/money.crt
SSLCertificateKeyFile /etc/pki/tls/private/money.key
ServerName 'www.openlab.com/money'
DocumentRoot /www/openlab/money
alias /money /www/openlab/money
</VirtualHost>
<Directory /www/openlab/money>
AllowOverride none
Require all granted
</Directory>
[root@server ~]# systemctl start httpd
Enter TLS private key passphrase for 192.168.48.130:443 (RSA) : ****** # 输入私钥的密码:123456


相关文章:
网络服务第二次作业
[rootlocalhost ~]# vim /etc/httpd/conf.d/vhosts.conf <Virtualhost 192.168.101.200:80> #虚拟主机IP及端口 DocumentRoot /www/openlab #网页文件存放目录 ServerName www.openlab.com #服务器域名 </VirtualHost> …...
【记录】USSOCOM Urban3D 数据集读取与处理
Urban3D数据集内容简介 Urban3D数据集图像为正摄RGB影像,分辨率为50cm。 从SpaceNet上使用aws下载数据,文件夹结构为: |- 01-Provisional_Train|- GT|- GT中包含GTC,GTI,GTL.tif文件,GTL为ground truth b…...

flutter ios webview不能打开http地址
参考 1、iOS添加信任 webview_flutter 在使用过程中会iOS出现无法加载HTTP请求的情况, 但是Flutter 却可以加载HTTP请求。这就与两个的框架有关了,Flutter是独立于UIKit框架的。 解决方案就是在iOS 的info.plist中添加对HTTP的信任。 <key>NSApp…...

【SpringBoot】详细介绍SpringBoot中Entity类中的getters和setters
在Spring Boot中的Entity类中,getters和setters是用来获取和设置对象属性值的方法。它们是Java Bean规范的一部分,并且通常被用于向开发人员和框架公开类的属性。 在Entity类中,getters和setters方法通常通过property来实现,即将…...

阿里云服务器搭建FRP实现内网穿透-P2P
前言 在了解frp - p2p之前,请先了解阿里云服务器搭建FRP实现内网穿透-转发: 文章地址 1、什么是frp - p2p frp(Fast Reverse Proxy)是一个开源的反向代理工具,它提供了多种功能,包括端口映射、流量转发和内网穿透等。…...
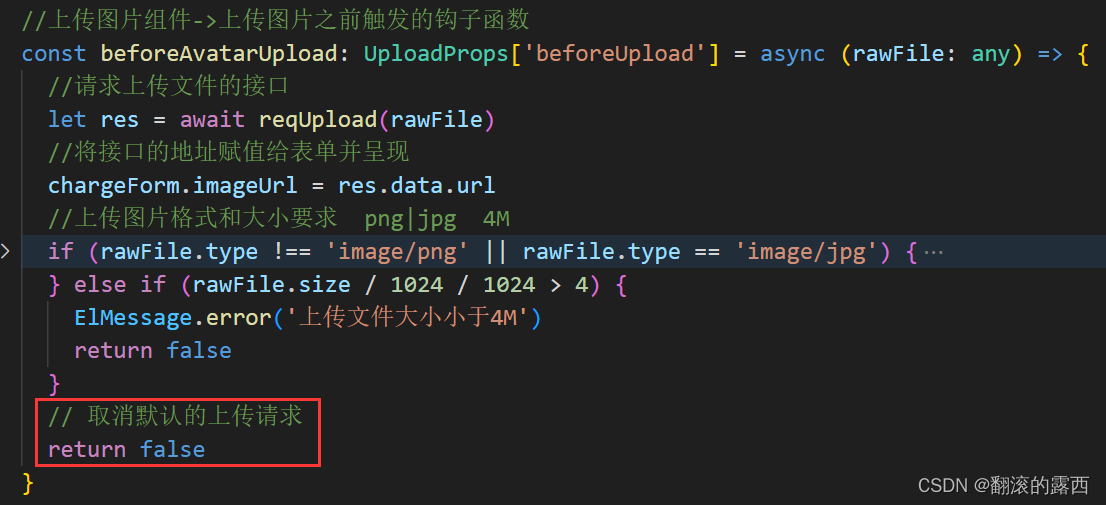
Vue3 Element-plus Upload 上传图片
技术栈:Vue3 Ts Element-plus 官网地址:Upload 上传 | Element Plus 一、背景: 表单上传图片功能 二、效果: 三、流程: ①点击上传图片按钮,系统弹出文件选择对话框,选择图片并确认 ②调…...

PCL | Ubuntu18安装CloudCompare
文章目录 操作教程 操作教程 CloudCompare下载官网:https://www.danielgm.net/cc/release/ 安装flatpak插件 sudo apt install flatpak添加库路径 flatpak remote-add flathub https://flathub.org/repo/flathub.flatpakrepo安装CC flatpak install flathub or…...
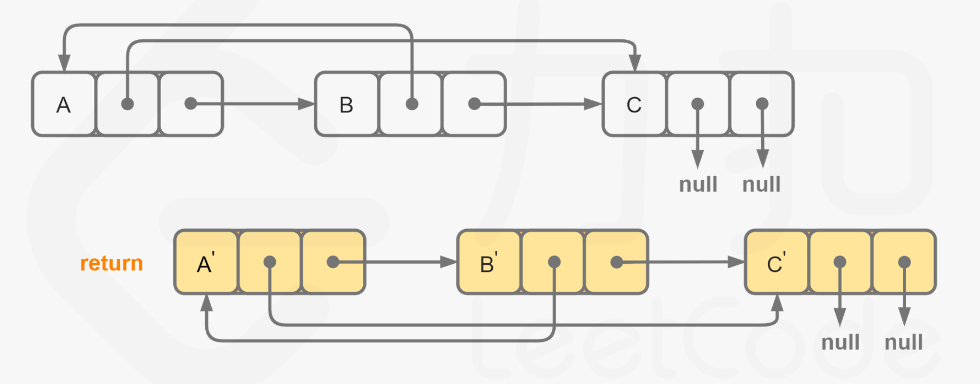
【LeetCode-中等题】138. 复制带随机指针的链表
文章目录 题目解题核心思路:找random指针指向思路一:哈希思路二:迭代构造新链表 方法一:哈希递归方法二:纯哈希方法三:迭代 节点拆分 题目 解题核心思路:找random指针指向 这里的拷贝属于深拷…...

C++--动态规划背包问题(1)
1. 【模板】01背包_牛客题霸_牛客网 你有一个背包,最多能容纳的体积是V。 现在有n个物品,第i个物品的体积为vivi ,价值为wiwi。 (1)求这个背包至多能装多大价值的物品? (2)若背包恰好装满&a…...
【Android-Flutter】我的Flutter开发之旅
目录: 0、文档:1、在Windows上搭建Flutter开发环境(1)[使用中国镜像(❌详细看官方文档)](https://docs.flutter.dev/community/china)(2)[下载最新版Flutter SDK(已包含Dart)](https://docs.flu…...
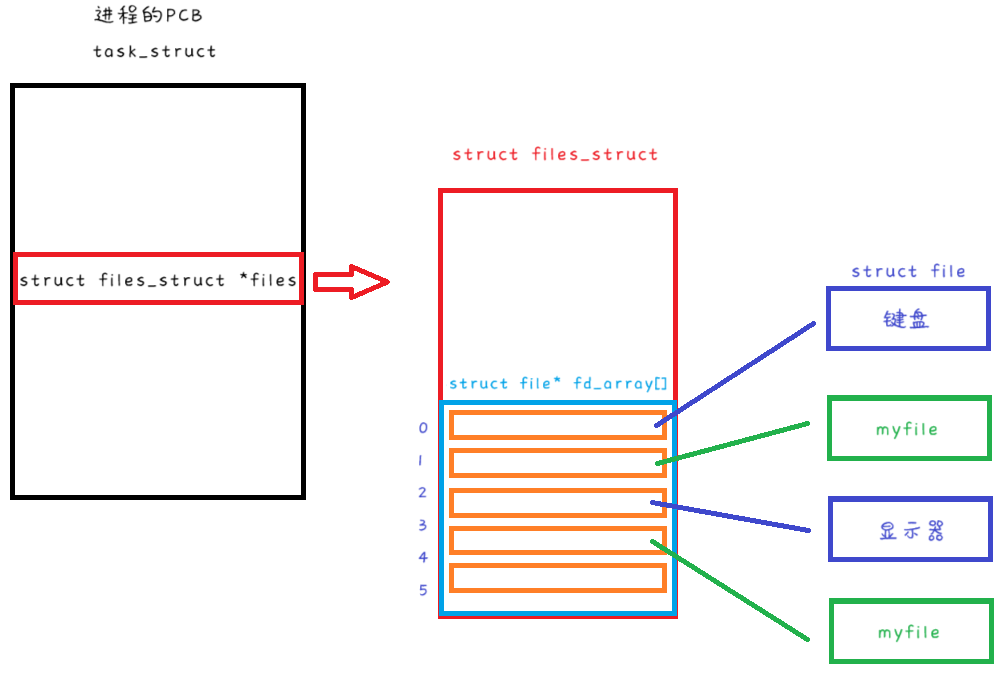
【Linux】深入理解文件操作
文章目录 初次谈论文件重温C语言文件操作系统文件操作接口openwriteread 再次谈论文件文件描述符文件描述符的分配规则 重定向什么是重定向重定向的本质系统调用接口实现重定向<、>、>> 初次谈论文件 开始之前先谈论一下关于文件的一些共识性问题。 一个文件可以…...
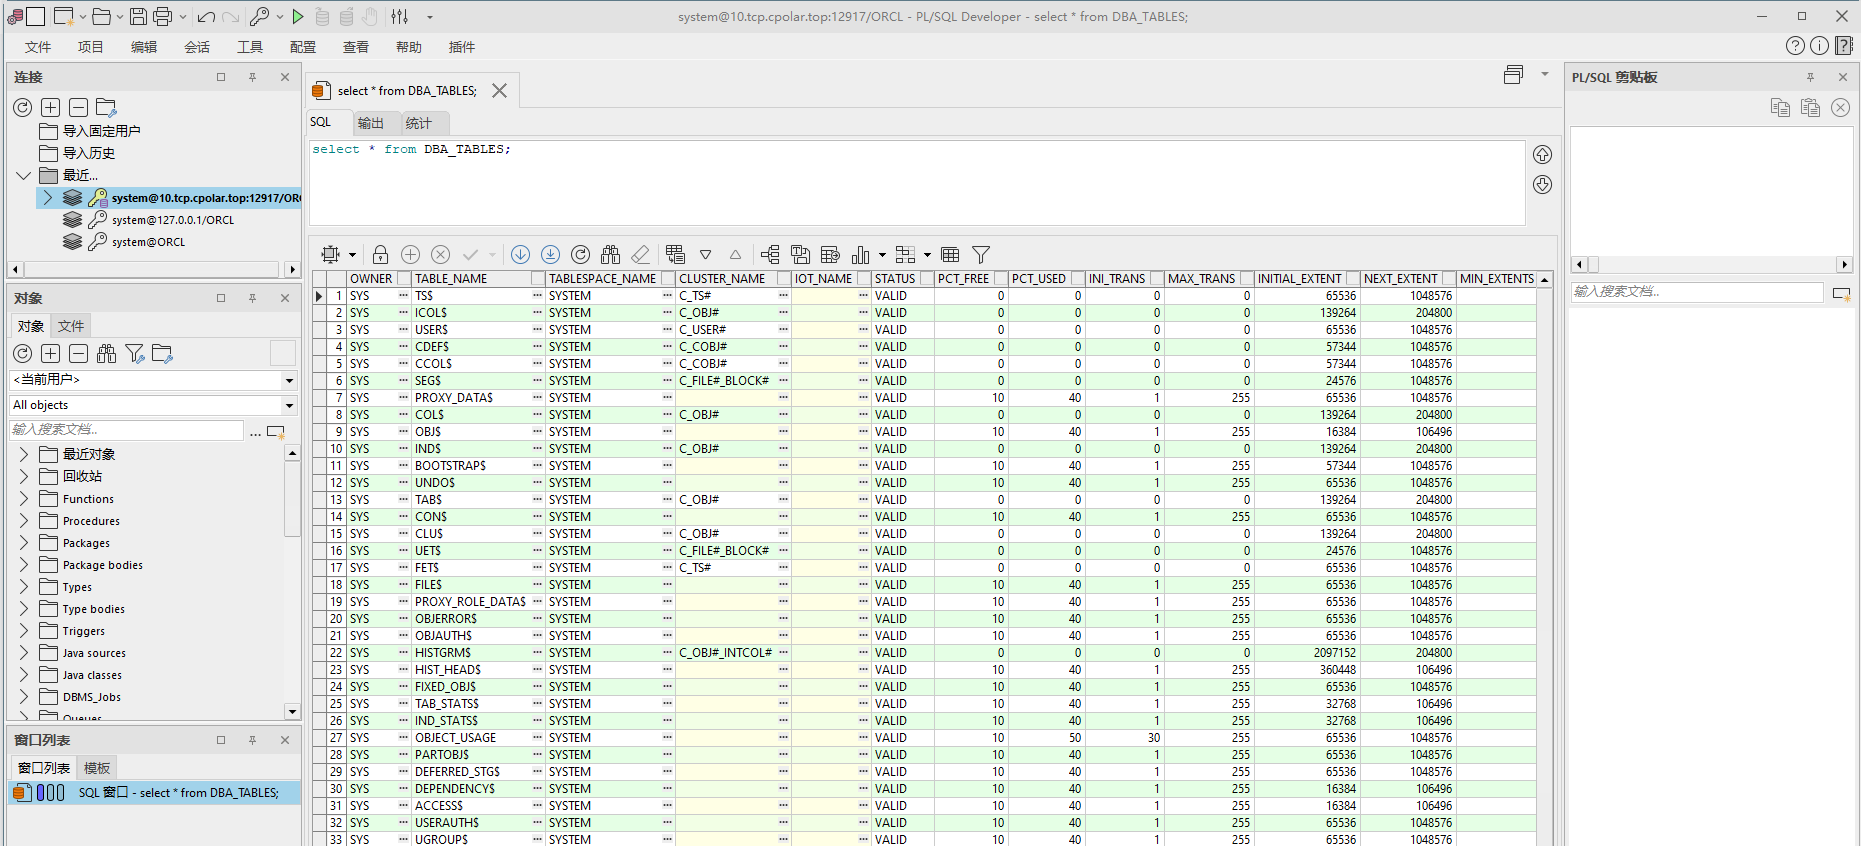
异地使用PLSQL远程连接访问Oracle数据库【内网穿透】
文章目录 前言1. 数据库搭建2. 内网穿透2.1 安装cpolar内网穿透2.2 创建隧道映射 3. 公网远程访问4. 配置固定TCP端口地址4.1 保留一个固定的公网TCP端口地址4.2 配置固定公网TCP端口地址4.3 测试使用固定TCP端口地址远程Oracle 前言 Oracle,是甲骨文公司的一款关系…...

【方案】基于AI边缘计算的智慧工地解决方案
一、方案背景 在工程项目管理中,工程施工现场涉及面广,多种元素交叉,状况较为复杂,如人员出入、机械运行、物料运输等。特别是传统的现场管理模式依赖于管理人员的现场巡查。当发现安全风险时,需要提前报告࿰…...

华为各型号交换机开启SNMP v3
设备型号:华为S5720S-28P-LI-AC 设备软件版本:V200R011C10SPC600 调试命令: snmp-agent snmp-agent sys-info version v3 snmp-agent group v3 GroupName privacy //{GroupName}是设置一个SNMP的组名,我设置是SNMPGroup snm…...

CocosCreator3.8研究笔记(一)windows环境安装配置
一、安装Cocos 编辑器 (1)、下载Cocos Dashboard安装文件 Cocos 官方网站Cocos Dashboard下载地址 : https://www.cocos.com/creator-download9下载完成后会得到CocosDashboard-v2.0.1-win-082215.exe 安装文件,双击安装即可。 …...

【JavaWeb 专题】15个最经典的JavaWeb面试题
文章目录 HTTP长连接和短连接HTTP/1.1 与 HTTP/1.0 的区别可扩展性缓存带宽优化长连接消息传递Host 头域错误提示 AjaxAjax 的优势: JSP 和 servlet 有什么区别?定义区别 JSP 的9大内置对象及作用JSP 的 4 种作用域?session 和 cookie 有什么…...
)
力扣:75. 颜色分类(Python3)
题目: 给定一个包含红色、白色和蓝色、共 n 个元素的数组 nums ,原地对它们进行排序,使得相同颜色的元素相邻,并按照红色、白色、蓝色顺序排列。 我们使用整数 0、 1 和 2 分别表示红色、白色和蓝色。 必须在不使用库内置的 sort …...

JVM 内存大对象监控和优化实践
作者:vivo 互联网服务器团队 - Liu Zhen、Ye Wenhao 服务器内存问题是影响应用程序性能和稳定性的重要因素之一,需要及时排查和优化。本文介绍了某核心服务内存问题排查与解决过程。首先在JVM与大对象优化上进行了有效的实践,其次在故障转移与…...

vue indexedDB 取指定数据库指定表 全部key用request.onsuccess
1 例子 export async function funcGetKey(dbName, tableName) {return new Promise((resolve, reject) > {// 打开指定的数据库const request indexedDB.open(dbName);request.onerror (event) > {console.error(打开数据库失败: , event.target.error);reject(event…...

Java 数据结构使用学习
Set和List的区别 Set 接口实例存储的是无序的,不重复的数据。List 接口实例存储的是有序的,可以重复的元素。 Set 检索效率低下,删除和插入效率高,插入和删除不会引起元素位置改变 <实现类有HashSet,TreeSet>。 List 和数…...

STM32CubeMX实战指南:ADC多通道扫描与DMA传输配置
1. ADC多通道扫描与DMA传输的核心价值 第一次用STM32做多路传感器采集时,我像大多数新手一样傻傻地用轮询方式读取每个ADC通道。结果发现CPU利用率直接飙到80%,系统卡得连LED灯都闪不利索。后来工程师老张甩给我一句话:"用DMA啊…...

iMeta | 伦敦国王学院量化系统生物学组-解析肝硬化中口腔-肠道转移细菌与宿主互作
点击蓝字 关注我们整合宿主–微生物组建模揭示了口腔–肠道微生物转移在晚期肝硬化中的潜在作用iMeta主页:http://www.imeta.science研究论文● 期刊: iMeta (IF 33.2,中科院双一区Top)● 英文题目: Integrative host-microbiome modelling uncovers the implicatio…...

如何快速上手PCL点云库:10个核心模块详解与实践
如何快速上手PCL点云库:10个核心模块详解与实践 【免费下载链接】pcl-learning 🔥PCL(Point Cloud Library)点云库学习记录 项目地址: https://gitcode.com/gh_mirrors/pc/pcl-learning PCL(Point Cloud Librar…...

终极指南:Xmake构建缓存清理策略,彻底解决缓存一致性问题
终极指南:Xmake构建缓存清理策略,彻底解决缓存一致性问题 【免费下载链接】xmake 🔥 A cross-platform build utility based on Lua 项目地址: https://gitcode.com/gh_mirrors/xm/xmake 在软件开发过程中,构建工具的缓存机…...
)
2026年Java面试高频考点终极整理(纯干货,建议直接背诵)
Java 面试 Java 作为编程语言中的 NO.1,选择入行做 IT 做编程开发的人,基本都把它作为首选语言,进大厂拿高薪也是大多数小伙伴们的梦想。以前 Java 岗位人才的空缺,而需求量又大,所以这种人才供不应求的现状,就是 Java 工程师的薪…...

别只盯着原理图:聊聊Cadence Virtuoso里带隙基准的版图匹配那些坑
带隙基准版图匹配实战:从原理图到后仿真的关键陷阱解析 当你在Cadence Virtuoso中完成了一个温漂仅2.6ppm的带隙基准电路设计,原理图仿真结果堪称完美——直到你开始画版图。这时你会发现,那些在原理图中对称排列的晶体管,在实际硅…...

n8n工作流模板库:开箱即用的自动化解决方案与实战指南
1. 项目概述:一个为n8n设计的全功能工作流模板库如果你正在使用或者考虑使用n8n这个强大的工作流自动化工具,那么你很可能已经遇到了一个经典难题:从零开始构建一个复杂的工作流,既耗时又容易出错。你需要考虑节点如何连接、数据如…...

CursorTouch/Operator-Use:融合光标与触摸的交互范式设计与实现
1. 项目概述:从“CursorTouch”到“Operator-Use”的交互范式演进最近在琢磨一个挺有意思的交互设计项目,我把它暂命名为“CursorTouch/Operator-Use”。这个名字听起来有点技术范儿,但核心想解决的问题其实很接地气:我们如何让电…...
)
STM32H743XIH6实战:用CubeMX搞定TIM6定时器中断和USART1串口通信(附完整代码)
STM32H743XIH6实战:CubeMX配置TIM6定时器中断与USART1通信全流程解析 1. 开发环境搭建与工程初始化 对于嵌入式开发者而言,一个稳定可靠的开发环境是项目成功的基础。在开始STM32H743XIH6的外设配置前,我们需要确保所有工具链已正确安装并配置…...

抖音无水印视频下载终极指南:5分钟快速上手douyin-downloader
抖音无水印视频下载终极指南:5分钟快速上手douyin-downloader 【免费下载链接】douyin-downloader A practical Douyin downloader for both single-item and profile batch downloads, with progress display, retries, SQLite deduplication, and browser fallbac…...