【案例实战】NodeJS+Vue3+MySQL实现列表查询功能
这篇文章,给大家带来一个列表查询的功能,从前端到后端的一个综合案例实战。
采用vue3作为前端开发,nodejs作为后端开发。
首先我们先来看一下完成的页面效果。点击分页,可以切换到上一页、下一页。搜索框可以进行模糊查询。


后端项目开发
好的,那么看完项目的演示,我们先来开发一下后端的逻辑。
后端需要开发的功能那个很简单,就是一个列表分页查询的接口。当然也可以用java语言去开发,我们这里就直接用nodejs作为一个后端语言去开发列表分页查询的接口。
1.创建一个后端的项目
(1)初始化项目
npm init -y
(2)下载express框架,对于express其实就是创建http服务的一款框架
cnpm i express@4.17.3 -S
(3)安装解析接收参数的中间件
cnpm i body-parser@1.19.2 -S
(4)下载跨域cors配置
cnpm i cors@2.8.5 -S
(5)创建app.js
/*** 统一入口*///引入express,配置app
const express = require("express");
const app = express();//配置post请求的参数解析
const bodyParser = require("body-parser");
app.use(bodyParser.json());
app.use(bodyParser.urlencoded({ extended: false }));//配置跨域设置
const cors = require("cors");
app.use(cors());//错误中间件配置
app.use((err, req, res, next) => {console.log(err);res.send({ code: 500, msg: err.message, data: null });
});//启动8090端口监听的服务
app.listen(8090, () => {console.log("server run in http://127.0.0.1:8090");
});
控制台输入node app.js,正常运行
mac@bogon product_server % node app.js
server run in http://127.0.0.1:8090
2.配置数据库
(1)linux部署mysql数据库
我们采用docker部署,大家可以在网上找一片博文去部署一下,这里就不再过多的去写部署步骤了。
docker run -p 3306:3306 --name mysql \
-v /usr/local/docker/mysql/conf:/etc/mysql \
-v /usr/local/docker/mysql/logs:/var/log/mysql \
-v /usr/local/docker/mysql/data:/var/lib/mysql \
-e MYSQL_ROOT_PASSWORD=123456 \
-d mysql:5.7
部署完成之后,采用可视化工具连接。

创建video表,脚本给大家提供好。
CREATE TABLE `video` (`id` int unsigned NOT NULL AUTO_INCREMENT COMMENT '课程id',`title` varchar(524) DEFAULT NULL COMMENT '视频标题',`course_img` varchar(524) DEFAULT NULL COMMENT '封面图',`price` varchar(11) DEFAULT NULL COMMENT '价格,分',`point` double(11,2) DEFAULT '8.70' COMMENT '默认8.7,最高10分',`level` varchar(50) CHARACTER SET utf8mb3 COLLATE utf8_general_ci DEFAULT NULL COMMENT '课程分类',`del` int DEFAULT '0' COMMENT '是否删除',`learn_num` varchar(100) DEFAULT NULL,PRIMARY KEY (`id`)
) ENGINE=InnoDB AUTO_INCREMENT=19 DEFAULT CHARSET=utf8mb3;
INSERT INTO test.video
(id, title, course_img, price, `point`, `level`, del, learn_num)
VALUES(1, 'MCA高级架构师', 'https://oss-cdn.mashibing.com/default/2ac035f1b09412a514833d72bd23629b.png', '109', 9.8, '高级', 0, '8372');
INSERT INTO test.video
(id, title, course_img, price, `point`, `level`, del, learn_num)
VALUES(4, 'Java后端工程师', 'https://oss-cdn.mashibing.com/default/ff0dbc7d6077b9656e3f68f8775d80de.png', '39', 9.2, '高级', 0, '2389');
INSERT INTO test.video
(id, title, course_img, price, `point`, `level`, del, learn_num)
VALUES(5, 'Python全系列大师课', 'https://oss-cdn.mashibing.com/default/e1b96583ce902f8475d50fccd00583f3.png', '49', 9.4, '高级', 0, '1231');
INSERT INTO test.video
(id, title, course_img, price, `point`, `level`, del, learn_num)
VALUES(6, 'AIoT智能物联网 ', 'https://oss-cdn.mashibing.com/default/fdf4171e34e95446c1faaab9780a6a3c.png', '29', 9.2, '高级', 0, '12331');
INSERT INTO test.video
(id, title, course_img, price, `point`, `level`, del, learn_num)
VALUES(7, 'AI人工智能算法班', 'https://oss-cdn.mashibing.com/default/b1519e27e526abce071077a46155debe.png', '29', 9.4, '高级', 0, '43123');
INSERT INTO test.video
(id, title, course_img, price, `point`, `level`, del, learn_num)
VALUES(8, 'Python全栈工程师', 'https://ksimage-cdn.mashibing.com/ee30a77db459480ab9e9dbca4110abb7.png', '3699', 9.9, '高级', 0, '3241');
INSERT INTO test.video
(id, title, course_img, price, `point`, `level`, del, learn_num)
VALUES(9, '网络安全大师课', 'https://oss-cdn.mashibing.com/default/4839c97b8638ef5d01d55ee945f73346.png', '1699', 9.9, '高级', 0, '2371');
INSERT INTO test.video
(id, title, course_img, price, `point`, `level`, del, learn_num)
VALUES(10, 'Web前端架构师', 'https://oss-cdn.mashibing.com/default/56d51db7d4e728b4bdd826871b31fcdd.png', '129', 9.9, '高级', 0, '43983');
INSERT INTO test.video
(id, title, course_img, price, `point`, `level`, del, learn_num)
VALUES(11, '大数据架构师', 'https://oss-cdn.mashibing.com/default/89c03f0a7d557932b2c916896f840ac0.png', '158', 9.9, '高级', 0, '8372');
INSERT INTO test.video
(id, title, course_img, price, `point`, `level`, del, learn_num)
VALUES(12, '嵌入式物联网工程师', 'https://oss-cdn.mashibing.com/default/8a0d860ae085d665cba6500037a42660.png', '189', 9.9, '高级', 0, '3874');
INSERT INTO test.video
(id, title, course_img, price, `point`, `level`, del, learn_num)
VALUES(13, '云原生架构师', 'https://oss-cdn.mashibing.com/default/0b611f56605230afa78e36d3fc28d7fe.png', '98', 9.9, '高级', 0, '2321');
INSERT INTO test.video
(id, title, course_img, price, `point`, `level`, del, learn_num)
VALUES(14, 'AI人工智能零基础入门班 ', 'https://oss-cdn.mashibing.com/default/93684399167651b31ed02224cdbc6f8a.jpg', '89', 9.9, '高级', 0, '32431');
INSERT INTO test.video
(id, title, course_img, price, `point`, `level`, del, learn_num)
VALUES(15, '游戏后端架构师', 'https://ksimage-cdn.mashibing.com/c6726d23750140fa9fb917172462e427.png', '99', 9.9, '高级', 0, '23543');
INSERT INTO test.video
(id, title, course_img, price, `point`, `level`, del, learn_num)
VALUES(16, 'C++ 软件开发工程师', 'https://oss-cdn.mashibing.com/default/f2fd73a74fa6465e3feaf41bb756457a.png', '1699', 9.9, '高级', 0, '12332');
INSERT INTO test.video
(id, title, course_img, price, `point`, `level`, del, learn_num)
VALUES(17, '数据分析全岗位实战班', 'https://oss-cdn.mashibing.com/default/440538433aa74ede1fbfe2945ec060c7.jpg', '68', 9.9, '高级', 0, '12343');
INSERT INTO test.video
(id, title, course_img, price, `point`, `level`, del, learn_num)
VALUES(18, '大厂算法特训班 ', 'https://oss-cdn.mashibing.com/default/412befe796fed3a83d695185001944fb.jpg', '79', 9.2, '高级', 0, '2341');
(3)下载mysql的依赖
cnpm i mysql@2.18.1 -S
(4)配置数据库连接
//引入mysql配置
const mysql = require('mysql');
//创建db实例
const db = mysql.createPool({host: '192.168.140.134',user: 'root',password: '123456',database: 'test',
});
//导出
module.exports = db;
3.编写课程查询接口
(1)创建course_controller.js
//引入db配置
const db = require("../config/db_config");exports.page = (req, res) => {//获取前端的参数let { title, page, size } = req.query;page = (page - 1) * size;if (title.length == 0) {title = "";} else {title = `and title like '%${title}%'`;}//查询课程列表sqlconst pageSql = `select * from video where del=0 ${title} order by id limit ${page},${size}`;//查询课程总数的sqlconst totalSql = `select count(*) as total from video where del=0 ${title}`;db.query(pageSql, (err, pageData) => {if (err) {throw new Error(err.message);}db.query(totalSql, (err, count) => {if (err) {throw new Error(err.message);}res.send({code: 200,msg: "",data: {data: pageData,total: count[0].total,pages:0},});});});
};
(2)创建router下的course.js
const express = require('express');
const router = express.Router();
const course_controller = require("../controller/course_controller");
//查询视频列表
router.get("/api/v1/page", course_controller.page);
//导出路由
module.exports = router;
(3)app.js配置路由
//配置路由
const productRouter = require("./router/course.js");
app.use("/course", productRouter);
整体的目录结构:

(4)访问接口测试
http://127.0.0.1:8090/course/api/v1/page?page=1&size=10&title

前端项目开发
前端采用vue3+elementUI开发。
1.前端项目搭建
(1)安装脚手架vue/cli
npm install -g @vue/cli@5.0.4
(2)下载elementUI组件
cnpm install element-plus@2.1.11 -S
cnpm install -D unplugin-vue-components@0 unplugin-auto-import@0
(3)安装less预处理器
cnpm i less@4.1.2 less-loader@7 -S
(4)搭建前端项目
vue create product_web
(5)配置vue.config.js
const { defineConfig } = require('@vue/cli-service');
const AutoImport = require('unplugin-auto-import/webpack');
const Components = require('unplugin-vue-components/webpack');
const { ElementPlusResolver } = require('unplugin-vue-components/resolvers');module.exports = defineConfig({transpileDependencies: true,lintOnSave: false, //关闭ESlint校验configureWebpack: {plugins: [AutoImport({resolvers: [ElementPlusResolver()],}),Components({resolvers: [ElementPlusResolver()],}),],},
});
(6)编写公共样式
html,
body {padding: 0;margin: 0;background-color: #f5f5f5;
}
html,
body,
#app {height: 100%;
}input {border: none;outline: none;
}
button {border: none;outline: none;
}
a {text-decoration: none;color: #333;
}
li {list-style-type: none;
}
(7)安装路由插件
cnpm i vue-router@4.0.14 -S
(8)element-plus图标自动引入配置,公共样式引入,以及路由引入
import { createApp } from 'vue'
import App from './App.vue'
import './common/base.css';
import * as elementIcons from '@element-plus/icons-vue';
import router from './router/index';const app = createApp(App);
for (let iconName in elementIcons) {app.component(iconName, elementIcons[iconName]);
}
app.use(router).mount('#app');
(9)创建路由文件
import { createRouter, createWebHashHistory } from "vue-router";//路由配置
const router = createRouter({history: createWebHashHistory(), //选择hash路由routes: [{path: "/",redirect: "/home",},{path: "/home",component: () => import("../views/Home"),}],
});
export default router;
(10)创建views文件夹,创建Home.vue文件

先保证项目不报错。
2.编写列表页面
(1)首先编写Home.vue文件,这里涉及接口的调用下面我们在编写这个接口的请求
<template><div class="main"><el-form><el-form-item><el-input v-model.trim="inputValue" placeholder="请输入内容"></el-input></el-form-item><el-button type="primary" @click="handleClick">查询</el-button></el-form><Table :list="data.list" /><Pagination :currentChange="currentChange"></Pagination></div>
</template>
<script setup>
import Table from "./components/Table.vue";
import Pagination from "./components/Pagination.vue";
import { reactive, ref,onMounted } from "vue";
import { getCourse } from "../api/index";
/*** 初始化的数据*/
const data = reactive({list: [],page: 1, //默认展示第一页total: 5, //课程总数
});//onMounted首次加载调用一次接口
onMounted(() => {getCourseData();
});/*** 课程列表数据获取和课程类目切换逻辑*/
const getCourseData = async (query) => {const title = query?.title || "";const page = query?.page || 1;const size = query?.size || 5;const res = await getCourse({ title, page, size });//筛选符合分类的课程data.list = res?.data.data.data;data.total = res?.data.data.total;
};/*** 分页的逻辑*/
const currentChange = (val) => {if (val === "pre") {if (data.page > 1) {data.page--;} else {ElMessage({message: "已经是第一页了!!!",type: "warning",showClose: true,});}}if (val === "next") {if (data.page < Math.ceil(data.total / 5)) {data.page++;} else {ElMessage({message: "已经是最后一页了!!!",type: "warning",showClose: true,});}}//请求课程的接口getCourseData({ title: data.title, page: data.page });
};/*** 搜索框的逻辑*/
const inputValue = ref("");//搜索的按钮
const handleClick = () => {getCourseData({ title: inputValue.value });ElMessage({message: "查询成功",type: "success",});
};
</script>
<style lang="less" scoped>
.el-form {display: flex;
}.main {background-color: #fff;padding: 20px;flex: 1;display: flex;flex-direction: column;.input-with-select {width: 400px;margin-bottom: 40px;}
}:deep(.el-table__header-wrapper) {position: fixed;z-index: 20;
}:deep(.el-table__inner-wrapper) {overflow: hidden;
}:deep(.el-table__body-wrapper) {margin-top: 40px;
}:deep(.el-input__inner) {width: 300px;margin-right: 10px;
}:deep(.warning-row) {--el-table-tr-bg-color: var(--el-color-warning-light-9) !important;height: 140px !important;
}.table {height: 80vh;width: 98vw;overflow: hidden;overflow-y: scroll;text-align: center;
}.table::-webkit-scrollbar {display: none;
}
</style>
这里面有两个组件需要创建一下
Pagination.vue
<template><div class="pagination"><div class="pre" @click="currentChange('pre')">上一页</div><div class="next" @click="currentChange('next')">下一页</div></div>
</template>
<script setup>
import { defineProps } from 'vue';
const { currentChange } = defineProps(['currentChange'])
</script>
<style lang='less' scoped>
.pagination {display: flex;justify-content: center;margin-top: 20px;color: #fff;.pre {background-color: #409eff;margin-right: 10px;padding: 5px;cursor:pointer;}.next {padding: 5px;background-color: #409eff;cursor:pointer;}
}
</style>
Table.vue
<template><div class="table"><el-table :data="list"><el-table-column prop="course_img" label="图片"><template #default="scope"><img :src="scope.row.course_img" class="courseImg-img"></template></el-table-column><el-table-column prop="title" label="标题"></el-table-column><el-table-column prop="price" label="价格"></el-table-column><el-table-column prop="point" label="评分"></el-table-column><el-table-column prop="level" label="级别"></el-table-column><el-table-column prop="learn_num" label="学习人数"></el-table-column><el-table-column label="操作"><template #default="scope"><el-button type="primary">编辑</el-button><el-popconfirm title="确定要删除该课程吗?"><template #reference><el-button type="danger">删除</el-button></template></el-popconfirm></template></el-table-column></el-table></div></template><script setup>import { defineProps } from 'vue';const { list } = defineProps(['list'])</script><style lang='less' scoped>.courseImg-img {width: 150px;height: 100px;}</style>
3.创建接口请求
(1)创建request.js
import axios from 'axios';
/*** 创建axios实例*/
const ENV = process.env.NODE_ENV;
const host =ENV === 'development' ? 'http://127.0.0.1:8090' : 'http://192.168.140.134:8090';
const service = axios.create({baseURL: host,timeout: '3000',
});/*** 封装请求函数*/
const request = (options) => {if (options.method === 'get') {options.params = options.data;}return service(options);
};export default request;
(2)创建api中index.js
import request from '../utils/request';/*** 课程列表数据接口*/
export const getCourse = (data) => {return request({ method: 'get', url: '/course/api/v1/page', data });
};
4.启动项目
npm run serve

当问页面

Ok,完成。源代码博主放在主页的资源上了,需要的可以下载哦,记得给博主三连啊!

相关文章:
【案例实战】NodeJS+Vue3+MySQL实现列表查询功能
这篇文章,给大家带来一个列表查询的功能,从前端到后端的一个综合案例实战。 采用vue3作为前端开发,nodejs作为后端开发。 首先我们先来看一下完成的页面效果。点击分页,可以切换到上一页、下一页。搜索框可以进行模糊查询。 后端…...
Google play开发者账号被封的几种常见原因及相关解决思路
在Google paly上,每天都有大量的应用被成功发布,同时也有很多开发者账号被封禁。特别是在今年的十月份之前,谷歌的"封号潮"给很多开发者带来了沉重的打击。不过,令人欣慰的是,自十月份之后,情况逐…...
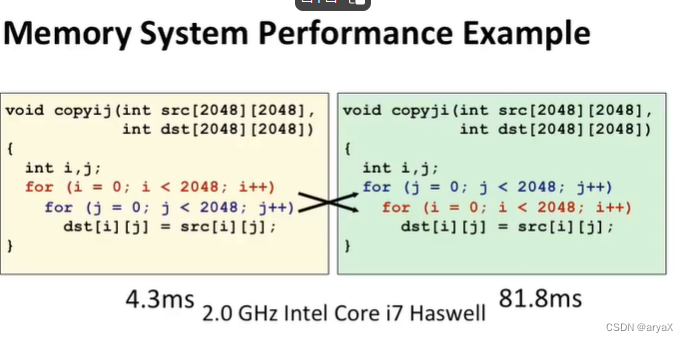
深入理解计算机系统CS213学习笔记
Lecture 01 1. 计算机表示数字 int 整数运算可能会出现错误,超过32位时会出现溢出。 float 浮点数不适用结合律,因为浮点数表示的精度有限。 根其原因,是用有限的位数表示无限的数字空间。 2.利用分层的存储系统,使程序运行更…...
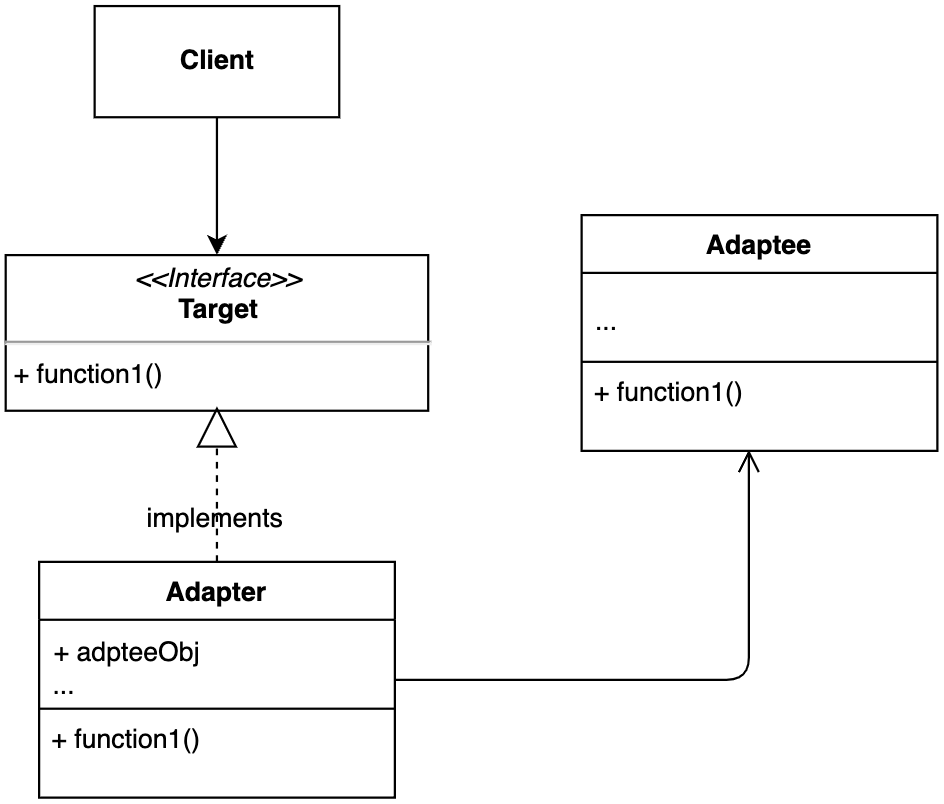
【设计模式】第8节:结构型模式之“适配器模式”
一、简介 适配器模式是用来做适配的,它将不兼容的接口转换为可兼容的接口,让原本由于接口不兼容而不能一起工作的类可以一起工作。 适配器模式角色: 请求者client:调用服务的角色目标Target:定义了Client要使用的功…...
Stable Diffusion WebUI扩展openpose-editor如何使用
先上地址: GitHub - fkunn1326/openpose-editor: Openpose Editor for AUTOMATIC1111s stable-diffusion-webuiOpenpose Editor for AUTOMATIC1111s stable-diffusion-webui - GitHub - fkunn1326/openpose-editor: Openpose Editor for AUTOMATIC1111s stable-diffusion-webu…...

企业网络带宽使用情况检查技巧
想要提高网络性能的企业通常会考虑限制对占用带宽的应用程序(如社交媒体和视频流应用程序)的访问,但对于那些真正需要获得高效网络的人来说,这还不够,您需要定期跟踪带宽使用情况。 虽然有许多工具可以帮助您检查网络…...
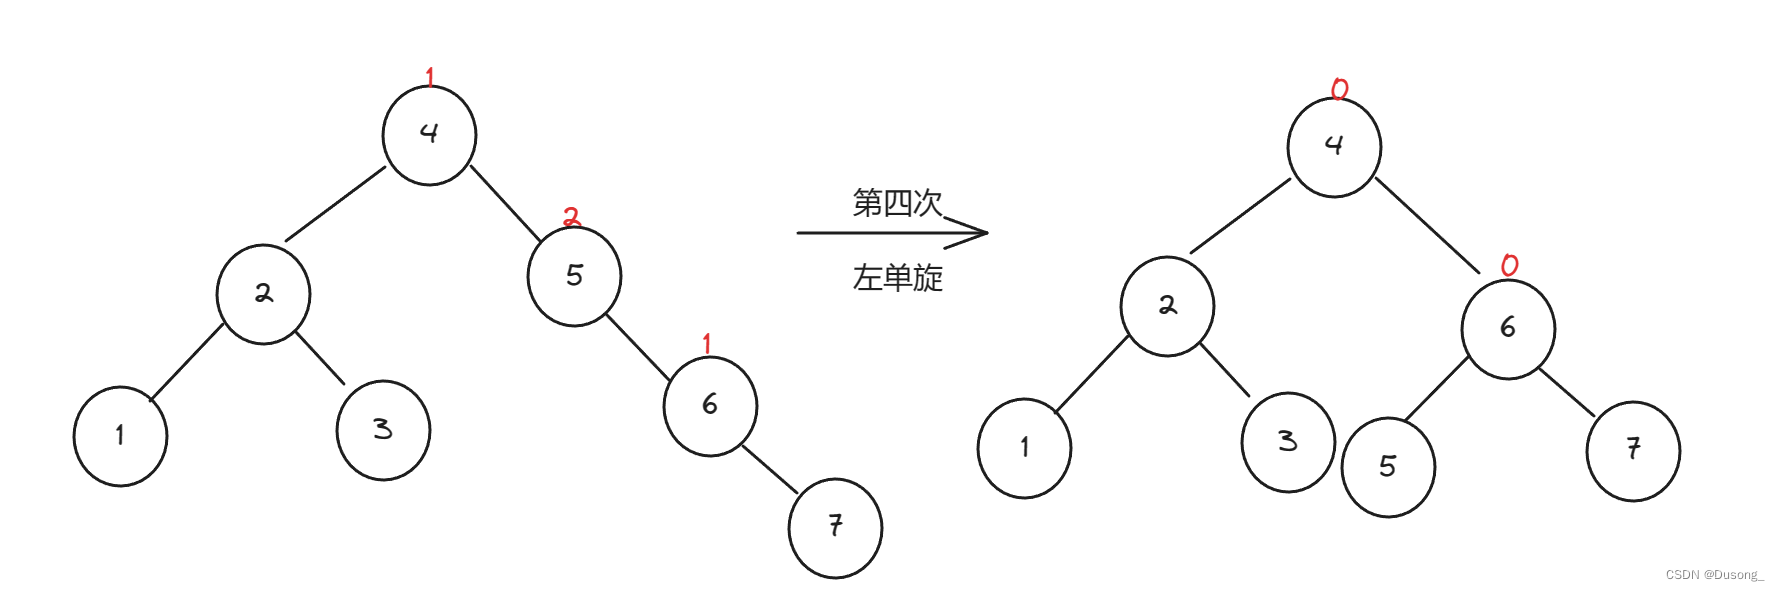
C/C++笔试易错与高频题型图解知识点(三)——数据结构部分(持续更新中)
目录 1. 排序 1.1 冒泡排序的改进 2. 二叉树 2.1 二叉树的性质 3. 栈 & 队列 3.1 循环队列 3.2 链式队列 4. 平衡二叉搜索树——AVL树、红黑树 5 优先级队列(堆) 1. 排序 1.1 冒泡排序的改进 下面的排序方法中,关键字比较次数与记录的初…...

Intel oneAPI笔记--oneAPI简介、SYCL编程简介
oneAPI简介 Intel oneAPI是Intel提供的统一编程模型和软件开发框架。 它旨在简化可充分利用英特尔各种硬件架构(包括 CPU、GPU 和 FPGA)的应用程序的开发 oneAPI一个重要的特性是开放性,支持多种类型的架构和不同的硬件供应商,是…...
Spring IOC - ConfigurationClassPostProcessor源码解析
上文提到Spring在Bean扫描过程中,会手动将5个Processor类注册到beanDefinitionMap中,其中ConfigurationClassPostProcessor就是本文将要讲解的内容,该类会在refresh()方法中通过调用invokeBeanFactoryPosstProcessors(beanFactory)被调用。 5…...
Android OpenGL ES 2.0入门实践
本文既然是入门实践,就先从简单的2D图形开始,首先,参考两篇官方文档搭建个框架,便于写OpenGL ES相关的代码:构建 OpenGL ES 环境、OpenGL ES 2.0 及更高版本中的投影和相机视图。 先上代码,代码效果如下图…...

sql语句性能进阶必须了解的知识点——索引失效分析
在前面的文章中讲解了sql语句的优化策略 sql语句性能进阶必须了解的知识点——sql语句的优化方案-CSDN博客 sql语句的优化重点还有一处,那就是—— 索引!好多sql语句慢的本质原因就是设置的索引失效或者根本没有建立索引!今天我们就来总结一…...
ctfhub技能树web题目全解
Rce 文件包含 靶场环境 重点是这个代码,strpos,格式是这样的strpoc(1,2,3) 1是要搜索的字符串,必须有;2是要查询的字符串,必须有;3是在何处开始查询&#…...

AMD、CMD、UMD是什么?
AMD(Asynchronous Module Definition)、CMD(Common Module Definition)和UMD(Universal Module Definition)是JavaScript模块化规范,用于管理和组织JavaScript代码的模块化加载和依赖管理。 1:AMD(异步模块定义): AMD是由RequireJS提出的模块化规范。它支持异步加载…...

AM@微分方程相关概念@线性微分方程@一阶线性微分方程的通解
文章目录 abstract引言 一般的微分方程常微分方程微分方程的解隐式解通解和特解初始条件初值问题微分方程的积分曲线 线性微分方程一阶线性微分方程一阶齐次和非齐次线性微分方程一阶齐次线性微分方程的解一阶非齐次线性微分方程的解 abstract AM微分方程相关概念线性微分方程…...
基于深度学习的安全帽识别检测系统(python OpenCV yolov5)
收藏和点赞,您的关注是我创作的动力 文章目录 概要 一、研究的内容与方法二、基于深度学习的安全帽识别算法2.1 深度学习2.2 算法流程2.3 目标检测算法2.3.1 Faster R-CNN2.3.2 SSD2.3.3 YOLO v3 三 实验与结果分析3.1 实验数据集3.1.1 实验数据集的构建3.1.2 数据…...

Spring源码分析篇一 @Autowired 是怎样完成注入的?究竟是byType还是byName亦两者皆有
1. 五种不同场景下 Autowired 的使用 第一种情况 上下文中只有一个同类型的bean 配置类 package org.example.bean;import org.springframework.context.annotation.Bean; import org.springframework.context.annotation.Configuration;Configuration public class FruitCo…...

Goby 漏洞发布|F5 BIG-IP AJP 身份认证绕过漏洞(CVE-2023-46747)
漏洞名称:F5 BIG-IP AJP 身份认证绕过漏洞(CVE-2023-46747) English Name:F5 BIG-IP AJP authentication bypass vulnerability (CVE-2023-46747) CVSS core: 10 影响资产数: 307282 漏洞描述: Cisco …...

Vue中watch侦听器用法
watch 需要侦听特定的数据源,并在单独的回调函数中执行副作用 watch第一个参数监听源 watch第二个参数回调函数cb(newVal,oldVal) watch第三个参数一个options配置项是一个对象{ immediate:true //是否立即调用一次 deep:true //是否开启…...

[算法前沿]--054-大语言模型的学习材料
大语言模型的学习材料 Other Papers If you’re interested in the field of LLM, you may find the above list of milestone papers helpful to explore its history and state-of-the-art. However, each direction of LLM offers a unique set of insights and contribut…...

DWA算法,仿真转为C用于无人机避障
DWA算法,仿真转为C用于无人机避障 链接: 机器人局部避障的动态窗口法(dynamic window approach) 链接: 机器人局部避障的动态窗口法DWA (dynamic window approach)仿真源码详细注释版 链接: 常见路径规划算法代码-Matlab (纯代码篇) …...

通用物联网开发板设计:基于ESP8266的硬件集成与开发实践
1. 项目概述:为什么我们需要一块“通用”的物联网开发板?在捣鼓了几年物联网项目之后,我发现自己桌面上堆满了各种开发板:ESP8266、ESP32、Arduino Uno、STM32 Nucleo……每个项目都要重新连线、配置电源、焊接传感器接口…...

理想二极管控制器:用MOSFET实现毫伏级压降的电源管理方案
1. 理想二极管控制器:告别传统二极管的压降损耗 在电源设计、电池保护、太阳能板并联这些领域里,二极管是个再常见不过的元件。我们用它来防反接、做整流、实现“或”逻辑供电,几乎不假思索。但如果你设计过一个需要处理大电流、低电压的系统…...
运营管理与服务保障平台建设方案)
低空旅游观光与低空通勤(eVTOL)运营管理与服务保障平台建设方案
本方案旨在为eVTOL载具构建集运营管理、空中交通管制、安全保障与乘客服务于一体的数字化平台。通过微服务架构、5G-A融合感知、空域网格化与零信任安全等核心技术,解决高密度飞行中的资源调度与安全冲突问题。目标实现毫秒级冲突解算与15分钟内快速周转,…...

OpenCore Legacy Patcher完整指南:让老旧Mac焕发新生,运行最新macOS
OpenCore Legacy Patcher完整指南:让老旧Mac焕发新生,运行最新macOS 【免费下载链接】OpenCore-Legacy-Patcher Experience macOS just like before 项目地址: https://gitcode.com/GitHub_Trending/op/OpenCore-Legacy-Patcher 你是否有一台被苹…...

英雄联盟回放播放难题终极解决方案:ROFLPlayer完整使用指南
英雄联盟回放播放难题终极解决方案:ROFLPlayer完整使用指南 【免费下载链接】ROFL-Player (No longer supported) One stop shop utility for viewing League of Legends replays! 项目地址: https://gitcode.com/gh_mirrors/ro/ROFL-Player 还在为英雄联盟旧…...

关于内卷,几个值得深想的洞察
首先声明:这篇不劝躺平,也不教内卷——只是想说清楚,你到底在一个什么样的游戏里。 你以为内卷是“资源不足”,其实是“分配方式” 很多人对内卷有个本质上的认知错误:以为内卷是因为资源不够,大家为了抢资…...

模拟调音台数字化改造:基于STM32与MOTU音频接口的智能控制方案
1. 项目概述:为老旧模拟调音台注入数字灵魂在不少社区广播电台、校园电台或是小型制作室里,你依然能看到那些服役了十几年甚至几十年的模拟调音台。它们皮实耐用,推子手感扎实,旋钮的阻尼感让人安心,但面对如今以数字文…...

Unity动态植被系统:实时天气与自然现象耦合方案
1. 这不是“贴图堆砌”,而是一套可交互的自然系统你有没有试过在Unity里拖进几棵树、铺点草地,结果运行起来——风一吹,所有树叶像被钉在空中一样纹丝不动;下雨时,雨滴垂直砸进地面,连个水花都没有…...
)
DeepSeek注释质量跃迁路径(附12个真实项目对比数据+可复用Prompt模板)
更多请点击: https://codechina.net 第一章:DeepSeek注释质量跃迁路径(附12个真实项目对比数据可复用Prompt模板) 高质量代码注释不再是“锦上添花”,而是模型理解意图、团队高效协同与长期可维护性的核心基础设施。…...

程序员的物理级打字肌肉记忆训练指南:从一指禅到无意识盲打的科学路径
程序员的物理级打字肌肉记忆训练指南:从一指禅到无意识盲打的科学路径 在日常写代码或重构时,你是否遇到过这种场景: 脑子里已经构思好了完美的重构逻辑,但在输入 >、{} 或 _ 时,手指本能地一顿,视线不…...