视频格式网络地址转换视频到本地,获取封面、时长,其他格式转换成mp4
使用ffmpeg软件转换网络视频,先从官网下载对应操作系统环境的包
注意:网络地址需要是视频格式结尾,例如.mp4,.flv 等
官网地址:Download FFmpeg
window包:
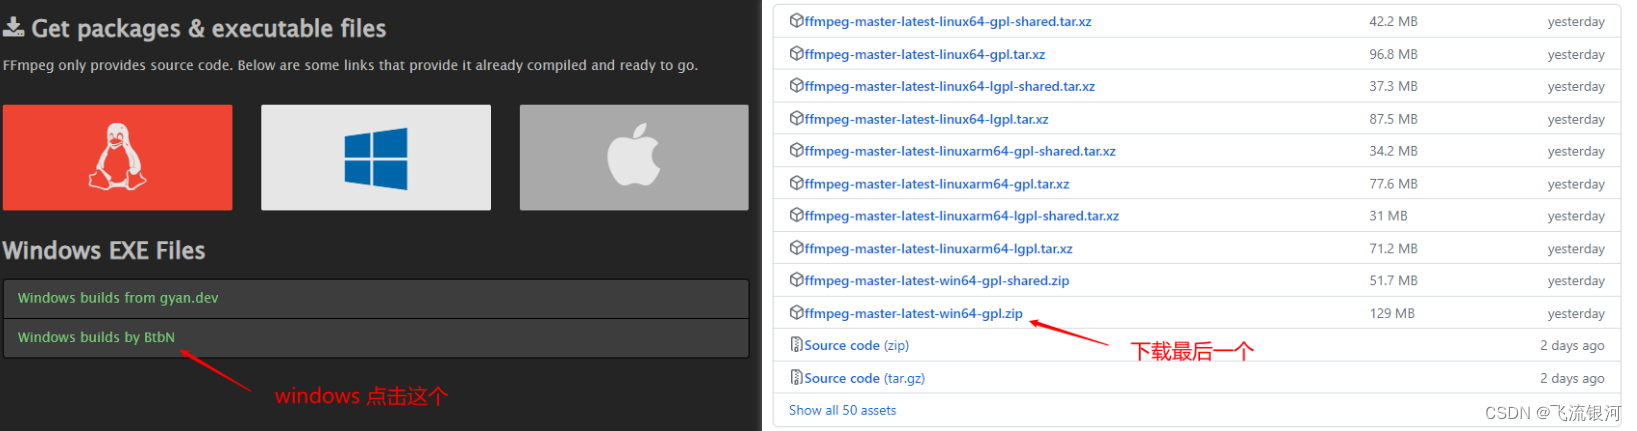
linux包:
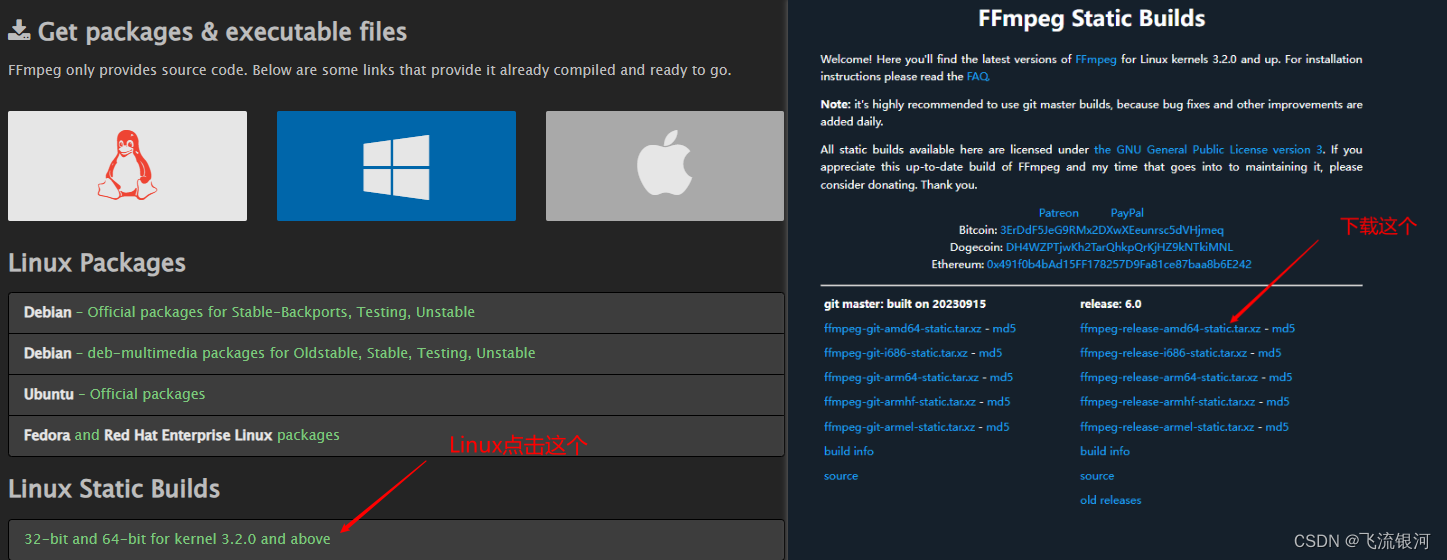
如果下载缓慢,下载迅雷安装使用下载。
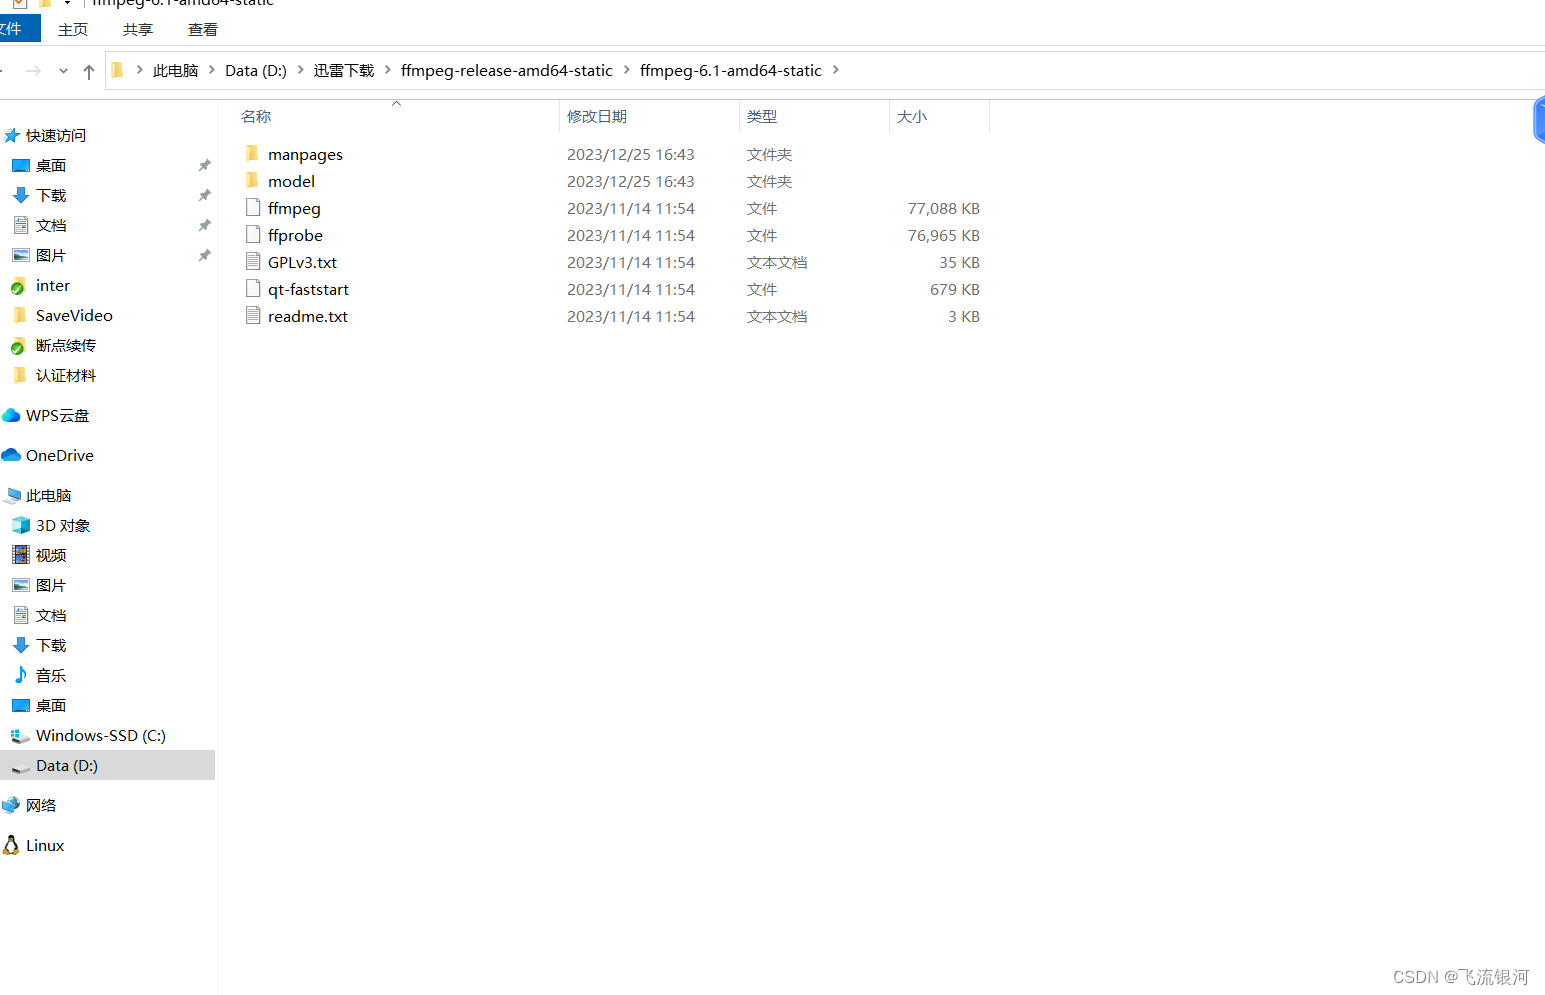
解压缩后对应截图:
window:

linux:
在maven项目的pom.xml引入依赖包:
<dependency><groupId>net.bramp.ffmpeg</groupId><artifactId>ffmpeg</artifactId><version>0.7.0</version></dependency><dependency><groupId>org.bytedeco</groupId><artifactId>javacpp</artifactId><version>1.4.1</version></dependency><dependency><groupId>org.bytedeco</groupId><artifactId>javacv</artifactId><version>1.4.1</version></dependency><dependency><groupId>org.bytedeco.javacpp-presets</groupId><artifactId>ffmpeg-platform</artifactId><version>3.4.2-1.4.1</version></dependency>引入类:
import cn.hutool.core.date.DateUtil;
import lombok.extern.slf4j.Slf4j;
import net.bramp.ffmpeg.FFmpeg;
import net.bramp.ffmpeg.FFmpegExecutor;
import net.bramp.ffmpeg.FFprobe;
import net.bramp.ffmpeg.builder.FFmpegBuilder;
import org.bytedeco.javacv.FFmpegFrameGrabber;
import org.bytedeco.javacv.FrameGrabber;
import org.bytedeco.javacv.Java2DFrameConverter;import javax.imageio.ImageIO;
import java.awt.image.BufferedImage;
import java.io.File;
import java.io.IOException;
import java.io.InputStream;
import java.io.RandomAccessFile;
import java.net.HttpURLConnection;
import java.net.URL;
网络地址转换成本地视频方法:
/*** 视频链接转换成本地视频* @param videoUrl* @param downloadPath* @return*/public static boolean downVideo(String videoUrl,String downloadPath){HttpURLConnection connection = null;InputStream inputStream = null;RandomAccessFile randomAccessFile = null;boolean re;try{URL url = new URL(videoUrl);connection = (HttpURLConnection) url.openConnection();connection.setRequestProperty("Range","bytes=0-");connection.connect();if (connection.getResponseCode() / 100 != 2){System.out.println("链接失败");return false;}inputStream = connection.getInputStream();int downloaded = 0;int fileSize = connection.getContentLength();randomAccessFile = new RandomAccessFile(downloadPath,"rw");while (downloaded < fileSize){byte[] buffer = null;if (fileSize - downloaded >= 1000000){buffer = new byte[1000000];}else{buffer = new byte[fileSize - downloaded];}int read = -1;int currentDownload = 0;while (currentDownload < buffer.length){read = inputStream.read();buffer[currentDownload++] = (byte) read;}randomAccessFile.write(buffer);downloaded += currentDownload;}re = true;return re;} catch (Exception e) {e.printStackTrace();re = false;return re;}finally {try{connection.disconnect();inputStream.close();randomAccessFile.close();}catch (Exception e){e.printStackTrace();}}}网站地址转换成本地视频后,再转换成mp4视频方法:
/*** 其他视频格式地址转换成mp4* @param orginalVideoPath 原视频地址* @param newMp4FilePath 新mp4地址* @return*/public static boolean otherVideoToMp4(String orginalVideoPath,String newMp4FilePath) {try{String ffmpegPath = "";String ffprobePath = "";if (SystemUtils.isWindows()){//目录里放的文件没有提交保存,在本地测试的时候自行添加ffmpegPath = VideoCovertUtil.class.getResource("/ffmpegdir/win/bin/ffmpeg.exe").getPath();ffprobePath = VideoCovertUtil.class.getResource("/ffmpegdir/win/bin/ffprobe.exe").getPath();}else if (SystemUtils.isLinux()){/*ffmpegPath = VideoCovertUtil.class.getResource("/ffmpegdir/linux/ffmpeg").getPath();ffprobePath = VideoCovertUtil.class.getResource("/ffmpegdir/linux/ffprobe").getPath();*///在linux安装ffmpeg后配置路径//安装步骤:https://blog.csdn.net/ysushiwei/article/details/130162831ffmpegPath = "/usr/local/bin/ffmpeg";ffprobePath = "/usr/local/bin/ffprobe";}log.info("ffmpegPath:"+ffmpegPath);log.info("ffmpegPath:"+ffprobePath);FFmpeg fFmpeg = new FFmpeg(ffmpegPath);FFprobe fFprobe = new FFprobe(ffprobePath);FFmpegBuilder builder = new FFmpegBuilder().setInput(orginalVideoPath).addOutput(newMp4FilePath).done();FFmpegExecutor executor = new FFmpegExecutor(fFmpeg,fFprobe);executor.createJob(builder).run();log.info("执行完毕");return true;}catch (IOException e){e.printStackTrace();return false;}}window可以直接放在项目中,但是linux还需要配置。步骤如下。
1、将上方的linux包上传到服务器,解压缩:
tar -xvf ffmpeg-release-amd64-static.tar.xz
2、解压缩后进入根目录分别复制根目录下的ffmpeg和ffprobe到 /usr/local/bin/目录下:
sudo cp 解压缩目录/ffmpeg /usr/local/bin/
sudo cp 解压缩目录/ffprobe /usr/local/bin/
3.还要给文件设置权限,否则运行代码的时候报没有权限:
sudo chmod +x /usr/local/bin/ffmpeg
sudo chmod +x /usr/local/bin/ffprobe
4、最后检查是否配置成功,如果有内容输出来则成功:
ffmpeg -version
ffprobe -version
linux环境配置好后,即可正常解析.
从视频中提取封面和获取时长:
/*** 获取视频的第一帧封面* @param filePath 视频地址* @param targetPath 视频封面地址*/public static void getCover(String filePath,String targetPath){try{// 视频地址FFmpegFrameGrabber grabber = new FFmpegFrameGrabber(new File(filePath));grabber.start();Java2DFrameConverter converter = new Java2DFrameConverter();BufferedImage image = converter.convert(grabber.grabImage());// 本地图片保存地址ImageIO.write(image, "png", new File(targetPath));grabber.stop();image.flush();}catch (Exception e){e.printStackTrace();}}/*** 使用FFmpeg获取视频时长** @param path 视频文件地址* @return 时长,单位为秒* @throws IOException*/public static String getDuration(String path) {// 读取视频文件FFmpegFrameGrabber grabber = new FFmpegFrameGrabber(path);try {grabber.start();} catch (FrameGrabber.Exception e) {e.printStackTrace();}// 获取视频长度(单位:秒)int duration = grabber.getLengthInFrames() / (int) grabber.getFrameRate();try {grabber.stop();} catch (FrameGrabber.Exception e) {e.printStackTrace();}return DateUtil.secondToTime(duration);}由于视频转换下载等速度比较慢,推荐使用异步执行。我用的是若依的框架,代码如下。如用其他框架,可自行参考写异步操作
//异步执行方法。不会等待执行完才执行下一位
AsyncManager.me().execute(AsyncFactory.convertVideoNetUrl(video.getVideoPath(),video.getId(),Constants.CONVERT_VIDEO_NET_VIDEO_URL));#在AsyncManager类里自定义一个异步方法如下/*** * @param videNetUrl 视频网络地址* @param id 类id* @param entityClazz 类 0:视频 1:文章* @return 任务task*/public static TimerTask convertVideoNetUrl(final String videNetUrl,Long id,Integer entityClazz){return new TimerTask(){@Overridepublic void run(){if (entityClazz == null || id == null || StrUtil.isBlank(videNetUrl)){return;}if (entityClazz == 0){IVideoService videoService =  SpringUtils.getBean(IVideoService.class);Video video = videoService.selectVideoById(id);if (video == null){return;}//现在是上传视频地址//先转换视频地址到服务器//后缀String ext = video.getVideoPath().substring(video.getVideoPath().lastIndexOf("."));String videosubpath = StringUtils.format("{}/{}_{}{}", DateUtils.datePath(),IdUtils.fastSimpleUUID(), Seq.getId(Seq.uploadSeqType), ext);String downloadPath = null;try {downloadPath = FileUploadUtils.getAbsoluteFile(HqaConfig.getUploadPath() + "/", videosubpath).getAbsolutePath();}catch (Exception e){e.printStackTrace();}boolean downVideo = VideoCovertUtil.downVideo(video.getVideoPath(),downloadPath);if (downVideo && StrUtil.isNotBlank(downloadPath) && downloadPath != null){if (!ext.contains("mp4")){//下载成功后如果不是mp4格式,转换成mp4格式String newVideosubpath = StringUtils.format("{}/{}_{}{}", DateUtils.datePath(),IdUtils.fastSimpleUUID(), Seq.getId(Seq.uploadSeqType), ".mp4");String newMp4FilePath = null;try {newMp4FilePath = FileUploadUtils.getAbsoluteFile(HqaConfig.getUploadPath() + "/", newVideosubpath).getAbsolutePath();}catch (Exception e){e.printStackTrace();}boolean toMp4 = VideoCovertUtil.otherVideoToMp4(downloadPath,newMp4FilePath);if (toMp4 && StrUtil.isNotBlank(newMp4FilePath) && newMp4FilePath != null){//转换成功后删除之前下载过的视频地址,并且保存新的mp4地址if (new File(downloadPath).exists()){FileUtils.deleteFile(downloadPath);}if (newMp4FilePath.contains("\\")){newMp4FilePath = newMp4FilePath.replace("\\","/");}String newPath = newMp4FilePath.replace(HqaConfig.getProfile(),"/profile");video.setVideoPath(newPath);}}else{if (downloadPath.contains("\\")){downloadPath = downloadPath.replace("\\","/");}//保存地址String newPath = downloadPath.replace(HqaConfig.getProfile(),"/profile");video.setVideoPath(newPath);}//视频截图和时长//获取视频第一帧封面String parentPath = HqaConfig.getUploadPath()+"/"+ DateUtils.datePath();String fileName = IdUtils.fastSimpleUUID()+".png";String targetPath = parentPath+"/"+ fileName;try {FileUploadUtils.getAbsoluteFile(parentPath,fileName);} catch (IOException e) {e.printStackTrace();}String filePath = video.getVideoPath().replace("/profile","");filePath=HqaConfig.getProfile()+filePath;VideoCovertUtil.getCover(filePath,targetPath);video.setCover(targetPath.replace(HqaConfig.getProfile(),"/profile"));String  duration = VideoCovertUtil.getDuration(filePath);video.setDuration(duration);videoService.updateVideo(video);}}else if (entityClazz == 1){IArticleService articleService = SpringUtils.getBean(IArticleService.class);Article article = articleService.selectArticleById(id);if (article == null){return;}//现在是上传视频地址//先转换视频地址到服务器//后缀String ext = article.getVideoPath().substring(article.getVideoPath().lastIndexOf("."));String videosubpath = StringUtils.format("{}/{}_{}{}", DateUtils.datePath(),IdUtils.fastSimpleUUID(), Seq.getId(Seq.uploadSeqType), ext);String downloadPath = null;try {downloadPath = FileUploadUtils.getAbsoluteFile(HqaConfig.getUploadPath() + "/", videosubpath).getAbsolutePath();}catch (Exception e){e.printStackTrace();}boolean downVideo = VideoCovertUtil.downVideo(article.getVideoPath(),downloadPath);if (downVideo && StrUtil.isNotBlank(downloadPath) && downloadPath != null){if (!ext.contains("mp4")){//下载成功后如果不是mp4格式,转换成mp4格式String newVideosubpath = StringUtils.format("{}/{}_{}{}", DateUtils.datePath(),IdUtils.fastSimpleUUID(), Seq.getId(Seq.uploadSeqType), ".mp4");String newMp4FilePath = null;try {newMp4FilePath = FileUploadUtils.getAbsoluteFile(HqaConfig.getUploadPath() + "/", newVideosubpath).getAbsolutePath();}catch (Exception e){e.printStackTrace();}boolean toMp4 = VideoCovertUtil.otherVideoToMp4(downloadPath,newMp4FilePath);if (toMp4 && StrUtil.isNotBlank(newMp4FilePath) && newMp4FilePath != null){//转换成功后删除之前下载过的视频地址,并且保存新的mp4地址if (new File(downloadPath).exists()){FileUtils.deleteFile(downloadPath);}if (newMp4FilePath.contains("\\")){newMp4FilePath = newMp4FilePath.replace("\\","/");}String newPath = newMp4FilePath.replace(HqaConfig.getProfile(),"/profile");article.setVideoPath(newPath);}}else{if (downloadPath.contains("\\")){downloadPath = downloadPath.replace("\\","/");}//保存地址String newPath = downloadPath.replace(HqaConfig.getProfile(),"/profile");article.setVideoPath(newPath);}articleService.updateArticle(article);}}}};}
相关文章:
视频格式网络地址转换视频到本地,获取封面、时长,其他格式转换成mp4
使用ffmpeg软件转换网络视频,先从官网下载对应操作系统环境的包 注意:网络地址需要是视频格式结尾,例如.mp4,.flv 等 官网地址:Download FFmpeg window包: linux包: 如果下载缓慢,下载迅雷安装使用…...
企业私有云容器化架构运维实战
什么是虚拟化: 虚拟化(Virtualization)技术最早出现在 20 世纪 60 年代的 IBM 大型机系统,在70年代的 System 370 系列中逐渐流行起来,这些机器通过一种叫虚拟机监控器(Virtual Machine Monitor,VMM&#x…...
)
Baumer工业相机堡盟工业相机如何通过NEOAPI SDK使用UserSet功能保存和载入相机的各类参数(C++)
Baumer工业相机堡盟工业相机如何通过NEOAPI SDK使用UserSet功能保存和载入相机的各类参数(C) Baumer工业相机Baumer工业相机NEOAPISDK中UserSet的技术背景代码案例分享第一步:保存相机当前参数设置UserSet_Save第二步:载入已经保存…...
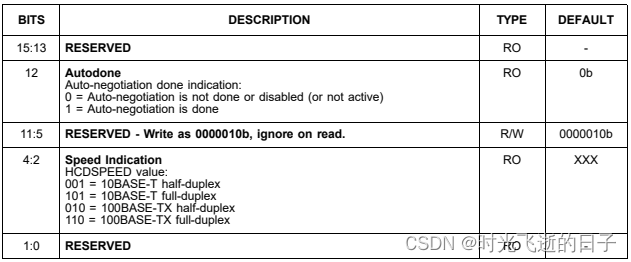
STM32的以太网外设+PHY(LAN8720)使用详解(3):PHY寄存器详解
0 工具准备 1.野火 stm32f407霸天虎开发板 2.LAN8720数据手册 3.STM32F4xx中文参考手册1 PHY寄存器 前面介绍到,站管理接口(SMI)允许应用程序通过2线时钟和数据线访问任意PHY寄存器,同时该接口支持访问最多32个PHY,也…...
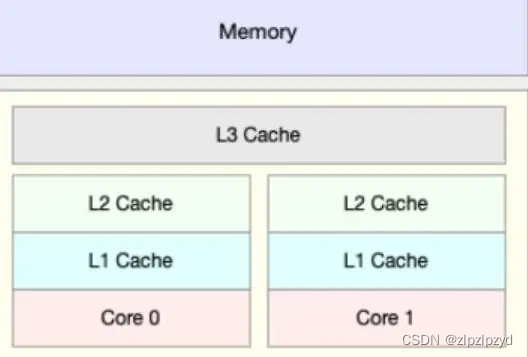
缓存和缓冲的区别
近期被这两个词汇困扰了,感觉有本质的区别,搜了一些资料,整理如下 计算机内部的几个部分图如下 缓存(cache) https://baike.baidu.com/item/%E7%BC%93%E5%AD%98 提到缓存(cache),就…...

C++高级-STL库概述
目录 一、概念 二、STL的历史背景 三、STL的版本 四、STL的主要优势...

uniapp 统一获取授权提示和48小时间隔授权
应用商店审核要求 获取权限前需要给提示,拒绝之后48小时不能给弹窗授权 项目用的是uniapp getImagePermission(v?: string, tag?: any, source?: any, proj?: any) {// proj proj || vueSelf.$proj(tag, source);let data {state: false,//是否原生授权denied…...

Halcon点云重建
dev_close_window () *点云文件数据的读取 read_object_model_3d (‘E:/1.om3’, ‘mm’, [], [], ObjectModel3D, Status) *获得点云的数据,例如高度 get_object_model_3d_params (ObjectModel3D, ‘point_coord_z’, GenParamValue) dev_open_window (0, 0, 512, …...
docker学习(二十一、network使用示例container、自定义)
文章目录 一、container应用示例1.需要共用同一个端口的服务,不适用container方式2.可用示例3.停掉共享源的容器,其他容器只有本地回环lo地址 总结 二、自定义网络应用示例默认bridge,容器间ip通信默认bridge,容器间服务名不通 自…...

【Python机器学习系列】一文带你了解机器学习中的Pipeline管道机制(理论+源码)
这是Python机器学习原创文章,我的第183篇原创文章。 一、引言 对于表格数据,一套完整的机器学习建模流程如下: 背景知识1:机器学习中的学习器 【Python机器学习系列】一文搞懂机器学习中的转换器和估计器(附案例&…...
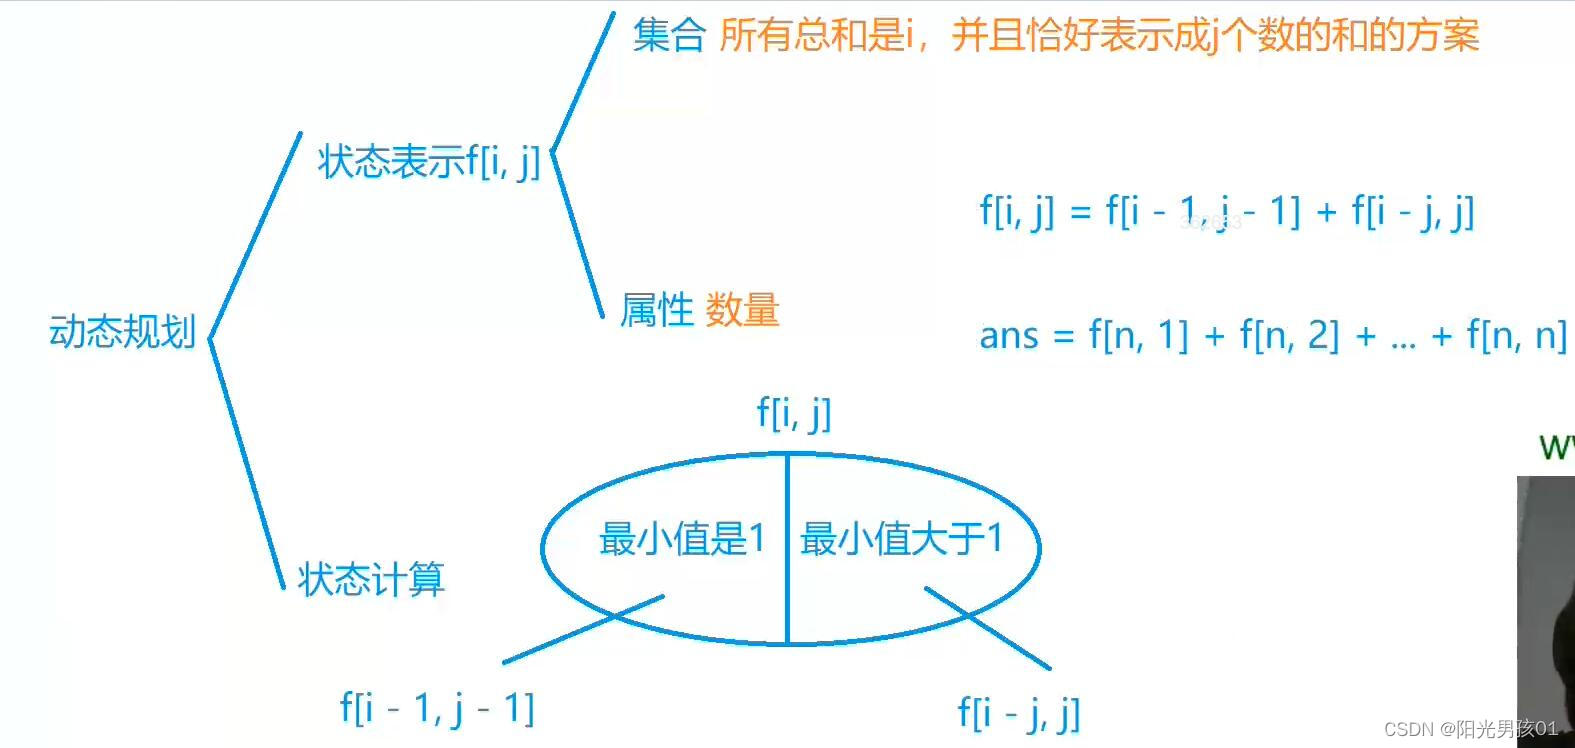
算法基础之整数划分
整数划分 核心思想: 计数类dp 背包做法 f[i][j] 表示 取 1 – i 的物品 总容量为j的选法数量 f[i][j] f[i-1][j] f[i-1][j-v[i]] f[i-1][j-2v[i]] f[i-1][j-3v[i]] ……f[i-1][j-kv[i]] f[i][j-v[i]] f[i-1][j-v[i]] f[i-1][j-2v[i]] f[i-1][j-3v[i]] ……f[i…...
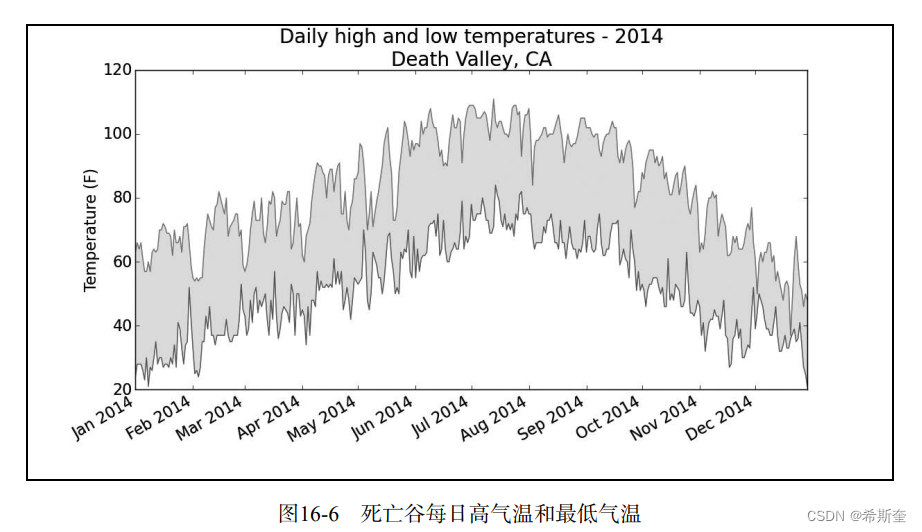
关于“Python”的核心知识点整理大全47
目录 16.1.10 错误检查 highs_lows.py highs_lows.py 16.2 制作世界人口地图:JSON 格式 16.2.1 下载世界人口数据 16.2.2 提取相关的数据 population_data.json world_population.py 16.2.3 将字符串转换为数字值 world_population.py 2world_population…...
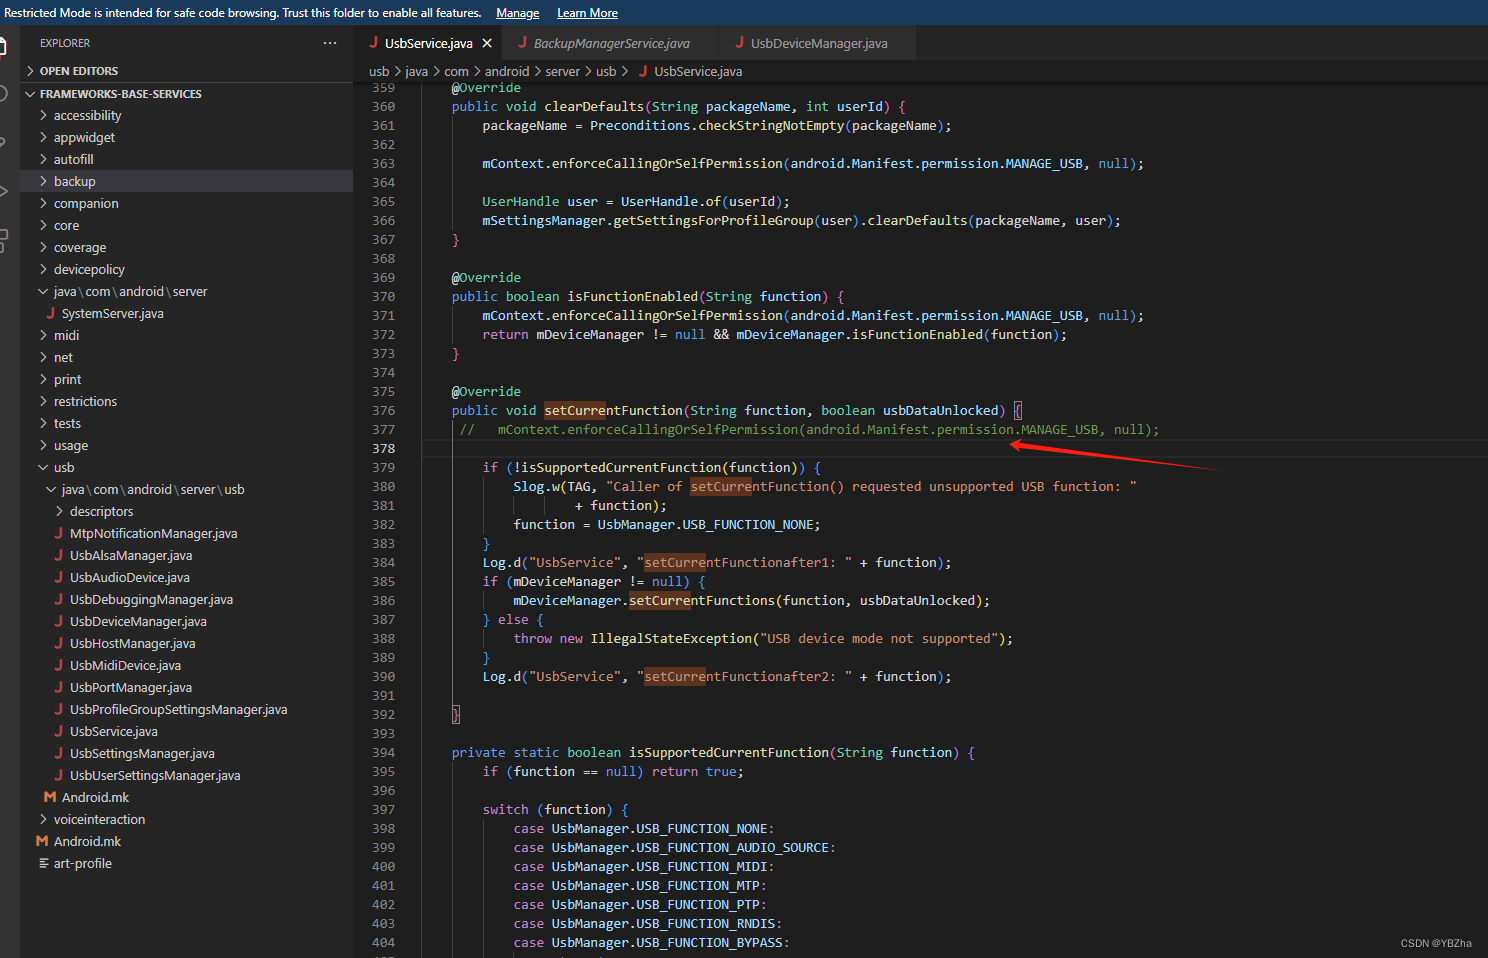
Android 8.1 设置USB传输文件模式(MTP)
项目需求,需要在电脑端adb发送通知手机端接收指令,将USB的仅充电模式更改成传输文件(MTP)模式,便捷用户在我的电脑里操作内存文件,下面是我们的常见的修改方式 1、android12以下、android21以上是这种方式…...
模型量化 | Pytorch的模型量化基础
官方网站:Quantization — PyTorch 2.1 documentation Practical Quantization in PyTorch | PyTorch 量化简介 量化是指执行计算和存储的技术 位宽低于浮点精度的张量。量化模型 在张量上执行部分或全部操作,精度降低,而不是 全精度…...

adb和logcat常用命令
adb的作用 adb构成 client端,在电脑上,负责发送adb命令daemon守护进程adbd,在手机上,负责接收和执行adb命令server端,在电脑上,负责管理client和daemon之间的通信 adb工作原理 client端将命令发送给ser…...

千巡翼X4轻型无人机 赋能智慧矿山
千巡翼X4轻型无人机 赋能智慧矿山 传统的矿山测绘需要大量测绘员通过采用手持RTK、全站仪对被测区域进行外业工作,再通过方格网法、三角网法、断面法等进行计算,需要耗费大量人力和时间。随着无人机航测技术的不断发展,利用无人机作业可以大…...
:编译服务器的配置、AOSP源码的下载、编译、运行)
【Android 13】使用Android Studio调试系统应用之Settings移植(一):编译服务器的配置、AOSP源码的下载、编译、运行
文章目录 1. 篇头语2. 系列文章3. ubuntu 最佳版本3.1 下载并安装3.2 配置AOSP工具链3.3 配置Python多版本支持4. AOSP源码下载4.1 配置repo工具4.2 源码下载5. AOSP编译5.1 添加emulator模拟器配置5.1.1 哪些是支持模拟器的Products?5.1.2 添加方法5.2 编译...

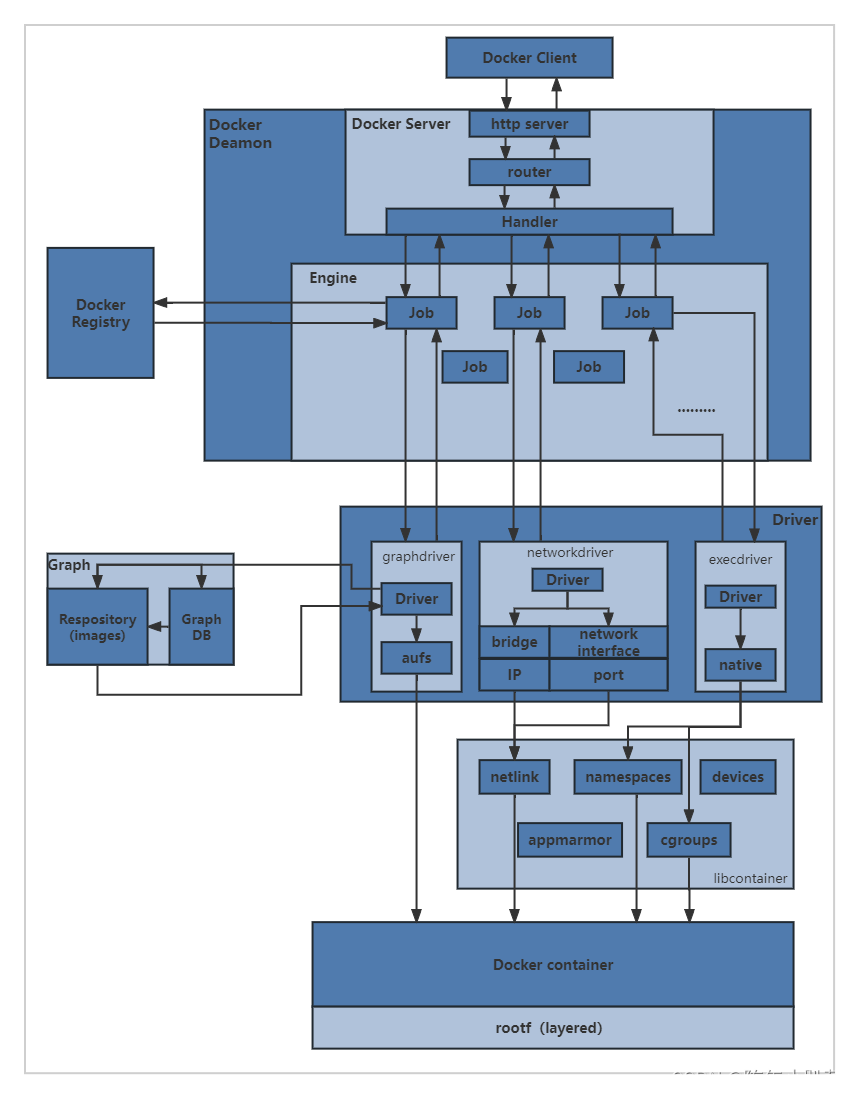
【1】Docker详解与部署微服务实战
Docker 详解 Docker 简介 Docker 是一个开源的容器化平台,可以帮助开发者将应用程序和其依赖的环境打包成一个可移植、可部署的容器。Docker 的主要目标是通过容器化技术实现应用程序的快速部署、可移植性和可扩展性,从而简化应用程序的开发、测试和部…...

C# JsonString转Object以及Object转JsonString
主要讲述了两种方法的转换,最后提供了格式化输出JsonString字符串。 需要引用程序集 System.Web.Extensions.dll、Newtonsoft.Json.dll System.Web.Extensions.dll可直接在程序集中引用,Newtonsoft.Json.dll需要在NuGet中下载引用。 详细代码…...
)
华为OD机试真题-中文分词模拟器-2023年OD统一考试(C卷)
题目描述: 给定一个连续不包含空格字符串,该字符串仅包含英文小写字母及英文文标点符号(逗号、分号、句号),同时给定词库,对该字符串进行精确分词。 说明: 1.精确分词: 字符串分词后,不会出现重叠。即“ilovechina” ,不同词库可分割为 “i,love,china” “ilove,c…...
)
避坑指南:DataSophon 1.0.0部署中那些官方文档没细说的步骤(防火墙、MySQL、Nginx配置)
DataSophon 1.0.0部署实战:防火墙策略、MySQL优化与Nginx反向代理的深度解析 当你第一次接触DataSophon这个新兴的大数据管理平台时,可能会被它"一小时部署300节点"的宣传所吸引。但真正开始部署时,很多工程师会发现官方文档对一些…...

CANN/asc-devkit流水线屏障同步API
PipeBarrier(ISASI) 【免费下载链接】asc-devkit 本项目是CANN 推出的昇腾AI处理器专用的算子程序开发语言,原生支持C和C标准规范,主要由类库和语言扩展层构成,提供多层级API,满足多维场景算子开发诉求。 项目地址: https://git…...

CANN/asc-devkit LogSoftMax Tiling接口文档
LogSoftMax Tiling 【免费下载链接】asc-devkit 本项目是CANN 推出的昇腾AI处理器专用的算子程序开发语言,原生支持C和C标准规范,主要由类库和语言扩展层构成,提供多层级API,满足多维场景算子开发诉求。 项目地址: https://gitc…...
:技能配置)
OpenClaw从入门到应用——工具(Tools):技能配置
通过OpenClaw实现副业收入:《OpenClaw赚钱实录:从“养龙虾“到可持续变现的实践指南》 所有与技能相关的配置都位于 ~/.openclaw/openclaw.json 中的 skills 字段下。 {skills: {allowBundled: ["gemini", "peekaboo"],load: {ext…...

Linux 绝对路径与相对路径详解——新手再也不迷路
前言在Linux中,无论是查看文件、修改配置,还是切换目录,都离不开“路径”——路径就像是文件和目录的“地址”,指引我们在庞大的文件系统中找到目标。对于新手来说,最容易混淆的就是“绝对路径”和“相对路径”&#x…...

完整 Ubuntu 服务器 XFCE 桌面 + XRDP 远程桌面 部署使用全流程
一、系统初始化 & 基础依赖安装bash# 更新系统sudo apt update && sudo apt upgrade -y# 安装必备依赖sudo apt install wget curl libfuse2 libxcb-xinput0 libxkbfile1 libssl-dev lrzsz -y二、安装 XFCE 轻量图形桌面bash# 完整安装XFCE桌面环境sudo apt instal…...

从源码到蓝图:使用Visual Paradigm高效逆向工程UML图
1. 逆向工程的价值与Visual Paradigm定位 接手一个遗留项目时,最头疼的往往不是写新代码,而是理解前人留下的"天书"。上周我就遇到个典型场景:客户紧急要求给三年前的老系统加功能,但项目文档只有一张模糊的截图和半页残…...

JoyCon-Driver:Windows平台上的Switch手柄完美解决方案
JoyCon-Driver:Windows平台上的Switch手柄完美解决方案 【免费下载链接】JoyCon-Driver A vJoy feeder for the Nintendo Switch JoyCons and Pro Controller 项目地址: https://gitcode.com/gh_mirrors/jo/JoyCon-Driver 还在为Nintendo Switch JoyCon控制器…...

实用指南:3分钟在Windows中解锁iPhone HEIC照片缩略图预览
实用指南:3分钟在Windows中解锁iPhone HEIC照片缩略图预览 【免费下载链接】windows-heic-thumbnails Enable Windows Explorer to display thumbnails for HEIC/HEIF files 项目地址: https://gitcode.com/gh_mirrors/wi/windows-heic-thumbnails 还在为iPh…...
)
为什么你的课程推荐越来越不准?Perplexity查询功能2024Q2算法升级内幕(附绕过冷启动限制的私有指令)
更多请点击: https://kaifayun.com 第一章:为什么你的课程推荐越来越不准?Perplexity查询功能2024Q2算法升级内幕(附绕过冷启动限制的私有指令) Perplexity 在 2024 年第二季度对课程推荐核心查询模块进行了深度重构&…...