Three.js 镜面反射Reflector 为MeshStandardMaterial增加Reflector能力
| 效果 | 效果 | 官方案例 |
|---|---|---|
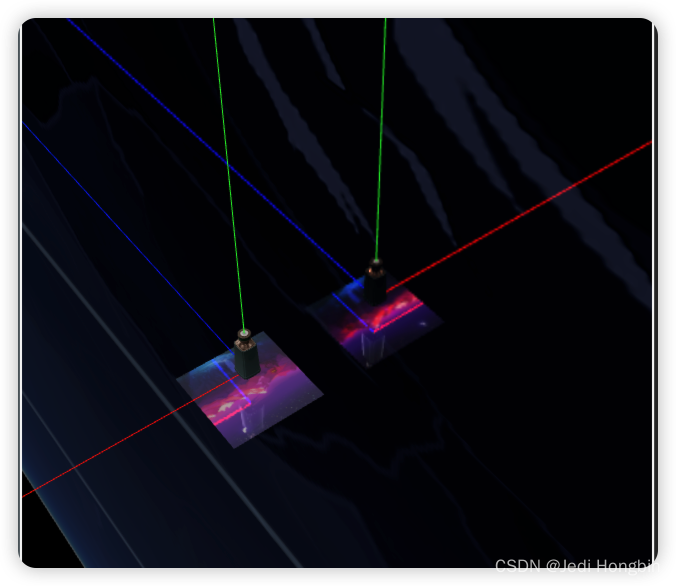 | 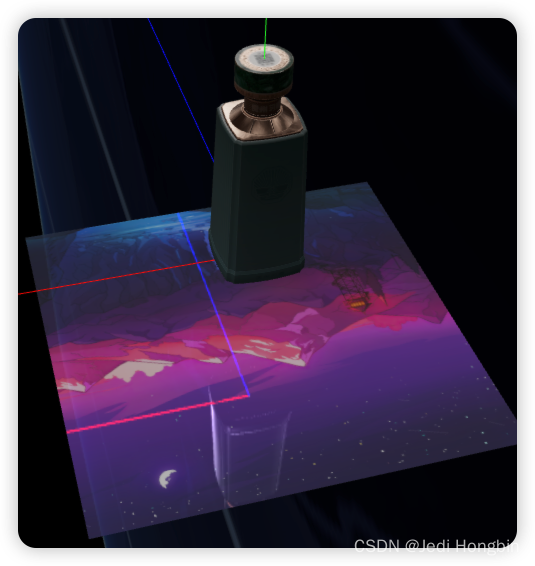 | 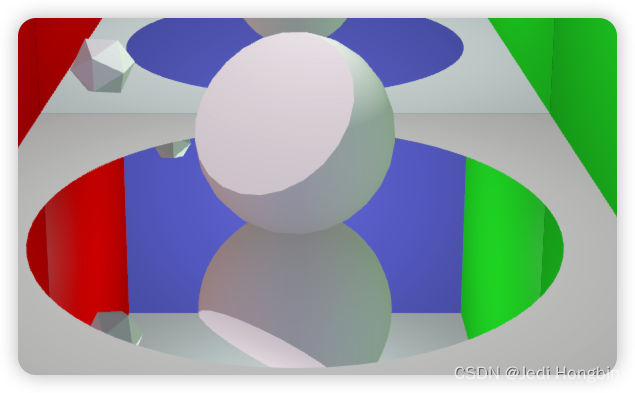 |
区别:官方的案例更像一个镜子 没有纹理等属性 也没有透明度修改
根据源码进行修改为 MeshStandardMaterial实现反射
使用案例
createReflector() {const plane = this.helper.create.plane(2, 2);this.helper.add(plane.mesh);plane.mesh.rotateX(Math.PI / -2);plane.mesh.position.y -= 0.5;const material = plane.mesh.material;console.log(material);plane.mesh.material = new THREE.MeshStandardMaterial({map: this.helper.loadTexture("/public/textures/wallhaven-kxj3l1_840x840.png",(t) => {t.colorSpace = THREE.SRGBColorSpace;}),transparent: true,opacity: 0.3,});addReflectorEffect(plane.mesh);{const plane = this.helper.create.plane(100, 100);this.helper.add(plane.mesh);plane.mesh.rotateY(Math.PI / 2);plane.mesh.position.x -= 1.5;plane.mesh.material = new THREE.MeshStandardMaterial({map: this.helper.loadTexture("/public/textures/building.png",(t) => {t.colorSpace = THREE.SRGBColorSpace;}),normalMap: this.helper.loadTexture("/public/textures/wallhaven-kxj3l1_840x840.png",(t) => {t.colorSpace = THREE.SRGBColorSpace;}),});addReflectorEffect(plane.mesh);}}
源码:
import {Color,Matrix4,Mesh,PerspectiveCamera,Plane,ShaderMaterial,UniformsUtils,Vector3,Vector4,WebGLRenderTarget,HalfFloatType,
} from "three";class Reflector extends Mesh {constructor(geometry, options = {}) {super(geometry);this.isReflector = true;this.type = "Reflector";this.camera = new PerspectiveCamera();const scope = this;const color =options.color !== undefined? new Color(options.color): new Color(0x7f7f7f);const textureWidth = options.textureWidth || 512;const textureHeight = options.textureHeight || 512;const clipBias = options.clipBias || 0;const shader = options.shader || Reflector.ReflectorShader;const multisample =options.multisample !== undefined ? options.multisample : 4;//const reflectorPlane = new Plane();const normal = new Vector3();const reflectorWorldPosition = new Vector3();const cameraWorldPosition = new Vector3();const rotationMatrix = new Matrix4();const lookAtPosition = new Vector3(0, 0, -1);const clipPlane = new Vector4();const view = new Vector3();const target = new Vector3();const q = new Vector4();const textureMatrix = new Matrix4();const virtualCamera = this.camera;const renderTarget = new WebGLRenderTarget(textureWidth,textureHeight,{ samples: multisample, type: HalfFloatType });const material = new ShaderMaterial({name: shader.name !== undefined ? shader.name : "unspecified",uniforms: UniformsUtils.clone(shader.uniforms),fragmentShader: shader.fragmentShader,vertexShader: shader.vertexShader,transparent: true,});material.uniforms["tDiffuse"].value = renderTarget.texture;material.uniforms["_opacity"].value = options.opacity || 1;material.uniforms["color"].value = color;material.uniforms["textureMatrix"].value = textureMatrix;this.material = material;this.count = 0;this.onBeforeRender = (renderer, scene, camera) => {this.count++;// if (this.count % 4 === 0) {//     return;// }reflectorWorldPosition.setFromMatrixPosition(scope.matrixWorld);cameraWorldPosition.setFromMatrixPosition(camera.matrixWorld);rotationMatrix.extractRotation(scope.matrixWorld);normal.set(0, 0, 1);normal.applyMatrix4(rotationMatrix);view.subVectors(reflectorWorldPosition, cameraWorldPosition);// Avoid rendering when reflector is facing awayif (view.dot(normal) > 0) return;view.reflect(normal).negate();view.add(reflectorWorldPosition);rotationMatrix.extractRotation(camera.matrixWorld);lookAtPosition.set(0, 0, -1);lookAtPosition.applyMatrix4(rotationMatrix);lookAtPosition.add(cameraWorldPosition);target.subVectors(reflectorWorldPosition, lookAtPosition);target.reflect(normal).negate();target.add(reflectorWorldPosition);virtualCamera.position.copy(view);virtualCamera.up.set(0, 1, 0);virtualCamera.up.applyMatrix4(rotationMatrix);virtualCamera.up.reflect(normal);virtualCamera.lookAt(target);virtualCamera.far = camera.far; // Used in WebGLBackgroundvirtualCamera.updateMatrixWorld();virtualCamera.projectionMatrix.copy(camera.projectionMatrix);// Update the texture matrixtextureMatrix.set(0.5,0.0,0.0,0.5,0.0,0.5,0.0,0.5,0.0,0.0,0.5,0.5,0.0,0.0,0.0,1.0);textureMatrix.multiply(virtualCamera.projectionMatrix);textureMatrix.multiply(virtualCamera.matrixWorldInverse);textureMatrix.multiply(scope.matrixWorld);// Now update projection matrix with new clip plane, implementing code from: http://www.terathon.com/code/oblique.html// Paper explaining this technique: http://www.terathon.com/lengyel/Lengyel-Oblique.pdfreflectorPlane.setFromNormalAndCoplanarPoint(normal,reflectorWorldPosition);reflectorPlane.applyMatrix4(virtualCamera.matrixWorldInverse);clipPlane.set(reflectorPlane.normal.x,reflectorPlane.normal.y,reflectorPlane.normal.z,reflectorPlane.constant);const projectionMatrix = virtualCamera.projectionMatrix;q.x =(Math.sign(clipPlane.x) + projectionMatrix.elements[8]) /projectionMatrix.elements[0];q.y =(Math.sign(clipPlane.y) + projectionMatrix.elements[9]) /projectionMatrix.elements[5];q.z = -1.0;q.w =(1.0 + projectionMatrix.elements[10]) /projectionMatrix.elements[14];// Calculate the scaled plane vectorclipPlane.multiplyScalar(2.0 / clipPlane.dot(q));// Replacing the third row of the projection matrixprojectionMatrix.elements[2] = clipPlane.x;projectionMatrix.elements[6] = clipPlane.y;projectionMatrix.elements[10] = clipPlane.z + 1.0 - clipBias;projectionMatrix.elements[14] = clipPlane.w;// Renderscope.visible = false;const currentRenderTarget = renderer.getRenderTarget();const currentXrEnabled = renderer.xr.enabled;const currentShadowAutoUpdate = renderer.shadowMap.autoUpdate;renderer.xr.enabled = false; // Avoid camera modificationrenderer.shadowMap.autoUpdate = false; // Avoid re-computing shadowsrenderer.setRenderTarget(renderTarget);renderer.state.buffers.depth.setMask(true); // make sure the depth buffer is writable so it can be properly cleared, see #18897if (renderer.autoClear === false) renderer.clear();// filteroptions.filter.forEach((name) => {const mesh = scene.getObjectByName(name);mesh.visible = false;});renderer.render(scene, virtualCamera);options.filter.forEach((name) => {const mesh = scene.getObjectByName(name);mesh.visible = true;});renderer.xr.enabled = currentXrEnabled;renderer.shadowMap.autoUpdate = currentShadowAutoUpdate;renderer.setRenderTarget(currentRenderTarget);// Restore viewportconst viewport = camera.viewport;if (viewport !== undefined) {renderer.state.viewport(viewport);}scope.visible = true;};this.getRenderTarget = function () {return renderTarget;};this.dispose = function () {renderTarget.dispose();scope.material.dispose();};}
}Reflector.ReflectorShader = {name: "ReflectorShader",uniforms: {color: {value: null,},tDiffuse: {value: null,},textureMatrix: {value: null,},_opacity: {value: null,},},vertexShader: /* glsl */ `uniform mat4 textureMatrix;varying vec4 vUv;#include <common>#include <logdepthbuf_pars_vertex>void main() {vUv = textureMatrix * vec4( position, 1.0 );gl_Position = projectionMatrix * modelViewMatrix * vec4( position, 1.0 );#include <logdepthbuf_vertex>}`,fragmentShader: /* glsl */ `uniform vec3 color;uniform float _opacity;uniform sampler2D tDiffuse;varying vec4 vUv;#include <logdepthbuf_pars_fragment>float blendOverlay( float base, float blend ) {return( base < 0.5 ? ( 2.0 * base * blend ) : ( 1.0 - 2.0 * ( 1.0 - base ) * ( 1.0 - blend ) ) );}vec3 blendOverlay( vec3 base, vec3 blend ) {return vec3( blendOverlay( base.r, blend.r ), blendOverlay( base.g, blend.g ), blendOverlay( base.b, blend.b ) );}void main() {#include <logdepthbuf_fragment>vec4 base = texture2DProj( tDiffuse, vUv );gl_FragColor = vec4( base.rgb , 0.1 );#include <tonemapping_fragment>#include <colorspace_fragment>}`,
};export { Reflector };/*** @description: 为mesh的材质增加反光效果* @param {*} mesh* @return {*}*/
export function addReflectorEffect(mesh, options = { filter: [] }) {const material = mesh.material;// material.isReflector = true;// material.type = "Reflector";const camera = new PerspectiveCamera();const textureWidth = options.textureWidth || 512;const textureHeight = options.textureHeight || 512;const clipBias = options.clipBias || 0;const shader = options.shader || Reflector.ReflectorShader;const multisample =options.multisample !== undefined ? options.multisample : 4;const reflectorPlane = new Plane();const normal = new Vector3();const reflectorWorldPosition = new Vector3();const cameraWorldPosition = new Vector3();const rotationMatrix = new Matrix4();const lookAtPosition = new Vector3(0, 0, -1);const clipPlane = new Vector4();const view = new Vector3();const target = new Vector3();const q = new Vector4();const textureMatrix = new Matrix4();const virtualCamera = camera;const renderTarget = new WebGLRenderTarget(textureWidth, textureHeight, {samples: multisample,type: HalfFloatType,});const appendUniforms = {refDiffuse: { value: renderTarget.texture },// refOpacity: { value: options.opacity || 1 },refTextureMatrix: { value: textureMatrix },};material.onBeforeCompile = (shader) => {console.log(shader);Object.assign(shader.uniforms, appendUniforms);shader.vertexShader = shader.vertexShader.replace("#include <common>",`#include <common>uniform mat4 refTextureMatrix;varying vec4 refUv;`);shader.fragmentShader = shader.fragmentShader.replace("#include <common>",`#include <common>uniform sampler2D refDiffuse;varying vec4 refUv;`);shader.vertexShader = shader.vertexShader.replace("#include <begin_vertex>",`#include <begin_vertex>refUv = refTextureMatrix * vec4( position, 1.0 );`);shader.fragmentShader = shader.fragmentShader.replace("#include <dithering_fragment>",`#include <dithering_fragment>gl_FragColor.rgb += texture2DProj( refDiffuse, refUv ).rgb;gl_FragColor.a =  ${options.opacity || "1.0"};`);// uniform sampler2D refDiffuse;// varying vec4 vUv;// console.log(shader.fragmentShader);};mesh.material.onBeforeRender = (renderer, scene, camera) => {reflectorWorldPosition.setFromMatrixPosition(mesh.matrixWorld);cameraWorldPosition.setFromMatrixPosition(camera.matrixWorld);rotationMatrix.extractRotation(mesh.matrixWorld);normal.set(0, 0, 1);normal.applyMatrix4(rotationMatrix);view.subVectors(reflectorWorldPosition, cameraWorldPosition);// Avoid rendering when reflector is facing awayif (view.dot(normal) > 0) return;view.reflect(normal).negate();view.add(reflectorWorldPosition);rotationMatrix.extractRotation(camera.matrixWorld);lookAtPosition.set(0, 0, -1);lookAtPosition.applyMatrix4(rotationMatrix);lookAtPosition.add(cameraWorldPosition);target.subVectors(reflectorWorldPosition, lookAtPosition);target.reflect(normal).negate();target.add(reflectorWorldPosition);virtualCamera.position.copy(view);virtualCamera.up.set(0, 1, 0);virtualCamera.up.applyMatrix4(rotationMatrix);virtualCamera.up.reflect(normal);virtualCamera.lookAt(target);virtualCamera.far = camera.far; // Used in WebGLBackgroundvirtualCamera.updateMatrixWorld();virtualCamera.projectionMatrix.copy(camera.projectionMatrix);// Update the texture matrixtextureMatrix.set(0.5,0.0,0.0,0.5,0.0,0.5,0.0,0.5,0.0,0.0,0.5,0.5,0.0,0.0,0.0,1.0);textureMatrix.multiply(virtualCamera.projectionMatrix);textureMatrix.multiply(virtualCamera.matrixWorldInverse);textureMatrix.multiply(mesh.matrixWorld);// Now update projection matrix with new clip plane, implementing code from: http://www.terathon.com/code/oblique.html// Paper explaining this technique: http://www.terathon.com/lengyel/Lengyel-Oblique.pdfreflectorPlane.setFromNormalAndCoplanarPoint(normal,reflectorWorldPosition);reflectorPlane.applyMatrix4(virtualCamera.matrixWorldInverse);clipPlane.set(reflectorPlane.normal.x,reflectorPlane.normal.y,reflectorPlane.normal.z,reflectorPlane.constant);const projectionMatrix = virtualCamera.projectionMatrix;q.x =(Math.sign(clipPlane.x) + projectionMatrix.elements[8]) /projectionMatrix.elements[0];q.y =(Math.sign(clipPlane.y) + projectionMatrix.elements[9]) /projectionMatrix.elements[5];q.z = -1.0;q.w =(1.0 + projectionMatrix.elements[10]) /projectionMatrix.elements[14];// Calculate the scaled plane vectorclipPlane.multiplyScalar(2.0 / clipPlane.dot(q));// Replacing the third row of the projection matrixprojectionMatrix.elements[2] = clipPlane.x;projectionMatrix.elements[6] = clipPlane.y;projectionMatrix.elements[10] = clipPlane.z + 1.0 - clipBias;projectionMatrix.elements[14] = clipPlane.w;// Render// TODO : 于一体的反光 不能将自己隐去 只是不显示反射纹理mesh.visible = false;const currentRenderTarget = renderer.getRenderTarget();const currentXrEnabled = renderer.xr.enabled;const currentShadowAutoUpdate = renderer.shadowMap.autoUpdate;renderer.xr.enabled = false; // Avoid camera modificationrenderer.shadowMap.autoUpdate = false; // Avoid re-computing shadowsrenderer.setRenderTarget(renderTarget);renderer.state.buffers.depth.setMask(true); // make sure the depth buffer is writable so it can be properly cleared, see #18897if (renderer.autoClear === false) renderer.clear();// filteroptions.filter.forEach((name) => {const mesh = scene.getObjectByName(name);mesh.visible = false;});renderer.render(scene, virtualCamera);options.filter.forEach((name) => {const mesh = scene.getObjectByName(name);mesh.visible = true;});renderer.xr.enabled = currentXrEnabled;renderer.shadowMap.autoUpdate = currentShadowAutoUpdate;renderer.setRenderTarget(currentRenderTarget);// Restore viewportconst viewport = camera.viewport;if (viewport !== undefined) {renderer.state.viewport(viewport);}mesh.visible = true;};
}
相关文章:
Three.js 镜面反射Reflector 为MeshStandardMaterial增加Reflector能力
效果效果官方案例 区别:官方的案例更像一个镜子 没有纹理等属性 也没有透明度修改 根据源码进行修改为 MeshStandardMaterial实现反射 使用案例 createReflector() {const plane this.helper.create.plane(2, 2);this.helper.add(plane.mesh);plane.mesh.rotat…...
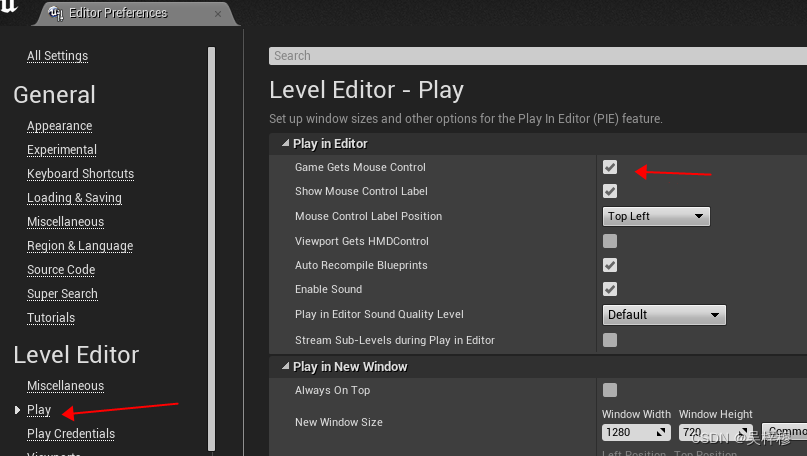
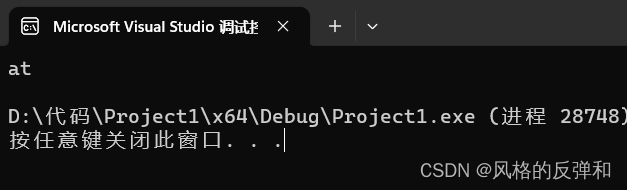
UE4使用技巧
打开蓝图编辑器时不是打开一个新窗口,而是作为主窗口 适用于全部的打开新窗口的操作 蓝图编译时自动保存 开始游戏后立即捕获鼠标...

行为型设计模式—职责链模式
职责链模式:从名字可以拆分为 职责 和 链。即能为请求创建一条由多个处理器组成的链路,每个处理器各自负责自己的职责,相互之间没有耦合,完成自己任务后请求对象即传递到链路的下一个处理器进行处理。 如果在写好的执行函数里加上…...

EndNote快速上手
前言:用EndNote主要就是为了方便管理文章引用的文献,所以本篇就是针对EndNote在文章中引用文献需要的技巧,然后本文用的是EndNoteX9。 EndNote快速上手 创建文献资料库创建文献分组导入文献手动输入文件导入在线搜索 修改文献信息去重文献删除…...
GRE隧道(初级VPN)配置步骤
一、拓朴图: 要求:1、PC1 和 PC2 能访问充当互联网接口地址的ISP环回口地址8.8.8.8 2、PC1 和 PC2 走GRE隧道互通 二、配置步骤: 1、配置IP 2、R1、R2 配置nat,代理内网地址通过G0/0/0口上外网 acl 2000rule permit source a…...

自然语言处理笔记
文章目录 情感词典中文分词单词向量化技术Word2vecGloVefastText 关键词提取算法 情感词典 英文的情感词典有:LIWC, SentiWordNet等 中文的情感词典有:NTUSD, 正文褒贬词典TSING, 知网HowNet等 中文分词 中文分词的工具有:jieba(核心算法是…...

广东省第三届职业技能大赛“网络安全项目”B模块任务书
广东省第三届职业技能大赛“网络安全项目”B模块任务书 PS: 关注鱼影安全第一部分 网络安全事件响应任务 1:应急响应 第二部分 数字取证调查任务 2 :操作系统取证任务 3: 网络数据包分析取证任务 4: 计算机单机取证 第三部分 应用…...

如何利用API接口获取电商平台数据?
作为产品经理,我们需要了解电商平台的数据情况,以便更好地制定产品策略和优化用户体验。而利用API接口获取电商平台数据是一种高效、便捷的方式。本文将从以下几个方面介绍如何利用API接口获取电商平台数据。 一、了解API接口 首先,我们需要…...
C语言天花板——指针(经典题目)
指针我们已经学习的差不多了,今天我来给大家分享几个经典的题目,来让我们相互学习🏎️🏎️🏎️ int main() {int a[4] { 1, 2, 3, 4 };int* ptr1 (int*)(&a 1);int* ptr2 (int*)((int)a 1);printf("%x,%…...

进程上下文的概念和切换简单通俗的解释
进程上下文是进程执行活动全过程的静态描述。我们把已执行过的进程指令和数据在相关寄存器与堆栈中的内容称为进程上文,把正在执行的指令和数据在寄存器与堆栈中的内容称为进程正文,把待执行的指令和数据在寄存器与堆栈中的内容称为进程下文。 实际上li…...
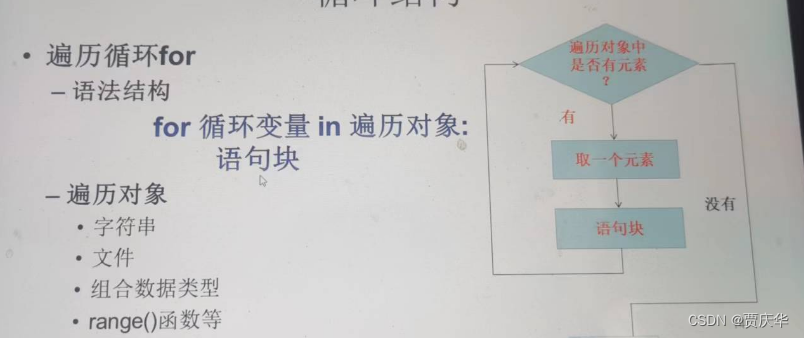
python学习笔记10(选择结构2、循环结构1)
(一)选择结构2 1、if……else……语句 #(1)基本格式 numbereval(input("请输入您的6位中奖号码:")) if number123456:print("恭喜您,中奖了") else:print("未中奖")#&…...

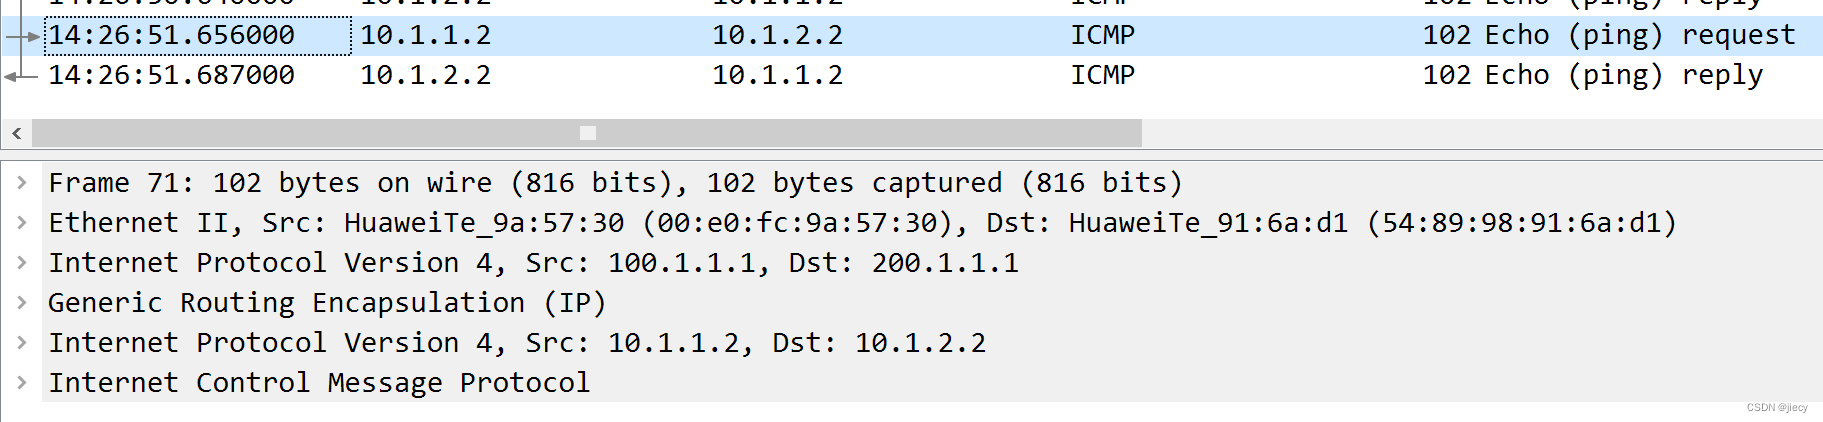
IPv6过渡技术---手动隧道
IPv6隧道 隧道(Tunnel)是一种封装技术。利用一种网络协议来传输另一种网络协议,即利用一种网络传输协议,将其他协议产生的数据报文封装在自身的报文中,然后在网络中传输。 隧道是一个虚拟的点对点的连接。一个Tunnel提供了一条使封装的数据报文能够传输的通路,并且在一个…...
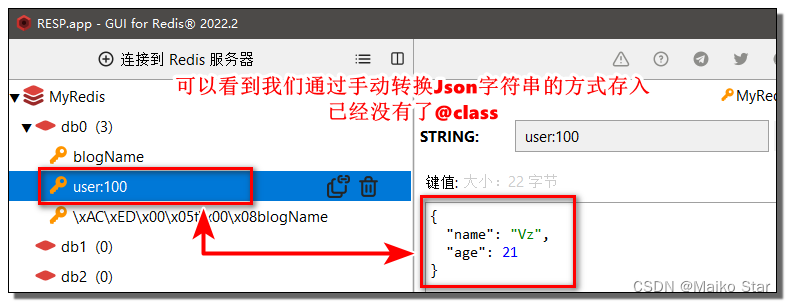
Redis中的Java客户端
一、Jedis Jedis是一个Java实现的Redis客户端连接工具。 Jedis使用非常简单,直接引入依赖。基于默认参数的Jedis连接池,初始化连接池类(使用默认连接池参数)JedisPool,获取一个Jedis连接Jedis jedisjp.getResource()…...

线性代数——行列式相关性质
目录 一、行列式与它的转置列行列式相等 二、对换行列式的两行(列),行列式变号 三、行列式某行(列)有公因子k,则k可以提到行列式外 四、行列式中若两行成比例,则行列式为0 五、行列式的某一行…...

跟着cherno手搓游戏引擎【5】layer(层)、Glad
编写基类层: Layer.h:提供Attach链接、Detach解绑、Update刷新、Event事件、GetName方法 #pragma once #include"YOTO/Core.h" #include"YOTO/Event/Event.h" namespace YOTO {class YOTO_API Layer{public:Layer(const std::string& nam…...
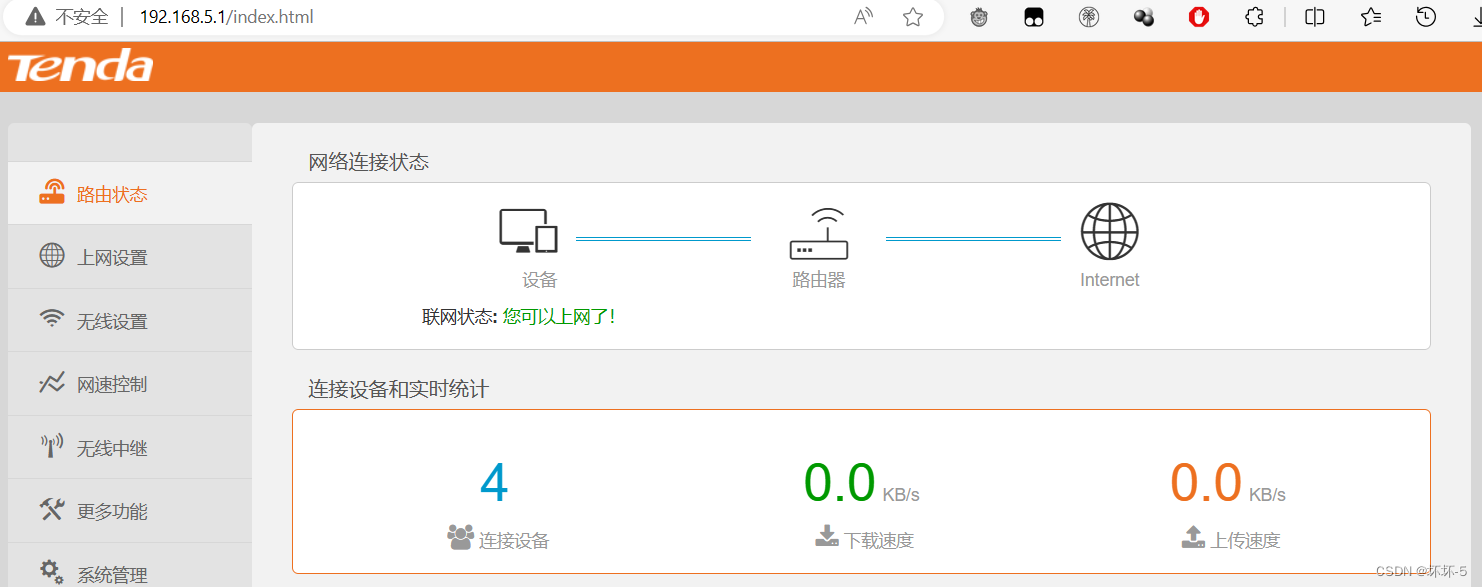
Windows无法登录管理路由器故障排查
问题描述 家里的路由器使用拨号上网,路由器DHCP分发IP的范围是192.168.1.0/24。默认使用192.168.1.1管理路由器。然后拨号上网成功后,修改了私网IP的分发范围:192.168.5.1-192.168.5.10。为了防止有人蹭网,只分配的10个IP地址。修…...
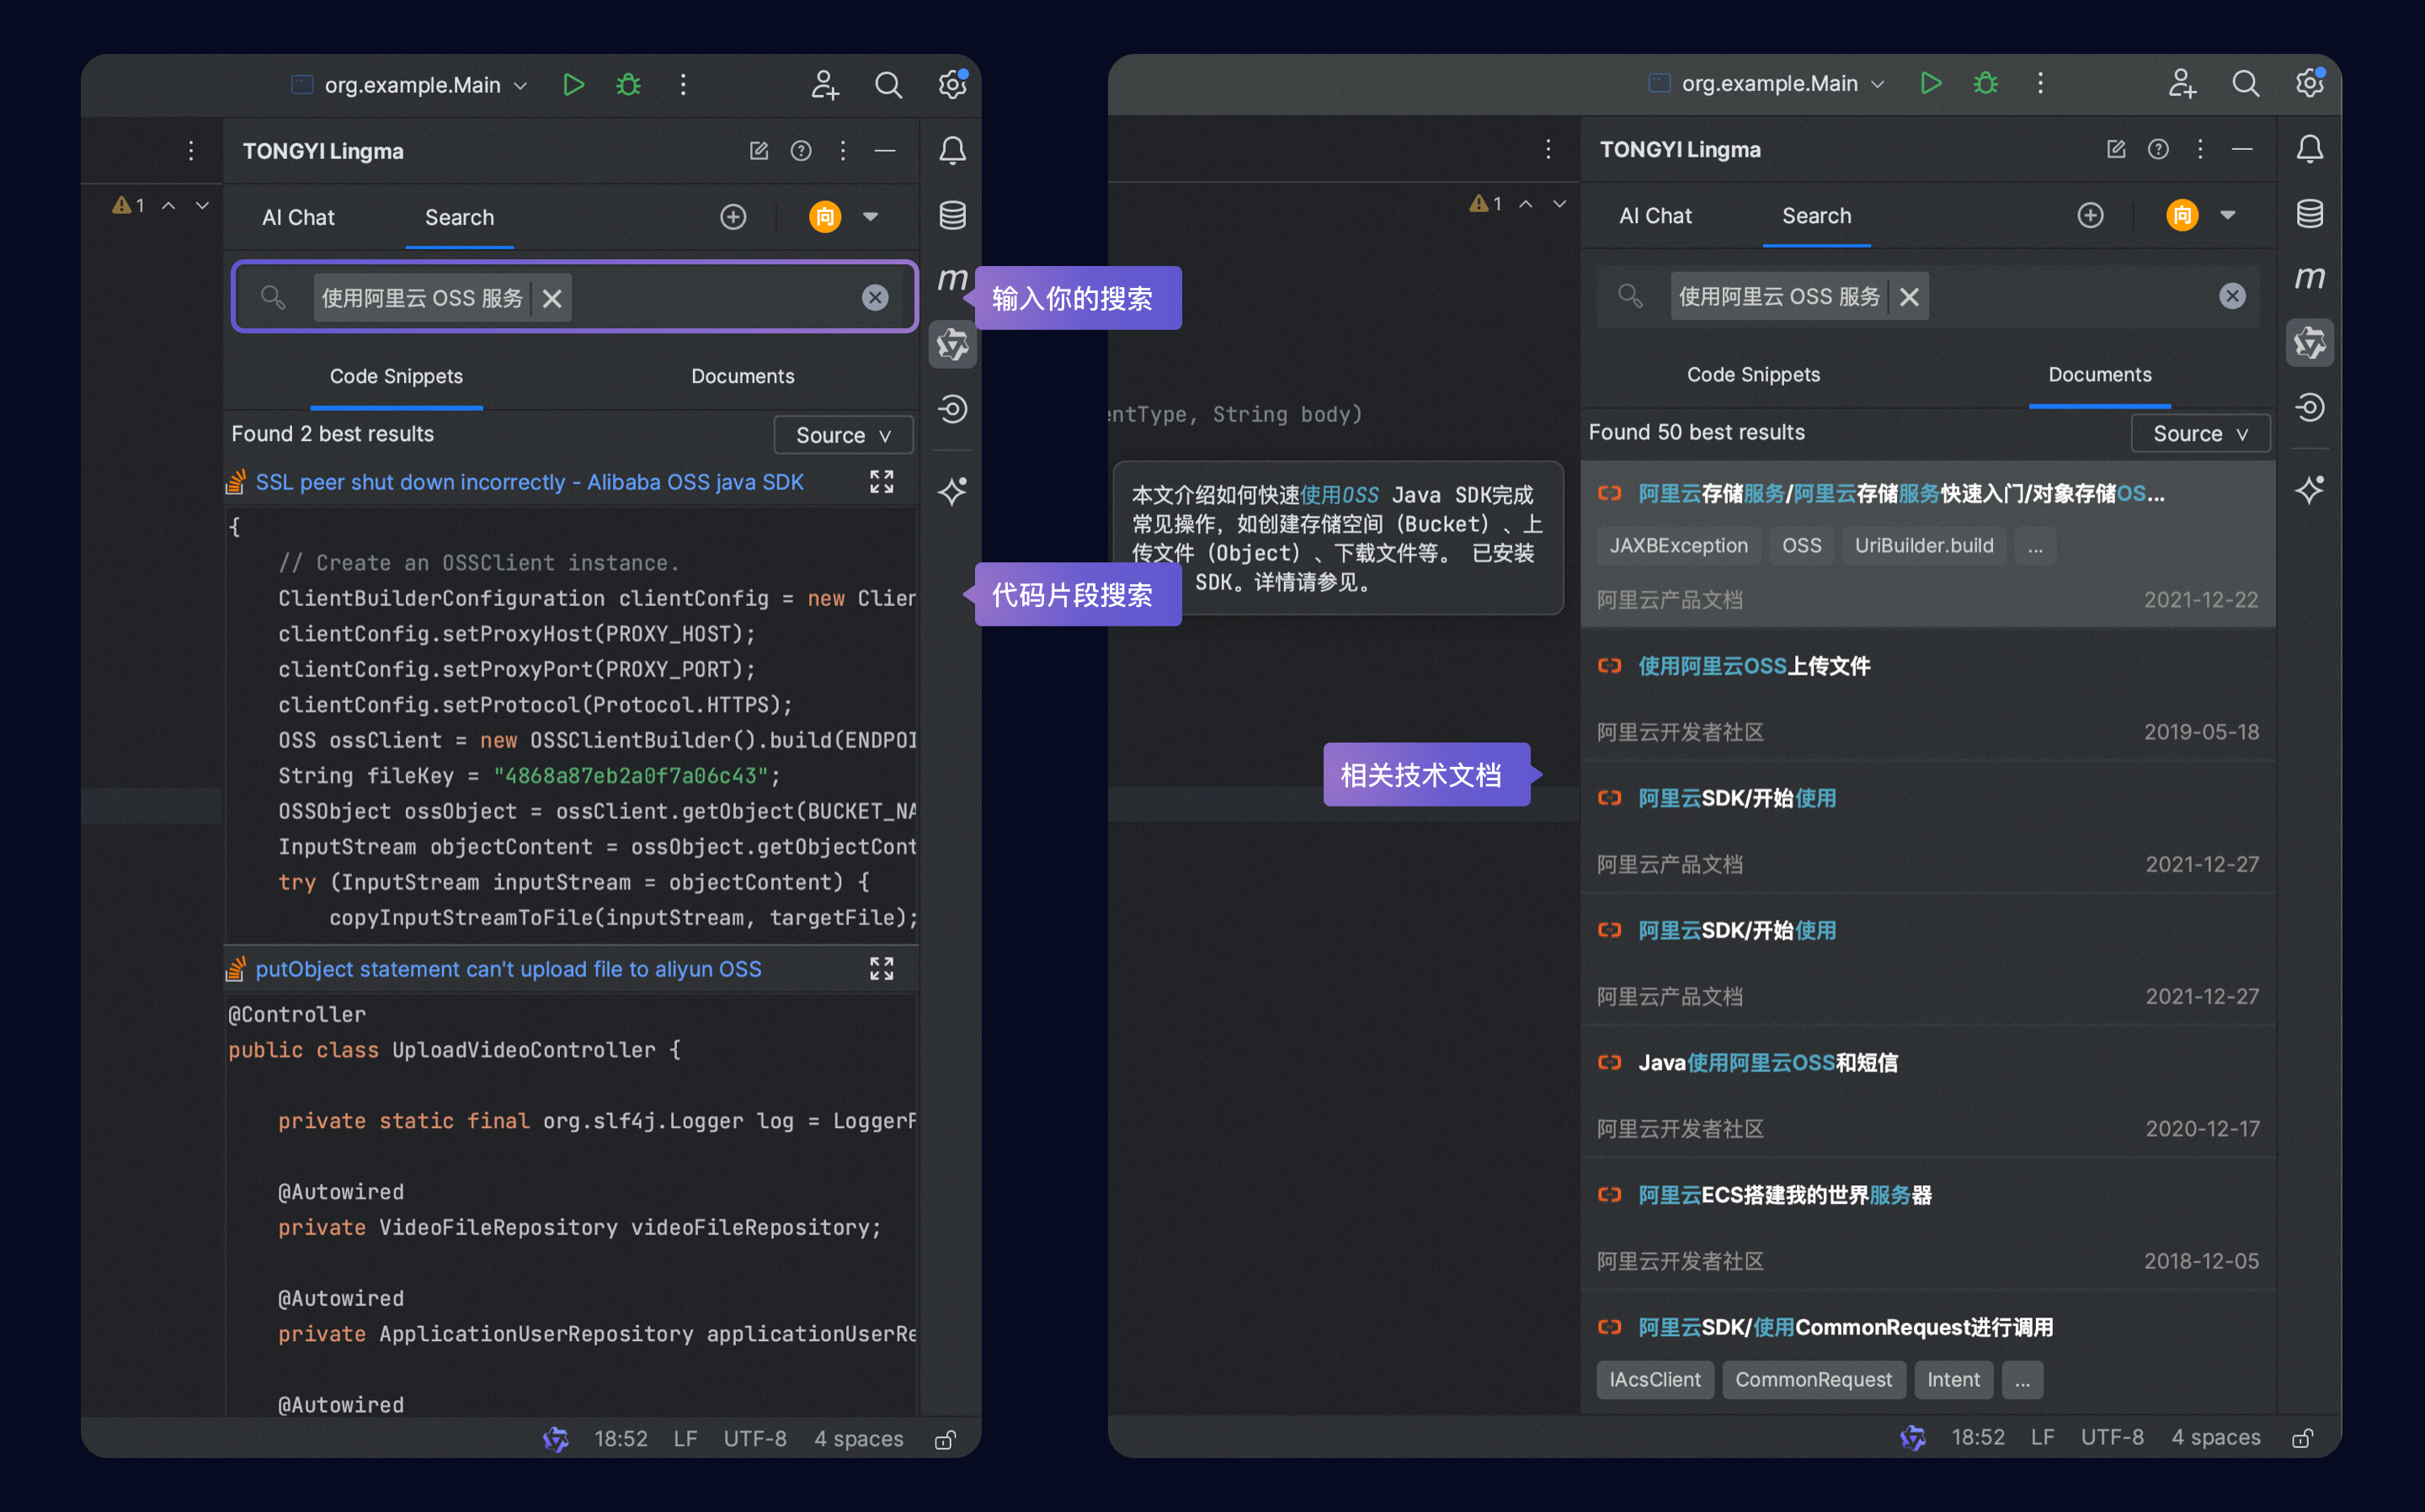
通义灵码 - 免费的阿里云 VS code Jetbrains AI 编码辅助工具
系列文章目录 前言 通义灵码,是阿里云出品的一款基于通义大模型的智能编码辅助工具,提供行级/函数级实时续写、自然语言生成代码、单元测试生成、代码注释生成、代码解释、研发智能问答、异常报错排查等能力,并针对阿里云 SDK/OpenAPI 的使用…...

山脉数组的峰顶索引
一、题目描述 852. 山脉数组的峰顶索引 符合下列属性的数组 arr 称为 山脉数组 : arr.length > 3存在 i(0 < i < arr.length - 1)使得: arr[0] < arr[1] < ... arr[i-1] < arr[i] arr[i] > arr[i1] > .…...
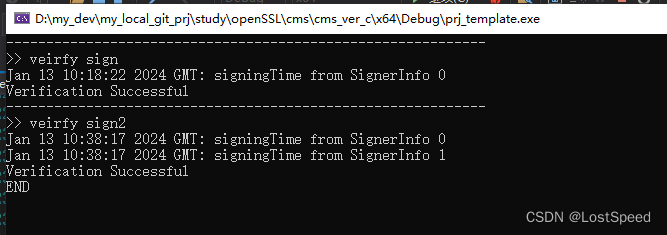
openssl3.2 - 官方demo学习 - cms - cms_ver.c
文章目录 openssl3.2 - 官方demo学习 - cms - cms_ver.c概述运行结果笔记END openssl3.2 - 官方demo学习 - cms - cms_ver.c 概述 CMS验签, 将单独签名和联合签名出来的签名文件都试试. 验签成功后, 将签名数据明文写入了文件供查看. 也就是说, 只有验签成功后, 才能看到签名…...

数据结构:堆和堆排序
数据结构:堆和堆排序 文章目录 数据结构:堆和堆排序1.二叉树的存储结构1.顺序结构2.链式结构 2.堆3.堆的实现4.堆排序(选择排序中的一类)1. 基本思想2.代码实现 1.二叉树的存储结构 1.顺序结构 顺序结构存储就是使用数组来表示一…...

3步解锁GTA V无限可能:ScriptHookV脚本注入核心技术深度解析
3步解锁GTA V无限可能:ScriptHookV脚本注入核心技术深度解析 【免费下载链接】ScriptHookV An open source hook into GTAV for loading offline mods 项目地址: https://gitcode.com/gh_mirrors/sc/ScriptHookV 想象一下,你正在玩《侠盗猎车手V》…...

BilibiliDown:简单三步掌握B站视频下载的终极指南
BilibiliDown:简单三步掌握B站视频下载的终极指南 【免费下载链接】BilibiliDown (GUI-多平台支持) B站 哔哩哔哩 视频下载器。支持稍后再看、收藏夹、UP主视频批量下载|Bilibili Video Downloader 😳 项目地址: https://gitcode.com/gh_mirrors/bi/Bi…...

终极指南:SVGnest如何实现材料利用率提升40%
终极指南:SVGnest如何实现材料利用率提升40% 【免费下载链接】SVGnest An open source vector nesting tool 项目地址: https://gitcode.com/gh_mirrors/sv/SVGnest SVGnest是一款完全免费开源的矢量嵌套工具,专为激光切割、CNC加工和工业设计领域…...

Google I/O 2026 全解析:从 Gemini 3.5 到 AI 智能体,一文看懂谷歌的 AI 全景布局
摘要: Google I/O 2026 盛大开幕,官方正式发布了 Gemini 3.5 Flash、Antigravity 2.0、Gemini Spark 个人智能体、全新 AI 搜索范式以及智能音频眼镜等一系列颠覆性技术。本文将为你全面梳理本次大会的核心干货,透视谷歌在智能体时代的全新战…...

YooAsset实战指南:Unity热更新架构重构与AB包管理
1. 为什么热更新不是“加个插件就能跑”,而是Unity项目上线前必须重做的一次架构手术 在Unity游戏开发里,"热更新"这三个字,听上去像是一键开启的魔法开关——版本发出去了,发现UI错位、数值写反、新活动脚本没加载&…...

魔兽争霸III终极优化指南:7大核心功能让经典游戏重获新生
魔兽争霸III终极优化指南:7大核心功能让经典游戏重获新生 【免费下载链接】WarcraftHelper Warcraft III Helper , support 1.20e, 1.24e, 1.26a, 1.27a, 1.27b 项目地址: https://gitcode.com/gh_mirrors/wa/WarcraftHelper 还在为《魔兽争霸III》在现代电脑…...

机器人任务级迭代学习控制技术解析与应用
1. 任务级迭代学习控制技术解析在机器人操控领域,可变形物体的动态控制一直是个棘手难题。想象一下让机器人系鞋带或者叠衣服的场景——这些对人类来说轻而易举的动作,对机器人而言却需要处理近乎无限的自由度变化。传统方法通常需要精确的物理建模或海量…...

QMCDecode:3步解锁你的QQ音乐收藏,告别格式限制的烦恼
QMCDecode:3步解锁你的QQ音乐收藏,告别格式限制的烦恼 【免费下载链接】QMCDecode QQ音乐QMC格式转换为普通格式(qmcflac转flac,qmc0,qmc3转mp3, mflac,mflac0等转flac),仅支持macOS,可自动识别到QQ音乐下载目录&#…...

瑞萨MCU集成AI加速器:嵌入式开发者的边缘智能实战指南
1. 项目概述:当传统MCU巨头按下AI加速键最近在半导体圈里,一个消息引发了不小的讨论:瑞萨电子,这家在微控制器领域常年稳坐头把交椅的巨头,宣布要全面拥抱人工智能。你可能对这个名字有点陌生,但你的车里、…...

智能电表:解锁智能照明精细化能耗管控新密码
摘要随着双碳政策深度落地与智慧楼宇数字化升级,智能照明已成为商业园区、市政道路、综合体的标配设施。传统机械式电表仅具备基础电量统计功能,存在数据滞后、精度不足、无分区计量、无异常监测等短板,无法适配现代照明多回路、多场景、长时…...