vue3 之 商城项目—详情页
整体认识
路由配置

准备组件模版
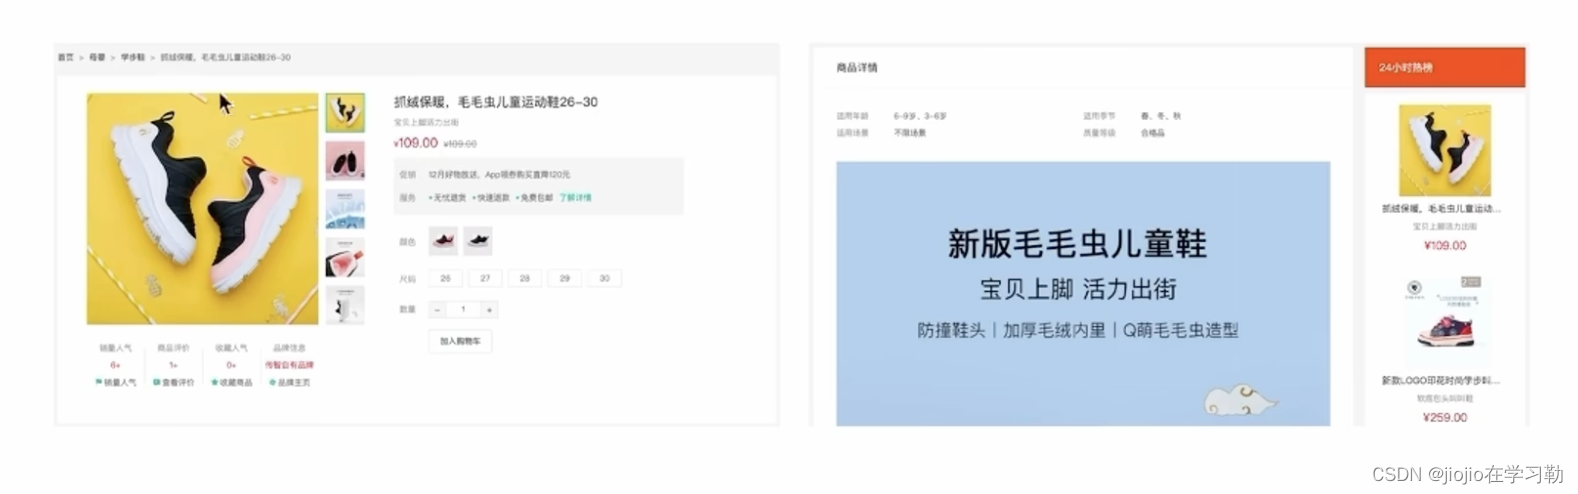
<script setup></script><template><div class="xtx-goods-page"><div class="container"><div class="bread-container"><el-breadcrumb separator=">"><el-breadcrumb-item :to="{ path: '/' }">首页</el-breadcrumb-item><el-breadcrumb-item :to="{ path: '/' }">母婴</el-breadcrumb-item><el-breadcrumb-item :to="{ path: '/' }">跑步鞋</el-breadcrumb-item><el-breadcrumb-item>抓绒保暖,毛毛虫子儿童运动鞋</el-breadcrumb-item></el-breadcrumb></div><!-- 商品信息 --><div class="info-container"><div><div class="goods-info"><div class="media"><!-- 图片预览区 --><!-- 统计数量 --><ul class="goods-sales"><li><p>销量人气</p><p> 100+ </p><p><i class="iconfont icon-task-filling"></i>销量人气</p></li><li><p>商品评价</p><p>200+</p><p><i class="iconfont icon-comment-filling"></i>查看评价</p></li><li><p>收藏人气</p><p>300+</p><p><i class="iconfont icon-favorite-filling"></i>收藏商品</p></li><li><p>品牌信息</p><p>400+</p><p><i class="iconfont icon-dynamic-filling"></i>品牌主页</p></li></ul></div><div class="spec"><!-- 商品信息区 --><p class="g-name"> 抓绒保暖,毛毛虫儿童鞋 </p><p class="g-desc">好穿 </p><p class="g-price"><span>200</span><span> 100</span></p><div class="g-service"><dl><dt>促销</dt><dd>12月好物放送,App领券购买直降120元</dd></dl><dl><dt>服务</dt><dd><span>无忧退货</span><span>快速退款</span><span>免费包邮</span><a href="javascript:;">了解详情</a></dd></dl></div><!-- sku组件 --><!-- 数据组件 --><!-- 按钮组件 --><div><el-button size="large" class="btn">加入购物车</el-button></div></div></div><div class="goods-footer"><div class="goods-article"><!-- 商品详情 --><div class="goods-tabs"><nav><a>商品详情</a></nav><div class="goods-detail"><!-- 属性 --><ul class="attrs"><li v-for="item in 3" :key="item.value"><span class="dt">白色</span><span class="dd">纯棉</span></li></ul><!-- 图片 --></div></div></div><!-- 24热榜+专题推荐 --><div class="goods-aside"></div></div></div></div></div></div>
</template><style scoped lang='scss'>
.xtx-goods-page {.goods-info {min-height: 600px;background: #fff;display: flex;.media {width: 580px;height: 600px;padding: 30px 50px;}.spec {flex: 1;padding: 30px 30px 30px 0;}}.goods-footer {display: flex;margin-top: 20px;.goods-article {width: 940px;margin-right: 20px;}.goods-aside {width: 280px;min-height: 1000px;}}.goods-tabs {min-height: 600px;background: #fff;}.goods-warn {min-height: 600px;background: #fff;margin-top: 20px;}.number-box {display: flex;align-items: center;.label {width: 60px;color: #999;padding-left: 10px;}}.g-name {font-size: 22px;}.g-desc {color: #999;margin-top: 10px;}.g-price {margin-top: 10px;span {&::before {content: "¥";font-size: 14px;}&:first-child {color: $priceColor;margin-right: 10px;font-size: 22px;}&:last-child {color: #999;text-decoration: line-through;font-size: 16px;}}}.g-service {background: #f5f5f5;width: 500px;padding: 20px 10px 0 10px;margin-top: 10px;dl {padding-bottom: 20px;display: flex;align-items: center;dt {width: 50px;color: #999;}dd {color: #666;&:last-child {span {margin-right: 10px;&::before {content: "•";color: $xtxColor;margin-right: 2px;}}a {color: $xtxColor;}}}}}.goods-sales {display: flex;width: 400px;align-items: center;text-align: center;height: 140px;li {flex: 1;position: relative;~li::after {position: absolute;top: 10px;left: 0;height: 60px;border-left: 1px solid #e4e4e4;content: "";}p {&:first-child {color: #999;}&:nth-child(2) {color: $priceColor;margin-top: 10px;}&:last-child {color: #666;margin-top: 10px;i {color: $xtxColor;font-size: 14px;margin-right: 2px;}&:hover {color: $xtxColor;cursor: pointer;}}}}}
}.goods-tabs {min-height: 600px;background: #fff;nav {height: 70px;line-height: 70px;display: flex;border-bottom: 1px solid #f5f5f5;a {padding: 0 40px;font-size: 18px;position: relative;>span {color: $priceColor;font-size: 16px;margin-left: 10px;}}}
}.goods-detail {padding: 40px;.attrs {display: flex;flex-wrap: wrap;margin-bottom: 30px;li {display: flex;margin-bottom: 10px;width: 50%;.dt {width: 100px;color: #999;}.dd {flex: 1;color: #666;}}}>img {width: 100%;}
}.btn {margin-top: 20px;}.bread-container {padding: 25px 0;
}
</style>
配置路由
const router = createRouter({history: createWebHistory(import.meta.env.BASE_URL),// path和component对应关系的位置routes: [{path: '/',component: Layout,children: [{path: '',component: Home},{path: 'category/:id',component: Category},{path: 'category/sub/:id',component: SubCategory},{path: 'detail/:id',component: Detail}]},{path: '/login',component: Login}],// 路由滚动行为定制scrollBehavior () {return {top: 0}}
})
绑定模版测试跳转
<RouterLink :to="`/detail/${item.id}`"><img :src="item.picture" alt="" /><p class="name">{{ item.name }}</p><p class="price">¥{{ item.price }}</p>
</RouterLink>
基础数据渲染

封装接口
import request from '@/utils/http'
export const getDetail = (id) => {return request({url: '/goods',params: {id}})
}
获取数据渲染模版
<script setup>
import { getDetail } from '@/apis/detail'
import { onMounted, ref } from 'vue'
import { useRoute } from 'vue-router'
const goods = ref({})
const route = useRoute()
const getGoods = async () => {const res = await getDetail(route.params.id)goods.value = res.result
}
onMounted(() => getGoods())
</script><template><div class="xtx-goods-page"><div class="container" v-if="goods.details"><div class="bread-container"><el-breadcrumb separator=">"><el-breadcrumb-item :to="{ path: '/' }">首页</el-breadcrumb-item><!-- 错误原因:goods一开始{}  {}.categories -> undefined  -> undefined[1]1. 可选链的语法?. 2. v-if手动控制渲染时机 保证只有数据存在才渲染--><el-breadcrumb-item :to="{ path: `/category/${goods.categories[1].id}` }">{{ goods.categories[1].name }}</el-breadcrumb-item><el-breadcrumb-item :to="{ path: `/category/sub/${goods.categories[0].id}` }">{{goods.categories[0].name}}</el-breadcrumb-item><el-breadcrumb-item>抓绒保暖,毛毛虫子儿童运动鞋</el-breadcrumb-item></el-breadcrumb></div><!-- 商品信息 --><div class="info-container"><div><div class="goods-info"><div class="media"><!-- 图片预览区 --><!-- 统计数量 --><ul class="goods-sales"><li><p>销量人气</p><p> {{ goods.salesCount }}+ </p><p><i class="iconfont icon-task-filling"></i>销量人气</p></li><li><p>商品评价</p><p>{{ goods.commentCount }}+</p><p><i class="iconfont icon-comment-filling"></i>查看评价</p></li><li><p>收藏人气</p><p>{{ goods.collectCount }}+</p><p><i class="iconfont icon-favorite-filling"></i>收藏商品</p></li><li><p>品牌信息</p><p>{{ goods.brand.name }}</p><p><i class="iconfont icon-dynamic-filling"></i>品牌主页</p></li></ul></div><div class="spec"><!-- 商品信息区 --><p class="g-name"> {{ goods.name }} </p><p class="g-desc">{{ goods.desc }} </p><p class="g-price"><span>{{ goods.oldPrice }}</span><span> {{ goods.price }}</span></p><div class="g-service"><dl><dt>促销</dt><dd>12月好物放送,App领券购买直降120元</dd></dl><dl><dt>服务</dt><dd><span>无忧退货</span><span>快速退款</span><span>免费包邮</span><a href="javascript:;">了解详情</a></dd></dl></div><!-- sku组件 --><!-- 数据组件 --><!-- 按钮组件 --><div><el-button size="large" class="btn">加入购物车</el-button></div></div></div><div class="goods-footer"><div class="goods-article"><!-- 商品详情 --><div class="goods-tabs"><nav><a>商品详情</a></nav><div class="goods-detail"><!-- 属性 --><ul class="attrs"><li v-for="item in goods.details.properties" :key="item.value"><span class="dt">{{ item.name }}</span><span class="dd">{{ item.value }}</span></li></ul><!-- 图片 --><img v-for="img in goods.details.pictures" :src="img" :key="img" alt=""></div></div></div><!-- 24热榜+专题推荐 --><div class="goods-aside"></div></div></div></div></div></div>
</template>
热榜区域实现
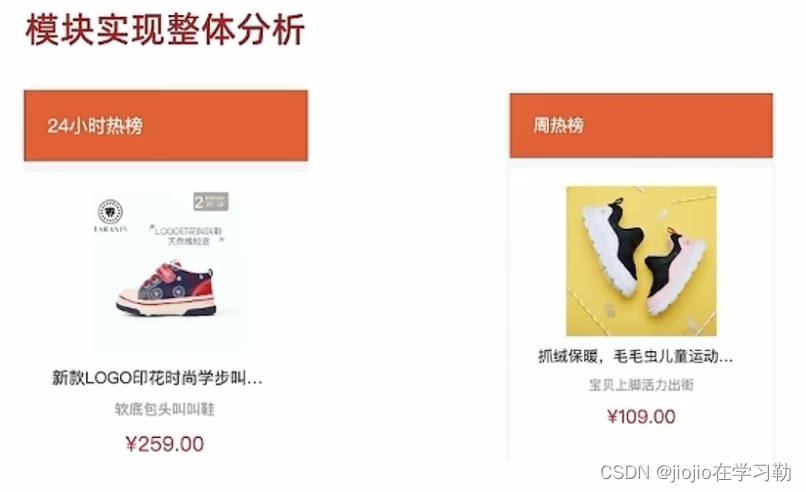
两块热榜相比,结构一致,标题title和列表内容不同

封装hot组件
<script setup>
import { ref } from 'vue'
import { getHotGoodsAPI } from '@/apis/detail'
import { useRoute } from 'vue-router'
const goodList = ref([])
const route = useRoute()
//**适配热榜类型type去适配title和数据列表**
const props = defineProps({type: {type: Number, // 1代表24小时热销榜 2代表周热销榜 3代表总热销榜 可以使用type去适配title和数据列表default: 1}
})
//适配热榜title
const TITLEMAP = {1: '24小时热榜',2: '周热榜',
}
const title = computed(() => TITLEMAP[props.type])const getHotList = async () => {const res = await getHotGoodsAPI({id: route.params.id,type: props.type})goodList.value = res.result
}
onMounted(() => getHotList())
</script><template><div class="goods-hot"><h3>{{title}}</h3><!-- 商品区块 --><RouterLink to="/" class="goods-item" v-for="item in goodList" :key="item.id"><img :src="item.picture" alt="" /><p class="name ellipsis">{{item.name}}</p><p class="desc ellipsis">{{item.desc}}</p><p class="price">¥{{item.price}}</p></RouterLink></div>
</template><style scoped lang="scss">
.goods-hot {h3 {height: 70px;background: $helpColor;color: #fff;font-size: 18px;line-height: 70px;padding-left: 25px;margin-bottom: 10px;font-weight: normal;}.goods-item {display: block;padding: 20px 30px;text-align: center;background: #fff;img {width: 160px;height: 160px;}p {padding-top: 10px;}.name {font-size: 16px;}.desc {color: #999;height: 29px;}.price {color: $priceColor;font-size: 20px;}}
}
</style>
封装接口
/*** 获取热榜商品* @param {Number} id - 商品id* @param {Number} type - 1代表24小时热销榜 2代表周热销榜* @param {Number} limit - 获取个数*/
export const fetchHotGoodsAPI = ({ id, type, limit = 3 }) => {return request({url:'/goods/hot',params:{id, type, limit}})
}
使用组件传入不同的type
<!-- 24小时热榜 -->
<GoodHot :type="1" />
<!-- 周热榜 -->
<GoodHot :type="2" />
图片预览组件封装
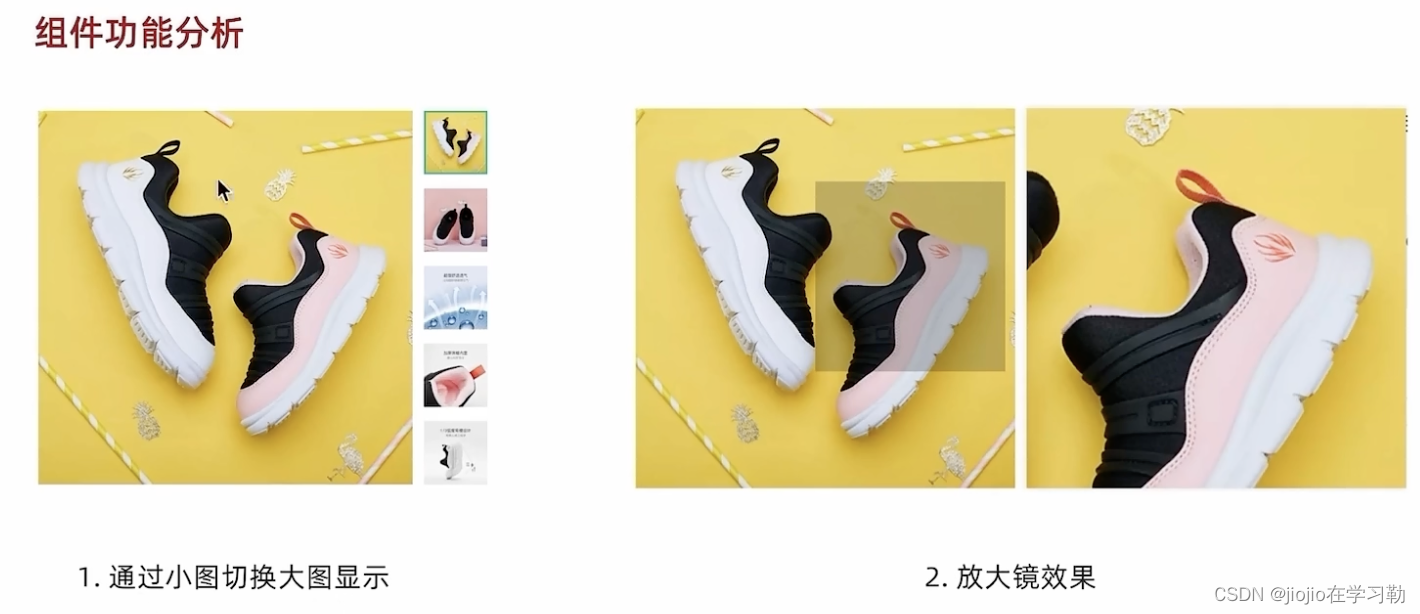
小图切换大图实现
思路:维护一个数组图片列表,鼠标划入小图记录当前小图下标值,通过下标值在数组中取对应图片,显示到大图位置

<script setup>
import { ref } from 'vue'
// 实现鼠标移入交互小图切换大图显示
const activeIndex = ref(0)
const enterhandler = (i) => {activeIndex.value = i
}
// 图片列表
const imageList = ["https://yanxuan-item.nosdn.127.net/d917c92e663c5ed0bb577c7ded73e4ec.png","https://yanxuan-item.nosdn.127.net/e801b9572f0b0c02a52952b01adab967.jpg","https://yanxuan-item.nosdn.127.net/b52c447ad472d51adbdde1a83f550ac2.jpg","https://yanxuan-item.nosdn.127.net/f93243224dc37674dfca5874fe089c60.jpg","https://yanxuan-item.nosdn.127.net/f881cfe7de9a576aaeea6ee0d1d24823.jpg"
]
</script>
<template><div class="goods-image"><!-- 左侧大图--><div class="middle" ref="target"><img :src="imageList[curIndex]" alt="" /><!-- 蒙层小滑块 --><div class="layer" :style="{ left: `0px`, top: `0px` }"></div></div><!-- 小图列表 --><ul class="small"><li v-for="(img, i) in imageList" :key="i" @mouseenter="enterhandler(i)" :class="{active:i===activeIndex}"><img :src="img" alt="" /></li></ul><!-- 放大镜大图 --><div class="large" :style="[{backgroundImage: `url(${imageList[0]})`,backgroundPositionX: `0px`,backgroundPositionY: `0px`,},]" v-show="false"></div></div>
</template><style scoped lang="scss">
.goods-image {width: 480px;height: 400px;position: relative;display: flex;.middle {width: 400px;height: 400px;background: #f5f5f5;}.large {position: absolute;top: 0;left: 412px;width: 400px;height: 400px;z-index: 500;box-shadow: 0 0 10px rgba(0, 0, 0, 0.1);background-repeat: no-repeat;// 背景图:盒子的大小 = 2:1  将来控制背景图的移动来实现放大的效果查看 background-positionbackground-size: 800px 800px;background-color: #f8f8f8;}.layer {width: 200px;height: 200px;background: rgba(0, 0, 0, 0.2);// 绝对定位 然后跟随咱们鼠标控制left和top属性就可以让滑块移动起来left: 0;top: 0;position: absolute;}.small {width: 80px;li {width: 68px;height: 68px;margin-left: 12px;margin-bottom: 15px;cursor: pointer;&:hover,&.active {border: 2px solid $xtxColor;}}}
}
</style>
放大镜效果实现
功能拆解
1️⃣左侧滑块跟随鼠标移动
2️⃣右侧大图放大效果实现
3️⃣鼠标移入控制滑块和大图显示隐藏
思路
1️⃣获取到当前的鼠标在盒子内的相对位置(useMouseInElement),控制滑块跟随鼠标移动(left/top)
2️⃣实现放大效果,大图的宽高是小图的两倍,大图的移动方向和滑块移动方向相反,且数值为2倍
3️⃣鼠标移入盒子(isOutside),滑块和大图才显示(v-show)


<script setup>
import { ref, watch } from 'vue'
import { useMouseInElement } from '@vueuse/core'// 图片列表
const imageList = ["https://yanxuan-item.nosdn.127.net/d917c92e663c5ed0bb577c7ded73e4ec.png","https://yanxuan-item.nosdn.127.net/e801b9572f0b0c02a52952b01adab967.jpg","https://yanxuan-item.nosdn.127.net/b52c447ad472d51adbdde1a83f550ac2.jpg","https://yanxuan-item.nosdn.127.net/f93243224dc37674dfca5874fe089c60.jpg","https://yanxuan-item.nosdn.127.net/f881cfe7de9a576aaeea6ee0d1d24823.jpg"
]// 1.小图切换大图显示
const activeIndex = ref(0)
const enterhandler = (i) => {activeIndex.value = i
}// 2. 获取鼠标相对位置
const target = ref(null)
const { elementX, elementY, isOutside } = useMouseInElement(target)// 3. 控制滑块跟随鼠标移动(监听elementX/Y变化,一旦变化 重新设置left/top)
const left = ref(0)
const top = ref(0)const positionX = ref(0)
const positionY = ref(0)
watch([elementX, elementY, isOutside], () => {console.log('xy变化了')// 如果鼠标没有移入到盒子里面 直接不执行后面的逻辑if (isOutside.value) returnconsole.log('后续逻辑执行了')// 有效范围内控制滑块距离// 横向if (elementX.value > 100 && elementX.value < 300) {left.value = elementX.value - 100}// 纵向if (elementY.value > 100 && elementY.value < 300) {top.value = elementY.value - 100}// 处理边界if (elementX.value > 300) { left.value = 200 }if (elementX.value < 100) { left.value = 0 }if (elementY.value > 300) { top.value = 200 }if (elementY.value < 100) { top.value = 0 }// 控制大图的显示positionX.value = -left.value * 2positionY.value = -top.value * 2})</script><template><div class="goods-image"><!-- 左侧大图--><div class="middle" ref="target"><img :src="imageList[activeIndex]" alt="" /><!-- 蒙层小滑块 --><div class="layer" v-show="!isOutside" :style="{ left: `${left}px`, top: `${top}px` }"></div></div><!-- 小图列表 --><ul class="small"><li v-for="(img, i) in imageList" :key="i" @mouseenter="enterhandler(i)" :class="{ active: i === activeIndex }"><img :src="img" alt="" /></li></ul><!-- 放大镜大图 --><div class="large" :style="[{backgroundImage: `url(${imageList[activeIndex]})`,backgroundPositionX: `${positionX}px`,backgroundPositionY: `${positionY}px`,},]" v-show="!isOutside"></div></div>
</template><style scoped lang="scss">
.goods-image {width: 480px;height: 400px;position: relative;display: flex;.middle {width: 400px;height: 400px;background: #f5f5f5;}.large {position: absolute;top: 0;left: 412px;width: 400px;height: 400px;z-index: 500;box-shadow: 0 0 10px rgba(0, 0, 0, 0.1);background-repeat: no-repeat;// 背景图:盒子的大小 = 2:1  将来控制背景图的移动来实现放大的效果查看 background-positionbackground-size: 800px 800px;background-color: #f8f8f8;}.layer {width: 200px;height: 200px;background: rgba(0, 0, 0, 0.2);// 绝对定位 然后跟随咱们鼠标控制left和top属性就可以让滑块移动起来left: 0;top: 0;position: absolute;}.small {width: 80px;li {width: 68px;height: 68px;margin-left: 12px;margin-bottom: 15px;cursor: pointer;&:hover,&.active {border: 2px solid $xtxColor;}}}
}
</style>
组件props适配
组件中的图片列表不能写死,需要通过props参数把接口数据传入
defineProps({imageList:{type:Array,default:()=>[]}
})
<ImageView :image-list='good.srcList'/>
总结
1️⃣封装复杂交互组件的通用思路

2️⃣图片预览组件的封装逻辑

相关文章:
vue3 之 商城项目—详情页
整体认识 路由配置 准备组件模版 <script setup></script><template><div class"xtx-goods-page"><div class"container"><div class"bread-container"><el-breadcrumb separator">">&…...

Linux笔记之Docker进行镜像备份与迁移
Linux笔记之Docker进行镜像备份与迁移 ——2024-02-11 code review! 文章目录 Linux笔记之Docker进行镜像备份与迁移1. 导出容器文件系统为 tar 归档文件2. 将 tar 归档文件导入为新的 Docker 镜像3. 运行新的 Docker 镜像并创建容器 1. 导出容器文件系统为 tar 归档文件 要导…...
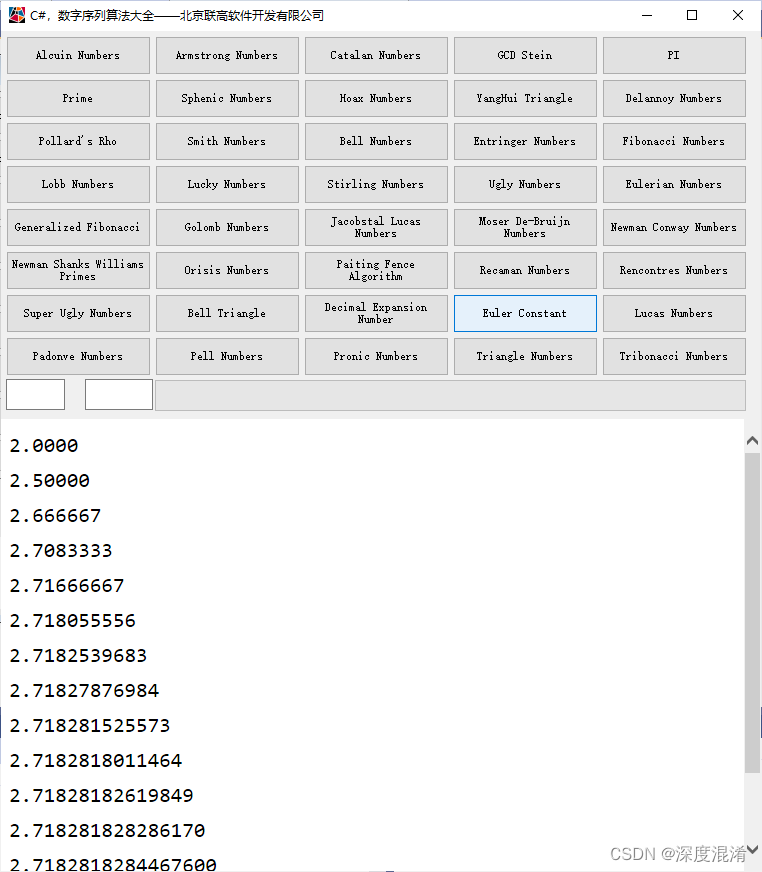
C#,欧拉常数(Euler Constant)的算法与源代码
1 欧拉常数 欧拉常数最先由瑞士数学家莱昂哈德 欧拉 (Leonhard Euler) 在1735年发表的文章《De Progressionibus harmonicus observationes》中定义。欧拉曾经使用γ作为它的符号,并计算出了它的前6位,1761年他又将该值计算到了16位 。 欧拉常数最先由瑞…...

asio监听eventfd
c - Does BOOST asio supports eventfd? like epoll - Stack Overflow asio的官方example并没有asio监听eventfd的例子,但asio支持posix::stream_descriptor, 如果将eventfd包装成posix::stream_descriptor,并注册到io_context里…...

《统计学简易速速上手小册》第9章:统计学在现代科技中的应用(2024 最新版)
文章目录 9.1 统计学与大数据9.1.1 基础知识9.1.2 主要案例:社交媒体情感分析9.1.3 拓展案例 1:电商销售预测9.1.4 拓展案例 2:实时交通流量分析 9.2 统计学在机器学习和人工智能中的应用9.2.1 基础知识9.2.2 主要案例:预测客户流…...
问题排查利器 - 分布式 trace
在分布式系统开发中,系统间的调用往往会横跨多个应用之间的接口。负责的调用链路也导致了,当线上环境出现问题时,例如请求失败、延迟增加或错误发生,我们无法第一时间确定是哪个环节出了问题,这给故障排查和修复带来了…...
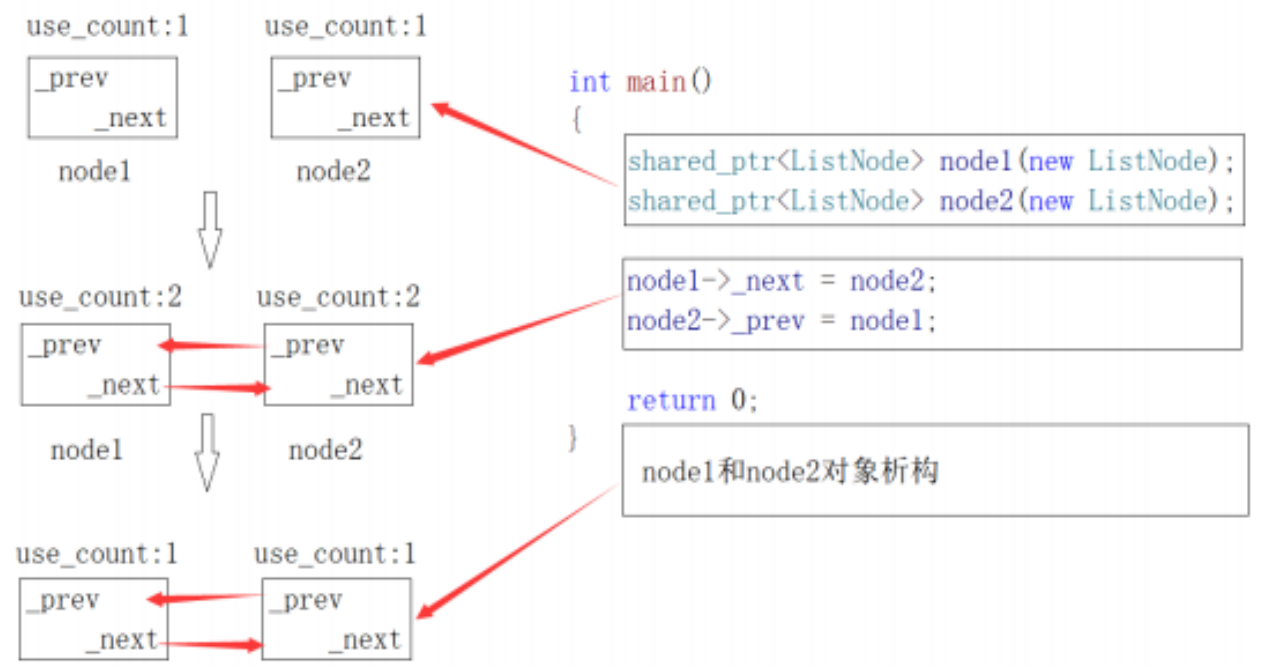
C++进阶(十四)智能指针
📘北尘_:个人主页 🌎个人专栏:《Linux操作系统》《经典算法试题 》《C》 《数据结构与算法》 ☀️走在路上,不忘来时的初心 文章目录 一、为什么需要智能指针?二、内存泄漏1、 什么是内存泄漏,内存泄漏的危…...

GPT最新进展:推出视频功能!迭代即将来临!
随着人工智能的不断进步,ChatGPT正准备以其全新的视频功能大跃进,同时,备受期待的GPT-5也即将在今年露面,预示着AI领域即将迎来一场变革。 在最近一期充满激情的Unconfuse Me播客中,OpenAI的首席执行官Sam Altman与技…...
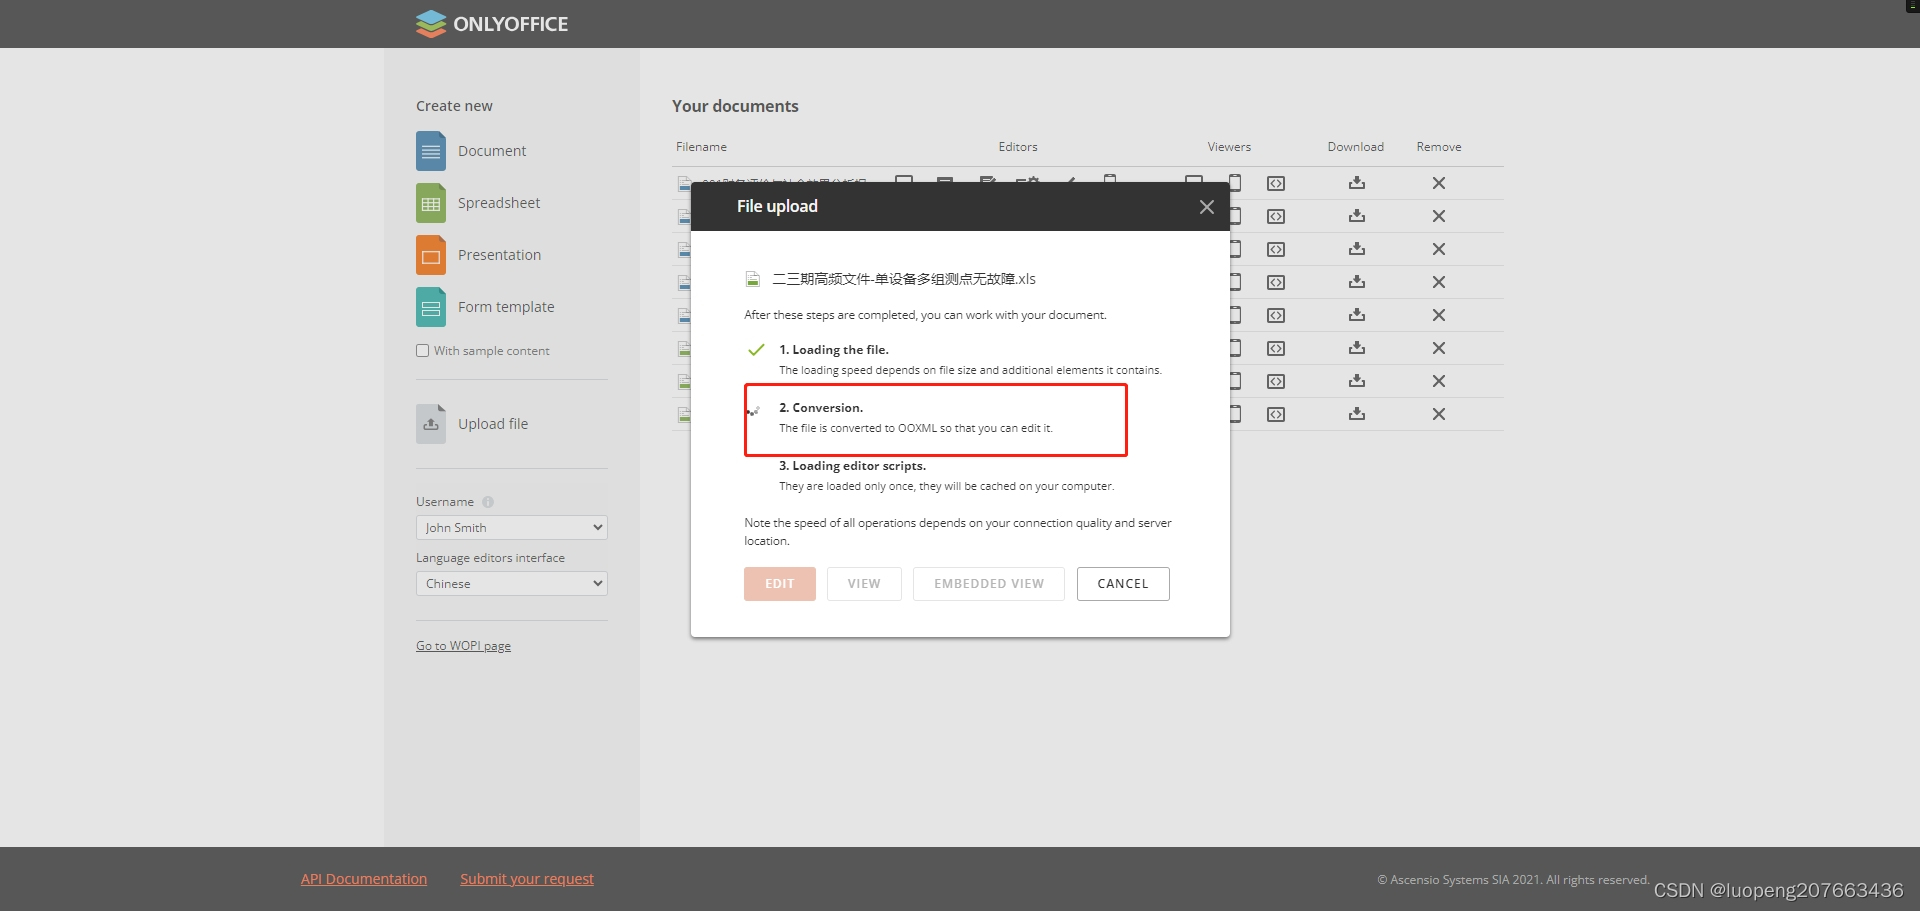
各款Excel、word在线预览工具对比分析以及onlyoffice预览Excel加载时间长的解决方案
对于onlyoffice插件预览慢的问题分析: 研究了一下onlyoffice,得出以下结论! 对于预览慢的问题,原因出在文件类型上,文件类型为低版本xls而非新版xlsx文件,onlyoffice服务器会自动将该文件转换为xlsx文件再…...
【课程作业_01】国科大2023模式识别与机器学习实践作业
国科大2023模式识别与机器学习实践作业 作业内容 从四类方法中选三类方法,从选定的每类方法中 ,各选一种具体的方法,从给定的数据集中选一 个数据集(MNIST,CIFAR-10,电信用户流失数据集 )对这…...

LeetCode374. Guess Number Higher or Lower——二分查找
文章目录 一、题目二、题解 一、题目 We are playing the Guess Game. The game is as follows: I pick a number from 1 to n. You have to guess which number I picked. Every time you guess wrong, I will tell you whether the number I picked is higher or lower th…...
继承
1.继承的作用 有些类与类之间存在特殊关系,下级别的成员除了拥有上一级别的共性,还有自己的特性。 这个时候我们就可以考虑利用继承技术,减少重复代码。 总结: 继承的好处:可以减少重复的代码 class A : public B;…...

北斗卫星在物联网时代的应用探索
北斗卫星在物联网时代的应用探索 在当今数字化时代,物联网的应用已经深入到人们的生活中的方方面面,让我们的生活更加智能便捷。而北斗卫星系统作为我国自主研发的卫星导航系统,正为物联网的发展提供了强有力的支撑和保障。本文将全面介绍北…...

SQL注入 - 利用报错函数 floor 带回回显
环境准备:构建完善的安全渗透测试环境:推荐工具、资源和下载链接_渗透测试靶机下载-CSDN博客 一、原理 利用COUNT(), FLOOR(), RAND(), 和 GROUP BY来生成主键重复错误 函数解释 count(): 这个函数用于计算满足某一条件下的行数,是SQL中的一个聚合函数,常用于统计查询结…...
NLP_Bag-Of-Words(词袋模型)
文章目录 词袋模型用词袋模型计算文本相似度1.构建实验语料库2.给句子分词3.创建词汇表4.生成词袋表示5.计算余弦相似度6.可视化余弦相似度 词袋模型小结 词袋模型 词袋模型是一种简单的文本表示方法,也是自然语言处理的一个经典模型。它将文本中的词看作一个个独立…...
C语言rand随机数知识解析和猜数字小游戏
rand随机数 rand C语言中提供了一个可以随机生成一个随机数的函数:rand() 函数原型: int rand(void);rand函数返回的值的区间是:0~RAND_MAX(32767)之间。大部分编译器都是32767。 #include<stdlib.h> int ma…...

django中的缓存功能
一:介绍 Django中的缓存功能是一个重要的性能优化手段,它可以将某些耗时的操作(如数据库查询、复杂的计算等)的结果存储起来,以便在后续的请求中直接使用这些缓存的结果,而不是重新执行耗时的操作。Django…...

三、搜索与图论
DFS 排列数字 #include<iostream> using namespace std; const int N 10; int a[N], b[N]; int n;void dfs(int u){if(u > n){for(int i 1; i < n; i)cout<<a[i]<<" ";cout<<endl;return;}for(int i 1; i < n; i){if(!b[i]){b[…...
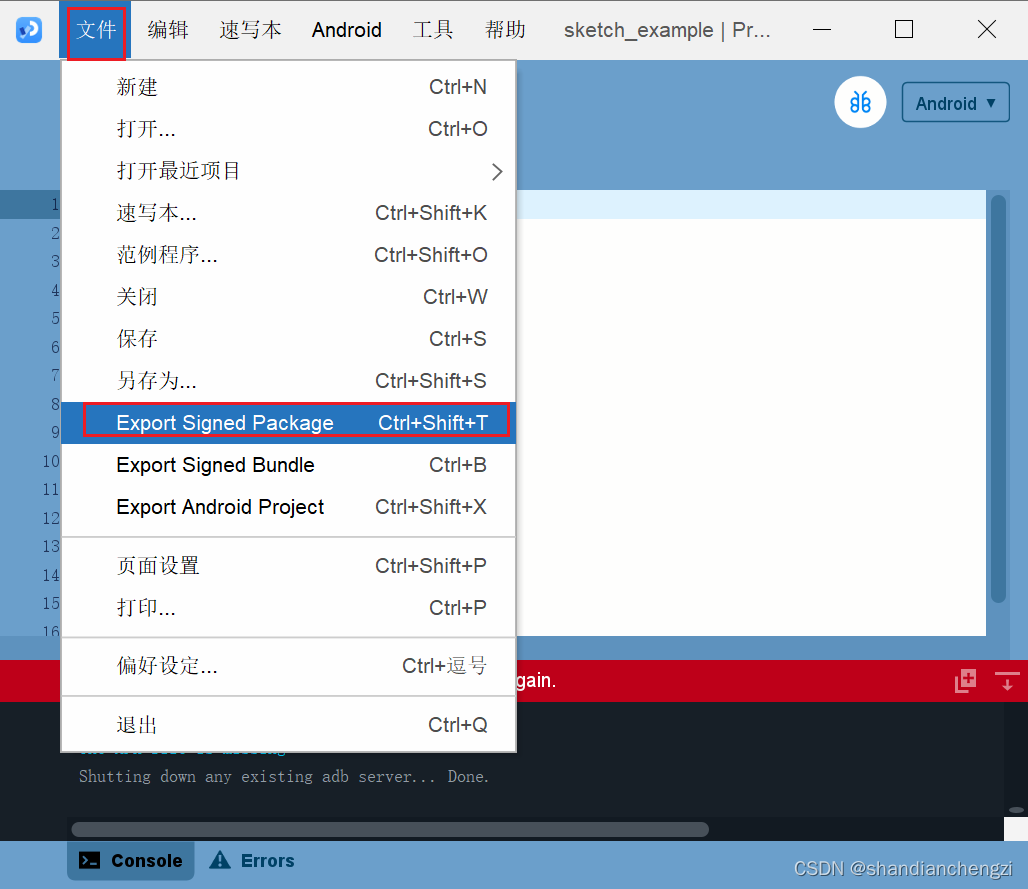
【翻译】Processing安卓模式的安装使用及打包发布(内含中文版截图)
原文链接在下面的每一章的最前面。 原文有三篇,译者不知道贴哪篇了,这篇干脆标了原创。。 译者声明:本文原文来自于GNU协议支持下的项目,具备开源二改授权,可翻译后公开。 文章目录 Install(安装࿰…...

MATLAB图像处理——边缘检测及图像分割算法
1.检测图像中的线段 clear clc Iimread(1.jpg);%读入图像 Irgb2gray(I); %转换为灰度图像 h1[-1, -1. -1; 2, 2, 2; -1, -1, -1]; %模板 h2[-1, -1, 2; -1, 2, -1; 2, -1, -1]; h3[-1, 2, -1; -1, 2, -1; -1, 2, -1]; h4[2, -1, -1; -1, 2, -1; -1, -1, 2]; J1imfilter(I, h1)…...

Bootstrap5 侧边栏导航
Bootstrap5 侧边栏导航 随着Web技术的发展,用户界面(UI)设计越来越受到重视。Bootstrap作为一个流行的前端框架,它为开发者提供了丰富的组件和工具,以快速构建响应式、移动优先的网站和应用程序。在Bootstrap 5中,侧边栏导航是一个重要的组件,它可以帮助用户在网站或应…...

Dell R730 2U服务器实战:解锁Nvidia P4计算卡在虚拟化环境下的AI训练潜能
1. 硬件准备与安装避坑指南 Dell PowerEdge R730作为一款经典的2U机架式服务器,在二手市场上性价比极高。我最近给实验室淘了两台二手R730,准备搭建AI训练集群。这次重点分享如何在这台服务器上安装Nvidia Tesla P4计算卡的经验。 先说说为什么选P4这张卡…...

基于开源项目构建实时语音AI对话系统:从ASR、LLM到TTS的完整技术栈解析
1. 项目概述与核心价值 最近在折腾一个挺有意思的东西,一个叫 bigsk1/voice-chat-ai 的开源项目。简单来说,它让你能和一个AI进行实时的语音对话,就像打电话一样。你对着麦克风说话,AI不仅能听懂,还能思考࿰…...

命令行AI工具gemini-cli:无缝集成Gemini大模型提升终端效率
1. 项目概述:一个与AI对话的命令行工具 如果你和我一样,大部分工作时间都泡在终端里,那么 eliben/gemini-cli 这个项目可能会让你眼前一亮。简单来说,它是一个让你能在命令行里直接与 Google 的 Gemini 大模型对话的工具。你不…...

阿里图像复原验证码识别
一、简介 这个就是阿里的图像还原验证码,他是从一个图片中任意抠出一个物品,可能是蜡烛、车轮、盘子、瓶子、盖子、扣子等等。然后让你通过鼠标拖动的方式,把物品拖到对应的位置上,完成图像复原验证。 这个验证码还有一个非常变态…...

量子错误校正与机器学习中的辅助比特影响研究
1. 量子错误校正与量子机器学习的基础概念量子计算的核心挑战之一是量子态的脆弱性。与环境相互作用导致的退相干效应会迅速破坏量子信息,这使得量子错误校正(QEC)成为实现实用量子计算的关键技术。在传统量子计算中,QEC通过冗余编…...

如何在Windows上快速配置词法语法分析器:WinFlexBison完整实战指南
如何在Windows上快速配置词法语法分析器:WinFlexBison完整实战指南 【免费下载链接】winflexbison Main winflexbision repository 项目地址: https://gitcode.com/gh_mirrors/wi/winflexbison 你是否在Windows平台上开发编译器、解释器或配置文件解析器时&a…...

ASReview实战:用主动学习技术高效完成文献综述
1. 项目概述:当学术文献综述遇上主动学习如果你是一名研究生、科研人员,或者任何需要从海量文献中筛选出相关研究的人,那么“大海捞针”这个词你一定深有体会。面对动辄成千上万篇的论文标题和摘要,传统的人工筛选不仅耗时耗力&am…...
仿真)
学Simulink——光伏储能系统双向DC-AC逆变器恒功率控制(PQ控制)仿真
目录 手把手教你学Simulink——光伏储能系统双向DC-AC逆变器恒功率控制(PQ控制)仿真 一、背景与挑战 1.1 为什么 PQ 控制?光伏与储能的“任务本质” 1.2 核心痛点与设计目标 二、系统架构与核心控制推导 2.1 整体架构:功率指令 → 电流跟踪 → 电网注入 2.2 核心数学…...

从DQN到D3QN:一个算法工程师的‘炼丹’笔记,聊聊那些论文里没写的训练细节
从DQN到D3QN:一个算法工程师的‘炼丹’笔记,聊聊那些论文里没写的训练细节 深度强化学习(DRL)的算法迭代就像一场精密的炼丹过程,每一个参数调整、每一处架构优化都如同炼丹师对火候的精准把控。在论文中,我…...